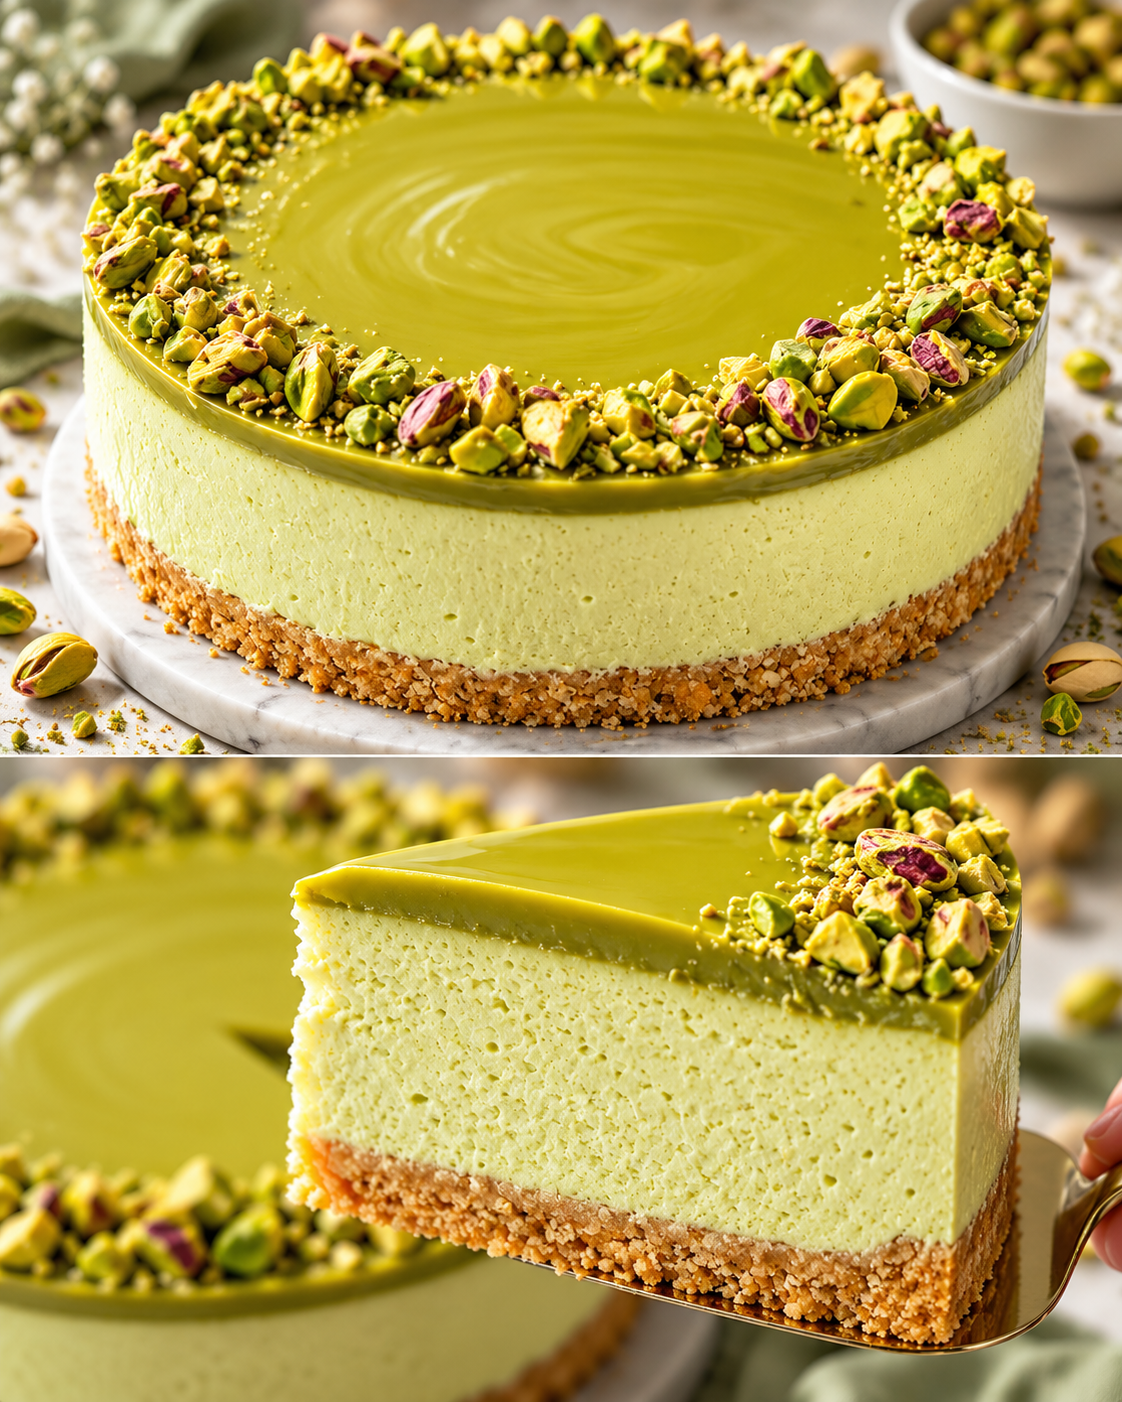
No-Bake Pistachio Cheesecake with Creamy Pistachio Topping
Introduction
This no-bake pistachio cheesecake is a rich, creamy dessert that combines the delicate, nutty flavor of pistachios with a smooth cream cheese filling and a buttery biscuit crust. Finished with a layer of pistachio paste and crunchy whole pistachios, it offers a satisfying contrast of flavors and textures.
With no oven required and approximately 20 minutes of preparation, this cheesecake is a convenient make-ahead dessert for family gatherings, celebrations, or special occasions. A few hours in the refrigerator allow the filling to firm up while maintaining its soft, creamy consistency.
Recipe Overview
-
Prep Time: 20 minutes
-
Cook Time: None
-
Chilling Time: At least 4 hours
-
Total Time: Approximately 4 hours 20 minutes
-
Servings: 8–10 slices
-
Cooking Method: No-bake, refrigerated
-
Pan Size: 8-inch (20 cm) round springform pan
-
Difficulty: Easy
Ingredients
For the Biscuit Crust
-
200 g (7 oz) plain dry biscuits, such as digestive biscuits
-
80 g (2.8 oz) unsalted butter, melted
For the Pistachio Cheesecake Filling
-
350 g (12.3 oz) full-fat cream cheese, such as Philadelphia
-
150 g (5.3 oz) pistachio paste
-
60 g (2.1 oz) powdered sugar, also called icing sugar
-
230 ml (scant 1 cup) cold heavy whipping cream, containing at least 30% milk fat
For the Pistachio Topping
-
200 g (7 oz) pistachio paste
-
Whole shelled pistachios, for decoration
Ingredient note: Pistachio paste and sweetened pistachio spread are not interchangeable in sweetness or consistency. Unsweetened pistachio paste has a stronger nut flavor, while sweetened spread produces a sweeter dessert. The type intended by the source recipe needs confirmation for consistent results.
Step-by-Step Instructions
1. Prepare the Biscuit Crust
Place the dry biscuits in a food processor and process until they resemble fine crumbs.
Alternatively, put the biscuits in a sealed food-safe bag and crush them with a rolling pin.
Transfer the crumbs to a mixing bowl and add the melted butter. Stir until all the crumbs are evenly coated and the mixture resembles damp sand.
Line the bottom of an 8-inch (20 cm) springform pan with parchment paper.
Transfer the biscuit mixture to the prepared pan. Press it firmly and evenly across the bottom using the back of a spoon or the base of a flat-bottomed glass.
Refrigerate the crust while preparing the filling. Chilling helps the butter firm up and keeps the base compact.
2. Mix the Cream Cheese and Pistachio Paste
Place the cream cheese in a large mixing bowl. It should be cool but pliable enough to mix smoothly.
Add the 150 g of pistachio paste and the powdered sugar.
Using an electric mixer on low to medium speed, beat until the ingredients are combined into a smooth, creamy mixture.
Scrape down the sides of the bowl as needed to ensure the pistachio paste is evenly distributed.
The mixture should have a uniform texture without visible lumps of cream cheese.
3. Whip the Heavy Cream
Pour the cold heavy whipping cream into a separate clean mixing bowl.
Beat with an electric mixer until medium peaks form. The cream should hold its shape while remaining soft enough to fold into the cheesecake filling.
Avoid overwhipping. If the cream becomes grainy or excessively stiff, it will be more difficult to incorporate smoothly.
Whipped cream provides much of the filling’s lightness and helps it hold its shape after chilling.
4. Combine the Cheesecake Filling
Add approximately one-third of the whipped cream to the pistachio cream cheese mixture.
Gently fold it in using a rubber spatula to loosen the mixture.
Add the remaining whipped cream in two portions, folding carefully after each addition.
Use slow movements, bringing the spatula down through the center of the bowl and lifting the mixture from the bottom.
Continue until the filling is evenly combined and no white streaks remain.
Avoid vigorous stirring, which can deflate the whipped cream and produce a denser cheesecake.
5. Assemble the Cheesecake
Remove the prepared biscuit crust from the refrigerator.
Spoon the pistachio cheesecake filling over the chilled base.
Spread it evenly using an offset spatula or the back of a spoon.
Smooth the surface carefully, making sure the filling reaches the edges of the pan.
The top should be relatively level so that the pistachio topping can be distributed evenly.
6. Prepare the Pistachio Topping
Place the remaining 200 g of pistachio paste in a microwave-safe bowl.
Heat briefly in the microwave, using short intervals totaling approximately 30 seconds, stirring between intervals.
The goal is to make the paste easier to spread, not to make it hot.
Allow it to cool to barely warm if necessary before adding it to the cheesecake.
The topping should be smooth enough to spread gently without disturbing the cream cheese layer underneath.
7. Add the Topping and Refrigerate
Carefully spoon the softened pistachio paste over the cheesecake filling.
Spread it across the surface with a spatula, using light movements to avoid mixing the two layers.
Cover the pan without touching the topping and place it in the refrigerator.
Chill for at least 4 hours, as specified in the source recipe. The filling should become noticeably firmer and hold together when sliced.
For cleaner slices and a more stable consistency, refrigerate the cheesecake overnight.
Because the recipe contains no gelatin or other setting agent, the finished texture will remain creamy rather than rigid. Firmness may vary depending on the cream cheese, whipped cream, and pistachio product used.
8. Remove from the Pan and Decorate
Once the cheesecake has chilled, carefully loosen the edges with a thin knife or offset spatula if necessary.
Open the springform ring slowly and lift it away.
If the sides are difficult to release, briefly hold a slightly warm towel around the outside of the pan. Avoid prolonged warming, which could soften the filling.
Transfer the cheesecake to a serving plate, keeping the biscuit base supported.
Decorate the surface with whole shelled pistachios.
For neat portions, cut the cheesecake with a sharp knife, wiping the blade clean between slices.
Serve chilled.
Recipe Tips
1. Choose Full-Fat Cream Cheese
Full-fat cream cheese provides body and richness to the cheesecake filling.
Lower-fat varieties can contain more moisture and may produce a softer consistency, particularly in a cheesecake that does not contain gelatin.
For the most dependable texture, use a thick, full-fat cream cheese.
2. Keep the Whipping Cream Cold
Cold cream traps air more effectively when whipped.
Keep it refrigerated until you are ready to use it, and whip it only until it reaches medium peaks.
Properly whipped cream helps the filling become light without losing its creamy character.
3. Press the Biscuit Crust Firmly
A loosely packed biscuit crust tends to crumble when the cheesecake is sliced.
Distribute the crumbs evenly and press them firmly into the base of the pan.
Pay particular attention to the edges, where loose crumbs can make slices harder to remove.
4. Avoid Overmixing the Filling
Once the whipped cream has been added, gentle folding is important.
Excessive mixing releases the air incorporated during whipping, making the filling heavier.
Stop folding as soon as the mixture becomes smooth and uniform.
5. Allow Enough Time for Chilling
The refrigerator is essential to this recipe because the filling is not baked.
Although the source recommends at least four hours, overnight refrigeration may make the cheesecake easier to remove from the pan and slice.
Keep it chilled until shortly before serving.
Variations and Substitutions
Try Different Biscuits for the Crust
Plain digestive biscuits provide a mildly sweet, buttery base that complements pistachios.
Graham crackers are another suitable option. Their slightly different flavor can add a subtle toasted note to the cheesecake.
Use the same weight of biscuit crumbs to maintain the original proportions.
Adjust the Pistachio Flavor
The type of pistachio product used has a noticeable effect on the dessert.
Unsweetened pistachio paste generally provides a more concentrated nut flavor, while sweetened pistachio spread contributes additional sugar and may have a softer consistency.
Changing between these products can affect both the sweetness and texture of the cheesecake, so the quantities should not be assumed to produce identical results.
Choose a Different Pistachio Decoration
Whole pistachios add crunch, but roughly chopped pistachios can provide a more even distribution across the surface.
Add them shortly before serving if you want them to retain their crunch.
Serving Suggestions
No-bake pistachio cheesecake tastes best when served chilled.
Its smooth filling and nutty topping make it suitable as a dessert after dinner or as part of a celebration.
For an attractive presentation, arrange the cheesecake on a simple serving plate and finish with a few whole or chopped pistachios.
The dessert pairs well with espresso, cappuccino, or unsweetened black tea. These beverages contrast pleasantly with the cheesecake’s richness.
For gatherings, slice the cheesecake immediately before serving and return any remaining portions to the refrigerator promptly.
Storage and Reheating
Refrigeration
Store leftover pistachio cheesecake in an airtight container or cover it securely to prevent it from absorbing refrigerator odors.
Keep it refrigerated at 40°F (4°C) or below and use within approximately 3–4 days. This follows general USDA refrigerated-leftover guidance.
Because the filling contains cream cheese and whipped cream, avoid leaving the cheesecake at room temperature for extended periods. Refrigerate it within two hours, or within one hour when temperatures exceed 90°F (32°C).
Freezing
Freezing is not recommended as the preferred storage method for this cheesecake because cream cheese-based fillings may become grainy or release moisture after thawing.
For the best creamy texture, prepare the dessert a day in advance and store it in the refrigerator.
Reheating
This cheesecake does not require reheating.
Serve it directly from the refrigerator to preserve its creamy texture and help the slices maintain their shape.
Conclusion
This no-bake pistachio cheesecake brings together a buttery biscuit crust, smooth pistachio cream cheese filling, and a rich nutty topping. With simple preparation and no oven required, it is a convenient dessert to make ahead for gatherings or special occasions.
Publisher Verification Required
The original recipe does not specify whether the 150 g of pistachio paste used in the filling and the 200 g used for the topping are pure unsweetened pistachio paste or sweetened pistachio spread. These products differ considerably in sweetness, consistency, and how they behave when chilled. Confirm the intended product before publication, particularly because the topping must spread smoothly and the filling contains no additional setting agent.