Skip to content
DisclaimerTerms Of UseGDPR PolicyCookie Policy

dailydishcraft

  • Home
  • Drinks
  • Appetizers
  • Dinner
  • Dessert
  • About
  • Contact
  • Privacy Policy
DisclaimerTerms Of UseGDPR PolicyCookie Policy

NO-ING-IMG

To make delicious caramel apple cider blondies, gather these simple ingredients: - 1 cup unsalted butter, melted - 1 cup packed brown sugar - 1/2 cup granulated sugar - 2 large eggs - 2 teaspoons pure vanilla extract - 1 1/2 cups all-purpose flour - 1/2 teaspoon baking powder - 1/2 teaspoon baking soda - 1/2 teaspoon salt - 1 teaspoon ground cinnamon - 1 cup apple cider - 1 medium apple, peeled and diced - 1/2 cup caramel sauce Each ingredient plays a key role. The butter adds moisture and richness. Brown sugar gives depth and flavor, while granulated sugar adds sweetness. Eggs bind everything together, creating a chewy texture. Vanilla extract enhances the flavor, making each bite taste better. Flour gives structure, while baking powder and baking soda help the blondies rise. Salt balances the sweetness, and cinnamon adds warmth. Apple cider brings a fruity punch, and diced apple adds texture and freshness. Finally, caramel sauce makes it all deliciously sweet. These ingredients together create a treat that feels like fall in every bite. Set your oven to 350°F (175°C). Use a 9x9 inch baking pan. Grease it well, or line it with parchment paper. This makes it easier to lift out the blondies later. In a large bowl, whisk the melted butter with brown sugar and granulated sugar. Mix until it looks smooth. Next, add in the eggs one at a time. Mix well after each egg. Stir in the vanilla extract for extra flavor. In another bowl, sift the flour, baking powder, baking soda, salt, and ground cinnamon. Sifting helps mix the dry ingredients well. This step is key for even cooking. Add the dry mix to the wet mix slowly. Alternate this with the apple cider. Stir gently until everything is just mixed. Avoid overmixing, as it can make the blondies tough. Fold in the diced apples carefully. Spread them evenly in the batter. Pour half the batter into the prepared pan. Drizzle half of the caramel sauce on top. Then, add the rest of the batter and spread it out. Drizzle the remaining caramel on top of the last layer. Bake for 25-30 minutes. Check if they are done by inserting a toothpick in the center. If it comes out clean, they are ready. Let the blondies cool in the pan for about 15 minutes. Then, move them to a wire rack to cool completely. To check if your blondies are done, use a toothpick. Insert it into the center. If it comes out clean, they are ready. If it has wet batter, bake a few more minutes. If your oven runs hot, check them earlier. You want a soft center and golden edges. Baking time can also change based on your pan size. For a larger pan, they might bake faster. Serve the blondies warm for the best taste. A scoop of vanilla ice cream on top works great. You can also add more caramel sauce for extra sweetness. Another idea is to sprinkle some chopped nuts on top for a nice crunch. For a pretty finish, cut the blondies into neat squares. Drizzle extra caramel sauce over them. A sprinkle of sea salt adds a nice contrast. Adding a thin apple slice on top makes it look fresh and inviting. {{image_4}} You can add nuts to your blondies for extra flavor. Walnuts or pecans work great. Just chop them coarsely. Mix in about 1/2 cup of your chosen nuts when you fold in the apples. This gives a nice crunch and makes each bite even better. Want to spice things up? Try adding different spices like nutmeg or ginger. Just a pinch can change the whole taste. You can also increase the cinnamon for a warm flavor. Experiment with these spices to find your favorite mix. If you want a lighter version, there are easy swaps. Use applesauce instead of some butter. This will cut down on fat. You can also use whole wheat flour instead of all-purpose flour. Another idea is to reduce the sugar or use a sugar substitute. These changes will help make a healthier treat without losing taste. To keep your caramel apple cider blondies fresh, start by letting them cool. Once cooled, cut them into squares. Place them in an airtight container. You can also use plastic wrap for added protection. Keep them at room temperature if you plan to eat them within a few days. To freeze blondies, first, let them cool completely. Cut them into squares. Wrap each square tightly in plastic wrap and then place them in a freezer bag. Make sure to squeeze out as much air as possible. To thaw, take them out and let them sit at room temperature for about an hour. You can also microwave them for a few seconds to warm them up. When stored properly, caramel apple cider blondies last about 3 to 5 days at room temperature. If you keep them in the fridge, they can last up to a week. Freezing extends their life to about three months. Be sure to check for any signs of spoilage before enjoying them. If your blondies turn out dry, here are some tips to fix them: - Add moisture: Drizzle some apple cider or extra caramel sauce on top. - Serve warm: Heating them in the microwave can help restore some moisture. - Use less flour: Next time, try adding a bit less flour to the mix. - Check baking time: Make sure you do not bake them too long. Yes, you can use different apples for this recipe. Here are some great choices: - Granny Smith: This tart apple adds a nice contrast to the sweet blondies. - Honeycrisp: These apples are sweet and crisp, making them a great option. - Fuji: They are sweet and juicy, perfect for adding flavor and moisture. - Gala: This type is sweet and soft, blending well with the other flavors. Absolutely! Here are some suggestions for gluten-free flour alternatives: - Almond flour: It adds a nutty flavor and keeps the blondies moist. - Coconut flour: Use this in smaller amounts as it absorbs more moisture. - Gluten-free all-purpose flour: Many brands work well for baking without changes. - Oat flour: This adds a nice texture and flavor, but check for gluten-free oats. You now have a clear recipe for caramel apple cider blondies. We covered ingredients, step-by-step instructions, and helpful tips. Feel free to explore variations to suit your taste. Storing them properly will keep them fresh longer. Enjoy them warm or topped for an extra treat. I hope you make these delicious blondies soon and share them with others. Happy baking!

Caramel Apple Cider Blondies Simple and Tasty Treat

Craving a sweet treat that perfectly combines the flavors of fall? Look no further than my Caramel Apple Cider Blondies!

- 2 boneless, skinless chicken breasts - 4 cups chicken broth - 2 packs of ramen noodles (discard the seasoning packets) - 4 cloves garlic, minced - 1 tablespoon ginger, freshly grated - 2 tablespoons soy sauce - 1 tablespoon chili paste (adjust for your preferred spice level) - 1 teaspoon toasted sesame oil - 1 tablespoon vegetable oil - 1 cup bok choy, roughly chopped - 1 medium carrot, julienned - 2 green onions, thinly sliced To make a great Spicy Garlic Chicken Ramen, you need some key items. First, chicken breasts give the dish its protein. Next, ramen noodles offer a chewy texture. They soak up the spicy broth well. The broth is the heart of this dish. Chicken broth adds depth. Garlic and ginger give it a nice kick. Soy sauce and chili paste add salt and heat. Toasted sesame oil rounds out the flavor and adds richness. - 1 soft-boiled egg (optional) - Sesame seeds for garnish - Green onions Garnishes make your ramen pop! A soft-boiled egg adds creaminess. It also looks beautiful on the bowl. Sesame seeds give a nice crunch and flavor. Lastly, sliced green onions add freshness and a splash of color. Feel free to mix and match these garnishes based on what you like. Each adds its own touch to the dish! Seasoning and Initial Cooking Process First, season both sides of the chicken breasts with salt and black pepper. Heat vegetable oil in a large pot on medium heat. Once hot, add the chicken. Cook each side for 5 to 6 minutes. Look for a golden brown color and check that they are fully cooked. Remove the chicken from the pot and let it rest on a cutting board for a few minutes. Resting and Slicing Chicken After resting, slice the chicken thinly. This keeps it juicy and tender. Set the sliced chicken aside while you prepare the broth. Sautéing Aromatics In the same pot, add minced garlic and grated ginger. Sauté them for about one minute until they smell great and turn golden. This step builds a strong flavor base for your ramen. Incorporating Broth and Seasonings Next, stir in soy sauce, chili paste, and toasted sesame oil. Pour in the chicken broth and raise the heat. Bring it to a rolling boil. This broth is the heart of the ramen, so make sure to mix well. Adding Ramen Noodles to the Broth When the broth is boiling, add the ramen noodles. Cook them according to package instructions, usually about 3 to 4 minutes. Stir them occasionally to avoid sticking together. Cooking Bok Choy and Carrots Once the noodles are almost done, add the chopped bok choy and julienned carrots. Let them cook for another 2 to 3 minutes. You want the bok choy to wilt and the carrots to stay slightly crunchy. Mixing Chicken and Broth Now, return the sliced chicken to the pot. Gently mix it with the noodles and broth. Stir well to combine everything. Taste it and add more salt or pepper if needed. Garnishing Tips Use a ladle to serve the ramen into deep bowls. Make sure each bowl has plenty of broth, noodles, vegetables, and chicken. For garnish, add sliced green onions, a soft-boiled egg if you like, and sprinkle sesame seeds for a nice crunch and look. Adjusting Spice Levels To control the heat in your Spicy Garlic Chicken Ramen, adjust the chili paste. Start with one tablespoon. Taste the broth. If you want more heat, add more chili paste bit by bit. This method lets you find the right spice for your taste. Balancing Salty and Sweet Tastes The soy sauce adds saltiness. You can balance this with a touch of sugar or honey. A small amount can make the flavors pop. Remember, a little sweetness can make the dish more complex and rich. Adding Crunch with Fresh Vegetables Fresh vegetables boost the texture. Bok choy and carrots add crunch. You can also add sliced bell peppers or snap peas for extra color and crunch. These add layers of flavor and make the dish more exciting. Alternative Toppings for More Flavor Toppings can change the game. Try adding sliced mushrooms, seaweed, or even pickled ginger. These extras can bring new tastes and textures to your ramen. Experiment and find your favorite combination. Making Ramen in Bulk You can cook this ramen for meal prep. Just double the recipe. Store the broth and noodles separately. This way, the noodles won’t get soggy. It’s a great way to have a quick meal ready. Storing and Reheating Tips Store leftovers in airtight containers. Keep the chicken and broth together. When reheating, use the stove for the best flavor. This keeps the broth rich and the noodles perfect. If using the microwave, add a splash of water to keep the noodles moist. {{image_4}} You can easily swap chicken for tofu or seafood. Tofu works great for a vegetarian option. Just press the tofu to remove extra water. Then, fry it until golden brown. For seafood, shrimp or fish fillets add a nice twist. Cook them in the broth until they are just done. If you need a gluten-free dish, use rice noodles instead of ramen. They cook quickly and absorb flavors well. Always check the broth for gluten-free options too. Ramen can change based on where you are. In some places, people add miso for a richer flavor. Others might use different spices in the broth. Try adding coconut milk for a creamy twist. Adding uncommon veggies like mushrooms or spinach can change the dish too. You can also use proteins like pork belly or beef slices. Each choice brings a new taste and texture. Don’t be afraid to mix in unique spices. A pinch of smoked paprika can add depth. Or try a splash of lime juice for brightness. Changing the noodle type can also make a difference. Soba noodles or udon can offer new textures. Each noodle has its own charm and pairs well with the broth. To keep your spicy garlic chicken ramen fresh, follow these tips: - Refrigeration Guidelines: Store leftovers in an airtight container. They last up to three days in the fridge. Make sure to cool the ramen first before sealing it up. - Best Practices for Freezing: You can freeze ramen, but it's best to separate the broth from the noodles and veggies. Store the broth in one container and the noodles and veggies in another. They can last up to three months in the freezer. When you're ready to enjoy your ramen again, here’s how to reheat: - Stovetop vs. Microwave: The stovetop is best for keeping the texture. Pour the broth in a pot, add the noodles and veggies, and heat until warm. For the microwave, place the ramen in a bowl and cover it with a damp paper towel. Heat in short bursts, stirring in between. - Maintaining Texture and Flavor: Add a splash of water to the broth when reheating. This keeps it from getting too thick or salty. If the noodles seem dry, add a little broth or water to help them soften up again. To reduce the heat, adjusting the chili paste works well. Start with half the amount, then taste. You can always add more if needed. Alternatives to spice include using sweet chili sauce or a mild soy sauce. These will still give flavor without the burn. Yes, you can use pre-packaged ramen noodles. Look for brands without seasoning packets for better control over flavor. Recommendations for flavorful options include any wheat-based ramen or soba noodles. Key differences in cooking are mainly timing. Packaged noodles usually cook faster, so watch closely to avoid mushiness. To make the perfect soft-boiled egg, timing and cooking tips are crucial. Bring a pot of water to a rolling boil. Gently add eggs and boil for 6-7 minutes. Techniques for perfect yolks include ice-bathing the eggs after boiling. This stops cooking and makes peeling easier. Spicy garlic chicken ramen is a rewarding dish to make. You learned about key ingredients, steps to cook, and tips to enhance flavor. Don't forget garnishes like eggs and green onions for extra taste. You can adapt the recipe for dietary needs or storage. Each bowl can become your own unique creation. Experiment with spices and toppings to make it special. Enjoy every bite as you master this dish!

Spicy Garlic Chicken Ramen Flavorful and Simple Recipe

Craving a hearty meal that’s both spicy and comforting? Try my Spicy Garlic Chicken Ramen! This simple recipe bursts with

- 2 cups whole milk - 1/2 cup heavy cream - 1/2 cup semi-sweet chocolate chips - 2 tablespoons cocoa powder - 1/4 cup caramel sauce (plus extra for drizzling) - 1 teaspoon vanilla extract - Whipped cream (for topping) - A pinch of sea salt (for garnish) To make your caramel swirl hot chocolate, you need simple and rich ingredients. Whole milk gives a creamy base. Heavy cream adds even more richness. Semi-sweet chocolate chips provide that deep chocolate flavor. Cocoa powder adds extra chocolatey goodness. The caramel sauce brings sweetness and a lovely swirl. It also tastes great on top! Vanilla extract adds a warm hint of flavor. Whipped cream makes everything feel special. Finally, a pinch of sea salt balances the sweetness and deepens the taste. With these ingredients, you create a cozy drink. Each sip warms you up and makes you smile. The flavors come together for a perfect treat. Let’s get started on making this delightful drink! Start by pouring 2 cups of whole milk and 1/2 cup of heavy cream into a medium saucepan. Set the stove to medium heat. Gently warm the milk mixture but avoid boiling. Stir it occasionally to stop it from scorching. You want the milk warm to the touch. Once the milk mixture is warm, add 1/2 cup of semi-sweet chocolate chips and 2 tablespoons of cocoa powder. Use a whisk to stir continuously. This will help melt the chocolate and create a silky and smooth texture. Keep whisking until everything blends well. Now, pour in 1/4 cup of caramel sauce and 1 teaspoon of vanilla extract. Stir until combined. Taste your hot chocolate. If you want it sweeter, add more caramel sauce. Keep stirring to mix all the flavors. Carefully remove the saucepan from the heat. Ladle the hot chocolate into your favorite mugs, leaving space for whipped cream. Top each mug with a generous dollop of whipped cream. Drizzle extra caramel sauce over the whipped cream. Just before serving, add a pinch of sea salt on top. This will enhance the flavors and add a fun twist. To boost the taste of your caramel swirl hot chocolate, add a pinch of sea salt. This small touch brings out the sweetness and makes the drink even more special. Just sprinkle it on top after you add the whipped cream. You can also experiment with different caramel sauces. Look for one that is rich and thick for the best drizzling effect. If it's too runny, it might not stay on top as well. Make your drink fun to serve! Use stir sticks or decorative spoons. This adds a playful touch and gives a hint of the delicious drink inside. For a fancy finish, add chocolate shavings on top of the whipped cream. It gives a nice look and adds a little extra chocolate flavor. You can also use colorful sprinkles for a festive touch! Avoid scalding your milk by keeping the heat at medium and stirring often. You want it warm, not boiling. This helps create that perfect creamy consistency. When you mix in the chocolate and caramel, keep whisking until everything is smooth. If the hot chocolate feels too thick, add a splash of milk to thin it out. This way, you enjoy a rich but not too heavy drink. {{image_4}} You can make your caramel swirl hot chocolate even better with some fun spices. Try adding a pinch of cinnamon or nutmeg for warmth. These spices bring a cozy feeling, especially on chilly days. You can also swap out the whole milk. Use almond or oat milk for a different taste. Each type of milk will change the flavor and texture, making it unique. The toppings can really change your drink. Instead of just whipped cream, add crushed nuts for a nice crunch. You can also use marshmallows for that classic hot chocolate feel. Consider flavored whipped cream, too. It can be vanilla, chocolate, or even caramel-flavored. Each topping adds a new layer of fun and taste. You can get creative with seasonal flavors, too. For fall, try a caramel apple version. Add apple cider to your hot chocolate for a sweet twist. In winter, use a holiday spice blend. Adding spices like cloves and allspice can give it a festive flair. These seasonal variants make your drink feel special all year long. To store leftover hot chocolate, let it cool first. Pour it into a clean container. Close it tightly with a lid and place it in the fridge. This way, it stays fresh for up to three days. When you're ready to enjoy it again, simply reheat it on the stove. Stir it gently while warming. You can also use a microwave. Heat it in short bursts, stirring between each one. This helps to keep it smooth. Yes, you can freeze caramel swirl hot chocolate! Pour it into freezer-safe containers, leaving some space at the top. This space allows for expansion. It will keep well for up to one month. To reheat frozen portions, take them out of the freezer and let them thaw in the fridge overnight. After thawing, reheat on the stove or in the microwave, stirring well before serving. You can add a splash of milk to restore creaminess if needed. To make caramel swirl hot chocolate vegan, you can substitute dairy ingredients. Use almond milk, oat milk, or coconut milk in place of whole milk and heavy cream. For the chocolate chips, choose dairy-free semi-sweet chocolate chips. This way, you still get a creamy, delicious drink without any animal products. When picking a caramel sauce, I recommend either homemade or store-bought. Homemade caramel sauce offers a rich taste. You can easily make it by melting sugar and adding a bit of cream or coconut milk. If you prefer store-bought, look for brands with simple ingredients. Aim for sauces without artificial flavors or colors. Yes, you can make this recipe in larger quantities. To adjust for parties or gatherings, simply multiply each ingredient by the number of servings you need. For example, double the recipe for four servings. Just remember to use a larger pot to hold all the delicious hot chocolate! This blog post showed you how to make delicious caramel swirl hot chocolate. We covered needed ingredients, step-by-step instructions, and clever tips for flavor and presentation. Remember, you can add spices or switch up your milk for a new taste. Use the storage tips to keep leftovers fresh, and don’t forget the fun variations for seasonal flavors. With these ideas, you can create the perfect drink for any occasion. Enjoy your cozy treat and share it with friends and family!

Caramel Swirl Hot Chocolate Comforting and Delicious Drink

Warm up your spirit with a cup of caramel swirl hot chocolate! This comforting drink combines rich chocolate flavors with

- 4 boneless, skinless chicken breasts - 1 cup sun-dried tomatoes, chopped - 1 cup fresh or frozen spinach The main ingredients bring rich flavors to this dish. The chicken breasts stay juicy while cooking. Sun-dried tomatoes add a punch of flavor. Fresh or frozen spinach brings a nice color and nutrition. Together, these ingredients create a hearty meal. - 1 medium onion, diced - 4 cloves garlic, minced - 1 teaspoon dried oregano - 1 teaspoon dried basil - ½ teaspoon red pepper flakes Flavor enhancers make this dish special. The diced onion and garlic build a tasty base. Oregano and basil give it that Tuscan touch. Red pepper flakes add warmth and spice. Adjust the flakes to fit your taste. These flavors mix well with the chicken and veggies. - 1 cup chicken broth - ½ cup heavy cream (or coconut cream) Cooking liquids keep everything moist. Chicken broth adds depth and richness. The heavy cream makes the sauce creamy and smooth. You can use coconut cream for a dairy-free option. These liquids combine with the ingredients for a tasty sauce. 1. Season the chicken breasts. Start by sprinkling salt, black pepper, dried oregano, dried basil, and red pepper flakes on both sides. This mix gives the chicken a great taste. Make sure to cover it well. 2. Prepare the onion and garlic. Dice one medium onion and mince four cloves of garlic. These will create a strong base in the slow cooker. 1. Layer the ingredients. First, spread the diced onion and minced garlic at the bottom of the slow cooker. Then, place the seasoned chicken breasts on top. This helps the chicken soak up the flavors. 2. Pour the chicken broth. After layering, add one cup of chicken broth over the chicken. This keeps the chicken moist and adds rich flavor as it cooks. 1. Set the slow cooker. Cover the pot with a lid and set it to cook. You can choose low for 6 to 7 hours or high for 3 to 4 hours, depending on your day. 2. Add cream before serving. About 30 minutes before serving, stir in half a cup of heavy cream. This makes the sauce creamy and rich. If you used frozen spinach, make sure it is heated through in the sauce. After cooking, shred the chicken and mix it with the sauce for a delicious dish. Using oil-packed sun-dried tomatoes gives your dish a rich taste. They add depth and sweetness. You will enjoy how they blend with the chicken. If you can, let the chicken marinate for a few hours. This will allow the flavors to soak in deeply. You may use a simple mix of olive oil, garlic, and herbs for marinating. Adjust cooking times based on your slow cooker type. Some cook faster than others. If you have a newer model, it may cook on high for less time. Check the chicken for doneness. You want it to be tender and juicy. To ensure even cooking, layer your ingredients carefully. This helps moisture stay in and keeps everything flavorful. For serving, place the Tuscan chicken over creamy polenta or pasta. Both options add a nice touch. Use a generous amount of sauce to coat your base. Garnish with fresh basil leaves for color and flavor. You can also sprinkle some grated cheese on top. For a complete meal, serve slices of crusty bread alongside. This adds texture and makes your dish even more enjoyable. {{image_4}} You can make this dish lighter by using coconut cream instead of heavy cream. Coconut cream adds a rich flavor without dairy. You can also add mushrooms or bell peppers for extra nutrition. These veggies bring more color and texture to the meal. For a Mediterranean twist, add olives to the slow cooker. Olives add a nice briny flavor that pairs well with the chicken. If you like some heat, try a spicy version. Add extra red pepper flakes or a dash of hot sauce to kick up the flavor. Consider making a larger batch of Slow Cooker Tuscan Chicken. This way, you can enjoy leftovers for lunch or dinner. You can also freeze portions for future meals. Just store them in airtight containers. This makes it easy to have a tasty meal ready when you need it. To store your Slow Cooker Tuscan Chicken, let it cool first. Place the leftovers in an airtight container. This keeps the flavors fresh. It will stay good in the fridge for about 3 to 4 days. Always check for any odd smells or changes in color before eating. If you want to freeze this dish, use freezer-safe bags or containers. Make sure to remove as much air as possible. This helps prevent freezer burn. The Tuscan chicken can last up to 3 months in the freezer. When you’re ready to eat it, thaw it overnight in the fridge. For reheating, you can use a microwave or stovetop. If using the microwave, heat in short bursts. Stir after each burst to avoid hot spots. If you choose the stovetop, warm it gently over low heat. Add a splash of chicken broth or cream to keep the sauce creamy. This helps maintain the dish's delicious texture. Can I use frozen chicken? Yes, you can use frozen chicken. Just extend the cooking time by one hour on low or 30 minutes on high. Ensure the chicken reaches 165°F for safety. How can I thicken the sauce? To thicken the sauce, mix a bit of cornstarch with water. Stir this mixture into the slow cooker about 30 minutes before serving. This will help create a nice, creamy sauce. Is this recipe gluten-free? Yes, this recipe is gluten-free. Just ensure the chicken broth you use is labeled gluten-free to stay safe. Can I substitute the heavy cream? You can use coconut cream as a dairy-free option. It adds a nice flavor and still gives a creamy texture. Can I cook it on high for a longer time? It’s best to stick to the recommended times. Cooking on high for too long can dry out the chicken. Follow the suggested 3-4 hours on high for best results. What can I serve with Slow Cooker Tuscan Chicken? Serve it over creamy polenta or pasta. You can also pair it with crusty bread for a complete meal. Fresh basil leaves make a lovely garnish as well. This recipe for Slow Cooker Tuscan Chicken is simple and full of flavor. It features tender chicken, rich sun-dried tomatoes, and fresh spinach. By layering the ingredients in your slow cooker and using the right cooking liquids, you ensure a delicious meal. Don't forget the tips for enhancing flavor and presentation. You can also explore healthy alternatives or fun twists. This meal is perfect for busy days and warms up well. Now, you are ready to impress with this easy and tasty dish.

Slow Cooker Tuscan Chicken Flavorful and Easy Dish

Looking for a warm, cozy dish that’s full of flavor? Slow Cooker Tuscan Chicken is your answer! With just a

- 2 cups rolled oats - 2 medium apples, peeled and diced (preferably Granny Smith or Honeycrisp for balance) - 1 cup almond milk (or any milk alternative you prefer) - 2 tablespoons pure maple syrup - 1 teaspoon vanilla extract - 1 teaspoon ground cinnamon - 1/2 teaspoon ground nutmeg - 1 teaspoon baking powder - 1/4 teaspoon salt - 1/2 cup walnuts or pecans, chopped (optional for added texture) - 1 tablespoon brown sugar (for a sweet, caramelized topping) - 1 tablespoon melted coconut oil (for greasing the dish) In this recipe, you will find simple but delicious ingredients. First, use rolled oats for a hearty base. They give the bake a lovely texture. Next, pick two medium apples. Granny Smith or Honeycrisp work best. They add sweetness and a slight tartness. For the liquid, almond milk keeps it creamy. You can swap it with any milk you love. Maple syrup adds natural sweetness. It pairs well with the spices. Speaking of spices, don't forget ground cinnamon and nutmeg. They bring warmth and depth to the dish. Baking powder makes it rise, while a pinch of salt enhances all the flavors. If you want extra crunch, add chopped walnuts or pecans. For a sweet touch, sprinkle brown sugar on top. Finally, use melted coconut oil to grease your baking dish. This will help the bake come out easily. These ingredients come together to make a warm and cozy breakfast. With each bite, you'll taste the love and care put into it. Enjoy making this delightful treat! {{ingredient_image_2}} 1. Preheat your oven to 350°F (175°C). Get a 9x9 inch baking dish and grease it lightly with melted coconut oil. This helps prevent sticking. 2. In a large bowl, mix the rolled oats, diced apples, almond milk, maple syrup, vanilla extract, ground cinnamon, ground nutmeg, baking powder, and salt. Stir until everything is well blended. 3. If you like nuts, gently fold in the chopped walnuts or pecans. This adds a nice crunch to your bake. 4. Pour the mixture into your greased baking dish. Spread it out evenly for uniform baking. 1. Bake for 30-35 minutes. Keep an eye on it. You want the edges to turn golden brown, and the center should feel firm. 2. Check doneness with a toothpick. Insert it into the center. If it comes out clean, your oatmeal bake is ready. 3. Let it cool for about 10 minutes before cutting it into squares. This helps it set up nicely. For those with allergies or special diets, swaps can help. Use gluten-free oats if needed. You can also swap almond milk for any milk you like, such as oat or soy. If you dislike nuts, leave them out. Apples can change the flavor too. Try using Fuji or Braeburn apples for a sweeter taste. To achieve perfect texture, ensure you mix the ingredients well. The oats need to soak in the milk for a bit. This helps them soften and absorb flavors. Bake until the edges are golden and the center is set. A toothpick will tell you when it’s done. When you're ready to serve, think toppings! A dollop of yogurt adds creaminess. Ice cream brings sweetness and fun. For a fresh touch, sprinkle cinnamon on top. Sliced apples make for a pretty garnish. Enjoy your oatmeal bake warm. Each square is packed with flavor. It’s great on its own, but these toppings make it even better. You can also serve it for brunch or a cozy breakfast. Pro Tips Choose the Right Apples: For the best flavor balance, use a combination of tart and sweet apples like Granny Smith and Honeycrisp. Customize Your Milk: Feel free to substitute almond milk with any milk alternative you enjoy, such as oat milk or soy milk, for different flavor profiles. Experiment with Spices: Don’t hesitate to add other spices like ginger or allspice to enhance the flavor of your oatmeal bake. Make It Ahead: Prepare the mixture the night before and store it in the fridge. Just bake it in the morning for a quick and delicious breakfast. {{image_4}} You can switch up your Apple Pie Oatmeal Bake by adding dried fruits or berries. Raisins, cranberries, or blueberries can bring new tastes. Each fruit adds a unique twist to the dish. Dried fruits work well because they add sweetness and chewiness. You can also use fresh berries for a burst of flavor. Seasonal spices can make your bake even more exciting. Try adding cardamom or ginger for a warm taste. These spices can enhance the apple flavor and create a cozy feel. You can also play with the amount of cinnamon or nutmeg. This way, you can find what you like best! Making this dish vegan or gluten-free is simple. Use almond milk or any other milk alternative you enjoy. For a gluten-free option, choose certified gluten-free oats. This way, everyone can enjoy this tasty breakfast treat. You can also add high-protein ingredients for a power boost. Consider mixing in some chia seeds or protein powder. They blend well without changing the taste much. You could even add Greek yogurt on top for added protein and creaminess. These variations help you customize your Apple Pie Oatmeal Bake. They ensure it fits your taste and diet. Enjoy experimenting with different flavors and options! To keep your Apple Pie Oatmeal Bake fresh, let it cool first. After cooling, store it in an airtight container in the refrigerator. It will stay good for about five days. When you're ready to enjoy it again, simply reheat it. You can use a microwave or an oven. For the microwave, heat individual servings for about one minute. If using the oven, cover it with foil and heat at 350°F (175°C) for about 10 minutes. If you want to save some for later, freezing is a great option. First, let it cool completely. Next, cut it into squares and wrap each piece in plastic wrap. Place the wrapped pieces in a freezer-safe bag. This way, you can take out just what you need. To thaw, simply move a piece from the freezer to the fridge. Let it thaw overnight. For reheating, use the same methods mentioned before. Enjoy your tasty treat anytime! Yes, you can use quick oats. The texture will be softer and less chewy. However, rolled oats give a heartier feel that many prefer for this dish. Add more maple syrup or brown sugar. You can also mix in honey or agave syrup for extra sweetness. Taste the mix before baking to find your perfect level. Absolutely! You can mix the ingredients the night before. Cover it and store it in the fridge. Bake it fresh in the morning for a warm treat. Yes, you can skip the nuts entirely. This recipe will still taste great without them. For added texture, consider using seeds like sunflower or pumpkin. You can use any milk you like. Options include soy milk, oat milk, or cow's milk. Each type will give a slightly different flavor. The oatmeal bake lasts about 5 days in the fridge. Store it in an airtight container. Reheat it in the oven or microwave for best results. This blog post guided you through making a delicious oatmeal bake. We covered key ingredients like rolled oats and apples, plus optional nuts and spices. You learned step-by-step instructions for preparation and baking. With tips on serving and variations, you can adjust the recipe to your taste. Remember, proper storage is key to enjoying leftovers. With these insights, you can create an oatmeal bake that suits any occasion and satisfies your cravings. Enjoy your cooking adventure!

Irresistible Apple Pie Oatmeal Bake Easy Breakfast Treat

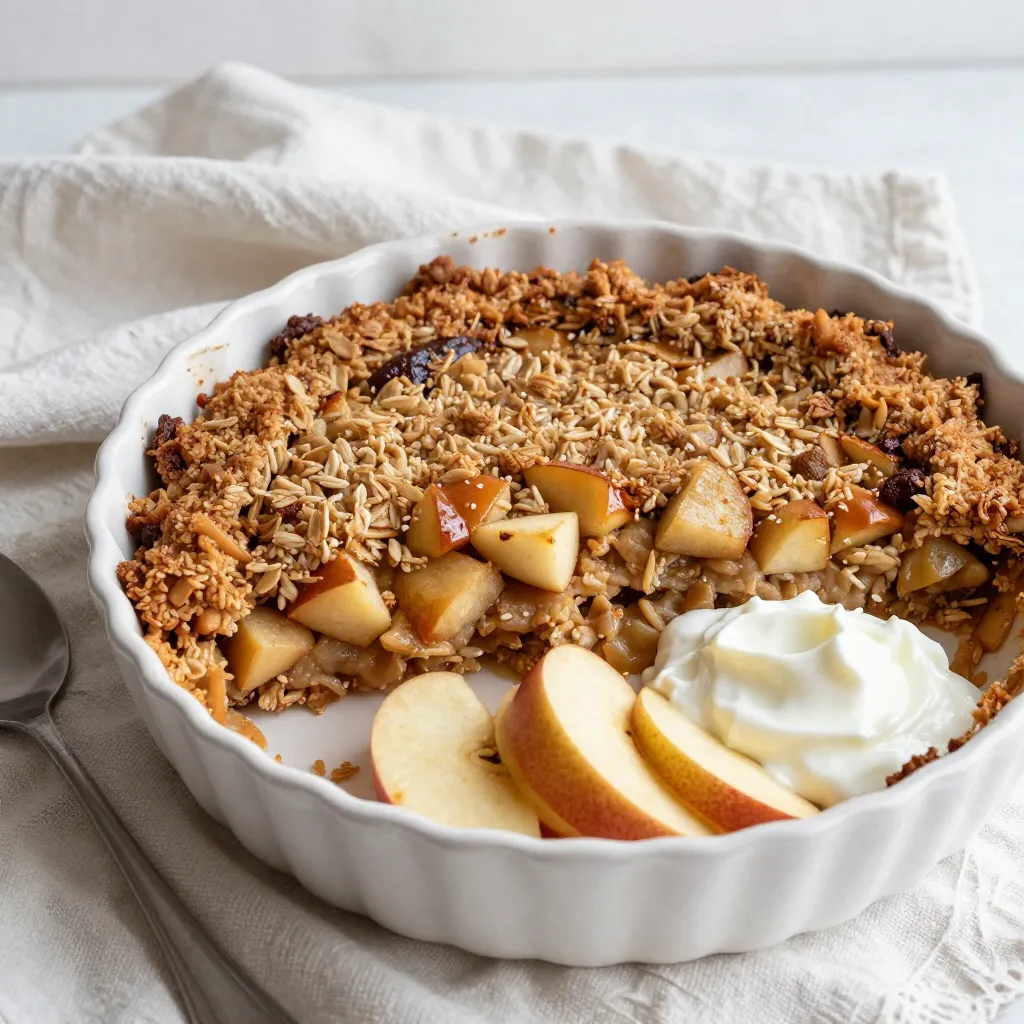
Looking for a simple, tasty breakfast? Let me introduce you to my Irresistible Apple Pie Oatmeal Bake! This dish is

- 1 cup pumpkin puree - 1 cup mascarpone cheese - 1 cup heavy whipping cream - ½ cup powdered sugar - ½ teaspoon vanilla extract - 1 teaspoon pumpkin spice - 12 ladyfinger cookies - ½ cup brewed coffee (cooled) - Cocoa powder for dusting - Optional: crushed ginger snaps for garnish Gather these ingredients to create your tasty pumpkin tiramisu cups. Each item plays a key role in crafting that perfect blend of flavors. Pumpkin puree gives a nice texture and taste. Mascarpone cheese adds creaminess. Heavy whipping cream makes it light and fluffy. The powdered sugar provides sweetness, while vanilla extract adds warmth. Pumpkin spice brings that fall flavor we all love. Ladyfinger cookies serve as a base layer. Dipping them in cooled coffee enhances their flavor. Lastly, cocoa powder adds a rich finish. If you want a little crunch, crushed ginger snaps make a great garnish. With these ingredients in hand, you’re ready to make a dessert that will impress! Start by grabbing a large mixing bowl. Add 1 cup of mascarpone cheese and 1 cup of pumpkin puree. Use a whisk to mix them well. Once combined, add ½ cup of powdered sugar, ½ teaspoon of vanilla extract, and 1 teaspoon of pumpkin spice. Whisk everything together until the mixture is smooth and creamy. Make sure no lumps remain. This step sets the base for your delicious dessert. Next, take another bowl and pour in 1 cup of heavy whipping cream. Use an electric mixer to whip it on medium speed. Keep mixing until soft peaks form. This means the cream should hold its shape but still look fluffy. Now, gently fold the whipped cream into the pumpkin mixture. Use a spatula and make sure to mix carefully. You want to keep the airy texture intact while blending. Now it’s time to build your cups. First, prepare 12 ladyfinger cookies. Quickly dip each one into ½ cup of cooled brewed coffee. Don’t soak them; just a swift dip is perfect. Place the dipped ladyfingers at the bottom of your serving cups. This forms your first layer. After that, spoon a layer of the pumpkin mascarpone mixture over the ladyfingers. Use your spatula to smooth it out evenly. Repeat this process. Add another layer of dipped ladyfingers, followed by more pumpkin mixture. Make sure each layer is evenly distributed. Once you finish layering, cover the cups with plastic wrap. Place them in the fridge for at least 4 hours, or overnight for best taste. This chilling time helps the flavors mix well. When you're ready to serve, dust the tops with cocoa powder for a touch of rich flavor. You can also add crushed ginger snaps on top for extra crunch. Enjoy your Pumpkin Tiramisu Cups! To make your pumpkin tiramisu cups shine, use a decorative tray. Place each cup on the tray for a stunning display. Add a sprig of mint or a cinnamon stick to each cup for extra flair. This small touch makes the dessert feel more festive and inviting. For seasonal occasions, you can serve these cups at Thanksgiving or Halloween. Pair them with a warm spiced apple cider or a nice cup of coffee. The flavors blend well and make for a cozy gathering. If you want to switch things up, you can use sweet potato puree instead of pumpkin. This gives a different flavor while keeping the spirit of the dessert. You can also mix in different spices. Try nutmeg or allspice for a new twist. For the cookies, ladyfingers work well. But you can also use crushed ginger snaps or even chocolate cookies. Each option adds a unique taste and texture. Layer them however you like to create your own version of this classic dessert. {{image_4}} You can store pumpkin tiramisu cups in the fridge for up to three days. To keep them fresh, cover each cup with plastic wrap or a tight lid. This prevents the dessert from absorbing other flavors in your fridge. The longer they sit, the more the flavors blend together, making them even tastier. Yes, you can freeze pumpkin tiramisu cups! To freeze, wrap each cup tightly in plastic wrap, then place them in a freezer-safe bag. They can last for up to two months in the freezer. When you're ready to enjoy, thaw them overnight in the fridge. Avoid thawing at room temperature to keep the texture smooth. Each serving of Pumpkin Tiramisu Cups has about 350 calories. This dessert packs a flavorful punch. Here’s a quick look at its macronutrient breakdown: - Carbohydrates: 40 grams - Fats: 22 grams - Proteins: 6 grams These numbers can change based on ingredient choices, but this gives a good starting point. You can make this dessert even healthier with a few swaps. Here are some options: - Mascarpone cheese: Use Greek yogurt for a lower-fat option. - Heavy whipping cream: Try coconut cream for a dairy-free twist. - Powdered sugar: Substitute with maple syrup or honey for a natural sweetener. For a vegan version, replace the mascarpone with cashew cream and use coconut cream instead of heavy cream. This way, you can enjoy the same rich taste while sticking to a plant-based diet. How long should I refrigerate the tiramisu cups? You should refrigerate the tiramisu cups for at least 4 hours. For best results, let them chill overnight. This time helps the flavors blend well. Can I make this dessert ahead of time? Yes! Pumpkin tiramisu cups are great to make in advance. They taste even better after sitting in the fridge. What can I use instead of mascarpone cheese? If you don’t have mascarpone, you can use cream cheese. Mix it with a bit of heavy cream for a smoother texture. Tips if the mixture doesn’t thicken If the mixture is too runny, double-check your whipped cream. Make sure you whip it until soft peaks form. This helps add volume and thickness. How to obtain the best flavor in pumpkin tiramisu cups To get the best flavor, use fresh pumpkin puree. Also, don't skip the pumpkin spice. It adds warmth and depth that makes this dessert special. You've learned how to make delicious pumpkin tiramisu cups. First, I shared the key ingredients like pumpkin puree and mascarpone cheese. Then, I laid out the simple steps for preparation and assembly. I provided tips for serving, storage, and even variations to try. In conclusion, this dessert blends fall flavors with a classic treat. Enjoy crafting these cups for your next gathering. They are sure to impress and delight everyone!

Pumpkin Tiramisu Cups Irresistible Dessert Delight

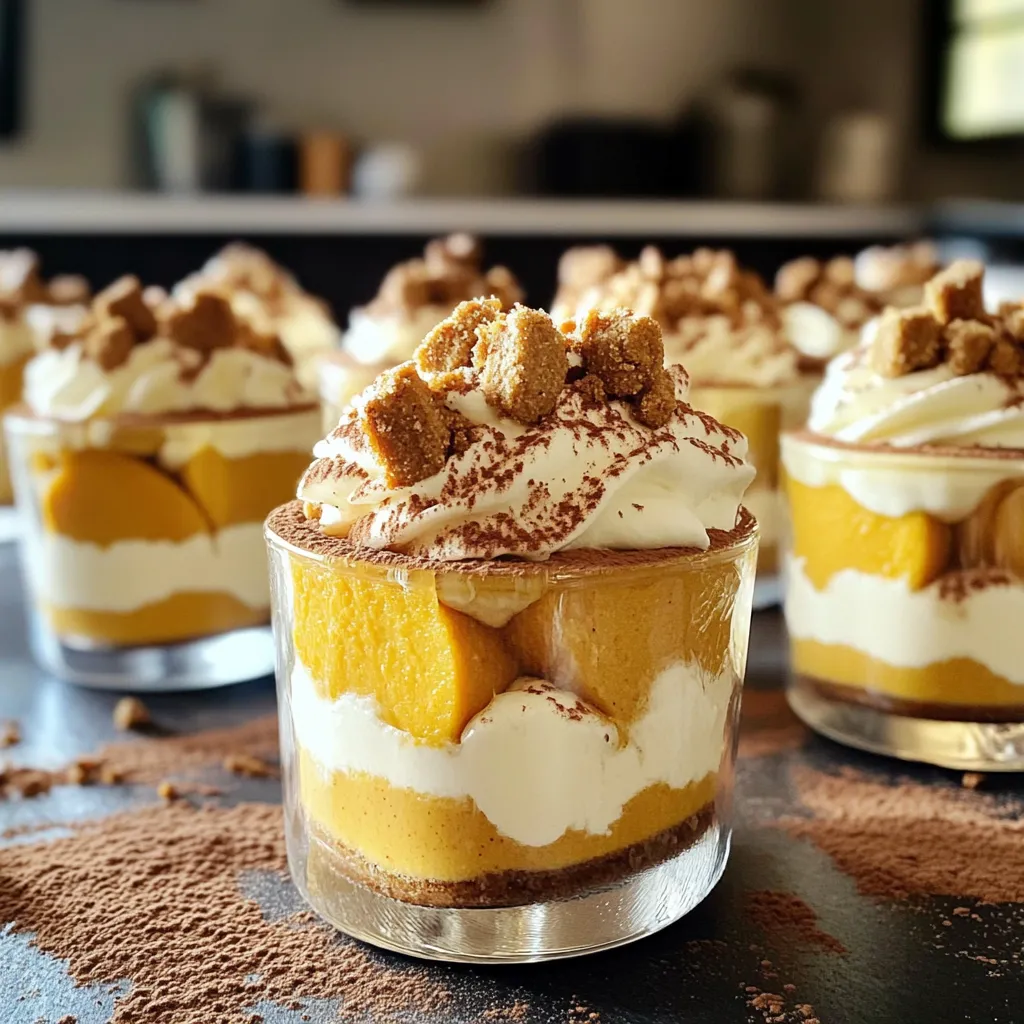
Get ready to savor a fall favorite with my Pumpkin Tiramisu Cups! This dessert combines rich pumpkin puree and creamy

- 8 chicken drumsticks - 1/4 cup pure maple syrup - 2 tablespoons soy sauce - 1 tablespoon Dijon mustard - 1 teaspoon garlic powder - 1 teaspoon onion powder - 1/2 teaspoon smoked paprika - 1/2 teaspoon black pepper - 1/4 teaspoon salt - Fresh parsley, for garnish - Chicken drumsticks: The star of the dish, providing juicy meat. - Maple syrup: Adds sweetness and a rich flavor. - Soy sauce: Brings umami and saltiness to balance the sweet. - Dijon mustard: Adds tang and depth to the marinade. - Garlic and onion powder: Infuse the chicken with savory notes. - Smoked paprika: Gives a hint of smokiness and color. - Black pepper and salt: Enhance all flavors and season the dish. - Parsley: A fresh touch for garnish, brightening the plate. - Soy sauce: Use tamari for a gluten-free option. - Maple syrup: Honey can work but will change the flavor. - Dijon mustard: Yellow mustard is a good substitute if needed. - Spices: Feel free to adjust based on your taste or what you have. Start by gathering your ingredients. You need pure maple syrup, soy sauce, Dijon mustard, garlic powder, onion powder, smoked paprika, black pepper, and salt. In a large bowl, mix these items well. Whisk until the marinade is smooth and combined. This step is crucial for flavor. Next, take your chicken drumsticks and add them to the marinade. Make sure they are fully coated. You can use your hands or tongs to toss them around. For the best taste, let them sit for at least 30 minutes. If you have time, cover the bowl and refrigerate them overnight. This makes a big difference. Now it's time to cook. Preheat your air fryer to 400°F (200°C). Let it heat for about 5 minutes. This ensures your drumsticks cook evenly. Place the marinated drumsticks in the air fryer basket. Space them out so hot air can flow around each piece. If your air fryer is small, cook in batches. Cook the drumsticks for 25-30 minutes. Halfway through, flip them to get a nice brown color. Check the internal temperature. It should reach 165°F (74°C) for safe eating. Once done, take them out and let the drumsticks rest for 3-5 minutes. This helps keep them juicy. For a lovely finish, drizzle leftover marinade over the drumsticks before serving. Garnish with chopped fresh parsley for color. Enjoy your meal! To get the most flavor, marinate your drumsticks well. Mix the maple syrup, soy sauce, Dijon mustard, and spices in a bowl. Toss the drumsticks in the marinade until they are fully coated. Let them sit for at least 30 minutes. For a richer taste, marinate them overnight in the fridge. This allows the flavors to soak in deeper. For crispy skin, preheat your air fryer to 400°F (200°C) before cooking. Make sure to space the drumsticks out in the basket. If they are too close, they won’t crisp up right. Cook them for 25-30 minutes, flipping halfway through. This helps them brown evenly. The outside will get golden and crispy, while the inside stays juicy. To be sure your drumsticks are cooked, use a meat thermometer. Insert it into the thickest part of the drumstick, avoiding the bone. You want the temperature to reach 165°F (74°C). This ensures they are safe to eat and perfectly cooked. If they need more time, put them back in the air fryer for a few more minutes. {{image_4}} You can mix up the flavor of your drumsticks easily. Try adding different sauces for fun tastes. For a spicy kick, add a teaspoon of cayenne pepper. You can also use honey instead of maple syrup for a sweeter glaze. If you love zest, mix in some lemon juice or lime juice. For a tangy twist, use barbecue sauce or sriracha. You can even try a teriyaki sauce for an Asian flair. The options are endless! Cooking times can change based on your air fryer model. Most air fryers cook at about 400°F. If yours runs hot, check your drumsticks at 20 minutes. If it runs cooler, you might need 30-35 minutes. Always check the internal temperature. It should be 165°F for safe eating. Flip the drumsticks halfway for even cooking. Each air fryer is unique, so keep an eye on your food. Serving your drumsticks well can make a big difference. Pair them with a fresh salad for a light meal. A side of roasted veggies adds color and nutrition. You can also serve them with rice or mashed potatoes for a filling option. For extra flavor, offer some dipping sauces like ranch or blue cheese. Garnish with fresh herbs like parsley or cilantro for a nice touch. These small details can elevate your meal! To keep your leftover drumsticks fresh, place them in an airtight container. You can also wrap them in plastic wrap. Make sure they cool down first. This helps keep moisture in and keeps them tasty. Store the drumsticks in the fridge for up to three days. When you are ready to eat the leftovers, reheat them for the best taste. The air fryer is a great tool for this. Set it to 350°F (175°C) and heat for about 10 minutes. This makes the skin crispy again. You can also use a microwave, but the skin may not stay crispy. If you use the microwave, heat in 30-second bursts until warm. For longer storage, you can freeze the drumsticks. First, make sure they are cooled completely. Then, wrap each drumstick in plastic wrap. Place them in a freezer bag, and remove as much air as possible. They can stay in the freezer for up to three months. When you want to eat them, thaw them in the fridge overnight, then reheat as mentioned above. To make Air Fryer Maple Drumsticks gluten-free, use tamari instead of soy sauce. Tamari is a gluten-free soy sauce alternative. It has a similar flavor and works great in this recipe. Just replace the soy sauce with an equal amount of tamari. This small swap ensures your dish remains gluten-free without losing taste. Yes, you can use other meats. Try chicken thighs or wings for a different bite. If you prefer, you can use turkey drumsticks as well. Just keep in mind that cooking times may change. Always check the internal temperature to ensure your meat is cooked through. Aim for 165°F (74°C) for safety. To clean your air fryer, start by unplugging it and letting it cool down. Remove the basket and pan, then wash them with warm, soapy water. Use a soft sponge to avoid scratches. Wipe the inside of the air fryer with a damp cloth. For tough stains, use a mixture of baking soda and water. Rinse and dry all parts before reassembling. Regular cleaning keeps your air fryer in top shape! In this article, we covered how to make delicious Air Fryer Maple Drumsticks. You learned about the key ingredients, how to prepare and cook them, and best practices for marinating. We also explored fun variations and essential storage tips. Air fryer cooking makes tasty meals easy. With these steps, you’ll enjoy juicy, crispy drumsticks. Experiment with flavors, and share your findings. Happy cooking!

Air Fryer Maple Drumsticks Simple and Juicy Recipe

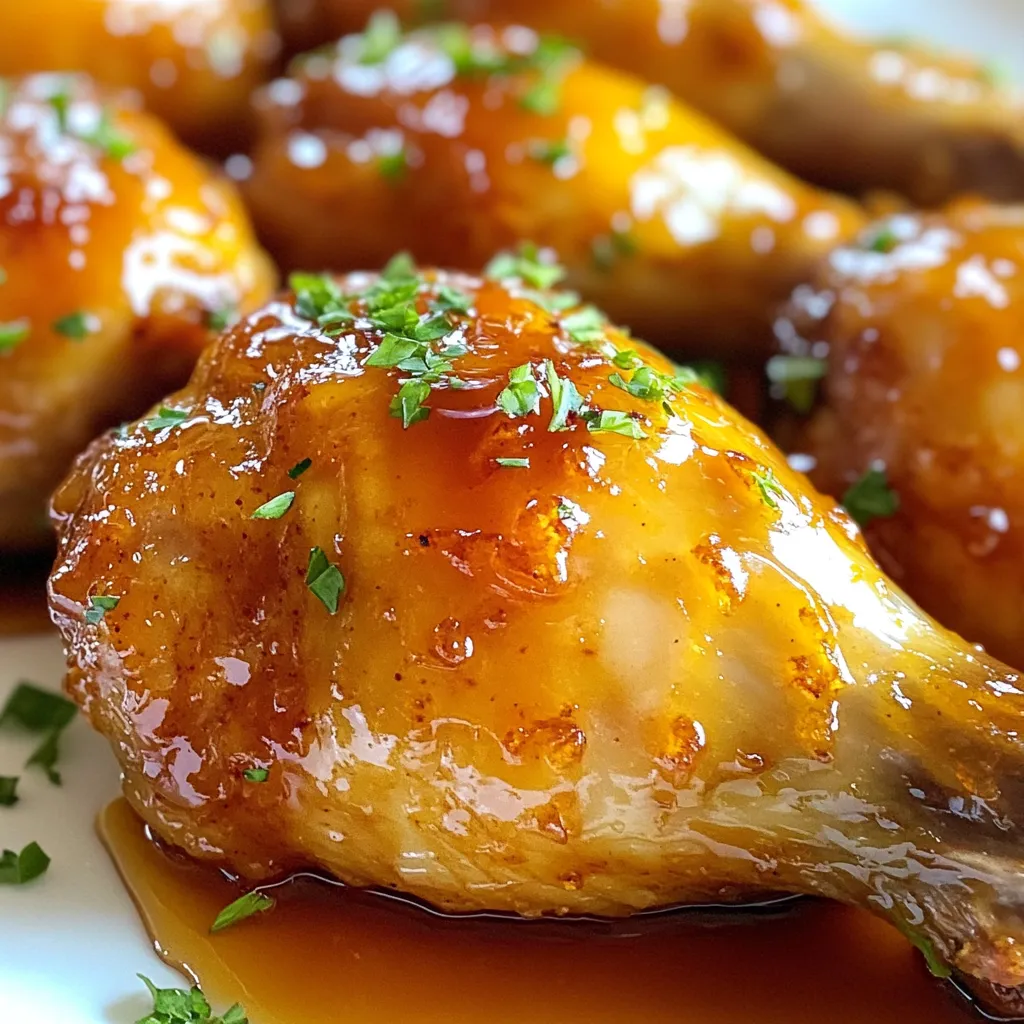
Looking for an easy, tasty meal? Try my Air Fryer Maple Drumsticks! This simple recipe gives you juicy chicken with

- Cauliflower florets - 1 cup all-purpose flour - 1 cup plant-based milk (almond or soy) - 1 teaspoon garlic powder - 1 teaspoon onion powder - 1 teaspoon smoked paprika - 1/2 teaspoon salt - 1/2 teaspoon black pepper - 1/2 cup BBQ sauce (your favorite brand or homemade) - 1 tablespoon olive oil - Fresh cilantro or parsley, for garnish To make these BBQ cauliflower wings, you need a medium head of cauliflower. Cut it into florets. Make sure they are all about the same size. This helps them cook evenly. For the batter, mix flour, plant-based milk, garlic powder, onion powder, smoked paprika, salt, and black pepper. This mix gives the wings a tasty crunch. You can use any BBQ sauce you like. Homemade or store-bought, both work great. Finally, fresh herbs like cilantro or parsley make a lovely garnish. They add color and freshness to your dish. Enjoy your cooking and get ready for some delicious wings! Start by rinsing the cauliflower under cold water. This step removes dirt and gives a fresh taste. Next, cut the cauliflower into bite-sized florets. Aim for a uniform size. When all pieces are even, they cook evenly. This helps avoid any burnt or undercooked parts. In a large bowl, mix the flour and plant-based milk. Add the garlic powder, onion powder, smoked paprika, salt, and black pepper. Use a whisk to combine everything. You want a smooth batter with no lumps. The right consistency should be creamy. If it's too thick, add a bit more milk. If it's too thin, add a little flour. Take each floret and dip it into the batter. Make sure to coat all sides well. This gives the wings a nice crunch. Allow any excess batter to drip off. Place the coated florets on a plate. Avoid piling them too high to keep them from getting soggy. Preheat your air fryer to 400°F (200°C). This takes about 3-5 minutes. Once it's hot, lay the battered cauliflower in the basket. Keep them in a single layer. This helps them crisp up nicely. Air fry for 12-15 minutes. Shake the basket halfway through to ensure even cooking. Look for a golden brown color to know they’re ready. When the wings finish cooking, take them out carefully. Transfer them back to your mixing bowl. Drizzle BBQ sauce over them. Gently fold to coat each piece evenly. Timing is key here. After coating, return them to the air fryer for another 3-5 minutes. This caramelizes the sauce, making it sticky and delicious. For a beautiful presentation, arrange the wings on a serving platter. Garnish them with chopped cilantro or parsley. This adds a pop of color. You can serve them with your favorite dips or sides for a complete meal. Enjoy these tasty bites! To get that perfect crispy texture, preheat your air fryer. Preheating helps the wings cook evenly and form a nice crust. Set your air fryer to 400°F (200°C) for about 3-5 minutes. This simple step makes a big difference in texture. When placing the cauliflower in the basket, leave space between each piece. This allows hot air to flow around the wings, making them crispier. If the wings touch, they will steam instead of fry. Aim for a single layer, and you’ll achieve great results. You can easily adjust the spice levels in your batter. Want it spicier? Add some cayenne pepper or chili powder. For a milder flavor, reduce the amount of smoked paprika. You can also switch up the BBQ sauce. Try different brands or homemade versions for unique flavors. A tangy sauce can give a nice kick, while a sweet sauce adds depth. Experiment until you find your favorite! One common mistake is overcrowding the air fryer basket. When you pack too many wings in, they don’t cook evenly. Always leave space for the hot air to circulate. Another mistake is not having a smooth batter. Lumpy batter can lead to uneven coating. Make sure to whisk your ingredients well until the batter is creamy and free of lumps. This helps the wings stay coated and delicious! {{image_4}} You can easily make these BBQ cauliflower wings vegan and gluten-free. Instead of all-purpose flour, use chickpea flour or almond flour. Both options give a nice texture. For milk, choose almond, soy, or oat milk. They all work well in the batter. When picking BBQ sauce, check labels for gluten-free options. Many sauces are vegan already, but it's wise to read the ingredients. Some brands use honey, which is not vegan. Make sure to find one that fits your diet. Boring batter is not an option! You can spice things up by adding more flavors. Try adding cayenne pepper for heat or a bit of cumin for earthiness. A dash of Italian herbs also adds a nice twist. Once your wings are cooked, you can experiment with sauces. Swap BBQ sauce for buffalo sauce or a spicy garlic sauce. Mix and match to find your favorite flavor combination. The options are endless! These BBQ cauliflower wings taste great with sides. Serve them with a fresh salad or some crunchy veggie sticks. They also pair well with sweet potato fries for a fun twist. For dips, ranch or blue cheese dressing is classic. You can also try a zesty yogurt dip or a spicy sriracha mayo. These dips add extra creaminess and flavor, making your meal even better. To keep your BBQ cauliflower wings fresh, use airtight containers. Glass or BPA-free plastic containers work best. Ensure the wings cool down to room temperature before sealing the container. This way, moisture won’t build up inside. Store them in the fridge. They stay good for up to three days. When reheating, use your air fryer for the best results. Set it to 350°F (175°C). Air fry for about 5-7 minutes. This helps maintain their crispiness. If you use a microwave, the wings may turn soggy. If you must use a microwave, heat on low power for short bursts. Always check the wings to avoid overheating. You can also freeze your BBQ cauliflower wings. First, let them cool completely. Place them in a single layer on a baking sheet. Freeze for about 1-2 hours until solid. Then transfer them to a freezer-safe bag. Remove as much air as possible. For cooking, thaw them in the fridge overnight. Cook straight from frozen in the air fryer at 400°F (200°C) for about 15-20 minutes. This will help bring back that crispy texture. Cook cauliflower in an air fryer for 12 to 15 minutes. The cooking time can change based on the floret size. For smaller pieces, aim for 12 minutes. For larger pieces, stick closer to 15 minutes. Always shake the basket halfway through to ensure even cooking. You want those bites crispy and golden brown. Yes, you can prepare these wings in advance. Cook the cauliflower and toss it in the BBQ sauce. Then, store them in the fridge for up to 24 hours. When you’re ready to enjoy, just pop them back into the air fryer for a quick reheat. This way, you save time and still get great flavor. Choose your favorite BBQ sauce for these wings! I recommend brands like Sweet Baby Ray's for a sweet touch or Stubb's for a tangy kick. If you like a smoky flavor, try a sauce with chipotle. Homemade BBQ sauce is also a great option if you want to control the ingredients. Yes, fresh cauliflower works great! It usually has a better texture than frozen. Make sure to rinse and cut it into even florets. This helps them cook uniformly. Frozen cauliflower may need longer cooking time due to moisture content, but fresh is always a tasty choice. These BBQ cauliflower wings are a healthier option than traditional wings. They are lower in calories and full of nutrients. Cauliflower is high in fiber and vitamins. While the batter adds some carbs, it balances out with the veggies. Serve with a nice salad for a complete meal. You now have a clear guide on making delicious BBQ cauliflower wings. We covered ingredients, step-by-step instructions, tips for best results, and variations for dietary needs. Remember to avoid overcrowding the air fryer for crispiness. Use the right batter consistency, and don’t skip on garnishes to make your dish shine. Enjoy experimenting with flavors and sauces. These tips will help you create a tasty, healthy snack that everyone can enjoy!

Air Fryer BBQ Cauliflower Wings Crispy and Flavorful

Looking for a tasty snack that won’t wreck your diet? I’m excited to share my Air Fryer BBQ Cauliflower Wings

- 2 cups pretzel sticks, finely crushed - 1 cup creamy peanut butter - 1/2 cup honey or maple syrup - 1 cup powdered sugar - 1 teaspoon vanilla extract - 1 cup semi-sweet chocolate chips - Sea salt, for garnish Each ingredient plays a key role in flavor and texture. The pretzel sticks give a nice crunch and saltiness. You can use gluten-free pretzels if you need a gluten-free option. For the nut butter, creamy peanut butter works best. If you prefer, almond butter or sunbutter can also be used. Honey adds sweetness and a little chew. Maple syrup is a great vegan swap. For sweetness, powdered sugar helps bind the mixture. These bars can fit into many diets. They are nut-rich and have natural sugars. If you want to avoid gluten, use gluten-free pretzels. For a vegan option, swap honey for maple syrup. Check the chocolate chips too; some brands offer dairy-free options. Always read labels to ensure they meet your dietary needs. To start, grab a large mixing bowl. Add the finely crushed pretzel sticks, creamy peanut butter, honey, powdered sugar, and vanilla extract. Mix these ingredients well. You want a sticky dough that holds together. If it feels too dry, add a splash more honey. This mix is both sweet and salty, a perfect combo. Next, take an 8x8 inch baking pan and line it with parchment paper. Leave some paper hanging over the sides. This makes it easy to pull the bars out later. The paper also helps the bars keep their shape. Now it's time to melt the chocolate. Place the semi-sweet chocolate chips in a microwave-safe bowl. Heat them in the microwave for 30 seconds at a time. Stir after each interval until smooth. This way, you avoid clumps or burnt chocolate. Pour the melted chocolate over the pretzel base. Use a spatula to spread it evenly. Lastly, sprinkle a tiny pinch of sea salt on top. This adds a nice flavor boost. Let the mixture chill in the fridge for at least 2 hours. Once set, slice and enjoy! Mixing is key to your bars. Start with dry ingredients first. Use finely crushed pretzel sticks for a good base. This helps the bars hold together. Next, add peanut butter, honey, powdered sugar, and vanilla. Stir well until the mix is sticky. You might need to use your hands. It should feel like dough. This ensures every bite is flavorful. Melt chocolate in short bursts. Use a microwave-safe bowl and heat for 30 seconds. Stir after each interval. This will keep the chocolate smooth. Once melted, pour it over the base evenly. Use a spatula to spread it out. A smooth layer looks nice and tastes great. Don't forget the sea salt! It adds a nice touch. Cut the bars into squares for easy serving. Use a sharp knife for clean cuts. Place them on a lovely platter. For a fun touch, add pretzel pieces or chocolate shavings on top. Serve them at room temperature or chilled for a cool treat. These bars look great and taste even better! {{image_4}} You can switch out the peanut butter for other nut butters. Almond butter adds a smooth flavor. Cashew butter gives a creamy taste. Sunflower seed butter is a great nut-free choice. Each nut butter brings its unique taste and texture. Feel free to experiment based on your preference. Mixing in extras can make your bars more fun. Try adding chocolate chips for extra sweetness. Chopped nuts add crunch and flavor. Dried fruits like cranberries or raisins bring a chewy aspect. You can also sprinkle some mini marshmallows on top. Each mix-in changes the bars and makes them special. Making these bars gluten-free is easy. Just use gluten-free pretzels. For a vegan version, switch honey for maple syrup. Check that your chocolate chips are dairy-free. These swaps keep the bars tasty while meeting different diets. Enjoy these treats no matter your needs! Store your no bake peanut butter pretzel bars in an airtight container. This keeps them fresh and tasty. Place parchment paper between layers to avoid sticking. Keep them in the fridge for the best texture. You can freeze the bars for later. Wrap them well in plastic wrap, then place them in a freezer-safe bag. This helps prevent freezer burn. They can last up to three months in the freezer. When ready to eat, let them thaw in the fridge overnight. These bars last about one week in the fridge. Keep an eye on them for any signs of spoilage. If you notice changes in smell or texture, it’s best to toss them. For the best taste, enjoy them within the first few days. Yes, you can use agave syrup instead of honey. The taste will change slightly. Agave is sweeter, so you may want to reduce the amount used. A good rule is to use about 3/4 of the honey amount. This keeps the balance of sweetness in your bars. These bars can last up to two weeks in the fridge. Store them in an airtight container. This helps keep them fresh and tasty. If you want them to last longer, consider freezing them. They can stay good for up to three months in the freezer. You can use chunky peanut butter if you prefer some texture. The bars will still taste great, but they will have a different mouthfeel. The crunch from the peanuts adds a fun twist. Just make sure to mix well, so all the ingredients blend together nicely. In this post, we explored key ingredients and how to make delicious bars. We covered mixing, baking, and topping techniques. We also shared storage tips and answered common questions. Remember, you can customize with different nut butters or toppings. Enjoy your tasty bars with family and friends. Experiment with variations to suit your taste. These treats can be a fun and healthy snack option!

No Bake Peanut Butter Pretzel Bars Simple Delight

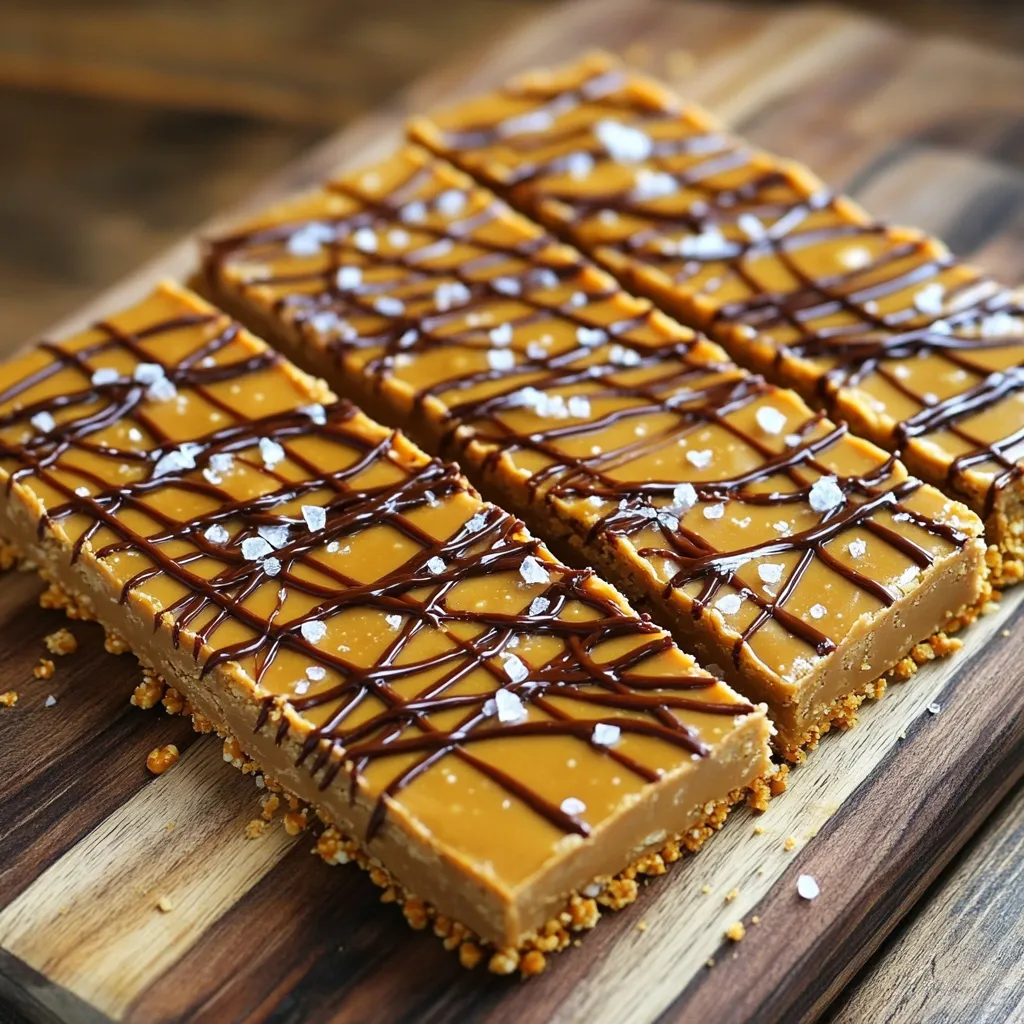
Looking for a quick and tasty snack? These No Bake Peanut Butter Pretzel Bars are your answer! With just a

- 1 cup apple cider - 1 ½ cups all-purpose flour - 1 teaspoon baking powder - ½ teaspoon baking soda - ¼ teaspoon salt - 1 teaspoon ground cinnamon - ½ teaspoon ground nutmeg - ½ cup granulated sugar - 1 large egg - ½ cup milk - ¼ cup unsalted butter, melted - 1 teaspoon vanilla extract - 1 cup powdered sugar (for glaze) - 2-3 tablespoons apple cider (for glaze) The apple cider gives these donuts their rich flavor. It's best to use fresh cider. The flour is the base that holds everything together. Baking powder and baking soda help the donuts rise. Salt and spices add depth to the taste. Sugar sweetens the mix and helps with browning. The egg binds the ingredients and adds moisture. Milk and butter keep the donuts soft. Lastly, the glaze made from powdered sugar and cider adds a sweet finish. You can swap apple cider with store-bought cider. If you need a gluten-free option, try almond or coconut flour. In place of eggs, use flaxseed meal mixed with water. For dairy-free donuts, use almond milk and coconut oil instead of butter. Each swap will change the flavor slightly, but the donuts will still be tasty! Start by pouring 1 cup of apple cider into a small saucepan. Heat it on medium until it boils. Then, lower the heat and let it simmer. You want to reduce the cider to about ⅓ cup. This takes about 15-20 minutes. When it’s done, take it off the heat and let it cool a bit. While the cider cools, preheat your oven to 375°F (190°C). Grab your donut pan and lightly grease it with cooking spray. This helps prevent the donuts from sticking when you bake them. In a large bowl, mix 1 ½ cups of all-purpose flour, 1 teaspoon baking powder, ½ teaspoon baking soda, ¼ teaspoon salt, 1 teaspoon ground cinnamon, ½ teaspoon ground nutmeg, and ½ cup granulated sugar. Whisk these dry ingredients well until they blend nicely. In another bowl, beat together 1 large egg, ½ cup milk, ¼ cup melted unsalted butter, 1 teaspoon vanilla extract, and your cooled reduced apple cider. Whisk until smooth. Now, slowly pour the wet mix into the dry mix. Use a spatula to stir gently. Don’t overmix; you want the batter to stay slightly lumpy for the best texture. Spoon the batter into the donut pan, filling each well about ¾ full. Bake your donuts for 10-12 minutes. They should look golden brown. A toothpick should come out clean when you check them. Let them cool in the pan for 5 minutes, then move them to a wire rack. For the glaze, mix 1 cup of powdered sugar with 2-3 tablespoons of apple cider in a small bowl. Whisk until it’s smooth. You can add more cider if it's too thick. Once the donuts cool completely, dip the tops into the glaze. Let any extra glaze drip back into the bowl. Place the glazed donuts back on the wire rack to let the glaze set. To get a light and fluffy donut, avoid overmixing. When you combine your wet and dry ingredients, use a spatula to fold them gently. This keeps air in the batter. A slightly lumpy batter is ideal. It helps create a tender donut. For a smooth glaze, mix powdered sugar with apple cider until it’s well-blended. Start with 2 tablespoons of cider. If the glaze is too thick, add more cider a little at a time. Dip the cooled donuts in the glaze, letting any extra run off. This keeps your glaze neat and pretty. One big mistake is underbaking the donuts. Make sure they are golden brown and pass the toothpick test. Another issue is using too much flour. Always spoon flour into the measuring cup and level it off. This ensures you get the right amount. Lastly, don’t skip cooling the donuts before glazing them. Warm donuts can cause the glaze to melt away. {{image_4}} You can switch up the glaze for your apple cider donuts. Try these options: - Maple Glaze: Mix powdered sugar with maple syrup instead of cider. - Brown Sugar Glaze: Combine brown sugar with milk for a rich twist. - Cinnamon Sugar: Toss warm donuts in a mix of cinnamon and sugar for a crunchy finish. These alternatives add new flavors and textures to your classic recipe. Want more flavor in your donuts? Here are some tasty ideas: - Caramel Drizzle: Drizzle warm caramel sauce on top for a sweet touch. - Chocolate Ganache: Dip the donuts in melted chocolate for a decadent treat. - Nutmeg Infusion: Add extra nutmeg to the glaze for a warm, spicy flavor. These boosters can make your apple cider donuts even more special. You can enjoy these donuts with dietary needs in mind. Here’s how: - Gluten-Free: Use a gluten-free flour blend instead of all-purpose flour. - Vegan: Replace the egg with a flax egg (1 tablespoon flaxseed meal + 2.5 tablespoons water). Use plant-based milk and butter for a dairy-free version. These options keep the flavor while catering to different diets. Store any leftover donuts in an airtight container. This keeps them fresh longer. If you leave them out, they may dry out. Place them at room temperature for up to two days. For longer storage, use the freezer. To freeze, let the donuts cool completely first. Then, wrap each donut in plastic wrap. Place them in a freezer-safe bag or container. They will stay fresh for about three months. When you're ready to eat, simply thaw them at room temperature. To reheat the donuts, use the microwave. Heat them for 10-15 seconds. Check to see if they are warm enough. If not, heat them in 5-second intervals. You can also use the oven. Preheat it to 350°F (175°C) and warm the donuts for about 5 minutes. This makes them taste fresh again! You can tell your donuts are done when they are golden brown. Insert a toothpick into the center of a donut. If it comes out clean, they are ready to take out. Bake them for about 10-12 minutes. Watch closely during the last few minutes to avoid overbaking. Yes, you can use store-bought apple cider. It saves time and still tastes great. Just make sure it is fresh. If you can find local cider, that is even better. It adds more flavor to your donuts. These donuts pair well with a warm drink. Try serving them with hot apple cider, coffee, or tea. You can also enjoy them with a scoop of vanilla ice cream for a sweet treat. Adding fresh apple slices can give a nice crunch and flavor contrast. These donuts stay fresh for about 2-3 days at room temperature. Store them in an airtight container to keep them soft. If you want them to last longer, you can freeze them. Just make sure to wrap them well before freezing. You now have all the details you need to make tasty apple cider glazed donuts. We covered the key ingredients, step-by-step instructions, and helpful tips. You can also explore fun variations and storage methods to keep your donuts fresh. Remember, practice makes perfect. Don’t be afraid to experiment with flavors or swap ingredients. Enjoy this delicious treat with friends or family, and share your creations. With these skills, you’ll master apple cider glazed donuts in no time.

Apple Cider Glazed Donuts Easy and Tasty Recipe

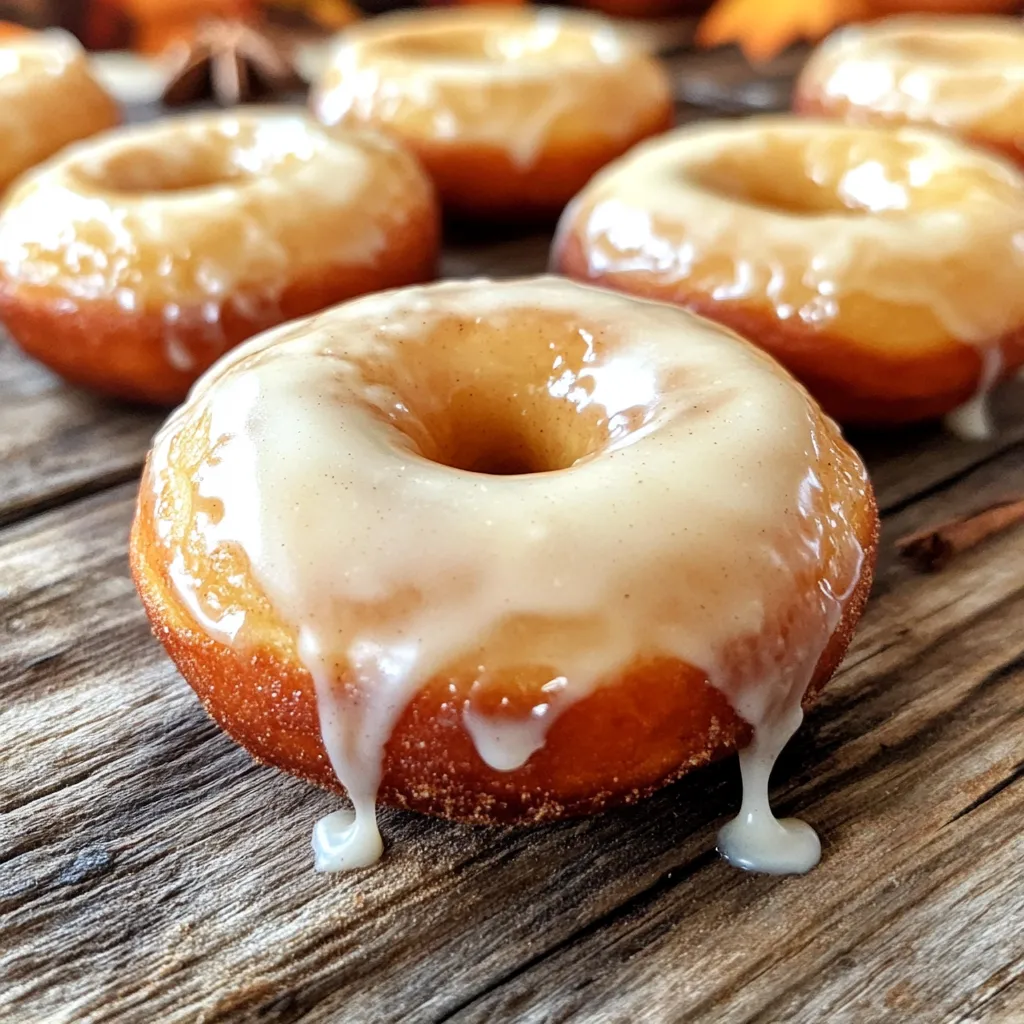
Craving a sweet treat that celebrates fall? Look no further! This easy recipe for apple cider glazed donuts will make

Older posts
Newer posts
← Previous Page1 … Page4 Page5 Page6 … Page86 Next →

dsad

© 2026 dailydishcraft • Built with GeneratePress

Our Policies

  • Copyright Policy
  • Cookie Policy
  • GDPR Policy
  • Privacy Policy
  • Disclaimer
  • Terms Of Use

More Information

  • Home
  • About
  • Contact
  • Appetizers
  • Dessert
  • Dinner
  • Drinks
©2026, dailydishcraft About Back To Top