Skip to content
DisclaimerTerms Of UseGDPR PolicyCookie Policy

dailydishcraft

  • Home
  • Drinks
  • Appetizers
  • Dinner
  • Dessert
  • About
  • Contact
  • Privacy Policy
DisclaimerTerms Of UseGDPR PolicyCookie Policy

NO-ING-IMG

To make Brown Butter Maple Glazed Shortbread Cookies, you need: - 1 cup unsalted butter (2 sticks), browned - 3/4 cup powdered sugar, plus extra for dusting - 1/4 cup pure maple syrup - 2 cups all-purpose flour - 1/2 teaspoon salt - 1/4 teaspoon baking powder - 1 teaspoon vanilla extract - Chopped pecans for garnish (optional) Each ingredient plays a key role. The butter gives richness, while maple syrup adds a sweet flavor. Powdered sugar helps in making the glaze smooth. Flour provides structure, and salt balances the sweetness. You can make swaps for some ingredients: - Use vegan butter for a dairy-free option. - Swap maple syrup with agave nectar or honey if needed. - For gluten-free cookies, try using a gluten-free flour blend. - If you can’t find chopped pecans, use walnuts or skip nuts entirely. These adjustments keep the spirit of the cookies while catering to different diets. To elevate your cookies, consider these garnishes: - Sprinkle extra chopped pecans on top for crunch. - Dust with more powdered sugar for a pretty finish. - Drizzle a little extra maple syrup for a sweet touch. Garnishes can add visual appeal and enhance the taste of your cookies. To start, we need to brown the butter. Take 1 cup of unsalted butter and put it in a medium saucepan. Heat it over medium. Stir it often. Watch closely as it cooks. In about 5-7 minutes, it will turn a beautiful golden brown. You will smell a nutty aroma. When it looks perfect, remove it from the heat. Let it cool for a couple of minutes. Now, let’s make the dough. In a large bowl, combine the slightly cooled brown butter with 3/4 cup of powdered sugar and 1/4 cup of pure maple syrup. Use a whisk or a spatula to mix it well. You want it to be smooth. Take your time to ensure everything blends nicely. Next, we will mix the dry ingredients. In a different bowl, sift together 2 cups of all-purpose flour, 1/2 teaspoon of salt, and 1/4 teaspoon of baking powder. Gradually add this dry mix to the wet mix. Stir gently until they just combine. Be careful not to overmix. This step is key for the right cookie texture. To make the best brown butter, start with unsalted butter. Place it in a medium saucepan over medium heat. Stir non-stop. Watch the butter change color to a golden brown. It will smell nutty when done, taking about 5-7 minutes. This step adds depth to your cookies. When you see that color, remove it from the heat. Let it cool for a few minutes before mixing it with the other ingredients. Baking is a science. Measure ingredients carefully. Use a kitchen scale for the best results. When mixing ingredients, avoid overmixing the dough. This keeps the texture light and crumbly. Remember to chill the dough. This helps the cookies hold their shape while baking. Also, ensure you slice the cookies evenly. This helps them bake at the same rate. Chilling the dough is key to great cookies. After shaping it into a log, wrap it tightly in plastic wrap. Place it in the fridge for at least 1 hour. This step firms up the butter. You can chill the dough for up to 2 days if needed. When ready to bake, slice the log into rounds. This will keep them from spreading too much in the oven. {{image_4}} You can spice up your shortbread cookies easily. Try adding citrus zest for a fresh twist. Lemon or orange zest gives a bright flavor. For a richer taste, mix in ground spices like cinnamon or nutmeg. Adding chocolate chips creates a sweet surprise in each bite. You can also fold in dried fruit for added texture. Think cranberries or cherries for a fruity touch. Be creative and use what you love! If you want to skip nuts, that’s easy! Just leave out the chopped pecans. Your cookies will still taste amazing. To add a little crunch, try using crushed graham crackers or seeds. Pumpkin or sunflower seeds work well. They keep the texture nice without using nuts. Everyone can enjoy them! For a gluten-free version, swap the all-purpose flour. Use a gluten-free flour blend instead. Look for ones that work well in baking. Make sure it has xantham gum for the best texture. You can also try almond flour, which adds a nice flavor. Just remember, gluten-free cookies may bake a bit differently. Keep an eye on them while they bake to find the perfect time! To keep your Brown Butter Maple Glazed Shortbread Cookies fresh, store them in an airtight container. Line the bottom of the container with parchment paper. This helps keep the cookies from sticking. Place a layer of cookies on top, then add parchment between layers if you have many. Store them at room temperature, away from direct sunlight. They will stay fresh this way for up to a week. If you want to save some cookies for later, freezing is a great option. First, let the cookies cool completely after baking. Then, place them in a single layer on a baking sheet. Freeze them for about an hour until firm. Once frozen, transfer the cookies to a freezer-safe bag or container. Label it with the date. You can freeze them for up to three months. When ready to eat, let them thaw at room temperature. The shelf life of these cookies is about one week at room temperature. If stored properly in an airtight container, they can retain their flavor and texture. If you freeze them, expect the best taste and texture for about three months. Remember, the glaze may soften a bit after freezing, but the flavor will still shine through! Yes, you can use salted butter. It will add a different taste. If you choose salted butter, skip the added salt in the recipe. This change can make the cookies taste richer. Just remember, the final flavor may vary. To make these cookies vegan, swap the butter for a vegan butter alternative. You can also use maple syrup in place of any other sweeteners. Ensure that your powdered sugar does not contain any animal products. Follow the same steps as the original recipe for great results. If you need a substitute for maple syrup, try agave nectar or honey. Both will add sweetness and a nice flavor. You can also use corn syrup, but it won't provide the same taste. Adjust the amount slightly to match your preferred sweetness level. This post covered how to make delicious brown butter maple glazed shortbread cookies. You learned about the key ingredients, useful tips, and variations to suit your taste. Remember, small changes can make a big difference. Experiment with flavors and substitutions that fit your needs. Always store cookies well to keep them fresh. With practice, you’ll master this recipe in no time. Enjoy the process and share your tasty results with friends!

Brown Butter Maple Glazed Shortbread Cookies Delight

If you’re ready to elevate your baking game, these Brown Butter Maple Glazed Shortbread Cookies will amaze you. Imagine a

To make Chicken Parmesan Stuffed Peppers, you need the following ingredients: - 4 large bell peppers - 1 lb ground chicken - 1 cup marinara sauce - 1 cup shredded mozzarella cheese - 1/2 cup grated Parmesan cheese - 1 cup cooked quinoa (or rice) - 1 teaspoon Italian seasoning - 1/2 teaspoon garlic powder - Salt and black pepper to taste - Fresh basil leaves for garnish These simple ingredients come together to create a tasty dish. Choose bell peppers that are firm and bright. You can use any color you like, such as red, green, yellow, or orange. Ground chicken gives the filling a juicy texture. Marinara sauce adds a rich flavor. Using quinoa or rice makes this meal filling and hearty. Italian seasoning and garlic powder give it a nice aroma. Salt and pepper enhance all the flavors in the dish. Finally, fresh basil leaves add a pop of color and fresh taste. Gather these ingredients for a fun and easy cooking adventure! {{ingredient_image_2}} - Preheat the oven and prepare the peppers First, set your oven to 375°F (190°C). While it heats, take four large bell peppers and slice off the tops. Remove the seeds and membranes to make room for the filling. Place them cut-side up in a baking dish. - Sauté the ground chicken In a large skillet, add a splash of olive oil and heat it over medium. Add one pound of ground chicken. Cook it for about 5-7 minutes. Use a spatula to break it apart. Cook until it turns brown and is no longer pink. - Combine the filling ingredients After the chicken is cooked, stir in one cup of marinara sauce. Then add one cup of cooked quinoa, one teaspoon of Italian seasoning, and half a teaspoon of garlic powder. Season with salt and black pepper to taste. Mix everything well. - Fill the peppers and add cheese Now, stir in half of the shredded mozzarella cheese and half of the grated Parmesan cheese into the chicken mixture. Spoon the filling into each pepper until they are full. Top the peppers with the rest of the mozzarella and Parmesan. - Bake the stuffed peppers To add flavor, pour a bit of extra marinara sauce around the base of the peppers. Cover the dish tightly with aluminum foil. Bake for 25 minutes. Then, remove the foil and bake for another 10-15 minutes. Keep an eye on them until the cheese is golden and bubbly. Once done, let them cool for about 5 minutes and garnish with fresh basil leaves. Enjoy your meal! - How to choose the best peppers: Look for peppers that are firm and shiny. Choose ones with no soft spots. Red, yellow, or green are all good options. - Ensuring even cooking: Cut the tops off the peppers evenly. Remove all seeds and membranes. This helps them cook uniformly. - Achieving gooey cheese texture: Mix half the cheese into the filling for a creamy base. Add the rest on top before baking for a bubbly finish. - Best sides to pair with stuffed peppers: Serve with a simple salad or garlic bread. These sides balance the meal nicely. - Presentation ideas: Use a bright plate for serving. Drizzle extra marinara sauce around the peppers for a nice touch. - Garnishes for added flavor: Fresh basil leaves add color and enhance the flavor. You can also sprinkle extra cheese on top before serving. Pro Tips Choose the Right Peppers: Opt for firm, vibrant bell peppers to ensure they hold their shape during baking and provide a sweet flavor contrast to the savory filling. Customize the Filling: Feel free to add in other vegetables like spinach or mushrooms to the filling for added nutrients and flavor. You can also substitute ground chicken with turkey or beef. Cheese Variations: Experiment with different cheeses for a unique twist. Try adding provolone or gouda for a richer taste or use dairy-free cheese for a vegan option. Make Ahead: Prepare the stuffed peppers in advance and store them in the fridge for up to a day before baking. This allows the flavors to meld together beautifully. {{image_4}} You can change the protein in your stuffed peppers. Instead of ground chicken, try ground turkey or beef. For a vegetarian option, use black beans or lentils as a base. Each option has its own flavor. If you need gluten-free choices, swap the quinoa with rice or cauliflower rice. Both work well and add different textures. When it comes to cheese, feel free to mix it up. Try a blend of provolone and fontina for a rich taste. You can also use dairy-free cheese if you want. To boost the flavor of your filling, add spices and herbs. Red pepper flakes can add heat, while fresh parsley or oregano brightens the dish. You can also toss in chopped vegetables. Spinach, mushrooms, or zucchini add great texture and nutrition. Just sauté them with the chicken for a few minutes. Sauces can change the flavor, too. Instead of marinara, use pesto or Alfredo sauce for a twist. A splash of balsamic vinegar can enhance the taste as well. To store your Chicken Parmesan Stuffed Peppers, let them cool first. Then, place them in an airtight container. Make sure the lid seals tightly. This helps keep them fresh. Store them in the fridge for up to three days. If you want to save space, slice the peppers in half before storing. You can freeze stuffed peppers before or after baking. For freezing before baking, prepare the peppers and filling, then stuff the peppers. Wrap them tightly in plastic wrap. Place them in a freezer-safe bag or container. They can last for up to three months in the freezer. If you freeze them after baking, let them cool completely first. Then, wrap each pepper in foil or plastic wrap. Store them in a freezer-safe container. To reheat, you can bake them at 350°F (175°C) for about 30 minutes, or until heated through. Alternatively, you can microwave them. Just place a pepper on a microwave-safe plate and heat for about 3-5 minutes. Enjoy your delicious meal anytime! Yes, you can make these stuffed peppers ahead of time. Prepare them fully and store them in the fridge. Just cover the dish tightly with plastic wrap or foil. They stay fresh for a day or two. When ready to eat, bake them straight from the fridge. To reheat leftover stuffed peppers, preheat your oven to 350°F (175°C). Place the peppers in a baking dish. Add a splash of marinara sauce to keep them moist. Cover with foil and bake for about 20 minutes. This keeps them warm and cheesy. I do not recommend using raw chicken. The filling needs to be fully cooked before you stuff the peppers. Raw chicken can lead to uneven cooking and food safety issues. Always cook the chicken first for best results. Stuffed peppers are quite healthy. They are low in carbs and rich in protein. You fill them with lean ground chicken, veggies, and quinoa. This combo makes a balanced meal packed with nutrients. The marinara sauce adds flavor without too many calories. Stuffed peppers last about 3 to 5 days in the refrigerator. Make sure to store them in an airtight container. If they smell off or look strange, it’s best to throw them out. Fresh is always better! You learned how to make tasty Chicken Parmesan Stuffed Peppers. We covered the ingredients, steps, and tips. You can also explore variations and storage options. This dish is easy to customize and great for any meal. Enjoy your cooking and try different flavors to make it your own. Stuffed peppers are not just delicious—they are also fun to prepare. Get creative and share your unique twists with family and friends!

Chicken Parmesan Stuffed Peppers Tasty and Easy Recipe

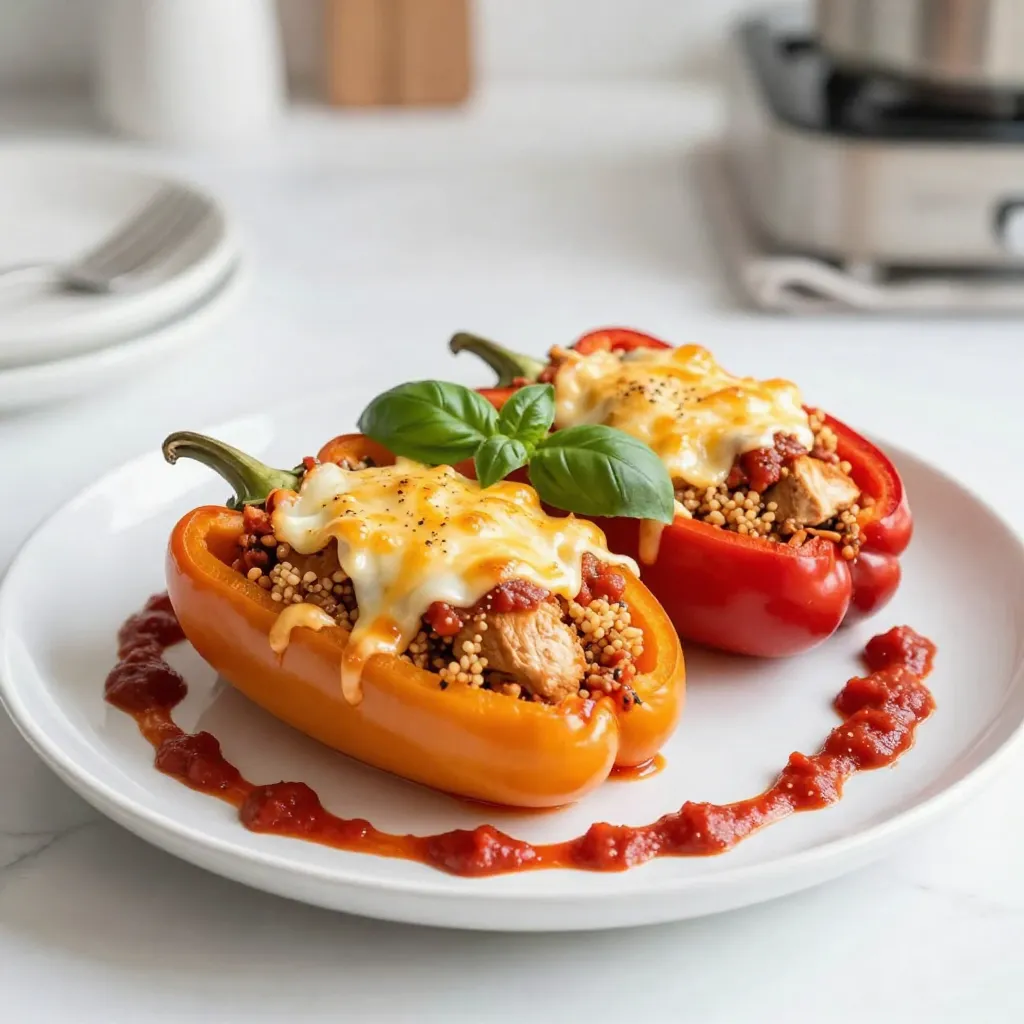
Looking for a simple, tasty dinner idea? Chicken Parmesan Stuffed Peppers are here to save the day! This recipe combines

- 4 bone-in, skin-on chicken thighs - 4 tablespoons unsalted butter, melted - 6 cloves of garlic, finely minced - 1 tablespoon fresh rosemary, finely chopped - 1 tablespoon fresh thyme, finely chopped - 1 teaspoon smoked paprika - Salt and freshly cracked pepper to taste - 1 pound baby potatoes, halved lengthwise - 1 pound green beans, trimmed and cleaned - Zest from 1 lemon - 2 tablespoons freshly squeezed lemon juice The chicken thighs are the star of this dish. They are juicy and full of flavor. The garlic adds a rich aroma that fills your kitchen. Fresh herbs like rosemary and thyme bring a lovely earthiness. Baby potatoes are perfect here; they roast nicely and soak up the garlic butter. Green beans add a pop of color and crunch. - Additional spices - Garnishes You can add spices like cayenne for heat or Italian seasoning for more flavor. Fresh herbs like parsley can make a lovely garnish. Lemon wedges also add brightness to your plate. - Sheet pan - Mixing bowl - Measuring spoons A good sheet pan is key. It holds everything and allows for even cooking. You need a mixing bowl to combine your garlic butter. Measuring spoons help get the right amounts of spices. These tools make cooking easy and fun. - Preheat the oven: Start by setting your oven to 400°F (200°C). This helps cook the chicken and veggies perfectly. - Create garlic butter mixture: In a bowl, mix 4 tablespoons of melted butter with 6 minced garlic cloves, 1 tablespoon of chopped rosemary, 1 tablespoon of chopped thyme, 1 teaspoon of smoked paprika, and a squeeze of fresh lemon juice. Stir it well and set aside. - Arrange chicken thighs: Place 4 bone-in, skin-on chicken thighs in the middle of a large sheet pan. Pour half of the garlic butter mixture over the chicken. Make sure each thigh gets coated well for great flavor. - Prepare potatoes and green beans: In another bowl, toss 1 pound of halved baby potatoes with the rest of the garlic butter mixture. Add salt and pepper to taste. Mix well and spread the potatoes cut side up around the chicken. Next, add 1 pound of trimmed green beans around the chicken and potatoes. Drizzle with olive oil and sprinkle with salt and pepper. - Baking times and temperatures: Place the sheet pan in the oven and bake for 35-40 minutes. The chicken should reach an internal temperature of 165°F (75°C). Meanwhile, the potatoes will become tender and golden. - Checking chicken doneness: Use a meat thermometer to ensure the chicken is cooked through. If needed, bake a little longer until it reaches the right temperature. To get that crispy chicken skin, you must dry it well. Pat the skin with paper towels. This removes moisture. Moisture causes steaming, not crisping. Next, use high heat. Set your oven to 400°F (200°C). The hot air crisps the skin quickly. Adding citrus, like lemon zest, boosts flavor. The zest gives a fresh kick. You can also swap herbs. If you lack rosemary or thyme, use oregano or parsley. They all add nice flavors. You can use an oven or an air fryer. An oven gives even cooking for all the food. An air fryer cooks faster and can make the chicken extra crispy. Always monitor cooking times. Chicken thighs need about 35-40 minutes. Use a meat thermometer to check for 165°F (75°C). This keeps the chicken safe and juicy. {{image_4}} You can use skinless chicken thighs for a lighter dish. They cook well and stay juicy. If you want to try something new, consider pork or tofu. Both options can soak up the garlic butter flavors. Pork adds a nice richness, while tofu gives a plant-based twist. Seasonal veggies work great in this recipe. You can swap in asparagus or bell peppers for a fresh taste. Root vegetable blends like carrots and parsnips also add a sweet touch. Mix and match based on what you have. This keeps your meal exciting and colorful. If you like heat, try a spicy garlic butter. Just add red pepper flakes to the mix. For a herb-infused version, use extra rosemary and thyme. Experiment with flavors to match your mood. Each profile gives a unique taste to the dish. After enjoying your garlic butter chicken thighs, store leftovers right away. Place them in an airtight container. This keeps the chicken moist and tasty. I suggest using glass containers for easy reheating. You can keep them in the fridge for up to four days. If you want to save some for later, freezing is a great option. Portion the chicken and veggies into smaller containers. This makes it easy to thaw just what you need. Use freezer-safe bags to save space. You can freeze these for up to three months. To thaw correctly, place the frozen portions in the fridge overnight. This keeps the chicken juicy and safe. You can also run cold water over the sealed bags for a faster thaw. For reheating, the oven works best. Preheat your oven to 350°F (175°C). Place the chicken and veggies on a baking tray. Cover with foil to keep them moist. Heat for about 20 minutes, checking to ensure they are hot all the way through. If you’re short on time, you can use the microwave. Place the chicken and veggies on a microwave-safe plate. Heat for 2-3 minutes, stirring halfway. Make sure the chicken reaches 165°F (75°C) before serving again. Bake chicken thighs for 35 to 40 minutes at 400°F (200°C). The chicken should reach an internal temperature of 165°F (75°C). This ensures your chicken is both safe to eat and juicy. Yes, you can use boneless chicken thighs. They will cook faster than bone-in thighs. Adjust the baking time to around 25 to 30 minutes. Keep checking the temperature to avoid overcooking. I love to serve garlic butter chicken thighs with roasted vegetables. Here are some tasty options: - Mashed potatoes: Creamy and buttery, they pair well with the chicken. - Steamed broccoli: A light and fresh side to balance the rich flavors. - Rice pilaf: Fluffy rice with herbs complements the dish nicely. - Salad: A crisp salad adds crunch and freshness to your meal. Feel free to mix and match these sides to fit your taste! This blog covers how to make garlic butter chicken thighs using simple steps. We looked at key ingredients like chicken, garlic, and herbs, plus optional spices. You can use tools like a mixing bowl and a sheet pan to prepare and bake your dish. We discussed tips for great flavor and proper cooking times. Remember, you can switch up proteins or veggies to suit your taste. With these guidelines, you can enjoy a tasty meal that’s easy to store and reheat. Happy cooking!

Garlic Butter Chicken Thighs Sheet Pan Delight

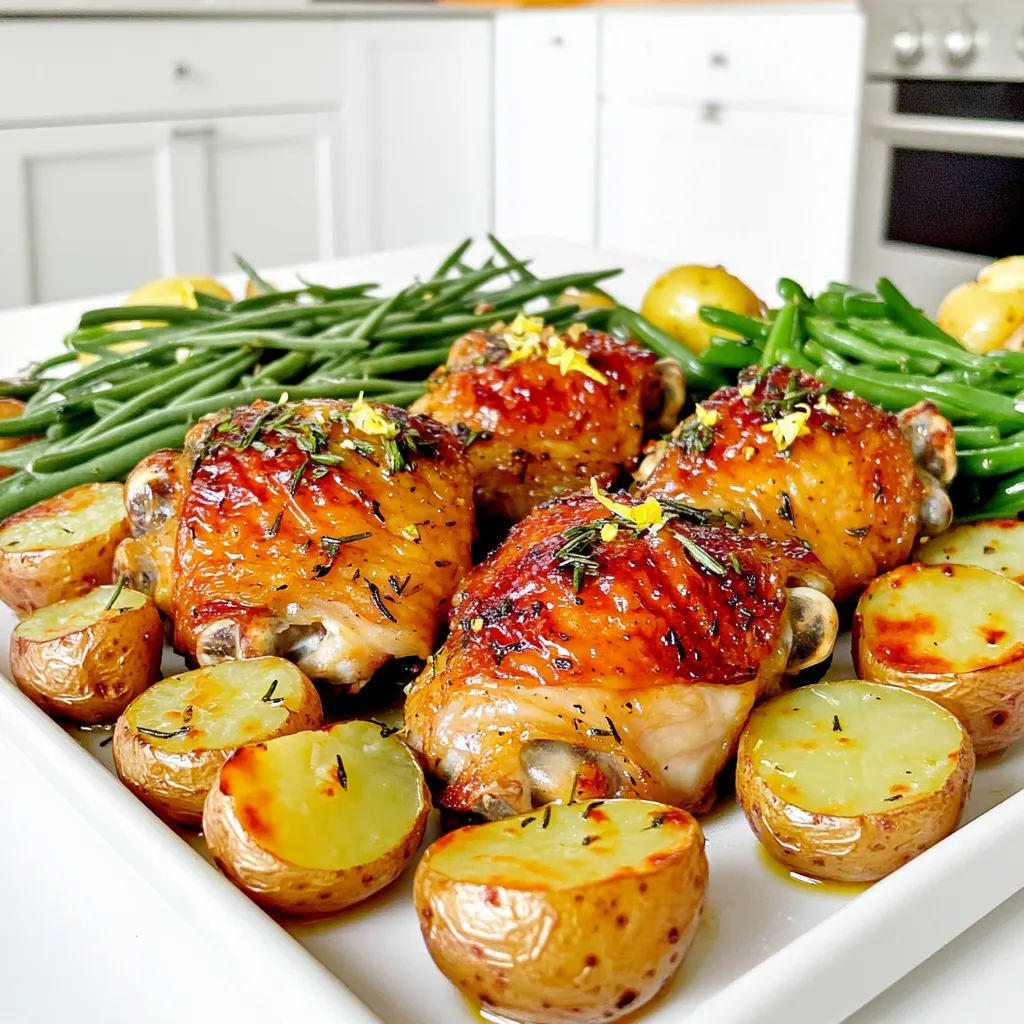
Welcome to Garlic Butter Chicken Thighs Sheet Pan Delight! If you love easy, flavorful meals, you’re in the right place.

- 1 cup all-purpose flour - 1 tablespoon baking powder - 1 teaspoon baking soda - 1 teaspoon ground cinnamon - ½ teaspoon ground nutmeg - ½ teaspoon salt - 2 tablespoons brown sugar These dry ingredients are the base of our pancakes. The flour gives them structure, while the baking powder and baking soda help them rise. Ground cinnamon and nutmeg add warm, cozy flavors that scream fall. Salt balances the sweetness from the brown sugar. - 1 cup pumpkin puree - 1 cup buttermilk - 1 large egg - 2 tablespoons melted butter Pumpkin puree brings a rich, creamy texture and a lovely color. Buttermilk adds tanginess and helps the pancakes stay moist. The egg binds everything together, while melted butter adds a touch of richness. - ½ cup powdered sugar - 2 teaspoons milk - 1 teaspoon vanilla extract This icing is easy to make and super tasty. It adds sweetness and makes the pancakes feel special. The vanilla extract gives a nice depth of flavor to the icing, making it a perfect drizzle on top of the warm pancakes. First, grab a large bowl. Whisk together: - 1 cup all-purpose flour - 1 tablespoon baking powder - 1 teaspoon baking soda - 1 teaspoon ground cinnamon - ½ teaspoon ground nutmeg - ½ teaspoon salt - 2 tablespoons brown sugar Make sure everything is mixed well. This will give your pancakes the right texture and flavor. In a different bowl, mix: - 1 cup pumpkin puree - 1 cup buttermilk - 1 large egg - 2 tablespoons melted butter Stir these until you see a smooth blend. This mix adds moisture and a warm pumpkin flavor. Now, gently pour the wet mix into the dry bowl. Stir them together slowly. You want to combine them just enough. It's okay to leave a few lumps. Overmixing will make your pancakes tough. Next, heat a non-stick skillet over medium heat. Lightly grease it with cooking spray or butter to avoid sticking. For each pancake, pour about ¼ cup of batter onto the skillet. Cook until bubbles form on top, which takes about 2-3 minutes. When the edges look set, flip the pancake with a spatula. Cook for another 2-3 minutes until they are golden brown. Remove the pancakes and keep them warm on a plate. In a small bowl, whisk together: - ½ cup powdered sugar - 2 teaspoons milk - 1 teaspoon vanilla extract Keep mixing until it’s smooth and creamy. This icing adds a sweet finish to your pancakes. Drizzle your icing over the warm pancakes right before serving. For a fun touch, add some pumpkin seeds or a light dusting of cinnamon on top. Enjoy your flavorful fall treat! To get the best pancake texture, avoid overmixing the batter. Mixing too much makes the pancakes tough. Just stir until the dry and wet ingredients combine. It's okay to have small lumps in the batter. They help keep the pancakes fluffy. Cooking at the right temperature is key. Preheat your skillet over medium heat. If it’s too hot, pancakes burn on the outside and stay raw inside. Cook each side for about 2-3 minutes. Look for bubbles forming on top before you flip them. You can serve these pancakes with many toppings. Try fresh fruit like bananas or berries. A dollop of whipped cream adds sweetness too. For something different, add a sprinkle of pumpkin seeds for crunch. Don’t forget the warm maple syrup on the side! Pair your pancakes with a hot drink. Coffee or chai tea works great. A glass of apple cider can also complement these fall flavors. If you can’t find pumpkin puree, use mashed sweet potatoes or butternut squash. These will give a similar taste and texture. For a dairy-free option, you can replace buttermilk with almond milk mixed with a splash of vinegar. This dairy-free buttermilk works well in pancakes too. Just let it sit for a few minutes before using it in your mix. {{image_4}} You can make these pancakes even better by adding nuts. Chopped walnuts or pecans bring a crunchy texture. They also add a nice flavor contrast to the soft pancakes. Just mix them into the batter before you cook. Start with about ¼ cup of nuts for a great taste. If you love chocolate, try adding chocolate chips. They melt and create gooey pockets of sweetness. Just fold ½ cup of chocolate chips into the batter. This twist makes the pancakes extra fun and indulgent. Kids especially love this version! Want to make these pancakes healthier? You can reduce sugar and calories easily. Try using less brown sugar in the batter. You might also swap some all-purpose flour for whole wheat flour. This keeps the flavor and adds fiber. Another tip is to use a sugar substitute for the icing. These small changes can make a big difference without losing taste. After making Cinnamon Roll Pumpkin Pancakes, let them cool completely on a wire rack. This step prevents sogginess. Once cooled, stack pancakes with parchment paper between each one. Place them in an airtight container. Store the container in the fridge for up to three days. This method keeps them fresh and ready for your next breakfast! When you want to enjoy leftover pancakes, the best way to reheat them is in a skillet. Heat the skillet over medium-low heat. Place the pancakes in the skillet and warm for about one minute on each side. This method keeps them moist and fluffy. You can also use the microwave, but be careful not to overheat. Heat for about 15-20 seconds at a time until warm. To freeze your pancakes, first, allow them to cool completely. Then, layer them with parchment paper in a freezer-safe bag. Squeeze out as much air as possible before sealing. Pancakes can be frozen for up to two months. When you're ready to eat them, thaw overnight in the fridge. Reheat them in a skillet or microwave. Expect them to taste just as good as fresh! Yes, you can make these pancakes ahead. Prepare the batter and store it in the fridge for up to 24 hours. Just remember to mix it again before cooking. You can also cook the pancakes and keep them warm. Pancakes are done when they are golden brown. Look for bubbles forming on the surface. The edges should look set. This usually takes about 2-3 minutes per side. If you don’t have buttermilk, you can make a substitute. Mix 1 cup of milk with 1 tablespoon of vinegar or lemon juice. Let it sit for five minutes. This will work well in your pancake recipe. Yes, you can double the recipe easily. Just multiply all ingredients by two. This will give you more delicious pancakes for family or friends. To keep pancakes warm, stack them on a plate. Cover them with a clean kitchen towel or foil. You can also place the plate in a low oven, around 200°F, while you cook the rest. This keeps them warm without drying them out. This post covered everything you need for Cinnamon Roll Pumpkin Pancakes. We explored all ingredients, from dry to wet. I shared step-by-step cooking instructions and useful tips for perfect results. You learned about variations to mix things up and how to store leftovers. In summary, these pancakes are easy and fun to make. With a few simple steps, you'll impress anyone at breakfast. Enjoy every bite and experiment with different toppings!

Cinnamon Roll Pumpkin Pancakes Flavorful Fall Treat

Fall is here, and that means it’s time for a cozy treat! Imagine fluffy pancakes infused with pumpkin spice and

- 2 pounds boneless, skinless chicken thighs - 4 cups chicken broth - 1 medium onion, finely chopped - 3 cloves garlic, minced - 3 carrots, peeled and diced - 3 celery stalks, diced - 1 cup frozen peas - 1 teaspoon dried thyme - 1 teaspoon dried rosemary - 1 teaspoon salt - ½ teaspoon freshly ground black pepper Chicken thighs are my go-to. They stay juicy and tender in the slow cooker. The chicken broth adds depth and flavor. Onion and garlic bring a tasty base. Carrots and celery add sweetness and crunch. Frozen peas give a fresh pop of color. Thyme and rosemary are two herbs that enhance the dish. They add warmth and earthiness. Salt and pepper are key for flavor balance. - 2 cups all-purpose flour - 1 tablespoon baking powder - 1 teaspoon salt (for dumplings) - ¾ cup milk (for dumplings) - 3 tablespoons fresh parsley, chopped (for garnish) For the dumplings, the flour gives structure. Baking powder makes them fluffy. Salt helps the flavor shine. Milk keeps the batter moist. Garnish with fresh parsley for a bright touch. It adds color and a fresh taste. This mix of ingredients creates a cozy, comforting meal. Each bite is rich and satisfying. Layering Ingredients Start by placing the chicken thighs at the bottom of your slow cooker. They will soak up all the flavors. Next, add the chicken broth. This will keep everything moist and tasty. Then, toss in the chopped onion, minced garlic, diced carrots, and diced celery. These veggies add great taste and nutrition. Mixing for Flavor Now, sprinkle in the dried thyme, dried rosemary, salt, and black pepper. Stir gently to mix everything well. It’s important that all the ingredients blend together. This step builds the base for rich flavor in your dish. Cooking Duration Cover the slow cooker with its lid. Set it on low heat and let it cook for 5 to 6 hours. This slow cooking makes the chicken tender and juicy. You’ll know it’s done when the chicken easily pulls apart. Shredding the Chicken Once the cooking time is up, use tongs to remove the chicken thighs. Place them on a plate. With two forks, shred the chicken into small pieces. It should fall apart easily. Return the shredded chicken back into the slow cooker. This helps it soak in all those delicious juices. Making Dumpling Batter In a medium bowl, whisk together the all-purpose flour, baking powder, and salt. This will be the dry mix for your dumplings. Gradually add the milk, stirring gently. Be careful not to overmix. The batter should stay thick and a bit lumpy for soft dumplings. Adding Dumplings to the Cooker Drop spoonfuls of the dumpling batter evenly over the creamy chicken mixture in the slow cooker. Do not stir! Just cover it with the lid and let it cook for an additional hour. This time lets the dumplings rise and cook through, making them fluffy and light. Spoon the dish into bowls, and enjoy the warm, creamy goodness! To keep chicken tender, use chicken thighs instead of breasts. Thighs have more fat, making them moist. Always cook on low heat for the best texture. Let it cook for 5-6 hours. This slow method helps the chicken become soft and flavorful. For fluffy dumplings, mix the batter gently. Overmixing makes them tough. The batter should be thick and lumpy. Drop spoonfuls over the chicken mixture without stirring. Cover the slow cooker and let them rise for an hour. This allows the dumplings to cook through and become fluffy. Serve the dish in shallow bowls. Make sure each bowl has chicken, dumplings, and creamy sauce. Sprinkle fresh parsley on top for color. This adds a nice touch and brightens the dish. Pair this dish with crusty bread or a simple salad. Bread helps soak up the creamy sauce. A salad adds a fresh crunch to your meal. Enjoy it with family and friends for a cozy gathering! {{image_4}} You can switch the chicken thighs with other proteins. Chicken breast works well, too. If you want a twist, try turkey or pork. For a meatless option, use chickpeas or lentils. These swaps make the dish fun and fresh. Feel free to change the veggies in your dish. You can add green beans or corn for variety. Sweet potatoes or mushrooms add a nice touch, too. Just remember to chop them small for even cooking. Want to kick up the flavor? Add spices like paprika or cumin. A pinch of cayenne pepper gives a nice heat. Fresh herbs like basil or dill can also brighten the dish. Experiment with flavors to find what you love. If you want more creaminess, try using half-and-half instead of heavy cream. You can also stir in some cream cheese for a richer texture. For a lighter option, use coconut milk. It adds a unique twist and makes it dairy-free. - Storing Leftovers: After enjoying your dish, let it cool. Place any leftovers in the fridge within two hours. This keeps the food safe. It will stay fresh for 3 to 4 days. - Recommended Containers: Use airtight containers for storing your creamy chicken and dumplings. Glass or plastic containers work well. Make sure they seal tightly to keep moisture in. - Freezing Instructions: You can freeze this dish too! Let it cool completely first. Then, transfer it to freezer-safe bags or containers. Squeeze out extra air for better storage. It can last up to 3 months in the freezer. - Thawing Process: To enjoy later, thaw in the fridge overnight. For faster results, use the microwave on low. Once thawed, reheat on the stove or in the slow cooker. Add a splash of broth or cream for extra moisture. Can I use chicken breast instead of thighs? Yes, you can use chicken breast. It cooks faster than thighs. However, chicken thighs are juicier and more tender. If you choose breasts, check for doneness early. How do I keep the dumplings from getting soggy? To avoid soggy dumplings, do not stir them once added. Keep the lid closed while they cook. This helps them rise and stay fluffy. What to do if the dumplings turn out dense? If your dumplings are dense, they may be overmixed. Mix the batter just until combined. Also, ensure you use fresh baking powder. Old baking powder can affect fluffiness. How to adjust cooking time for different slow cookers? Cooking times can vary. If your slow cooker runs hot, check the chicken sooner. If it runs cool, add an extra hour. Always use a meat thermometer for safety. This post covered the key ingredients for a delicious meal, step-by-step cooking tips, and how to store leftovers. With the right mix of chicken, veggies, and herbs, you can create a tasty dish anyone will love. Remember, don’t hesitate to swap proteins or add your favorite spices for extra flavor. Use these tips to make perfect dumplings and impress at your next meal. Enjoy experimenting, and happy cooking!

Savory Slow Cooker Creamy Chicken and Dumplings Dish

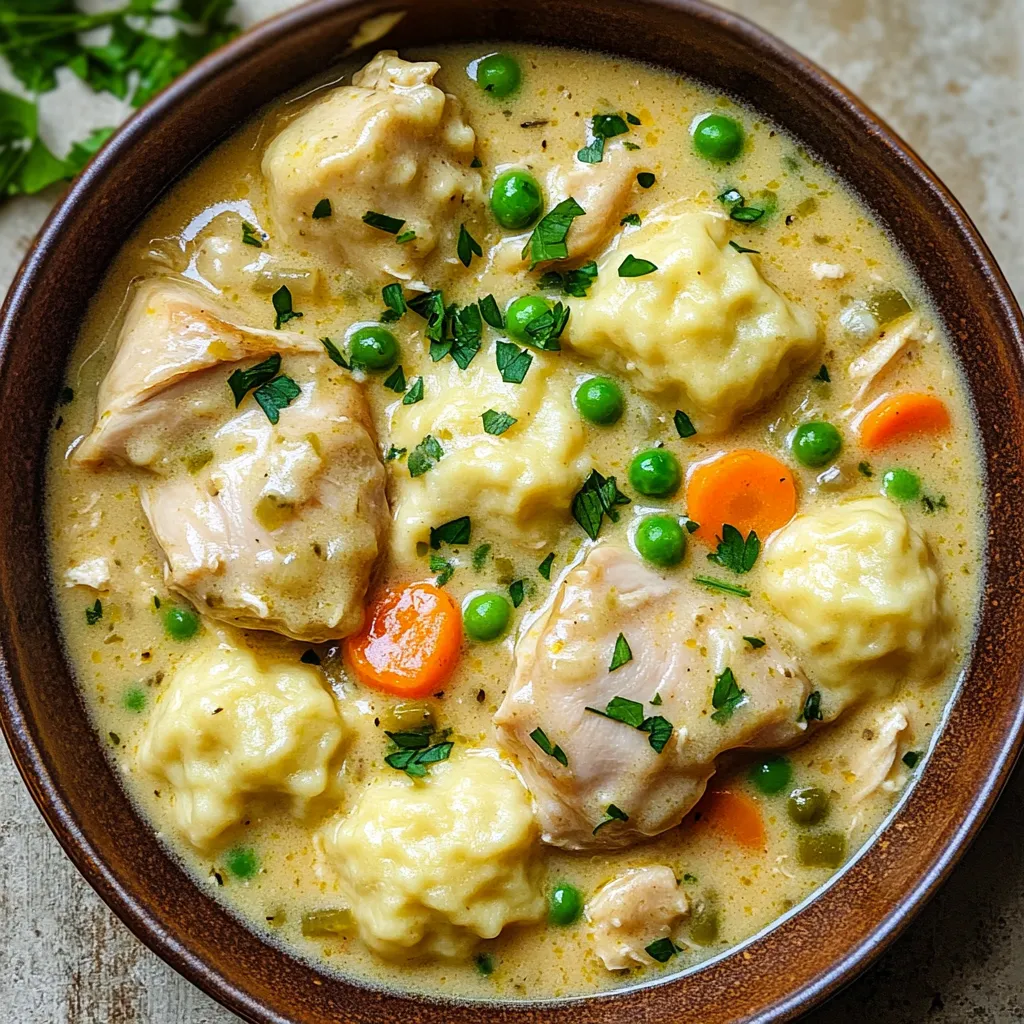
Craving a warm, hearty meal that practically cooks itself? My Savory Slow Cooker Creamy Chicken and Dumplings dish is just

Let’s gather the essential components for these Air Fryer Jalapeño Cheddar Pretzel Bites. Each ingredient plays a key role in achieving that perfect flavor and texture. - 1 cup warm water (between 110°F and 115°F) - 1 packet active dry yeast (2 1/4 teaspoons) - 1 tablespoon packed brown sugar - 3 cups all-purpose flour - 1 teaspoon fine salt - 1/2 cup shredded sharp cheddar cheese - 1-2 jalapeños, finely diced (remove seeds for milder flavor) - 1/4 cup baking soda (for the boiling process) - Coarse sea salt, for sprinkling on top - 1 egg (for optional egg wash) In this recipe, the warm water helps activate the yeast. The yeast is what makes the dough rise. Brown sugar adds a hint of sweetness. The flour provides structure, while the fine salt enhances flavor. Shredded sharp cheddar cheese gives each bite a rich taste. Jalapeños add a spicy kick, and you can adjust the heat by removing seeds. Baking soda is key for boiling, creating that classic pretzel crust. Finally, coarse sea salt brings it all together with a salty crunch. Gather these ingredients, and you’re ready to make a tasty snack. Each step will bring you closer to a delicious treat that everyone will love. To start, we need to activate the yeast. In a mixing bowl, combine 1 cup of warm water, 1 packet of active dry yeast, and 1 tablespoon of brown sugar. Let this sit for about 5 minutes. You will see bubbles form, which means the yeast is ready. Next, add 3 cups of all-purpose flour and 1 teaspoon of fine salt to the yeast mix. Stir until a dough starts to form. Now, it’s time to knead the dough. Add 1/2 cup of shredded sharp cheddar cheese and 1-2 finely diced jalapeños to the dough. Knead until everything is mixed well. The dough should feel soft and a bit sticky. Then, place the dough in a lightly oiled bowl. Cover it with a kitchen towel and let it rise in a warm spot for about 1 hour. You want it to double in size. After the dough has risen, preheat your air fryer to 375°F. In a large pot, bring 8 cups of water to a boil. Carefully stir in 1/4 cup of baking soda. This will create bubbles, so watch out! Divide the dough into small pieces, about 1 inch each, and roll them into balls. Boil the pretzel bites in the baking soda water for 30 seconds each. Use a slotted spoon to take them out and place them on a tray. If you want a nice shine, brush each bite with a whisked egg and sprinkle coarse sea salt on top. Finally, arrange them in the air fryer basket. Cook for 8-10 minutes until golden brown. Let them cool for a bit before serving. Enjoy your tasty pretzel bites! To make the best pretzel bites, managing dough texture is key. The dough should feel soft and slightly sticky. If it’s too dry, add a bit of warm water. If it's too wet, sprinkle in some flour. Knead the dough until it is smooth. This helps create the right texture. Getting the golden finish is all about the egg wash. Whisk an egg and brush it lightly over each bite. This gives them a rich color and shine. Make sure you sprinkle coarse sea salt on top before cooking. This adds flavor and makes them look great. When it comes to dipping sauces, creamy mustard is a classic choice. You could also try a cheesy dip for extra flavor. Both pair well with the warmth of the pretzel bites. For garnishes, consider fresh jalapeño slices. They add a pop of color and spice. You can also use finely chopped herbs like parsley or cilantro. This makes your dish look fancy and bright. {{image_4}} You can switch up the flavor of your pretzel bites easily. For cheese, consider using mozzarella or pepper jack. These options add a nice twist. You can also mix in some cream cheese for extra creaminess. Adding spices can enhance the flavor too. Try garlic powder, onion powder, or smoked paprika. These spices give your bites a savory kick. You can even add dried herbs like oregano or thyme for a fresh taste. If you need gluten-free options, you can swap all-purpose flour with a gluten-free blend. Make sure it has a binding agent like xanthan gum. This helps the dough hold together well. For vegan alternatives, replace the cheddar cheese with a plant-based cheese. You can use nutritional yeast for a cheesy flavor without dairy. Use a flax egg instead of a regular egg for the wash. This makes the recipe vegan-friendly while keeping the delicious taste. To keep your air fryer jalapeño cheddar pretzel bites fresh, store them in an airtight container. This prevents moisture loss and keeps them soft. You can place a paper towel in the container to absorb excess moisture. For the best taste, enjoy them within three days. After that, they may lose their delightful texture. When it's time to eat your leftover pretzel bites, reheating is key. You want them warm and crispy again. The best way to reheat them is in the air fryer. Set it to 350°F (175°C) and heat for about 3-5 minutes. This method helps restore their crunchy outside. If you don't have an air fryer, you can use an oven too. Just heat them at 350°F (175°C) for 5-7 minutes. Enjoy your tasty bites as if they were just made! Yes, you can prepare the dough a day in advance. After you knead it, place it in the fridge. Cover the bowl tightly with plastic wrap. When ready to bake, let the dough warm up for about 30 minutes. This makes the dough easier to work with. You can use mozzarella for a milder taste. Pepper jack adds a spicy kick. Feel free to mix different cheeses for a unique flavor. The key is to ensure your cheese melts well. Use flour on your hands and the work surface. This keeps the dough from sticking too much. If the dough feels very tacky, add a bit more flour as you knead. Just be careful not to add too much. Every air fryer can cook a bit differently. Start checking the bites a minute or two early. Some models may cook faster or slower. If your air fryer has multiple racks, use them to cook more bites at once. In this post, we explored how to make delicious pretzel bites. We started with key ingredients like warm water, yeast, cheese, and jalapeños. You learned step-by-step how to activate your yeast, knead the dough, and cook the bites in an air fryer. We shared tips to perfect your pretzel texture and suggested fun flavors. Finally, we covered storage and reheating methods. Enjoy these simple bites at home, and feel free to experiment with your favorite ingredients!

Air Fryer Jalapeño Cheddar Pretzel Bites Delight

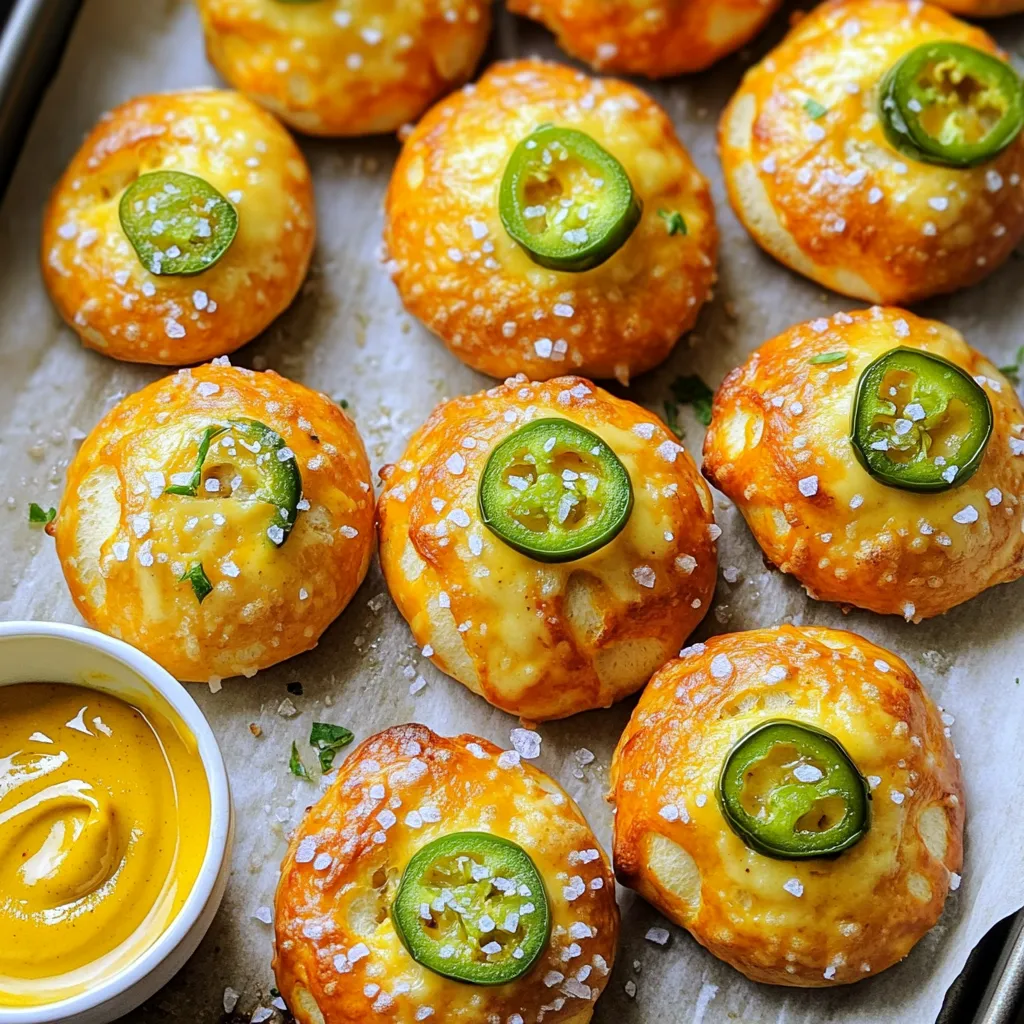
Get ready to elevate your snack game with Air Fryer Jalapeño Cheddar Pretzel Bites! These tasty bites are easy to

- 4 large bell peppers, diced (choose your favorite colors) - 1 cup quinoa, rinsed under cold water - 2 cups low-sodium vegetable broth - 1 can (15 oz) black beans, drained and rinsed - 1 cup corn kernels (fresh or frozen, thawed if frozen) - 1 cup diced tomatoes (canned or fresh) - 1 teaspoon ground cumin - 1 teaspoon smoked paprika - 1 teaspoon garlic powder - 1/2 teaspoon onion powder - 1 cup shredded cheese (cheddar or Mexican blend) - Salt and black pepper to taste - 2 tablespoons olive oil for sautéing - Fresh cilantro leaves, chopped (optional) When you select bell peppers, each color has its own flavor. Red peppers are sweet, yellow peppers are fruity, and green ones are more bitter. Mix them for a colorful dish. For the vegetable broth, go for low-sodium options. They bring flavor without making the dish too salty. You can make your own broth too, using leftover veggie scraps. Just simmer them with water for a few hours. You can add some extra flavor with seasonings. Try chili powder or oregano for a twist. You can also use ground turkey or cooked lentils instead of black beans for a protein boost. For garnishes, consider adding sliced avocado or a dollop of sour cream. Fresh cilantro adds a nice touch, too, brightening the dish with color and taste. 1. Preheat your oven to 375°F (190°C). This makes sure it’s hot for baking. 2. In a medium pot, bring 2 cups of low-sodium vegetable broth to a boil. 3. Rinse 1 cup of quinoa under cold water. Add it to the boiling broth. 4. Lower the heat to a simmer, cover, and cook for 15 minutes. 5. Once the quinoa absorbs the broth, remove it from heat. Let it cool a bit. 1. In a large skillet, heat 2 tablespoons of olive oil over medium heat. 2. Add 4 large diced bell peppers to the skillet. Sauté for 5-7 minutes. 3. Stir the bell peppers until they soften and turn bright. 4. Add 1 can of black beans, 1 cup of corn, and 1 cup of diced tomatoes to the skillet. 5. Next, add the cooked quinoa. Sprinkle in 1 teaspoon of cumin, 1 teaspoon of smoked paprika, 1 teaspoon of garlic powder, and 1/2 teaspoon of onion powder. 6. Season with salt and black pepper. Mix well and heat for another 3-5 minutes. 1. Take a greased 9x13-inch baking dish. Transfer the mixture from the skillet into the dish. 2. Spread the mixture evenly in the dish. Top it with 1 cup of shredded cheese. 3. Cover the dish tightly with aluminum foil. Bake in the preheated oven for 25 minutes. 4. After 25 minutes, remove the foil. Bake for another 10-15 minutes until the cheese is golden and bubbly. 5. Once done, let the casserole cool for a few minutes. Garnish with chopped cilantro before serving. To ensure your quinoa is fluffy, rinse it well before cooking. This step removes the bitter saponins. When you cook it, use low-sodium vegetable broth for added flavor. Bring the broth to a boil, then simmer for about 15 minutes. Wait until all the liquid is gone. Fluff it with a fork after it cools a bit. This method gives you light and airy quinoa. When sautéing bell peppers, heat olive oil in a large skillet. Use medium heat to avoid burning. Add diced peppers and let them cook for 5-7 minutes. Stir them occasionally. You want them soft but still vibrant. This step adds great flavor and color to your casserole. For the best melting cheese, I recommend using cheddar or a Mexican blend. These cheeses melt nicely and add rich flavor. You can also try pepper jack for some heat. If you prefer a dairy-free option, look for plant-based cheeses. Many brands now offer great melting cheeses that fit well in casseroles. Garnish your casserole with fresh cilantro for a burst of color. This adds freshness and a nice touch. Serve directly from the baking dish for a cozy vibe. For a complete meal, pair it with avocado slices or a dollop of sour cream. These sides complement the flavors and make for a tasty dinner. {{image_4}} You can make this dish vegetarian by using different vegetables. Try zucchini, carrots, or mushrooms for extra flavor. You can also swap out black beans for lentils or chickpeas. These options boost protein and add a nice texture. If you prefer meat, adding ground turkey, beef, or sausage works great. Brown the meat in the skillet before adding the other ingredients. This step brings out the meat’s flavor and keeps it juicy. Make sure to drain any excess fat for a lighter dish. For gluten-free options, use quinoa and check that your broth is gluten-free. If you want a vegan version, just skip the cheese or use plant-based cheese. You can also add tofu for protein. These changes ensure everyone can enjoy this tasty casserole. To keep your stuffed bell pepper casserole fresh, place it in an airtight container. Refrigerate it right after it cools down. This helps prevent bacteria growth. You can store it in the fridge for up to 4 days. Make sure to label the container with the date. If you want to freeze the casserole, let it cool completely first. Then, cut it into portions. Wrap each piece tightly in plastic wrap, then place them in a freezer-safe bag. This way, you can pull out just what you need later. The casserole will last for up to 3 months in the freezer. When you’re ready to eat, take a portion out of the freezer. Thaw it in the fridge overnight. To reheat, place it in a baking dish and cover it with foil. Bake at 375°F (190°C) for about 25 minutes or until it’s heated through. Enjoy your meal without losing flavor! How do I know when the casserole is done baking? You can tell the casserole is done when the cheese is melted and bubbly. It should also be golden on top. Can I make this ahead of time? Yes, you can prepare the casserole a day ahead. Just cover it tightly and store it in the fridge. Bake it when you're ready to serve. What can I substitute for quinoa in this recipe? If you need a substitute for quinoa, try brown rice or couscous. Both options cook well and add nice texture. How can I adjust the spice level in the casserole? To make it spicier, add some diced jalapeños or red pepper flakes. If you want it milder, reduce the spices or omit them. What are the nutrition facts for stuffed bell pepper casserole? This casserole is rich in protein and fiber. It has about 250 calories per serving. Nutrition may vary based on added ingredients and portion sizes. Stuffed bell pepper casserole is a versatile dish full of flavor. You learned about its key ingredients, cooking steps, and tips for the best meal. From vegetarian to meat options, this recipe fits any diet. Remember to store leftovers properly and consider freezing extras. With these guidelines, you can enjoy a tasty meal that fits your taste. Experiment with variations and make it your own. Enjoy your cooking adventure!

Stuffed Bell Pepper Casserole Tasty Dinner Delight

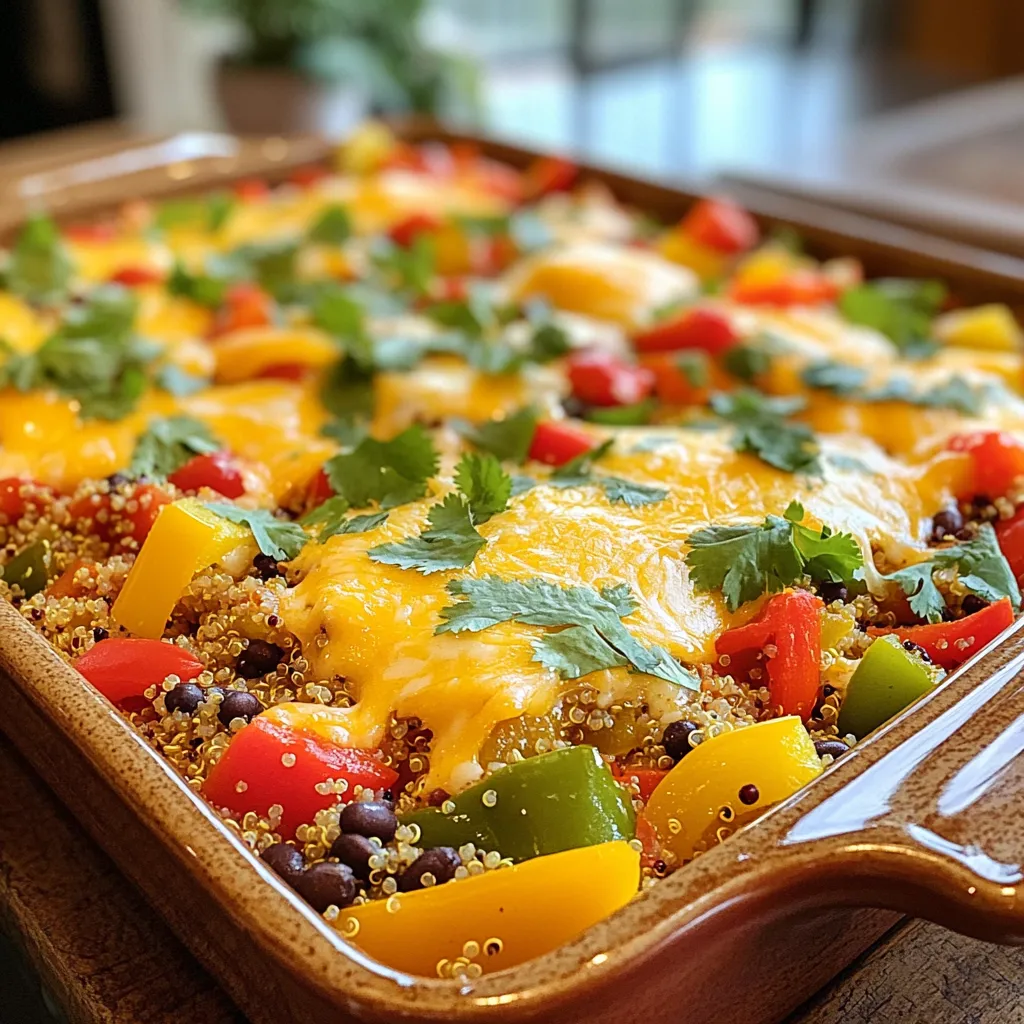
Are you in search of a quick, tasty dinner idea? Look no further than this Stuffed Bell Pepper Casserole! It

- 1 cup rolled oats - 1 ½ cups almond milk (or milk of your choice) - 2 tablespoons unsweetened cocoa powder - 1 tablespoon instant coffee granules - 2 tablespoons pure maple syrup (or honey) The main ingredients form the base of your mocha overnight oats. Rolled oats are hearty and fill you up. Almond milk adds creaminess without being heavy. Cocoa powder gives a rich chocolate flavor, while instant coffee adds a kick. Maple syrup or honey sweetens the dish naturally. - ¼ cup Greek yogurt - Chocolate chips - Sliced bananas These optional ingredients can make your oats even better. Greek yogurt adds creaminess and protein. Chocolate chips bring extra sweetness and fun. Sliced bananas add a fresh taste and a nice texture. You can mix and match based on your mood. - 1 teaspoon pure vanilla extract - A pinch of sea salt Seasoning is key for flavor. Vanilla extract gives a warm, sweet note. A pinch of sea salt enhances all the flavors. It balances the sweetness and makes every bite taste better. Incorporating these ingredients will create a delicious and energizing breakfast. Mocha overnight oats are a simple way to enjoy a gourmet breakfast without much effort. Start by gathering your dry ingredients. In a large mixing bowl, combine: - 1 cup rolled oats - 2 tablespoons unsweetened cocoa powder - 1 tablespoon instant coffee granules - A pinch of sea salt Use a whisk or spoon to mix these items well. Make sure the cocoa and coffee blend evenly with the oats. This step is key for great flavor. Next, focus on the wet ingredients. In a separate bowl, whisk together: - 1 ½ cups almond milk (or your choice of milk) - 2 tablespoons pure maple syrup (or honey) - 1 teaspoon pure vanilla extract - ¼ cup Greek yogurt (optional for creaminess) Stir until the mixture is smooth and free of lumps. This blend adds sweetness and flavor to your oats. Now, pour the wet mixture into the bowl with the dry ingredients. Mix them gently but thoroughly. Ensure the oats absorb all the liquid. Once mixed, divide the oatmeal into two or three glass jars or airtight containers. Cover each jar securely. Place them in the refrigerator overnight. This allows the oats to soak up all the flavors. If you need them faster, four hours will work too. When you are ready to enjoy, stir the oats. If they are too thick, add a splash more almond milk. Top with chocolate chips and sliced bananas for a special treat. Enjoy your delicious breakfast! To get the right texture for your mocha overnight oats, adjust the liquid. If you like thicker oats, use less almond milk. If you want them thinner, add more milk. Start with the recipe's 1 ½ cups of almond milk. After chilling overnight, check the texture. If it's too thick, stir in a splash of milk. This keeps your oats creamy and smooth. For a beautiful presentation, use clear jars. You can see the layers of oats and toppings. After you mix the oats, divide them into jars. Top with chocolate chips and sliced bananas for color and taste. You can also sprinkle cocoa powder on top before serving. This little touch makes your breakfast look fancy. To make your mocha oats even tastier, think about extra spices or sweeteners. You can add a pinch of cinnamon for warmth. If you want more sweetness, try adding a bit more maple syrup or honey. You could also mix in a scoop of nut butter for creaminess. These small changes make a big difference in flavor! {{image_4}} You can switch up your milk choice. Try coconut milk or oat milk for a unique taste. Each milk brings its own flavor and creaminess. If you prefer sweeteners, agave syrup works well. It mixes nicely, and it’s plant-based. If you want a vegan option, use almond milk and maple syrup. Both are great for a plant-based diet. You can also skip the Greek yogurt or use a vegan yogurt. For gluten-free oats, check the label on your rolled oats. Many brands offer gluten-free options. Adding nut butter can enhance your mocha overnight oats. Almond butter or peanut butter adds richness. You can also sprinkle in spices like cinnamon. This adds warmth and depth to your dish. Feel free to get creative with flavors! Store mocha overnight oats in airtight containers or mason jars. Both options work well. Airtight containers are great for keeping oats fresh. Mason jars help you see the layers, which looks nice. Use whichever you prefer. Just make sure the lids seal tightly. Mocha overnight oats last up to five days in the refrigerator. This makes them perfect for meal prep. You can make a batch and enjoy them throughout the week. Just remember to check for any signs of spoilage before eating. You can freeze mocha overnight oats for up to three months. To freeze, divide the mixture into portions. Store in freezer-safe containers or bags. When ready to eat, thaw them in the fridge overnight. Reheat in the microwave if you prefer warm oats. Just add a little almond milk if they seem dry. Enjoy your convenient breakfast! Yes, you can! If you want a caffeine-free option, try using roasted barley or chicory root. These alternatives give you a rich flavor without any coffee. You can also add extra cocoa powder for a deeper chocolate taste. Enjoy your mocha vibe without the jitters! To boost protein, add protein powder to your oats. A scoop of chocolate or vanilla protein powder works well. You can also mix in more Greek yogurt. This adds creaminess and extra protein. Both options keep your breakfast filling and delicious! Absolutely! Mocha overnight oats are perfect for meal prep. Divide the mixture into jars or containers for easy servings. Store them in the fridge for up to three days. This makes busy mornings super easy and tasty! Mocha overnight oats are easy to make and very tasty. You learned the main ingredients, like oats, cocoa, and coffee. The step-by-step guide helps you mix and store them right. Tips show you how to make them just right and decorate them nicely. You can try different milks and sweeteners for fun. Storage tips help keep them fresh and ready to eat. Overall, mocha overnight oats offer a quick and yummy breakfast choice. Enjoy making your own tasty version!

Mocha Overnight Oats Energizing Breakfast Recipe

Start your day with a delightful twist on breakfast: Mocha Overnight Oats! Packed with rolled oats, rich cocoa, and a

To make Caramel Pecan Turtle Brownies, you need these ingredients: - 1 cup unsalted butter, melted - 1 cup granulated sugar - 1 cup packed brown sugar - 4 large eggs - 1 teaspoon vanilla extract - 1 cup all-purpose flour - 1/2 cup unsweetened cocoa powder - 1/2 teaspoon salt - 1 cup chocolate chips - 1 cup pecans, roughly chopped - 1 cup caramel sauce (store-bought or homemade) These ingredients work together to create rich, fudgy brownies with a sweet, gooey caramel layer. If you need to swap out some ingredients, here are great options: - Use coconut oil instead of butter for a dairy-free option. - Replace granulated sugar with coconut sugar for a lower glycemic index. - Use aquafaba (chickpea liquid) as an egg substitute, about 3 tablespoons for each egg. - Almond flour can replace all-purpose flour for a gluten-free version. - Dark chocolate chips can replace semi-sweet chocolate chips for a richer taste. These substitutions will keep your brownies tasty and allow you to cater to dietary needs. For the best results, I recommend these brands: - For butter, use Kerrygold; it has great flavor. - Domino is a reliable choice for granulated and brown sugar. - For chocolate chips, Ghirardelli or Nestlé Toll House are top picks. - For caramel sauce, Smucker’s offers a delicious store-bought option. - If you prefer homemade, use high-quality cream and brown sugar for your sauce. Using these brands can enhance the quality of your brownies, making them even more irresistible. {{ingredient_image_2}} Start by preheating your oven to 350°F (175°C). Grab a 9x13-inch baking pan. You can grease it with butter or cooking spray. For easy removal, line it with parchment paper. This step is key for perfect brownies. In a large bowl, blend 1 cup of melted butter with 1 cup of granulated sugar and 1 cup of brown sugar. Use a whisk or mixer to get it creamy. Make sure there are no lumps. Next, crack 4 large eggs into the bowl, one at a time. Beat them in well. This adds air and makes the brownies light. Stir in 1 teaspoon of vanilla extract for flavor. In another bowl, mix 1 cup of all-purpose flour, 1/2 cup of cocoa powder, and 1/2 teaspoon of salt. Gradually add this dry mix to your buttery mix. Stir gently until just combined. Don't over-mix, or your brownies might turn out dense. Now, fold in 1 cup of chocolate chips and 1 cup of chopped pecans. This makes each bite extra tasty. Pour half of your brownie batter into the prepared pan. Spread it evenly. Drizzle half of 1 cup of caramel sauce over this layer. Use a knife to swirl it into the batter. This creates a lovely marbled look. Next, add the rest of the brownie batter on top of the caramel layer. Spread it out evenly. Drizzle the remaining caramel sauce over this layer too. Swirl again for a beautiful finish. Now, place the pan in the oven and bake for 25-30 minutes. To check if they're done, insert a toothpick in the center. It should come out with a few moist crumbs. This means your brownies are perfect. After baking, let them cool in the pan for around 15 minutes. Then, move them to a wire rack to cool completely. This helps them get that fudgy texture you love. To get that perfect brownie texture, you must mix the batter well. Start with melted butter and sugars. Blend these until smooth. Add eggs one at a time, mixing well after each. This step adds air and makes your brownies light. Mix your dry ingredients separately. Ensure no lumps in the flour or cocoa powder. Combine them gently with the wet mix. Over-mixing can lead to tough brownies. You want a soft, fudgy texture, not a cake-like one. One common mistake is over-baking. Brownies should come out with a few moist crumbs on the toothpick. If you see dry crumbs, they are overdone. Another mistake is not cooling them enough before cutting. This can cause them to fall apart. Always let them cool for 15 minutes in the pan. Then, move them to a wire rack. Lastly, don’t skip the swirling of caramel. It adds flavor and looks great! You can boost flavor by adding more goodies. Try mixing in different nuts, like walnuts or almonds. You can also swap in white chocolate chips for a twist. If you enjoy a little heat, add a pinch of sea salt on top. A sprinkle of flaky salt can enhance the sweet and salty balance. Don’t forget, a drizzle of the extra caramel sauce on top makes them extra special! Each bite will delight your senses. Pro Tips Use Room Temperature Eggs: Make sure your eggs are at room temperature before mixing them into the batter. This helps create a smoother mixture, ensuring the brownies rise properly and have a lighter texture. Quality Cocoa Powder Matters: Choose a high-quality unsweetened cocoa powder for richer chocolate flavor in your brownies. This will elevate the overall taste and make them even more indulgent. Don’t Overmix: Once you combine the dry and wet ingredients, mix just until no flour streaks remain. Overmixing can lead to tough brownies, so be gentle to maintain that fudgy texture. Let Them Cool: Allow the brownies to cool completely before cutting. This helps them set properly, making it easier to achieve clean, neat squares when slicing. {{image_4}} You can change the nuts in these brownies. Try walnuts for a richer taste. They add a nice crunch and a slightly bitter flavor. Almonds also work well; their crunch is delightful. If you want a fun twist, use macadamia nuts. This will give a creamy texture and a unique flavor. To make these brownies gluten-free, swap all-purpose flour for a gluten-free blend. Many blends work well, so choose one that you like. This change ensures that everyone can enjoy these sweet treats. The taste remains rich and satisfying. You can play with different sauces. For a twist, use chocolate sauce instead of caramel. It creates a deep, rich flavor that pairs well with the brownies. You can also try peanut butter sauce for a nutty kick. If you want extra sweetness, add whipped cream or a scoop of ice cream on top before serving. To keep your brownies fresh, store them in an airtight container. This will help maintain their soft and chewy texture. You can keep them at room temperature for up to three days. If you want them to last longer, refrigerate them. In the fridge, they can stay good for about a week. If you need to freeze your brownies, first let them cool completely. Then, cut them into squares. Wrap each square tightly in plastic wrap. Place the wrapped brownies in a freezer-safe bag. Label the bag with the date. They can last in the freezer for up to three months. When you are ready to enjoy them, just thaw them at room temperature. To reheat brownies, take them out of the container. Place them on a microwave-safe plate. Heat them in the microwave for about 10-15 seconds. Check to see if they are warm. If not, heat them in five-second bursts until just warm. This quick method brings back the fudgy texture. Enjoy them with a scoop of ice cream for a special treat! Yes, you can use different types of chocolate. Dark chocolate, milk chocolate, or even white chocolate can work well. Each type gives the brownies a unique taste. I often mix milk chocolate chips with dark chocolate for a rich flavor. You can also try using chocolate bars instead of chips, just chop them into small pieces. To check if your brownies are done, insert a toothpick into the center. If it comes out with a few moist crumbs, they are ready. The edges should look set, while the center may still look slightly soft. Remember, they will continue to cook a bit after you take them out of the oven. Don’t overbake; you want that fudgy texture! These brownies are great on their own but serve them with a scoop of vanilla ice cream for a real treat. You can also drizzle more caramel sauce on top or sprinkle some sea salt for contrast. For a fun twist, serve them with fresh berries or a dollop of whipped cream. Enjoying them warm is a must! You can make great brownies by using the right ingredients and steps. We covered what you need, how to mix, and tips to get it right. Remember to try different nuts or add flavors you love. Storing your brownies well can keep them tasty longer. With these tips, you’ll avoid common mistakes and bake brownies that everyone enjoys. Enjoy your baking journey and have fun!

Caramel Pecan Turtle Brownies Irresistible Treats

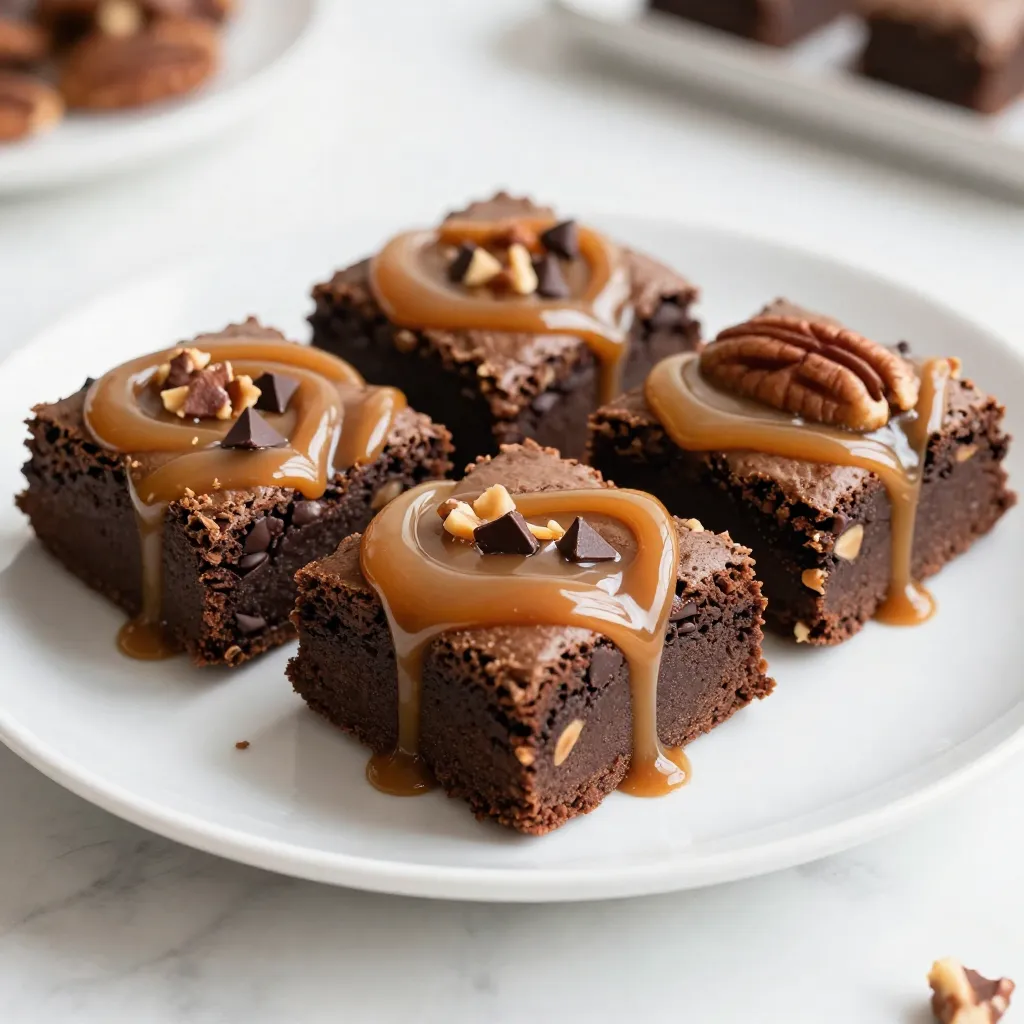
If you love rich desserts, you’re in for a treat! Caramel Pecan Turtle Brownies are a delicious mix of sweet

- 4 tablespoons all-purpose flour - 4 tablespoons granulated sugar - 2 tablespoons unsweetened cocoa powder - 1/8 teaspoon baking powder - 1/8 teaspoon salt - 3 tablespoons milk (your choice of type) - 2 tablespoons creamy or crunchy peanut butter - 1 tablespoon vegetable oil - 1/4 teaspoon pure vanilla extract - Optional: a handful of chocolate chips for added richness Gathering the right ingredients is key to a great mug cake. You need simple items you might already have. The flour, sugar, and cocoa powder form the cake's base. Baking powder helps it rise. A pinch of salt balances the sweetness. You can use any milk you like—dairy or plant-based. Peanut butter gives the cake its rich flavor. I recommend creamy, but crunchy is fun too! The vegetable oil keeps the cake moist. Lastly, vanilla adds a lovely aroma. If you're feeling extra indulgent, toss in some chocolate chips. They melt and create pockets of gooey chocolate. This cake is quick and easy, making it perfect for a sweet craving. Enjoy the joy of making this delightful treat! {{ingredient_image_2}} Grab a microwave-safe mug. It should hold about 12 oz. In the mug, combine: - 4 tablespoons all-purpose flour - 4 tablespoons granulated sugar - 2 tablespoons unsweetened cocoa powder - 1/8 teaspoon baking powder - 1/8 teaspoon salt Use a small whisk or spoon. Mix these dry ingredients until blended. This step is key for a smooth cake. Next, pour in the wet ingredients: - 3 tablespoons milk - 2 tablespoons creamy or crunchy peanut butter - 1 tablespoon vegetable oil - 1/4 teaspoon pure vanilla extract Stir well with a fork or small whisk. Make sure the batter is smooth and creamy. If you want extra richness, fold in a handful of chocolate chips. Place the mug in the microwave. Cook on high power for 40 to 60 seconds. Start checking at 40 seconds. The cake should be set around the edges but a little moist in the center. Remember, cooking times may vary by microwave. After cooking, carefully take the mug out of the microwave. It will be hot! Let it cool for about one minute before serving. This keeps you safe from burns. For fun toppings, add a dollop of whipped cream or a drizzle of melted peanut butter. These extras make your cake look and taste amazing! Enjoy your treat right from the mug or share it on a plate for a special touch. - Avoid overcooking: The key to a great mug cake is timing. Start with 40 seconds in the microwave. Check if it’s done. If it’s still wet in the middle, add 10 seconds. You want it set at the edges but soft in the center. Overcooking makes it tough. - Mixing tips for a smooth batter: Use a fork or small whisk to mix. Start with the dry ingredients first. Make sure they are well blended. When you add wet ingredients, stir until smooth. If you see lumps, keep mixing. A smooth batter makes for a soft cake. - Presentation ideas: You can serve the mug cake right in the mug. It looks cozy and fun. For a fancier look, tip it onto a plate. Add some chocolate chips or nuts on top. A sprig of mint can add a nice touch too. - Pairings with ice cream or toppings: This cake is great with ice cream! A scoop of vanilla or chocolate ice cream on the side works well. You can also add whipped cream on top. A drizzle of peanut butter or chocolate sauce makes it extra special. Pro Tips Use a Large Mug: Ensure you use a mug that holds at least 12 oz to prevent overflow while cooking the cake in the microwave. Check the Cake Frequently: Microwaves vary in power, so start checking for doneness at the 40-second mark to avoid overcooking. Experiment with Nut Butters: Try using different nut butters like almond or cashew for a unique twist on flavor. Add Toppings: Elevate your mug cake by adding whipped cream, chocolate sauce, or a sprinkle of sea salt for a delicious contrast. {{image_4}} - Gluten-free options: To make this mug cake gluten-free, swap all-purpose flour with a gluten-free blend. Look for a blend that includes xanthan gum for best results. - Vegan alternatives: To create a vegan version, use plant-based milk and replace the egg with a flax egg. Mix one tablespoon of ground flaxseed with two and a half tablespoons of water. Let it sit for a few minutes to thicken. - Adding spices like cinnamon or espresso: You can spice up your cake by adding a dash of cinnamon or a teaspoon of instant espresso. These flavors enhance the chocolate and give it a warm twist. - Different nut butter substitutes: If you want to change the taste, try almond butter or cashew butter instead of peanut butter. Each nut butter brings its unique flavor and richness to the cake. To store leftover mug cake, let it cool completely. Then, cover it tightly with plastic wrap or transfer it to an airtight container. This keeps the cake fresh and moist. You can store it in the fridge for up to two days. To reheat, place the mug cake in the microwave for about 15 to 20 seconds. Check if it’s warm enough. If not, heat in short bursts until warm. Avoid overheating, as this can dry it out. The freshness of your chocolate peanut butter mug cake lasts about two days in the fridge. If you want it to last longer, consider freezing it. Just wrap it well and place it in the freezer. In the freezer, it can last up to a month. When you’re ready to enjoy it, thaw it in the fridge overnight. Then, reheat as described. Yes, you can! To bake it in the oven, preheat to 350°F (175°C). Use an oven-safe dish. Pour the batter into the dish and bake for about 10 to 15 minutes. Check the cake with a toothpick. It should come out clean when done. A microwave-safe mug that holds about 12 oz works best. Look for one that is thick and sturdy. This helps the cake cook evenly and not overflow. Yes, you can! To make more, simply multiply the ingredients. Use a larger bowl to mix. Then pour the batter into several mugs or a bigger dish. Adjust cooking time if using a larger dish. You can use almond butter, sunflower seed butter, or cashew butter. Each will give a different taste. Pick one that you enjoy. Make sure it’s creamy for the best texture. Yes, you can make a keto version! Use almond flour instead of all-purpose flour. Replace sugar with a keto-friendly sweetener like erythritol. Make sure to choose a nut butter with low carbs. This way, you can enjoy a tasty treat while staying on track! You now have all you need to make a delicious mug cake. We covered easy ingredients, step-by-step instructions, and helpful tips. You can even modify the recipe to fit your needs. Whether you bake it quick in the microwave or enjoy fun variations, this treat is sure to impress. Keep these steps in mind for a yummy dessert every time. Enjoy your baking adventure and the tasty results!

Chocolate Peanut Butter Mug Cake Delight in Minutes

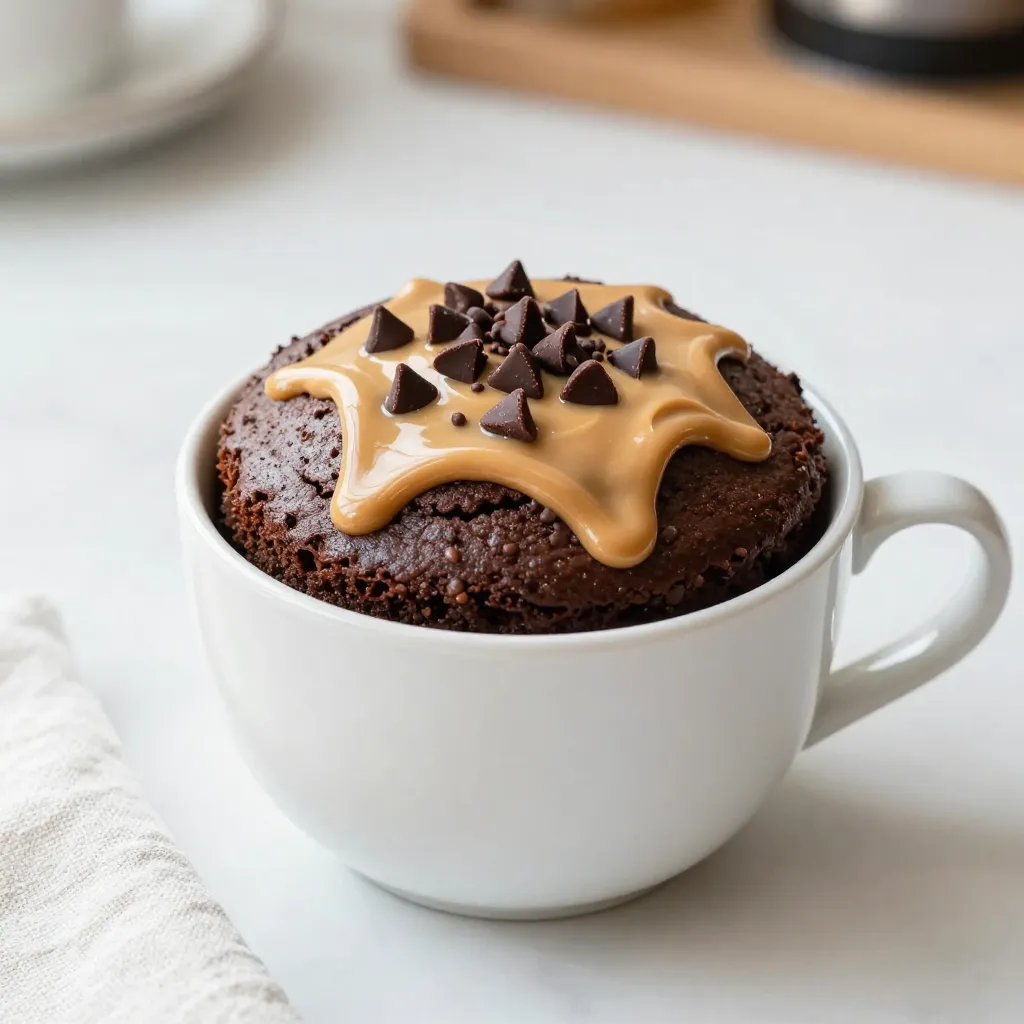
Craving a quick treat? Let me introduce you to the delicious Chocolate Peanut Butter Mug Cake! In just a few

Older posts
Newer posts
← Previous Page1 … Page3 Page4 Page5 … Page86 Next →

dsad

© 2026 dailydishcraft • Built with GeneratePress

Our Policies

  • Copyright Policy
  • Cookie Policy
  • GDPR Policy
  • Privacy Policy
  • Disclaimer
  • Terms Of Use

More Information

  • Home
  • About
  • Contact
  • Appetizers
  • Dessert
  • Dinner
  • Drinks
©2026, dailydishcraft About Back To Top