Skip to content
DisclaimerTerms Of UseGDPR PolicyCookie Policy

dailydishcraft

  • Home
  • Drinks
  • Appetizers
  • Dinner
  • Dessert
  • About
  • Contact
  • Privacy Policy
DisclaimerTerms Of UseGDPR PolicyCookie Policy

NO-ING-IMG

- 8 oz cream cheese, softened - 1/2 cup sour cream - 1/2 cup powdered sugar - 1 teaspoon pure vanilla extract - 1 cup fresh blueberries (plus extra for garnish) - 1 tablespoon fresh lemon juice - 1/4 teaspoon ground cinnamon - Assorted graham crackers, cookies, or fresh fruit for dipping For the cream cheese, use a low-fat version if you want, but regular gives the best taste. Sour cream can be swapped with plain Greek yogurt for a tangy twist. If you don’t have powdered sugar, you can blend regular sugar until fine. For vanilla extract, try almond extract for a different flavor. Fresh blueberries are ideal, but frozen ones work in a pinch. Just make sure to thaw them first. This dip serves about 6-8 people. Each serving has roughly: - Calories: 210 - Fat: 15g - Carbohydrates: 17g - Protein: 3g - Fiber: 1g This dip is a sweet treat but still has some nutritional benefits from the blueberries, which are high in antioxidants. Enjoy in moderation! {{ingredient_image_2}} Start with 8 oz of softened cream cheese. Place it in a medium bowl. Beat it with an electric mixer on medium speed. Mix until it is smooth and creamy, with no lumps. This step is key for a nice dip. Next, add 1/2 cup of sour cream. Then, add 1/2 cup of powdered sugar and 1 teaspoon of pure vanilla extract. Keep mixing until the mix is velvety and well combined. Now, take 1 cup of fresh blueberries. Mash half of them in a small bowl with a fork. Leave some chunks for texture. Mix in 1 tablespoon of fresh lemon juice and 1/4 teaspoon of ground cinnamon. Stir until it’s blended well. This blueberry mix adds a fruity burst to your dip. Gently fold the mashed blueberry mix into the cream cheese base. Use a spatula to create swirls. Be careful not to overmix; you want to keep those pretty swirls. Now, transfer the dip into a nice serving bowl. For a lovely touch, add the reserved blueberries on top for garnish. Serve it right away with graham crackers, cookies, or fresh fruit. Enjoy this creamy and fruity delight! To get a smooth dip, start with softened cream cheese. Cold cream cheese will not mix well. Beat it well until it is creamy and lump-free. Mix in sour cream and powdered sugar next. This adds creaminess and sweetness. Make sure to blend until it is velvety. Avoid overmixing at the end to keep some of the blueberry texture. For a tasty twist, add a hint of lemon juice. It brightens the flavors and balances the sweetness. You can also try a pinch of ground cinnamon. This adds warmth and depth to the dip. If you want more blueberry flavor, fold in more mashed blueberries. Feel free to experiment with flavors you enjoy. Serve the dip in a pretty bowl for a great look. Top it with fresh blueberries for color. Pair the dip with graham crackers, cookies, or fresh fruit. Try strawberries or apple slices for something different. This dip is perfect for parties or as a fun snack at home. Enjoy every creamy bite! Pro Tips Use Room Temperature Ingredients: Ensuring your cream cheese and sour cream are at room temperature will make it easier to achieve a smooth and creamy dip without lumps. Fresh vs. Frozen Blueberries: For the best flavor and texture, always opt for fresh blueberries. If using frozen, make sure to thaw and drain them well to avoid excess moisture. Customize Your Sweetness: Adjust the amount of powdered sugar to suit your taste. If you prefer a less sweet dip, start with less sugar and add more if needed. Presentation Matters: For an appealing presentation, serve the dip in a decorative bowl and garnish with extra blueberries and a sprinkle of cinnamon on top. {{image_4}} You can change up the fruit in this dip. Instead of blueberries, try strawberries, raspberries, or diced peaches. Each fruit brings a new taste. You can also mix in nuts or coconut for added crunch. If you like a bit of spice, add a touch of nutmeg or ginger. Toppings can make your dip extra special. Try crushed graham crackers for a crunchy layer. You can also sprinkle some chocolate chips or mini marshmallows on top. Fresh mint leaves add color and a burst of flavor. Get creative with your toppings to match your taste. To make this dip gluten-free, use gluten-free graham crackers or cookies. Fresh fruit is a great choice too. You can even use gluten-free pretzels for a salty twist. Always check labels to ensure your ingredients are gluten-free. This way, everyone can enjoy this tasty treat! After enjoying your Blueberry Cheesecake Dip, store any leftovers in an airtight container. This keeps the dip fresh and tasty. Make sure to cover it well to avoid drying out. You can also wrap the bowl tightly with plastic wrap if needed. This dip tastes best when served cold. If your dip seems a bit thick after storage, mix in a splash of sour cream or cream cheese. Stir it well to regain that creamy texture. Avoid heating it in the microwave, as it may change the flavor. You can store the Blueberry Cheesecake Dip in the fridge for up to 3 days. After that, the freshness may fade. Always check for any off smells or changes in texture before enjoying it again. Yes, Blueberry Cheesecake Dip can be gluten-free. The main dip ingredients, like cream cheese and sour cream, are gluten-free. To keep it gluten-free, use gluten-free graham crackers or fruit for dipping. You can make this dip ahead of time. It stays fresh in the fridge for up to two days. Just cover it well to keep it from drying out. Serve it chilled for the best taste. You have many options for dipping! Try using cookies, fresh fruit like strawberries or apple slices, or even pretzels. Each adds a fun twist to the tasty dip. Yes, you can use frozen blueberries! Just thaw them before mashing. Keep in mind that frozen berries may be more watery. This might change the dip's texture slightly. This blog post covered how to make a tasty Blueberry Cheesecake Dip. We looked at the key ingredients, like cream cheese and blueberries, and shared helpful tips for the best texture and taste. You learned about fun variations and storage tips, so your dip stays fresh. In conclusion, I hope you feel ready to try this easy recipe. Enjoy experimenting with flavors and toppings to make it your own!

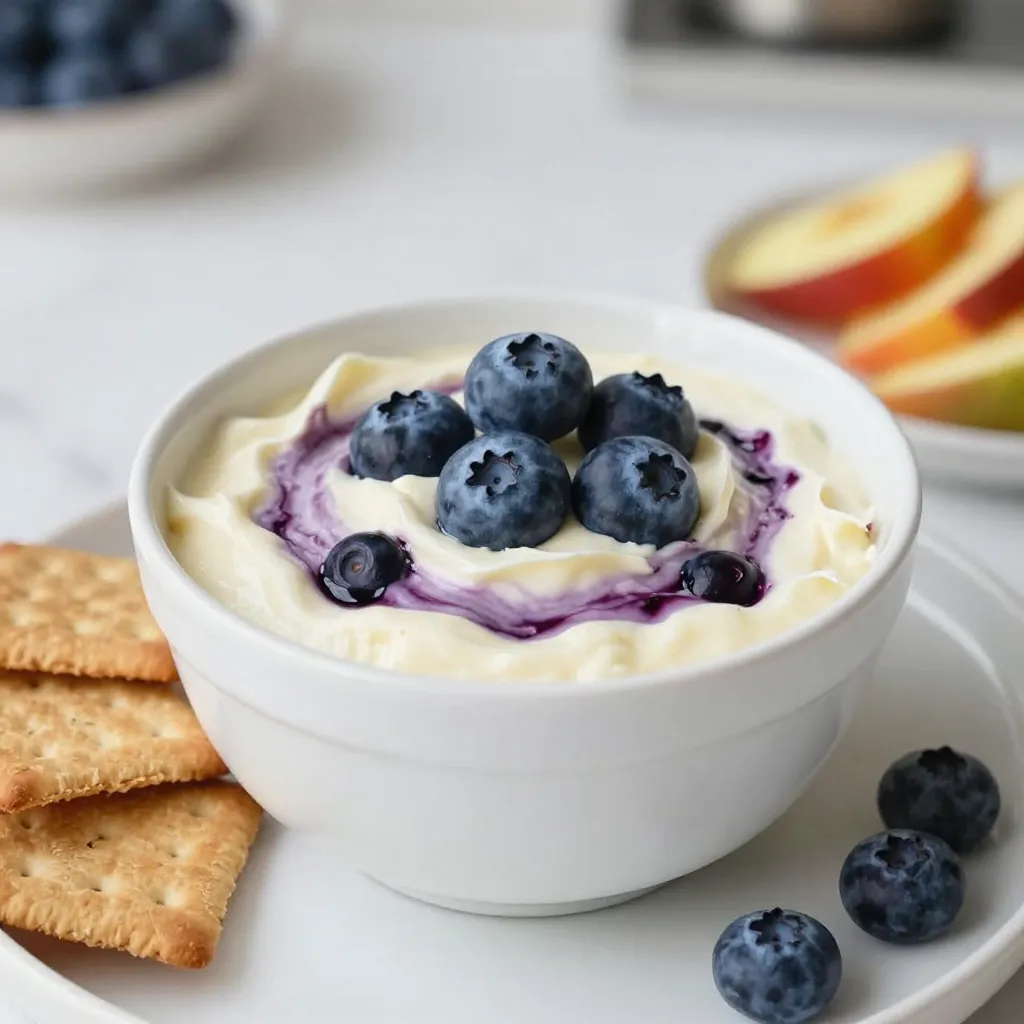
Blueberry Cheesecake Dip Tasty and Simple Treat

Looking for a sweet treat that’s easy to make and packed with flavor? You’ll love this Blueberry Cheesecake Dip! With

- 1 ½ cups graham cracker crumbs - ½ cup unsalted butter, melted - 1 cup fresh raspberries (reserve some for garnish) - 2 tablespoons granulated sugar (for the raspberries) - 16 oz cream cheese, softened to room temperature - 1 cup granulated sugar - 3 large eggs, at room temperature - 1 teaspoon pure vanilla extract - 2 tablespoons all-purpose flour - ½ cup sour cream - Mixing bowls - Electric hand mixer - Springform pan - Small saucepan - Spatula Gathering your ingredients is key to making a perfect raspberry swirl cheesecake. Start with the crust. You will need graham cracker crumbs and melted butter. This mixture gives your cheesecake a nice, crunchy base. Next, for the filling, you will use cream cheese, sugar, eggs, vanilla, sour cream, and a bit of flour. Each one plays an important role. The cream cheese gives the cheesecake its rich texture. The sugar adds sweetness, while eggs help it set. Don't forget the fresh raspberries! They create that lovely swirl and add a tart flavor. Save some for decoration too. For tools, you will need mixing bowls and an electric hand mixer. A springform pan makes it easy to remove the cheesecake. A small saucepan is for cooking the raspberries, and a spatula helps with mixing and spreading. Having everything ready will make your baking experience smooth and fun! {{ingredient_image_2}} To start, take a small saucepan and add 1 cup of fresh raspberries along with 2 tablespoons of sugar. Cook this mixture over medium heat. Stir it gently as it heats up. In about 5-7 minutes, the raspberries will break down. You want the mixture to thicken slightly. Once it thickens, take it off the heat and let it cool. This sauce adds a fruity punch to our cheesecake. Next, preheat your oven to 325°F (160°C). In a mixing bowl, combine 1 ½ cups of graham cracker crumbs with ½ cup of melted unsalted butter. Stir the mix until it looks like wet sand. Now, press this mixture evenly into the bottom of a 9-inch springform pan. Bake the crust for about 10 minutes until it turns a light golden color. After baking, remove it from the oven and let it cool completely. In a large mixing bowl, take 16 oz of softened cream cheese. Use an electric hand mixer to beat it until smooth and creamy. Gradually add in 1 cup of granulated sugar. Keep mixing until there are no lumps left. Now, add 3 large eggs one at a time. Mix well after each egg. Next, include 1 teaspoon of pure vanilla extract and ½ cup of sour cream. Mix until everything is fully combined. Finally, sprinkle in 2 tablespoons of all-purpose flour and mix just until combined. Pour half of the cheesecake batter over the cooled crust. Now, drizzle half of the raspberry sauce on top of the batter. To create a lovely swirl, use a butter knife or skewer. Gently swirl the raspberry sauce into the cheesecake batter. Repeat this with the rest of the batter and raspberry sauce. This step is key for a beautiful finish. Place the cheesecake in your preheated oven and bake it for 55-60 minutes. The edges should look set, but the center should still jiggle slightly. This jiggle means it’s done. Once the baking time is up, turn off the oven and crack the door open. Leave the cheesecake inside for about 1 hour. This helps it cool slowly and prevents cracks. After the cheesecake cools in the oven, take it out and let it reach room temperature. Cover it tightly with plastic wrap and place it in the fridge. Chill for at least 4 hours, but overnight is best. This chilling time helps the flavors meld together. When ready to serve, remove the cheesecake from the fridge. Garnish with reserved fresh raspberries on top. Slice into pieces and enjoy! To make a stunning raspberry swirl, follow these tips: - Use a butter knife or skewer to create the swirl. - Pour half the cheesecake batter first, then drizzle raspberry sauce on top. - Gently swirl the knife through the batter to mix without fully blending. This technique gives you that eye-catching marbled look that impresses everyone. Avoid these common pitfalls for the best cheesecake: - Overmixing: This can add too much air to the batter. It might cause cracks during baking. Mix just until combined. - Cracking: To prevent cracks, cool the cheesecake in the oven with the door slightly ajar. This slow cooling allows the cheesecake to set evenly. Present your cheesecake like a pro with these ideas: - Serve with whipped cream on top for extra creaminess. - Garnish with reserved fresh raspberries for a pop of color. - Consider a drizzle of raspberry sauce over each slice for added flavor. These tips will make your raspberry swirl cheesecake look as good as it tastes! Pro Tips Use Room Temperature Ingredients: For a smoother cheesecake, ensure that your cream cheese and eggs are at room temperature before mixing. This helps prevent lumps in the batter. Don’t Overmix: Once you add the eggs and flour, mix just until combined. Overmixing can lead to a dense cheesecake texture. Prevent Cracks: Allow the cheesecake to cool gradually in the oven with the door slightly ajar after baking. This helps to prevent cracks on the surface. Chill Overnight: For the best flavor and texture, refrigerate the cheesecake overnight. This allows the flavors to develop and the cheesecake to set properly. {{image_4}} You can change the fruit in your cheesecake for a new taste. Try strawberries for a sweet twist. Blueberries also work well, adding a lovely color and flavor. Simply replace the raspberries with your chosen fruit. You still cook them with sugar to make a sauce. This keeps the swirl effect and adds fun flavors. Want to mix things up? Add chocolate chips to the batter. They melt and give a rich taste. You can also add lemon zest for a bright, fresh kick. Just a teaspoon will enhance the cheesecake without overpowering it. These little changes can make a big difference in taste. Need gluten-free options? Use almond flour instead of graham cracker crumbs for the crust. You can also use a gluten-free cookie if you prefer. If you are vegan, try cashew cream instead of cream cheese. Use flax eggs to replace the eggs. Both options keep the cheesecake creamy and delicious while meeting your dietary needs. To keep your raspberry swirl cheesecake fresh, store it in the fridge. Use a tight cover or wrap to keep it safe. This helps it stay moist and tasty. Place it on a shelf, not in the door, for the best temperature. You can freeze cheesecake if you need to save some for later. First, let it cool completely. Then, wrap it well in plastic wrap. Use aluminum foil for extra protection. You can freeze it for up to three months. To thaw, place it in the fridge overnight. This keeps the texture nice and creamy. When stored properly, your cheesecake can stay fresh in the fridge for about five days. If you freeze it, it lasts longer. But remember, the sooner you eat it, the better it tastes! Enjoy your delicious creation while it’s at its best. You can tell your cheesecake is ready by looking for a few signs: - The edges are set. - The center has a slight jiggle. - It should not look wet or soupy. If you see these signs, your cheesecake is done baking! Yes, you can use frozen raspberries! Here are some tips: - Thaw them first before cooking. - Drain any excess liquid to avoid a watery sauce. - Use the same amount as fresh raspberries. Frozen raspberries work great and still taste good! If you want a different crust, try these options: - Crushed cookies, like Oreos or vanilla wafers. - Ground nuts, like almonds or pecans. - Oats mixed with melted butter. These alternatives add a unique twist to your cheesecake. Chilling is key for the best flavor. I recommend: - Chill for at least 4 hours. - For better taste, chill overnight. This time allows the flavors to blend nicely. Enjoy your creamy delight! In this post, we explored how to make a delicious raspberry swirl cheesecake. You learned about each ingredient, essential tools, and detailed steps, from the raspberry sauce to serving tips. I shared practical advice and common mistakes to avoid, ensuring a smooth baking experience. Remember, you can customize this recipe with different fruits or flavors. Enjoy creating this sweet treat! Your friends and family will love it.

Raspberry Swirl Cheesecake Dreamy Dessert Delight

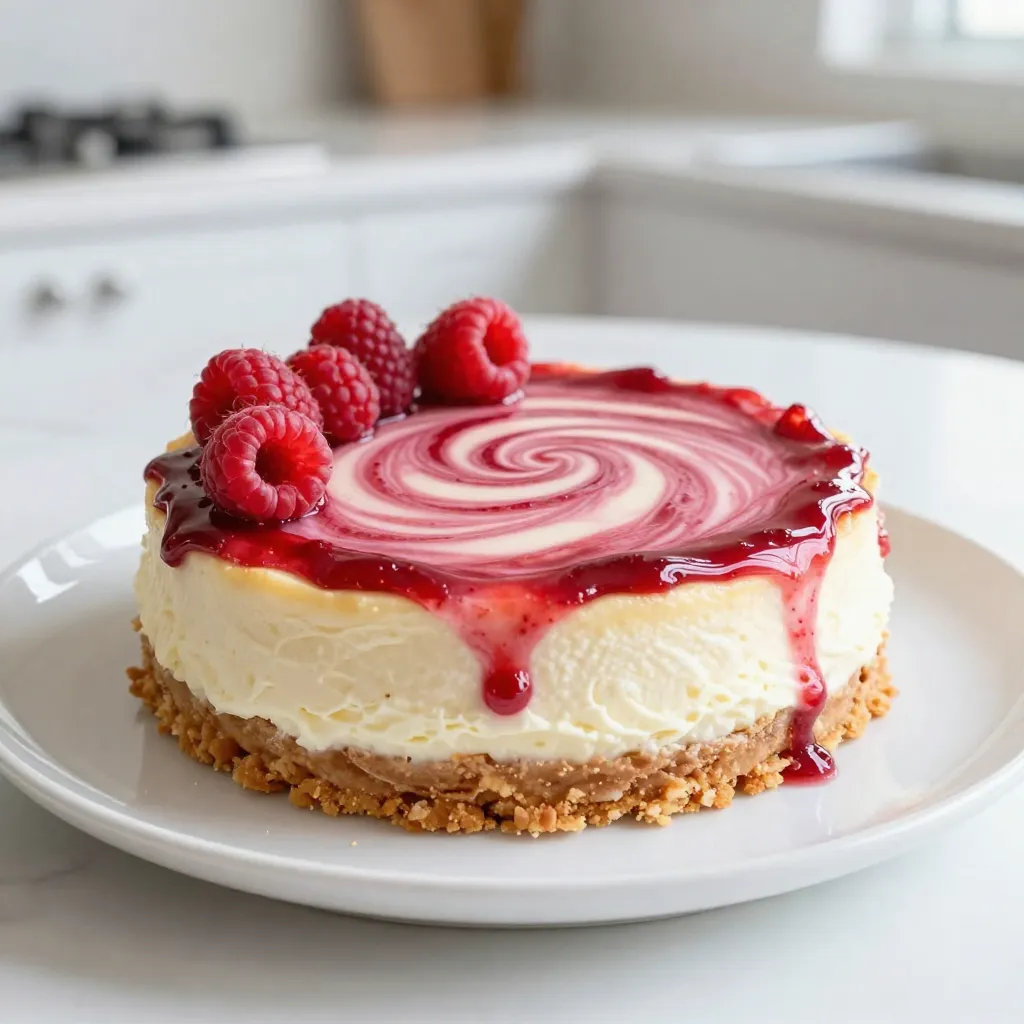
Indulge in a dessert that brings joy with every bite—Raspberry Swirl Cheesecake! This creamy treat features a luscious swirl of

To make a Cherry Pineapple Dump Cake, gather these simple ingredients: - 1 can (20 oz) crushed pineapple, undrained - 1 can (21 oz) cherry pie filling - 1 box (15.25 oz) yellow cake mix - 1 cup unsalted butter, melted - 1/2 cup chopped pecans or walnuts (optional) - Whipped cream or vanilla ice cream for serving Each ingredient plays a key role in creating this tasty dessert. The crushed pineapple adds moisture and sweetness. The cherry pie filling brings a burst of fruity flavor. The yellow cake mix forms the perfect crumbly top. Melted butter creates a golden crust that holds it all together. If you choose to add nuts, they give a nice crunch. Finally, whipped cream or ice cream makes the dish extra special. This dessert is simple but packs a lot of flavor. You can easily find these ingredients at any grocery store. The best part? You can keep it fun and creative by adding your favorite toppings! {{ingredient_image_2}} Start by preheating your oven to 350°F (175°C). This step is crucial. It ensures your cake bakes evenly. A hot oven helps create a nice texture. Grab a 9x13-inch baking dish. Pour the undrained crushed pineapple into the dish. Spread it evenly across the bottom. This juicy layer will be the cake’s base. Next, carefully spoon the cherry pie filling over the pineapple. Spread it out so each bite has sweet cherry flavor. Open the box of yellow cake mix. Sprinkle the dry mix evenly on top. Do not mix; just layer it. This will form the cake's topping. Now, take your melted butter. Drizzle it over the cake mix. Try to cover as much of the dry mix as you can. This step helps achieve that golden, crispy topping. Place the baking dish in the preheated oven. Bake for 40-45 minutes. You want the top to be golden brown and the edges bubbling. Once done, take it out and let it cool for about 10 minutes. This cooling time helps the layers set. It makes serving easier and keeps the cake from falling apart. To get a golden crust, start by preheating your oven to 350°F. This ensures even baking. Once you pour in the crushed pineapple, spread it evenly. This helps keep the cake moist. When you add the cherry pie filling, make sure it covers the pineapple well. The cake mix should go on top in an even layer. Do not mix! This will create a nice texture. Drizzling melted butter over the mix is key. It helps achieve that crispy top we all love. Bake for 40-45 minutes until the edges bubble. You want a golden brown color that says, “I am ready to eat!” Serving Cherry Pineapple Dump Cake warm makes it even better. Top it with whipped cream or a scoop of vanilla ice cream. This adds creaminess and balances the sweetness. For a pop of color, garnish with fresh cherries or pineapple slices. This makes your dessert look fancy and appetizing. Your friends and family will love it! If you want to switch things up, try different fruits. Peaches or blueberries work well as alternatives. You can even mix fruits for a fun twist. Instead of yellow cake mix, use a gluten-free option. If you want a nutty flavor, add chopped pecans or walnuts. Don't worry if you don’t like nuts; you can leave them out. This dessert is flexible and can fit your taste! Pro Tips Use Fresh Cherries: For an even more vibrant flavor, consider using fresh cherries instead of canned pie filling. Just pit and slice them, and toss them with a little sugar to enhance their sweetness. Experiment with Cake Mix: While yellow cake mix is classic, try using different flavors like chocolate or spice cake for a unique twist on this dump cake. Layering Technique: Make sure to layer the ingredients carefully as directed; this helps to create distinct layers that add to the overall texture and flavor profile of the cake. Serving Suggestions: For an extra special treat, serve the dump cake with a drizzle of caramel sauce or a sprinkle of toasted coconut on top for added richness. {{image_4}} You can have fun with flavors. Try using peach, blueberry, or mixed berry. Each fruit brings its own taste. For a peach dump cake, use canned peaches instead of cherry filling. Blueberries add a sweet and tart kick. Mixed berries give you a burst of fruity goodness. Experimenting keeps your dessert fresh and exciting. If you need gluten-free options, there are cake mixes available. Look for a gluten-free yellow cake mix in stores. For vegan choices, use vegan butter instead of regular butter. This way, you can still enjoy the cake without the dairy. Both options make the cake just as tasty and fun for everyone. Using a slow cooker is an easy way to prepare this dessert. First, spray your slow cooker with non-stick spray. Layer the crushed pineapple and cherry filling just like usual. Next, sprinkle the cake mix on top. Finally, drizzle melted butter over everything. Cook on low for about 3 to 4 hours. This method gives you a warm, gooey treat with less fuss. To keep your Cherry Pineapple Dump Cake fresh, store it in the fridge. Place it in an airtight container or cover it tightly with plastic wrap. If you want to save it for later, you can freeze it too. Cut the cake into pieces and wrap each piece in plastic wrap. Then, place them in a freezer-safe bag. This way, you can enjoy your dessert anytime! When you're ready to enjoy your leftovers, reheating is key. The best method is to use the oven. Preheat your oven to 350°F (175°C). Place the cake in a baking dish and cover it with foil. Heat for about 15-20 minutes. This will help keep the texture soft and the flavors intact. You can also use the microwave, but it may make the cake a bit soggy. Cherry Pineapple Dump Cake lasts about 3-5 days in the fridge. If you freeze it, it can stay good for up to 3 months. Just remember to label your containers with the date, so you know how long they have been stored. Always check for any signs of spoilage before eating leftovers. It takes about 55 minutes to make this cake. You need 10 minutes to prep and 40-45 minutes for baking. The cake cooks quickly and is easy to make. Yes, you can use fresh fruit! Just chop fresh pineapples and cherries. However, you may need to adjust the sugar. Canned fruit is sweeter and juicier, while fresh fruit may need extra sweetness. You can make this dump cake ahead of time. Mix all the layers and store them in the fridge. Bake it just before serving. This saves time and keeps it fresh. You can use any cake mix you like. Chocolate cake mix or vanilla cake mix works well. Just follow the same steps for layering and baking. You can also make a homemade cake mix if you prefer. Check for a golden brown color on top. The edges should bubble a bit. A toothpick inserted into the center should come out clean. If it’s not ready, bake it a few more minutes. This blog post covered a simple and tasty cherry pineapple dump cake recipe. You learned about the key ingredients and how to layer them for perfect results. We discussed tips for getting a golden crust and variations to try. Remember, you can store this cake and enjoy it later. Don't be afraid to mix flavors or make substitutions that suit your taste. I hope this encourages you to create your own delicious dessert soon!

Cherry Pineapple Dump Cake Simple and Tasty Dessert

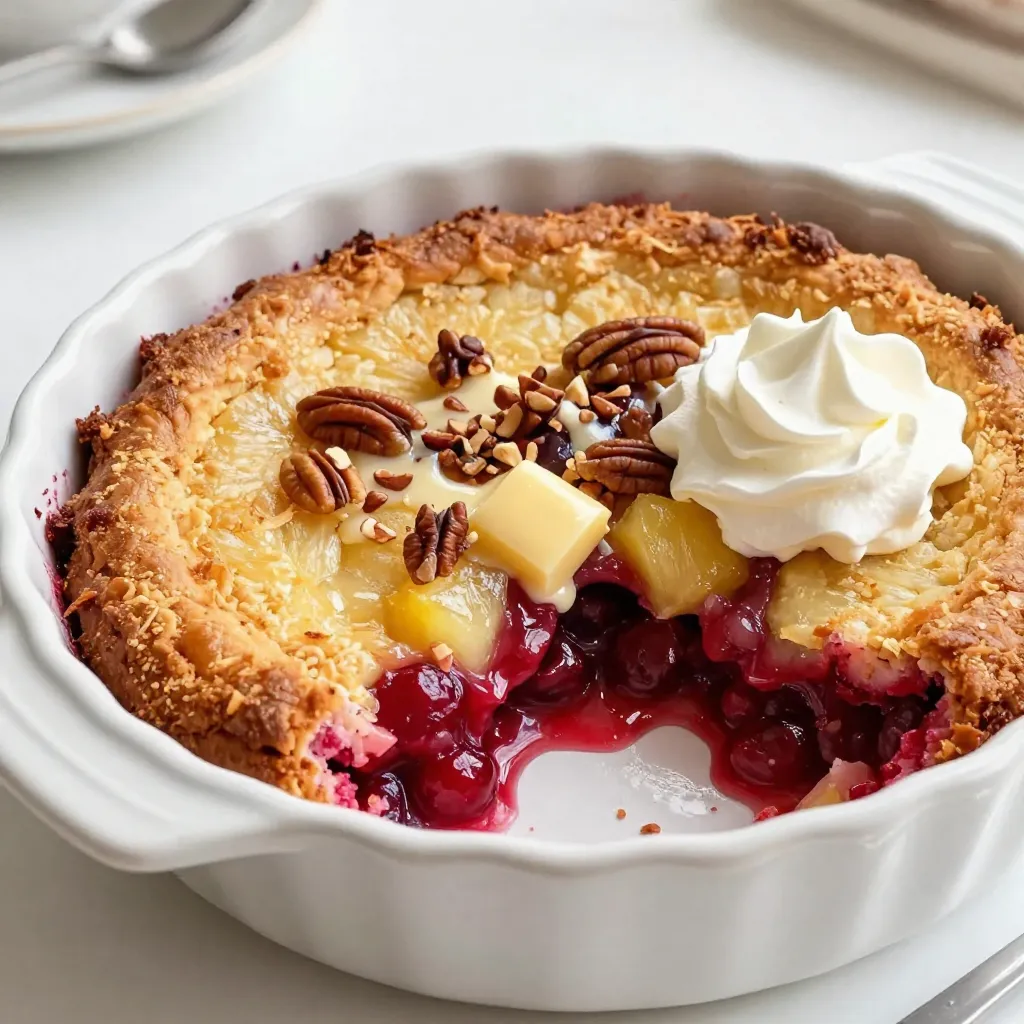
Are you ready for a dessert that’s as easy as pie? Meet Cherry Pineapple Dump Cake—a simple and tasty treat

- 4 large lobster tails Fresh lobster tails are key to this dish. Look for tails that feel firm and smell fresh. The shells should be hard and shiny. If you can, buy them the same day you plan to cook. - 1/2 cup (1 stick) unsalted butter - 4 cloves garlic, finely minced - 2 tablespoons freshly squeezed lemon juice This mixture adds rich flavor. Use unsalted butter to control the saltiness. Fresh garlic is best, as it gives a strong taste. The lemon juice adds a bright note, balancing the butter's richness. - 2 tablespoons fresh parsley, finely chopped - 1 teaspoon smoked paprika - Salt and freshly cracked black pepper to taste - Lemon wedges, for garnishing and serving Fresh parsley brings a pop of color and freshness. Smoked paprika adds depth and warmth. Adjust salt and pepper to your taste. Lemon wedges not only look nice but also add a zesty kick when served. {{ingredient_image_2}} First, preheat your oven to 425°F (220°C). This heat will cook the lobster just right. Next, take your large lobster tails and place them on a cutting board. Use kitchen scissors or a sharp knife to cut through the hard shell. Start from the thickest part and go down the center. Stop before you reach the tail fin. Gently pull the lobster meat out while keeping it attached at the base. Lay the meat on top of the shell for a nice look. In a small saucepan, melt 1/2 cup of unsalted butter over medium heat. Keep an eye on it so it doesn’t burn. After it melts, add 4 cloves of finely minced garlic. Sauté the garlic for about 1 minute. You want it to smell great and turn golden. Next, pour in 2 tablespoons of fresh lemon juice and add 2 tablespoons of finely chopped parsley. Sprinkle in 1 teaspoon of smoked paprika. Add a pinch of salt and black pepper to taste. Mix everything well. Now it’s time to bake! With a pastry brush, cover the lobster meat with the garlic butter mixture. Save a little butter for basting later. Place the lobster tails on a baking sheet, making sure they have space. Bake them in your preheated oven for about 12-15 minutes. The meat should turn opaque and firm. Halfway through cooking, baste the lobster with the reserved garlic butter for extra flavor. Once done, take them out and let them rest for a minute. Serve with lemon wedges for a fresh kick. Choose lobster tails that feel heavy for their size. The shells should be firm and free from cracks. Look for tails with a bright color and a clean smell. If possible, buy them from a trusted source. Freshness matters for taste and texture. To get the best garlic flavor, use fresh garlic. Mince it finely for a strong taste. Sauté it in melted butter until just golden. This prevents bitterness and brings out the sweetness. Adding smoked paprika gives a nice depth. Always taste and adjust salt and pepper to your liking. Serve your lobster tails on a stylish platter. Drizzle the extra garlic butter over the meat. Fresh lemon wedges add brightness and zest. Pair with a light salad or garlic bread for a complete meal. A chilled white wine also complements the dish perfectly. Pro Tips Use Fresh Lobster: For the best flavor and texture, opt for fresh lobster tails rather than frozen ones if possible. Don’t Overcook: Keep an eye on the lobster while it bakes. Overcooking can make the meat tough; it should be opaque and firm to the touch. Experiment with Flavors: Feel free to add your favorite herbs or spices to the garlic butter for a personalized touch, such as thyme or chili flakes. Serve Immediately: Lobster is best enjoyed fresh out of the oven, so serve it right away for maximum flavor and tenderness. {{image_4}} If you love heat, add some spice. Mix in red pepper flakes to the garlic butter. Start with half a teaspoon and adjust to your taste. This kick adds a new layer of flavor. You can also use chili oil for a unique twist. This variation pairs well with lemon juice for balance. Herbs can elevate your dish. Try adding fresh thyme or rosemary to the garlic butter. Mince the herbs finely and stir them in as you melt the butter. This gives a fresh taste that complements the lobster. You can mix and match herbs based on your preference. Basil and tarragon are also great options. Grilling adds a smoky flavor. If you prefer this method, prepare the lobster tails as before. Brush them with garlic butter and place them on a hot grill. Cook them for about 5-7 minutes. Turn them halfway through for even cooking. Baking gives a tender texture, while grilling adds that nice char. Both methods are tasty, so choose what you like best! After enjoying your garlic butter lobster tails, you may have some leftovers. Store them in an airtight container. Let the lobster cool to room temperature before sealing it. Place the container in the fridge. Leftover lobster tails will last for up to two days. For the best taste, eat them sooner rather than later. To reheat lobster tails, use an oven or microwave. For the oven, preheat it to 350°F (175°C). Place the lobster tails on a baking sheet and cover them with foil. Heat for about 10 minutes until warm. In the microwave, place the lobster in a microwave-safe dish. Add a little butter or water to keep it moist. Heat for 1-2 minutes, checking often. If you want to keep lobster tails longer, freezing is a great option. First, cool them completely. Wrap each tail tightly in plastic wrap. Then, place them in a freezer bag or container. Remove as much air as possible. Frozen lobster tails can last for up to three months. When ready to eat, thaw them in the fridge overnight before reheating. Lobster tails are done when the meat is opaque and firm. You can check the meat's color. It should change from translucent to white. A good rule is to bake them for 12-15 minutes at 425°F. If you have a meat thermometer, the internal temperature should reach 140°F. This ensures they are safe to eat and full of flavor. Yes, you can use frozen lobster tails. Just make sure to thaw them first. Place the tails in the fridge overnight for best results. If you're short on time, you can run them under cold water for about 30 minutes. Once thawed, follow the same steps in the recipe. The flavor and texture will still be great. Garlic butter lobster tails pair well with many sides. Here are some ideas: - Garlic bread: Perfect for soaking up extra butter. - Steamed vegetables: Broccoli or asparagus add color and nutrition. - Rice or quinoa: These grains soak up the sauce and add heartiness. - Salad: A fresh green salad balances the richness. Feel free to mix and match based on your taste! You learned about making delicious lobster tails. We covered fresh ingredients, easy steps, and helpful tips. You can also explore tasty variations and proper storage. My final thoughts: mastering lobster tails can impress your guests. Enjoy cooking and savoring this dish!

Garlic Butter Lobster Tails Savory and Simple Dish

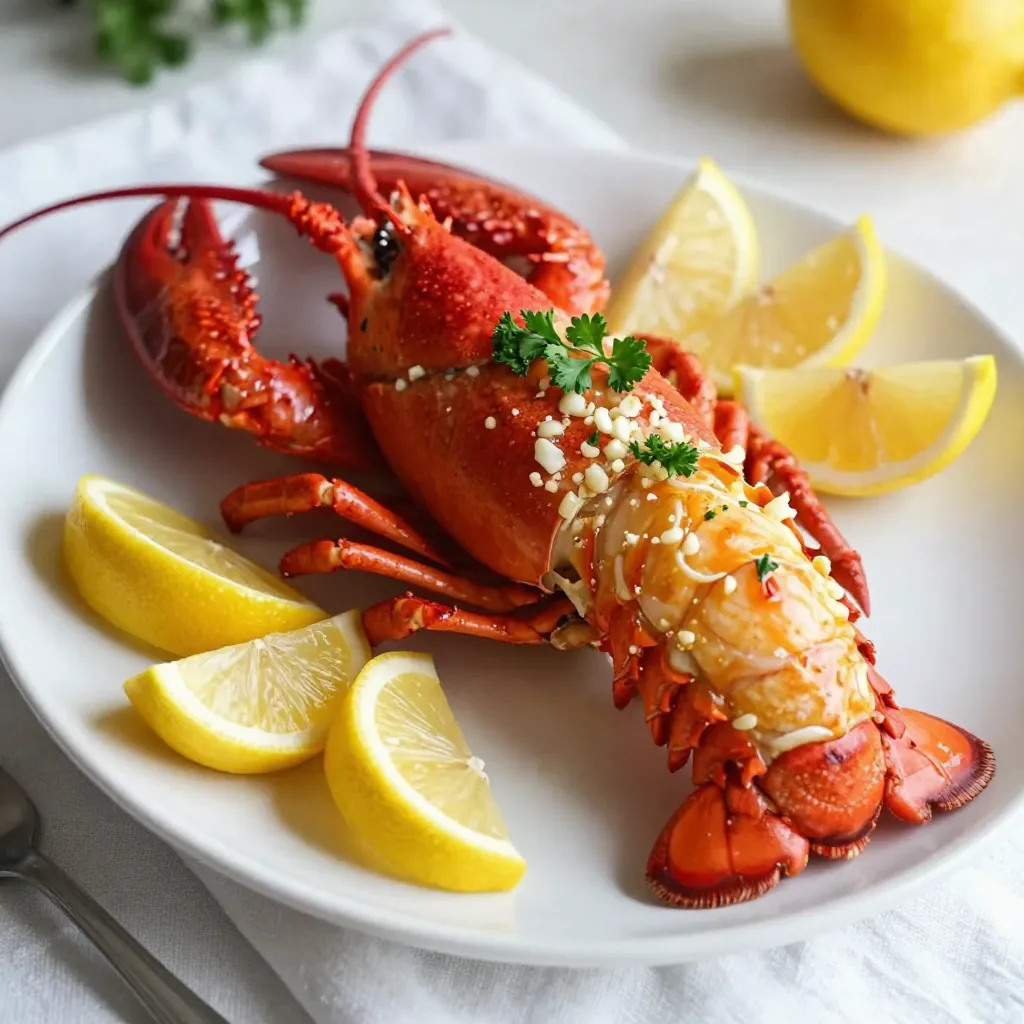
Are you ready to impress your dinner guests? Garlic Butter Lobster Tails are a tasty and simple dish that brings

- 1 cup pomegranate juice - 1 cup sparkling water - 2 tablespoons freshly squeezed lime juice - 1 tablespoon agave syrup (optional) - ¼ cup pomegranate seeds (for garnish) - 2 lime slices (for garnish) - Handful of fresh mint leaves (for garnish) Pomegranate juice is the star of this drink. It gives a rich, fruity flavor. You can find fresh pomegranate juice at stores or make it yourself. Squeeze fresh limes for the best taste. If you want it sweeter, add agave syrup. It mixes well without making it too sweet. The sparkling water adds a fun fizz. It keeps the drink light and refreshing. For garnish, I like to use pomegranate seeds. They look pretty and add a burst of flavor. Lime slices on the rim give a pop of color and extra zest. Fresh mint leaves add a lovely aroma and a touch of green. Each ingredient plays a role in this mocktail. Together, they create a fresh and fruity delight that’s perfect for any occasion. {{ingredient_image_2}} 1. In a large pitcher, pour in the pomegranate juice and the lime juice. If you want a sweeter drink, add the agave syrup. Mix well until everything blends nicely. 2. Grab your serving glasses and fill each one with ice cubes. This helps keep your drink nice and cold. 3. Carefully pour the pomegranate mixture into each glass. Fill them about halfway so there is room for the sparkling water. 4. Next, gently top each glass with sparkling water. Pour until they are full, which creates a lovely fizz. 5. With a spoon or straw, stir each drink gently. This mixes the sparkling water with the pomegranate mix without losing all the bubbles. 6. To make it look fancy, garnish each drink. Sprinkle pomegranate seeds on top, add a slice of lime on the rim, and place a few mint leaves for a fresh touch. Choosing high-quality pomegranate juice is key. Look for pure juice with no added sugars. This gives your drink a rich and fresh flavor. Adjusting sweetness to taste makes a big difference. If you like it sweeter, add agave syrup. Start with one tablespoon and taste. You can always add more if needed. The best types of sparkling water to use are those with fine bubbles. They add a nice fizz to your drink. You can also use flavored sparkling water for a twist. Just make sure it complements the pomegranate flavor. By following these tips, you can create a stunning mocktail that impresses everyone. Enjoy your refreshing and fruity delight! Pro Tips Chill Your Ingredients: For an extra refreshing mocktail, chill the pomegranate juice and sparkling water in the refrigerator before mixing. Experiment with Flavors: Feel free to add other juices, like orange or grapefruit, to create unique flavor combinations. Use Fresh Ingredients: Fresh lime juice and mint elevate the taste of your mocktail. Avoid bottled lime juice for the best flavor. Presentation Matters: Consider using clear glasses to showcase the beautiful colors of the pomegranate and garnishes for a visually appealing drink. {{image_4}} You can easily change up the flavor of your sparkling pomegranate mocktail. One fun way is to add herbs like rosemary or basil. Just a small sprig can give your drink a fresh twist. The herbal notes pair well with the sweet pomegranate. Another option is to mix in other fruit juices. Orange juice adds a bright, citrusy flavor. Cranberry juice offers a tart kick that balances the sweetness. Feel free to experiment with your favorite juices! Using flavored sparkling waters is another great idea. You can choose options like lime, berry, or even ginger. These flavors add a new layer to your mocktail and make it even more refreshing. Remember, the key to a great mocktail is to play with flavors until you find what you love! To store leftover pomegranate juice mixture, keep it in a clean, airtight container. You can place it in the fridge for up to three days. Make sure to label the container with the date. This way, you won’t forget about it! To maintain the fizz in your sparkling drinks, store the sparkling water separately. When you're ready to serve, mix it in fresh. If you mix it too early, the bubbles will go flat. For garnishes, like pomegranate seeds and mint, use them right before serving. If you need to store them, keep them in a damp paper towel inside a sealed bag. This helps keep them fresh. Avoid cutting lime slices too early, as they can dry out. Yes, you can prepare the pomegranate juice mixture ahead. Mix the pomegranate juice, lime juice, and agave syrup in a pitcher. Cover it and store it in the fridge for up to 24 hours. When you are ready to serve, add ice and top with sparkling water. This keeps the fizz fresh and fun. Pomegranates are packed with nutrients. They are full of vitamins C and K. They also have antioxidants that help fight inflammation. Drinking pomegranate juice can support heart health and boost your immune system. Plus, it makes your mocktail not just tasty, but healthy too! To make your mocktail party-ready, think about fun garnishes. Use colorful straws, fancy glasses, or add edible flowers for flair. You can also mix in fresh herbs like basil or mint. Adding a splash of another fruit juice can give a new twist. Create a mocktail station where guests can mix their own drinks! This blog helped you make a tasty sparkling pomegranate mocktail. We covered all the ingredients, steps, and garnish tips to create a refreshing drink. Remember to pick high-quality pomegranate juice and adjust sweetness as needed. You can also explore fun flavor variations with herbs or other juices. If you have leftovers, store the juice well to keep it fresh. I hope you feel ready to impress your guests with this drink!

Sparkling Pomegranate Mocktail Fresh and Fruity Delight

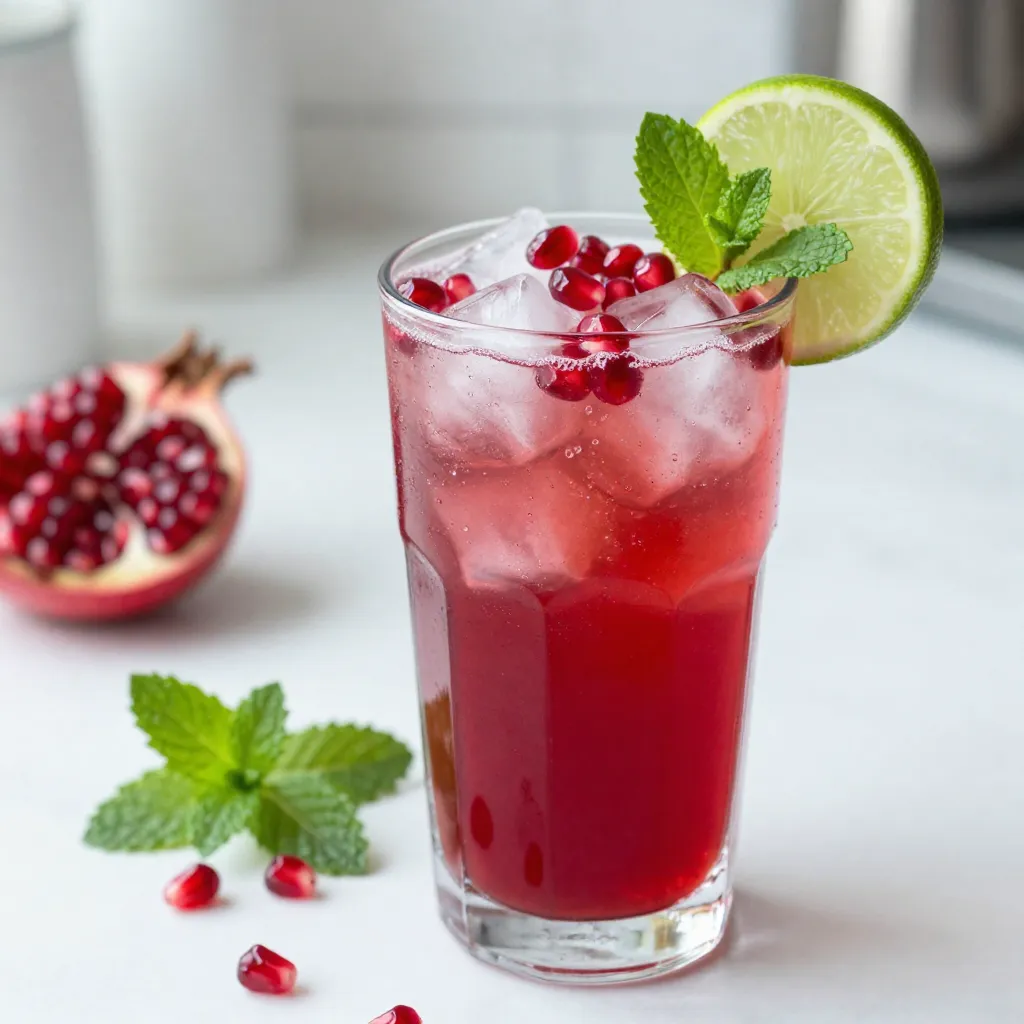
Looking for a refreshing drink that shines at any gathering? The Sparkling Pomegranate Mocktail is your go-to choice! This vibrant

- 1 ½ cups all-purpose flour - 1 teaspoon baking powder - ½ teaspoon baking soda - ½ teaspoon salt For these cupcakes, I use all-purpose flour. It gives the right structure. Baking powder and baking soda help the cupcakes rise. Salt adds flavor and balances sweetness. - ½ cup unsalted butter, softened to room temperature - 1 cup granulated sugar - 2 large eggs, at room temperature - ½ cup buttermilk, at room temperature - 1 teaspoon pure vanilla extract - Zest of 1 lemon (about 1 teaspoon) - 1 tablespoon freshly squeezed lemon juice Next, I combine unsalted butter and sugar. This mix needs to be light and fluffy. The eggs follow, adding richness and moisture. Buttermilk gives a nice tang. Lemon juice and zest add bright flavor. - 1 cup fresh strawberries, pureed Fresh strawberries are key! I use ripe strawberries for sweetness. Puree them to mix in the batter. This gives the cupcakes a lovely pink color and fruity taste. {{ingredient_image_2}} First, preheat your oven to 350°F (175°C). Grab a standard cupcake pan and line it with colorful cupcake liners. This adds a fun touch to your cupcakes and makes them easy to remove. Next, cream together the softened butter and granulated sugar. Use a hand mixer or stand mixer on medium speed. Mix until the mixture is light and fluffy. This takes about 3-4 minutes. Add the eggs one at a time. Mix well after each egg. Then, stir in the vanilla extract and lemon zest. This gives your batter a bright flavor. In another bowl, whisk together the all-purpose flour, baking powder, baking soda, and salt. This is important to ensure even rising. Now, combine the wet and dry mixtures. Gradually add the dry mix to the butter-sugar mix. Start and end with the dry mix. Alternate with the buttermilk and lemon juice. Mix until just combined. Overmixing will make the cupcakes dense. After that, gently fold in the fresh strawberry puree. Use a spatula to ensure the puree is evenly mixed. This will create a lovely pink color in your batter. Now, it’s time to fill the cupcake liners. Divide the batter evenly, filling each liner about 2/3 full. This allows room for the cupcakes to rise. Place the cupcake pan in the preheated oven. Bake for 18-20 minutes. You can check if they are done by inserting a toothpick in the center. If it comes out clean, they are ready. Let the cupcakes cool in the pan for 5 minutes. Then, carefully transfer them to a wire rack to cool completely. To make great cupcakes, avoid overmixing the batter. Overmixing can make your cupcakes tough. Mix just until the ingredients combine. This keeps cupcakes light and fluffy. After baking, let the cupcakes cool in the pan for five minutes. Then, transfer them to a wire rack. Cooling them fully is key for the best taste. Getting the right frosting consistency is important. Start with softened butter. Beat it until it’s smooth and creamy. Gradually add sifted powdered sugar. Mix on low speed to keep the sugar from flying everywhere. Once mixed, add heavy cream and lemon juice. Beat until light and fluffy. If the frosting is too thick, add a little more cream. If it’s too thin, add more powdered sugar. Taste as you go to find the perfect sweetness. Garnishing makes your cupcakes look special. Use fresh strawberry slices on top. This adds color and freshness. A sprinkle of lemon zest also adds a nice touch. It gives a hint of lemon flavor and looks pretty. You can even put a whole strawberry beside each cupcake for fun. These small touches make your strawberry lemonade cupcakes shine! Pro Tips Use Room Temperature Ingredients: Ensure your butter, eggs, and buttermilk are at room temperature for a smoother batter that incorporates air better, leading to fluffier cupcakes. Don’t Overmix the Batter: Mix until just combined to keep the cupcakes light and airy. Overmixing can develop gluten and result in dense cupcakes. Check for Doneness: Insert a toothpick into the center of a cupcake; it should come out clean or with a few moist crumbs. This ensures perfect baking without dryness. Store Properly: Keep frosted cupcakes in an airtight container at room temperature for up to 3 days. Refrigerate for longer storage, but let them come to room temperature before serving. {{image_4}} You can easily make these cupcakes vegan or gluten-free. For a vegan option, replace the eggs with flax eggs. To make flax eggs, mix 1 tablespoon of ground flaxseed with 2.5 tablespoons of water. Let it sit for 5 minutes until it thickens. Use a plant-based butter instead of unsalted butter. For gluten-free cupcakes, swap all-purpose flour with a gluten-free flour blend. Make sure it has xantham gum for better texture. Feel free to mix up the flavors! You can add other fruits like raspberries or blueberries. A teaspoon of almond or coconut extract can also give your cupcakes a fun twist. If you want more lemon flavor, add extra lemon juice or zest. This will make your cupcakes bright and fresh. Experimenting with flavors lets you find your perfect taste. While the strawberry lemon frosting is delicious, you can change it up. Try a cream cheese frosting for a tangy kick. You can also make a simple vanilla buttercream. Just use vanilla extract instead of lemon juice. Another fun idea is to add a chocolate ganache on top for a rich treat. These options keep your cupcakes exciting and let you enjoy different flavors. To keep your strawberry lemonade cupcakes fresh, store them in an airtight container. Place parchment paper between the cupcakes if they touch. This keeps the frosting from sticking. You can also keep them in the fridge for a cool treat. Just remember to bring them to room temperature before serving. This makes the flavors shine. You can freeze these cupcakes for later enjoyment. Let them cool completely after baking. Wrap each cupcake in plastic wrap. Then, place them in a freezer-safe bag or container. They can stay frozen for up to three months. To thaw, take them out and let them sit at room temperature for about an hour. Frost them after thawing for the best taste. These delightful cupcakes stay fresh for about three days at room temperature. If stored in the fridge, they last up to a week. Always check for any signs of spoilage. If they look or smell off, it's best to discard them. Enjoy your tasty treats while they last! Yes, you can use frozen strawberries. Just thaw them first. Drain any excess liquid. You may want to chop them into smaller pieces. Frozen strawberries can still give you a nice flavor. They may change the texture a bit, but they work well in baking. You can replace eggs with applesauce or mashed bananas. Use 1/4 cup of either for each egg. This keeps the cupcakes moist. Another option is to use a mix of water, oil, and baking powder. Combine 2 tablespoons of water, 1 tablespoon of oil, and 1 teaspoon of baking powder for each egg. This helps the cupcakes rise. You can make a quick buttermilk substitute. Combine 1 cup of milk with 1 tablespoon of vinegar or lemon juice. Let it sit for about 5 minutes. This will sour the milk and give you a similar taste. You can also use plain yogurt or sour cream. Just thin them with a bit of milk to match the consistency. You’ve explored the essential ingredients and methods for baking perfect strawberry cupcakes. We discussed dry and wet ingredients, as well as how to prepare fresh strawberries. I shared step-by-step instructions to guide you through baking, mixing, and frosting. You also learned tips to avoid common mistakes and variations for dietary needs. Baking is about creativity and fun. With these tips, you can create delicious cupcakes every time. Enjoy your baking journey!

Strawberry Lemonade Cupcakes Delightful and Easy Treat

If you’re looking for a sweet treat that bursts with flavor, you’re in the right place! These Strawberry Lemonade Cupcakes

- 2 slices of sourdough bread - 2 tablespoons unsalted butter, softened - 1 ripe peach, thinly sliced - 1/2 cup white cheddar cheese, shredded - 1 tablespoon honey - Optional: Fresh basil leaves, sea salt The ingredients for Honey Peach White Cheddar Grilled Cheese are simple but full of flavor. First, you need two slices of sourdough bread. This bread has a nice chew and tang that pairs well with sweet peaches. Next, use two tablespoons of unsalted butter. This will help the bread get golden and crisp when grilled. You’ll also need a ripe peach. Look for one that feels soft but not mushy. Thinly slice it to get the best flavor in every bite. The star of the show is the half cup of shredded white cheddar cheese. This cheese melts well and adds a rich, creamy taste. Don’t forget the tablespoon of honey. It adds a touch of sweetness that balances the savory cheese. For a fresh twist, consider adding some basil leaves. A sprinkle of sea salt can enhance the flavors too. Each ingredient works together to create a deliciously unique grilled cheese. Enjoy the blend of sweet, savory, and creamy with every bite! - Start by spreading butter on one side of each slice of sourdough bread. - Lay half of the shredded white cheddar cheese on one slice. - Arrange the thinly sliced peach pieces on top of the cheese. - Drizzle honey over the peaches to add sweetness. - Top with the remaining white cheddar cheese for a gooey finish. - Place the other slice of bread on top, buttered side up. - Preheat a skillet over medium heat until hot. - Gently place the sandwich in the skillet. - Grill for about 3-4 minutes on each side. - Look for a golden brown color and melted cheese. - Let the sandwich rest for a minute before slicing. - Add a pinch of sea salt and fresh basil for flavor. - Achieving the perfect crisp To get that perfect crispy crust, use softened butter. Spread it evenly on each slice of sourdough bread. This helps the bread brown nicely. Preheat your skillet over medium heat. Don’t rush this step; a hot skillet is key. - Cheese melting tips Use freshly shredded white cheddar cheese. It melts better than pre-shredded cheese. Layer it generously on both sides of the peaches for gooey goodness. Keep an eye on the heat. If it’s too high, the bread may burn before the cheese melts. - Adding spices or additional ingredients Want to spice it up? Try adding a pinch of cinnamon or nutmeg. This adds warmth to the sweetness of the peaches and honey. Fresh herbs like thyme or rosemary can also elevate the flavor. - Pairing suggestions This grilled cheese pairs well with a light salad or a bowl of tomato soup. The soup adds a nice contrast to the sweetness of the sandwich. For drinks, consider iced tea or lemonade for a refreshing touch. {{image_4}} You can change the cheese for more flavor. Try gouda or brie for a twist. You may also swap peaches for other fruits. Sliced figs or apples work well. These fruits add a nice sweetness. Bread choice can change the whole dish. Use brioche for a rich, buttery taste. Whole wheat adds a hearty texture. Each bread type gives a new flavor. Remember to adjust the cooking time. Different breads may grill faster or slower. After enjoying your Honey Peach White Cheddar Grilled Cheese, store leftovers properly. Let the sandwich cool to room temperature. Place it in an airtight container. This keeps it fresh and tasty. You can also wrap it in foil or plastic wrap. It will stay good in the fridge for about two days. Be sure not to leave it out. Bacteria can grow quickly at room temperature. When you want to enjoy your grilled cheese again, reheating is key. I recommend using a skillet for the best results. Heat the skillet over low to medium heat. Place the sandwich in it and cover it with a lid. This helps the cheese melt nicely. Heat for about 5 minutes on each side. If you prefer, you can use a microwave. But remember, the bread may not stay crispy. Heat it in 30-second intervals until warm. Enjoy your sandwich just like the first time! Yes, you can make this grilled cheese vegan. Use plant-based butter instead of unsalted butter. For cheese, choose a vegan white cheddar or another nut-based cheese. You can also use agave syrup or maple syrup instead of honey for sweetness. Grilled cheese pairs well with many sides. Try these: - Tomato soup - Fresh salad - Sweet potato fries - Pickles - Chips Each of these sides adds a great taste and texture to your meal. You can prepare this sandwich ahead of time. Here are some tips: - Assemble the sandwich, but do not grill it yet. - Wrap it tightly in plastic wrap or foil to keep it fresh. - Store it in the fridge for up to 24 hours. To reheat, grill it in a skillet over medium heat. This helps keep the bread crispy and the cheese melty. You now know how to make a tasty grilled cheese with peaches. This sandwich combines sweet and savory flavors using simple ingredients like sourdough and cheddar. Remember to keep grilling tips in mind for the best texture. Feel free to experiment with different cheeses and fruits to create your own twist. Store leftovers in the fridge and reheat them for a quick meal. Enjoy your creation!

Honey Peach White Cheddar Grilled Cheese Delight

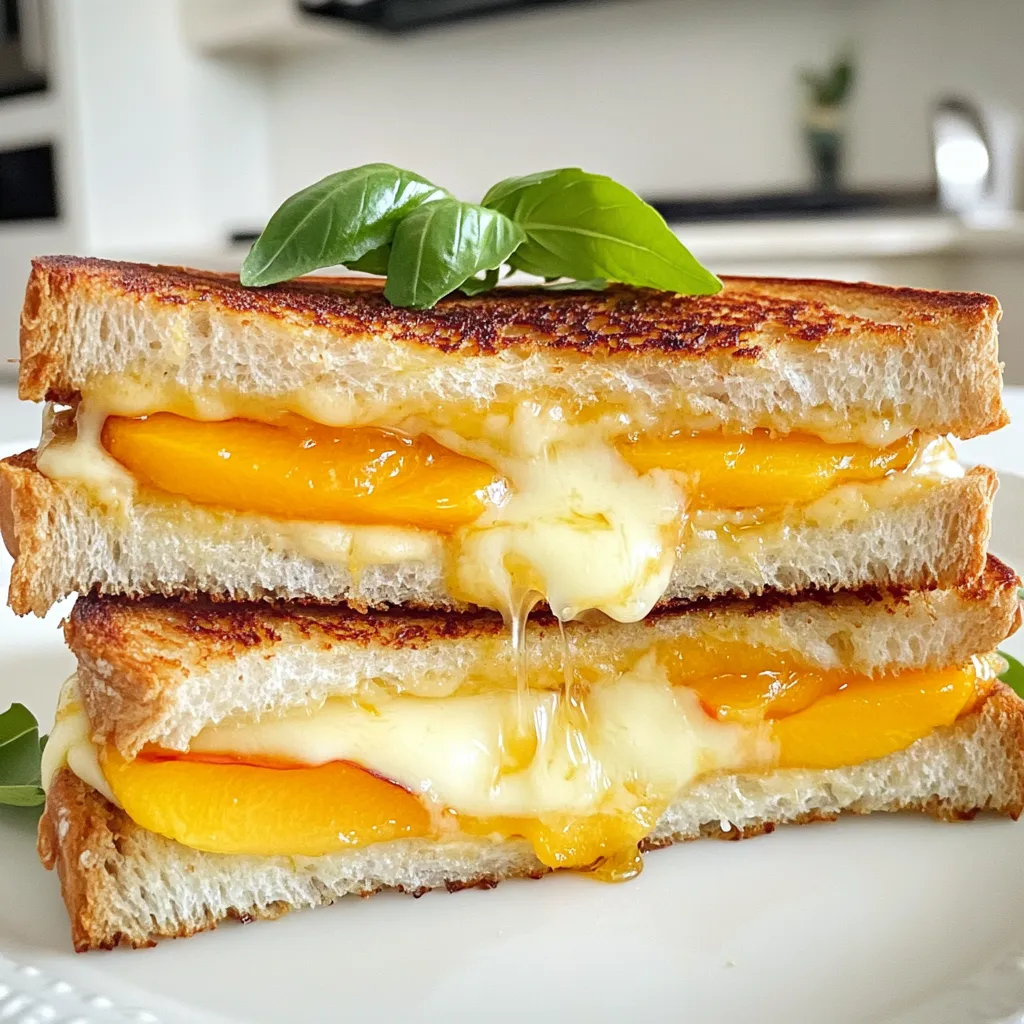
Are you ready to elevate your grilled cheese game? The Honey Peach White Cheddar Grilled Cheese Delight is not just

- 1 cup freshly squeezed lemon juice (about 4-6 lemons) - 1/2 cup blue spirulina powder or blue food coloring - 1 cup coconut water - 3 cups sparkling water - 1/2 cup agave syrup or honey - Fresh mint leaves, for garnish - Ice cubes - Large pitcher - Whisk or spoon - Serving glasses To make Blue Lagoon Tropical Lemonade, gather your fresh ingredients. Start with freshly squeezed lemon juice. This gives your drink a bright and zesty flavor. You’ll need about four to six lemons for one cup of juice. Next, add the blue spirulina powder. This adds a beautiful blue color. If you can't find spirulina, you can use blue food coloring instead. It will still look amazing! Coconut water is the next ingredient. It brings a light sweetness and a tropical vibe. Then you will need sparkling water for fizz. This makes your drink refreshing and fun. You can sweeten your lemonade with agave syrup or honey. Use half a cup, but feel free to adjust if you like it sweeter. Fresh mint leaves are great for garnish. They add a nice touch and a fresh smell. Don't forget the ice cubes! They make your drink cold and enjoyable. For tools, you’ll need a large pitcher to mix everything. A whisk or spoon helps to blend the ingredients smoothly. Finally, have serving glasses ready to pour your lemonade into. With these ingredients and tools, you are set to create a delightful Blue Lagoon Tropical Lemonade. Enjoy the colorful and refreshing drink! 1. Start by squeezing 4 to 6 lemons. You need one cup of fresh lemon juice. 2. In a large pitcher, pour in the lemon juice. 3. Next, add half a cup of blue spirulina powder. If you can't find this, blue food coloring works great too. 4. Pour in one cup of coconut water. 5. Mix everything well with a whisk or spoon until it looks smooth. 1. Add half a cup of agave syrup or honey to your mixture. 2. Stir again to blend the sweetness evenly. 3. Taste your lemonade. If it needs more sweetness, add a bit more agave or honey. 1. Now, it's time to add some fizz! Pour in three cups of sparkling water slowly. 2. Stir gently to keep the bubbles intact. 3. Fill serving glasses with ice cubes to chill your drink. 4. Pour the Blue Lagoon Tropical Lemonade over the ice, filling each glass about three-quarters full. 5. To make it pretty, garnish with fresh mint leaves and thin slices of lemon and lime. 6. Give your drink a gentle stir before enjoying it. Savor those tropical flavors! To make your Blue Lagoon Tropical Lemonade shine, focus on balancing sweetness. Start with the right amount of agave syrup or honey. I suggest using half a cup, then tasting it. If you want it sweeter, add more. Remember, you can always add, but you can't take away! To enhance the lemon flavor, consider using freshly squeezed juice. The zest of the lemon adds a bright note too. Just grate a bit and mix it in. This extra touch makes the lemonade even more vibrant. Serving your Blue Lagoon Tropical Lemonade can be fun! Use colorful glasses to bring out the tropical theme. Clear glasses show off the beautiful blue color. Adding colorful straws can make each drink pop even more. Garnishes are key for a great look. Fresh mint leaves make the drink smell nice. Thin slices of lemon and lime add color and a hint of extra flavor. Place these on the rim of the glass or float them in the drink. This small detail makes a big impact! {{image_4}} You can change the sweetener in your Blue Lagoon Tropical Lemonade. Instead of agave syrup, try honey or maple syrup. Each option adds a unique flavor. If you want to cut calories, use a sugar substitute like stevia. Adding fruits can also change the drink's taste. You can mix in fresh berries like strawberries or blueberries. Pineapple chunks add a tropical twist, too. Just chop the fruit and stir it into the lemonade. This adds both taste and color. You can easily turn this lemonade into a fun cocktail. Add a splash of rum or vodka for an adult version. The lightness of the lemonade pairs well with these spirits. For a fruity cocktail, try mixing in peach schnapps or coconut rum. This adds a sweet flavor that fits the tropical theme. You can also create a layered drink. Pour the lemonade first and then add the spirit on top for a pretty look. To store leftover Blue Lagoon Tropical Lemonade, pour it into a clean pitcher. Seal it with a lid or plastic wrap. This helps keep it fresh and tasty. Place the lemonade in the fridge. It stays good for about 3 days. After that, the flavors may fade. Always check for off smells before drinking. You can freeze Blue Lagoon Tropical Lemonade for later use. Pour some into ice cube trays. This makes fun blue ice cubes. They add a splash of color to any drink. To freeze, cover the trays with plastic wrap. Freeze until solid, usually about 4-6 hours. To use your frozen lemonade cubes, let them sit at room temperature for a few minutes. You can also place them in the fridge for a quick thaw. Add them to your drinks for a cool, refreshing twist! What is blue spirulina powder and where to find it? Blue spirulina powder is a natural blue food dye. It comes from a type of algae called spirulina. You can find it in health food stores or online. It adds a vibrant blue color and some nutrients. Can I use bottled lemon juice for this recipe? Yes, you can use bottled lemon juice. However, fresh lemon juice tastes better. Fresh juice has a brighter flavor. Bottled juice may not be as strong or fresh. What to do if my lemonade isn’t blue enough? If your lemonade isn’t blue enough, add more blue spirulina powder. Mix it well until the color is vibrant. If you want a quick fix, you can use blue food coloring instead. How to fix overly sweet lemonade? If your lemonade is too sweet, add more lemon juice. This will balance the sweetness. You can also add a little water or sparkling water to dilute it. Caloric content per serving Each serving has about 120 calories. This can vary based on how much sweetener you use. Health benefits of ingredients used - Lemon juice: Rich in vitamin C and helps digestion. - Coconut water: Hydrating and contains electrolytes. - Blue spirulina: Packed with antioxidants and proteins. - Mint leaves: Aids in digestion and adds flavor. Our fresh Blue Lagoon Tropical Lemonade recipe offers a fun and healthy twist on a classic drink. We started with simple ingredients like lemon juice and coconut water, then added blue spirulina for vibrancy. You learned how to create a balanced sweetness and enhance flavor. Don't forget the presentation tips to impress your guests! In the end, your unique lemonade can cater to different tastes, whether non-alcoholic or cocktail. With proper storage, it stays flavorful and refreshing for days. Enjoy this drink and share it with friends or family to brighten any occasion.

Blue Lagoon Tropical Lemonade Refreshing Drink Recipe

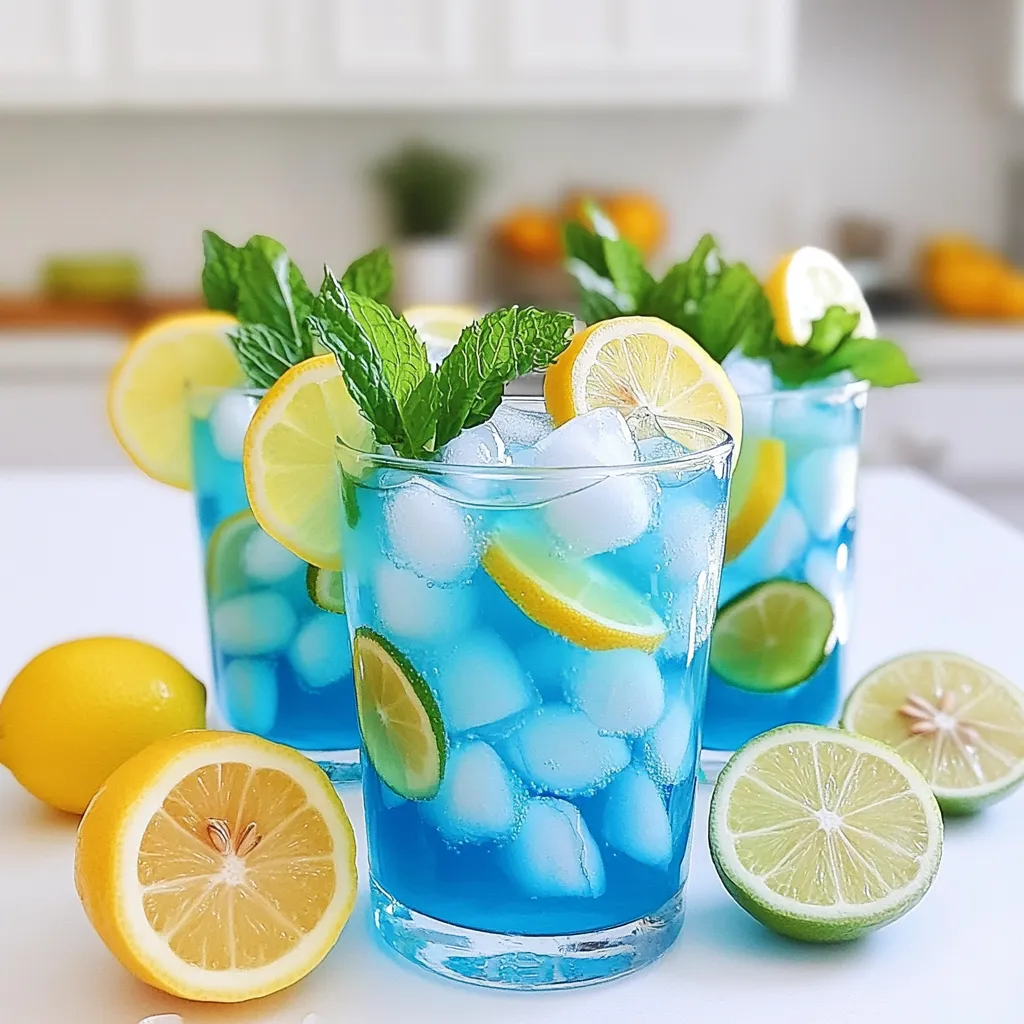
Looking for a refreshing drink that stands out? Try my Blue Lagoon Tropical Lemonade! This vibrant drink mixes the tang

- 4 medium potatoes, diced into 1-inch cubes - 3 carrots, sliced into rounds - 2 celery stalks, chopped into small pieces - 1 zucchini, diced into bite-sized pieces - 1 red bell pepper, diced - 1 yellow onion, finely chopped - 4 cloves garlic, minced - 2 cups fresh spinach, roughly chopped In this stew, I love using a mix of colorful vegetables. Potatoes add heartiness. Carrots bring sweetness. Celery gives crunch. Zucchini and bell pepper add freshness. Onion and garlic provide depth. Fresh spinach adds vibrant color and nutrition. - 4 cups vegetable broth (low sodium recommended) - 1 can (14.5 oz) diced tomatoes, including juice - 1 teaspoon dried thyme - 1 teaspoon dried rosemary - 1 teaspoon smoked paprika - Salt and pepper, to taste Vegetable broth creates a rich base. Diced tomatoes add acidity and sweetness. Thyme and rosemary bring earthiness. Smoked paprika adds a hint of warmth. Adjust salt and pepper to suit your taste. - 1 tablespoon olive oil Using olive oil enhances flavor. It helps sauté the onion and garlic. This step builds a strong flavor foundation for the stew. Choose high-quality olive oil for the best results. First, I heat the olive oil in a large skillet. I use medium heat for this step. Once the oil is warm, I add the finely chopped onion and minced garlic. I sauté them for about three minutes. The onion should turn translucent and smell great. After that, I carefully transfer the onion and garlic to the slow cooker. Now, it’s time to add the rest of the veggies. I layer in the diced potatoes, sliced carrots, chopped celery, diced zucchini, and red bell pepper. I spread them evenly so they cook well. Next, I pour in the can of diced tomatoes with its juice. Then, I add the vegetable broth, making sure all the veggies are submerged. For flavor, I sprinkle in the dried thyme, rosemary, and smoked paprika. I also add some salt and pepper. I mix everything gently to blend the seasonings throughout the vegetables. I cover the slow cooker with its lid. For cooking, I have two options: low heat for six to eight hours or high heat for four to six hours. I want the vegetables to be tender and full of flavor. In the last 15 minutes, I stir in the chopped spinach. This helps it wilt and adds a fresh taste to the stew. Before serving, I always taste my stew. If needed, I adjust the seasoning with more salt and pepper. To make your stew burst with flavor, taste it before serving. It’s simple. Add salt or pepper if needed. You can also enhance the veggie flavors by sautéing onions and garlic in olive oil first. This step brings out their sweetness. Using fresh herbs is another great way to boost taste. Add some chopped parsley or basil just before serving. These bright flavors make your stew shine. Cooking time can change based on how big you cut your veggies. For example, if you slice the carrots thick, they will need more time to cook. On the other hand, if you cut them thin, they will cook faster. Stick to the cooking times in the recipe, but check for doneness. If the veggies feel firm, let them cook a bit longer. Aim for tender, not mushy. For a cozy look, serve your stew in rustic bowls. This adds charm to the meal. You can garnish each bowl with fresh parsley or a drizzle of olive oil. It makes the dish look fancy and adds flavor. Pair your stew with crusty bread or a simple salad. These sides make a complete and satisfying meal. Enjoy the warmth of this hearty dish! {{image_4}} You can add proteins to your stew for extra heartiness. Legumes like beans or lentils work great. They add fiber and protein while keeping the dish plant-based. For meat lovers, try diced chicken or beef. Cooked sausage also adds rich flavor. Just remember to adjust cooking times based on what you choose. To give your stew a flavor boost, consider adding spices and herbs. A pinch of cayenne pepper adds heat. Try fresh herbs like basil or parsley for brightness. You can also use curry powder for a unique twist. Experiment with flavors to find what you love best. Feel free to swap out vegetables based on the season or your personal taste. Sweet potatoes add sweetness and extra nutrients. You can use green beans for a nice crunch. If you prefer leafy greens, kale is a great option. The key is to use what you have and enjoy! After you enjoy the stew, store leftovers in an airtight container. Let the stew cool first. This keeps it fresh and tasty. Use glass or plastic containers that seal well. Make sure to refrigerate within two hours of cooking. The stew will stay good in the fridge for a few days. To freeze the stew, first let it cool completely. Use freezer-safe containers or bags. Leave a little space at the top for the stew to expand. When you’re ready to eat it, thaw the stew in the fridge overnight. Reheat it on the stove or in the microwave. Stir it well to heat evenly. In the fridge, the stew lasts about 3 to 4 days. If you freeze it, it can last up to 3 months. For the best taste, eat it sooner rather than later. Always check for off smells or changes in color before eating. This ensures you enjoy a safe and delicious meal. You can store this stew in the fridge for about 4 to 5 days. Make sure to keep it in an airtight container for safety. If you want to keep it longer, freezing is a great option. In the freezer, the stew can last for up to 3 months. Just thaw it in the fridge before you heat it up. Yes, this stew is easily made vegan! All the ingredients are plant-based. Just make sure to use vegetable broth and check that your canned tomatoes do not have any added ingredients that are not vegan. You can also add more veggies or beans to boost the protein. This stew pairs well with many sides. Here are some great options: - Crusty bread for dipping - A fresh green salad to add crunch - Cooked grains like quinoa or rice for added texture - A dollop of vegan sour cream on top for creaminess In this blog, we explored making a tasty Slow Cooker Rustic Veggie Stew. We covered all essential ingredients, from fresh veggies to flavorful broth and seasonings. The cooking steps showed how to layer ingredients for rich taste. We shared tips for perfecting flavors and offered variations for personal touch. Lastly, we provided storage tips for easy leftovers. Enjoy creating your stew, as it’s simple and full of flavor! This dish will warm your meals every time.

Slow Cooker Rustic Veggie Stew Hearty and Healthy Dish

Are you ready to whip up a warm and hearty dish that’s packed with flavor? My Slow Cooker Rustic Veggie

To make No Bake White Chocolate Pumpkin Fudge, you need a few simple items. Here’s what you will need: - 1 cup pumpkin puree (canned or freshly made) - 2 cups white chocolate chips - 1 cup sweetened condensed milk - 1 teaspoon pure vanilla extract - 1 teaspoon pumpkin pie spice - 1/2 teaspoon fine sea salt - 1 cup chopped pecans or walnuts (optional) - Additional white chocolate chips for decoration (optional) These ingredients come together to create a rich and creamy treat. The pumpkin puree gives the fudge a lovely autumn flavor. The white chocolate adds sweetness, while the sweetened condensed milk makes it smooth and creamy. Adding vanilla and pumpkin pie spice brings warmth and depth to the taste. If you like a bit of crunch, include nuts. They add texture and make the fudge even more delightful. You can also top it with more white chocolate chips for a sweet finish. Enjoy the process of gathering these ingredients, as it sets the stage for a fun cooking experience! Start by taking a medium saucepan. Set it on low heat. Add 2 cups of white chocolate chips and 1 cup of sweetened condensed milk. Stir the mixture well. Keep stirring to prevent burning. You want it to melt smoothly. Once the chocolate is melted, take it off the heat. Now, add 1 cup of pumpkin puree, 1 teaspoon of pure vanilla extract, and 1 teaspoon of pumpkin pie spice. Mix it all together until smooth. If you love nuts, fold in 1 cup of chopped pecans or walnuts for added crunch. Now, prepare your baking dish. Line an 8x8 inch dish with parchment paper. Leave some paper hanging over the edges for easy lifting later. Pour the fudge mixture into the dish. Use a spatula to spread it evenly. For extra sweetness, sprinkle additional white chocolate chips on top. Gently press them down. Cover with plastic wrap or foil and chill in the fridge for at least 4 hours. Once firm, lift it out using the parchment paper. Cut it into squares or rectangles for serving. To make great fudge, keep your heat low. This helps the white chocolate melt without burning. If you burn it, the fudge will taste bad. Stir the mixture often while it heats. This keeps the chocolate smooth and helps it blend well with the other ingredients. Nuts add a nice crunch to the fudge. I love using pecans or walnuts. They give a rich flavor and texture. When choosing nuts, look for fresh ones without any bad smells. Toasting them lightly can enhance their taste. Just chop them up before adding to the fudge. How you serve the fudge matters! For a fun look, place the fudge on a nice platter. Sprinkling a bit of pumpkin pie spice on top adds flavor and style. You can also decorate the platter with mini-pumpkins or colorful leaves. This gives a cozy autumn feel to your dessert table. {{image_4}} You can easily change the flavor of your fudge. Adding spices like cinnamon or nutmeg gives it a warm taste. Just a pinch can make a big difference. You can also use flavored white chocolate. Try vanilla or caramel white chocolate for a fun twist. Want to make it vegan? Use dairy-free white chocolate and coconut milk instead of sweetened condensed milk. It’s simple and just as tasty. For a healthier option, look for sugar-free white chocolate. This way, you can enjoy your fudge without the extra sugar. The beauty of fudge is how customizable it is. You can add dried fruit, like cranberries or cherries, for a sweet burst. If you love texture, try adding mini marshmallows or more nuts. For toppings, sprinkle some sea salt or drizzle extra white chocolate on top. These little changes can elevate your fudge to a whole new level. To keep your fudge fresh, you should store it in the fridge. Place the fudge in an airtight container. This keeps moisture out and helps maintain its texture. You can also layer parchment paper between the fudge pieces to prevent sticking. If you want to freeze the fudge, wrap it tightly in plastic wrap. Then, place it in a freezer-safe bag. This helps it last longer and keeps it safe from freezer burn. The fudge will stay fresh in the fridge for about two weeks. If you freeze it, it can last up to three months. Always check for signs of spoilage. Look for changes in color or texture. If the fudge smells off or has a strange taste, it’s best to toss it. Enjoy your sweet treat while it’s fresh! Yes, you can use fresh pumpkin. Just cook and puree it first. Fresh pumpkin adds a bright flavor. Make sure it is smooth for the best texture. The fudge is ready when it feels firm to the touch. It should not be sticky. You can also test it by cutting a small piece; it should hold its shape well. Yes, you can make this fudge ahead of time. It stays fresh in the fridge for about a week. You can also freeze it for longer storage. You can use coconut milk for a dairy-free option. Another choice is to mix milk and sugar. Just simmer them until it thickens. Yes, you can swap white chocolate for dark chocolate. This will give the fudge a richer flavor. Just keep in mind that it will taste different. In this blog post, we explored making delicious pumpkin white chocolate fudge. We listed the key ingredients and shared step-by-step instructions. I offered tips for a smooth texture and great presentation. We also covered variations to suit different diets and tastes. Finally, we discussed how to store the fudge properly. As you make this treat, remember to have fun. Customize it to fit your friends and family. Enjoy your time in the kitchen!

No Bake White Chocolate Pumpkin Fudge Delightful Treat

Get ready to indulge in a sweet, creamy delight with my No Bake White Chocolate Pumpkin Fudge! This easy recipe

Older posts
Newer posts
← Previous Page1 Page2 Page3 … Page86 Next →

dsad

© 2026 dailydishcraft • Built with GeneratePress

Our Policies

  • Copyright Policy
  • Cookie Policy
  • GDPR Policy
  • Privacy Policy
  • Disclaimer
  • Terms Of Use

More Information

  • Home
  • About
  • Contact
  • Appetizers
  • Dessert
  • Dinner
  • Drinks
©2026, dailydishcraft About Back To Top