Get ready to impress your friends and family this holiday season with Santa Hat Brownie Bites! These festive treats combine rich brownie goodness with fresh strawberries and whipped cream, creating delightful mini desserts. In just a few easy steps, you’ll learn how to whip up these fun holiday bites that will brighten any table. Let’s dive into the ingredients and get baking!
Why I Love This Recipe
- Festive Presentation: These Santa Hat Brownie Bites are not only delicious but also visually appealing, making them a perfect festive treat for holiday gatherings.
- Easy to Make: This recipe uses a brownie mix, making it quick and simple, even for beginner bakers, while still allowing for a fun decorating experience.
- Customizable: You can easily swap out the decorations or flavors to suit your preferences, making these brownie bites versatile for any occasion.
- Delicious Flavor: The combination of fudgy brownies, fresh strawberries, and whipped cream creates a delightful mix of flavors and textures that everyone will love.
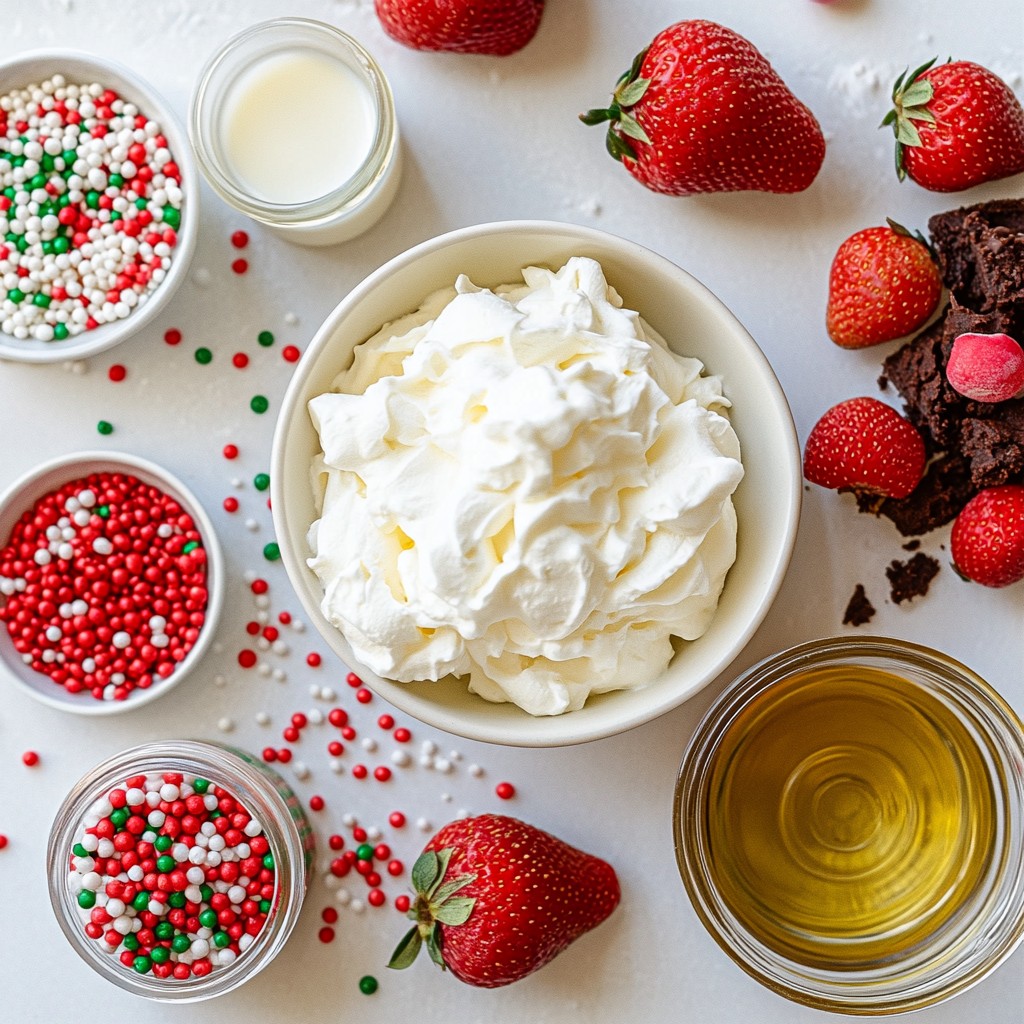
Ingredients
Main Ingredients
- 1 box brownie mix (includes eggs, water, and oil as per package instructions)
- 12 fresh strawberries, tops and leaves removed
- 1 cup whipped cream (or canned whipped topping for convenience)
- 1/2 cup white chocolate chips
- Optional: 1 tablespoon coconut oil (to achieve a smoother texture in the melted chocolate)
To make Santa Hat Brownie Bites, start with the essential brownie mix. This mix gives you a rich and fudgy base. You will also need fresh strawberries. Their bright red color adds a festive look. Next, grab a cup of whipped cream. This will help create the fluffy top of Santa's hat.
White chocolate chips are key for that snowy touch. If you want a smoother finish, add coconut oil when melting the chocolate. Each ingredient plays a role in creating a fun holiday treat.
Step-by-Step Instructions
Preheat and Prepare
First, preheat your oven as stated on the brownie mix box. This is important for even baking. While the oven warms up, grab a mini muffin tin. You can grease it lightly with cooking spray or use mini paper liners to make removal easier.
Next, it’s time to mix the brownie batter. In a large bowl, add the brownie mix. Then, follow the box instructions for adding eggs, water, and oil. Stir the mixture until it is smooth. Make sure there are no dry bits left. This step is key for yummy brownie bites.
Baking Process
Now, scoop the brownie batter into each muffin cup. Fill them about two-thirds full. This allows the brownies to rise nicely. Place the muffin tin in your preheated oven and bake for about 18-20 minutes. To check if they are done, insert a toothpick into the center of a brownie. If it comes out with a few moist crumbs, they are ready!
Cooling and Decorating
Once they are baked, let the brownie bites cool in the tin for a few minutes. After that, transfer them to a cooling rack. Allow them to cool completely before decorating.
While the brownies cool, melt the white chocolate chips. If you have coconut oil, mix it in for a smoother texture. Place the chocolate in a microwave-safe bowl. Heat it in 30-second bursts, stirring after each time. Do this until the chocolate is fully melted and creamy.
Next, dip the top of each cooled brownie bite into the melted white chocolate. Let any extra chocolate drip off. This gives the brownies a snowy look.
Now, for the fun part! Take a fresh strawberry and place it upside down on each brownie. The pointy end should face up, like Santa's hat.
Use the whipped cream to add a dollop on top of each strawberry. This will look just like the fluffy fur on Santa's hat.
Finally, sprinkle red and green sprinkles around the base of the strawberries and on the whipped cream. This adds a festive touch to your Santa Hat Brownie Bites. Enjoy these delightful treats with family and friends!
Tips & Tricks
Baking Tips
To make sure your brownies stay moist, follow these simple steps:
- Don’t overbake: Check the brownies a minute or two early. A toothpick should have a few moist crumbs.
- Use eggs at room temperature: This helps them mix better with the batter.
- Add a splash of milk: This can enhance moisture in the batter.
Perfecting chocolate melting is key for great results:
- Use a microwave: Heat white chocolate in short bursts of 30 seconds. Stir in between to prevent burning.
- Add coconut oil: It helps the chocolate melt smoothly. This makes for a nice finish when you dip the brownies.
Decoration Tips
Creating a festive look is part of the fun! Here’s how to get it right:
- Use sprinkles wisely: After adding whipped cream, sprinkle red and green around the edges. This adds color and flair.
- Make the whipped cream fluffy: When you add a dollop on top of the strawberry, use a piping bag. This makes it look like Santa's hat fur.
These tips will help you create tasty Santa Hat Brownie Bites that impress everyone!
Pro Tips
- Use Quality Ingredients: Opt for high-quality chocolate and fresh strawberries for the best flavor in your Santa Hat Brownie Bites.
- Chill the Strawberries: Refrigerating the strawberries before using them can help them hold their shape better and stay fresh longer.
- Customize the Decorations: Feel free to use different colored sprinkles or edible glitter to give your brownie bites a unique festive flair.
- Serve at Room Temperature: Allow the brownie bites to come to room temperature before serving for the best texture and flavor experience.
Variations
Flavor Modifications
You can boost the taste of your Santa Hat Brownie Bites in fun ways.
- Adding peppermint extract: A few drops of peppermint extract can add a cool twist. It pairs well with chocolate and brings a festive vibe. Just remember, a little goes a long way. Start with 1/4 teaspoon and adjust to your taste.
- Using different chocolate types: You can swap white chocolate for dark or milk chocolate. Each type brings its own flavor. Dark chocolate offers a rich taste, while milk chocolate is sweeter and creamier. Experiment to find your favorite!
Dietary Adjustments
Making these treats fit your diet is easy with a few swaps.
- Gluten-free brownie mix options: Many brands offer gluten-free brownie mixes. Look for one that you enjoy. Follow the same steps as traditional mixes, and you’ll have a delicious gluten-free treat.
- Vegan substitutions: To make these bites vegan, use a vegan brownie mix. Instead of eggs, use flaxseed meal or applesauce. Whipped cream can be replaced with coconut whipped cream for a dairy-free option. These swaps still create tasty treats!
Storage Info
Storage Guidelines
To keep your Santa Hat Brownie Bites fresh, store them in an airtight container. This helps maintain their taste and texture. Line the container with parchment paper for extra protection.
- Keep them at room temperature for up to three days.
- If you want to store them longer, place them in the fridge. They will last for about a week.
Reheating Instructions
If you want to enjoy your brownie bites warm, reheating is easy. Just follow these steps to keep them fresh:
1. Preheat your oven to 350°F (175°C).
2. Place the brownie bites on a baking sheet.
3. Heat them for about 5 minutes or until warm.
Avoid using the microwave, as it can make the brownies tough. Enjoy the warm, gooey goodness!
FAQs
How can I make these chocolate-free?
You can skip the white chocolate. Instead, use a vanilla glaze. Mix powdered sugar with milk until you reach a smooth consistency. Dip the brownie bites in this glaze. It will still look great and taste sweet!
Can I use frozen strawberries instead?
Frozen strawberries can work, but fresh is best. If you use frozen, thaw them first. Drain any extra juice. This keeps your brownie bites from getting soggy. Fresh strawberries give a better look and crunch.
How long will these last at room temperature?
Santa Hat Brownie Bites can stay at room temp for 2 days. Keep them in an airtight container. If it's warm, put them in the fridge. They stay fresh longer that way. Enjoy your treats while they last!
This blog post covered how to make festive brownie bites. You learned the key ingredients, like brownie mix, strawberries, and white chocolate chips. We walked through the steps, from baking to decorating. I shared tips to keep brownies moist and ideas for fun variations. Lastly, I explained how to store and reheat them.
Now, you can impress friends and family with these treats. Enjoy baking and have fun creating your own variations!