Japanese Katsu Bowls Delicious and Easy Recipe Guide

Japanese Katsu bowls are both delicious and simple to make. With crispy chicken, flavorful rice, and fresh veggies, this dish is a total crowd-pleaser. In this guide, I’ll walk you through each step to create the perfect Katsu bowl at home. From key ingredients to cooking tips, get ready to impress friends and family with a tasty Japanese classic. Let’s dive in and whip up this delightful dinner!

Ingredients

Main Ingredients for Japanese Katsu Bowls

To make your Katsu bowls, gather these key ingredients:

– 2 boneless, skinless chicken thighs

– 1 cup panko breadcrumbs

– 1/2 cup all-purpose flour

– 1 large egg

– 1 tablespoon soy sauce

– 1 tablespoon Dijon mustard

– Salt and pepper to taste

– Vegetable oil for frying

– 2 cups cooked Japanese rice (short-grain preferred)

– 1 cup shredded cabbage (purple or green)

– 1 ripe avocado, sliced

– 1/4 cup pickled ginger

These ingredients create layers of flavor and texture. The chicken thighs provide juiciness. Panko gives a crispy crust. Rice acts as a soft base, while cabbage adds crunch. Avocado offers creaminess, and pickled ginger adds a zesty touch.

Optional Garnishes and Sides

To take your Katsu bowls to the next level, consider these garnishes and sides:

– Sesame seeds

– Chopped green onions

– Teriyaki sauce

– Lime wedges

Sesame seeds and green onions add a nice finish. They make the dish look pretty and tasty. A drizzle of teriyaki sauce enhances the flavor. A squeeze of lime can brighten the dish. These small touches can make your meal special. Check out the Full Recipe for detailed steps on preparation!

Step-by-Step Instructions

Preparing the Chicken

Start with two boneless, skinless chicken thighs. Lay them between two pieces of plastic wrap. Use a meat mallet or a rolling pin to pound the chicken down to about 1/2 inch thick. This helps the chicken cook evenly. Season both sides with salt and pepper to add flavor.

Breading the Chicken

Next, set up your breading station. Grab three shallow dishes. In the first, add 1/2 cup of all-purpose flour. In the second, beat one large egg and mix in one tablespoon of soy sauce and one tablespoon of Dijon mustard. In the third dish, place one cup of panko breadcrumbs. Organizing these in a line makes it easy to coat the chicken.

Cooking the Chicken

Heat about 1/2 inch of vegetable oil in a large skillet over medium-high heat. Wait until the oil shimmers, but be careful not to let it smoke. Carefully add the breaded chicken to the hot oil. Fry each piece for about 3-4 minutes on each side. You want the chicken to be golden brown and reach an internal temperature of 165°F. Once cooked, place the chicken on paper towels to drain any excess oil.

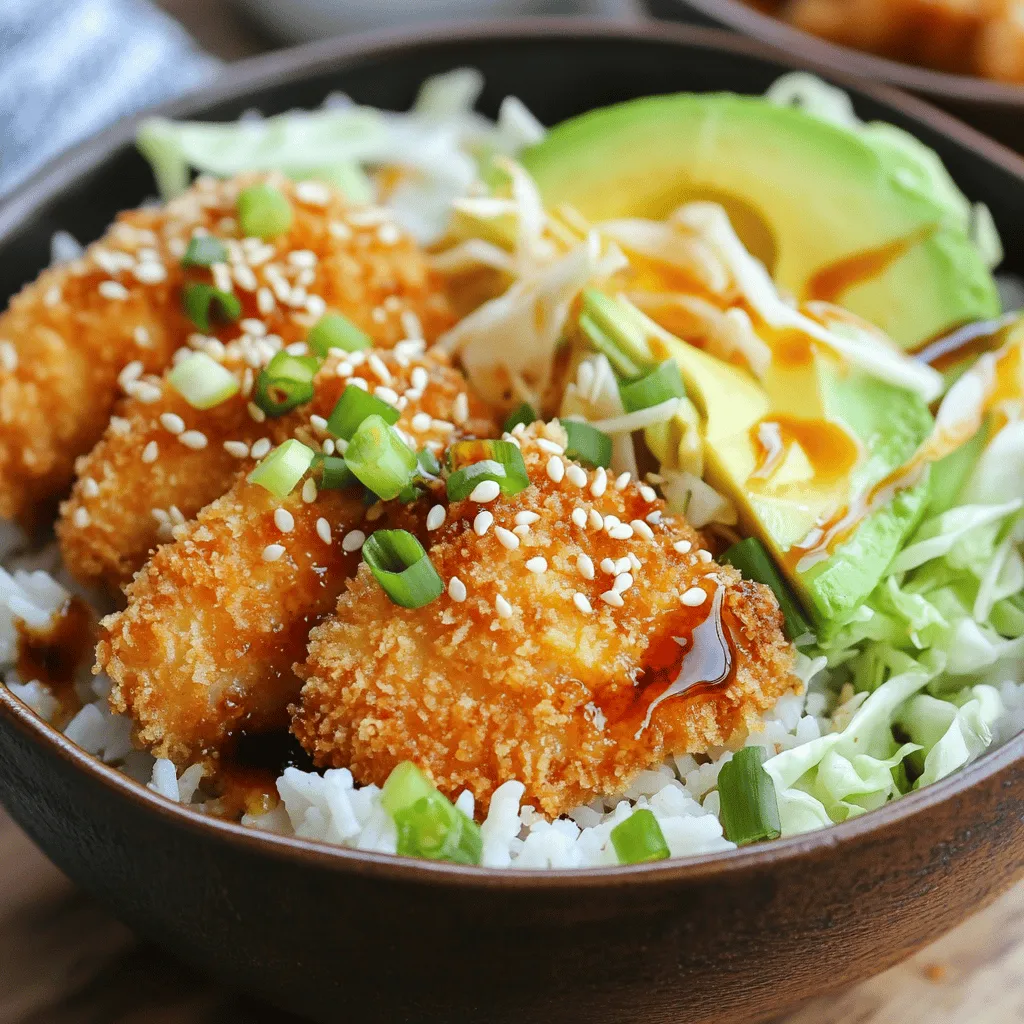
Assembling the Bowls

For the best Katsu bowls, start with a scoop of cooked Japanese rice at the bottom of each bowl. Layer shredded cabbage on top of the rice. Next, slice the crispy chicken and place it over the cabbage.

Garnish the Bowls

Add sliced avocado next to the chicken. Include a tablespoon of pickled ginger on the side. Drizzle the dish with teriyaki sauce and sprinkle sesame seeds and chopped green onions over the top. This adds great flavor and makes your bowls look beautiful.

Now you can enjoy your delicious Katsu bowls! For the complete recipe, check the Full Recipe section.

Tips & Tricks

Perfecting the Katsu

To get the best katsu, start with the right chicken. I prefer chicken thighs for their juiciness. Pound the chicken to an even 1/2 inch thickness. This step helps it cook evenly. Season both sides with salt and pepper.

When frying, heat vegetable oil in a skillet to medium-high. The oil should shimmer but not smoke. This temperature ensures a crispy coating. Fry each piece for about 3-4 minutes per side. Look for a golden brown color. The chicken must reach 165°F inside. Let it rest on paper towels to drain excess oil.

Presentation Tips

Presentation matters when serving katsu bowls. Begin with a scoop of warm cooked Japanese rice in deep bowls. This is the base. Layer shredded cabbage on top for crunch. Add the crispy katsu next.

For visual appeal, artfully arrange sliced avocado beside the chicken. Place vibrant pickled ginger on the side. Drizzle with teriyaki sauce for flavor. Finish with sesame seeds and chopped green onions on top. This makes the dish pop!

Recommendations for Authentic Flavors

To keep the flavors authentic, use traditional Japanese ingredients. Look for high-quality panko breadcrumbs. These give a light and crispy texture. Soy sauce should be from a trusted brand. It adds depth to the katsu.

Using Japanese rice is key for the right taste. Short-grain rice is best for its sticky texture. If you can, find fresh pickled ginger. It adds brightness to the dish. These small details bring your katsu bowls to life. For the full recipe, check out the [Full Recipe].

Variations

Chicken vs. Pork Katsu

You can choose between chicken and pork for your katsu. Chicken katsu tends to be lighter. It has a delicate flavor that pairs well with many sides. Pork katsu, on the other hand, offers a richer taste. It is juicier and can be more filling. The cooking method stays the same for both. You pound the meat to ensure even cooking. Then, you bread and fry it, but the flavor will differ based on your choice.

Vegetarian and Vegan Options

If you want a vegetarian or vegan version, try tofu katsu. Start with firm tofu for the best texture. Press the tofu to remove extra water. Then, slice it into thick slabs. Follow the same breading steps as you would for chicken. You can also add some fun sides like sautéed mushrooms, or a fresh salad. This way, you keep the meal tasty and healthy.

Seasonal Variations

You can make your katsu bowl unique by adding seasonal vegetables. In spring, try fresh asparagus or snap peas. In summer, add ripe tomatoes or bell peppers. Autumn brings squash and sweet potatoes, while winter calls for hearty greens. These veggies not only boost flavor but also add color. You can mix and match your toppings to fit the season. This keeps your meal fresh and exciting.

Storage Info

Storing Leftovers

To keep your Katsu bowls fresh, store them in the fridge. Place the chicken, rice, and veggies in separate airtight containers. This helps maintain texture and taste. Enjoy them within 2 to 3 days for the best flavor. If you want to keep them longer, you can freeze the chicken and rice. Wrap them tightly in plastic wrap, then place them in a freezer bag. They last well for up to 3 months in the freezer. Just be sure to label them with the date.

Reheating Methods

Reheat your Katsu bowls carefully to keep them tasty. For the chicken, use an oven or air fryer. Preheat to 350°F (175°C) and cook for about 10-15 minutes. This makes it crispy again. If you want a quicker method, use a microwave. But be mindful, as this may make the chicken less crispy. For the rice, sprinkle a little water on it before microwaving. This keeps it moist. For the veggies, heat them briefly on the stove to keep their crunch. Enjoy your meals warm for the best experience!

FAQs

What is the origin of Katsu?

Katsu comes from Japan. It means “cutlet” in Japanese. The dish has roots in Western cuisine. In the late 19th century, the Japanese adopted breaded cutlets. Katsu quickly became a popular dish. It is often served with rice and cabbage. Today, Katsu represents home-cooked comfort in Japan. It symbolizes the blend of cultures in Japanese food.

Can I use chicken breasts instead of thighs?

Yes, you can use chicken breasts. They are leaner than thighs. This change affects the flavor and texture. Breasts can be drier when cooked. Thighs provide a richer taste and moist texture. If you choose breasts, watch the cooking time. You want them to stay juicy and tender.

What to serve with Katsu bowls?

Katsu bowls are great with several sides. Here are some tasty options:

– Miso soup

– Edamame

– Pickled vegetables

– Steamed broccoli

– Seaweed salad

These sides add balance and flavor to the meal. They also enhance the katsu experience.

How can I make Katsu gluten-free?

You can easily make Katsu gluten-free. Use gluten-free flour instead of regular flour. For the breadcrumbs, choose gluten-free panko. Many brands offer these options. Check labels to ensure they are gluten-free. This way, you can enjoy Katsu without worry.

You now have a complete guide to making delicious Japanese Katsu bowls. We covered the essential ingredients, step-by-step cooking methods, and tips for the best texture and flavor. Each layer of the dish adds to the experience, from crispy chicken to fresh vegetables. Remember, you can customize your Katsu for dietary needs or seasonal tastes. Enjoy your cooking and savor your Katsu, knowing you’ve mastered this flavorful meal. You have the skills to impress anyone at your next dinner!

To make your Katsu bowls, gather these key ingredients: - 2 boneless, skinless chicken thighs - 1 cup panko breadcrumbs - 1/2 cup all-purpose flour - 1 large egg - 1 tablespoon soy sauce - 1 tablespoon Dijon mustard - Salt and pepper to taste - Vegetable oil for frying - 2 cups cooked Japanese rice (short-grain preferred) - 1 cup shredded cabbage (purple or green) - 1 ripe avocado, sliced - 1/4 cup pickled ginger These ingredients create layers of flavor and texture. The chicken thighs provide juiciness. Panko gives a crispy crust. Rice acts as a soft base, while cabbage adds crunch. Avocado offers creaminess, and pickled ginger adds a zesty touch. To take your Katsu bowls to the next level, consider these garnishes and sides: - Sesame seeds - Chopped green onions - Teriyaki sauce - Lime wedges Sesame seeds and green onions add a nice finish. They make the dish look pretty and tasty. A drizzle of teriyaki sauce enhances the flavor. A squeeze of lime can brighten the dish. These small touches can make your meal special. Check out the Full Recipe for detailed steps on preparation! Start with two boneless, skinless chicken thighs. Lay them between two pieces of plastic wrap. Use a meat mallet or a rolling pin to pound the chicken down to about 1/2 inch thick. This helps the chicken cook evenly. Season both sides with salt and pepper to add flavor. Next, set up your breading station. Grab three shallow dishes. In the first, add 1/2 cup of all-purpose flour. In the second, beat one large egg and mix in one tablespoon of soy sauce and one tablespoon of Dijon mustard. In the third dish, place one cup of panko breadcrumbs. Organizing these in a line makes it easy to coat the chicken. Heat about 1/2 inch of vegetable oil in a large skillet over medium-high heat. Wait until the oil shimmers, but be careful not to let it smoke. Carefully add the breaded chicken to the hot oil. Fry each piece for about 3-4 minutes on each side. You want the chicken to be golden brown and reach an internal temperature of 165°F. Once cooked, place the chicken on paper towels to drain any excess oil. For the best Katsu bowls, start with a scoop of cooked Japanese rice at the bottom of each bowl. Layer shredded cabbage on top of the rice. Next, slice the crispy chicken and place it over the cabbage. Add sliced avocado next to the chicken. Include a tablespoon of pickled ginger on the side. Drizzle the dish with teriyaki sauce and sprinkle sesame seeds and chopped green onions over the top. This adds great flavor and makes your bowls look beautiful. Now you can enjoy your delicious Katsu bowls! For the complete recipe, check the Full Recipe section. To get the best katsu, start with the right chicken. I prefer chicken thighs for their juiciness. Pound the chicken to an even 1/2 inch thickness. This step helps it cook evenly. Season both sides with salt and pepper. When frying, heat vegetable oil in a skillet to medium-high. The oil should shimmer but not smoke. This temperature ensures a crispy coating. Fry each piece for about 3-4 minutes per side. Look for a golden brown color. The chicken must reach 165°F inside. Let it rest on paper towels to drain excess oil. Presentation matters when serving katsu bowls. Begin with a scoop of warm cooked Japanese rice in deep bowls. This is the base. Layer shredded cabbage on top for crunch. Add the crispy katsu next. For visual appeal, artfully arrange sliced avocado beside the chicken. Place vibrant pickled ginger on the side. Drizzle with teriyaki sauce for flavor. Finish with sesame seeds and chopped green onions on top. This makes the dish pop! To keep the flavors authentic, use traditional Japanese ingredients. Look for high-quality panko breadcrumbs. These give a light and crispy texture. Soy sauce should be from a trusted brand. It adds depth to the katsu. Using Japanese rice is key for the right taste. Short-grain rice is best for its sticky texture. If you can, find fresh pickled ginger. It adds brightness to the dish. These small details bring your katsu bowls to life. For the full recipe, check out the [Full Recipe]. {{image_4}} You can choose between chicken and pork for your katsu. Chicken katsu tends to be lighter. It has a delicate flavor that pairs well with many sides. Pork katsu, on the other hand, offers a richer taste. It is juicier and can be more filling. The cooking method stays the same for both. You pound the meat to ensure even cooking. Then, you bread and fry it, but the flavor will differ based on your choice. If you want a vegetarian or vegan version, try tofu katsu. Start with firm tofu for the best texture. Press the tofu to remove extra water. Then, slice it into thick slabs. Follow the same breading steps as you would for chicken. You can also add some fun sides like sautéed mushrooms, or a fresh salad. This way, you keep the meal tasty and healthy. You can make your katsu bowl unique by adding seasonal vegetables. In spring, try fresh asparagus or snap peas. In summer, add ripe tomatoes or bell peppers. Autumn brings squash and sweet potatoes, while winter calls for hearty greens. These veggies not only boost flavor but also add color. You can mix and match your toppings to fit the season. This keeps your meal fresh and exciting. To keep your Katsu bowls fresh, store them in the fridge. Place the chicken, rice, and veggies in separate airtight containers. This helps maintain texture and taste. Enjoy them within 2 to 3 days for the best flavor. If you want to keep them longer, you can freeze the chicken and rice. Wrap them tightly in plastic wrap, then place them in a freezer bag. They last well for up to 3 months in the freezer. Just be sure to label them with the date. Reheat your Katsu bowls carefully to keep them tasty. For the chicken, use an oven or air fryer. Preheat to 350°F (175°C) and cook for about 10-15 minutes. This makes it crispy again. If you want a quicker method, use a microwave. But be mindful, as this may make the chicken less crispy. For the rice, sprinkle a little water on it before microwaving. This keeps it moist. For the veggies, heat them briefly on the stove to keep their crunch. Enjoy your meals warm for the best experience! Katsu comes from Japan. It means "cutlet" in Japanese. The dish has roots in Western cuisine. In the late 19th century, the Japanese adopted breaded cutlets. Katsu quickly became a popular dish. It is often served with rice and cabbage. Today, Katsu represents home-cooked comfort in Japan. It symbolizes the blend of cultures in Japanese food. Yes, you can use chicken breasts. They are leaner than thighs. This change affects the flavor and texture. Breasts can be drier when cooked. Thighs provide a richer taste and moist texture. If you choose breasts, watch the cooking time. You want them to stay juicy and tender. Katsu bowls are great with several sides. Here are some tasty options: - Miso soup - Edamame - Pickled vegetables - Steamed broccoli - Seaweed salad These sides add balance and flavor to the meal. They also enhance the katsu experience. You can easily make Katsu gluten-free. Use gluten-free flour instead of regular flour. For the breadcrumbs, choose gluten-free panko. Many brands offer these options. Check labels to ensure they are gluten-free. This way, you can enjoy Katsu without worry. You now have a complete guide to making delicious Japanese Katsu bowls. We covered the essential ingredients, step-by-step cooking methods, and tips for the best texture and flavor. Each layer of the dish adds to the experience, from crispy chicken to fresh vegetables. Remember, you can customize your Katsu for dietary needs or seasonal tastes. Enjoy your cooking and savor your Katsu, knowing you've mastered this flavorful meal. You have the skills to impress anyone at your next dinner!

Japanese Katsu Bowls

Discover how to create mouthwatering Japanese Katsu bowls with this simple and delicious recipe guide! Featuring crispy chicken, fluffy rice, and fresh veggies, this dish is sure to impress at any meal. Follow step-by-step instructions to master this classic Japanese favorite. Perfect for dinner gatherings or a cozy night in! Click through to explore the full recipe and bring the taste of Japan to your kitchen today!

Ingredients
  

2 boneless, skinless chicken thighs

1 cup panko breadcrumbs

1/2 cup all-purpose flour

1 large egg

1 tablespoon soy sauce

1 tablespoon Dijon mustard

Salt and pepper to taste

Vegetable oil for frying

2 cups cooked Japanese rice (short-grain preferred)

1 cup shredded cabbage (purple or green)

1 ripe avocado, sliced

1/4 cup pickled ginger

2 tablespoons teriyaki sauce

Sesame seeds for garnish

Chopped green onions for garnish

Instructions
 

Prepare the Chicken: Start by laying the chicken thighs between two pieces of plastic wrap. Using a meat mallet or rolling pin, gently pound the chicken to an even thickness of about 1/2 inch. This ensures even cooking. Season both sides generously with salt and pepper for flavor.

    Set Up Breading Station: Prepare a breading station by placing the all-purpose flour in one shallow dish, the beaten egg mixed with soy sauce and Dijon mustard in a second, and the panko breadcrumbs in a third. Organizing these in a line will make the coating process easier.

      Bread the Chicken: Dredge each piece of chicken in the flour, shaking off any excess. Next, dip the chicken into the egg mixture, ensuring it is well-coated. Finally, press it into the panko breadcrumbs, covering the chicken evenly and pressing gently to form a nice crust.

        Fry the Chicken: In a large skillet, heat about 1/2 inch of vegetable oil over medium-high heat. Wait until the oil is shimmering (but not smoking) before carefully adding the breaded chicken. Fry for approximately 3-4 minutes on each side, or until the chicken is golden brown and cooked through (the internal temperature should reach 165°F). Once done, remove the chicken and let it rest on paper towels to drain any excess oil.

          Assemble the Bowls: To create the bowls, start with a generous scoop of the cooked Japanese rice at the bottom of each serving bowl. Layer the shredded cabbage on top, followed by the crispy chicken katsu.

            Garnish the Bowls: Artfully arrange the sliced avocado next to the chicken and add a tablespoon of vibrant pickled ginger on the side. Drizzle the dish with teriyaki sauce and generously sprinkle sesame seeds and chopped green onions over everything for a tasty finish.

              Prep Time, Total Time, Servings: 20 minutes | 40 minutes | 2 servings

                - Presentation Tips: Serve in deep bowls with the rice as the foundation and the colorful toppings artistically arranged on top. A few extra sesame seeds and a wedge of lime can add a delightful pop of color. Enjoy your Katsu bowls warm for the best flavor!

                  Leave a Comment

                  Recipe Rating