Looking for a tasty and healthy snack? You’ve come to the right place! Garlic Herb Roasted Chickpeas are crispy, full of flavor, and easy to make. With simple ingredients and easy steps, these chickpeas are perfect for any occasion. Let’s dive into how you can whip up this delicious treat that will satisfy your cravings without guilt. Read on and get ready to snack right!
Why I Love This Recipe
- Crispy Texture: The key to this recipe is ensuring the chickpeas are dry before roasting, resulting in a perfectly crispy snack that is addictive!
- Flavorful Seasoning: The combination of garlic, herbs, and spices creates a mouthwatering flavor profile that elevates simple chickpeas to a gourmet level.
- Quick and Easy: This recipe is incredibly simple, taking just 10 minutes of prep time, making it a perfect snack for busy days.
- Versatile Snack: Whether enjoyed on their own or paired with dips, these roasted chickpeas are a versatile and healthy option for any occasion.
Ingredients
Complete ingredient list
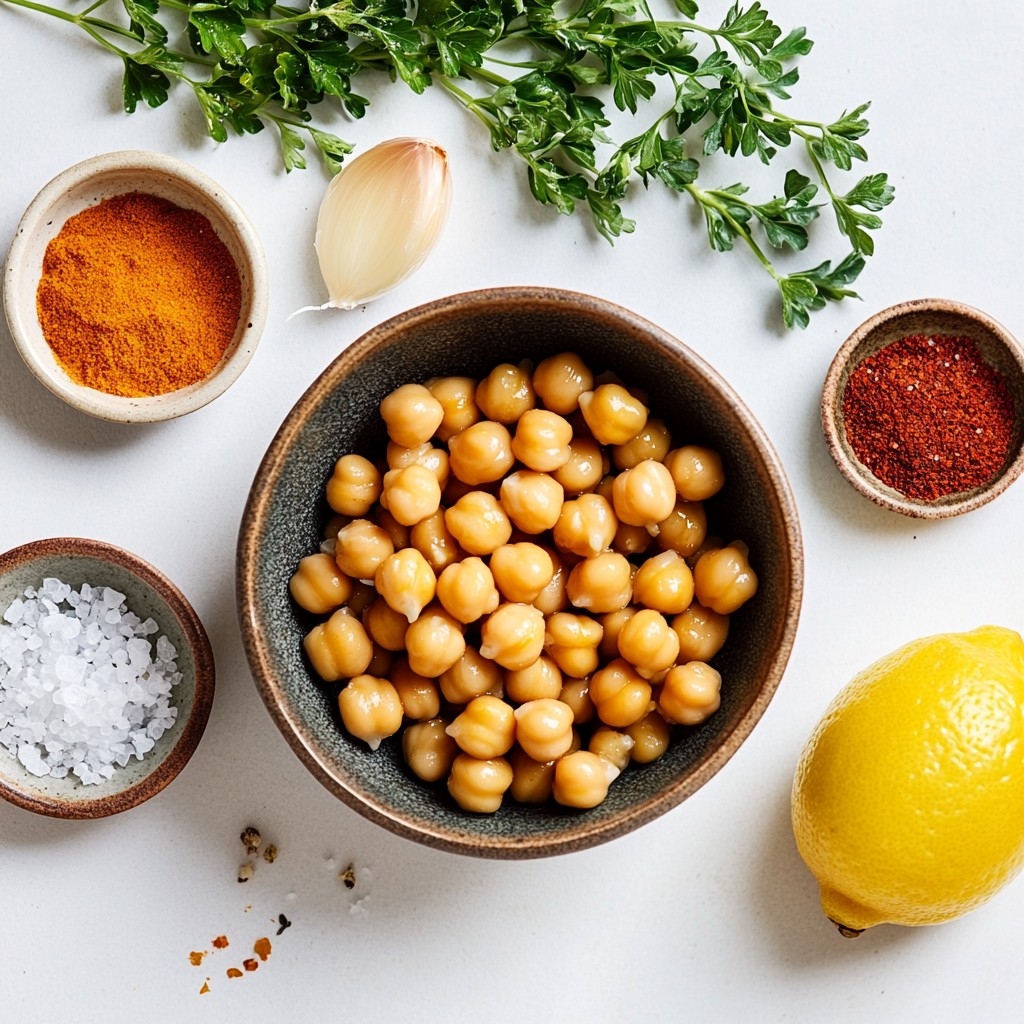
- 1 can (15 oz) chickpeas, thoroughly drained and rinsed
- 2 tablespoons extra virgin olive oil
- 4 garlic cloves, finely minced
- 1 teaspoon dried oregano
- 1 teaspoon dried thyme
- ½ teaspoon smoked paprika
- ½ teaspoon sea salt
- ¼ teaspoon freshly ground black pepper
- Zest from 1 lemon
- Fresh parsley, finely chopped (for garnish)
Description of key ingredients
Chickpeas are the star of this dish. They bring protein and fiber. They also have a mild flavor that absorbs spices well. Olive oil helps the chickpeas crisp up in the oven. It adds a rich taste too. Garlic gives a strong, savory kick. The dried oregano and thyme add a nice herbal note. Smoked paprika brings a hint of smoky flavor, giving depth. Sea salt and black pepper enhance the taste. Finally, lemon zest adds brightness, making every bite refreshing.
Substitute options for dietary needs
If you need alternatives, here are some easy swaps:
- Use any beans if chickpeas are not available.
- Replace olive oil with avocado oil for a different flavor.
- For a garlic-free version, try onion powder instead.
- Use fresh herbs like thyme or oregano if you prefer them over dried.
- To add spice, consider using cayenne pepper in place of smoked paprika.
Step-by-Step Instructions
Preparation of chickpeas
First, preheat your oven to 400°F (200°C). This makes sure the chickpeas roast well. Next, get a baking sheet and line it with parchment paper. This helps with easy cleanup later. Take one can of chickpeas, which is about 15 ounces. Drain them well in a colander. Rinse the chickpeas under cold water to remove any canning liquid. After that, use a clean kitchen towel to gently pat them dry. Getting them dry is key. It helps them become crispy when you roast them.
Seasoning the chickpeas
In a large mixing bowl, add the dry chickpeas. Pour in 2 tablespoons of extra virgin olive oil. This adds flavor and helps the seasonings stick. Next, finely mince 4 garlic cloves and add them to the bowl. For herbs, add 1 teaspoon each of dried oregano and dried thyme. These herbs bring a nice aroma. Then, add ½ teaspoon of smoked paprika for a hint of smokiness. Sprinkle in ½ teaspoon of sea salt and ¼ teaspoon of freshly ground black pepper. Mix everything well until all the chickpeas are evenly coated in the oil and spices.
Roasting process
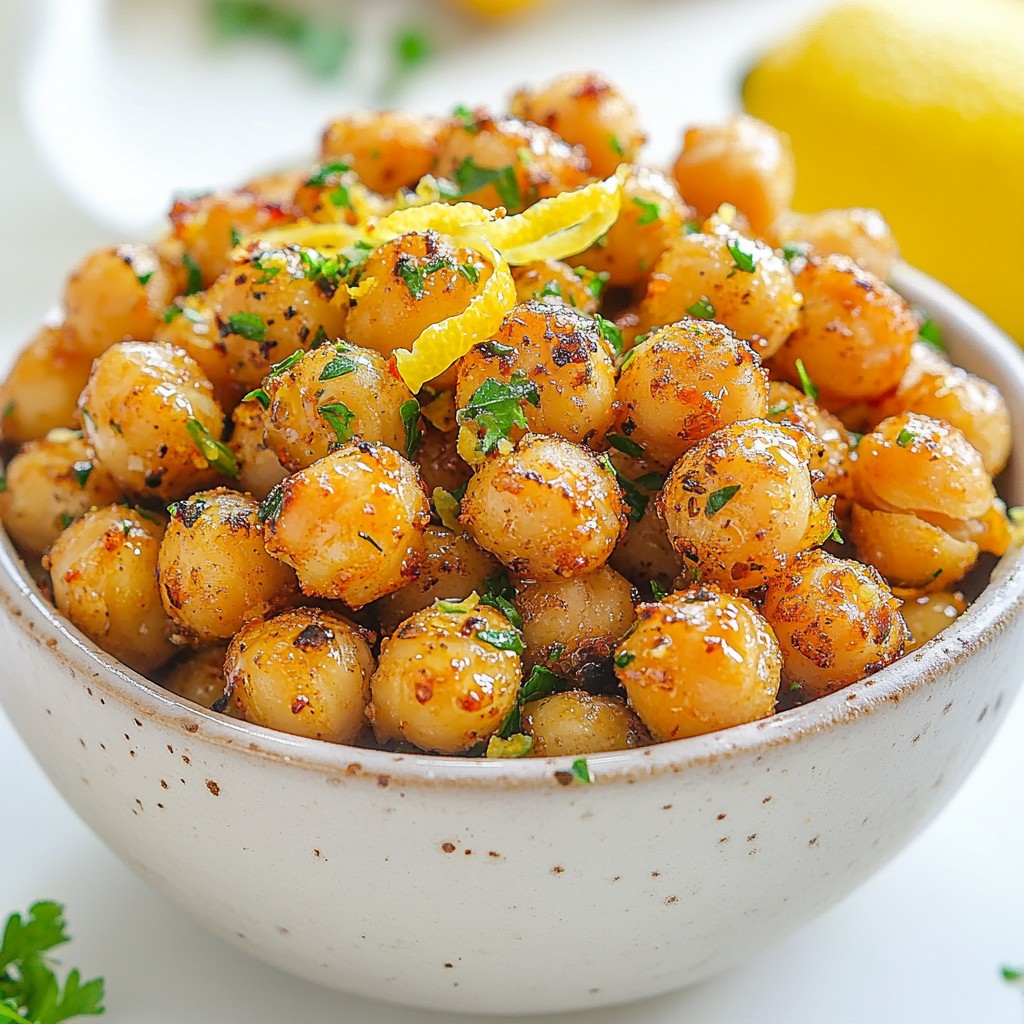
Spread the seasoned chickpeas in a single layer on the lined baking sheet. Make sure they are not crowded. This allows each chickpea to roast evenly. Place the baking sheet in the preheated oven. Roast for 25-30 minutes, shaking the pan halfway through. This helps them brown evenly. When they are done, they should look golden and crisp. Once out of the oven, sprinkle with lemon zest for a fresh, zesty flavor. Toss gently to mix the zest in well. Let the chickpeas cool for a few minutes before serving. For a pop of color, garnish with finely chopped fresh parsley.
Tips & Tricks
How to achieve maximum crispiness
To get crunchy garlic herb roasted chickpeas, start by drying them well. Lay them on a clean towel and pat gently. Remove as much moisture as you can. When you coat them in oil, make sure they are evenly covered. Use just enough olive oil to coat, but not drown them. Spread the chickpeas in a single layer on the baking sheet. If they are too close, they will steam instead of roast. Shake the pan halfway through cooking. This helps them brown evenly.
Best practices for seasoning
For great flavor, use fresh garlic cloves. Mince them finely so they mix well. Add dried herbs like oregano and thyme for a classic taste. Smoked paprika gives them a nice smoky kick. Adjust the salt to your taste, but don't skip it. Salt enhances the flavors. Toss the chickpeas well so every piece is coated. Zesting lemon over the hot chickpeas adds brightness.
Cooling and storage tips
After roasting, let the chickpeas cool on the baking sheet. This keeps them crispy. If you store them, use an airtight container. They taste best within a few days. Avoid storing them in the fridge, as moisture makes them soft. If they lose their crunch, re-roast them for a few minutes. Enjoy your tasty snack whenever you want!
Pro Tips
- Dry Chickpeas Thoroughly: Ensuring your chickpeas are completely dry before roasting is key to achieving that desired crispiness.
- Use High-Quality Olive Oil: A good extra virgin olive oil will enhance the flavor of the chickpeas, making them even more delicious.
- Experiment with Spices: Don't hesitate to tweak the spices to your liking! Adding a pinch of cayenne or a dash of cumin can elevate the flavor profile.
- Store in an Airtight Container: To maintain crispiness, store any leftovers in an airtight container. They are best enjoyed within a few days.
Variations
Flavor variations (e.g., spicy, cheesy)
You can easily change the flavor of your garlic herb roasted chickpeas. For a spicy kick, add cayenne pepper or chili powder. Mix in one teaspoon of either spice when you combine the chickpeas with oil and herbs. If you want a cheesy taste, sprinkle in some nutritional yeast. It gives a rich, cheesy flavor without dairy. Just add a couple of tablespoons when seasoning your chickpeas.
Alternative herbs and spices
Feel free to get creative with herbs and spices. Instead of oregano and thyme, try using rosemary or basil for a new twist. You can also experiment with curry powder for a warm, earthy flavor. If you love smokiness, use chipotle powder instead of smoked paprika. Each herb or spice brings its own character to the dish.
Serving suggestions for different occasions
Garlic herb roasted chickpeas are great for many events. For a movie night, serve them in a bowl with popcorn for a fun mix. If you host a gathering, add them to a charcuterie board. They pair well with cheeses, nuts, and fruits. For a healthy snack, enjoy them with a yogurt dip or hummus. You can also toss them in salads for extra crunch and flavor.
Storage Info
How to store leftovers
After you enjoy your garlic herb roasted chickpeas, let them cool completely. Place them in an airtight container. This keeps them fresh and tasty. If you have a lot, split them into smaller containers. Store them in the fridge for best results.
Reheating methods for optimal texture
To keep your roasted chickpeas crispy, avoid the microwave. Instead, use the oven or an air fryer. Preheat your oven to 350°F (175°C). Spread the chickpeas on a baking sheet and heat for about 10 minutes. If using an air fryer, cook them at 350°F for around 5 minutes. This way, they stay crunchy and delicious.
Shelf life of roasted chickpeas
When stored properly, roasted chickpeas can last up to a week in the fridge. They might lose some crispiness over time. If you want to keep them longer, consider freezing them. Just place them in a freezer-safe bag. They can last for up to three months in the freezer. When ready to eat, thaw and reheat for a tasty snack!
FAQs
Can I use dried chickpeas instead of canned?
Yes, you can use dried chickpeas. First, soak them overnight in water. After soaking, cook them until tender. This process will take longer than using canned chickpeas. Make sure to drain and rinse them well before roasting. Dried chickpeas can give a fresher taste and texture.
What can I serve with garlic herb roasted chickpeas?
You can serve roasted chickpeas in many ways. They make a great snack on their own. You can also pair them with a creamy yogurt dip or some smooth hummus. For a fun twist, toss them on a salad for added crunch. They add flavor and texture to any dish!
Are roasted chickpeas healthy?
Yes, roasted chickpeas are very healthy! They are high in protein and fiber. This makes them great for your diet. They are also low in fat when you use less oil. Plus, they are a great alternative to chips or other snacks. Enjoy them guilt-free!
In this post, we discussed how to make garlic herb roasted chickpeas. We covered the key ingredients, step-by-step prep, and roasting process. You learned tips for crispiness and best seasoning practices. We shared flavor variations and smart storage ideas. Remember, roasted chickpeas are easy to make and fun to enjoy. Whether you want a snack or a party treat, these chickpeas fit the bill. Try them out and impress your friends with your tasty skills!