Craving a sweet treat that’s both easy and delicious? Look no further! My Coconut Cream Pie Bars are the perfect no-bake dessert for any occasion. With a creamy filling and a crunchy crust, these bars will impress your family and friends. Plus, you only need simple ingredients you likely already have. Let’s dive into this easy recipe that brings the taste of tropical sunshine right to your kitchen!
Ingredients
Dry Ingredients
– 1 cup all-purpose flour
– 1/2 cup unsweetened shredded coconut
– 1/4 cup powdered sugar
– 1/4 cup cornstarch
Wet Ingredients
– 1/2 cup unsalted butter, softened to room temperature
– 1 (14 oz) can coconut milk, well stirred
– 1/2 cup granulated sugar
– 3 large eggs, at room temperature
– 1 teaspoon pure vanilla extract
Toppings
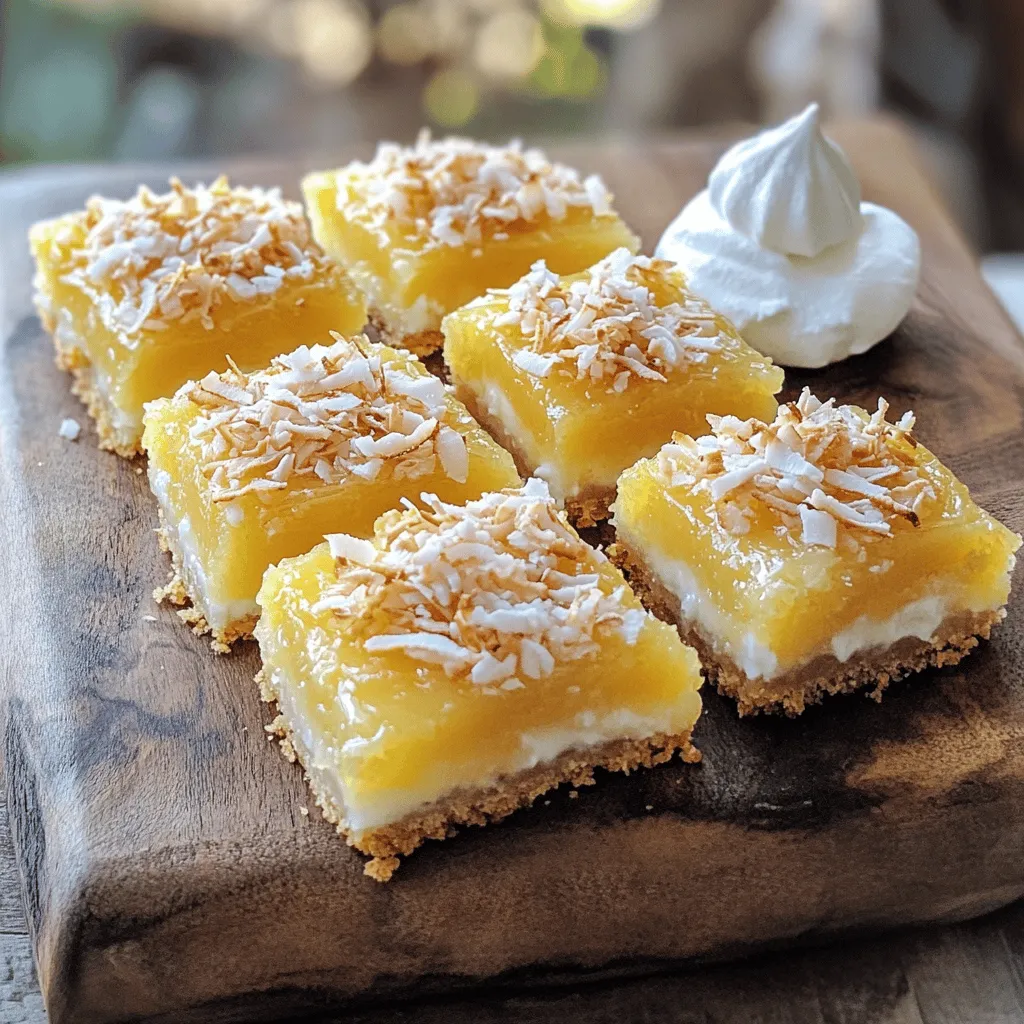
– 1/4 cup sweetened shredded coconut, lightly toasted
– Whipped cream (optional)
I love using simple, fresh ingredients to create Coconut Cream Pie Bars. The dry ingredients form a lovely crust that serves as the base. The all-purpose flour gives the bars structure, while the unsweetened shredded coconut adds a nice texture. The powdered sugar sweetens the crust just right, and the cornstarch helps keep it firm.
The wet ingredients bring life to these bars. Unsalted butter adds richness, and coconut milk brings a creamy, tropical touch. Granulated sugar sweetens the filling, and eggs help it set perfectly. Pure vanilla extract makes everything taste great.
For toppings, I toast sweetened shredded coconut until golden. It gives a crunchy bite on top. A dollop of whipped cream adds extra indulgence, but it’s optional.
Step-by-Step Instructions
Preparing the Crust
1. Preheat your oven to 350°F (175°C). Grab an 8×8 inch baking dish and lightly grease it with cooking spray or butter.
2. In a medium bowl, mix together the all-purpose flour, unsweetened shredded coconut, powdered sugar, and softened butter until it looks like coarse crumbs. You can use your fingers or a pastry cutter for this.
3. Press the crumbly mixture evenly into the bottom of your baking dish to form a solid crust. Make sure it is packed well.
Making the Filling
1. In a separate bowl, combine the well-stirred coconut milk, granulated sugar, large eggs, cornstarch, pure vanilla extract, and salt.
2. Whisk this mixture until it is smooth and creamy. This will be the delicious filling for your bars.
Baking and Cooling
1. Place the crust in the oven and bake it for about 15 minutes, until it is light golden brown. Keep an eye on it to avoid burning.
2. Once the crust is done, remove it from the oven and let it cool slightly. Pour the coconut filling over the cooled crust, spreading it evenly.
3. Return the dish to the oven and bake for an additional 25-30 minutes. The filling should be set in the center and lightly golden on top.
Chilling and Serving
1. After baking, let the bars cool completely at room temperature. This step is important!
2. Transfer the dish to the refrigerator and chill for at least 2 hours. This helps the bars firm up nicely.
3. When ready to serve, use a sharp knife to cut the dessert into squares or bars. Top with the toasted shredded coconut for a lovely finish. If you like, add a dollop of whipped cream right before serving.
Tips & Tricks
Achieving the Perfect Texture
To get the best texture, pay attention to baking times. For the crust, bake it for about 15 minutes. Look for a light golden color. If it’s too dark, your bars may taste burnt. After baking, allow the crust to cool slightly. This step helps the filling set better.
Let the baked bars cool completely at room temperature. Then, chill them in the fridge for at least two hours. Chilling firms up the filling. It also makes cutting the bars easier.
Substitutions and Enhancements
You can swap some ingredients to fit your taste. For a gluten-free option, use almond flour instead of all-purpose flour. If you prefer less sugar, cut down the granulated sugar by a quarter.
Want to enhance the flavor? Mix in some crushed pineapple for a tropical twist. You could also add a touch of almond extract for a unique taste.
Presentation Ideas
When serving, use a decorative platter. This adds a nice touch to your dessert table. Garnish with fresh mint leaves for color. A light dusting of powdered sugar also looks great.
For an extra special treat, top each bar with whipped cream. Serve it right before enjoying. This adds creaminess that everyone loves. You can even add a sprinkle of toasted coconut on top for a delightful crunch.

Variations
Tropical Twist
You can add a burst of flavor by including pineapple. Fresh pineapple chunks or crushed pineapple work great. This fruity addition gives the bars a refreshing twist. For coconut cream variations, try using coconut cream instead of coconut milk. This change makes the filling even richer and creamier.
Chocolate Indulgence
For chocolate lovers, incorporating cocoa powder is a must. Mix in two tablespoons of cocoa powder with your wet ingredients. This simple addition transforms your bars into a chocolate delight. You can also drizzle melted chocolate on top before serving. It adds a beautiful finish and extra flavor.
Nutty Delight
If you love nuts, add pecans or almonds. Chop them up and mix them into the filling. This will give your bars a nice crunch. You can also sprinkle them on top with the toasted coconut. Mixing with other toppings like crushed cookies or chocolate chips adds even more texture and taste.
Storage Info
Refrigeration Tips
To keep your Coconut Cream Pie Bars fresh, store them in an airtight container. A glass container works well, but plastic will do too. They stay tasty in the fridge for about five days. Just make sure they are cool before sealing. This helps keep the texture right.
Freezing Instructions
You can freeze these bars for longer storage. First, cut them into squares. Place them in a single layer on a baking sheet. Put the sheet in the freezer for about an hour. Once they are firm, transfer them to a freezer-safe bag or container. This helps prevent sticking. They can last up to three months in the freezer.
When you are ready to enjoy them, take out what you want. Thaw them in the fridge overnight for the best results. This keeps them creamy and delicious. Enjoy your Coconut Dream Bars any time!
FAQs
Can I make these bars gluten-free?
Yes, you can make these bars gluten-free. Just swap the all-purpose flour with a gluten-free flour blend. Many blends work well in baking. Look for options that include xanthan gum for the best texture.
How do I know when the bars are done baking?
You can tell the bars are done when the filling is set and lightly golden. Gently shake the baking dish; the center should not jiggle. If the edges look firm and the top has color, it’s time to take them out.
Can I use sweetened coconut instead of unsweetened?
Yes, you can use sweetened coconut. Sweetened coconut adds more flavor and sweetness. However, you may want to reduce the sugar in your filling to balance the flavors.
What can I serve with Coconut Cream Pie Bars?
Serve these bars with whipped cream for a creamy touch. Fresh fruit, like sliced strawberries or berries, adds a nice contrast. Mint leaves can also brighten the plate. For extra crunch, try some nuts on top!
Coconut Cream Pie Bars combine bright flavors and simple steps. We explored dry and wet ingredients, along with toppings. I shared clear instructions for making the crust, filling, and baking. With tips for texture and fun variations, your options are limitless. Store them well, and enjoy fresh bites for days. Create your unique twist and indulge in these tasty bars. Baking can be fun and rewarding, so dive in!