If you're looking for a sweet treat that's easy to make and totally delicious, you've found it! Chocolate covered strawberry bark is a fun dessert that blends rich chocolate with sweet strawberries. In just a few simple steps, you can create this beautiful snack. Let me show you how to make this delightful treat and explore fun variations to impress your friends and family. Get ready to indulge!
Why I Love This Recipe
- Decadent Flavor Combination: The rich dark chocolate paired with the creamy white chocolate creates a delightful balance that’s hard to resist.
- Easy to Make: This recipe requires minimal effort and time, making it perfect for last-minute treats or gifts.
- Customizable: You can easily switch up the toppings with your favorite nuts or dried fruits to make it your own.
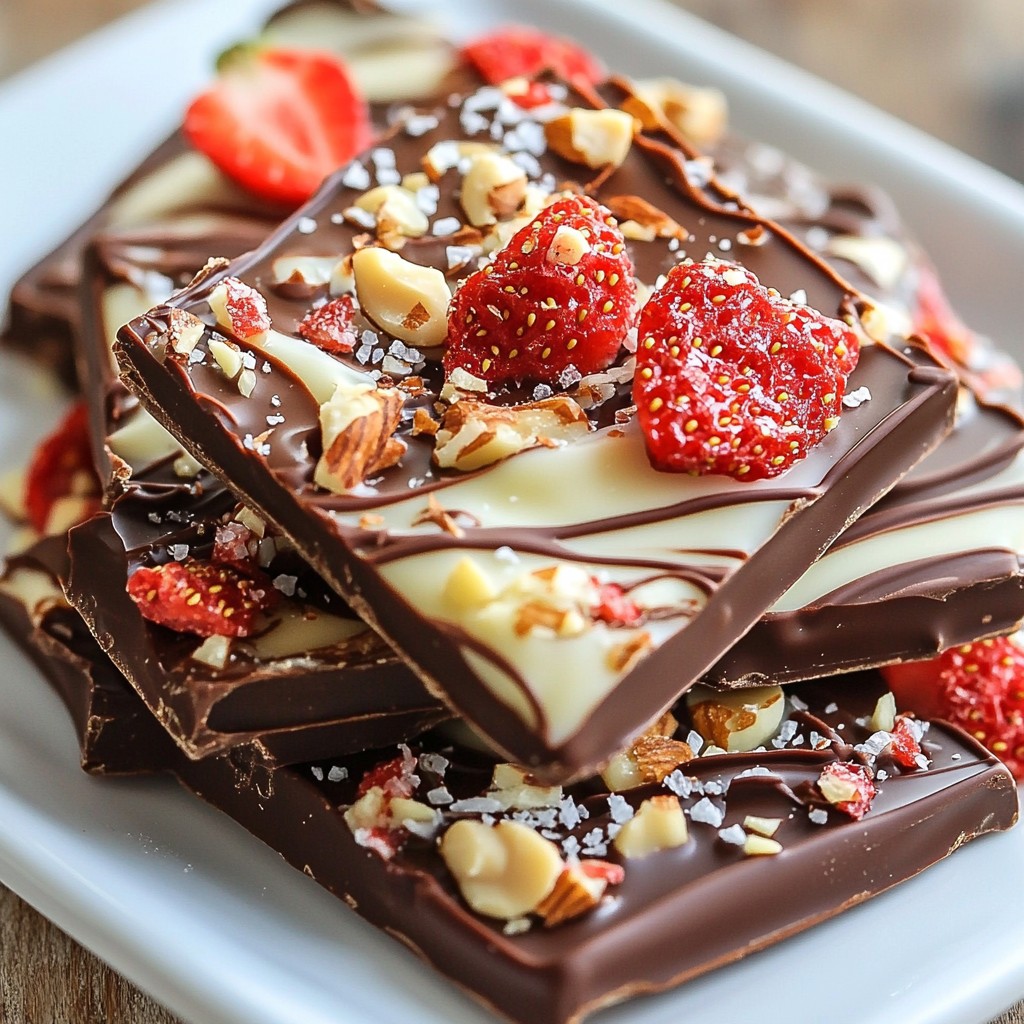
- Impressive Presentation: The marbled effect and colorful toppings make this bark not only tasty but visually stunning.
Ingredients
Main Ingredients for Chocolate Covered Strawberry Bark
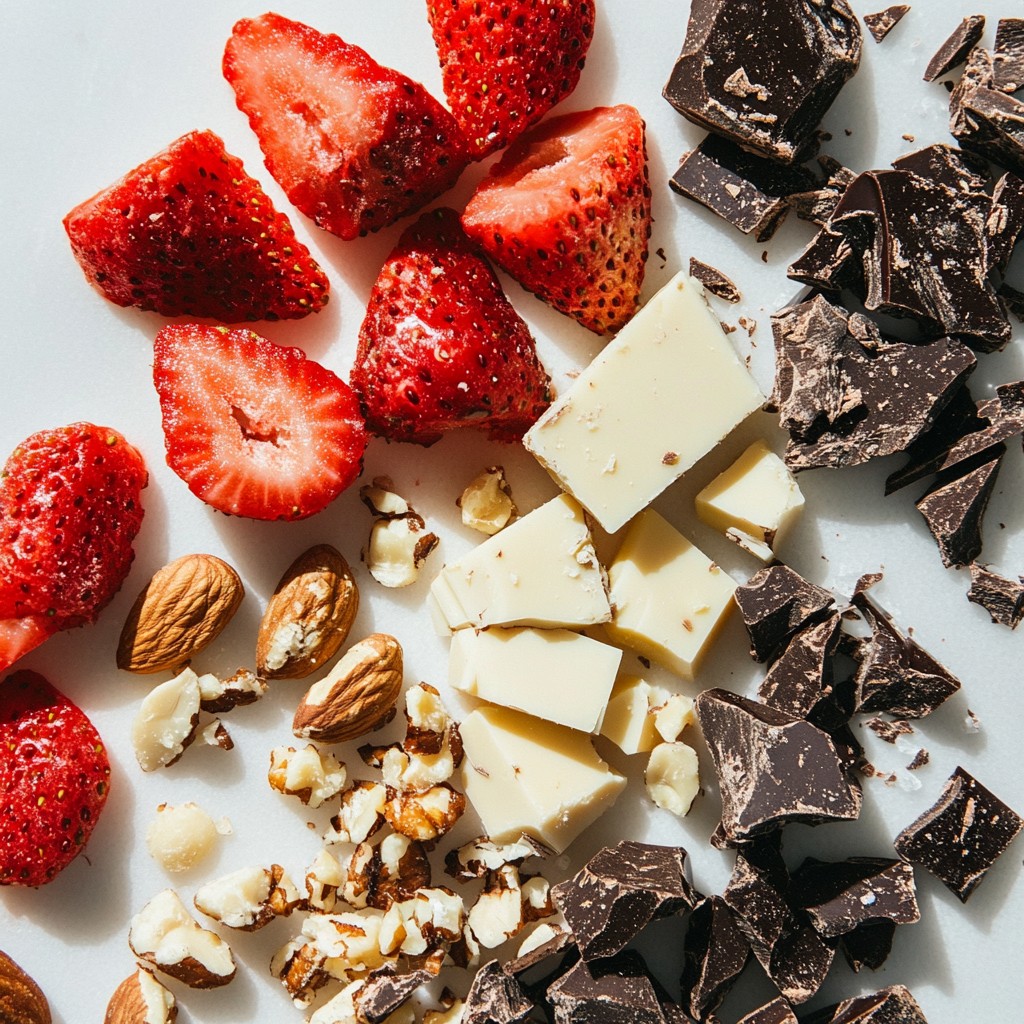
- 8 oz dark chocolate, finely chopped
- 8 oz white chocolate, finely chopped
- 1 cup freeze-dried strawberries
- 1/2 cup chopped nuts (such as almonds or walnuts)
- Sea salt flakes for finishing
Optional Add-Ins and Substitutions
- Alternative chocolates (milk chocolate or vegan chocolate)
- Different nuts or seeds
- Other freeze-dried fruits
When I make chocolate covered strawberry bark, I love to use quality dark chocolate. It gives a deep flavor that pairs well with sweet white chocolate. For this recipe, I chop 8 ounces of each type into small pieces. This helps them melt evenly and quickly.
Next, I add freeze-dried strawberries. One cup is perfect for a fruity crunch. They add a burst of color and flavor to the bark. I also like to toss in half a cup of chopped nuts. Almonds and walnuts work great, adding a nice crunch.
A sprinkle of sea salt flakes on top gives a lovely contrast to the sweetness. I love using it sparingly for a little kick.
If you want to switch things up, consider using milk chocolate or vegan chocolate. Different nuts or seeds can also change the flavor. You can even try other freeze-dried fruits like raspberries or bananas! This recipe is fun because you can make it your own with these simple swaps.
Step-by-Step Instructions
Preparing the Baking Sheet
Start by lining a baking sheet with parchment paper. This step helps the bark not stick. It makes the process easier when you want to break the bark into pieces later. Make sure the paper covers the entire sheet for best results.
Melting the Chocolates
To melt dark chocolate, chop it finely and put it in a microwave-safe bowl. Heat it in 30-second bursts. Stir well after each interval. This keeps the chocolate smooth. Be careful not to overheat it. Overheating can make the chocolate grainy.
Next, melt the white chocolate in the same way. Use a separate bowl. Stir it until it is silky. This technique works best for both types of chocolate.
Assembling the Bark
Once both chocolates are melted, pour the dark chocolate onto the lined baking sheet. Spread it evenly to about 1/4 inch thick. Then, drizzle the white chocolate over the dark layer. Use a spatula or toothpick to swirl them together. This creates pretty patterns.
Now, it's time for toppings! Sprinkle the freeze-dried strawberries and chopped nuts over the chocolate. Lightly push them down so they stick. For an extra kick, add sea salt flakes on top. This adds a nice flavor contrast.
Setting the Chocolate
Transfer the baking sheet to the fridge for about 30 minutes. This is the perfect time for the chocolate to harden. Make sure it sets until solid. Once set, you can break it into pieces. Use your hands or a knife to get the size you like. Enjoy your delicious creation!
Tips & Tricks
Ensuring Smooth Chocolate
To melt chocolate well, avoid overheating. Use a microwave-safe bowl. Heat the dark chocolate in 30-second bursts. Stir after each interval. This helps it melt evenly. If you see any lumps, keep stirring. The chocolate should be smooth and glossy. If it gets too hot, it may seize up. Keep the temperature low for the best results.
Creating Decorative Swirls
For a lovely marbled effect, drizzle white chocolate on the dark layer. Use a toothpick or spatula to swirl them together. Do this gently to avoid mixing too much. You want to see both colors. The swirls should look random but pretty. This adds a creative touch to your bark.
Serving Suggestions
When serving, make it look nice. Place your bark on a decorative platter. You can cut it into pieces or leave it in larger chunks. Adding whole fresh strawberries around the bark makes it pop. For gifts, wrap pieces in clear bags or boxes. This makes your treat feel special. Enjoy sharing this delightful treat at parties or gatherings!
Pro Tips
- Use Quality Chocolates: The flavor of your bark heavily relies on the quality of chocolate you use. Opt for high-quality dark and white chocolates for the best taste and texture.
- Customize with Add-ins: Feel free to experiment with different toppings like dried fruits, coconut flakes, or even crushed candies to personalize your bark.
- Control the Thickness: To achieve the desired texture, aim for a uniform thickness of about 1/4 inch when spreading the chocolate. Thicker bark will take longer to set.
- Storage Tips: Store the chocolate bark in an airtight container at room temperature for up to two weeks to maintain its freshness and crunchiness.
Variations
Flavor Combinations
You can mix things up with fun flavors. Instead of freeze-dried strawberries, try using mango or raspberries. These fruits add a bright taste. You can also switch up the nuts. Try pecans or pistachios for a new crunch. Mixing in some coconut flakes can add a tropical twist. Get creative with your toppings. The more you experiment, the more unique your bark will be!
Dietary Adjustments
Making the bark vegan is easy. Use dark chocolate that’s dairy-free. You can also skip the nuts if you have allergies. Instead, consider seeds like sunflower or pumpkin seeds. This keeps the crunch while keeping it safe for all. For a gluten-free option, use certified gluten-free chocolate. Everyone can enjoy this tasty treat!
Seasonal Twists
Give your bark a holiday flair! For Christmas, add red and green sprinkles. You can also use festive-shaped candies. For Halloween, swap the strawberries for orange candy pieces. For Thanksgiving, think about using pumpkin spice flavorings. These little changes make your bark fit for any season. It’s a fun way to celebrate with food!
Storage Info
How to Store Chocolate Covered Strawberry Bark
To keep your chocolate covered strawberry bark fresh, store it in an airtight container. Use parchment paper to separate the layers. This prevents the chocolate from sticking together. Place the container in a cool, dry place away from heat. Avoid direct sunlight as it can melt the chocolate.
Shelf Life
When stored properly, the bark stays fresh for about two weeks. For the best taste and texture, try to eat it within the first week. After that, the flavors may fade and the chocolate can become dull.
Freezing Options
You can freeze chocolate covered strawberry bark for longer storage. Wrap it tightly in plastic wrap, then place it in a freezer-safe bag. When you're ready to enjoy it, thaw it in the fridge overnight. This keeps the chocolate smooth and delicious. Avoid thawing it at room temperature to prevent condensation.
FAQs
Can I use milk chocolate instead of dark chocolate?
Yes, you can use milk chocolate instead of dark chocolate. Milk chocolate adds a sweeter taste. It also gives a creamier texture. This choice makes the bark rich and fun. You may want to adjust the sweetness of other ingredients to match. Dark chocolate has health benefits, like being high in antioxidants. Milk chocolate, while tasty, has less of these benefits. Both types can create a delightful treat.
How thick should the chocolate layer be?
The chocolate layer should be about 1/4 inch thick. This thickness ensures the bark breaks nicely. If it’s too thin, it may crumble. If it’s too thick, it may be hard to bite. A thicker layer can also make it richer. You can play with the thickness, but 1/4 inch is ideal for the best texture.
Can I add other fruits besides freeze-dried strawberries?
Yes, you can add different fruits. Freeze-dried bananas, raspberries, or blueberries work well. Each fruit brings its own flavor and color. You can mix and match to suit your taste. Just make sure the fruits are dry. This keeps the bark from becoming soggy. Enjoy experimenting with your favorite fruits!
In this article, we explored how to make tasty chocolate covered strawberry bark. You learned about the key ingredients, like dark and white chocolate, and how to add your personal touch with different nuts or fruits. I shared simple steps to make it look great and tips for keeping it fresh. Don't forget, you can customize this treat for any occasion. Enjoy making this sweet snack that is sure to please!