Get ready for a sweet treat that's easy to make and hard to resist! In this guide, I’ll show you how to whip up delicious chocolate-covered cheesecake bites. These bites are the perfect blend of creamy cheesecake and rich chocolate, making them a hit at any gathering. Whether you're new to baking or a pro, you'll find simple steps and fun tips. Let’s dive into the tasty world of chocolate-covered cheesecake bites!
Why I Love This Recipe
- Delicious Flavor Combination: The rich cream cheese filling paired with the sweet chocolate coating creates an indulgent treat that's hard to resist.
- Easy to Make: This recipe requires minimal ingredients and simple steps, making it perfect for both novice and experienced bakers.
- Perfect for Any Occasion: These cheesecake bites are great for parties, gatherings, or just a sweet snack at home.
- Customizable: You can easily tweak the recipe by using different types of chocolate or adding flavors to the cheesecake filling, such as lemon or almond extract.
Ingredients
Main Ingredients for Chocolate Covered Cheesecake Bites
To make these tasty bites, you will need:
- 8 oz cream cheese, softened
- 1/4 cup powdered sugar
- 1/2 teaspoon vanilla extract
- 1/2 cup crushed graham crackers
- 1 cup dark chocolate chips (or milk chocolate, if preferred)
- 2 tablespoons coconut oil (for melting chocolate)
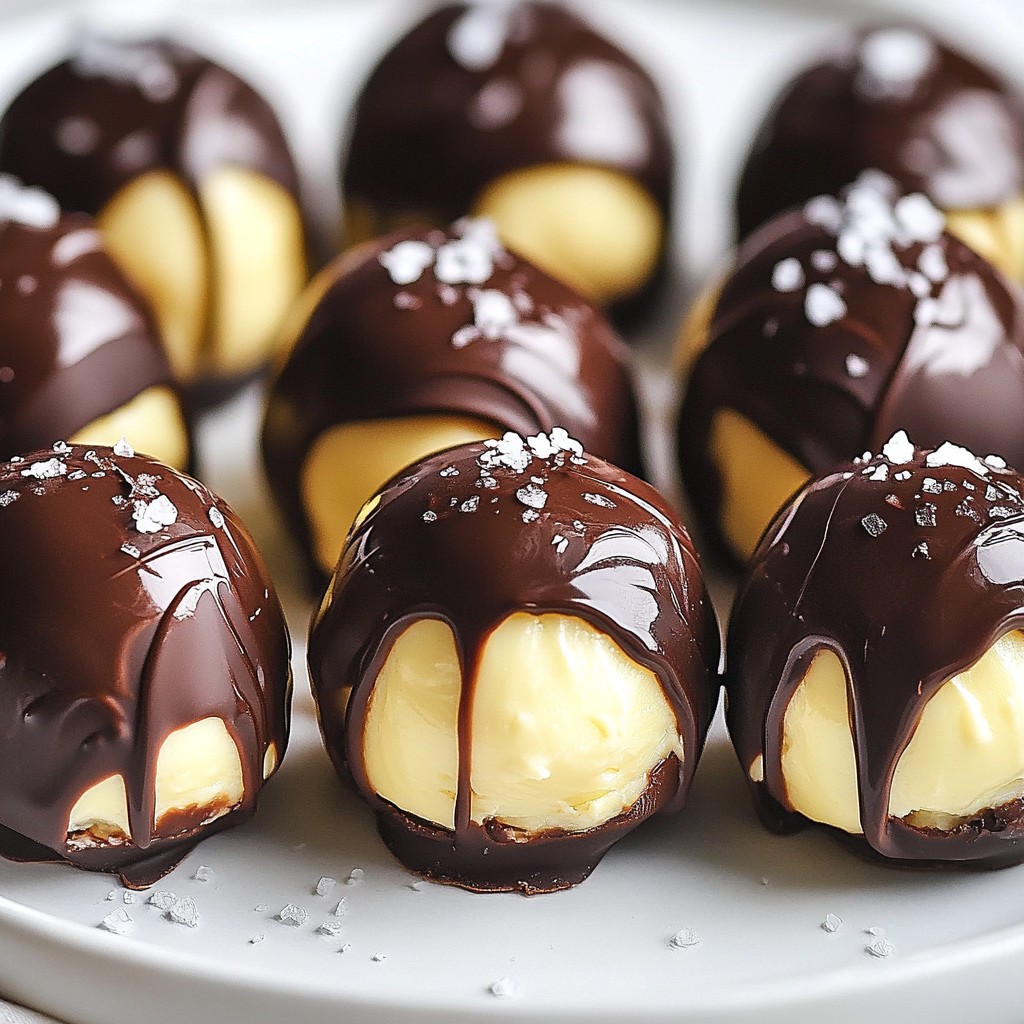
- Sea salt (for sprinkling)
These ingredients create a rich and creamy filling. The cream cheese gives the bites their smooth texture. The powdered sugar adds just the right sweetness. The graham crackers provide a nice crunch, making each bite more enjoyable.
Essential Tools and Equipment
You will need a few tools to make this recipe:
- Medium-sized mixing bowl
- Electric mixer
- Small cookie scoop or your hands for shaping
- Parchment-lined baking sheet
- Microwave-safe bowl for melting chocolate
- Fork for dipping
Using the right tools makes this process easier and more fun. The electric mixer helps mix the filling quickly. A cookie scoop ensures all the bites are the same size.
Suggested Variations for Ingredients
Feel free to mix things up! Here are some ideas:
- Swap cream cheese for mascarpone for a lighter taste.
- Use flavored extracts like almond or orange for a twist.
- Add mini chocolate chips or nuts for extra texture.
- Try different coatings like white chocolate or yogurt.
These variations let you create your own unique flavors. You can personalize the cheesecake bites to suit your taste or occasion.

Step-by-Step Instructions
Detailed Instructions for Preparation
1. Start by softening the cream cheese. Place it in a medium bowl.
2. Add the powdered sugar and vanilla extract to the bowl.
3. Use an electric mixer and blend this mixture. Mix for 2-3 minutes until it is smooth.
4. Gently fold in the crushed graham crackers using a spatula. This adds texture to your bites.
5. Now, scoop out small portions of the mixture. Each should be about 1 inch wide.
6. Place these balls on a parchment-lined baking sheet. Make sure they are spaced apart.
7. Freeze the cheesecake bites for 30 minutes. They need to be firm before dipping in chocolate.
Freezing Tips for Maintaining Shape
To keep the bites firm, freeze them properly. Do not overcrowd the baking sheet. Each bite must have space. This allows the cold air to circulate around them. If they touch, they may stick together. After 30 minutes, check if they feel solid. If not, give them a few more minutes. A firm texture helps when dipping in chocolate.
Chocolate Melting Techniques
While the bites freeze, prepare the chocolate. Use a microwave-safe bowl for this. Combine dark chocolate chips and coconut oil in the bowl. Microwave in 30-second intervals. Stir well between each interval. Keep heating until the chocolate melts completely and is smooth. This should take about 1-2 minutes total. Be careful not to burn it. Once melted, it will coat the cheesecake bites perfectly.
Tips & Tricks
Expert Tips for Perfect Cheesecake Bites
To make the best cheesecake bites, use softened cream cheese. This helps to blend well. Mix until smooth, about 2-3 minutes. The texture is key for creaminess. Make sure to fold in the graham crackers gently. This keeps the mixture light and airy. When forming the bites, use a cookie scoop. This helps with even sizing. Freeze them for at least 30 minutes. This step ensures they hold their shape when dipped in chocolate.
Common Mistakes to Avoid
One common mistake is not freezing the bites long enough. If they are too soft, they will fall apart in the chocolate. Another mistake is overheating the chocolate. Always melt it in short bursts. Stir well to get a smooth consistency. Avoid using too much coconut oil, as it can make the chocolate too thin. Lastly, don’t skip the sea salt sprinkle. It adds a nice flavor contrast that elevates the treat.
How to Customize Flavors
You can easily change the flavors of these cheesecake bites. Try adding different extracts, like almond or lemon, for a twist. For a fruity flavor, mix in some raspberry or strawberry puree. You can also roll the bites in crushed nuts or coconut for added texture. If you love chocolate, use flavored chocolate chips, like mint or orange. Each variation can give you a new and exciting treat!
Pro Tips
- Chill the Ingredients: Make sure your cream cheese is well-softened, and consider chilling your mixing bowl for a few minutes before combining the ingredients. This helps achieve a smoother mixture.
- Quality Chocolate Matters: Use high-quality chocolate for melting, as it will not only taste better but also provide a more appealing glossy finish when set.
- Experiment with Flavors: Customize your cheesecake bites by adding different extracts like almond or lemon, or mix in some mini chocolate chips for an extra texture twist.
- Serving Suggestions: Serve these bites at room temperature for the best flavor experience. You can also pair them with fresh berries or a fruit sauce for a delightful contrast.
Variations
Flavor Variations
You can mix up the flavor of your cheesecake bites. Try adding fruit for a fun twist. For strawberry bites, fold in some finely chopped strawberries into the cream cheese mix. This adds a fresh taste. If you love mint, add a drop of peppermint extract instead of vanilla. You’ll enjoy a refreshing minty bite!
Alternative Coatings
While dark chocolate is popular, you can use white chocolate too. It gives a sweeter taste to your bites. To make white chocolate even better, add a dash of vanilla extract to the melting mix. You could also use colored candy melts for a festive look. This is great for parties or holidays!
Gluten-Free Options
If you need gluten-free bites, swap the graham crackers. Use gluten-free cookie crumbs instead. You can find many options at the store. Just check the label to be sure they are gluten-free. This way, everyone can enjoy these tasty treats!
Storage Info
How to Store Chocolate Covered Cheesecake Bites
To keep your cheesecake bites fresh, store them in an airtight container. Place parchment paper between layers to avoid sticking. Keep them in the fridge for up to one week. This way, they stay creamy and delicious.
Freezing Instructions for Long-term Storage
If you want to store them longer, freezing is a great option. Place the cheesecake bites in a single layer on a baking sheet. Freeze them until solid, then transfer to a freezer bag. They can last up to three months in the freezer. Just remember to label the bag with the date.
Best Practices for Reheating or Serving
These bites are best served cold or at room temperature. If you prefer them soft, let them sit out for a few minutes before serving. Avoid reheating them in the microwave, as this can melt the chocolate coating. Enjoy them straight from the fridge or freezer for the best texture and taste!
FAQs
Can I use different types of chocolate for coating?
Yes, you can use various types of chocolate for coating. Dark, milk, or even white chocolate all work well. Each type brings a different taste. Dark chocolate adds a rich flavor, while milk chocolate is sweeter. White chocolate gives a creamy touch. You can mix chocolates for a fun twist.
How long do the cheesecake bites last in the fridge?
These cheesecake bites stay fresh in the fridge for up to one week. Store them in an airtight container. This keeps them safe from other smells and moisture. If you want them to last longer, consider freezing them.
Can these cheesecake bites be made vegan?
Yes, you can make these cheesecake bites vegan. Use vegan cream cheese and a plant-based sweetener. For the chocolate coating, choose dairy-free chocolate chips. You can also skip the coconut oil or use a vegan alternative. This way, everyone can enjoy these tasty treats!
In this blog post, we explored how to make chocolate covered cheesecake bites. We discussed key ingredients and tools, plus step-by-step instructions. You learned expert tips and common mistakes to make these treats perfect. I also shared ways to customize flavors and store your bites properly.
In conclusion, try these bites for any occasion. They are easy to make, delicious, and fun to share. Enjoy your tasty creations!