Best Banana Pudding Delightful and Creamy Dessert Treat

Are you ready to make the best banana pudding you’ve ever tasted? This delightful and creamy dessert treat is simple to whip up and perfect for any occasion. I’ll guide you through each step, from selecting the perfect bananas to achieving that perfect creamy texture. Get ready to impress your friends and family with a dessert that will have them coming back for seconds. Let’s dive in!

Ingredients

List of Ingredients for Best Banana Pudding

– 4 ripe bananas, sliced

– 1 cup granulated sugar

– 1/4 cup cornstarch

– 1/4 teaspoon salt

– 2 3/4 cups whole milk

– 4 large egg yolks

– 2 tablespoons unsalted butter

– 2 teaspoons pure vanilla extract

– 1 box (about 12 oz) vanilla wafers

– Whipped cream, for topping

– Optional: crushed vanilla wafers, for garnish

Explanation of Ingredient Functions

Each ingredient plays a key role in making banana pudding perfect. The ripe bananas add natural sweetness and flavor. The granulated sugar enhances this flavor and helps the pudding thicken. Cornstarch acts as a thickener, giving the pudding its creamy texture. Salt balances all the sweetness and brings out the flavors.

Whole milk provides a rich base for the pudding. Egg yolks help to enrich the pudding, making it smooth and custard-like. The unsalted butter adds richness and a lovely mouthfeel. Pure vanilla extract enhances the overall taste with warm notes. Vanilla wafers add texture and crunch, while whipped cream gives a light, airy finish.

Tips for Selecting the Best Bananas

When choosing bananas, look for ones that are ripe but not overripe. The skin should be yellow with few brown spots. Avoid green bananas, as they will not be sweet. If you need bananas to ripen faster, place them in a paper bag. This traps ethylene gas, speeding up the ripening process. For the best flavor, aim to use bananas that feel slightly soft when gently pressed.

Step-by-Step Instructions

Detailed Cooking Process for Best Banana Pudding

To make the best banana pudding, start with a medium saucepan. Mix the sugar, cornstarch, and salt together. Heat it on medium heat while whisking. This step helps blend the dry ingredients. Gradually pour in the milk while whisking non-stop. This keeps the mixture smooth and lump-free.

In a separate bowl, whisk the egg yolks until they look thick and light. This takes just a minute. Now, take a few spoonfuls of the hot milk mix and add it to the egg yolks. Whisk constantly as you do this. This process is called tempering, and it warms the yolks. It stops them from cooking too quickly.

Once the yolks are warmed, pour them back into the saucepan. Keep cooking over medium heat, stirring all the time. In about 5 to 7 minutes, the pudding will thicken and start bubbling. When that happens, remove the pan from the heat. Stir in the butter and vanilla until they melt and mix in.

Tempering Egg Yolks: A Key Technique

Tempering is a very important step in making banana pudding. It helps to avoid scrambled eggs in your mix. By slowly warming the yolks with hot milk, you keep them smooth. If you add them too fast, they will cook too quickly. Remember, gentle is key here.

Layering for Presentation and Flavor

Now it’s time to layer the pudding. Grab a 2-quart serving dish or small cups. Start with a layer of vanilla wafers. Next, add a layer of sliced bananas. Finally, pour a layer of creamy pudding over it. Repeat these layers until you use all the ingredients. Make sure the last layer is pudding.

Cover your dish tightly with plastic wrap. Make sure it touches the pudding’s surface. This prevents a skin from forming. Chill in the fridge for at least 4 hours. For the best taste, let it sit overnight. When it’s time to serve, top with whipped cream and a sprinkle of crushed wafers for a crunchy touch.

Tips & Tricks

How to Achieve the Creamiest Texture

To make the creamiest banana pudding, focus on the milk and egg yolks. Use whole milk for richness. The egg yolks add a lovely creaminess too. When cooking, stir constantly. This helps the pudding thicken evenly without lumps. If you want extra smoothness, strain the pudding through a fine mesh sieve before layering. This step removes any tiny bits that may have formed.

Common Mistakes to Avoid

Many people make mistakes that affect texture and flavor. One common error is cooking the pudding too fast. Keep the heat at medium. If it cooks too quickly, it can become grainy. Another mistake is not layering properly. Make sure to alternate layers of bananas, pudding, and wafers. Skipping layers can lead to uneven flavor. Lastly, do not skip the chilling time. Allowing the pudding to set is key for taste.

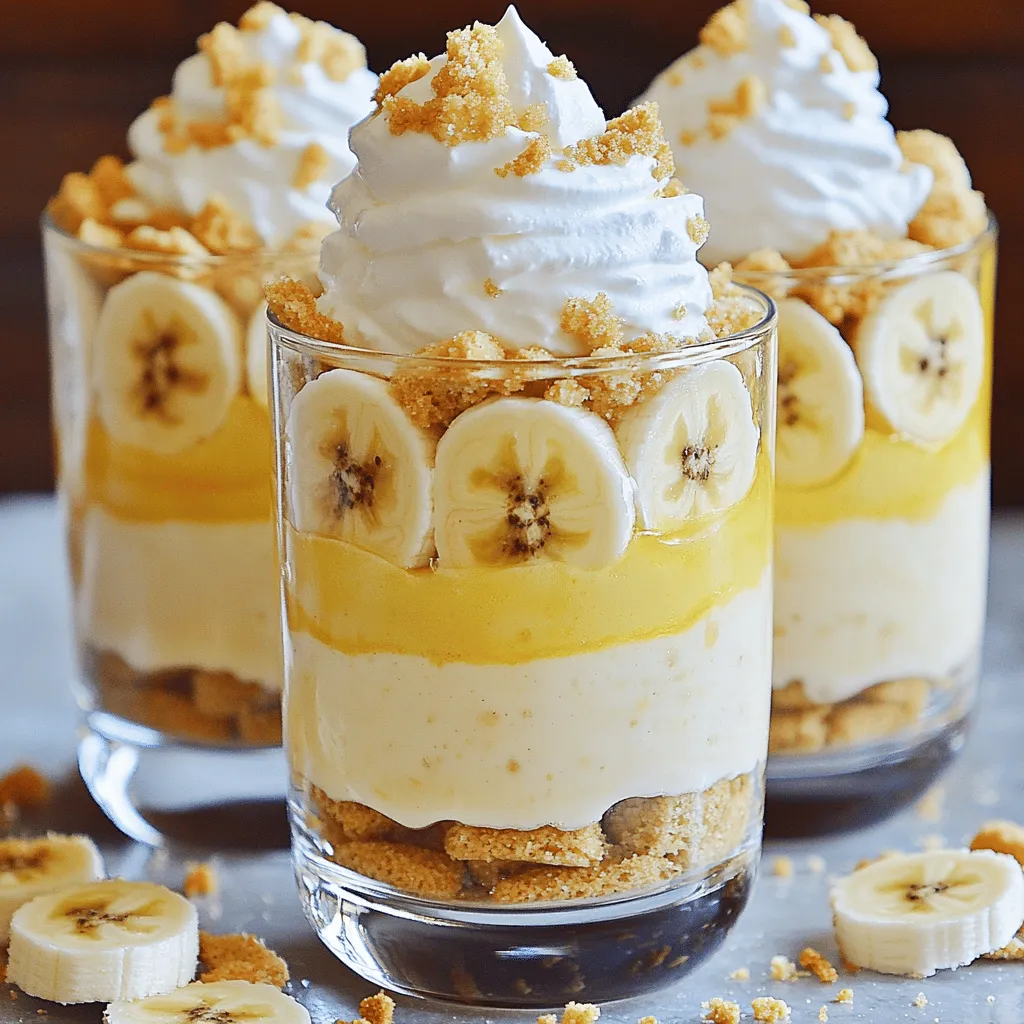
Expert Tips for the Best Serving Temperature

Banana pudding tastes best when served cold. Chill your pudding for at least four hours. If you can, let it chill overnight. This allows the flavors to blend beautifully. When serving, add whipped cream just before you eat. This keeps it fresh and fluffy. Use individual cups to make serving easier and more fun. You can even layer the cups for a pretty look. For a little crunch, sprinkle crushed wafers on top.

For the complete recipe, check out the Full Recipe section.

{{image_4}}

Variations

Alternative Flavors and Add-ins

You can make banana pudding even more fun by adding flavors. Try mixing in chocolate or peanut butter for a twist. You can use chocolate wafers instead of vanilla wafers, which adds a rich taste. Another idea is to add a layer of caramel sauce between the bananas. This gives a sweet touch that pairs well with the pudding. You can also try adding berries like strawberries or blueberries for a fruity surprise.

Healthy Substitutions for a Lighter Dessert

If you want a lighter option, you can make some easy swaps. Use low-fat milk instead of whole milk. This still keeps the pudding creamy but cuts down on fat. You can also use a sugar substitute like stevia or monk fruit sweetener for less sugar. If you prefer a dairy-free option, try almond or coconut milk. These alternatives can make the pudding just as tasty while keeping it light.

Ideas for Gluten-Free or Dairy-Free Banana Pudding

Making gluten-free banana pudding is simple. Just choose gluten-free vanilla wafers for the layers. Many brands offer these now, so you can still enjoy that classic taste. For a dairy-free version, use plant-based milk and a dairy-free whipped topping. You can also substitute the butter with a dairy-free margarine or coconut oil. This way, everyone can enjoy this delightful treat, no matter their dietary needs.

For the complete experience, check out the Full Recipe.

Storage Info

Best Practices for Storing Banana Pudding

To keep your banana pudding fresh, store it in the fridge. Make sure to cover it tightly with plastic wrap. This will stop air from getting in. Place the wrap directly on the pudding’s surface. This prevents a skin from forming. You can also use a sealed container. Just make sure it seals well.

How Long Does Banana Pudding Last?

Banana pudding can last 3 to 4 days in the fridge. After that, the bananas may turn brown. The pudding may also lose its creamy texture. It’s best to eat it fresh for the best taste. If you want to enjoy it later, consider making it without bananas. Then, add the bananas just before serving.

Tips for Reheating or Refreshing Leftovers

If you want to refresh your leftovers, try this simple trick. Take the pudding out of the fridge and let it sit at room temperature for about 15 minutes. This helps restore some creaminess. If you find it too thick, gently stir in a little milk. This will help make it smooth again. Always top with fresh whipped cream right before serving. This keeps it light and fluffy. For more details, check the Full Recipe.

FAQs

What Makes the Best Banana Pudding?

The best banana pudding has layers of flavor and creaminess. You want a rich, smooth pudding that melts in your mouth. Using ripe bananas adds natural sweetness and a strong banana flavor. The texture should be creamy, not runny. A good balance of vanilla and a touch of salt enhances the taste. The vanilla wafers should be soft, but still hold their shape. Overall, it’s about harmony in the layers. Each bite should be a delightful mix of sweetness and creaminess.

Can I Use Different Types of Bananas?

Yes, you can use different bananas! While ripe Cavendish bananas are common, you can also try plantains. If you choose plantains, you should cook them first. They will add a different flavor and texture. You can also mix in other banana varieties for fun. Just make sure the bananas are ripe. Ripe bananas will give the pudding that sweet, rich flavor we love.

How Can I Make Banana Pudding Ahead of Time?

You can make banana pudding ahead of time easily. Just prepare the pudding and layer it as usual. Then, cover it tightly with plastic wrap. Make sure the wrap touches the surface to prevent a skin from forming. Refrigerate it for at least four hours, but overnight is best. This gives the flavors time to mix. When ready to serve, just add the whipped cream on top. It’s a great dessert to prepare for gatherings or special meals.

In this post, we explored how to make the best banana pudding. We covered the key ingredients and their roles, as well as techniques like tempering egg yolks. I shared tips for creamy texture, common mistakes to avoid, and variations for different tastes. Always store pudding correctly to keep it fresh. Banana pudding is easy to make, and with these tips, you’ll create a dessert that everyone loves. Enjoy crafting your perfect banana pudding!

- 4 ripe bananas, sliced - 1 cup granulated sugar - 1/4 cup cornstarch - 1/4 teaspoon salt - 2 3/4 cups whole milk - 4 large egg yolks - 2 tablespoons unsalted butter - 2 teaspoons pure vanilla extract - 1 box (about 12 oz) vanilla wafers - Whipped cream, for topping - Optional: crushed vanilla wafers, for garnish Each ingredient plays a key role in making banana pudding perfect. The ripe bananas add natural sweetness and flavor. The granulated sugar enhances this flavor and helps the pudding thicken. Cornstarch acts as a thickener, giving the pudding its creamy texture. Salt balances all the sweetness and brings out the flavors. Whole milk provides a rich base for the pudding. Egg yolks help to enrich the pudding, making it smooth and custard-like. The unsalted butter adds richness and a lovely mouthfeel. Pure vanilla extract enhances the overall taste with warm notes. Vanilla wafers add texture and crunch, while whipped cream gives a light, airy finish. When choosing bananas, look for ones that are ripe but not overripe. The skin should be yellow with few brown spots. Avoid green bananas, as they will not be sweet. If you need bananas to ripen faster, place them in a paper bag. This traps ethylene gas, speeding up the ripening process. For the best flavor, aim to use bananas that feel slightly soft when gently pressed. To make the best banana pudding, start with a medium saucepan. Mix the sugar, cornstarch, and salt together. Heat it on medium heat while whisking. This step helps blend the dry ingredients. Gradually pour in the milk while whisking non-stop. This keeps the mixture smooth and lump-free. In a separate bowl, whisk the egg yolks until they look thick and light. This takes just a minute. Now, take a few spoonfuls of the hot milk mix and add it to the egg yolks. Whisk constantly as you do this. This process is called tempering, and it warms the yolks. It stops them from cooking too quickly. Once the yolks are warmed, pour them back into the saucepan. Keep cooking over medium heat, stirring all the time. In about 5 to 7 minutes, the pudding will thicken and start bubbling. When that happens, remove the pan from the heat. Stir in the butter and vanilla until they melt and mix in. Tempering is a very important step in making banana pudding. It helps to avoid scrambled eggs in your mix. By slowly warming the yolks with hot milk, you keep them smooth. If you add them too fast, they will cook too quickly. Remember, gentle is key here. Now it’s time to layer the pudding. Grab a 2-quart serving dish or small cups. Start with a layer of vanilla wafers. Next, add a layer of sliced bananas. Finally, pour a layer of creamy pudding over it. Repeat these layers until you use all the ingredients. Make sure the last layer is pudding. Cover your dish tightly with plastic wrap. Make sure it touches the pudding’s surface. This prevents a skin from forming. Chill in the fridge for at least 4 hours. For the best taste, let it sit overnight. When it’s time to serve, top with whipped cream and a sprinkle of crushed wafers for a crunchy touch. To make the creamiest banana pudding, focus on the milk and egg yolks. Use whole milk for richness. The egg yolks add a lovely creaminess too. When cooking, stir constantly. This helps the pudding thicken evenly without lumps. If you want extra smoothness, strain the pudding through a fine mesh sieve before layering. This step removes any tiny bits that may have formed. Many people make mistakes that affect texture and flavor. One common error is cooking the pudding too fast. Keep the heat at medium. If it cooks too quickly, it can become grainy. Another mistake is not layering properly. Make sure to alternate layers of bananas, pudding, and wafers. Skipping layers can lead to uneven flavor. Lastly, do not skip the chilling time. Allowing the pudding to set is key for taste. Banana pudding tastes best when served cold. Chill your pudding for at least four hours. If you can, let it chill overnight. This allows the flavors to blend beautifully. When serving, add whipped cream just before you eat. This keeps it fresh and fluffy. Use individual cups to make serving easier and more fun. You can even layer the cups for a pretty look. For a little crunch, sprinkle crushed wafers on top. For the complete recipe, check out the Full Recipe section. {{image_4}} You can make banana pudding even more fun by adding flavors. Try mixing in chocolate or peanut butter for a twist. You can use chocolate wafers instead of vanilla wafers, which adds a rich taste. Another idea is to add a layer of caramel sauce between the bananas. This gives a sweet touch that pairs well with the pudding. You can also try adding berries like strawberries or blueberries for a fruity surprise. If you want a lighter option, you can make some easy swaps. Use low-fat milk instead of whole milk. This still keeps the pudding creamy but cuts down on fat. You can also use a sugar substitute like stevia or monk fruit sweetener for less sugar. If you prefer a dairy-free option, try almond or coconut milk. These alternatives can make the pudding just as tasty while keeping it light. Making gluten-free banana pudding is simple. Just choose gluten-free vanilla wafers for the layers. Many brands offer these now, so you can still enjoy that classic taste. For a dairy-free version, use plant-based milk and a dairy-free whipped topping. You can also substitute the butter with a dairy-free margarine or coconut oil. This way, everyone can enjoy this delightful treat, no matter their dietary needs. For the complete experience, check out the Full Recipe. To keep your banana pudding fresh, store it in the fridge. Make sure to cover it tightly with plastic wrap. This will stop air from getting in. Place the wrap directly on the pudding’s surface. This prevents a skin from forming. You can also use a sealed container. Just make sure it seals well. Banana pudding can last 3 to 4 days in the fridge. After that, the bananas may turn brown. The pudding may also lose its creamy texture. It’s best to eat it fresh for the best taste. If you want to enjoy it later, consider making it without bananas. Then, add the bananas just before serving. If you want to refresh your leftovers, try this simple trick. Take the pudding out of the fridge and let it sit at room temperature for about 15 minutes. This helps restore some creaminess. If you find it too thick, gently stir in a little milk. This will help make it smooth again. Always top with fresh whipped cream right before serving. This keeps it light and fluffy. For more details, check the Full Recipe. The best banana pudding has layers of flavor and creaminess. You want a rich, smooth pudding that melts in your mouth. Using ripe bananas adds natural sweetness and a strong banana flavor. The texture should be creamy, not runny. A good balance of vanilla and a touch of salt enhances the taste. The vanilla wafers should be soft, but still hold their shape. Overall, it’s about harmony in the layers. Each bite should be a delightful mix of sweetness and creaminess. Yes, you can use different bananas! While ripe Cavendish bananas are common, you can also try plantains. If you choose plantains, you should cook them first. They will add a different flavor and texture. You can also mix in other banana varieties for fun. Just make sure the bananas are ripe. Ripe bananas will give the pudding that sweet, rich flavor we love. You can make banana pudding ahead of time easily. Just prepare the pudding and layer it as usual. Then, cover it tightly with plastic wrap. Make sure the wrap touches the surface to prevent a skin from forming. Refrigerate it for at least four hours, but overnight is best. This gives the flavors time to mix. When ready to serve, just add the whipped cream on top. It’s a great dessert to prepare for gatherings or special meals. In this post, we explored how to make the best banana pudding. We covered the key ingredients and their roles, as well as techniques like tempering egg yolks. I shared tips for creamy texture, common mistakes to avoid, and variations for different tastes. Always store pudding correctly to keep it fresh. Banana pudding is easy to make, and with these tips, you’ll create a dessert that everyone loves. Enjoy crafting your perfect banana pudding!

- Best Banana Pudding

Discover how to create the best banana pudding that will impress your friends and family! This delightful and creamy dessert treat is easy to make and perfect for any occasion. From selecting ripe bananas to achieving a smooth texture, I've got you covered with step-by-step instructions and helpful tips. Ready to indulge in this classic dessert? Click through to explore the full recipe and make your banana pudding dreams come true!

Ingredients
  

4 ripe bananas, sliced

1 cup granulated sugar

1/4 cup cornstarch

1/4 teaspoon salt

2 3/4 cups whole milk

4 large egg yolks

2 tablespoons unsalted butter

2 teaspoons pure vanilla extract

1 box (about 12 oz) vanilla wafers

Whipped cream, for topping

Optional: crushed vanilla wafers, for garnish

Instructions
 

In a medium saucepan, combine the granulated sugar, cornstarch, and salt. Place over medium heat and whisk the dry ingredients together until they are well blended.

    Gradually pour in the whole milk while continuously whisking to ensure no lumps form in the mixture.

      In a separate bowl, whisk the egg yolks until slightly thickened and pale in color. Slowly add several spoonfuls of the heated milk mixture to the egg yolks, whisking constantly to gently warm the yolks (this is called tempering).

        Once the egg yolks are tempered, pour this mixture back into the saucepan with the remaining milk mixture. Continue to cook over medium heat, stirring constantly until the pudding thickens and bubbles, approximately 5-7 minutes.

          Remove the saucepan from the heat and stir in the unsalted butter and pure vanilla extract until fully melted and incorporated into the pudding mixture.

            In a 2-quart serving dish (or individual cups for portion control), create layers: begin with a layer of vanilla wafers, followed by a layer of sliced bananas, then pour a layer of the creamy pudding over the top. Repeat these layers until all ingredients are used, ensuring the final layer is the pudding.

              Cover the dish tightly with plastic wrap, ensuring it touches the surface of the pudding to prevent a skin from forming. Refrigerate for at least 4 hours or preferably overnight to allow flavors to meld and the pudding to set.

                When ready to serve, top the pudding with a generous layer of whipped cream. For an added decorative touch, sprinkle with crushed vanilla wafers for extra texture and a hint of crunch.

                  Prep Time, Total Time, Servings: 20 mins | 4 hours (chill) | 8 servings

                    - Presentation Tips: Serve the banana pudding in charming individual parfait cups for an appealing presentation and easy serving. Drizzle extra whipped cream over the top and add a few banana slices for a delightful finishing touch.

                      Leave a Comment

                      Recipe Rating