
Cranberry Brie Bites Tasty and Easy Party Appetizer
Looking for a quick and delicious appetizer for your next party? These Cranberry Brie Bites are your answer! They combine
Looking for a quick and delicious appetizer for your next party? These Cranberry Brie Bites are your answer! They combine
![To make a delicious chocolate peanut butter mug cake, you need a few simple ingredients. Here’s what you’ll need: - 4 tablespoons all-purpose flour - 4 tablespoons granulated sugar - 2 tablespoons unsweetened cocoa powder - 1/8 teaspoon baking powder - 1/8 teaspoon salt - 3 tablespoons milk (dairy or plant-based) - 2 tablespoons peanut butter (creamy or chunky) - 1 tablespoon vegetable oil - 1/4 teaspoon vanilla extract - Optional: a handful of chocolate chips for extra indulgence These ingredients create a rich and moist cake that you can make in minutes. If you want to take your mug cake to the next level, consider these optional add-ins or toppings: - A dollop of whipped cream on top - A drizzle of chocolate syrup - A sprinkle of crushed peanuts Feel free to get creative and personalize your cake. The choice is yours! For the complete recipe, check the [Full Recipe]. First, gather your ingredients. In a microwave-safe mug, add: - 4 tablespoons all-purpose flour - 4 tablespoons granulated sugar - 2 tablespoons unsweetened cocoa powder - 1/8 teaspoon baking powder - 1/8 teaspoon salt Mix these dry ingredients well. Use a fork to stir until no lumps remain. This step is key for a smooth cake. Next, add the wet ingredients to the same mug: - 3 tablespoons milk - 2 tablespoons peanut butter - 1 tablespoon vegetable oil - 1/4 teaspoon vanilla extract Now, mix these together with your fork. Make sure everything blends into a smooth batter. If you want extra chocolate goodness, fold in a handful of chocolate chips. Place your mug in the microwave. Cook it on high for 1 minute and 15 seconds. Keep an eye on it, as the cooking time can change based on your microwave's power. To check if it’s done, look for the cake to rise and set around the edges. The center should still be slightly moist. This means your cake is just perfect! Once your cake is done, carefully take it out of the microwave. It will be hot! Let it cool for about a minute. For a fun twist, top it with: - A dollop of whipped cream - A drizzle of chocolate syrup - A sprinkle of crushed peanuts You can serve it right in the mug for a cozy vibe. If you prefer a fancier look, move it to a plate and dust it with powdered sugar or cocoa. Enjoy your delicious creation! - Overmixing the batter: Mixing too much creates a tough cake. Stir just until the ingredients blend. - Not measuring ingredients properly: Use precise measurements. Too much flour or sugar can ruin the texture. - Adding variations or extras: You can mix in chocolate chips or nuts for a fun twist. Try adding a pinch of espresso powder for depth. - Suggestions for adjusting cook time: If your microwave is strong, reduce cooking time. Start with one minute, then check for doneness. - Recommended mug types: Use a wide mug for even cooking. A ceramic or glass mug works best. - Cooking tools for best results: A fork or small whisk is perfect for mixing. Keep a toothpick handy to check if the cake is done. For more tips, check out the Full Recipe for Chocolate Peanut Butter Mug Cake! {{image_4}} You can switch peanut butter for other nut butters. Almond butter adds a nutty twist. Cashew butter makes it creamy and smooth. Sunflower seed butter is a great choice for nut-free diets. Each nut butter brings a new flavor. Experiment with what you like best! To make your mug cake even better, add extras. You can mix in chopped bananas or berries for freshness. Try white chocolate chips for a sweet surprise. You can even sprinkle in some crushed nuts for crunch. These add-ins create a richer dessert. Each bite will be full of flavor! If you need a gluten-free mug cake, use almond flour instead of regular flour. Coconut flour is another great option, but use less. For every 1 tablespoon of coconut flour, use 3 tablespoons of liquid. This keeps the cake moist. You can still enjoy this treat without gluten! To store leftover mug cake, let it cool first. Place it in an airtight container. This keeps it fresh. Store it in the fridge for up to two days. When you want to enjoy it again, simply reheat it. Microwave it for about 15-30 seconds. Check if it’s warm throughout before eating. To freeze your mug cake, first, let it cool completely. Wrap it tightly in plastic wrap. Then place it in a freezer-safe container. This prevents freezer burn. When you are ready to eat it, take it out and let it thaw in the fridge overnight. You can also microwave it from frozen. Start with 30 seconds and add more time if needed. The mug cake stays fresh for about two days in the fridge. If you freeze it, it can last up to three months. Watch for signs of spoilage. If you see any mold or an off smell, throw it away. Enjoy your Chocolate Peanut Butter Mug Cake while it’s fresh for the best taste! Check out the Full Recipe for more tips on making this treat. You can tell when the mug cake is done by a few signs. First, look at the edges. They should be set and look firm. Next, check the top. It should have risen and look dry. If you poke it with a toothpick, it should come out clean or with a few moist crumbs. Remember, the center can stay slightly soft. This is what makes it so tasty! Yes, you can double the recipe! Just use two mugs instead of one. Mix the dry and wet ingredients in separate bowls first. Then, divide the batter evenly between the mugs. Cook each mug cake in the microwave for the same time. If you use a bigger mug, you might need to add a few extra seconds to the cook time. If you don’t have a microwave, you can make the mug cake in an oven. Preheat the oven to 350°F (175°C). Pour the batter into an oven-safe mug or ramekin. Bake for about 15 to 20 minutes. Check for doneness like you would in a microwave. Just use a toothpick to see if it comes out clean. Yes! You can make this mug cake vegan. Just swap the milk for a plant-based milk, like almond or oat milk. For the peanut butter, ensure it is dairy-free. You can also use a vegan oil, like coconut oil, in place of vegetable oil. With these swaps, you’ll have a delicious vegan treat. Enjoy this easy recipe by checking the Full Recipe for more details! We covered all you need to make a delicious mug cake. You learned about the ingredients, how to prepare the batter, and tips for perfecting your microwave timing. We also explored flavor variations, storage methods, and answered common questions. Enjoy making this quick treat and share it with friends! With some practice, you'll master this easy recipe. Remember, the best part is making it your own with toppings and add-ins. Now, grab your mug and start baking!](https://dailydishcraft.com/wp-content/uploads/2025/07/a73b63bf-a85c-42dc-97ae-e65bc5b57c03.webp)
Craving a quick and tasty treat? Look no further than this Chocolate Peanut Butter Mug Cake! In just minutes, you

If you love comfort food, you need to try my Cheesy Broccoli Rice Casserole! It’s creamy, cheesy, and packed with
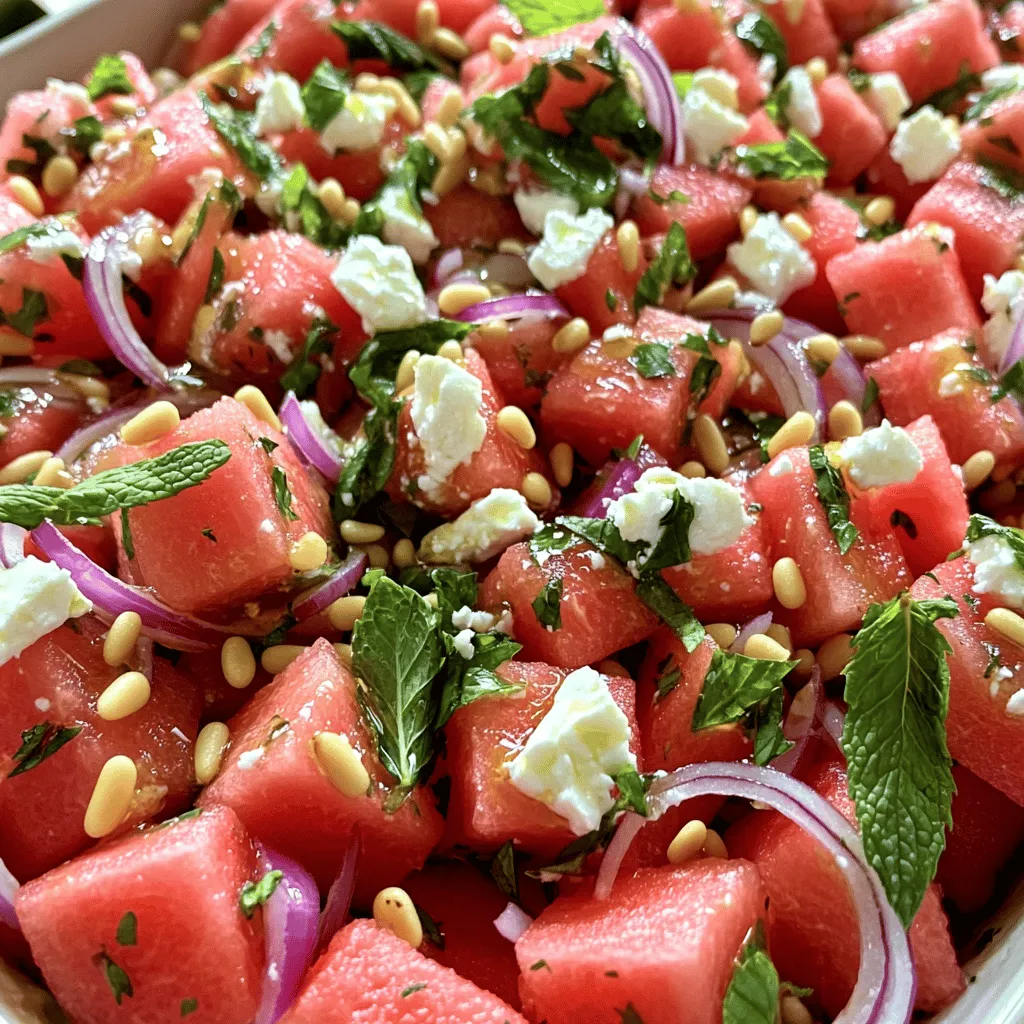
Are you ready to dive into a refreshing dish that’s perfect for any occasion? This Watermelon Feta Salad combines juicy

Craving a tasty snack that packs a punch? My Oven Baked Buffalo Cauliflower Wings are just what you need! These
. - Step 1: Preparing the Water Fill a large pot with water. Add a generous amount of salt. This helps flavor the pasta. - Step 2: Cooking Time Guidelines Bring the water to a rolling boil. Add your pasta carefully. Cook according to package instructions, usually 8-10 minutes. - Step 3: Reserving Pasta Water Once cooked, reserve 1 cup of the starchy pasta water. Drain the pasta in a colander after cooking. - Step 1: Combining Ingredients in the Processor While the pasta cooks, prepare the avocado sauce. In a food processor, add the halved avocados, cilantro, garlic, lime juice, olive oil, salt, and pepper. - Step 2: Achieving the Right Consistency Blend the mixture until it is smooth and creamy. If it seems too thick, add a tablespoon of reserved pasta water. - Step 3: Adjusting Seasonings to Taste Taste the sauce and adjust the salt and lime juice as needed. This balance will enhance the flavor. - Step 1: Combining Pasta and Sauce In a large mixing bowl, add the drained pasta. Pour the avocado sauce over the pasta and mix well. - Step 2: Adding Fresh Ingredients Gently fold in halved cherry tomatoes. Be careful not to mash them; they add great texture. - Step 3: Plating Suggestions Serve the creamy pasta in deep bowls. Drizzle extra olive oil on top. Garnish with toasted pine nuts and lime wedges. Enjoy this tasty dish! For the full recipe, check out the complete instructions above. To make the sauce just right, you need to focus on two key things: the thickness and the avocados. - Adjusting Thickness with Pasta Water: After cooking your pasta, save some of the starchy water. This water works wonders! If your sauce feels thick, add a few spoonfuls. Mix it well until it reaches a smooth, creamy texture. - Using Ripe Avocados: Ripe avocados are a must. They should feel soft when you press them gently. If they are hard, wait a few days for them to ripen. Ripe avocados add a rich and creamy feel to your sauce. Adding extra flavors can take your pasta to the next level. Here are two simple ways to boost taste: - Adding Extra Herbs and Spices: Fresh herbs like basil or parsley can bring new life to your dish. You can chop them finely and mix them into the sauce for an extra kick. Spices like red pepper flakes can add a nice heat. - Balancing Acidity with Lime Juice: Lime juice is key in this recipe. It brightens up the creamy sauce. If your dish tastes flat, squeeze in more lime juice. Just a little can make a big difference. How you serve your pasta matters just as much as how it tastes. Follow these tips for a stunning look: - Serving in Rustic Bowls: Use deep, rustic bowls to serve your pasta. This gives a cozy feel and makes the dish look inviting. - Garnishing for Visual Appeal: To make it pop, sprinkle the pasta with fresh cilantro and add lime wedges. This not only looks good but also adds flavor. For the full recipe, check out the complete guide on making creamy avocado cilantro lime pasta. {{image_4}} You can easily boost your creamy avocado cilantro lime pasta with protein. - Grilled Chicken or Shrimp: Adding grilled chicken or shrimp gives the dish a satisfying twist. The smoky flavor pairs well with the creamy sauce. Simply cook the protein separately and toss it in before serving. - Tofu or Chickpeas for Vegetarian Options: If you prefer a vegetarian choice, use tofu or chickpeas. Tofu can soak up all the flavors and adds a nice texture. Chickpeas offer a hearty bite and extra fiber. Changing up ingredients can make this dish your own. - Substituting Pasta Shapes: You can use any pasta you like. Fettuccine and spaghetti are great, but penne or rotini also work well. Choose what you have on hand or what you enjoy most. - Using Different Herbs: While cilantro shines in this recipe, consider other herbs too. Basil or parsley can add fresh notes and new flavors. Experiment and find your favorite mix. You might want to adjust the recipe for different diets. - Vegan or Gluten-Free Adjustments: This dish is already vegan if you skip animal products. For gluten-free, simply choose gluten-free pasta. Many brands offer great options. - Low-Calorie Substitutes: To lower calories, use less olive oil or swap avocados for a lower-calorie spread. You can also add more veggies like zucchini or spinach for bulk without many calories. These variations ensure that creamy avocado cilantro lime pasta can fit anyone's taste and dietary needs. For the complete recipe, check out the [Full Recipe]. To keep your creamy avocado cilantro lime pasta fresh, store it in an airtight container. This helps prevent it from drying out. You can keep it in the fridge for up to three days. After this time, the sauce may lose its vibrant color and flavor. When reheating, use a saucepan over low heat. This method keeps the creaminess of the avocado sauce. Stir gently and add a splash of reserved pasta water if it seems too thick. Avoid using high heat, as it can cause the sauce to separate. You can freeze leftover pasta, but the texture may change. To freeze, place the pasta in a freezer-safe container. Make sure to leave some space for expansion. It can last up to two months in the freezer. When ready to eat, thaw in the fridge overnight. Reheat gently on the stove, adding a bit of water to return its creaminess. For the best taste and texture, I do not recommend freezing the avocado sauce itself. I recommend using fettuccine or spaghetti. Both hold the creamy sauce well. You want a pasta that complements the smoothness of the avocado. Any pasta shape you enjoy can work, too. Just make sure it cooks evenly. Yes, you can make the avocado sauce in advance. Store it in the fridge to keep it fresh. Cook the pasta when you're ready to serve. Combine the two just before eating. This keeps the pasta from getting soggy. To make this dish for more people, simply double the ingredients. For fewer servings, halve the amounts. This recipe is easy to scale up or down. Just keep the same ratios for best results. This dish pairs well with a fresh salad. You can also serve garlic bread on the side. Grilled chicken or shrimp adds protein, too. These options create a balanced meal that tastes great together. Absolutely! Creamy avocado sauce is great for meal prep. Just store it in an airtight container. The pasta can also be made in advance. Mix them together when you are ready to eat for the best taste. For the full recipe, check out the details above. This blog post covered a simple yet delicious recipe for Creamy Avocado Cilantro Lime Pasta. You learned about the key ingredients, step-by-step instructions, and helpful tips. The variations let you customize the dish to fit your taste. You can store leftovers easily or adapt the recipe for meal prep. I hope you feel inspired to make this dish. It's fresh, tasty, and perfect for any occasion. Enjoy your cooking!](https://dailydishcraft.com/wp-content/uploads/2025/07/dad908b3-84d8-4931-8f8f-d713892356bc.webp)
If you’re craving a fresh twist on pasta, you’re in for a treat! My Creamy Avocado Cilantro Lime Pasta is

Looking for a quick and tasty meal? This Easy Cheesy Taco Pasta Skillet is your answer! Packed with flavors and
. First, preheat your oven to 400°F (200°C). This helps the chickpeas get crispy. Next, drain a can of chickpeas. Rinse them well under cold water. Place them in a colander to drain fully. After that, use a clean kitchen towel to dry the chickpeas. This step is key to achieving that crunchy texture you want. In a medium bowl, combine the dried chickpeas with seasoning. Add 1 tablespoon of extra virgin olive oil, 1 teaspoon of garlic powder, 1 teaspoon of smoked paprika, ½ teaspoon of cayenne pepper, ½ teaspoon of sea salt, and ½ teaspoon of black pepper. Toss everything together until the chickpeas are well coated. If you like a bit of sweetness, drizzle 1 teaspoon of pure maple syrup. It adds a nice touch! Spread the seasoned chickpeas on a baking sheet lined with parchment paper. This prevents sticking and makes cleanup easy. Roast them in the oven for 25 to 30 minutes. Remember to shake the baking sheet halfway through. This helps them roast evenly and get that golden brown color. While the chickpeas roast, heat a dry skillet over medium heat. Add 1 cup of assorted nuts, like almonds, cashews, and walnuts. Toast them for about 5 to 7 minutes. Stir them often to keep them from burning. You want them fragrant and lightly golden. Once the chickpeas are done, take them out of the oven and let them cool for a few minutes. If you used maple syrup, toss the chickpeas again to coat them well. In a large bowl, mix together the roasted chickpeas, toasted nuts, ½ cup of dried cranberries or raisins, and ¼ cup of pumpkin seeds. Toss everything to create a delightful snack mix. Let the mix cool completely before storing. Transfer it to an airtight container. This helps keep your snack fresh for longer. Enjoy your crispy roasted chickpea snack mix anytime you need a tasty treat! For the full recipe, check the details above! To get crispy chickpeas, start by patting them dry. After you drain and rinse the chickpeas, use a clean towel. This helps remove excess moisture. Drying them ensures they roast well. An even coating of oil and spices is key. Toss them well in the bowl until every chickpea shines. This step makes a big difference in crunchiness. You can jazz up your chickpeas with different spices. Try adding cumin for warmth or chili powder for heat. If you love sweet snacks, a dash of cinnamon works wonders. You can also mix in a bit of honey or sugar. This adds a nice contrast to the savory flavors. Don’t be afraid to experiment with your favorite seasonings. Make this snack mix your own! You can add dried fruits like apricots or figs for sweetness. Mix in nuts such as pecans or hazelnuts for crunch. Pumpkin seeds are also a great choice for added nutrition. If you want more texture, consider sunflower seeds. This way, you create a snack that fits your tastes perfectly. For the full recipe, check the detailed steps above! {{image_4}} You can make this snack mix even more fun by adding sweetness. Try drizzling honey or a bit of sugar over the roasted chickpeas. This simple addition gives your mix a nice balance. Sweet and savory flavors work great together. You can also add a sprinkle of cinnamon for a warm twist. It makes the snack feel extra cozy and delicious. If you crave cheese, I have great news! You can add cheese powder to your chickpeas before roasting. This adds a tasty and rich flavor. Other spices like onion powder or Italian herbs can also spice things up. You can even try adding a bit of chili powder for a kick. Each choice creates a unique flavor and makes the mix exciting. This snack mix can fit many diets. For a vegan option, skip the cheese and use plant-based seasonings. You can also make it gluten-free by using certified gluten-free oats or grains. If you watch your salt, try low-sodium chickpeas and season lightly. This way, everyone can enjoy this crunchy treat. There are many ways to make it fit your needs. For the full recipe, check out the earlier section! To keep your crispy roasted chickpea snack mix fresh, use airtight containers. Glass jars or plastic containers work well. Make sure they seal tightly to keep out air. Store your snack mix in a cool, dry place. Avoid sunlight and heat, which can make it go stale. If you want, you can also divide your mix into smaller portions. This makes it easy to grab and enjoy as a snack. When stored properly, your snack mix lasts about one week. If you place it in the fridge, it can last up to two weeks. However, for best taste and texture, eat it within the first week. This way, you enjoy the crunchiness of the chickpeas and nuts. If your snack mix loses its crunch, don’t worry! You can easily revive it. Preheat your oven to 350°F (175°C). Spread the mix on a baking sheet in a single layer. Heat it in the oven for 5 to 10 minutes. Keep an eye on it to avoid burning. This quick step brings back the crispy texture and makes it fresh again. Enjoy your snack mix as if it just came out of the oven! Yes, you can use canned chickpeas. Just make sure to rinse and drain them well. Rinsing helps remove excess sodium. Draining is key for a crispy texture. Crispy roasted chickpeas can last about a week. Store them in an airtight container at room temperature. Keep them away from moisture to maintain their crunch. If you want nut-free options, try seeds like sunflower or hemp. You can also use roasted chickpeas or extra dried fruit. These alternatives keep the mix tasty and crunchy. Yes, you can make this snack mix ahead of time. Prepare it a few days in advance. Just store it properly to keep the flavors fresh. Check out the Full Recipe for details on prep! This snack mix combines chickpeas, nuts, and dried fruits for a healthy treat. The chickpeas add protein and fiber, while nuts provide healthy fats. Roasting gives them a crunchy texture, and you can customize flavors with spices. Remember to store your mix in a tight container to keep it fresh. Enjoy trying different combinations to make your own perfect snack mix. Healthy snacking can be fun and tasty!](https://dailydishcraft.com/wp-content/uploads/2025/07/c7ed7f0f-fb2c-4787-a180-555ada1b9298.webp)
Looking for a tasty and healthy snack? Try my Crispy Roasted Chickpea Snack Mix! This mix combines crunchy chickpeas, nuts,
![- 1 cup canned pumpkin puree - 1/2 cup vegetable oil - 1 cup packed brown sugar - 1/2 cup granulated sugar - 3 large eggs - 1 teaspoon pure vanilla extract - 1 3/4 cups all-purpose flour - 1 teaspoon baking powder - 1/2 teaspoon baking soda - 1 tablespoon pumpkin pie spice - 1/2 teaspoon salt - 8 oz cream cheese, softened to room temperature - 1/4 cup powdered sugar - 1 egg yolk - 1 teaspoon ground cinnamon (optional) - Muffin tin - Mixing bowls - Whisk - Toothpick or skewer - Toppings like nuts or chocolate chips - Additional spices for extra flavor When I make Pumpkin Spice Cream Cheese Swirl Muffins, I love how simple the ingredients are. The canned pumpkin puree gives the muffins a smooth texture. Vegetable oil keeps them moist, while brown and granulated sugars add a sweet touch. The eggs help bind everything together, and vanilla extract adds a warm flavor. Next, we have the dry ingredients. All-purpose flour gives structure, while baking powder and baking soda help them rise. Pumpkin pie spice brings that classic fall taste, and a touch of salt balances the sweetness. The cream cheese swirl is the star here. Softened cream cheese, powdered sugar, and an egg yolk make it rich and creamy. You can even sprinkle ground cinnamon on top for extra flavor if you like. With these ingredients, you're set to create a delightful treat. For the full recipe, check the section above. Enjoy the process! - Preheat your oven to 350°F (175°C). - Prepare your muffin tin with liners or grease each cup well. - In a large bowl, combine the wet ingredients. - In a separate bowl, mix the dry ingredients. - Gradually fold the dry mix into the wet mix. - Be gentle to avoid overmixing; a few lumps are okay. - In a medium bowl, beat the cream cheese with powdered sugar and the egg yolk until smooth. - Fill the muffin cups with a scoop of pumpkin batter. - Add a dollop of the cream cheese mixture on top. - Spoon more pumpkin batter until cups are two-thirds full. - Bake the muffins for 18-20 minutes. - Check for doneness with a toothpick; it should come out clean. - Cool the muffins slightly before transferring them to racks. For the complete recipe, refer to the [Full Recipe]. To make the best muffins, avoid overmixing. Overmixing can make them tough. Mix until just combined; it’s okay if some lumps remain. Also, use room temperature ingredients. This helps the batter mix evenly and rise well. Fresh spices make a big difference. They add depth and warmth to your muffins. You can also try mix-ins like nuts or chocolate. These add extra texture and flavor. A handful of walnuts or chocolate chips can be a game changer. Dust your muffins with powdered sugar before serving. This adds a nice touch and makes them look fancy. Serve them warm alongside coffee or tea. The warm muffins and hot drinks create a cozy vibe. Try to enjoy them fresh for the best taste. For the full recipe, check out the detailed instructions above! {{image_4}} For a gluten-free version, swap all-purpose flour with a gluten-free blend. Look for a blend that includes xanthan gum for the best results. This change keeps the muffins moist and tender while still delivering that delightful pumpkin spice flavor. If you want a dairy-free treat, simply replace cream cheese with a dairy-free alternative. Many brands offer great cream cheese substitutes made from nuts or soy. This swap makes the muffins just as creamy and tasty without the dairy. To give your muffins a coffee kick, add espresso or coffee flavor to the cream cheese filling. Mix in a tablespoon of instant coffee or espresso powder. This addition gives a rich depth of flavor, perfect for those who love a warm pumpkin spice latte. Try these variations to enjoy your Pumpkin Spice Cream Cheese Swirl Muffins in new ways! For the complete recipe, check out the [Full Recipe]. Store your muffins in an airtight container at room temperature. They stay fresh for up to 3 days. This keeps them soft and moist. You can enjoy them as a quick snack or breakfast treat. For longer storage, refrigerate your muffins. They will last for up to a week. If you want to save them even longer, freeze the muffins. They can stay in the freezer for up to 3 months. Just make sure to wrap them well to avoid freezer burn. When it's time to enjoy a muffin, you can warm them up. Microwave them for a few seconds to bring back their soft texture. If you like crispy edges, toast them in the oven. This adds a nice crunch and enhances the flavors. You can find the Full Recipe to make these delightful muffins and enjoy them fresh! Yes, just ensure it's well-pureed and cooked properly. Fresh pumpkin can add a nice taste. Reduce the amount of brown sugar and granulated sugar. Start with cutting both by one-fourth. Absolutely! Fold them into the batter for added flavor. Dark chocolate pairs well with pumpkin spice. Use applesauce or flaxseed mixed with water as an egg replacer. One tablespoon of flaxseed needs three tablespoons of water. A toothpick should come out clean when inserted into the center. If it has batter on it, bake a few more minutes. For the complete recipe, check [Full Recipe]. You now have a simple guide to making delicious pumpkin muffins. We discussed key ingredients, essential tools, and step-by-step instructions. Tips for perfect texture and flavor enhancements can elevate your baking. Enjoying these muffins with coffee makes for a great treat. You can store them easily or even freeze them for later. With various options, like gluten-free or dairy-free, there’s something for everyone. Embrace your creativity and make these muffins your own! Start baking and enjoy the tasty results!](https://dailydishcraft.com/wp-content/uploads/2025/07/f5159872-e327-44a6-bc56-01771698f80a.webp)
Get ready to indulge in the cozy flavors of fall with my Pumpkin Spice Cream Cheese Swirl Muffins! These muffins
![- 1 ½ cups all-purpose flour - 1 tablespoon poppy seeds - 1 teaspoon baking powder - ½ teaspoon baking soda - ¼ teaspoon salt - ½ cup granulated sugar - ½ cup plain yogurt - 2 large eggs - ¼ cup vegetable oil - Zest of 1 lemon - 2 tablespoons fresh lemon juice - ½ teaspoon vanilla extract - Nuts or fruits (e.g., walnuts, blueberries) - Spices for enhanced flavor (e.g., cinnamon) - 9x5 inch loaf pan - Whisk and mixing bowls - Spatula To make the Lemon Poppy Seed Yogurt Loaf, gather these simple and fresh ingredients. The main ingredients bring together a nice balance of flavors and texture. The poppy seeds add a nice crunch, while the yogurt keeps the loaf moist and soft. You can also add in nuts or fruits for a twist. I love putting walnuts or blueberries in mine. For tools, you will need a loaf pan, a whisk, and mixing bowls. These will help you mix the batter and bake it perfectly. Make sure to have everything ready before you start. Remember, the key to a great loaf is using fresh ingredients and having fun while you bake. For the full recipe, check the details provided above! - Preheat to 350°F (175°C). - Grease and line your loaf pan. This helps the loaf come out easily. - In a bowl, combine: - 1 ½ cups all-purpose flour - 1 tablespoon poppy seeds - 1 teaspoon baking powder - ½ teaspoon baking soda - ¼ teaspoon salt - Whisk these ingredients well. This step ensures all dry ingredients mix evenly. - In a larger bowl, mix: - ½ cup granulated sugar - ½ cup plain yogurt - 2 large eggs - ¼ cup vegetable oil - Zest of 1 lemon - 2 tablespoons fresh lemon juice - ½ teaspoon vanilla extract - Use a whisk to blend until smooth. This mixture brings a lot of flavor! - Gradually fold the dry mixture into the wet mixture. - Use a spatula to combine gently. Do not overmix! A few lumps are okay. - Pour the batter into the pan. - Bake for 45-50 minutes. - Check doneness with a toothpick. It should come out clean. - Cool in the pan for 10 minutes. - Then, transfer to a wire rack. This helps the loaf cool evenly. The full recipe can guide you through each step with ease. Enjoy making this tasty loaf! To get a fluffy loaf, avoid overmixing. When you mix the wet and dry ingredients, do it gently. A few lumps are okay! Also, make sure your ingredients are at room temperature. This helps them blend better and rise nicely. If you don’t have yogurt, you can use sour cream or buttermilk. These will add a nice creaminess and tang. For a gluten-free option, try using almond flour or a gluten-free blend. Just remember, your loaf may bake differently, so check it often. For a fun twist, add some citrus zest. Lime or orange zest can brighten up the flavor. You can also mix in fresh herbs like thyme or rosemary. They add a unique taste that pairs well with lemon and poppy seeds. {{image_4}} You can get creative with the flavors in your Lemon Poppy Seed Yogurt Loaf. One great option is to make a lemon blueberry poppy seed loaf. Just fold in fresh blueberries before baking. The berries add sweetness and color. Another fun variation is the orange poppy seed variant. Simply replace the lemon zest and juice with orange zest and juice. This change gives the loaf a sweet and citrusy twist. If you want a vegan version, you can use egg substitutes. Applesauce or mashed banana works well. Just replace each egg with ¼ cup of your chosen substitute. For a low-sugar option, swap granulated sugar for a sugar alternative. You can use honey or maple syrup. Just remember to adjust the liquid in your recipe to balance it out. This loaf pairs perfectly with tea or coffee. A warm cup of tea enhances the citrus flavor. Coffee brings out the poppy seeds' nuttiness. For refreshing sides, consider a fruit salad or yogurt. Fresh berries or a light citrus salad work nicely. They add color and brightness to your plate. For the complete recipe, check out the [Full Recipe]. You can keep your Lemon Poppy Seed Yogurt Loaf at room temperature for a short time. Wrap it in plastic wrap or foil to keep it fresh. If you want it to last longer, store it in the fridge. Use an airtight container to prevent it from drying out. This way, it stays soft and tasty. To freeze your loaf, first let it cool completely. Then, wrap it well in plastic wrap. You can also use aluminum foil for extra protection. Place it in a freezer bag and remove as much air as possible. When you want to enjoy it, take it out of the freezer. Let it thaw in the fridge overnight for the best taste. Your Lemon Poppy Seed Yogurt Loaf can last for about 3 to 4 days at room temperature. If you refrigerate it, it can last up to a week. Always check for signs of spoilage. If you see mold or a strange smell, it's best to throw it away. Enjoy your loaf while it’s fresh for the best flavors! Yes, you can use Greek yogurt. It makes the loaf moist and rich. Greek yogurt adds a nice tangy flavor, too. This yogurt has more protein than regular yogurt. It can also make the loaf a bit denser. If you want a lighter texture, stick to regular yogurt. A dense loaf can happen for a few reasons. First, overmixing the batter can lead to density. Mixing too much adds air, which is not good for the loaf. Second, too much flour can make it heavy. Make sure you measure the flour correctly. Lastly, if the oven temperature is too low, the loaf may not rise well. You can check the loaf by inserting a toothpick into the center. If it comes out clean, the loaf is done. Look for a golden brown color on top, too. The sides should pull away from the pan. If it looks wet or sticky inside, it needs more time. Yes, mini loaves are a great idea! You can use a mini loaf pan instead. Bake them for about 25-30 minutes. Keep an eye on them, as they can cook faster. Check for doneness using the toothpick method mentioned earlier. This loaf is perfect for kids! It has yogurt, which is good for strong bones. The lemon adds a fresh taste that kids often love. Plus, it’s fun to make together. You can even add fruits like blueberries for extra flavor and nutrition. This blog post focused on making a delightful lemon poppy seed loaf. We covered key ingredients like flour, sugar, and yogurt, along with optional add-ins to spice things up. Clear steps took you through preparation, mixing, baking, and cooling. I shared tips for perfect texture and tasty variations. Don’t forget the storage tips for keeping your loaf fresh. Enjoy baking this treat and experimenting with flavors that suit your taste! Happy baking!](https://dailydishcraft.com/wp-content/uploads/2025/07/2ccc74e7-da9d-4712-b788-059c318444bd.webp)
Brighten up your baking routine with my Lemon Poppy Seed Yogurt Loaf! This delightful and easy recipe combines fresh lemon
