Skip to content
DisclaimerTerms Of UseGDPR PolicyCookie Policy

dailydishcraft

  • Home
  • Drinks
  • Appetizers
  • Dinner
  • Dessert
  • About
  • Contact
  • Privacy Policy
DisclaimerTerms Of UseGDPR PolicyCookie Policy

Jessica

Fresh strawberries are the star here. You need 2 cups of hulled and sliced strawberries. They add a bright flavor and natural sweetness that is just perfect. Next, grab 1 ½ cups of strawberry preserves. This adds a rich, fruity base to the pie. For a little zing, use 1 tablespoon of lemon juice. It balances the sweetness and brightens the flavor. You will also need 2 tablespoons of cornstarch. This helps to thicken the filling so it holds together well. Add 1 tablespoon of granulated sugar for extra sweetness. Don’t forget 1 teaspoon of vanilla extract. This makes the pie taste even better with its warm notes. For the crust, you can use 1 pre-made pie crust. This saves time and gets you to the yummy part faster. Lastly, consider whipped cream for serving. It adds a creamy touch that pairs well with the sweet strawberries. Here’s a quick list of what you need: - Fresh strawberries: 2 cups - Strawberry preserves: 1 ½ cups - Lemon juice: 1 tablespoon - Cornstarch: 2 tablespoons - Granulated sugar: 1 tablespoon - Vanilla extract: 1 teaspoon - Pie crust: 1 pre-made crust - Optional: Whipped cream for serving This full recipe makes a delightful treat that’s easy and tasty! - Preheat oven to 425°F (220°C). - Prepare homemade or store-bought pie crust. Let’s start by getting your oven nice and hot. Preheating it to 425°F (220°C) ensures the crust bakes perfectly. If you choose to make a homemade crust, roll it out and place it in a 9-inch pie plate. Use your fingers to crimp the edges. If you prefer store-bought, just fit it into the pie plate as the package says. - Combine preserves, lemon juice, cornstarch, sugar, and vanilla in a saucepan. - Stir until thickened (5-7 minutes). Next, let’s make that sweet strawberry filling! Grab a medium saucepan. Add the strawberry preserves, lemon juice, cornstarch, sugar, and vanilla extract. Heat it over medium. Stir it well until it starts to bubble and thicken, which takes about 5 to 7 minutes. This mixture will be the heart of your pie. - Fold in sliced strawberries. - Pour mixture into the pie crust. - Bake until golden brown (20-25 minutes). Now, fold in the sliced strawberries. Make sure every slice gets coated in the sauce. Then, carefully pour this tasty mixture into your prepared pie crust. Use a spatula to spread it evenly. Place the pie in the oven and bake it for 20 to 25 minutes. You want the crust to turn golden brown and the filling to bubble happily. - Allow pie to cool on a wire rack. - Serve with whipped cream. Once baked, take the pie out and let it cool on a wire rack. This cooling time helps the pie set. Let it cool for at least 1 hour. When you’re ready to serve, add a generous dollop of whipped cream on each slice. This makes each bite even more delicious! To make a great strawberry pie, you need ripe strawberries. Look for berries that are bright red and firm. Avoid any with dark spots or mushy parts. These signs show the fruit is past its prime. When you get home, wash the strawberries gently under cool water. Pat them dry with a clean towel. Remove the green tops and slice them into even pieces. This helps them mix well with the filling. A flaky pie crust makes your pie shine. For a great crust, keep your butter cold and work quickly. If you use a store-bought crust, make sure to fit it tightly in the pie plate. This helps avoid a soggy bottom. If you make your crust, roll it out evenly. Prick the bottom with a fork to let steam escape while baking. This simple step keeps your crust crisp. Presentation matters! Cut the pie into neat wedges for serving. Place each slice on a pretty plate. A sprig of fresh mint adds a nice touch. It brings color and freshness. You can pair the pie with whipped cream for extra creaminess. Ice cream is also a great match. These options make each bite a delightful experience. {{image_4}} If you want a gluten-free pie, you have choices. For the crust, try almond flour or gluten-free flour blends. You can make a simple crust using crushed gluten-free cookies mixed with butter. This gives a sweet and nutty flavor. To ensure your filling is safe, check that your strawberry preserves are gluten-free. Most brands are, but it's good to read the label. For a vegan version of this pie, you can swap out eggs and dairy. Use a plant-based milk in place of dairy. You can also use flaxseed meal to replace eggs. Simply mix one tablespoon of flaxseed meal with three tablespoons of water. Let it sit for a few minutes until it thickens. For the crust, try a homemade vegan pie crust. Combine flour, coconut oil, and water. This creates a flaky and tasty base. Want to add a twist to your pie? Try adding other fruits like blueberries or rhubarb. Blueberries bring a sweet burst, while rhubarb adds a tangy kick. You can also infuse flavors with herbs or spices. Basil gives a fresh taste, while ginger adds warmth. Experiment with small amounts first to find your favorite mix. For the full recipe, check out the Delicious Strawberry Pie section above. Enjoy making your pie your way! To keep your leftover strawberry pie fresh, refrigerate it. Place the pie in a covered dish. If you don't have a lid, use plastic wrap. This helps keep moisture in and prevents the pie from drying out. Try to eat the pie within three days for the best taste. The longer it sits, the more the crust may get soggy. You can freeze strawberry pie for later enjoyment! First, let the pie cool completely. Wrap it in plastic wrap, then in aluminum foil. This double layer helps protect the pie from freezer burn. It should keep well for up to three months. When you're ready to eat it, thaw the pie in the fridge overnight. To warm it up, bake it at 350°F (175°C) for about 15-20 minutes. This helps restore its texture and flavor. Enjoy your pie just like when it was fresh! Yes, you can use frozen strawberries for this pie. They work well, but they have some extra water. This can make the filling a bit runny. To fix this, thaw the strawberries first. Drain any extra juice to keep the filling thick. Using frozen strawberries can save time and still give you tasty pie. To check if your pie is done, look for a golden-brown crust. The filling should also bubble. This bubbling means the fruit and syrup are hot and ready. If you see this, your pie is likely done. Let it cool before slicing. This helps the filling set nicely. Yes, you can make the pie ahead of time. After baking, let it cool fully. Cover it with plastic wrap or foil. Store it in the fridge for up to three days. You can also freeze it for longer storage. Just make sure to thaw it overnight in the fridge before serving. For the best taste, serve it fresh if you can. For the complete recipe, check out the Full Recipe. Making the best strawberry pie is fun and simple. You need fresh strawberries, preserves, and a good crust. Start by preparing your ingredients and cooking your filling. Then bake and enjoy! Remember, selecting ripe strawberries and using a flaky crust are key. Don’t hesitate to try variations like vegan options or tasty additions. Store leftovers carefully and savor this delightful treat for days. Enjoy your strawberry pie adventure!

Best Strawberry Pie Tasty and Easy Homemade Delight

Are you ready to make the best strawberry pie ever? This tasty and easy homemade delight will wow your friends

Raspberry Lemon Cheesecake Bars need simple, fresh ingredients. Here’s what you need: - 1 ½ cups graham cracker crumbs - ⅓ cup granulated sugar (for crust) - ½ cup unsalted butter, melted - 16 oz cream cheese, softened - ¾ cup granulated sugar (for filling) - 2 large eggs - 2 tablespoons all-purpose flour - Zest of 1 lemon - ⅓ cup fresh lemon juice - 1 cup fresh raspberries (plus extra for garnish) - 1 teaspoon vanilla extract These ingredients work together to create a creamy and tangy flavor. The graham cracker crust adds a sweet crunch, while the filling is rich and smooth. Using fresh raspberries gives a burst of tangy flavor. The lemon juice and zest brighten everything up. This combination makes the bars a delightful treat. Make sure all ingredients are at room temperature. This step helps to blend the cheesecake filling smoothly. For the best taste, use fresh raspberries. You can find them at local markets or grocery stores. Be ready to enjoy a delicious dessert that is easy to make with these ingredients! For the complete guide on how to put it all together, check the Full Recipe. - Preheat the oven to 325°F (160°C). - Line an 8x8-inch baking pan with parchment paper. First, you want to get your oven nice and warm. Preheating it helps your bars bake evenly. Next, take your baking pan and line it with parchment paper. Let the paper hang over the sides. This makes it easy to lift the bars out later. - Combine graham cracker crumbs, sugar, and melted butter. - Firmly press the mixture into the pan and bake. In a bowl, mix graham cracker crumbs, sugar, and melted butter. Stir until it looks like wet sand. Then, press this mixture firmly into the bottom of the pan. Bake the crust for about 10 minutes. It should be firm but not too brown. - Beat cream cheese and sugar until smooth. - Incorporate eggs, flour, lemon zest, lemon juice, and vanilla. For the filling, beat softened cream cheese and sugar in a large bowl. Use an electric mixer for a smooth texture. Add eggs one by one, mixing well after each. Then, mix in flour, lemon zest, lemon juice, and vanilla. Be careful not to overmix; just blend until combined. - Fold in raspberries and pour filling over the crust. - Bake until set with a slight jiggle. Now, gently fold in the fresh raspberries into your cheesecake mixture. Take your time to keep some raspberries whole. Pour this filling over the baked crust. Spread it evenly. Bake for 25 to 30 minutes. The edges should be firm, while the center has a slight jiggle. - Cool to room temperature and refrigerate. - Cut into bars and garnish with raspberries. After baking, let the bars cool at room temperature for about 30 minutes. Then, place them in the fridge for at least 2 hours. Once fully set, lift the bars out using the parchment paper. Cut them into 16 bars and garnish with extra raspberries for a beautiful finish. For the full recipe, you can refer to the details above. Room temperature ingredients make a big difference. Cream cheese blends better when it is warm. This helps you avoid lumps. Always let your cream cheese sit out for about 30 minutes before you start. Be careful not to overmix the filling. Mixing too much can add too much air. This can make your cheesecake puffy instead of smooth. Mix just until you see no more dry spots. Check for doneness without overbaking. The edges should be firm, but the center should jiggle slightly. This means your bars will set up perfectly as they cool. To avoid cracks, bake at a low temperature. You can also place a pan of water in the oven. This adds moisture and keeps the cheesecake from drying out. Garnish your bars for a beautiful look. Fresh raspberries on top add color and freshness. A dusting of powdered sugar can make them look elegant too. For serving, consider cutting them into small squares. These make great finger foods for parties. Pair them with whipped cream for a tasty treat! {{image_4}} You can change the flavor of these cheesecake bars easily. Swapping raspberries for other fruits works great. Try strawberries, blueberries, or peaches for a fresh twist. Each fruit brings its unique taste and color. Adding chocolate or caramel layers can also enhance the bars. Drizzling melted chocolate on top adds sweetness and richness. For a caramel layer, pour it over the filling before you bake. It gives a nice contrast to the tangy lemon flavor. If you need a gluten-free option, you can make a simple crust. Use gluten-free graham crackers instead of regular ones. Crush them and mix with sugar and butter. This makes a tasty base for your cheesecake. For vegan adaptations, swap out the cream cheese with a plant-based version. There are many good vegan cream cheeses on the market. Use flax eggs instead of real eggs to help bind the filling. This way, you can enjoy cheesecake while sticking to your diet. For the Full Recipe, check the recipe section above. To keep your Raspberry Lemon Cheesecake Bars fresh, store them in the fridge. Place the bars in an airtight container. Make sure to separate layers with parchment paper. This helps prevent sticking. If you want to freeze them, wrap each bar tightly in plastic wrap. Then, place them in a freezer-safe bag. This keeps them tasty for later. Fresh bars last about 5 days in the fridge. If you freeze them, they can stay good for up to 3 months. Just remember to thaw them in the fridge before serving. For more details, check out the Full Recipe. Enjoy your delicious treat! Raspberry lemon cheesecake bars stay fresh for about five days in the fridge. Store them in an airtight container to keep them from drying out. This helps maintain their creamy texture and bright flavor. Yes, you can make these bars ahead of time. They taste great when made a day or two before you serve them. Just chill them in the fridge after baking. This lets the flavors meld, making each bite even better. To slice cheesecake bars neatly, use a sharp knife. Dip the knife in hot water before cutting. Wipe it clean after each slice. This method helps you get clean edges. You can also chill the bars before slicing for easier cutting. Yes, you can use frozen raspberries. They work well in the recipe. Just remember to thaw and drain them first to avoid excess moisture. This keeps the cheesecake bars from becoming too watery. Enjoy the lovely flavor they add! You learned how to make delicious Raspberry Lemon Cheesecake Bars from scratch. We covered the key ingredients and step-by-step instructions to guide you. Remember the importance of room temperature ingredients and not overmixing for the best texture. Whether you stick to the recipe or try a fun variation, these bars will impress. Store extras properly for fresh taste. Enjoy making these treats for yourself or your friends!

Raspberry Lemon Cheesecake Bars Delightfully Simple Treat

If you crave a sweet dessert that’s easy to make, look no further! My Raspberry Lemon Cheesecake Bars are a

- 4 ripe bananas, sliced - 1 cup granulated sugar - 1/4 cup cornstarch - 1/4 teaspoon salt - 2 3/4 cups whole milk - 4 large egg yolks - 2 tablespoons unsalted butter - 2 teaspoons pure vanilla extract - 1 box (about 12 oz) vanilla wafers - Whipped cream, for topping - Optional: crushed vanilla wafers, for garnish Each ingredient plays a key role in making banana pudding perfect. The ripe bananas add natural sweetness and flavor. The granulated sugar enhances this flavor and helps the pudding thicken. Cornstarch acts as a thickener, giving the pudding its creamy texture. Salt balances all the sweetness and brings out the flavors. Whole milk provides a rich base for the pudding. Egg yolks help to enrich the pudding, making it smooth and custard-like. The unsalted butter adds richness and a lovely mouthfeel. Pure vanilla extract enhances the overall taste with warm notes. Vanilla wafers add texture and crunch, while whipped cream gives a light, airy finish. When choosing bananas, look for ones that are ripe but not overripe. The skin should be yellow with few brown spots. Avoid green bananas, as they will not be sweet. If you need bananas to ripen faster, place them in a paper bag. This traps ethylene gas, speeding up the ripening process. For the best flavor, aim to use bananas that feel slightly soft when gently pressed. To make the best banana pudding, start with a medium saucepan. Mix the sugar, cornstarch, and salt together. Heat it on medium heat while whisking. This step helps blend the dry ingredients. Gradually pour in the milk while whisking non-stop. This keeps the mixture smooth and lump-free. In a separate bowl, whisk the egg yolks until they look thick and light. This takes just a minute. Now, take a few spoonfuls of the hot milk mix and add it to the egg yolks. Whisk constantly as you do this. This process is called tempering, and it warms the yolks. It stops them from cooking too quickly. Once the yolks are warmed, pour them back into the saucepan. Keep cooking over medium heat, stirring all the time. In about 5 to 7 minutes, the pudding will thicken and start bubbling. When that happens, remove the pan from the heat. Stir in the butter and vanilla until they melt and mix in. Tempering is a very important step in making banana pudding. It helps to avoid scrambled eggs in your mix. By slowly warming the yolks with hot milk, you keep them smooth. If you add them too fast, they will cook too quickly. Remember, gentle is key here. Now it’s time to layer the pudding. Grab a 2-quart serving dish or small cups. Start with a layer of vanilla wafers. Next, add a layer of sliced bananas. Finally, pour a layer of creamy pudding over it. Repeat these layers until you use all the ingredients. Make sure the last layer is pudding. Cover your dish tightly with plastic wrap. Make sure it touches the pudding’s surface. This prevents a skin from forming. Chill in the fridge for at least 4 hours. For the best taste, let it sit overnight. When it’s time to serve, top with whipped cream and a sprinkle of crushed wafers for a crunchy touch. To make the creamiest banana pudding, focus on the milk and egg yolks. Use whole milk for richness. The egg yolks add a lovely creaminess too. When cooking, stir constantly. This helps the pudding thicken evenly without lumps. If you want extra smoothness, strain the pudding through a fine mesh sieve before layering. This step removes any tiny bits that may have formed. Many people make mistakes that affect texture and flavor. One common error is cooking the pudding too fast. Keep the heat at medium. If it cooks too quickly, it can become grainy. Another mistake is not layering properly. Make sure to alternate layers of bananas, pudding, and wafers. Skipping layers can lead to uneven flavor. Lastly, do not skip the chilling time. Allowing the pudding to set is key for taste. Banana pudding tastes best when served cold. Chill your pudding for at least four hours. If you can, let it chill overnight. This allows the flavors to blend beautifully. When serving, add whipped cream just before you eat. This keeps it fresh and fluffy. Use individual cups to make serving easier and more fun. You can even layer the cups for a pretty look. For a little crunch, sprinkle crushed wafers on top. For the complete recipe, check out the Full Recipe section. {{image_4}} You can make banana pudding even more fun by adding flavors. Try mixing in chocolate or peanut butter for a twist. You can use chocolate wafers instead of vanilla wafers, which adds a rich taste. Another idea is to add a layer of caramel sauce between the bananas. This gives a sweet touch that pairs well with the pudding. You can also try adding berries like strawberries or blueberries for a fruity surprise. If you want a lighter option, you can make some easy swaps. Use low-fat milk instead of whole milk. This still keeps the pudding creamy but cuts down on fat. You can also use a sugar substitute like stevia or monk fruit sweetener for less sugar. If you prefer a dairy-free option, try almond or coconut milk. These alternatives can make the pudding just as tasty while keeping it light. Making gluten-free banana pudding is simple. Just choose gluten-free vanilla wafers for the layers. Many brands offer these now, so you can still enjoy that classic taste. For a dairy-free version, use plant-based milk and a dairy-free whipped topping. You can also substitute the butter with a dairy-free margarine or coconut oil. This way, everyone can enjoy this delightful treat, no matter their dietary needs. For the complete experience, check out the Full Recipe. To keep your banana pudding fresh, store it in the fridge. Make sure to cover it tightly with plastic wrap. This will stop air from getting in. Place the wrap directly on the pudding’s surface. This prevents a skin from forming. You can also use a sealed container. Just make sure it seals well. Banana pudding can last 3 to 4 days in the fridge. After that, the bananas may turn brown. The pudding may also lose its creamy texture. It’s best to eat it fresh for the best taste. If you want to enjoy it later, consider making it without bananas. Then, add the bananas just before serving. If you want to refresh your leftovers, try this simple trick. Take the pudding out of the fridge and let it sit at room temperature for about 15 minutes. This helps restore some creaminess. If you find it too thick, gently stir in a little milk. This will help make it smooth again. Always top with fresh whipped cream right before serving. This keeps it light and fluffy. For more details, check the Full Recipe. The best banana pudding has layers of flavor and creaminess. You want a rich, smooth pudding that melts in your mouth. Using ripe bananas adds natural sweetness and a strong banana flavor. The texture should be creamy, not runny. A good balance of vanilla and a touch of salt enhances the taste. The vanilla wafers should be soft, but still hold their shape. Overall, it’s about harmony in the layers. Each bite should be a delightful mix of sweetness and creaminess. Yes, you can use different bananas! While ripe Cavendish bananas are common, you can also try plantains. If you choose plantains, you should cook them first. They will add a different flavor and texture. You can also mix in other banana varieties for fun. Just make sure the bananas are ripe. Ripe bananas will give the pudding that sweet, rich flavor we love. You can make banana pudding ahead of time easily. Just prepare the pudding and layer it as usual. Then, cover it tightly with plastic wrap. Make sure the wrap touches the surface to prevent a skin from forming. Refrigerate it for at least four hours, but overnight is best. This gives the flavors time to mix. When ready to serve, just add the whipped cream on top. It’s a great dessert to prepare for gatherings or special meals. In this post, we explored how to make the best banana pudding. We covered the key ingredients and their roles, as well as techniques like tempering egg yolks. I shared tips for creamy texture, common mistakes to avoid, and variations for different tastes. Always store pudding correctly to keep it fresh. Banana pudding is easy to make, and with these tips, you’ll create a dessert that everyone loves. Enjoy crafting your perfect banana pudding!

Best Banana Pudding Delightful and Creamy Dessert Treat

Are you ready to make the best banana pudding you’ve ever tasted? This delightful and creamy dessert treat is simple

- 2 cups all-purpose flour - 1 tablespoon baking powder - 1/4 teaspoon baking soda - 1/2 teaspoon salt - 1/3 cup granulated sugar - 1/2 cup unsalted butter, cold and cubed - 3/4 cup heavy cream, plus extra for brushing - 1 teaspoon vanilla extract - 1 pound fresh strawberries, hulled and sliced - 2 tablespoons powdered sugar (for strawberries) - Whipped cream (for serving) Gathering fresh, quality ingredients is key to a great strawberry shortcake. I love using ripe strawberries. They should be bright red and firm. This gives the dish a sweet and juicy flavor. The biscuit base needs cold butter. It helps create a flaky texture. Use unsalted butter for better control over the sweetness. Heavy cream adds richness to the biscuits and whipped cream. For the dry ingredients, all-purpose flour is best. The baking powder and baking soda help the biscuits rise. Granulated sugar adds sweetness, while a pinch of salt balances the flavors. When you mix these ingredients, remember to avoid lumps. You can find everything you need at your local grocery store. This recipe is simple and fun to make. It’s perfect for a sunny day or a special gathering. Check out the [Full Recipe] for complete instructions! To start, we need to macerate the strawberries. This means we will draw out their juices. Take one pound of fresh strawberries and hull them. Then slice them into small pieces. Next, sprinkle two tablespoons of powdered sugar over the strawberries in a medium bowl. Gently toss them to coat. Let them sit for 15 to 20 minutes. This waiting time helps create a sweet syrup. Now, let’s make the biscuit dough. First, combine the dry ingredients in a large bowl. You will need two cups of all-purpose flour, one tablespoon of baking powder, one-fourth teaspoon of baking soda, one-half teaspoon of salt, and one-third cup of granulated sugar. Whisk these items together until they blend well. Next, we cut in the butter. Use half a cup of cold, cubed unsalted butter. Add it to the dry mix. Using your fingers or a pastry cutter, work the butter into the flour. Keep mixing until the mixture looks crumbly. You want some small chunks of butter to stay. This helps the biscuits be flaky. Before we bake, preheat your oven to 425°F (220°C). Line a baking sheet with parchment paper to prevent sticking. Now, let’s shape the biscuits. Turn the dough onto a floured surface. Pat it into a rectangle that is about one inch thick. Using a round biscuit cutter, cut out biscuits. You can re-roll any dough scraps to make more biscuits. Before baking, brush the tops with heavy cream. This will help them turn golden. Bake the biscuits for 12 to 15 minutes. They should be lightly golden when done. Once baked, take them out and let them cool for a few minutes. It’s time to assemble our strawberry shortcake! Carefully slice each biscuit in half. On the bottom half, spoon a generous amount of the macerated strawberries, along with some syrup. Then, add a dollop of whipped cream. Place the biscuit top half over the cream. This creates a lovely layered effect. For serving, present the shortcakes on a pretty platter. You can drizzle some strawberry juice over the top. Add some fresh mint leaves for a nice touch. For more details on this recipe, check out the full recipe. Enjoy your sweet treat! To make your shortcake shine, choose ripe strawberries. Look for berries that are bright red, firm, and fragrant. Avoid dull or soft strawberries; they may be overripe. Fresh strawberries are best from late spring to early summer. During this time, you can find them at local farms or farmers' markets. This seasonal availability means you get the sweetest berries. The key to great biscuits is using cold ingredients. Cold butter helps create a flaky texture. Do not let your butter sit out; keep it in the fridge until you need it. When mixing, avoid overmixing the dough. Mix just until the dry and wet ingredients combine. This keeps the biscuits light and fluffy. Serve your strawberry shortcake on a nice platter for a beautiful look. Stack the layers high for a stunning effect. Drizzle some strawberry juice on top for added color. For a final touch, add fresh mint leaves. They not only look great but also add a hint of flavor. Enjoy your dreamy and delicious treat! {{image_4}} You can change up the fruit in your shortcake. Try using peaches or blueberries. Both fruits add a fresh twist to this classic dessert. You can also mix different fruits together. A blend of strawberries, blueberries, and peaches creates a colorful and tasty treat. This mix brings a fun flavor explosion and looks beautiful on the plate. If you want a different topping, try dairy-free whipped cream. There are many great brands available. You can also make your own using coconut cream. For an extra sweet touch, add syrups or sauces. Drizzle chocolate or caramel sauce on top for a rich flavor. You can even use flavored syrups like vanilla or almond for a unique taste. For a gluten-free version, swap out the all-purpose flour. Use almond flour or gluten-free all-purpose flour instead. You might need to adjust the liquid in your dough. Start with a little less, then add more if needed. This change keeps the shortcake soft and delicious. With these tweaks, everyone can enjoy a slice of this dreamy dessert. You might want to store your leftover shortcakes for later. If you have assembled the shortcakes, place them in an airtight container. This helps keep them fresh. Try to eat them within two days for the best taste. The biscuits can become soggy if left too long, so enjoy them quickly. If you have leftover components, store them separately. Keep the biscuits in a sealed bag or container at room temperature. Store the strawberries in the fridge. Make sure they are in a bowl covered with plastic wrap. The cream should also go in the fridge in a separate container. This way, you can assemble fresh shortcakes later. Can you freeze biscuits? Yes, you can freeze biscuits! To do this, bake them first and let them cool completely. Then, wrap each biscuit in plastic wrap. Place them in a freezer bag. They will stay good for about three months. When ready to eat, thaw them in the fridge and reheat them in the oven. Freezing strawberries and cream tips are simple! You can freeze strawberries after washing and slicing them. Place them on a baking sheet in a single layer, then freeze until firm. After that, transfer them to a freezer bag. The cream doesn’t freeze as well. Instead, whip it fresh when you are ready to serve. This keeps your dessert tasty and fluffy. For the full recipe, check the section above! To make strawberry shortcake from scratch, follow these steps: 1. Prepare the strawberries: Slice fresh strawberries and mix them with powdered sugar. Let them sit for 15-20 minutes to create a syrup. 2. Make the biscuit dough: Combine flour, baking powder, baking soda, salt, and sugar. Cut in cold butter until crumbly. Mix in cream and vanilla. 3. Shape and bake: Pat the dough into a rectangle and cut out biscuits. Bake at 425°F for 12-15 minutes. 4. Assemble: Slice biscuits in half. Layer strawberries and whipped cream between the halves. For full details, check the Full Recipe. Yes, you can use frozen strawberries for your shortcake. However, frozen strawberries may change the texture and flavor. They often become softer and release more liquid. This can make the dessert a bit soggy if not handled carefully. To use frozen berries, let them thaw and drain excess liquid before mixing with sugar. Shortcake and cake differ mainly in texture and ingredients. Shortcake is a biscuit-like dessert. It is flaky and crumbly. Cake is fluffy and soft, made with more sugar and eggs. Shortcake often highlights fresh fruit and whipped cream, while cake can have many layers and flavors. Homemade strawberry shortcake is best enjoyed fresh. However, if stored properly, it can last for about 1-2 days. Keep it in the fridge to maintain freshness. To prevent sogginess, store biscuits and toppings separately. This way, you can enjoy a fresh taste with each serving. Making strawberry shortcake is simple and fun. We covered the key ingredients, from fresh strawberries to butter and cream. I shared step-by-step instructions to help you make the biscuits and assemble the dessert. You also learned tips for choosing strawberries and achieving the best texture. Whether you stick to the classic recipe or try new fruits, the joy of strawberry shortcake is always a treat. Use these tips to impress friends or enjoy a sweet moment at home. Now, go ahead and make your own delicious strawberry shortcake!

Easy Strawberry Shortcake Dreamy and Delicious Treat

Craving a sweet, fruity delight? Look no further than this Easy Strawberry Shortcake! It’s a dreamy treat that’s simple to

- 8 ounces spaghetti - 1 pound boneless, skinless chicken breasts, diced - 1 small onion, finely chopped - 1 bell pepper (red or yellow), diced - 2 cloves garlic, minced - 1 can (14.5 ounces) diced tomatoes with juices - 1 cup chicken broth The main flavors of chicken spaghetti come from the spaghetti, chicken, and vegetables. You need the spaghetti to be the base. The chicken adds protein and heartiness. Vegetables like onions, bell peppers, and garlic bring freshness and depth to the dish. - 1 tablespoon olive oil - 1 teaspoon Italian seasoning - ½ teaspoon paprika - Salt and pepper to taste These flavors make each bite pop. Olive oil helps cook the chicken and adds richness. Italian seasoning gives that classic flavor. Paprika adds warmth and color. Salt and pepper balance all the tastes. - 1 cup shredded mozzarella cheese - 1 cup grated Parmesan cheese - Fresh basil leaves for garnish Garnishes make the dish look and taste special. Mozzarella and Parmesan add creaminess and a savory finish. Fresh basil adds a bright note that lifts all the flavors. You can change these garnishes based on what you like. For the full recipe, check out the Cheesy Chicken Spaghetti Delight . First, grab a large pot and fill it with water. Add a good pinch of salt to the water. This helps flavor the spaghetti. Bring it to a rolling boil on high heat. Once boiling, add 8 ounces of spaghetti. Cook it according to the package instructions until it is al dente. This usually takes about 8-10 minutes. When done, drain the spaghetti in a colander and set it aside. Next, take a large skillet and heat 1 tablespoon of olive oil over medium heat. Add 1 pound of diced chicken. Season it with salt, pepper, paprika, and 1 teaspoon of Italian seasoning. Cook the chicken for about 5-7 minutes. Make sure it turns golden brown and is no longer pink in the center. Once cooked, remove the chicken from the skillet and place it on a plate. In the same skillet, add the chopped onion and diced bell pepper. Sauté these vegetables for 3-4 minutes until they soften. Next, add 2 cloves of minced garlic and cook for another minute. The garlic should smell great by now. Pour in a can of diced tomatoes with their juices and 1 cup of chicken broth. Stir well and let it simmer for about 5 minutes. This step lets the flavors blend together. Now, return the cooked chicken to the skillet along with the sautéed vegetables. Add the drained spaghetti to this mix. Gently toss everything together until well combined and heated through. Finally, sprinkle 1 cup of shredded mozzarella cheese and half of 1 cup of grated Parmesan cheese over the top. Cover the skillet with a lid for 2-3 minutes. This will melt the cheese perfectly. Now, you have a delicious chicken spaghetti ready to serve from the [Full Recipe]. To boost flavor, adjust seasoning levels as needed. Taste your dish as you cook. If it seems bland, add more salt or a bit of pepper. For a kick, consider adding a pinch of chili flakes. When sautéing, use medium heat. This allows the chicken to brown well without burning. Make sure to stir often for even cooking. Don’t overcrowd the pan; this can trap steam and cause soggy chicken. For great texture, cook the chicken until it is golden brown. This gives a nice crust and keeps it juicy. Try not to move the chicken too much in the pan. Let it sear before flipping. Timing matters a lot in cooking. Sauté vegetables until they are just tender. This keeps them crisp and tasty. Remember to simmer your sauce for about five minutes to develop deeper flavors. Serve your chicken spaghetti in a large, shallow bowl for a nice look. Top with extra Parmesan cheese for a rich flavor. A drizzle of olive oil adds shine. For garnishing, use fresh basil leaves. Place a sprig in the center of each bowl. This not only adds color but also enhances flavor. For an extra touch, you could even add a few cherry tomatoes around the edge! {{image_4}} You can make chicken spaghetti healthier. Use whole wheat or gluten-free spaghetti. These options add fiber and nutrients. You can also choose leaner chicken options, like chicken thighs or ground chicken. These cuts can lower fat but keep flavor. To boost flavor, add more vegetables. Try mushrooms, spinach, or bell peppers. Each vegetable brings a unique taste. You can also incorporate different cheeses. Swap mozzarella for cheddar or gouda. This change creates a new flavor profile in your dish. Consider regional twists on chicken spaghetti. For a kick, make spicy chicken spaghetti. Add red pepper flakes or hot sauce. For a creamy version, stir in cream cheese or sour cream. These twists make the dish exciting and flavorful. To store leftovers, let the chicken spaghetti cool first. Place it in an airtight container. This keeps it fresh and safe to eat later. Use glass or plastic containers with tight lids. They help preserve flavors and prevent spills. For freezing, portion the chicken spaghetti into smaller servings. Wrap each portion tightly in plastic wrap. Then, place them in a freezer bag. Remove as much air as possible to avoid freezer burn. When ready to eat, thaw in the fridge overnight or use a microwave. To reheat, use a skillet on low heat. Add a splash of chicken broth to keep it moist. Stir often to avoid sticking. You can also use a microwave; cover with a damp paper towel. This helps to keep the texture nice and tender. You can easily swap some ingredients for healthier options. Try using whole wheat spaghetti instead of regular. This adds fiber and keeps you fuller longer. You can also replace chicken with leaner cuts or even turkey. Add more veggies like spinach or zucchini for extra nutrients. Finally, use low-sodium chicken broth to cut down on salt. Yes, you can prep chicken spaghetti ahead of time. Cook the spaghetti and chicken, then store them separately. For best results, keep the sauce in a separate container. You can mix everything when you're ready to eat. This helps keep the pasta from getting mushy. It’s a great way to save time on busy nights. If you want to try something different, there are great substitutes. Zoodles, or zucchini noodles, are a fun and healthy option. You can also use spaghetti squash for a gluten-free choice. For a heartier meal, try whole grain or chickpea pasta. Each option adds its own flavor and texture to the dish. Yes, you can easily make chicken spaghetti vegetarian. Replace the chicken with a mix of your favorite veggies. Mushrooms, bell peppers, and broccoli work well. You can also add plant-based protein like chickpeas or lentils. Use vegetable broth instead of chicken broth for the sauce. This keeps all the great flavors while making it meatless. This article covered how to make chicken spaghetti from scratch. We discussed key ingredients, cooking steps, and tips for great flavor. You learned about variations and storage methods to ensure your meal stays fresh. Remember, cooking is all about creativity and adjustments. Don’t hesitate to try new veggies or seasonings. This dish can be a healthy and tasty meal choice. Enjoy your cooking and make it your own!

Chicken Spaghetti Flavorful and Easy Family Meal

Looking for a quick, tasty meal the whole family will love? My Chicken Spaghetti recipe is not only flavorful but

- 4 slices of whole grain bread - 1 cup natural creamy peanut butter - 1 ripe banana, sliced - 2 tablespoons honey or maple syrup - 2 tablespoons chia seeds - 1 teaspoon ground cinnamon - A pinch of sea salt - Optional toppings: dark chocolate shavings, shredded coconut, fresh berries Peanut butter toast makes a quick and tasty breakfast. To make it, gather these simple ingredients. Whole grain bread gives you fiber and nutrients. Natural creamy peanut butter adds healthy fats and protein. A ripe banana adds sweetness. Honey or maple syrup offers extra flavor. Chia seeds bring a crunch and nutrition. Ground cinnamon enhances the taste, while sea salt balances the sweetness. You can also get creative with optional toppings. Dark chocolate shavings add a sweet touch. Shredded coconut gives a tropical vibe. Fresh berries bring color and freshness. These choices let you personalize your toast. Check out the Full Recipe for more details and tips! - Preheat your toaster or oven. - Toast the bread slices for 3-5 minutes until golden brown. Toasting bread is simple but key to great peanut butter toast. If you want a crispy texture, aim for a nice golden-brown color. This adds a lovely crunch that balances the creamy peanut butter. - Slice the banana. - Measure out honey or maple syrup, chia seeds, and ground cinnamon. While the bread toasts, prep your toppings to save time. A ripe banana adds natural sweetness. Chia seeds give a nice crunch and pack in nutrients. Ground cinnamon adds warmth and flavor. - Spread peanut butter. - Arrange banana slices. - Drizzle with honey or maple syrup. - Sprinkle chia seeds and ground cinnamon. - Add optional toppings. - Finish with sea salt. Start by spreading a thick layer of peanut butter on each slice. This creamy base holds the toppings well. Next, place banana slices evenly on top. Drizzle honey or maple syrup over the bananas for extra sweetness. Then, sprinkle chia seeds and cinnamon to boost the flavor. You can get creative with optional toppings. Dark chocolate shavings add richness. Fresh berries give a burst of freshness. Finally, a pinch of sea salt ties everything together, enhancing the flavors. Check out the Full Recipe for all the details and more flavor ideas! When making peanut butter toast, pick the right bread. Whole grain bread is a great choice. It adds fiber and flavor. Gluten-free options are also available for those who need them. Sourdough and rye can add a fun twist. They give your toast a unique taste that pairs well with peanut butter. Not all peanut butter is the same. Natural peanut butter has simple ingredients, like peanuts and salt. This type is healthier and tastier. Processed peanut butter often has added sugar and oils. Crunchy peanut butter has bits of peanut, giving a nice texture. Creamy peanut butter spreads easily and is perfect for a smooth bite. Choose based on your taste! To make your toast exciting, think about spices and toppings. Ground cinnamon adds warmth and sweetness. You can also try nutmeg or cocoa powder for a twist. Add fresh fruit like strawberries or blueberries for a fruity touch. Drizzle honey or maple syrup for extra sweetness. You can even sprinkle dark chocolate shavings for a treat! Try new combinations to find what you love. For more ideas, check the Full Recipe. Enjoy your tasty creations! {{image_4}} You can easily make vegan peanut butter toast. Instead of honey, use agave syrup or coconut nectar. Both options add a sweet touch without any animal products. For nut butters, consider using almond or cashew butter. These alternatives still provide great flavor and texture. Peanut butter toast is not just sweet. You can create savory versions too. Try adding a thin layer of cream cheese or hummus. This adds a rich taste to your toast. You can also mix in fruits like sliced apples or pears for extra sweetness. Fresh herbs, like basil or mint, can brighten the dish and add depth. Each season brings new flavors. In the fall, sprinkle pumpkin spice over your peanut butter toast. This gives a warm, cozy feeling. In summer, add fresh berries like strawberries or blueberries. Their juiciness pairs well with peanut butter. You can find many ways to enjoy this simple dish throughout the year. For a complete guide, check the Full Recipe of Peanut Butter Paradise Toast. To keep your bread fresh, store it in a cool, dry place. A bread box works well, or you can use a resealable bag. Avoid storing it in the fridge. This can make the bread stale faster. Peanut butter should stay in a cool, dark spot too. Once opened, it lasts best in the pantry. If you prefer, you can refrigerate it. This helps it last longer, but it may become hard. If you make toast ahead of time, let it cool down first. Store it in an airtight container to keep it from getting soggy. If you want to eat it later, you can refrigerate it. Reheat it in a toaster or oven for a few minutes. This will help it regain its crispiness. Avoid using a microwave, as it may make your toast chewy. Peanut butter can last a long time. If it’s unopened, it can stay good for about 6 to 9 months. Once opened, it lasts about 3 months in the pantry. You can extend its life by refrigerating it. For ripe bananas, they usually last about 2 to 7 days at room temperature. To keep them fresh longer, store them in the fridge. The skin may turn brown, but the fruit inside stays good. To make peanut butter toast healthier, choose whole grain bread. Whole grains add fiber, which helps digestion. You can use natural peanut butter, as it has fewer added sugars and oils. Adding slices of fresh fruit boosts vitamins and minerals. Consider swapping honey for a smaller amount of maple syrup or skipping it altogether for less sugar. Yes! Almond and cashew butter work great. They have different flavors but still offer healthy fats. Almond butter has a nutty taste, while cashew butter is creamier and milder. Feel free to experiment with these for a twist on your toast. Many toppings can enhance peanut butter toast. Here are some ideas: - Fresh banana slices - Chia seeds - Dark chocolate shavings - Shredded coconut - Fresh berries - A sprinkle of cinnamon Each topping adds flavor and nutrition, making your toast even better. Peanut butter toast can be gluten-free if you use gluten-free bread. Many brands offer this option now. Always check the labels to ensure there is no gluten in the ingredients. You can prepare some parts in advance. Slice the banana and store it in the fridge. However, toast the bread just before eating for the best taste. Assembling the toast too early can make the bread soggy. Make it fresh to enjoy the crunch! For the full recipe, check out Peanut Butter Paradise Toast. This blog covers an easy peanut butter toast recipe packed with flavor and nutrition. We explored the key ingredients, step-by-step instructions, and helpful tips. You also learned about tasty variations and storage info. In closing, peanut butter toast is customizable and fun to make. Use this guide to create your favorite versions. Enjoy delicious meals while staying healthy. Keep experimenting for new flavors!

Peanut Butter Toast Easy and Healthy Breakfast Treat

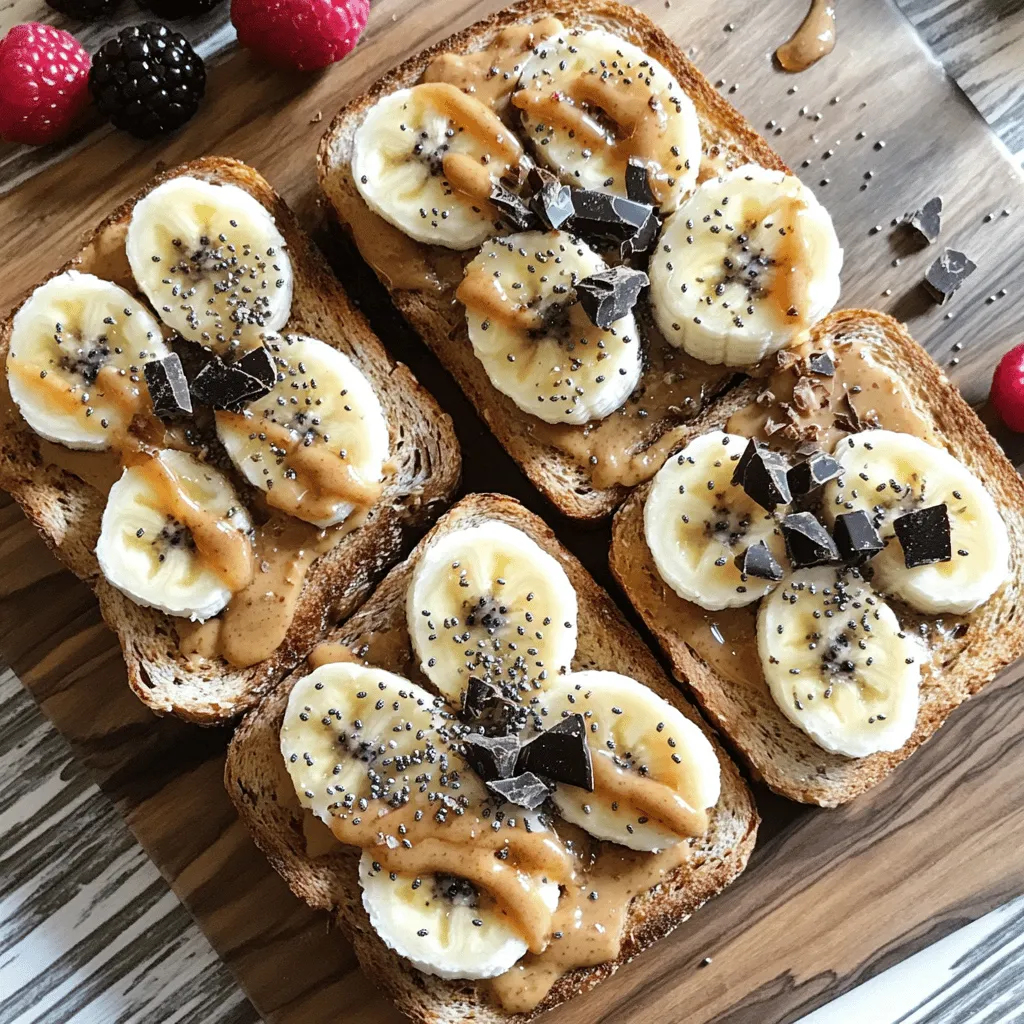
Looking for a quick, tasty breakfast that packs a punch? Peanut butter toast is your answer! It’s simple to make,

- 12 oz bowtie pasta - 1 lb ground beef - 1 medium onion, finely diced - 2 cloves garlic, minced - 1 can (14.5 oz) diced tomatoes with green chilies - 1 cup beef broth - 2 cups shredded sharp cheddar cheese - 1 teaspoon Italian seasoning - 1 teaspoon smoked paprika - Salt and black pepper to taste - 1 tablespoon extra-virgin olive oil - Fresh parsley, chopped (for garnish, optional) When measuring your ingredients, precision makes a big difference. For the pasta, use a kitchen scale if you have one. Weighing 12 oz gives you the right amount. For the ground beef, make sure to get lean meat. This helps keep your dish healthy. Use a medium onion, as it provides just the right flavor. Dice it finely for even cooking. Garlic should be minced for a strong taste. When using canned tomatoes, drain them slightly to avoid excess liquid. The beef broth adds depth, so measure exactly one cup. For the cheese, use sharp cheddar for a robust flavor. Lastly, season to your taste with salt and black pepper. You can swap the ground beef for turkey or chicken for a lighter option. If you prefer a vegetarian dish, use lentils or mushrooms instead. For cheese, mozzarella or pepper jack can work well too. You can also replace bowtie pasta with any pasta shape you like, such as penne or fusilli. Just adjust the cooking time as needed. Start by boiling a large pot of salted water. This step is key for flavor. Add the bowtie pasta when the water reaches a rolling boil. Cook it until al dente, following the package directions. This usually takes about 8-10 minutes. Once done, drain the pasta and set it aside. It will soak up the sauce later. In a large skillet, heat 1 tablespoon of extra-virgin olive oil over medium heat. When the oil shimmers, add the finely diced onion. Cook it for about 3-4 minutes. Stir in 2 cloves of minced garlic. You want the onion to soften and turn clear. This creates a tasty base for your beef. Now, add 1 pound of ground beef to the skillet. Use a spatula to break the meat into smaller pieces as it cooks. This helps it brown evenly. Cook for about 5-7 minutes until the beef is no longer pink. If there's too much fat, drain it from the skillet. This keeps the dish from being greasy. Next, stir in a can of diced tomatoes (14.5 oz) with green chilies. Pour in 1 cup of beef broth. Add 1 teaspoon of Italian seasoning and 1 teaspoon of smoked paprika. Season with salt and black pepper to taste. Bring this mixture to a gentle simmer. Let it cook for about 5 minutes. This allows the flavors to blend nicely. Reduce the heat to low. Add the drained bowtie pasta to your beef mixture. Stir well to ensure the pasta is evenly coated with the sauce. This step is crucial for flavor integration. You want every bite to be cheesy and rich. Now comes the best part—cheese! Gradually sprinkle in 2 cups of shredded sharp cheddar cheese. Stir continuously until the cheese melts and creates a creamy sauce. If the mixture seems too thick, add a bit more beef broth. This helps achieve the perfect consistency for your dish. Taste your dish and adjust the seasoning if needed. Add more salt or pepper if you like. Once satisfied, serve the cheesy beef and bowtie pasta hot. If you want to make it look nice, garnish with fresh parsley. This adds a bright touch to your delicious creation. For the full recipe, check out the detailed instructions above! To make sure your bowtie pasta is perfect, start with plenty of salted water. Bring it to a rolling boil before adding the pasta. This keeps the pasta from sticking. Stir it often while cooking. Aim for al dente, where the pasta is firm to the bite. This usually takes about 10-12 minutes. Once done, drain the pasta well and avoid rinsing. Rinsing washes away the starch that helps the sauce cling. To kick up the flavors of your cheesy beef and bowtie pasta, consider adding a few more spices. A pinch of red pepper flakes can add heat. Fresh herbs like basil or oregano elevate the taste too. You might also try a splash of Worcestershire sauce for richness. Just remember to taste as you go. This helps you find the perfect balance. Prep your ingredients before you cook. Chop your onions and garlic in advance. You can also measure out your spices and cheese ahead of time. This not only saves time but makes cooking less stressful. If you have leftover beef or cheese, use them in your next meal. This keeps your kitchen efficient and cuts down on waste. For more details, check the Full Recipe. {{image_4}} You can switch up the meat in this dish. Try ground turkey or chicken for a leaner option. If you want a vegetarian twist, use lentils or mushrooms instead of beef. These choices still give you a hearty meal. You can also use plant-based ground meat for a vegan version. Each swap brings a new flavor and texture to the dish. The sauce can change a lot with different cheeses. Instead of sharp cheddar, use mozzarella or pepper jack for a spicy kick. You can mix cheeses for a richer taste. For the tomato base, try a marinara or a creamy Alfredo sauce. Each variation can help you create a new experience. Don’t forget to adjust your spices to match the sauce. You can serve this dish with a side salad or garlic bread. Both options add nice textures and flavors. If you want to try something new, bake it in the oven. Just add more cheese on top and bake it until bubbly. This gives a fun twist to the meal, and it’s perfect for gatherings. You can also top it with fresh herbs for added color and taste. To keep your Cheesy Beef and Bowtie Pasta fresh, store it in an airtight container. Let it cool to room temperature before sealing. Refrigerate it within two hours of cooking. This helps preserve the flavors and texture. It can last in the fridge for up to three days. If you want to save some for later, freezing is a great option. Divide the pasta into single portions. Use freezer-safe bags or containers. Remove as much air as possible to prevent freezer burn. Label each bag with the date. You can freeze it for up to three months. When reheating, avoid a microwave if you can. Instead, use a skillet over medium heat. Add a splash of beef broth or water to keep it moist. Stir often to ensure even heating. You can also use the oven at 350°F. Cover it with foil to maintain moisture. This way, your pasta stays creamy and delicious. To make Cheesy Beef and Bowtie Pasta, follow these steps: 1. Cook the Pasta: Boil salted water. Add bowtie pasta. Cook until al dente. 2. Sauté Aromatics: Heat olive oil. Cook diced onion and minced garlic until soft. 3. Brown the Beef: Add ground beef. Cook until browned, breaking it up as it cooks. 4. Flavor the Mixture: Stir in diced tomatoes, beef broth, and seasonings. Simmer for 5 minutes. 5. Combine Pasta and Beef: Mix the cooked pasta with the beef mixture. 6. Incorporate Cheese: Add shredded cheddar cheese, stirring until melted and creamy. 7. Adjust Seasoning: Taste and add more salt or pepper if needed. 8. Serve and Garnish: Serve hot, garnished with parsley if desired. Yes, you can prepare this dish ahead of time. Cook the pasta and the beef mixture separately. Store them in the fridge. When you're ready to eat, combine and heat everything in a pot. This method keeps the pasta from becoming mushy. You can serve this dish with: - Garlic bread - A fresh garden salad - Steamed vegetables - Roasted Brussels sprouts These sides balance the richness of the pasta. To make Cheesy Beef and Bowtie Pasta healthier, consider these tips: - Use lean ground turkey instead of beef. - Add fresh spinach or kale for extra nutrients. - Use whole wheat pasta for more fiber. - Reduce the amount of cheese or use a lighter cheese option. You can transform leftovers in fun ways: - Mix with scrambled eggs for breakfast. - Make a pasta bake by adding more cheese and baking it. - Toss with extra veggies for a new dish. Yes! You can use other pasta shapes like: - Penne - Fusilli - Rotini These shapes will hold the sauce well and taste great. Absolutely! To scale the recipe: - Double or triple the ingredients based on the number of guests. - Use a large pot for cooking and a big serving dish. - Consider adding more vegetables to stretch the dish. For the full recipe, check out the instructions above. In this post, we explored a delicious Cheesy Beef and Bowtie Pasta recipe. We covered essential ingredients, measurement tips, and easy substitutions for flexibility. You learned step-by-step cooking instructions, along with helpful tips to enhance flavors and save time. For best results, remember to adjust seasoning to your taste. This dish is perfect for family meals, and the options for variations are endless. Enjoy creating this comforting meal that everyone will love!

Cheesy Beef and Bowtie Pasta Flavorful Dinner Recipe

Looking to spice up your dinner routine? This Cheesy Beef and Bowtie Pasta recipe is quick, tasty, and loved by

- 1 pound ground beef - 1/2 cup breadcrumbs - 1/4 cup grated Parmesan cheese - 1 large egg - 1 teaspoon garlic powder - 1 teaspoon onion powder - Salt and pepper to taste For the meatballs, ground beef is key. It gives a rich taste and holds the shape well. Breadcrumbs add texture, while Parmesan cheese gives a nice flavor boost. The egg binds everything together. Garlic and onion powders bring depth. Don't forget salt and pepper for seasoning. - 1 tablespoon Worcestershire sauce - 1 medium onion, thinly sliced - 2 cups beef broth - 2 cups sliced mushrooms - 2 tablespoons cornstarch mixed with 2 tablespoons water (for thickening) - Fresh parsley, finely chopped (for garnish) Worcestershire sauce adds a savory kick. Onions and mushrooms create a flavorful base for the meatballs. Beef broth keeps everything juicy and tender. A cornstarch slurry thickens the sauce, making it rich. Finally, fresh parsley adds a touch of color and freshness. For the full recipe, check out the detailed instructions above. Combining the Ingredients First, grab a large mixing bowl. In it, combine 1 pound of ground beef, 1/2 cup of breadcrumbs, 1/4 cup of grated Parmesan cheese, and 1 large egg. Add 1 teaspoon of garlic powder, 1 teaspoon of onion powder, and a sprinkle of salt and pepper. Then, pour in 1 tablespoon of Worcestershire sauce. Mix all these ingredients well using your hands or a spoon until everything is evenly blended. Shaping the Meatballs Now it's time to shape the mixture into meatballs. Roll the mixture into balls about the size of a golf ball, which is around 1.5 inches in diameter. Make sure they are firm and well-formed to hold their shape while cooking. Layering Vegetables Next, prepare your slow cooker. Start by slicing one medium onion and 2 cups of mushrooms. Layer the sliced onions and mushrooms at the bottom of the slow cooker. This step adds great flavor to the meatballs as they cook. Placing Meatballs in the Cooker Carefully place the meatballs on top of the sliced vegetables in the slow cooker. Once the meatballs are arranged, pour 2 cups of beef broth over them. Ensure the meatballs are mostly submerged in the broth. This will help them cook evenly and stay juicy. Cooking Time on Low vs. High Cover the slow cooker with its lid. You can set it to cook on low for 6-8 hours or on high for 3-4 hours. The meatballs will be ready when they are fully cooked and tender. Monitoring the Cooking Process Check on your meatballs about halfway through cooking. If you want, stir them gently to ensure even cooking. About 30 minutes before serving, mix 2 tablespoons of cornstarch with 2 tablespoons of water in a small bowl. Stir this into the slow cooker to thicken the sauce. Replace the lid and continue cooking until the sauce thickens to your liking. Enjoy this easy recipe for Slow Cooker Salisbury Steak Meatballs by referring to the Full Recipe for all the details! Ensuring Flavor and Tenderness To make juicy meatballs, start with fresh ground beef. You want 80/20 beef for the best fat content. Mixing in breadcrumbs and cheese adds flavor and keeps them moist. Don't overmix the meat; just combine until blended. This helps keep them tender. Common Mistakes to Avoid A big mistake is making meatballs too big. Aim for golf ball size for even cooking. Also, avoid cooking them straight from the fridge. Let them sit out for about 30 minutes before cooking. This helps them cook evenly and keeps them juicy. Using Cornstarch Slurry The sauce thickens great with cornstarch. Mix 2 tablespoons of cornstarch with 2 tablespoons of water. Stir until smooth, then add it to the slow cooker. Make sure to add this about 30 minutes before serving for the best results. Alternatives for Thickening If you don't have cornstarch, use flour or arrowroot powder. Mix it with cold water like the cornstarch. You can also mash some of the mushrooms and onions to thicken the sauce naturally. This will add more flavor and texture too. For the full recipe, check [Full Recipe]. {{image_4}} Different Meats or Meat Alternatives You can use different meats for your Salisbury steak meatballs. Ground turkey or chicken works well as a leaner option. If you want a richer flavor, try ground lamb. For a vegetarian twist, use plant-based ground meat or lentils. Both options can make tasty meatballs that suit your diet. Gluten-Free Adaptations To make your meatballs gluten-free, swap the breadcrumbs with gluten-free bread or almond flour. It will still hold the meatballs together nicely. Just make sure to check labels on all ingredients for hidden gluten. Adding Spices and Herbs You can boost the flavor of your meatballs by adding spices and herbs. Try adding a teaspoon of smoked paprika or dried thyme to the mix. Fresh herbs like parsley or cilantro can also add a fresh taste. Experiment with flavors that you love. Incorporating Vegetables Add more nutrients by incorporating vegetables into your meatballs. Finely chopped carrots, zucchini, or bell peppers mix well. You can also add spinach for a pop of color and nutrition. These additions make your dish even tastier and healthier. For more details, don't miss the full recipe! *Refrigeration Tips* To store your Slow Cooker Salisbury Steak Meatballs, let them cool first. Place them in an airtight container. Keep the meatballs and sauce together. They will stay fresh for up to three days in the fridge. *Freezing Guidelines* If you want to freeze them, use a freezer-safe bag. Remove as much air as possible before sealing. These meatballs can last up to three months in the freezer. To use, thaw them in the fridge overnight before reheating. *Best Methods to Reheat* The best way to reheat your meatballs is in the microwave. Heat them in a bowl with the sauce. You can also use the stovetop. Place them in a pan over low heat. Stir gently until hot. *Maintaining Flavor and Texture* To keep the meatballs juicy, add a splash of beef broth when reheating. This helps preserve their flavor. Avoid high heat, as it can dry them out. Enjoy your leftovers just as much as the first time! You can serve these meatballs with many tasty sides. Here are some ideas: - Mashed Potatoes: Creamy mashed potatoes pair well with the savory gravy. - Egg Noodles: They soak up the sauce nicely and add a comforting touch. - Rice: White or brown rice works great for a filling meal. - Steamed Vegetables: Green beans or broccoli can add color and nutrition. - Salad: A fresh garden salad can add crunch and balance the meal. These options will help create a complete meal that everyone will love. Yes, you can make these meatballs ahead of time. Here are some tips: - Meal Prep Tips: Prepare the meat mixture and shape the meatballs. Store them in the fridge for one day or freeze them for longer storage. - Storage Duration: If frozen, the meatballs can stay good for up to three months. Just thaw them overnight in the fridge before cooking. Making them ahead saves you time on busy days. Leaving meat in the slow cooker overnight is not safe. Here are some guidelines: - Food Safety Guidelines: Cook meat on a low setting for 6-8 hours or on high for 3-4 hours. After cooking, keep it warm, but do not leave it for long. - Recommended Cooking Times: Always ensure the meat reaches an internal temperature of 160°F. This helps prevent foodborne illness. Following these tips keeps your meal safe and tasty. Slow Cooker Salisbury Steak Meatballs provide a tasty and easy meal. We covered ingredients, methods, and expert tips to enhance flavor. Whether you want to swap meats or store leftovers, you have options. Always aim for tasty meatballs by monitoring cooking times and following safety guidelines. Enjoying your meal is the goal. Try this recipe, and you will impress your family and friends. Happy cooking!

Slow Cooker Salisbury Steak Meatballs Easy Recipe

Craving a comforting, home-cooked meal? Slow Cooker Salisbury Steak Meatballs are a game changer! This easy recipe combines tender meatballs

- 4 boneless, skinless chicken breasts - 1 can (10.5 oz) cream of chicken soup - 1 package (8 oz) cream cheese, softened - 1 packet (1 oz) ranch dressing mix - 1/2 cup low-sodium chicken broth - Garlic powder - Onion powder - Dried thyme - Salt and pepper - Fresh thyme sprigs for garnish - Slow cooker - Mixing bowl - Whisk - Measuring cups and spoons To make Crockpot Angel Chicken, gather these ingredients first. Start with the chicken breasts, which give the dish its heartiness. The cream of chicken soup and cream cheese create a rich and creamy sauce. The ranch dressing mix adds a nice kick. For additional flavor, use low-sodium chicken broth and a few spices. I like to add garlic and onion powders for depth. Dried thyme brings a lovely herbal note. You can adjust salt and pepper to taste. Fresh thyme sprigs add a beautiful touch when serving. Make sure you have a good slow cooker, mixing bowl, and some measuring tools. These tools will help you create a delicious meal with ease. Once you have everything ready, you can dive into the cooking process. If you want to check the full recipe, it lays everything out step-by-step. Start by placing the chicken in the crockpot evenly. Lay the chicken breasts flat, not overlapping. This helps them cook evenly. If they overlap, some pieces may not cook through. You want each bite to be tender and juicy. Next, mix the sauce. In a medium bowl, combine the cream of chicken soup and softened cream cheese. Use a whisk to blend them until smooth. Then, add the ranch dressing mix, chicken broth, garlic powder, onion powder, and dried thyme. Season with salt and pepper. Stir well to combine all the flavors. Now, pour the creamy sauce over the chicken. Make sure to coat each piece well. Cover the crockpot and set it on low for 6 to 7 hours or high for 3 to 4 hours. You know it is done when the chicken reaches 165°F. Shred the chicken directly in the crockpot with two forks. This lets the chicken soak up the sauce. Stir everything together to ensure the chicken is coated. Let it rest for a few minutes to thicken the sauce. For the full recipe, you can refer to the initial list of ingredients and instructions. To enhance the flavor of your Crockpot Angel Chicken, adjust the seasonings. You can add more garlic powder or a pinch of cayenne for some heat. Taste the sauce before cooking. If it needs more salt or herbs, add them. For the best texture, make sure to shred the chicken while it’s still warm. This ensures it absorbs the creamy sauce fully, making each bite delicious. Cooking time can change based on a few factors. The thickness of your chicken breasts plays a big role. Thicker pieces require more time. Your slow cooker model also affects cook time. Some cook faster than others. To check doneness, use a meat thermometer. The chicken should reach an internal temperature of 165°F. If you don’t have a thermometer, look for the chicken to be tender and easy to shred. When serving, spoon the angel chicken over fluffy rice or creamy mashed potatoes. This helps soak up the sauce. For a pop of color, garnish with fresh thyme sprigs. You can also sprinkle some chopped parsley for extra flair. Consider pairing your dish with a side of steamed green beans or broccoli. This makes your meal colorful and healthy. Enjoy your beautiful plate! {{image_4}} You can change the taste of Crockpot Angel Chicken easily. Adding different herbs and spices can make a big difference. Try mixing in fresh basil or oregano for a new twist. You can also sprinkle in some paprika or cayenne for a bit of heat. Incorporating vegetables makes this meal more complete. You can add carrots, bell peppers, or even spinach. Just chop them up and add them to the crockpot with the chicken. They will cook nicely in the creamy sauce and add extra flavor. If you want to try different proteins, there are many options. Turkey breast works well instead of chicken. You can also use tofu for a plant-based meal. Just make sure to cut it into cubes. For those who need dairy-free options, you can swap out the cream cheese. Use coconut cream or a dairy-free cream cheese. Check the labels to make sure they suit your diet. There are many fun ways to serve this dish. You can spoon the angel chicken over rice or mashed potatoes. It also goes great with pasta. For a twist, try serving it in a baked casserole dish. Just layer the chicken with some vegetables and top with cheese before baking. These variations keep the meal exciting and let you customize it to your taste. You can explore new flavors while keeping the creamy comfort of the original recipe. For the full recipe, check out the detailed instructions above. To keep your Crockpot Angel Chicken fresh, store it in the fridge. Place the chicken in an airtight container. This helps to prevent moisture loss and keeps flavors intact. Make sure it cools down before sealing it up. You can enjoy leftovers within three to four days. If you want to save it longer, freezing is a great option. Portion out the chicken into freezer-safe bags. Squeeze out as much air as possible before sealing. This helps keep the chicken from getting freezer burn. It can last up to three months in the freezer. When it's time to eat, thaw the chicken overnight in the fridge. For a quick option, you can use the microwave on the defrost setting. Reheat it gently on the stove or in the microwave until hot. In the fridge, your Crockpot Angel Chicken lasts about three to four days. If kept in the freezer, it stays good for about three months. Always check for any off smells or changes in color before eating. Crockpot Angel Chicken is perfect for meal prep. You can make a big batch to use for the week. This dish works well for lunches or quick dinners. You can pair it with rice, pasta, or veggies. Divide the portions into containers for easy grab-and-go meals. This saves time on busy days and keeps your meals tasty. Plus, it’s great for families or anyone who loves easy meals. Cooking time varies by setting. If you use low, it takes about 6 to 7 hours. On high, it cooks in about 3 to 4 hours. Your chicken should reach 165°F to be safe to eat. Yes, you can use frozen chicken. However, make sure to add extra cooking time. Cook on high for about 4 to 5 hours. Ensure the chicken reaches 165°F before serving. This keeps the meal safe and tasty. Crockpot Angel Chicken pairs well with many sides. Here are some ideas: - Fluffy rice - Creamy mashed potatoes - Steamed green beans - Fresh garden salad These sides balance the creamy chicken. They add color and nutrition to your meal. For more ideas, check the Full Recipe for tasty combinations! Crockpot Angel Chicken is easy and tasty. You need simple ingredients like chicken, cream soup, and cream cheese. Using a slow cooker makes the prep a breeze. Don’t forget to adjust flavors with spices and herbs. You can even switch up ingredients for different tastes. To enjoy your dish for days, store leftovers properly. This meal fits into busy weeks and meal prep plans. Now, you have all the tools and tips for a great dinner. Enjoy your cooking and happy eating!

Crockpot Angel Chicken Simple and Creamy Meal

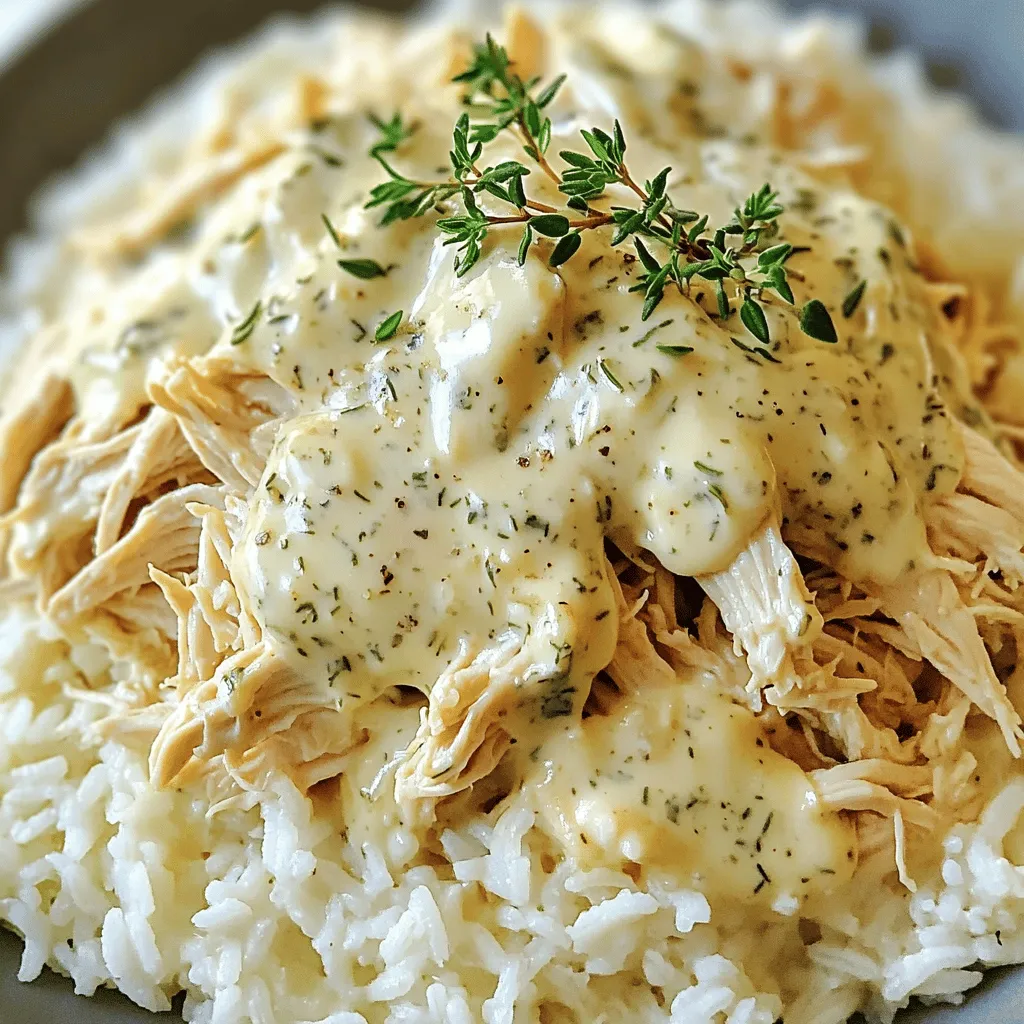
Are you ready to discover a simple and creamy meal that will wow your family? Crockpot Angel Chicken is the

- 4 bone-in pork chops (approximately 1 inch thick) - 1 teaspoon salt - 1/2 teaspoon black pepper - 1 teaspoon garlic powder - 1 teaspoon smoked paprika - 2 tablespoons olive oil - 1 large onion, thinly sliced - 2 cloves garlic, minced - 1 cup low-sodium chicken broth - 1 tablespoon Dijon mustard - 1 tablespoon Worcestershire sauce - 1 teaspoon dried thyme - 1 cup heavy cream - Fresh parsley, finely chopped (for garnish) Pork chops are a great source of protein. They help build and repair muscles. The olive oil is rich in healthy fats. It can support heart health. Onions have antioxidants that may reduce inflammation. Garlic can help boost your immune system. Heavy cream adds richness and calcium for strong bones. Chicken broth offers hydration and flavor with fewer calories. You can swap bone-in pork chops for boneless ones. They will still taste great! For a lower-calorie option, use light cream instead of heavy cream. If you want less sodium, use homemade chicken broth. You can replace Dijon mustard with yellow mustard. If you don’t have smoked paprika, regular paprika works too. Fresh herbs can replace dried thyme if you have them. First, gather your ingredients. You need bone-in pork chops, salt, black pepper, garlic powder, and smoked paprika. Pat the pork chops dry with paper towels. This helps them sear better. Season both sides generously with salt, black pepper, garlic powder, and smoked paprika for great flavor. Let the chops sit for a few minutes to absorb the seasoning. Heat a large skillet over medium-high heat. Add two tablespoons of olive oil and let it shimmer. Carefully place the pork chops in the skillet. Sear them for about 4-5 minutes on each side. Look for a nice golden-brown crust. This step locks in the pork's juices and flavor. Once they are seared, remove the chops from the skillet and place them on a plate to rest. In the same skillet, add one large onion, thinly sliced. Sauté over medium heat for about 5 minutes. Wait until the onions turn translucent and tender. Add two cloves of minced garlic and stir for one more minute. Now, pour in one cup of low-sodium chicken broth. Add one tablespoon of Dijon mustard, one tablespoon of Worcestershire sauce, and one teaspoon of dried thyme. Stir well and let it simmer for 3-4 minutes. This helps meld the flavors together. Reduce the heat to medium-low and stir in one cup of heavy cream. Keep it on the heat for about 3-5 minutes, stirring occasionally. This will thicken the sauce and make it creamy. Finally, return the seared pork chops to the skillet. Spoon the sauce over them and cover the skillet. Let it simmer on low heat for 15-20 minutes. The pork should reach an internal temperature of 145°F. Your smothered pork chops are now ready for a delicious meal. For the full recipe, check the details above. To get the best flavor in smothered pork chops, start with seasoning. Use salt, black pepper, garlic powder, and smoked paprika. These spices add depth and warmth. Sear the chops well. This forms a nice crust. The crust locks in moisture and enhances taste. When cooking the onions, let them cook until soft and sweet. This sweetness adds to the sauce. Lastly, use low-sodium chicken broth. It keeps the dish from being too salty while adding rich flavor. For the perfect creamy sauce, use heavy cream. It gives a rich and smooth texture. Once you add it, lower the heat. Simmer gently until it thickens. Stir often to avoid sticking. If too thick, add a bit more broth to loosen it. You can also whisk in a little flour to thicken if needed. This will help maintain that creamy feel. One common mistake is not searing the pork chops enough. If you skip this step, you miss out on flavor. Don’t overcrowd the pan when searing. This can lower the temperature and prevent browning. Another mistake is overcooking the pork chops. Use a meat thermometer to check the temperature. It should reach 145°F. Lastly, don’t skip the resting time. Letting the meat rest helps keep it juicy. For more tips, refer to the Full Recipe. {{image_4}} Want to kick up the heat? Add some spice. Mix in cayenne pepper or crushed red pepper flakes. A teaspoon of each will do the trick. You can also swap smoked paprika for hot paprika. This gives your dish a nice kick. Serve these spicy chops with a side of creamy coleslaw to balance the heat. Mushrooms add an earthy flavor. Use about one cup of sliced mushrooms. Add them right after sautéing the onions. Let them cook until soft before adding the broth. This blend makes the sauce rich and savory. Try using cremini or shiitake mushrooms for a gourmet touch. You can cook smothered pork chops in two ways. The stovetop method is quicker. It takes about 40 minutes. If you prefer slow cooking, use a slow cooker. This method takes about 6-8 hours on low. The result is tender, juicy chops. For both methods, the sauce will still be creamy and delicious. To store your leftover smothered pork chops, let them cool down first. Then, place them in an airtight container. Make sure to include some of the sauce for moisture. You can keep them in the fridge for up to three days. This keeps the flavors fresh and tasty. When you want to enjoy the leftovers, reheat them gently. You can use the microwave or a skillet. If using the microwave, cover the container to prevent drying out. Heat in short bursts, about one minute, stirring in between. If using a skillet, add a splash of broth or water, cover, and warm on low heat. You can freeze smothered pork chops for longer storage. First, cool them completely. Then, wrap each chop tightly in plastic wrap. Place them in a freezer bag or container, making sure to remove as much air as possible. They can last for up to three months in the freezer. To reheat, thaw overnight in the fridge before warming. Feel free to check the [Full Recipe] for more tips on making these delicious chops! Smothered pork chops taste great with many sides. Here are some favorites: - Mashed potatoes - Steamed rice - Roasted vegetables - Green beans - Coleslaw These sides add flavor and texture. They help balance the rich sauce. Yes, you can use boneless pork chops. Just remember to adjust the cooking time. Boneless chops cook faster than bone-in chops. Aim for an internal temperature of 145°F. This way, your pork remains juicy and tender. To make smothered pork chops dairy-free, swap heavy cream for coconut cream or cashew cream. Both options provide a rich texture. Use a non-dairy butter for cooking. Your sauce will still taste creamy and delicious. Check the Full Recipe for more ideas on how to adjust the dish. This blog post covered how to make smothered pork chops. We discussed key ingredients, their health benefits, and substitutions. You learned step-by-step how to prepare and cook these chops, plus tips for the best flavor and texture. We explored tasty variations and detailed ways to store leftovers. Remember, you can swap ingredients and try different cooking methods. These choices can make the dish your own. Enjoy experimenting and savoring your delicious creation!

Savory Smothered Pork Chops Creamy and Easy Recipe

Craving something hearty and comforting? You’ll love my Savory Smothered Pork Chops recipe! This dish is creamy, easy to make,

Older posts
Newer posts
← Previous Page1 … Page35 Page36 Page37 … Page39 Next →

dsad

© 2025 dailydishcraft • Built with GeneratePress

Our Policies

  • Copyright Policy
  • Cookie Policy
  • GDPR Policy
  • Privacy Policy
  • Disclaimer
  • Terms Of Use

More Information

  • Home
  • About
  • Contact
  • Appetizers
  • Dessert
  • Dinner
  • Drinks
©2025, dailydishcraft About Back To Top