![To make this tasty soup, you need a few key ingredients: - 1 lb ground beef or Italian sausage - 1 medium onion, diced - 2 cloves garlic, minced - 1 (28 oz) can crushed tomatoes - 4 cups chicken or vegetable broth - 1 teaspoon dried oregano - 1 teaspoon dried basil - 1 teaspoon Italian seasoning - Salt and pepper to taste - 9-12 lasagna noodles, broken into smaller pieces - 1 cup ricotta cheese - 1 cup shredded mozzarella cheese, divided - ½ cup grated Parmesan cheese, divided - Fresh basil leaves for garnish (optional) These ingredients mix to create a warm and hearty dish. The ground meat adds protein and flavor, while the crushed tomatoes give a rich base. If you want to make changes, here are some easy swaps: - Use ground turkey or chicken instead of beef or sausage. - Swap onion for shallots or leeks for a milder flavor. - You can use fresh tomatoes if you prefer. Just chop and cook them down. - Try vegetable broth for a vegetarian version. - Substitute cottage cheese for ricotta if you want a lower-fat option. These substitutions keep the soup delicious while fitting your taste and needs. Garnishing can make your soup even better. Here are some ideas: - Sprinkle extra mozzarella on top for more cheese. - Add grated Parmesan for a salty kick. - Use fresh basil leaves for a pop of color and flavor. - A drizzle of olive oil can add richness. These garnishes add flavor and make your dish look appealing. You can mix and match to find your perfect bowl. Check out the Full Recipe for more tips! To start, gather all your ingredients. You will need ground beef or Italian sausage, onion, garlic, crushed tomatoes, broth, spices, and lasagna noodles. Don't forget the ricotta and mozzarella cheese! 1. First, heat some olive oil in a large pot over medium heat. 2. Next, add the ground meat. Cook it until it is brown, about 5-7 minutes. 3. If there's extra fat, drain it off to keep the soup lighter. 4. Now, add the diced onion and cook for 3-4 minutes. The onion should become soft. 5. After that, add the minced garlic. Cook for one more minute to bring out its flavor. After your onions and garlic are ready, add the crushed tomatoes and broth to the pot. Stir in the dried oregano, basil, and Italian seasoning. Add salt and pepper to your taste. 1. Turn up the heat until the soup starts to boil. 2. Once it boils, lower the heat to a simmer. 3. Add your broken lasagna noodles to the soup. Let them cook for about 10-12 minutes until they are al dente. Stir occasionally to keep them from sticking. 4. While the noodles cook, mix the ricotta cheese, half the mozzarella, and half the Parmesan in a bowl. Blend them well. When the noodles are done, take the pot off the heat. Add dollops of the ricotta mixture into the soup. Stir gently so you keep some creamy pockets intact. Serve the soup hot in bowls. Top each serving with the rest of the mozzarella and Parmesan. For a fresh touch, add some basil leaves on top. Enjoy your hearty lasagna soup! You can find the full recipe to guide you through this easy process. To make the best lasagna soup, focus on the flavors. Use fresh herbs for a brighter taste. I love adding a pinch of red pepper flakes for a kick. This small addition can really elevate the dish. When cooking the meat, let it brown well. This adds depth and richness. Stir the soup often to prevent the noodles from sticking. If you're short on time, use pre-cooked meat. Ground turkey or chicken works well. You can also use jarred marinara sauce. Just add it in place of crushed tomatoes for faster prep. Use no-boil lasagna noodles. They cook quickly and save time. Prepare the cheese mixture in advance. Store it in the fridge for easy use later. Store leftover soup in airtight containers. It keeps well in the fridge for up to three days. To reheat, warm it on the stove over low heat. Stir often to prevent burning. You can also use the microwave. Just heat in short bursts and stir in between. If freezing, leave out the cheese. Add it when reheating for best taste. For the full recipe, refer to the earlier section. {{image_4}} You can make this soup vegetarian by swapping the meat for veggies. Use mushrooms, zucchini, or spinach for rich flavors. Start by sautéing the veggies in olive oil until soft. Then, add the crushed tomatoes and broth as in the original recipe. This gives you a hearty soup without meat. To make this soup gluten-free, choose gluten-free lasagna noodles. You can find these in most grocery stores. Cook them according to the package instructions before adding them to the soup. This way, you can enjoy all the flavors without the gluten. If you want some heat, add crushed red pepper flakes to the pot. Start with half a teaspoon and adjust to your taste. You can also use spicy Italian sausage instead of ground beef. This will give your soup a nice kick and keep things exciting. These variations allow you to customize Easy Lasagna Soup to fit your tastes and dietary needs. For the full recipe, check out the [Full Recipe]. To store leftover soup, let it cool first. Once it is cool, transfer it to an airtight container. This keeps it fresh and safe. Place the container in the fridge. The soup will stay good for about three to four days. If you want to save soup for later, freezing is a great option. Pour the cooled soup into freezer-safe containers. Leave some space at the top, as soup expands when frozen. Seal the containers tightly and label them with the date. The soup can last up to three months in the freezer. Lasagna soup can last in the fridge for up to four days. If frozen, enjoy it within three months for the best taste. Always check for any signs of spoilage before eating. When in doubt, throw it out. This soup is best when fresh, but knowing how to store it helps you enjoy it longer. Yes, you can use store-bought marinara sauce. It saves time and adds flavor. Just choose a brand you like. Pour it into the pot after you cook the meat. Mix it well with the other ingredients. This will keep the soup tasty and easy. To make this soup dairy-free, skip the ricotta and cheeses. Use a dairy-free cheese if you want. You can also add more veggies for creaminess. Blending cooked cauliflower can add texture. Try coconut milk for a rich taste. This way, you still enjoy a hearty soup. I love serving this soup with garlic bread. It soaks up the broth well. A fresh side salad also pairs nicely. You could add a simple green salad with lemon dressing. For a fun twist, serve it in bread bowls. This makes for a cozy meal. For the full recipe, check the recipe section above. Easy lasagna soup is simple and fun to make. We covered the key ingredients, tips for success, and different variations to suit your taste. Remember to store leftovers well so you can enjoy them later. You can make this soup even easier with some time-saving tricks. Whether you like it spicy or vegetarian, you can customize it. Now it's your turn to try making this comforting meal! Enjoy every spoonful.](https://dailydishcraft.com/wp-content/uploads/2025/04/02fc48f9-7fda-4340-ae60-842840c037ba.webp)
Easy Lasagna Soup Flavorful and Hearty Dinner Option
Craving a warm meal that’s easy to whip up? You’re in the right place! This Easy Lasagna Soup is both
Craving a warm meal that’s easy to whip up? You’re in the right place! This Easy Lasagna Soup is both
![To make Sweet Pineapple Chicken & Rice, you need simple yet flavorful ingredients. This dish combines tender chicken, sweet pineapple, and fresh vegetables, all served over jasmine rice. The mix creates a delightful balance of savory and sweet tastes. - 2 cups jasmine rice - 4 cups chicken broth - 1 pound boneless, skinless chicken breasts, cubed - 1 cup fresh pineapple, diced (or canned pineapple, drained) - 1 red bell pepper, diced - 1 cup sugar snap peas, trimmed - 3 tablespoons low-sodium soy sauce - 2 tablespoons honey - 1 tablespoon sesame oil - 2 cloves garlic, minced - 1-inch piece of ginger, minced - 3 green onions, sliced (for garnish) - Sesame seeds (for garnish) - Salt and pepper to taste You will need a few kitchen tools for this recipe: - Medium-sized pot for cooking rice - Large skillet or wok for cooking chicken and vegetables - Measuring cups and spoons - Cutting board and knife for chopping - Mixing bowl for sauce - Fork for fluffing rice First, we need to cook the rice. Using a medium pot, bring the chicken broth to a boil. Once boiling, add in the jasmine rice. Cover the pot and reduce the heat to low. Let it simmer for about 15 minutes. This helps the rice absorb all the liquid and become tender. After 15 minutes, remove the pot from heat. Keep it covered for another 5 minutes to let it steam. This step makes the rice fluffy and perfect. While the rice cooks, we can prepare the chicken. Heat sesame oil in a large skillet over medium-high heat. Season the cubed chicken with salt and pepper. This adds great flavor. Add the chicken to the hot skillet and cook it for about 5 to 7 minutes. Stir it occasionally. You want the chicken to be golden brown and fully cooked. Next, add minced garlic and ginger to the skillet. Sauté them for about 1 minute. This brings out their lovely aromas and flavors. Now, let’s combine everything! Add diced red bell pepper and sugar snap peas to the skillet with the chicken. Stir the mixture and cook for an extra 3 to 4 minutes. This softens the veggies just a bit while keeping them crunchy. For the sauce, mix soy sauce, honey, and diced pineapple in a small bowl. Pour this tasty sauce over the chicken and veggies. Stir well so everything gets coated. Let it simmer for 2 to 3 minutes. This allows all the flavors to blend together. Finally, fluff the cooked jasmine rice with a fork. Add the rice to the skillet, mixing it gently with the chicken and veggies. Make sure all the ingredients are well combined. Now, your Sweet Pineapple Chicken & Rice is ready to serve! Enjoy this vibrant meal that is easy and quick to make. For the complete recipe, check the Full Recipe section. To cook perfect chicken, start with even-sized cubes. This ensures even cooking. Heat your skillet well before adding the chicken. When the oil is hot, add the chicken and don’t overcrowd the pan. This helps the chicken brown nicely. Cook until the chicken is golden and no longer pink inside. Use a meat thermometer to check that it reaches 165°F. This keeps it safe and juicy. To boost the flavors, use fresh ginger and garlic. Their bright taste makes a big difference. Adding soy sauce and honey creates a sweet and savory balance. For a twist, try adding a splash of lime juice. It adds a zesty kick. Also, let the chicken simmer in the sauce for a few minutes to absorb the flavors. This step is key to making your dish pop. Garnishing adds beauty and flavor. Use sliced green onions for a fresh crunch. Sesame seeds add a nice touch too. For a tropical vibe, add more diced pineapple on top. You can also squeeze lime over the dish before serving. This simple step brightens the overall taste. To impress guests, serve it in deep bowls. Add extra pineapple around the edges for a colorful look. For the full recipe, check the [Full Recipe]. {{image_4}} You can easily make Sweet Pineapple Chicken & Rice vegetarian. Swap chicken for tofu or tempeh. Use the same spices and cooking steps. Tofu absorbs flavors well. It adds protein and texture. You can also add extra veggies like broccoli or carrots. This keeps the dish colorful and tasty. If you like heat, add chili flakes or fresh jalapeños. Mix them in with the garlic and ginger. This will boost the flavor and give it a kick. You can also use sriracha in the sauce for extra spice. Adjust the amount to suit your taste. Not a fan of jasmine rice? Try quinoa or brown rice instead. Quinoa is high in protein and cooks fast. Brown rice offers a nutty flavor and is more filling. Both options work great with the sweet and savory sauce of the dish. Just follow the cooking instructions based on the grain you choose. To explore the full recipe, check out the Full Recipe section. After enjoying your Sweet Pineapple Chicken & Rice, cool any leftovers. Place the dish in an airtight container. Store it in the fridge for up to three days. This keeps the flavors fresh and safe to eat. Always make sure the dish is at room temperature before sealing it. To reheat, microwave the dish in a bowl. Use medium power for about 1 to 2 minutes. Stir halfway to ensure even heating. You can also reheat on the stove. Add a splash of chicken broth to a pan. Heat it over medium until warm, stirring gently. This keeps the rice moist and tasty. You can freeze Sweet Pineapple Chicken & Rice for longer storage. Place it in a freezer-safe container, leaving space for expansion. It can last up to three months in the freezer. When ready to eat, thaw it overnight in the fridge. Reheat using the methods mentioned above for the best taste. Yes, you can use brown rice instead of jasmine rice. Brown rice needs more water and takes longer to cook. Use about 4 cups of water for 2 cups of brown rice. Cook it for about 40 to 45 minutes. This rice adds a nice, nutty flavor and extra fiber. Sweet Pineapple Chicken & Rice lasts about 3 to 4 days in the fridge. Store it in an airtight container. Make sure to let it cool before sealing. This helps keep it fresh and safe to eat later. If you can't find sugar snap peas, try using snow peas or green beans. Both have a similar crunch and taste great in this dish. You can also add broccoli florets for a different texture. Just cook them until they are tender but still crispy. This blog post shared a clear recipe for Sweet Pineapple Chicken & Rice. I outlined the ingredients, tools, and a step-by-step guide. You learned tips to cook chicken perfectly and add flavor. I also suggested variations for spice and vegetarian preferences. In the end, this dish is flexible and easy to make. Enjoy it fresh or store leftovers for later. Happy cooking!](https://dailydishcraft.com/wp-content/uploads/2025/04/d1fcb414-13a3-4709-844d-b82e9e80c006.webp)
Looking for a delicious and simple dinner idea? Sweet Pineapple Chicken & Rice is your answer! This dish is a

If you love cinnamon rolls, then you’re in for a treat! This Cinnamon Roll Cake is an easy twist on

Looking for a quick and tasty meal? Garlic Butter Chicken Bites are your answer! In just a few steps, you
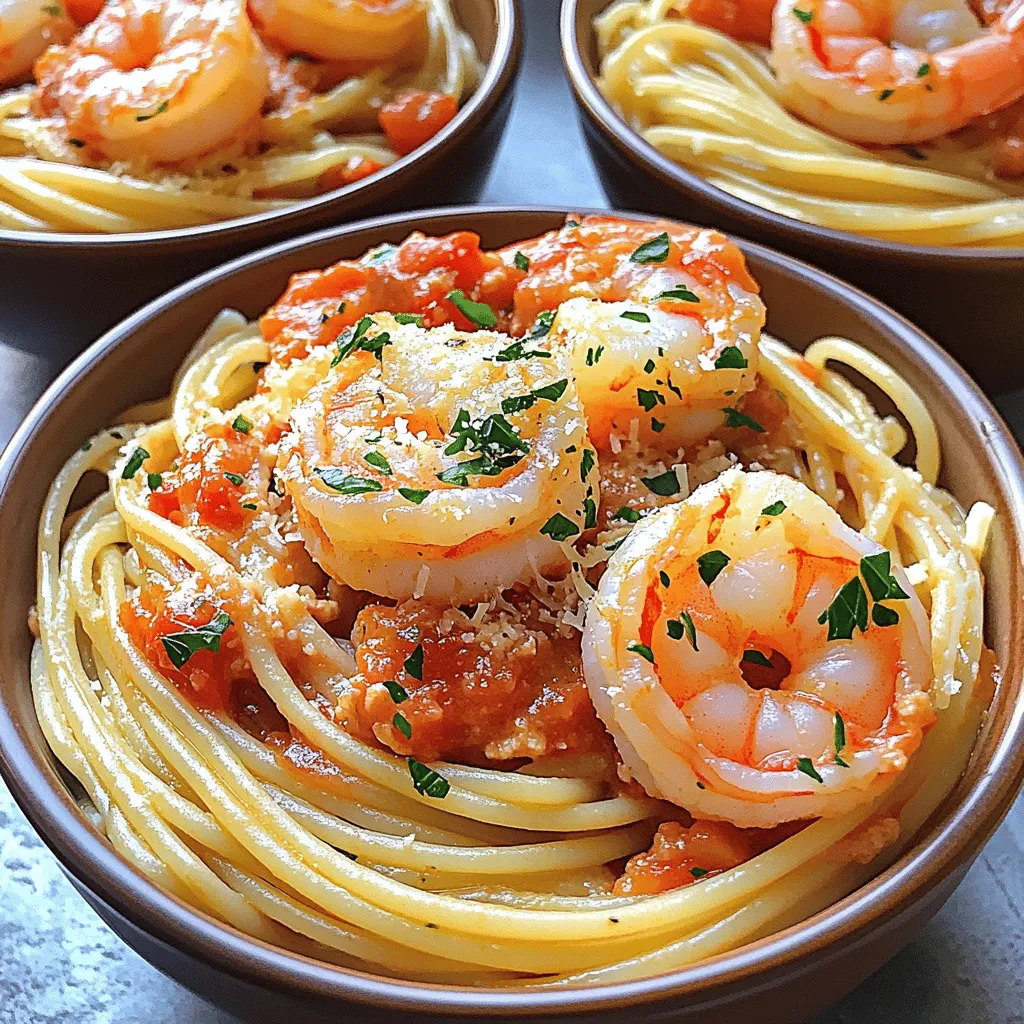
Craving a rich, flavorful dish? You’ll love my Spaghetti with Shrimp in Creamy Tomato Sauce! This recipe brings together tender

If you crave a tasty meal that’s easy to make, I’ve got just the thing for you: a Chicken Burrito
![To make a delicious chocolate lasagna, you need a few simple ingredients. Here’s the list: - 12 Oreo cookies, finely crushed - 1/4 cup unsalted butter, melted - 1 package (8 oz) cream cheese, softened - 1 cup powdered sugar - 1 cup whipped topping, thawed - 1 package (3.9 oz) chocolate instant pudding mix - 2 cups cold milk - 1 cup semi-sweet chocolate chips - Additional whipped topping and chocolate shavings for garnish Start by crushing the Oreo cookies until they are fine crumbs. Melt the butter and mix it with the crumbs. This forms the base of your dessert. For the cream cheese layer, let the cream cheese sit at room temperature until soft. This helps it blend smoothly with the powdered sugar. For the pudding, whisk together the chocolate pudding mix and cold milk for about 2 minutes. It should thicken nicely. The chocolate chips add a delightful crunch and rich flavor when sprinkled on top. You can swap out the Oreo cookies for gluten-free cookies if needed. Use a dairy-free cream cheese alternative for a dairy-free version. If you want a different flavor, try vanilla pudding mix instead of chocolate. You can also use crushed graham crackers for the crust if you prefer. This makes the dessert versatile and fun to customize! Making chocolate lasagna is fun and easy! Let’s dive into the steps. 1. Prepare the crust: In a medium bowl, mix 12 finely crushed Oreo cookies with 1/4 cup melted unsalted butter. Stir until the crumbs are wet. Press this mixture into the bottom of a 9x9-inch baking dish. Make sure it’s even and firm. This crust gives your dessert a sweet and crunchy base. 2. Make the cream cheese layer: In another bowl, use an electric mixer to beat 1 package (8 oz) softened cream cheese with 1 cup powdered sugar until smooth. This should take a few minutes. Next, gently fold in 1 cup of thawed whipped topping with a spatula. Spread this cream cheese mix evenly over your crust. Smooth the top with your spatula for a nice finish. 3. Prepare the chocolate pudding: Take a clean bowl and whisk together 1 package (3.9 oz) chocolate instant pudding mix and 2 cups of cold milk. Whisk for about 2 minutes until it thickens. Once thickened, pour this chocolate pudding over the cream cheese layer. Use the spatula to spread it evenly. 4. Add the chocolate chips: Sprinkle 1 cup of semi-sweet chocolate chips over the chocolate pudding layer. This step adds rich flavor and a nice texture. 5. Finish with whipped topping: Take the remaining 1 cup of whipped topping and spread it over the chocolate chips. Make sure it’s smooth and even. 6. Chill: Cover your dish loosely with plastic wrap. Place it in the refrigerator for at least 4 hours. For the best taste, chill overnight. This lets the layers set and the flavors blend. 7. Serve: After chilling, slice the chocolate lasagna into squares. Garnish each piece with more whipped topping and a sprinkle of chocolate shavings. This makes your dessert look fancy and inviting. Now you have a delicious chocolate lasagna ready to enjoy! For more detailed steps, check out the Full Recipe. To get those beautiful layers, start with a firm crust. Press the Oreo mix tightly into the dish. This helps keep the layers separate. When adding the cream cheese layer, spread it gently to avoid mixing. Use a spatula to smooth it out well. For the pudding layer, whisk it until it thickens. This ensures it stays in place on top of the cream cheese. Chilling time matters too. I recommend at least four hours in the fridge. Overnight chilling works best. It gives the layers time to set and flavors to blend. Presentation is key for a dessert like this. Slice the chocolate lasagna into squares for easy serving. Place each square on a decorative plate. Drizzle with chocolate sauce for a touch of elegance. Adding fresh mint leaves brightens up the look. For a delightful twist, serve with vanilla ice cream or fresh berries. These add a nice contrast to the rich chocolate. You can also sprinkle some extra chocolate shavings on top for added flair. For the full recipe, check the earlier section. {{image_4}} You can make chocolate lasagna even better with some easy swaps. If you need a gluten-free option for the crust, try using gluten-free chocolate cookies. They work just as well as Oreos. You can crush them the same way. This keeps the dessert tasty and safe for those with gluten allergies. For a fun twist, try flavored pudding. You can use vanilla, butterscotch, or even peanut butter pudding. Each flavor adds a new layer to the taste. Just mix it with the same amount of cold milk as you do with chocolate pudding. This way, you can make many different versions of this dessert. Want to impress your guests? Transform chocolate lasagna into mini dessert cups. Just layer the ingredients in small cups. This makes for a cute and fun way to serve. Each person gets their own little treat. Plus, it looks great on the table. You can also layer chocolate lasagna with fruit. Fresh strawberries, raspberries, or bananas work well. The fruit adds a pop of color and a burst of freshness. Just place a layer of sliced fruit between the cream cheese and pudding layers. This creates a beautiful and tasty dessert that everyone will love. To keep your chocolate lasagna fresh, store it in the refrigerator. Use a tight lid or plastic wrap to cover it. This keeps it from drying out and absorbing other smells. If you want to save it longer, you can freeze it. Wrap it well in plastic wrap and then in foil. This helps prevent freezer burn. The shelf life for chocolate lasagna in the refrigerator is about 3 to 5 days. If frozen, it can last up to 2 months. Just remember, the texture may change a bit after freezing. You may not need to reheat chocolate lasagna, as it tastes great cold. However, if you want it slightly warm, remove it from the fridge and let it sit at room temperature for about 10 minutes. This allows the layers to soften a bit. For serving leftovers, slice your pieces and enjoy them cold. The layers will stay intact, and the flavors remain delicious. If you want to recreate that fresh taste, consider adding a dollop of whipped topping on each slice before serving. This little touch brings back the dessert's charm. Check out the Full Recipe for more details! Can I make chocolate lasagna ahead of time? Yes, you can make chocolate lasagna ahead of time. In fact, it tastes better when chilled overnight. Prepare it a day before serving to let the flavors blend. Just cover it well in the fridge. What can I substitute for cream cheese? If you need a substitute for cream cheese, try using Greek yogurt. It has a similar texture and adds a nice tang. You can also use vegan cream cheese if you want a dairy-free option. How do I make this recipe dairy-free? To make chocolate lasagna dairy-free, use almond milk or coconut milk instead of regular milk. Choose a dairy-free cream cheese and a non-dairy whipped topping. You can still enjoy that rich flavor while avoiding dairy! For the full recipe, check out the [Full Recipe]. You now know how to make a delightful chocolate lasagna. We covered the ingredients, steps, and smart tips for perfect layers. Remember to explore fun variations and serving ideas to impress your guests. Storing leftovers properly keeps this dessert fresh. With easy swaps for dietary needs, chocolate lasagna can fit any occasion. Dive into your kitchen and enjoy creating this delicious treat!](https://dailydishcraft.com/wp-content/uploads/2025/04/0f46f9e0-9a39-4b62-9a52-68eb59986353.webp)
If you love chocolate, you need this dessert in your life! Chocolate Lasagna is a fun, no-bake treat that layers
![To make the best soft and chewy snickerdoodle cookies, you need simple, quality ingredients. Here’s what you will need: - 1 cup unsalted butter, softened to room temperature - 1 ½ cups granulated sugar - 2 large eggs - 1 teaspoon pure vanilla extract - 3 cups all-purpose flour - 2 teaspoons cream of tartar - 1 teaspoon baking soda - ½ teaspoon salt - 2 tablespoons cinnamon sugar (mix 1 tablespoon ground cinnamon with 1 tablespoon granulated sugar) Each ingredient plays a key role in making your cookies soft and chewy. For example, the cream of tartar adds a nice tang and helps with the cookie's texture. The combination of butter and sugar gives the cookies their soft, tender feel. You can customize your cookies with optional ingredients as well. Consider adding: - ½ cup chopped nuts for crunch - ½ cup chocolate chips for sweetness These add-ins can take your snickerdoodles to the next level. Just remember, when adding extras, adjust the flour slightly to keep the dough from getting too wet. Using high-quality ingredients is crucial. Fresh butter and pure vanilla will boost flavor. Always check the expiration dates on your baking soda and powder for the best results. Good ingredients create great cookies! For the full recipe, check the complete guide. Start by creaming the butter and sugar. Use an electric mixer for about 3-4 minutes. This step adds air, making the cookies light. Add eggs one at a time. Mix well after each egg. This keeps the dough moist. Then, add the vanilla extract. This adds flavor, making your cookies more delicious. Next, sift the dry ingredients together. In a separate bowl, mix flour, cream of tartar, baking soda, and salt. Gradually combine this dry mixture with the wet ingredients. Mix just until everything is blended. Overmixing can make cookies tough, so be gentle. Chilling the dough is important. It helps the cookies keep their shape while baking. Cover the dough with plastic wrap and chill it for about 30 minutes. This allows the flavors to blend nicely. After chilling, scoop out the dough with a tablespoon. Roll each piece into a ball. Aim for about 1.5 tablespoons per cookie. Roll each ball in cinnamon sugar. This will give the cookies a sweet and spicy crust. Preheat your oven to 350°F (175°C). Line a baking sheet with parchment paper for easy cleanup. Place the dough balls on the baking sheet, spacing them about 2 inches apart. Bake the cookies for 10-12 minutes. Watch closely; the edges should be golden, while the centers stay soft. Pull them out when they look slightly underbaked. They will continue to cook on the baking sheet. After baking, let the cookies cool for 5 minutes. Then move them to a wire rack. This helps them cool completely. For the full recipe, check out the details above. To make soft and chewy snickerdoodle cookies, focus on these key factors: - Butter Temperature: Use softened butter. Cold butter does not mix well, leading to dense cookies. - Eggs: Add eggs at room temperature. This helps with mixing and keeps the cookies soft. - Mixing: Cream the butter and sugar well. This adds air to the mix, making cookies fluffy. - Flour Measurement: Avoid packing the flour. Use the spoon and level method for accuracy. Common mistakes to avoid include: - Overmixing: Stop mixing as soon as the dry and wet ingredients combine. Overmixing makes cookies tough. - Skipping Chilling: Always chill the dough. It helps the cookies hold their shape. - Baking Too Long: Pull cookies when they look slightly underbaked. They will firm up as they cool. Snickerdoodles look great on a plate. Here are some ideas for serving: - Stacking: Arrange cookies in a tall stack for a fun look. - Dusting: Add a light sprinkle of cinnamon sugar on top. - Accompaniments: Serve with a glass of cold milk or a scoop of ice cream. You can also elevate the cookie experience: - Pairing: Try them with coffee or a warm chai tea. - Toppings: Add chocolate drizzle or caramel sauce for extra sweetness. For the full recipe, see the section above. Enjoy the soft and chewy goodness! {{image_4}} You can add fun flavors to your snickerdoodle cookies. Try adding chocolate chips for a sweet twist. Mix in 1 cup of semi-sweet chocolate chips right before you chill the dough. If you love nuts, chopped pecans or walnuts add a nice crunch. Just ½ cup is enough to make a big difference. You can also play with spices. For a warm touch, add ½ teaspoon of nutmeg or ginger. This adds a unique flavor that pairs well with cinnamon. Experimenting with spices can help you create a new favorite cookie. If you need a gluten-free version, swap the all-purpose flour with a gluten-free flour blend. Make sure it includes xanthan gum for the right texture. This will keep your cookies soft and chewy. For a vegan-friendly option, replace the butter with coconut oil. Use flax eggs instead of regular eggs. Mix 1 tablespoon of flaxseed meal with 2.5 tablespoons of water for each egg. Let it sit for a few minutes to thicken. These changes will keep the taste delicious without using animal products. These variations let you enjoy snickerdoodles in different ways. You can find your perfect version with a little creativity! For the full recipe, check out the details above. To keep your snickerdoodle cookies fresh, store them in an airtight container. This helps prevent moisture loss. If you want, you can place a slice of bread in the container. The bread will absorb moisture and keep your cookies soft. If you plan to bake later, freeze the dough. To do this, scoop out dough balls and place them on a baking sheet. Freeze the balls until firm, then put them in a freezer-safe bag. This way, you can bake fresh cookies anytime. For baked cookies, let them cool completely first. Then, store them in an airtight container at room temperature. This keeps them from getting hard or stale. Snickerdoodle cookies last about one week when stored properly. If you freeze them, they can last up to three months. Just remember to label your container with the date. You can tell cookies are stale if they become hard or lose their flavor. If they smell off, it’s best to toss them out. Always check your cookies before eating. Enjoying them fresh is the best way! For the full recipe, check out the [Full Recipe]. To make your snickerdoodles thicker, you can try a few simple tricks. First, add a bit more flour to your dough. Start with an extra 1/4 cup and see how the dough feels. Second, chill the dough longer before baking. This helps the cookies hold their shape. Lastly, don’t flatten the dough balls before baking. Keep them round for a thicker cookie. Yes, you can make the dough ahead of time. Prepare the dough as usual, then wrap it tightly in plastic wrap. You can store it in the fridge for up to three days. If you want to keep it longer, freeze the dough. It will last up to three months. Just remember to thaw it in the fridge before baking. If your cookies spread too much, it could be due to a few reasons. One common cause is using warm butter instead of softened butter. For best results, always use room-temperature butter. Another reason might be not enough flour in the dough. Check your measurements carefully. Finally, if the dough is too warm when it goes in the oven, it will spread more. Chilling the dough can help prevent this. To make snickerdoodle cookies like a pro, I covered key ingredients, careful dough prep, and baking tips. You learned how to chill dough, roll in cinnamon sugar, and spot when your cookies are done. Remember, using quality ingredients and avoiding common mistakes keeps your cookies soft and chewy. Don’t forget the fun of creative variations! With proper storage, your cookies will stay fresh. Enjoy these cookies with friends or family, and share your delicious results! Happy baking!](https://dailydishcraft.com/wp-content/uploads/2025/04/096db9e6-7660-4d86-94c3-3f950be870db.webp)
If you crave a warm, soft, and chewy treat, these Snickerdoodle Cookies are for you! With just a few simple

Craving a delicious and easy meal? The Street Corn Chicken Rice Bowl is here to satisfy you. This bowl blends
![To make a tasty Egg Roll Soup, you need a few key ingredients. Here is the list of what you'll need: - 1 tablespoon vegetable oil - 1 medium onion, finely diced - 2 cloves garlic, minced - 1-inch piece of fresh ginger, grated - 2 cups shredded cabbage (mix of green and red for color) - 1 cup shredded carrots - 1 cup sliced shiitake mushrooms (or any mushrooms you like) - 4 cups chicken or vegetable broth - 2 tablespoons low-sodium soy sauce - 1 tablespoon toasted sesame oil - 1 teaspoon rice vinegar - 2 large eggs, beaten - 2 green onions, sliced thinly (for garnish) - Sesame seeds (for garnish) - Salt and freshly cracked pepper to taste These ingredients make the soup rich and full of flavor. The mix of veggies adds great texture, while the broth ties everything together. When I make this soup, I love the way the aromas fill the kitchen. You can find the full recipe [here]. 1. Sautéing aromatics: Start by heating 1 tablespoon of vegetable oil in a large pot. Use medium heat until the oil shimmers. Add 1 medium diced onion. Sauté for 3 to 4 minutes. The onion should turn soft and clear. 2. Adding vegetables: Next, add 2 minced garlic cloves and 1-inch grated ginger. Stir for 1 minute. The kitchen will smell amazing! Now, toss in 2 cups of shredded cabbage, 1 cup of shredded carrots, and 1 cup of sliced shiitake mushrooms. Stir well and cook for 5 to 7 minutes. The veggies should soften but not lose their crunch. 3. Incorporating broth: Pour in 4 cups of chicken or vegetable broth. Bring it to a rapid boil. Once boiling, lower the heat and let it simmer for 10 minutes. This will help all the flavors mix nicely. 1. Seasoning the soup: Add 2 tablespoons of low-sodium soy sauce, 1 tablespoon of toasted sesame oil, and 1 teaspoon of rice vinegar. Stir well and taste. Adjust with salt and fresh cracked pepper as needed. 2. Adding the eggs: Slowly drizzle in 2 beaten eggs while stirring gently. This creates nice egg ribbons in the soup. Cook for another 2 to 3 minutes until the eggs are fully set. 3. Serving suggestions: Remove the pot from heat. Serve the soup hot in clear bowls to show off the colors. Garnish with sliced green onions and a sprinkle of sesame seeds for a tasty finish. For a fun touch, offer chopsticks alongside a spoon. Feel free to check out the Full Recipe for a complete guide! - Achieving the perfect broth flavor: Start with a good-quality chicken or vegetable broth. Heat it gently to bring out its rich taste. Add low-sodium soy sauce and toasted sesame oil for depth. Taste often, and adjust with salt and pepper as needed. This balance makes a big difference. - Cooking eggs for texture: Beat the eggs well before adding them to the soup. Pour them in slowly while stirring. This creates delicate ribbons. Cook for just a few minutes so the eggs stay soft and tender. You want them to blend nicely, not scramble. - Presentation tips: Serve the soup in clear bowls. This shows off the vibrant colors of the veggies. For a special touch, drizzle more toasted sesame oil on top. Garnish with sliced green onions and sesame seeds. This adds flavor and makes your dish look stunning. - Overcooking the vegetables: Keep an eye on the cooking time. If you cook the veggies too long, they lose their crunch. Aim for 5-7 minutes of cooking. This keeps them bright and fresh. Remember, you want them soft but not mushy. - Troubleshooting flavor issues: If the soup tastes flat, it may need more seasoning. Try adding a splash of rice vinegar or a bit more soy sauce. These ingredients boost the flavor. Don’t be afraid to taste as you go. Adjusting the flavor makes the dish truly yours. For the full recipe, check out the detailed instructions above. {{image_4}} You can change the proteins in this recipe easily. If you prefer shrimp, use it instead of pork or chicken. Shrimp cooks fast, so add it late in the cooking process. If you want chicken, use cooked, shredded chicken. It will add great flavor to the soup. For vegetables, you can swap in different choices. Bok choy is a fantastic option. It adds a nice crunch and flavor. Bell peppers also work well. They bring a sweet taste and colorful look to your soup. If you follow a vegan or vegetarian diet, you can still enjoy this soup. Start with vegetable broth instead of chicken broth. Skip the eggs, or use a tofu scramble for texture. Also, ensure your soy sauce is vegan. This way, you keep all the flavors without animal products. For gluten-free options, pick gluten-free soy sauce or tamari. This small change makes a big difference. Always check your broth to ensure it is gluten-free too. Enjoy your Egg Roll Soup without worry! For a complete recipe, refer to the Full Recipe section. To store leftover egg roll soup, let it cool first. Pour the soup into an airtight container. Seal it tightly to keep out air. Place it in your fridge. It can last for about 3 to 4 days. When you reheat it, do so gently. Pour the soup into a pot. Heat on medium-low, stirring often. This keeps the flavors intact and warms it evenly. You can freeze egg roll soup for longer storage. Use a freezer-safe container. Leave some space at the top, as it will expand when frozen. It can last up to 3 months in the freezer. To reheat, move the soup to the fridge a day before you plan to eat it. This helps it thaw slowly. Heat it on the stove over medium heat. Stir often to avoid hot spots. You can also add a splash of broth if it seems too thick. Enjoy that comforting bowl of soup again! Can I make Egg Roll Soup ahead of time? Yes, you can make Egg Roll Soup ahead of time. It tastes great when reheated. Just store it in the fridge for up to three days. Reheat in a pot over medium heat. You may need to add a bit of broth to refresh it. What can I serve with Egg Roll Soup? Egg Roll Soup pairs well with many dishes. You can serve it with spring rolls or dumplings. A side of rice or noodles also complements this soup nicely. Fresh herbs, like cilantro or basil, add a nice touch too. How do I make Egg Roll Soup spicier? To spice up your Egg Roll Soup, add red pepper flakes or sriracha. You can also use sliced jalapeños for heat. Start with a little, then taste and adjust to your liking. This way, you control the spice level. Experiences from other cooks Many cooks love how easy Egg Roll Soup is to make. They enjoy the bright flavors and how it warms the soul. Some say it reminds them of their favorite takeout dish. Others appreciate the fresh ingredients and quick prep time. Suggestions for improvement and personal twists Cooks suggest adding cooked chicken or shrimp for protein. Others like to throw in extra veggies like bok choy or bell peppers. Some even add a splash of lime juice for freshness. Don't be afraid to try your own twists! Each change can make it special. For the full recipe, check out the complete guide. This blog outlined how to make delicious Egg Roll Soup. We discussed the key ingredients like vegetables, broth, and seasonings. Then, I shared steps for cooking and tips for flavor and texture. I also covered variations, storage methods, and answered common questions. Egg Roll Soup is easy to make and fun to customize. Enjoy exploring different flavors and share your unique creations with others. Happy cooking!](https://dailydishcraft.com/wp-content/uploads/2025/04/14a68a4a-f6de-4975-8b82-81855c9e0763.webp)
Do you crave a warm and hearty meal? Look no further than Egg Roll Soup! This simple dish packs all
