Skip to content
DisclaimerTerms Of UseGDPR PolicyCookie Policy

dailydishcraft

  • Home
  • Drinks
  • Appetizers
  • Dinner
  • Dessert
  • About
  • Contact
  • Privacy Policy
DisclaimerTerms Of UseGDPR PolicyCookie Policy

Jessica

- 1 whole chicken (approximately 4-5 pounds) - 4 tablespoons extra virgin olive oil - 2 teaspoons fine sea salt - 1 teaspoon freshly ground black pepper - 1 tablespoon garlic powder - 1 tablespoon onion powder - 1 tablespoon dried thyme - 1 tablespoon dried rosemary - 1 tablespoon dried oregano - 1 juicy lemon, halved - 1 head of garlic, halved horizontally - Fresh herbs for garnish (like parsley or extra thyme) Each ingredient adds its own magic to this dish. The whole chicken is the star, providing a juicy base. Olive oil helps keep the chicken moist and adds richness. Salt and pepper enhance flavors, making each bite savory. Garlic and onion powders give depth, while thyme, rosemary, and oregano bring herbal notes. The lemon and garlic in the cavity infuse the meat with zest and aroma. Fresh herbs at the end make the dish look nice and fresh. Use the best quality chicken you can find. Organic or free-range chicken often tastes better. Choose extra virgin olive oil for its rich flavor. Fresh herbs are vital for the best taste. Look for bright, vibrant herbs that smell strong. Use fresh spices if possible, but dried ones work well too. Always pick ripe lemons; they will add the most flavor. Good quality ingredients make all the difference in your meal. If you want to know more about the cooking method, check out the Full Recipe. First, preheat your oven to 425°F (220°C). This high heat helps create a crispy skin. While the oven heats, pat the chicken dry with paper towels. Drying the chicken is key for that perfect crunch. Make sure to get into all the nooks and crannies. In a small bowl, mix together the following: - 4 tablespoons extra virgin olive oil - 2 teaspoons fine sea salt - 1 teaspoon freshly ground black pepper - 1 tablespoon garlic powder - 1 tablespoon onion powder - 1 tablespoon dried thyme - 1 tablespoon dried rosemary - 1 tablespoon dried oregano Stir until you form a smooth herb paste. This mixture adds a lot of flavor to the chicken. Now it’s time to season the chicken. Rub the herb mixture all over the chicken. Get under the skin for extra flavor. Don’t forget to coat the inner cavity too. Next, stuff the chicken with the halved lemon and garlic. These will make the meat juicy and fragrant. Place the chicken, breast side up, in a roasting pan. Roast it in the oven for about 1 hour and 15 minutes. Use a meat thermometer to check that the internal temperature reaches 165°F (75°C). The juices should run clear when you test it with a skewer. Once done, take the chicken out and let it rest for 10-15 minutes. This step helps lock in the juices. For the Full Recipe, refer to the details above. Finally, carve the chicken and serve it on a platter. Garnish with fresh herbs and lemon wedges for a beautiful touch. Enjoy your savory herb roasted chicken! To get juicy chicken, start with a good quality bird. A fresh, organic chicken often tastes best. Before cooking, let the chicken sit at room temperature for about 30 minutes. This helps it cook evenly. Use paper towels to dry the chicken well. A dry surface helps create a nice crust. Make sure to use enough seasoning. Rub the herb mixture generously under the skin. This method allows the flavors to seep in. Adding lemon and garlic inside the cavity also boosts flavor. Letting the chicken rest after cooking is a must. This step keeps the juices locked in, making each bite tender. For crispy skin, the oven temperature matters. Preheat your oven to 425°F (220°C) before roasting. This high heat helps the skin crisp up quickly. Using a roasting pan is a great choice. It allows hot air to circulate all around the chicken. Remember to avoid covering the chicken while it cooks. Covering traps steam, which makes the skin soggy. If you want extra crunch, baste the chicken with its own juices halfway through cooking. This adds flavor and helps with crispiness. Having the right tools makes roasting easier. A sturdy roasting pan is essential. It should have high sides to catch juices. Use a meat thermometer to check the chicken's doneness. This tool ensures it reaches the safe temperature of 165°F (75°C). A good pair of kitchen tongs helps with handling the hot chicken. You can also use a carving knife for serving. Finally, a basting brush is handy for applying juices. With these tools, you can roast like a pro! {{image_4}} You can change the herbs for different flavors. If you like a fresh taste, try dill or basil. For a warm flavor, use sage or tarragon. Mix and match to find what you love. Each herb adds its own twist to the chicken. While lemon and garlic are great, you can stuff the chicken with other tasty things. Try onions and apples for a sweet flavor. You can also use mushrooms and spinach for a savory mix. Stuffing with herbs like parsley or cilantro can also add freshness. Experiment with different combos to surprise your taste buds. Both air frying and oven roasting can make delicious chicken. Air fryers cook faster and can create crisp skin with less oil. They use hot air to cook evenly. Oven roasting gives a deep, rich flavor, perfect for gatherings. Choose the method that fits your time and taste. Each way can yield juicy and flavorful results. For the full recipe, check out the earlier section. After cooking your Savory Herb Roasted Chicken, allow it to cool. Wrap the chicken tightly in plastic wrap or aluminum foil. You can also place it in an airtight container. This keeps the chicken fresh and prevents it from drying out. To reheat, preheat your oven to 350°F (175°C). Place the chicken in a baking dish. Cover it with foil to keep moisture in. Heat for about 20-25 minutes or until warm. If you prefer, you can also use a microwave. Just slice the chicken into pieces and heat for 1-2 minutes, checking often. Leftover Savory Herb Roasted Chicken will last up to four days in the fridge. For longer storage, you can freeze it. When frozen, it will stay good for up to three months. Be sure to label your containers with the date. This way, you know how long they have been stored. Enjoy your delicious leftovers in salads, sandwiches, or simply reheated! You should cook the chicken to an internal temperature of 165°F (75°C). This ensures the chicken is safe to eat and juicy. Use a meat thermometer for accuracy. Insert it into the thickest part of the thigh without touching the bone. The juices should run clear when the chicken is done. If it’s below 165°F, continue roasting it and check again. Yes, you can use different types of chicken. You can roast chicken parts, like thighs or breasts, if you prefer. Just adjust the cooking time. Bone-in cuts will need more time, while boneless cuts will cook faster. Whole chickens are great for flavor and presentation, but feel free to experiment. Just ensure they reach the same safe temperature of 165°F (75°C). Savory Herb Roasted Chicken pairs well with many sides. I suggest roasted vegetables, like carrots, potatoes, or Brussels sprouts. A fresh green salad adds a nice crunch. Creamy mashed potatoes are also a great choice. You could serve rice or quinoa for a healthy option. Bread rolls make a lovely addition too. These sides complement the chicken's rich flavors perfectly. In this article, we explored how to make Savory Herb Roasted Chicken. We covered the key ingredients and their quality. Then, we walked through easy steps to prepare and cook the chicken. I shared helpful tips for juicy meat and crispy skin. You also learned about fun variations and proper storage. Follow these ideas, and you will enjoy making this delicious dish. It's simple, rewarding, and sure to impress anyone at your table.

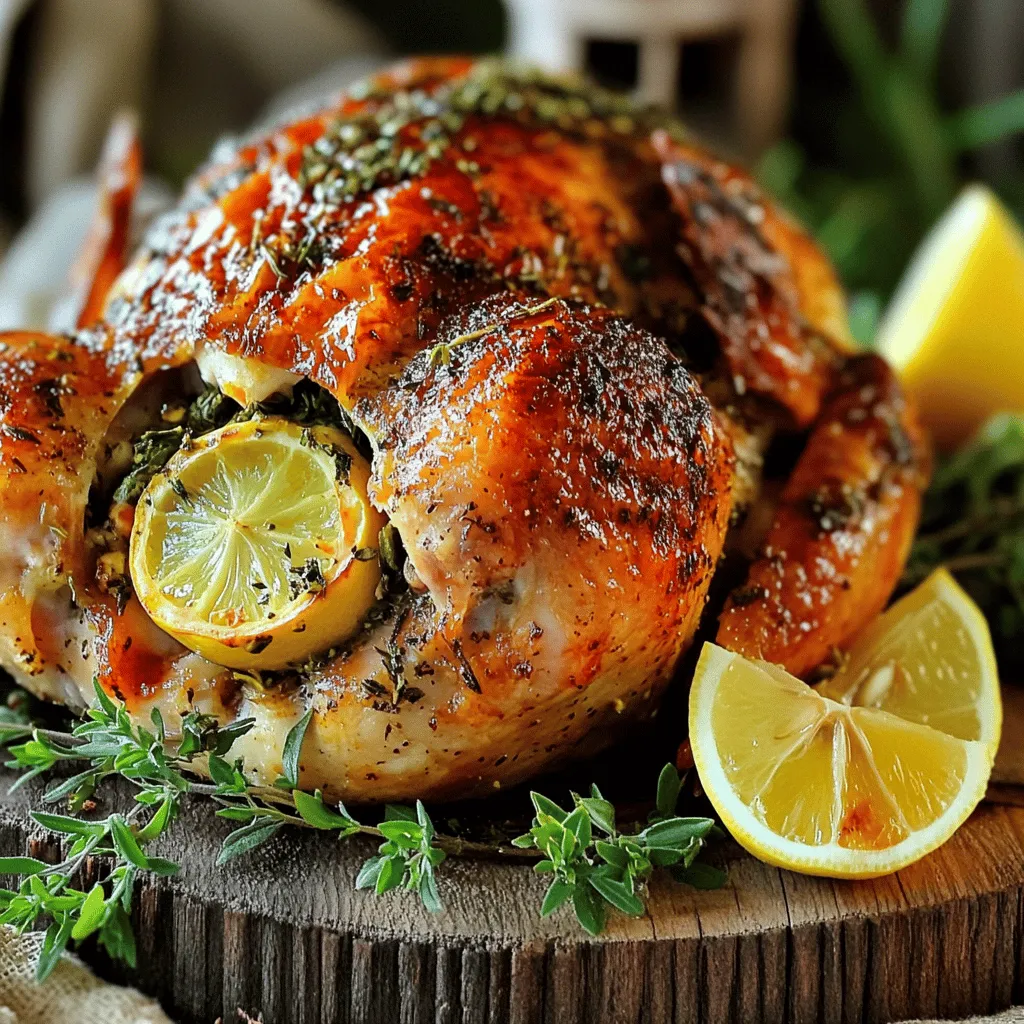
Savory Herb Roasted Chicken Juicy and Flavorful Meal

Are you ready to impress your family with a mouth-watering meal? This Savory Herb Roasted Chicken is juicy, flavorful, and

To make this delicious dip, gather these simple ingredients: - 1 cup all-purpose flour (heat-treated for safety) - 1/2 cup unsalted butter, softened to room temperature - 3/4 cup packed brown sugar - 1/4 cup granulated sugar - 1 teaspoon pure vanilla extract - 1/2 teaspoon sea salt - 1 cup mini chocolate chips - 8 ounces cream cheese, softened - 1/4 cup powdered sugar - 1/4 cup milk (adjust as needed for desired consistency) - Extra mini chocolate chips for garnish You can change a few ingredients if needed: - Use coconut oil instead of butter for a dairy-free option. - Swap granulated sugar with coconut sugar for a healthier choice. - Greek yogurt can replace cream cheese for a lighter dip. - Maple syrup can substitute for brown sugar in a pinch. Before mixing, prepare your ingredients: - Heat-treat the flour by baking it at 350°F for 5 minutes. This step kills any germs. - Soften your butter and cream cheese by leaving them out for about 30 minutes. This helps them mix better. - Measure all ingredients ahead of time. This makes mixing faster and easier. - If you want a thicker dip, use less milk. For a thinner dip, add more milk slowly. Following these tips will ensure your Chocolate Chip Cookie Dough Dip turns out amazing! Enjoy the process and have fun mixing! Start by gathering all your ingredients. In a medium bowl, mix the softened butter, brown sugar, and granulated sugar. Use an electric mixer to beat them together until creamy. This should take about 2 to 3 minutes. The mixture needs to be smooth for the best dip. Next, add the softened cream cheese and pure vanilla extract. Mix again until the blend is smooth and fluffy. Scrape down the sides of the bowl to ensure everything mixes well. Gradually add the heat-treated flour and sea salt. Mix on low speed until just combined. Slowly add milk, one tablespoon at a time, until you reach your desired dip consistency. Now, gently fold in the mini chocolate chips with a spatula. Make sure they are evenly mixed in. Transfer your dip into a nice serving bowl. For a fun touch, sprinkle extra mini chocolate chips on top. You can serve the dip right away with graham crackers, pretzels, or fresh fruit. If you prefer, chill the dip for up to 30 minutes to let the flavors meld. It will be even more delicious! To get that perfect dip, start with soft butter and cream cheese. Mix them well until creamy. If the dip is too thick, add milk a little at a time. Keep stirring until you find the right smoothness. If it gets too runny, you can mix in some more flour. One common mistake is using regular flour without heat-treating it. This can make the dip unsafe to eat. Another mistake is not mixing the butter and sugar enough. If you don’t mix well, the dip can be grainy. Also, be careful not to overmix after adding the flour. This can make the dip tough. For a fun look, serve the dip in a colorful bowl. Surround it with tasty dippers like graham crackers, pretzels, or fruit. You can even layer the dip in a glass jar for a nice view. For a final touch, sprinkle extra mini chocolate chips on top. This makes it look as good as it tastes. Try these ideas to impress your guests! {{image_4}} You can make this dip healthier by using Greek yogurt. Greek yogurt adds creaminess and protein. It also cuts some fat from the recipe. Replace half of the cream cheese with Greek yogurt. This swap keeps the flavor rich while making it lighter. You still get that creamy texture without the guilt. Want to mix things up? Try adding peanut butter for a nutty twist. Just a half cup of peanut butter gives a rich taste. You can also add crushed Oreos for a fun cookie crunch. If you love mint, toss in some mint extract. This simple change gives a fresh kick to your dip. Feel free to play with other mix-ins like butterscotch chips or coconut flakes. If you need gluten-free options, substitute the all-purpose flour with gluten-free flour. Make sure to check that your chocolate chips are also gluten-free. This way, everyone can enjoy the dip without worry. You can also make it vegan by using dairy-free cream cheese and butter. These swaps keep the taste delicious while fitting different diets. After you enjoy your Chocolate Chip Cookie Dough Dip, store any leftovers in an airtight container. This keeps it fresh and tasty. Place the container in the fridge. Make sure to use it within a few days for the best flavor. You can serve this dip cold or at room temperature. If you prefer it warm, gently heat it in the microwave. Start with 10 seconds, then stir. Keep heating in short bursts until it warms to your liking. Be careful not to overheat, as it may change the texture. The dip lasts about 3-5 days in the fridge. If you want to store it longer, freeze it! Place the dip in a freezer-safe container. It can last up to 2 months in the freezer. When you’re ready to enjoy it, thaw it in the fridge overnight. Stir well before serving. This dip is a treat that stays delightful, even after storage. Yes, you can eat raw cookie dough in this dip! However, the flour in cookie dough can carry germs. To make it safe, I heat-treat the flour. This step kills harmful bacteria. Just spread the flour on a baking sheet and bake it at 350°F for about 5 minutes. Let it cool before mixing it into the dip. This way, you enjoy that cookie dough taste without worry! If you find the dip too sweet, it's easy to fix! You can reduce the brown sugar or granulated sugar. Start by cutting back by a tablespoon or two. Taste as you go to find the right balance. Adding a pinch of sea salt can help too. Salt brings out flavors and makes the dip taste less sweet. You can also add more cream cheese or yogurt for a creamier texture and less sweetness. This dip is fun to share! I love serving it with: - Graham crackers - Pretzels - Fresh fruit slices like apples or strawberries - Chocolate-covered pretzels - Mini cookies These snacks pair well and add a nice crunch. You can even serve it with ice cream for a sweet treat. Feel free to get creative with your choices! We covered the key ingredients needed for the dip and how to prepare them. I shared tips for perfecting the dip's consistency and showcased tasty variations and substitutions. You can store leftovers easily and even freeze them for later. Remember, you can enjoy this delicious dip in various ways. Keep experimenting with flavors that excite you. Have fun making this treat!

Chocolate Chip Cookie Dough Dip Irresistible Treat

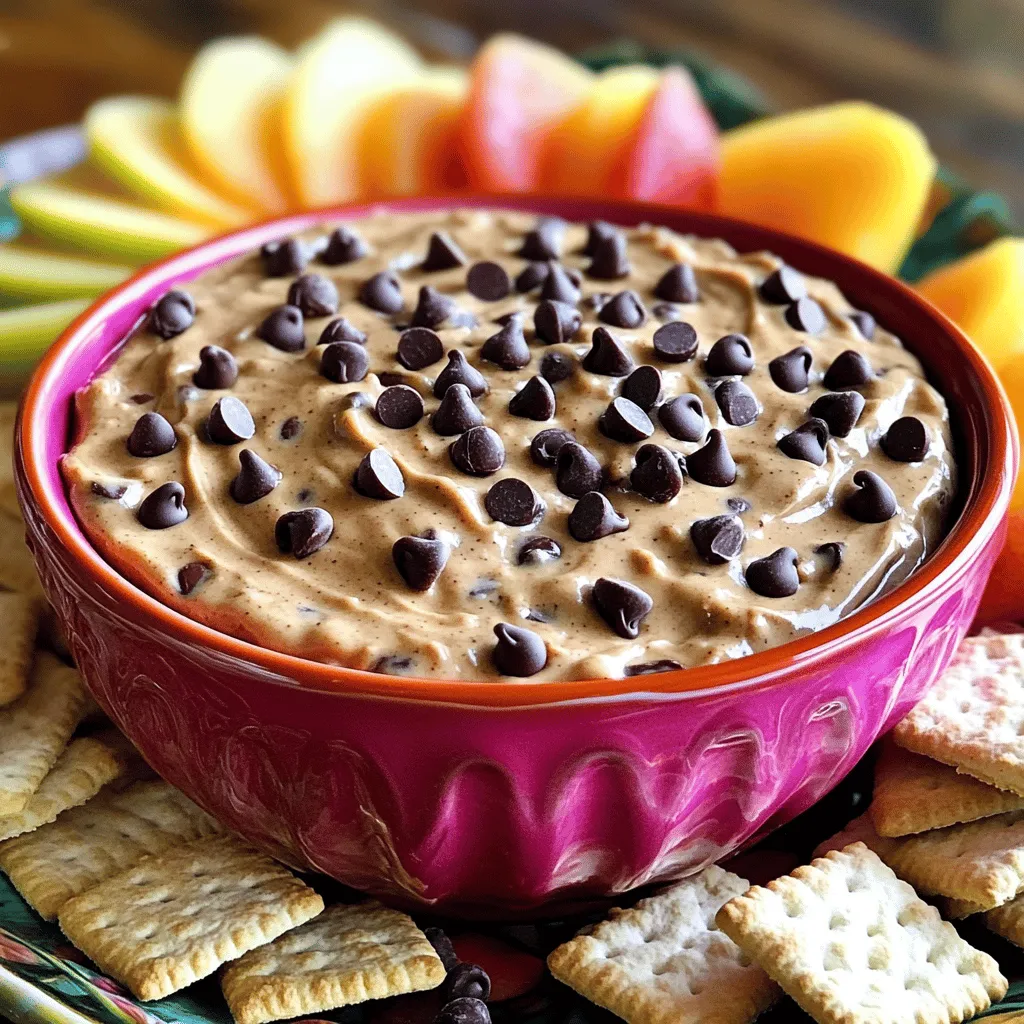
Craving a sweet treat that’s easy to make and hard to resist? Chocolate Chip Cookie Dough Dip is the answer!

Here is the list of ingredients you will need for your Zesty Lemon Garlic Shrimp Tacos: - 1 pound large shrimp, peeled and deveined - 2 tablespoons extra virgin olive oil - 4 cloves garlic, finely minced - Zest and juice of 2 fresh lemons - 1 teaspoon smoked paprika - 1/2 teaspoon ground cumin - Salt and freshly cracked black pepper - 8 small corn tortillas - 1 cup finely shredded cabbage - 1/4 cup fresh cilantro, coarsely chopped - 1 ripe avocado, sliced - 1 lime, cut into wedges - Hot sauce (optional for serving) Each ingredient plays a key role in building flavor. The shrimp gives a sweet and rich taste. The lemon zest adds a bright zing. Garlic brings depth and warmth. Smoked paprika and cumin add a smoky, earthy touch. This combination creates a fresh, tasty dish that makes every bite a delight. For the full recipe, check out the details on how to prepare this dish. Enjoy crafting these delicious tacos! First, gather your ingredients and a large mixing bowl. In the bowl, combine the shrimp with the extra virgin olive oil, minced garlic, lemon zest, and lemon juice. Add in the smoked paprika, ground cumin, salt, and freshly cracked black pepper. Mix everything gently. Make sure the shrimp are well-coated in the marinade. Cover the bowl and let it sit in the refrigerator for 15 minutes. This step helps the shrimp absorb all the amazing flavors. Next, take a non-stick skillet and heat it over medium-high heat. Once the skillet is hot, add the marinated shrimp in a single layer. Cook the shrimp for about 2-3 minutes on each side. You will know they are done when they turn pink and opaque. Be careful not to overcook them, as this can make them tough. While the shrimp cooks, prepare your corn tortillas. Warm them until they are soft and pliable. You can do this in a pan or in the microwave. Soft tortillas make it easier to roll and fold your tacos. Make sure to check the [Full Recipe] for the exact steps and tips on serving your zesty lemon garlic shrimp tacos. To make the best shrimp, you must avoid overcooking. Overcooked shrimp can turn tough and chewy. Cook them just until they turn pink and opaque. This usually takes about 2-3 minutes on each side. If you have a non-stick skillet, it helps to prevent sticking and burning. Always check the shrimp closely while cooking for the best texture. When you build your tacos, use a generous amount of cabbage. It adds great crunch and freshness. Start with a handful of shredded cabbage at the center of each warm tortilla. Then layer on the cooked shrimp. You can also add avocado slices and cilantro. These toppings elevate the flavor and make your tacos more colorful. For a beautiful display, arrange your tacos on a vibrant platter. A colorful plate makes the meal inviting. Garnish with extra lime wedges and cilantro on top. Include small bowls of hot sauce for guests. This setup not only looks great but also lets everyone customize their tacos. Enjoying your meal is just as important as making it! {{image_4}} You can make your tacos even better with extra toppings. Add diced tomatoes for sweetness, sliced jalapeños for heat, or crumbled queso fresco for creaminess. Each of these toppings brings a new flavor and texture. Feel free to mix and match! If you want a change, use different proteins. Grilled chicken offers a nice, smoky taste. Tofu is a great option for a plant-based meal. You can also try fish, like tilapia or cod, which pairs well with the zesty flavors. Want a kick? Experiment with spices. Chili powder adds warmth, while cayenne gives a spicy punch. You can tweak these to match your heat level. A little extra spice can turn a good taco into a great one. For the full recipe, check out the complete details. Store any leftover tacos in an airtight container. Keep them in the fridge. Use the tacos within 2 days for the best taste. If you wait too long, the shrimp can lose its flavor and texture. To reheat the shrimp, do it gently in a skillet. This helps keep the shrimp's nice texture. Heat on low and stir often. Avoid the microwave, as it can make the shrimp rubbery. You can freeze the shrimp mixture before cooking. This is great for quick meals later. Just marinate the shrimp and place it in a freezer bag. When you want to use it, thaw it in the fridge overnight. Then, cook as usual for tasty tacos. For the full recipe, check out Zesty Lemon Garlic Shrimp Tacos. Yes, just ensure they are fully thawed and drained before marinating. Flour tortillas or lettuce wraps are suitable substitutes. Ensure the tortillas and any additional toppings are certified gluten-free. Spice level can be adjusted with or without hot sauce and by selecting milder or hotter jalapeños. You can marinate the shrimp ahead of time but assemble tacos right before serving for best freshness. This blog post showed how to make tasty shrimp tacos using fresh and simple ingredients. You learned to marinate shrimp, cook them perfectly, and assemble your tacos. Remember to avoid overcooking the shrimp for the best taste. Use plenty of cabbage for crunch, and feel free to explore different toppings to match your liking. Store any leftovers wisely to enjoy later. Whether you stick to shrimp or try different proteins, these tacos will always impress. Enjoy making these delicious tacos that can be tailored just for you!

Zesty Lemon Garlic Shrimp Tacos Fresh and Tasty Dish

If you’re craving a fresh and tasty dish, look no further than my Zesty Lemon Garlic Shrimp Tacos! This vibrant

This Easy Spinach Artichoke Dip is creamy and packed with flavor. It takes only 35 minutes to make. You can serve it warm or hot. This dip is great for parties or cozy nights at home. Here’s what you need: - 1 cup fresh spinach, finely chopped - 1 cup canned artichoke hearts, drained and chopped - 1 cup cream cheese, softened - ½ cup plain Greek yogurt - 1 cup shredded mozzarella cheese - ½ cup grated Parmesan cheese - 2 cloves garlic, minced - 1 teaspoon fresh lemon juice - Salt and pepper, to taste - 1 tablespoon extra virgin olive oil These ingredients combine to create a rich and flavorful dip. The cream cheese and yogurt give it a smooth texture. The spinach and artichokes add a fresh taste. For garnishing, sprinkle some fresh parsley on top. You can also add more mozzarella for a cheesy look. For dippers, try: - Tortilla chips - Warm pita bread - Fresh veggies like carrots or celery These options enhance the dip's flavor and make it fun to eat. Enjoy experimenting with different dippers! You can find the full recipe [here](#). First, gather all your ingredients. You will need fresh spinach, canned artichoke hearts, cream cheese, Greek yogurt, mozzarella cheese, Parmesan cheese, garlic, lemon juice, and olive oil. Measure each ingredient carefully. Chop the spinach finely. Drain and chop the artichoke hearts into small bits. Mince the garlic cloves. This step helps release their flavor. Set everything aside once prepared. Preheat your oven to 350°F (175°C). This ensures a perfect bake. Next, heat the olive oil in a medium skillet over medium heat. Add the minced garlic. Cook it for about one minute until it smells great, but don’t let it brown. Now, add the chopped spinach. Stir until it wilts, which should take about 2-3 minutes. This keeps the vibrant green color. Once wilted, remove the skillet from the heat and let it cool slightly. In a large bowl, mix the softened cream cheese with Greek yogurt. Blend until smooth. This will be the creamy base of your dip. Gently fold in the sautéed spinach and garlic. Then add the artichokes, mozzarella cheese, Parmesan cheese, and lemon juice. Mix well until everything is combined. Season the mixture with salt and black pepper to taste. Adjust the salt as you like. This step adds depth to your dip. Transfer the mixture into a lightly greased baking dish. Spread it evenly for even cooking. Place the dish in your preheated oven. Bake for 20-25 minutes. Look for a golden brown top and bubbling sides. Once it’s ready, take it out and let it cool for about 5 minutes. This helps prevent burns when you dig in. Serve warm with tortilla chips or warm pita bread. Enjoy your creamy spinach artichoke dip, a delicious treat that everyone will love! To get that perfect creamy texture, use softened cream cheese. I let mine sit out for about 30 minutes. This helps it blend smoothly with the Greek yogurt. Mixing these two well is key. Stir until you see no lumps. When you add the spinach and artichokes, fold gently. This keeps the dip light and fluffy. To make your dip even better, try adding some spices. A pinch of crushed red pepper gives it a nice kick. You can also add a dash of Worcestershire sauce for depth. Fresh herbs, like basil or dill, add great flavor too. Don’t forget the lemon juice; it brightens everything up! Serve your dip warm right from the oven. This keeps it creamy and inviting. Use a nice baking dish for a good look. Garnish with extra cheese or fresh parsley for color. Pair it with crispy tortilla chips or warm pita bread. This will make your dip a hit at any gathering! {{image_4}} To make a lighter version of this dip, swap cream cheese with low-fat cream cheese. You can also use Greek yogurt as a base. This keeps the dip creamy while cutting calories. Using less cheese helps too. You can use only half the mozzarella and Parmesan. For added nutrition, add chopped veggies like bell peppers or mushrooms. Mixing in different flavors can make this dip even better. Try adding some sun-dried tomatoes for a tangy twist. You can also add a pinch of red pepper flakes for heat. If you love herbs, mix in fresh basil or dill. These small changes can really boost the flavor and make your dip unique. If you follow a vegan diet, use plant-based cream cheese and cheese. Nutritional yeast can give a cheesy flavor. For gluten-free diets, serve with gluten-free chips or veggies. Always check labels on pre-made products to be sure they fit your diet. These adjustments let everyone enjoy this creamy treat. For the complete recipe, check the [Full Recipe]. To store leftovers, let the dip cool completely. Then, transfer it into an airtight container. This helps keep it fresh. You can store it in the fridge for up to three days. Make sure to cover it well to avoid drying out. When you're ready to enjoy the dip again, preheat your oven to 350°F (175°C). Place the dip in an oven-safe dish. Heat it for about 15-20 minutes. Stir it halfway through to ensure even heating. You want it to be warm and bubbly again. If you want to freeze the dip, place it in a freezer-safe container. Leave some space at the top for expansion. It can last in the freezer for up to three months. When you’re ready to eat it, thaw it overnight in the fridge. Then, reheat it in the oven as mentioned above. You can also use the Full Recipe to guide you through the process. Yes, you can prepare this dip in advance. Mix all the ingredients and store the dip in a covered dish. Keep it in the fridge for up to two days. When you’re ready to bake, just pop it in the oven. This makes it a great choice for parties and gatherings. To avoid burning, bake the dip at 350°F (175°C). Keep an eye on it while it cooks. If the top browns too fast, cover it loosely with foil. This helps cook the dip evenly without burning the top layer. You can serve the dip with several tasty sides. Here are some great options: - Tortilla chips - Warm pita bread - Vegetables like carrots and celery - Slices of baguette - Crackers These sides help balance the creamy dip and add crunch. You can find the full recipe to get started on your spinach artichoke dip adventure! This blog post covered everything you need for a great spinach artichoke dip. We looked at key ingredients, explained how to prepare and cook it, and shared tips for making it creamy and flavorful. You also learned about variations for different diets and how to store leftovers safely. Now, you can confidently make this dip for any gathering. With these steps, your dish will impress everyone. Enjoy your tasty creation and share it with friends!

Easy Spinach Artichoke Dip Delicious and Creamy Treat

Looking for a crowd-pleasing snack? You’ll love this easy spinach artichoke dip! This creamy treat is perfect for game days,

- 4 boneless, skinless chicken breasts - 3 tablespoons olive oil - 4 cloves garlic, minced - 1 cup chicken broth - 1 cup heavy cream - 1 teaspoon dried thyme - 1 teaspoon dried oregano - 1 teaspoon onion powder - Salt and pepper to taste - 1 cup baby spinach - ½ cup grated Parmesan cheese - Fresh parsley, finely chopped, for garnish - Large skillet - Wooden spoon - Measuring cups and spoons - Meat thermometer - Plate for resting chicken Gather all your ingredients first. This keeps the cooking process smooth. For this creamy garlic chicken skillet, you'll want fresh chicken and herbs for the best flavor. The chicken breasts are the star of the dish. They soak up all the tasty sauce. Olive oil adds richness and helps cook the chicken. Garlic gives a punch of flavor. Use minced garlic for a strong taste. Chicken broth adds depth to the sauce. Heavy cream brings creaminess and smoothness. Don't skip the dried thyme and oregano. They add warmth and aroma. Onion powder gives a hint of sweetness. Season with salt and pepper to enhance all the flavors. The baby spinach adds color and nutrition. Grated Parmesan cheese thickens the sauce and adds umami. Finally, fresh parsley brightens the dish with its green touch. Make sure to have the right kitchen tools ready. A large skillet is key for cooking everything in one pan. A wooden spoon helps mix the sauce well. Measuring cups and spoons ensure you add the right amounts. A meat thermometer checks the chicken's doneness. A plate is handy for resting the cooked chicken. With these ingredients and tools, you are set for a fun cooking experience. For the full details on how to prepare this dish, check out the Full Recipe. - First, season your chicken breasts on both sides. Use salt, pepper, thyme, and oregano. Make sure each piece gets a good coat for the best flavor. - Next, heat 3 tablespoons of olive oil in a large skillet over medium-high heat. Wait until the oil shimmers before adding the chicken. - Now, place the seasoned chicken breasts in the hot skillet. Sear them for 6-7 minutes on each side. Look for a nice golden color and ensure they reach an internal temperature of 165°F. Once done, take them out and set them aside on a plate. - In the same skillet, lower the heat to medium. Add 4 cloves of minced garlic to the pan. Sauté for about 1 minute. You want the garlic to smell wonderful but not burn. - Carefully pour in 1 cup of chicken broth. Stir with a wooden spoon to deglaze the skillet. Scrape up any tasty bits stuck to the bottom. Let this mix simmer for 2-3 minutes to blend the flavors. - Next, add 1 cup of heavy cream and 1 teaspoon of onion powder to the skillet. Stir well and allow it to simmer for 3-4 minutes. You want the sauce to thicken a bit. - Stir in 1 cup of baby spinach. Cook for just 1 more minute. You want the spinach to wilt and turn bright green. - Now, fold in ½ cup of grated Parmesan cheese. Keep stirring until it melts into the sauce. Taste and adjust with more salt or pepper if you wish. - Return the seared chicken breasts to the skillet. Spoon some of that creamy sauce over the top. Let everything heat together for about 2 minutes. - Before you serve, garnish with freshly chopped parsley. This adds color and a fresh taste to your dish. For the full recipe, check out the complete instructions to make this creamy garlic chicken skillet. To get the best sear on your chicken, start with a hot skillet. Heat olive oil over medium-high heat. When the oil shimmers, add the chicken. Sear each side for 6-7 minutes. This gives a nice golden color. Make sure the internal temperature reaches 165°F for safe eating. Season the chicken well with salt, pepper, thyme, and oregano. This mix brings out great flavor. To thicken your sauce, let it simmer longer. As it cooks, the liquid reduces and gets creamier. If the sauce is too thin, try adding a bit more Parmesan cheese. This will help with thickness and taste. Always taste your sauce before serving. Adjust with a pinch of salt or pepper to balance the flavor. Serve the creamy garlic chicken over mashed potatoes. This pairing works well with the rich sauce. You can also add steamed veggies on the side. These bright colors contrast nicely. For garnish, sprinkle fresh parsley on top. It adds a pop of color and freshness to your dish. You want your meal to look as good as it tastes! For the full recipe, check out the details above. {{image_4}} You can customize this dish in many ways. For proteins, try turkey or pork instead of chicken. Each option adds a unique taste. If you want a meat-free version, use tofu or chickpeas. These alternatives keep the meal hearty and satisfying. For a vegan or dairy-free option, swap heavy cream with coconut milk or cashew cream. This change keeps the dish creamy while adding a hint of sweetness. Use nutritional yeast instead of Parmesan cheese for a cheesy flavor without dairy. To elevate the dish, you can add herbs and spices. Fresh basil or rosemary adds a bright note. For a spicy kick, sprinkle in some red pepper flakes. These additions can take your creamy garlic chicken to the next level. Incorporating vegetables can also enhance flavor and nutrition. Add bell peppers or mushrooms when sautéing the garlic. Spinach is great, but you can also try kale or broccoli. They bring color and texture to the meal. When serving this dish, choose sides that balance its richness. Mashed potatoes or rice are perfect to soak up the creamy sauce. Steamed broccoli or green beans add a fresh crunch. For beverages, a chilled white wine pairs well. A light Pinot Grigio complements the flavors nicely. If you prefer non-alcoholic, try sparkling water with lemon. It refreshes the palate between bites. To keep your creamy garlic chicken fresh, follow these tips: - Use airtight containers. This helps keep out air and moisture. - Cool down the dish before storing it. Let it sit for about 30 minutes. - Store in the fridge. It stays good for up to 3 days. Check for any signs of spoilage before eating. If it smells off or looks strange, toss it. When you're ready to enjoy your leftovers, here are the best ways to reheat: - Use a skillet over low heat. This warms the chicken evenly. - Add a splash of chicken broth or cream. This keeps the sauce creamy. - Stir gently to avoid breaking up the chicken. Microwaving is quick but can dry out the chicken. If you must, cover it with a damp paper towel. Enjoy the rich flavors again! Check out the Full Recipe for more tips and tricks. It takes about 15 minutes to prep and 30 minutes to cook. So, the total time is 45 minutes. This means you can enjoy a tasty dinner in less than an hour! Yes, you can use frozen chicken. Just make sure to thaw it first. You can do this in the fridge overnight or use the microwave on the defrost setting. Thawed chicken cooks more evenly and gives better flavor. You can pair this dish with many sides. Here are a few ideas: - Mashed potatoes - Steamed broccoli - Roasted carrots - A fresh garden salad These options add color and balance to the rich sauce. Yes, you can prepare some parts ahead of time. Season the chicken and chop the garlic the day before. You can also make the sauce a day early. Just store everything in the fridge. When you’re ready to cook, heat the sauce and add the chicken. Absolutely! Here are some tips: - Use boneless, skinless chicken thighs instead of breasts. - Swap heavy cream for half-and-half or Greek yogurt. - Reduce the cheese or use a low-fat version. These changes keep the flavor while cutting calories and fats. Check out the Full Recipe for more details! This blog post covered a tasty creamy garlic chicken skillet recipe. You learned about the key ingredients like chicken, cream, and spices. I shared the tools you'll need, from a skillet to a meat thermometer, to ensure great results. The step-by-step guide makes cooking easy. In closing, this dish is simple to make and bursting with flavor. Feel free to tweak ingredients or adjust servings. With a few tips, you'll impress anyone with this meal. Happy cooking!

Creamy Garlic Chicken Skillet Flavorful Dinner Delight

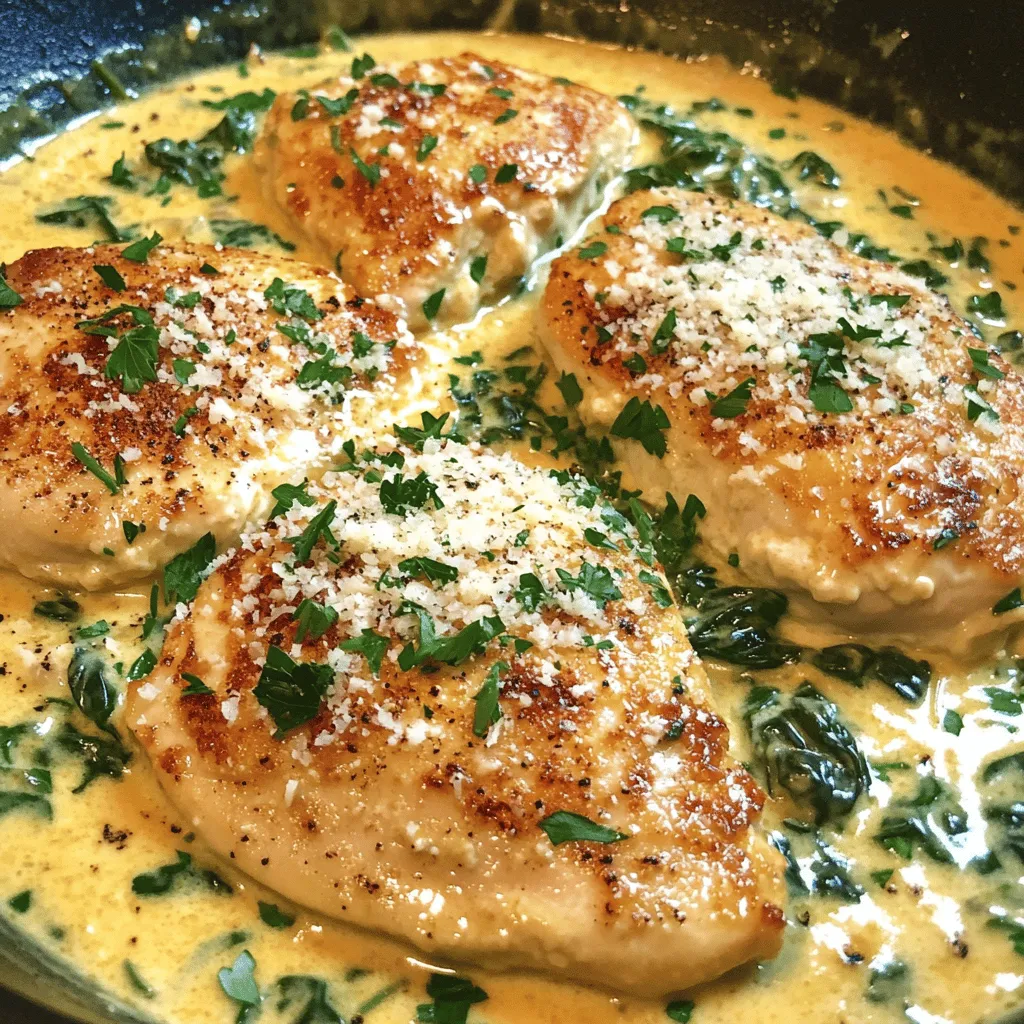
Are you ready for a dinner that packs a punch of flavor? This Creamy Garlic Chicken Skillet is your new

To make Loaded Potato Meatloaf, you need the following items: - 1 ½ pounds ground beef - 1 cup leftover mashed potatoes (preferably cooled) - 1 cup shredded sharp cheddar cheese - 1/2 cup green onions, finely chopped - 1/2 cup milk - 1/2 cup breadcrumbs (plain or seasoned) - 1 large egg, lightly beaten - 2 tablespoons Worcestershire sauce - 1 teaspoon garlic powder - 1 teaspoon onion powder - Salt and pepper to taste - 1/2 cup ketchup (for topping) These ingredients combine to create a savory, comforting dish that everyone will love. You can change the flavor to fit your taste. Consider adding: - Cooked bacon bits for a smoky flavor - Diced bell peppers for crunch - Other cheeses, like mozzarella or pepper jack - Fresh herbs like parsley or thyme for a fresh taste Feel free to mix and match these items to make the meatloaf truly yours. To round out your meal, pair the meatloaf with sides that enhance its flavors. Here are some great ideas: - Steamed broccoli or green beans for a healthy touch - Mashed sweet potatoes for a sweet balance - A fresh garden salad with a light vinaigrette - Garlic bread for a tasty, hearty addition These sides not only complement the meatloaf but also add color and nutrition to your plate. Check out the Full Recipe for complete cooking instructions! Start by preheating your oven to 350°F (175°C). This step warms the oven for baking. Next, take a big mixing bowl. Add the ground beef, leftover mashed potatoes, and shredded cheddar cheese. Include the finely chopped green onions, milk, breadcrumbs, and the beaten egg. Mix in Worcestershire sauce, garlic powder, and onion powder. Don’t forget to season with salt and pepper. Use your hands or a spatula to blend everything well. Aim for no streaks of beef in the mix. Once the mix is ready, transfer it into your greased loaf pan. Use your hands to shape the mixture into a neat loaf. Make sure it’s evenly spread in the pan. For the glaze, mix ketchup with a splash of Worcestershire sauce in a small bowl. This step is optional but adds great flavor. Spread this mixture on top of the meatloaf to create a tasty glaze. Bake the meatloaf in your preheated oven for about one hour. To check if it's done, insert a meat thermometer into the center. It should read 160°F (70°C) for safe eating. After baking, take the meatloaf out and let it rest for about ten minutes. This step helps the juices stay inside, making slicing easier. For a beautiful finish, serve slices garnished with extra cheese and green onions. Enjoy! To get the best texture in your meatloaf, combine your ingredients gently. Too much mixing makes it dense. Use your hands or a fork to blend the meat, potatoes, and spices just until mixed. This keeps the meatloaf tender. Also, make sure your mashed potatoes are cool before adding them. Hot potatoes can change the texture. Having the right tools makes cooking easier. Here are some must-haves for meatloaf: - Mixing bowls: Use a large bowl for mixing. - Loaf pan: A standard loaf pan helps shape the meatloaf. - Meat thermometer: This checks the doneness and ensures safety. - Baking sheet: Place the loaf pan on a sheet to catch drips. Using these tools will help you create a perfect Loaded Potato Meatloaf. Here are some mistakes to watch out for: - Overmixing: This leads to a tough meatloaf. - Skipping the rest time: Letting it rest helps keep juices inside. - Not checking the temperature: Always ensure it reaches 160°F (70°C). - Using hot mashed potatoes: Cool them first to keep texture right. Avoiding these mistakes will help you make a flavorful and moist dish every time. For detailed steps, check the Full Recipe. {{image_4}} You can easily make this meatloaf vegetarian. Start with plant-based ground meat or lentils. Use chickpeas or black beans for texture. Add your leftover mashed potatoes and cheese for flavor. This gives a savory twist while keeping it filling. Adding herbs and spices can change the taste. Try adding rosemary or thyme for depth. A dash of smoked paprika brings smoky notes. You can mix in chopped bell peppers for a fresh crunch. For toppings, consider using BBQ sauce or a spicy ketchup blend. This adds zing and keeps things exciting. Experiment with different cheeses for fun flavors. Creamy mozzarella or tangy feta can work well. You can add vegetables like spinach or mushrooms. Chopped spinach gives color and nutrition. Diced mushrooms add an earthy taste. These tweaks can make your loaded potato meatloaf unique and delicious. For more details, check out the Full Recipe. After enjoying your loaded potato meatloaf, store leftovers properly. Let the meatloaf cool down first. Wrap it tightly in plastic wrap or aluminum foil. You can also place it in an airtight container. This keeps it fresh and prevents odors from other foods in the fridge. Stored this way, your meatloaf lasts about 3 to 4 days in the fridge. When you’re ready to enjoy the leftovers, reheating is key. Preheat your oven to 350°F (175°C). Place slices of meatloaf in a baking dish. Cover the dish with aluminum foil to keep moisture in. Heat for about 20 minutes or until warm. If you prefer, you can also use the microwave. Just add a splash of water to keep it moist. Heat on medium power for 1 to 2 minutes. To save your loaded potato meatloaf for later, freezing is a great option. Slice the meatloaf before freezing for easy portions. Wrap each slice in plastic wrap, then put them in a freezer bag. Be sure to remove as much air as possible. This helps prevent freezer burn. Your meatloaf can stay fresh for up to 3 months in the freezer. Thaw it overnight in the fridge before reheating. Enjoy that comforting taste anytime! Yes, you can use fresh potatoes. Just cook and mash them first. Make sure they are smooth and creamy. This will help the meatloaf stay moist. Fresh potatoes may add a different texture, but they will still taste good. If you want to keep it simple, leftover mashed potatoes work best. To check if the meatloaf is done, use a meat thermometer. Insert it into the center of the loaf. It should read 160°F (70°C). If you don't have a thermometer, you can cut into the meatloaf. The inside should not be pink, and the juices should run clear. Let it rest for 10 minutes before slicing. This helps keep the juices in. If you need a substitute for breadcrumbs, try crushed crackers or oats. Both options work well. You can also use ground nuts for a gluten-free choice. Just remember to adjust the amount if needed. Each substitute can change the taste slightly, but they will still hold the meatloaf together. This blog post covered all you need for the perfect Loaded Potato Meatloaf. You learned about key ingredients, tips for cooking, and how to store leftovers. I shared ways to customize the dish and avoid common mistakes. With these steps and ideas, your meatloaf will impress everyone. Remember, practice makes perfect. Enjoy experimenting with flavors and sides. Happy cooking!

Loaded Potato Meatloaf Savory and Comforting Dish

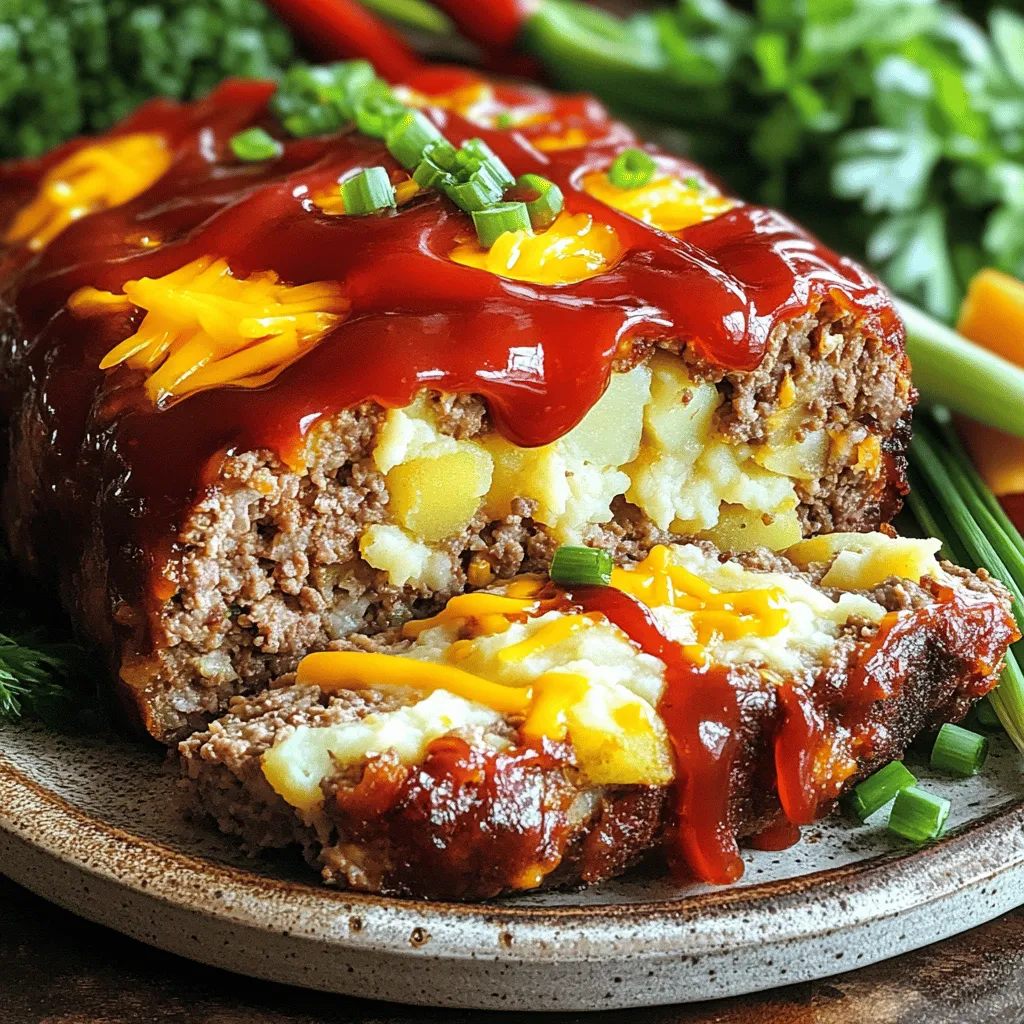
If you’re craving a dish that’s both hearty and comforting, look no further than Loaded Potato Meatloaf. This savory meal

- 8 oz elbow macaroni - 2 cups sharp cheddar cheese, shredded - 1 cup mozzarella cheese, shredded - 1/2 cup cream cheese, softened - 4 tablespoons unsalted butter - 1/4 cup all-purpose flour - 2 cups milk - 1 teaspoon garlic powder - 1/2 teaspoon onion powder - 1/2 teaspoon mustard powder - Salt and freshly ground black pepper to taste - 1/2 cup panko breadcrumbs - 1/4 teaspoon smoked paprika To make the best mac and cheese, you need quality ingredients. Elbow macaroni forms the base. It gives the dish that classic, comforting feel. Next, the cheese is key. I love using sharp cheddar for its intense flavor. Mozzarella adds creaminess, while cream cheese makes it rich and smooth. Butter and flour help create a roux for the cheese sauce. Milk brings everything together, making it creamy. Spices like garlic and onion powder add depth. Don’t forget salt and pepper for taste! If you want to add a crunchy layer, panko breadcrumbs work great. A sprinkle of smoked paprika can kick up the flavor. It adds a nice touch of warmth and smoke. This combination makes for a mac and cheese that everyone will love. For the full recipe, check out the Ultimate Creamy Mac & Cheese. To start, fill a large pot with water and add salt. Bring it to a rolling boil. Add 8 oz of elbow macaroni. Cook as per the package instructions, usually around 7-9 minutes. You want the pasta al dente, which means it should be firm to the bite. To check, taste a piece before draining. Once done, drain the pasta and let it cool slightly. In a large saucepan, melt 4 tablespoons of unsalted butter over medium heat. Once melted, add 1/4 cup of all-purpose flour. Stir constantly for about 2 minutes until the mixture turns a light golden color. Gradually pour in 2 cups of milk while whisking. Keep stirring until the sauce thickens, which should take about 5 minutes. Next, lower the heat and mix in 1/2 cup of softened cream cheese, 2 cups of sharp cheddar cheese, and 1 cup of mozzarella cheese. Stir until all the cheeses melt into a creamy sauce. Add 1 teaspoon of garlic powder, 1/2 teaspoon of onion powder, 1/2 teaspoon of mustard powder, salt, and black pepper to taste. This blend adds depth to the sauce. Now, gently fold the cooked macaroni into the cheese sauce. Stir until every piece of pasta is well coated. This step ensures a nice, creamy texture throughout. Preheat your oven to 350°F (175°C). Lightly grease a baking dish with butter or spray. Transfer the mac and cheese mixture into the dish, spreading it evenly. For a crunchy topping, mix 1/2 cup of panko breadcrumbs with a little smoked paprika, if you like. Sprinkle this mixture over the top. Place the dish in the oven and bake for about 20-25 minutes. Look for a golden, crispy top. Once baked, take it out and let it cool for a few minutes before serving. Enjoy your delicious mac and cheese! For the full recipe, visit [Full Recipe]. To make your mac and cheese super creamy, focus on your cheese choice. I suggest using a mix of sharp cheddar and mozzarella. The cheddar gives a strong flavor, while the mozzarella adds stretchiness. You can use a 2:1 ratio of cheddar to mozzarella for the best taste. Adding cream cheese is a game changer. It melts smoothly and adds a rich texture. Just use half a cup in your cheese sauce. This small change makes a big difference in creaminess. Baking your mac and cheese gives it a fantastic crust. To get that perfect golden top, use panko breadcrumbs. They crisp up nicely when baked. Mix them with a bit of smoked paprika for extra flavor. Adjust your baking time based on how gooey you want it. If you like it extra creamy, bake for 20 minutes. For a firmer texture, go for 25 minutes. Keep an eye on the top; you want it golden brown but not burnt. Presentation matters! For a fun touch, serve mac and cheese in small bowls. You can also sprinkle extra cheese or fresh herbs on top. This makes each serving look special and inviting. Pair your mac and cheese with side dishes. A fresh salad or steamed vegetables balances the meal. You could also serve it with grilled chicken or crispy bacon for added protein. Each bite will be a comforting delight. {{image_4}} Baked mac and cheese has a crispy top. It gets a golden brown crunch from the oven. Stovetop mac and cheese is smooth and creamy. It cooks quickly on the stove. Pros of Baked Mac & Cheese: - Crispy top layer adds texture. - Great for serving a crowd. - Can be made ahead and reheated. Cons of Baked Mac & Cheese: - Takes longer to cook. - Requires more dishes. Pros of Stovetop Mac & Cheese: - Quick and easy to make. - Less cleanup involved. - Creamy and comforting. Cons of Stovetop Mac & Cheese: - No crispy top layer. - May not hold well when cooled. You can change up the flavor. Adding proteins like chicken or bacon makes it heartier. You can also toss in veggies. Peas, spinach, or broccoli work well. They add color and nutrients. For seasoning, try adding: - Smoked paprika for a smoky taste. - Hot sauce for a spicy kick. - Fresh herbs like basil or thyme for brightness. If you need gluten-free options, use gluten-free pasta. Many brands offer great alternatives. For those avoiding dairy, look for dairy-free cheese. Brands now make tasty options that melt well. You can also use nut milk instead of cow’s milk. With these variations, you can customize your mac and cheese to fit any taste or need. Each method brings its own charm. Explore these ideas to make the best mac and cheese for you! To keep leftover mac and cheese fresh, store it in an airtight container. Make sure to let it cool first. You can keep it in the fridge for about 3 to 5 days. If you want it to last longer, consider freezing it. In the freezer, it can stay good for up to 3 months. When it's time to enjoy your leftover mac and cheese, reheating it right is key. The best way to keep it creamy is by using the stovetop. Add a splash of milk to the pot. Heat it on low and stir often. This helps bring back the smooth texture. If you use a microwave, put it in a bowl and add some milk. Heat in short bursts, stirring in between. This will help avoid dryness. Avoid high heat, as it can dry out your delicious meal. The best cheese for mac and cheese is a blend of sharp cheddar and mozzarella. Sharp cheddar gives a rich, tangy taste. Mozzarella adds creaminess and stretch. You can also mix in cream cheese for extra smoothness. - Blend Ideas: - 2 cups sharp cheddar cheese, shredded - 1 cup mozzarella cheese, shredded - 1/2 cup cream cheese, softened This mix creates a perfect flavor and texture. Feel free to try other cheeses too, like gouda or Monterey Jack. Yes, you can make mac and cheese ahead of time. Prepare the dish as normal, then store it in the fridge. You can keep it fresh for up to two days. - Prep Tips: - Cook the pasta and cheese sauce. - Mix them together and place in a baking dish. - Cover tightly with foil before refrigerating. When ready to bake, remove it from the fridge. Let it sit at room temperature for about 30 minutes before baking. This helps it heat evenly. To prevent dry mac and cheese, avoid overcooking the pasta. Cook it just until al dente. Also, ensure your cheese sauce is creamy and well-mixed. - Common Mistakes: - Cooking pasta too long makes it mushy. - Not adding enough cheese can lead to dryness. If it does get dry, you can add more milk or a pat of butter. Stir it in while reheating to restore that creamy texture. Now you know how to make mac and cheese that’s both tasty and creamy. We covered the key ingredients, step-by-step instructions, and helpful tips for a perfect dish. Don't forget to explore variations and storage methods. Mac and cheese can be a versatile meal, fitting many tastes. Use this guide to create your own delicious versions, whether baked, stovetop, or with fun add-ins. Enjoy the cooking process and the yummy results!

The Best Mac & Cheese Recipe for Comforting Flavor

Looking for the ultimate mac & cheese recipe that warms your heart? You’ve come to the right place! I’ll guide

- 1 package (16 oz) store-bought gnocchi - 2 cups cherry tomatoes, halved - 2 tablespoons extra virgin olive oil - 2 cloves garlic, minced finely - 1 teaspoon dried basil - 1 teaspoon dried oregano - Salt and freshly ground pepper to taste - 8 oz burrata cheese, at room temperature - Fresh basil leaves, torn, for garnish - Crushed red pepper flakes, to taste (optional) Gathering quality ingredients is key to making this dish shine. Start with the store-bought gnocchi. It cooks quickly and saves you time. The cherry tomatoes bring sweetness and color. Their juicy burst adds life to every bite. Extra virgin olive oil is essential for flavor. Use a good quality oil for the best taste. Don't forget the garlic! It brings a warm, cozy aroma that makes your kitchen feel inviting. Dried basil and oregano enhance the flavors of the tomatoes. Season with salt and pepper to make everything pop. For the final touch, burrata cheese is a must. Its creamy texture pairs perfectly with the gnocchi. When you add fresh basil leaves, you get a bright, herbal note. If you like a kick, sprinkle in some crushed red pepper flakes. This will elevate your dish and add a hint of heat. Make sure to check the [Full Recipe](#) for more details. Happy cooking! Bring a large pot of salted water to a rolling boil. This step is key for cooking the gnocchi perfectly. Carefully drop in the gnocchi. Cook them until they float to the surface, which takes about 2-3 minutes. This floating means they are ready. Once they float, drain the gnocchi in a colander. Set them aside while you prepare the sauce. In a large skillet, heat 2 tablespoons of extra virgin olive oil over medium heat. Add 2 cloves of minced garlic and sauté for about 30 seconds. Stir often to keep the garlic from browning. Next, introduce 2 cups of halved cherry tomatoes, along with 1 teaspoon of dried basil and 1 teaspoon of dried oregano. Season with salt and freshly ground pepper to taste. Cook for about 5-7 minutes. Stir occasionally until the tomatoes soften and start to burst. This will create a rich, flavorful sauce. Gently fold the cooked gnocchi into the tomato mixture. Carefully toss to coat the gnocchi in the sauce. Allow it to cook together for another 2 minutes. This warms everything through. Remove the skillet from heat. Create a small well in the center of the gnocchi. Delicately place 8 ounces of burrata cheese in the center. The heat will warm the cheese slightly, making it creamy. Finally, garnish with torn fresh basil leaves and a sprinkle of crushed red pepper flakes to taste. For the full recipe, refer to the earlier sections. To make perfect gnocchi, ensure you bring water to a rolling boil. This step is key. Dropping them in boiling water helps them cook evenly. After cooking for 2-3 minutes, the gnocchi will float. This means they are ready. Use a slotted spoon to drain them effectively. This tool allows water to escape while keeping your gnocchi intact. Flavor is vital in this dish. You can adjust garlic and seasoning to fit your taste. A little more garlic can add depth. If you want a fresh taste, use ripe cherry tomatoes. Their sweetness makes the sauce vibrant and delicious. You can even mix in fresh herbs for added flavor. How you serve the dish matters, too. Serve the gnocchi in shallow bowls, which makes it look inviting. A drizzle of extra virgin olive oil adds shine and flavor. Pair it with crusty bread for a complete meal. The bread soaks up the tasty sauce, making each bite better. For added color, you can scatter torn basil leaves on top. This makes the dish pop visually. {{image_4}} You can easily make this dish vegetarian. Just swap the burrata cheese for ricotta or feta cheese. Both cheeses offer a creamy texture that works well. Ricotta is slightly milder, while feta adds a tangy bite. Try both to see which one you like best! Want a heartier meal? Add grilled chicken or shrimp. Both options cook quickly and add great flavor. Grilled chicken provides a nice, savory taste, while shrimp brings a touch of sweetness. Just toss them in the skillet with the tomatoes for a few minutes until cooked through. Feel free to add more veggies! Spinach, zucchini, or bell peppers work wonders in this dish. Spinach wilts down nicely, adding nutrients without taking over. Zucchini and bell peppers add color and crunch. Simply chop them up and toss them in with the tomatoes. This makes your meal even healthier and more colorful. For the complete recipe, check out the full recipe above. Store any leftover tomato gnocchi in an airtight container. It will stay fresh for up to 3 days. Make sure to let it cool down before sealing. To reheat, gently warm the gnocchi in a skillet. Add a splash of water to keep it moist. Heat on low and stir often. This method keeps the dish tasty and prevents it from drying out. If you want to save some for later, freeze the cooked gnocchi separately. When ready to eat, combine it with the tomato sauce as you reheat. This way, you maintain the best flavor and texture. Yes, homemade gnocchi can be used but may require additional cooking time. If you make gnocchi from scratch, ensure they are light and fluffy. The cooking time might differ based on the size and texture. Keep an eye on them to avoid overcooking. Fresh gnocchi may take a minute or two longer than store-bought ones. While burrata adds creaminess, you can use other cheeses if unavailable. Options like mozzarella or ricotta can work well too. Each cheese brings its own flavor. If you prefer a sharper taste, consider using aged cheeses like Parmigiano-Reggiano. Experiment to find what you like best! Substitute burrata with a vegan cheese alternative to make it vegan-friendly. There are many great vegan cheeses available today. Look for creamy options that melt well. Nutritional yeast can also add a cheesy flavor if you want to enhance the taste without using dairy. This dish combines simple ingredients for a tasty meal. We've covered cooking gnocchi, sautéing tomatoes, and adding burrata. You can adjust the flavors and try variations to suit your taste. Don’t forget to store leftovers correctly for later enjoyment. This recipe is versatile and easy to make. Experiment with different cheeses and veggies to create your own version. Enjoy making this comforting dish with friends and family. You’ll love the fresh flavors and quick prep.

30 Minute Tomato Gnocchi with Burrata Delight

Looking for a quick yet delicious meal? Try this 30-minute Tomato Gnocchi with Burrata! It’s a simple dish bursting with

To make Crockpot Loaded Steak and Potato Bake, you need these key ingredients: - 1.5 lbs flank steak, cut into bite-sized pieces - 4 medium russet potatoes, diced into 1-inch cubes - 1 medium onion, finely chopped - 4 cloves garlic, minced - 1 cup beef broth (low-sodium preferred) - 1 cup shredded sharp cheddar cheese - 1 cup sour cream - 1 teaspoon smoked paprika - 1 teaspoon dried thyme - Salt and pepper to taste These ingredients work together to give the dish depth and richness. The flank steak is juicy and tender, while the potatoes add heartiness. The smoked paprika brings a nice warmth, and the sour cream offers a creamy finish. You can add these optional ingredients for extra flavor and a nice touch: - ½ cup green onions, sliced - ½ cup cooked bacon bits These garnishes add freshness and crunch. Cooked bacon bits add a savory touch that many will love. Green onions provide a pop of color and a mild onion flavor. If you need to swap out some ingredients, here are some simple ideas: - Use chuck roast instead of flank steak for a more affordable option. - Swap russet potatoes for Yukon Gold or red potatoes for a different texture. - If you don’t have beef broth, you can use chicken broth or vegetable broth. - For a lighter option, substitute Greek yogurt for sour cream. - You can use any cheese you like, such as Monterey Jack or mozzarella. These substitutions help you adapt the recipe to what you have on hand. Feel free to experiment and discover your favorite flavor combinations! For the complete details on preparation, check the Full Recipe. First, you need to season the flank steak. Use salt, pepper, and smoked paprika. This adds depth to the flavor. Next, heat oil in a large skillet over medium-high heat. Sear the steak for 2-3 minutes, browning all sides. This step builds a rich taste through caramelization. Once browned, transfer the steak to your crockpot. In the same skillet, add a bit more oil if needed. Next, add the chopped onions and minced garlic. Sauté them for about 2 minutes. You want the onions to be clear and fragrant. This step will fill your dish with amazing flavors. Now, combine everything in the crockpot. First, layer the sautéed onion and garlic over the steak. Then, evenly spread the diced potatoes on top. This helps to ensure even cooking. Pour beef broth over the ingredients in the crockpot. Sprinkle dried thyme on top. Gently mix everything together. Be careful not to break the potato pieces. Cover the crockpot and cook on low for 6-8 hours or on high for 3-4 hours. You want the steak to be tender and the potatoes to be soft. For a creamy finish, stir in shredded cheddar cheese and sour cream before serving. Mix until everything is combined and creamy. Taste and adjust the seasoning as needed. Enjoy this hearty dish! For the full process and tips, you can check the Full Recipe. To boost the flavor of your crockpot loaded steak and potato bake, I recommend a few simple tricks. First, sear the steak before adding it to the crockpot. This step creates a nice brown crust that adds deep flavor. Season the meat well with salt, pepper, and smoked paprika. This spice gives a warm, smoky taste that pairs well with beef and potatoes. You can also add fresh herbs like thyme and rosemary. These herbs brighten up the dish and add freshness. Using low-sodium beef broth helps control salt levels and keeps the flavors balanced. For a richer taste, consider adding a splash of Worcestershire sauce or soy sauce. Getting the right texture is key for this dish. To keep the steak tender, cook it low and slow. This method breaks down tough fibers in the meat. Aim for 6-8 hours on low heat for the best results. For the potatoes, cut them into uniform pieces. This ensures they cook evenly. Dicing them into 1-inch cubes helps them cook through without becoming mushy. Stir gently when mixing ingredients to avoid breaking the potato pieces, which helps maintain their shape. Many cooks make simple mistakes that affect the final dish. One common error is not browning the steak. Skipping this step can lead to a bland flavor. Another mistake is overloading the crockpot. Too many ingredients can lead to uneven cooking. Stick to the recipe for the best results. Finally, avoid lifting the lid while cooking. Each time you do, heat escapes, which can alter cooking time. For more details, check the full recipe for this delicious dish. {{image_4}} You can make a tasty vegetarian version of this dish. Swap the flank steak for hearty mushrooms or lentils. Both options add great texture. Use vegetable broth instead of beef broth. This keeps the dish rich in flavor. You can also add beans for protein. Try black beans or chickpeas for a protein boost. Feel free to mix in your favorite veggies. Carrots, bell peppers, or green beans work well. Chop them into similar sizes as the potatoes. This ensures even cooking. You can add leafy greens like spinach, too. Just stir them in during the last hour of cooking. This keeps them vibrant and full of nutrients. If you want to switch up the meat, try chicken or pork. Both will give the dish a new twist. Use boneless cuts for best results. You can also use ground meat for a different texture. Just cook it in the skillet before adding it to the crockpot. Remember to adjust cooking times if using different meats. Always check that your meat is cooked through before serving. You can find the full recipe [here](#). After enjoying your meal, let leftovers cool completely. Then, transfer them to an airtight container. This helps keep the flavors fresh. Store the container in the fridge for up to three days. Labeling the container with the date can help you keep track of freshness. To reheat, you can use the microwave or stovetop. For the microwave, place the leftovers in a microwave-safe bowl. Heat in 30-second bursts, stirring in between. On the stovetop, warm over low heat, stirring often. Add a splash of beef broth or water if the dish seems dry. This helps revive the creamy texture. If you want to freeze your leftovers, ensure they cool completely before storing. Use a freezer-safe container, leaving space for expansion. This dish can be frozen for up to three months. When ready to eat, thaw it overnight in the fridge. Reheat as directed above for the best taste. For full enjoyment, try to eat it soon after thawing. Yes, you can cook this recipe on high. If you choose high, set the crockpot for 3-4 hours. This method cooks the meat and potatoes quicker. However, cooking on low for 6-8 hours often makes the steak more tender. Check the steak and potatoes for tenderness. Use a fork to test the potatoes. They should break apart easily. The steak should be soft and easy to shred. If both are tender, it is ready to enjoy! To adjust servings, change the amount of steak and potatoes. For larger groups, double the recipe. For smaller gatherings, cut the recipe in half. Keep the seasoning and broth ratios similar to maintain flavor. You can serve this dish with a fresh salad or steamed vegetables. Garlic bread or cornbread also pairs well. These sides add balance and freshness to the hearty meal. Enjoy your delicious feast! For the full recipe, check out the details above. This blog post covered everything you need for a great Crockpot Loaded Steak and Potato Bake. We listed key ingredients and offered garnish choices. You learned how to prep steak, sauté aromatics, and assemble your dish. Tips helped you enhance flavor and avoid common mistakes. We also shared variations for different diets and useful storage info. Use these steps and ideas to make yourCooking fun and easy. Enjoy trying new recipes with confidence!

Crockpot Loaded Steak and Potato Bake Flavor Boost

Are you ready to elevate your dinner game with a Crockpot Loaded Steak and Potato Bake? This mouthwatering dish combines

- 4 large bell peppers (choose red, yellow, green, or orange) - 1 pound ground turkey - 1 cup cooked quinoa (white, red, or a blend) - 1 can (15 oz) black beans, drained and rinsed - 1 cup corn (fresh or frozen) - 1 cup diced tomatoes (canned or fresh) For stuffed bell peppers, I always choose large, bright peppers. They add color and flavor. Ground turkey is my go-to protein. It’s lean and absorbs spices well. Quinoa or rice gives the dish a hearty feel. Black beans and corn are great for texture and nutrients. Diced tomatoes keep the filling juicy and fresh. - 1 teaspoon ground cumin - 1 teaspoon chili powder - 1/2 teaspoon smoked paprika - Salt and black pepper to taste - 1 cup shredded cheese (cheddar or Monterey Jack) - Fresh cilantro, chopped, for garnish - 1 tablespoon olive oil Seasoning is key! Cumin adds warmth, while chili powder brings spice. Smoked paprika gives that nice, smoky flavor. I love to use cheese for a creamy finish. Fresh cilantro adds a burst of brightness at the end. A drizzle of olive oil helps keep everything moist. These ingredients not only make the dish tasty but also colorful! You can find the full recipe [here]. 1. Preheat your oven to 375°F (190°C). This step warms your oven for the perfect bake. 2. Take your bell peppers and cut off the tops. Scoop out the seeds and membranes. 3. Brush the outsides of the peppers lightly with olive oil. This adds flavor and helps them cook. 1. In a medium skillet over medium heat, add the ground turkey. Brown it for about 5-7 minutes. 2. Break the turkey apart with a wooden spoon. Make sure it is cooked through and no longer pink. 3. Stir in cooked quinoa, rinsed black beans, corn, diced tomatoes, cumin, chili powder, smoked paprika, salt, and pepper. 4. Mix everything well and cook for another 5 minutes. This melds the flavors together nicely. 5. Take the skillet off the heat and stir in half of the shredded cheese. Let it melt into the mixture. 1. Carefully spoon the turkey filling into each prepared bell pepper. Pack it tightly for a good fit. 2. Sprinkle the remaining shredded cheese on top of each stuffed pepper. This makes them cheesy and delicious. 3. Cover the baking dish with aluminum foil. This keeps the peppers moist while baking. 4. Bake in the preheated oven for 30 minutes. Then, remove the foil and bake for another 10-15 minutes. 5. Check for tenderness in the peppers and bubbly, golden cheese. 6. Let the stuffed peppers cool for a few minutes after baking. Garnish with chopped cilantro right before serving. For the full recipe, check out the details above and enjoy your cooking! To ensure even cooking with stuffed bell peppers, I recommend a few simple steps. First, preheat your oven to 375°F (190°C). This helps the peppers cook evenly. When you cut the tops off your bell peppers, make sure to keep the bottoms flat. This way, they stand up straight while baking. You want to avoid any peppers toppling over in the oven. To prevent soggy peppers, brush the outsides lightly with olive oil. This not only adds flavor but also helps them hold their shape. When stuffing, pack the filling tightly but not too tight. This keeps the peppers firm but allows steam to escape. Covering them with foil for the first half of the bake keeps moisture in. Remove the foil for the last 10-15 minutes to let the cheese crisp up. For spice substitutes, consider using garlic powder or onion powder if you need a change. These can add depth without overwhelming the dish. You can also mix in herbs like oregano or basil for a different flavor profile. Adding extra ingredients can make your stuffed peppers even more exciting. Try adding diced zucchini or chopped spinach for a veggie boost. You might also consider mixing in some salsa or taco sauce for a zesty twist. These small changes can lead to big flavor bursts in your stuffed bell peppers. Check out the [Full Recipe] for more creative ideas to customize your dish! {{image_4}} If you want to skip the ground turkey, you have tasty options. You can use plant-based protein, like lentils or mushrooms. These swaps keep your dish hearty and full of flavor. Try using 1 pound of lentils instead of turkey. They cook quickly and add great texture. You can also try crumbled tofu or tempeh. These options soak up spices well, making them tasty. For stuffing, you can get creative. Instead of turkey, use cooked rice or quinoa. Mix in black beans, corn, and diced vegetables. Zucchini, spinach, or even kale work great. You can add spices like cumin and chili powder for a kick. This way, you still get a burst of flavor. There are many ways to spice up your stuffed bell peppers. You can give them a Mexican twist by adding salsa and taco seasoning. Use pepper jack cheese for a cheesy kick. You could also add jalapeños for heat. For an Italian flavor, use marinara sauce instead of diced tomatoes. Mix in Italian herbs like oregano and basil. Top with mozzarella cheese for a rich finish. If you want a Mediterranean flair, add feta cheese and olives. Use couscous instead of rice. You can even toss in sun-dried tomatoes for extra flavor. Mixing in different vegetables also adds crunch and freshness. Try bell peppers, onions, or even eggplant for a fun twist. Explore these variations and make your stuffed peppers uniquely yours! For the full recipe, check out the Turkey Fiesta Stuffed Bell Peppers. To keep your stuffed bell peppers fresh, you have two great options: refrigeration and freezing. - Refrigeration and leftovers: First, let the stuffed peppers cool down. Place them in an airtight container. They will last up to 4 days in the fridge. Just remember to store them without the cilantro garnish. Add it fresh when serving. - Freezing stuffed peppers: To freeze, wrap each pepper tightly in plastic wrap. Then place them in a freezer-safe bag. They can stay frozen for up to three months. This method keeps them tasty for later meals. When you want to enjoy your stuffed peppers again, reheating them properly is key. - Best methods for reheating: The oven is the best choice. Preheat it to 350°F (175°C). Place the peppers in a baking dish, cover with foil, and heat for about 20 minutes. This keeps them moist. You can also use a microwave. Heat on medium power for 2-3 minutes, but this may make the peppers a bit softer. - Serving suggestions after storage: After reheating, add a sprinkle of fresh cilantro and a squeeze of lime. This will brighten the flavor. You can serve them with a side salad or some rice for a complete meal. Enjoy your flavor-packed peppers! How long to bake stuffed peppers? Bake your stuffed peppers for about 30 minutes covered with foil. This helps them cook evenly. After that, remove the foil and bake for another 10 to 15 minutes. The cheese on top should be bubbly and golden. Can I use other ground meats? Yes, you can use other ground meats. Ground beef, chicken, or pork all work well. Each type adds its own flavor. Just make sure to cook it well before mixing in the other ingredients. What can I serve with stuffed bell peppers? Stuffed bell peppers pair nicely with a fresh salad or some crusty bread. You can also serve them with rice or quinoa for a filling meal. A dollop of sour cream or guacamole on top adds a nice touch. Nutritional benefits of the ingredients Stuffed bell peppers are packed with nutrients. Bell peppers are rich in vitamins A and C. Ground turkey is a lean protein that helps build muscle. Quinoa is a great source of fiber and protein, while black beans offer fiber and healthy carbs. Calorie count and serving size considerations Each stuffed pepper has about 300 to 350 calories, depending on the filling and cheese used. This recipe makes four servings. Adjust the size of your bell peppers and the amount of filling to fit your needs. Enjoy the burst of flavors while keeping it healthy! Stuffed bell peppers are a tasty meal packed with nutrition. We discussed main ingredients, like ground turkey and quinoa, along with spices that add flavor. I shared easy steps for preparing, filling, and baking them. Tips for perfect cooking and storage keep your meal fresh. You learned ways to make them vegetarian or explore fun flavor twists. Enjoy making your own stuffed peppers using these ideas! They are simple, healthy, and sure to please everyone.

Stuffed Bell Peppers with Ground Turkey Flavor Burst

Are you ready to bring bold flavors to the dinner table? Stuffed bell peppers with ground turkey are a fun

Older posts
Newer posts
← Previous Page1 … Page26 Page27 Page28 … Page42 Next →

dsad

© 2025 dailydishcraft • Built with GeneratePress

Our Policies

  • Copyright Policy
  • Cookie Policy
  • GDPR Policy
  • Privacy Policy
  • Disclaimer
  • Terms Of Use

More Information

  • Home
  • About
  • Contact
  • Appetizers
  • Dessert
  • Dinner
  • Drinks
©2025, dailydishcraft About Back To Top