![- 6 cups fresh baby spinach - 1 cup strawberries - 1 cup blueberries - 1 cup raspberries - 1/2 cup crumbled feta cheese - 1/2 cup candied walnuts - 1/4 red onion - 1/4 cup balsamic glaze - 2 tablespoons olive oil - Salt and pepper to taste This Summer Berry Spinach Salad is fresh and bright. Each bite bursts with flavor. The base is made from six cups of fresh baby spinach. This gives a crisp, green foundation for the salad. I love using fresh spinach because it is full of nutrients. Next, I add one cup each of strawberries, blueberries, and raspberries. These berries bring color and sweetness. The strawberries should be hulled and sliced thin. The blueberries and raspberries need only a good rinse. They add juicy bites that balance the greens. For a creamy touch, I sprinkle half a cup of crumbled feta cheese. The feta adds a salty flavor that contrasts the sweet fruits. Then, I include half a cup of candied walnuts. They give a sweet crunch and make each bite exciting. I slice a quarter of a red onion very thin. This adds a little sharpness to the mix. For the dressing, I whisk together a quarter cup of balsamic glaze and two tablespoons of olive oil. This dressing is sweet and tangy. It ties all the flavors together. I season it with salt and pepper to taste. This salad is not just a meal; it’s an experience. You can find the Full Recipe to prepare this delightful dish. Enjoy the process as you create something colorful and tasty! 1. Start with 6 cups of fresh baby spinach. Wash it under cold water. Use a salad spinner to dry the leaves well. 2. Take 1 cup of strawberries. Hull them to remove the green tops. Slice them thinly. 3. Rinse 1 cup of blueberries and 1 cup of raspberries under cool water. Drain them well. 1. In a large bowl, combine the dried spinach with the sliced strawberries, blueberries, and raspberries. 2. Gently toss the fruits with the spinach to mix them well. 3. Add 1/2 cup of crumbled feta cheese for a creamy touch. Then sprinkle in 1/2 cup of candied walnuts to add some crunch. 1. In a small bowl, whisk together 1/4 cup of balsamic glaze and 2 tablespoons of olive oil. 2. Add a pinch of salt and freshly cracked pepper to taste. Mix until you have a smooth dressing. 3. Drizzle this dressing over the salad. Toss gently to coat everything well without bruising the berries. You can find the detailed recipe here: [Full Recipe]. For a stunning display, use a large, shallow platter. This lets all the colors pop. You can also serve in individual bowls for a more personal touch. To impress, top each bowl with a few whole berries. A drizzle of extra balsamic glaze adds a nice finish. I recommend using extra virgin olive oil for the best flavor. It pairs perfectly with the berries and greens. You can also try avocado oil for a different taste. If you want a change, consider a honey mustard dressing or a citrus vinaigrette. These options add a refreshing twist to your salad. To keep your spinach fresh, wash it just before use. Pat the leaves dry to avoid wilting. Store the spinach in a container lined with paper towels. This helps absorb moisture and keeps it crisp. Keep the berries and other ingredients separate until assembly. This way, they stay fresh and delicious. {{image_4}} You can easily change fruits in this salad. Instead of strawberries, try peaches or blackberries. These fruits add unique flavors that mix well with spinach. You can also switch the feta cheese for a dairy-free option like tofu or avocado. This keeps the salad creamy without using dairy. Feel free to get creative with dressings. A creamy dressing like ranch or yogurt can add richness. For a fresh twist, try a citrus-based dressing. Lemon or orange juice mixed with olive oil brightens the flavors. You can also add herbs for extra zest. Boost the nutrition by adding protein. Grilled chicken makes the salad hearty. Chickpeas are a great plant-based option too. They add fiber and protein. You can throw in more nuts or seeds, like almonds or sunflower seeds, for a crunchy texture and healthy fats. These add-ins make your meal more filling and balanced. For the full recipe, check out the [Full Recipe]. To store leftovers of your Summer Berry Spinach Salad, place it in an airtight container. This keeps the salad fresh for about 1 to 2 days. To maintain freshness, avoid adding the dressing until you're ready to eat. This way, the spinach stays crisp and the berries remain juicy. If you notice any wilting, remove those leaves before storing. Prep ingredients in advance for easy assembly. Wash and dry the spinach, and store it in a separate container. Slice the strawberries and store them in a small bowl. Keep blueberries and raspberries in their original containers to avoid squishing them. For salads, use clear containers to show off the vibrant colors. This makes it easy to grab and go. You can layer the ingredients, with the spinach at the bottom and berries on top, to keep them fresh longer. You can store this salad for up to two days in the fridge. Keep it in an airtight container. To keep the spinach fresh, store the dressing separately. Add the dressing just before serving. This helps avoid soggy leaves. Yes, you can use frozen berries. They are a great option, especially in winter. Just thaw them and drain excess water. This keeps your salad from getting watery. Fresh berries taste best, but frozen ones work well too. If you want a dairy-free option, try using avocado or chickpeas. Both add creaminess and flavor. You can also use goat cheese or mozzarella for different tastes. Each option gives a unique twist to your salad. Absolutely! All the ingredients in Summer Berry Spinach Salad are gluten-free. This makes it safe for anyone with gluten sensitivities. Always check labels on your ingredients to ensure safety. Enjoy this fresh dish worry-free! This blog post covers a fresh and tasty Summer Berry Spinach Salad. We discussed the key ingredients, easy steps for preparation, and tips for serving. You can swap fruits and dressings to fit your taste. Always focus on freshness to keep your salad vibrant. With these tips, you can enjoy a healthy, colorful dish anytime. Try making this salad for quick meals or special occasions. You'll impress everyone with its flavor and nutrition. Enjoy your cooking journey with this salad!](https://dailydishcraft.com/wp-content/uploads/2025/07/08692963-e965-41d6-a37f-e1f2163aeab1.webp)
Summer Berry Spinach Salad Fresh and Flavorful Recipe
Looking for a vibrant, fresh salad that bursts with flavor? This Summer Berry Spinach Salad is your answer! With sweet
Looking for a vibrant, fresh salad that bursts with flavor? This Summer Berry Spinach Salad is your answer! With sweet

Get ready to spice up your dinner table with my Cheddar Jalapeño Cornbread! This recipe is easy to follow and

Looking for a tasty, easy snack? Buffalo Cauliflower Bites are your answer! These crispy bites pack all the flavor of
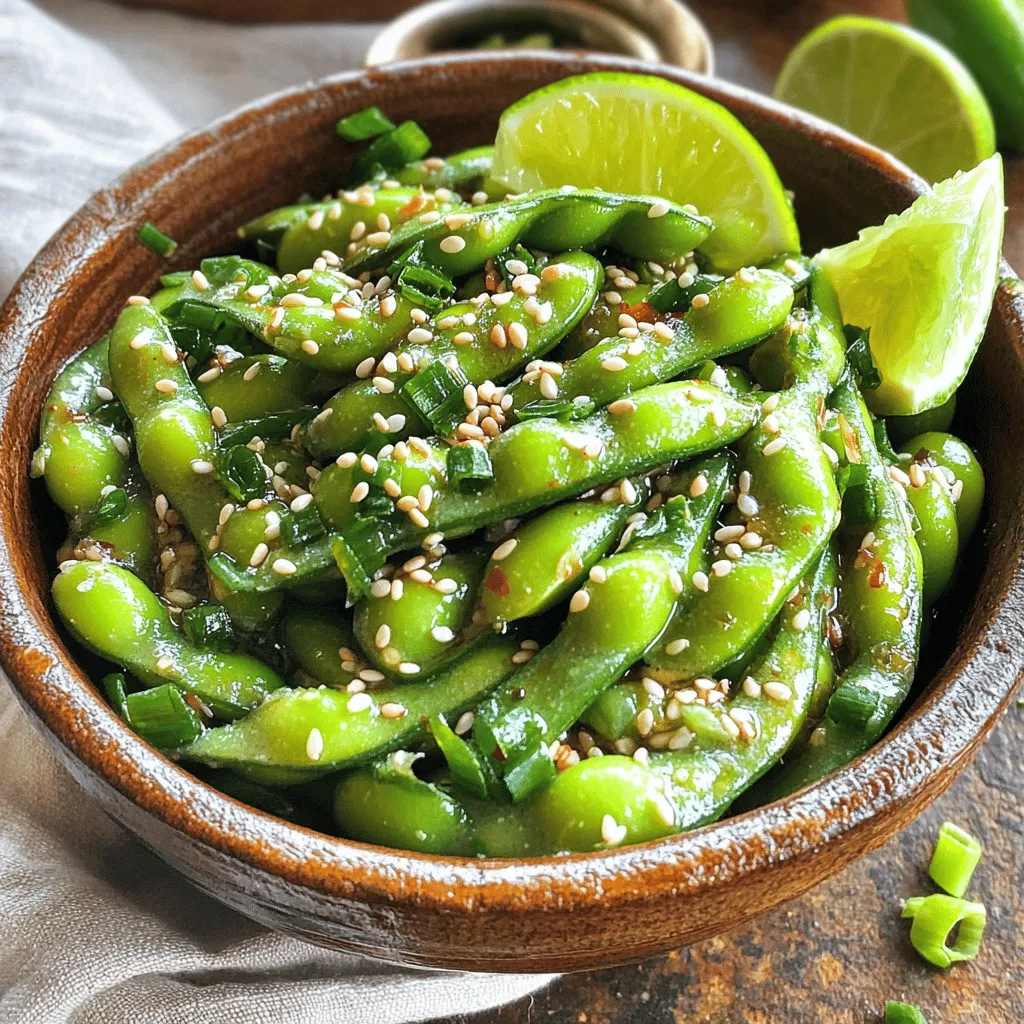
Are you ready to elevate your snacking game? My Spicy Garlic Edamame recipe is packed with bold flavors and is
![- 1 can (15 oz) black beans, rinsed and drained - 1 can (15 oz) sweet corn, drained - 1 red bell pepper, diced into small cubes - 1 green bell pepper, diced into small cubes - 1 small red onion, finely chopped - 1 cup cherry tomatoes, halved - 1 ripe avocado, diced into bite-sized pieces - 1/4 cup fresh cilantro, finely chopped - 2 tablespoons fresh lime juice - 1 tablespoon extra virgin olive oil - 1 teaspoon ground cumin - 1 teaspoon chili powder - Salt and freshly ground black pepper to taste These ingredients combine to create a fresh and vibrant Southwest Black Bean Salad. Each component adds flavor, texture, and nutrition to the dish. The black beans provide protein and fiber, while the sweet corn adds a pop of sweetness. The bell peppers and cherry tomatoes bring a crisp bite, and the avocado offers creamy richness. - Alternative beans: You can use pinto beans or kidney beans if you prefer. Both add unique flavors. - Fresh vs canned: Fresh ingredients are great, but canned beans and corn save time. Just rinse and drain. - Lime juice substitutes: If you don’t have lime juice, lemon juice works well. It adds a similar tangy flavor. - Caloric content: This salad is around 200 calories per serving, making it a healthy choice. - Macronutrient breakdown: Each serving has about 9g of protein, 8g of fat, and 30g of carbs. - Health benefits of key ingredients: Black beans are high in fiber, which helps digestion. Avocado provides healthy fats. Bell peppers are full of vitamins A and C. This salad is not just tasty; it’s also good for you. The mix of colorful ingredients makes it a feast for both the eyes and the stomach. For a full step-by-step guide, check out the Full Recipe. 1. Start by rinsing and draining the black beans. This helps remove extra salt and makes them taste fresh. 2. Next, drain the sweet corn. This adds a nice sweetness to the salad. 3. Now, chop the red and green bell peppers into small cubes. They add crunch and color. 4. Finely chop the red onion. This gives a nice sharp flavor. 5. Halve the cherry tomatoes. Their juiciness brightens up the dish. 6. Finally, dice the avocado into bite-sized pieces. This brings creaminess to the salad. 1. In a large bowl, combine the black beans and sweet corn. This will be the hearty base for your salad. 2. Add the diced red and green bell peppers, chopped onion, and halved cherry tomatoes. Stir gently to mix. 3. Carefully fold in the diced avocado and chopped cilantro. Be gentle to keep the avocado intact. 4. In a small bowl, whisk together the lime juice, olive oil, cumin, chili powder, salt, and pepper. This dressing packs a lot of flavor. 5. Drizzle the dressing over the salad mixture and toss gently. Make sure everything gets coated. 1. Taste your salad. Adjust the seasoning if needed. Add more salt, pepper, or lime juice to your liking. 2. For the best flavor, chill the salad in the fridge for at least 30 minutes. This lets the flavors blend well. For the full recipe, check out the details above. Enjoy this fresh and vibrant Southwest Black Bean Salad! To boost the flavor, marinate the salad for at least 30 minutes. This helps the taste blend well. You can add more spices like smoked paprika or cayenne pepper for extra heat. These spices bring a smoky profile that pairs nicely with the beans. To keep avocado from becoming mushy, add it last. Fold it in gently. Use fresh veggies like bell peppers, corn, and onions for a nice crunch. Toasted nuts or seeds can also add a delightful texture contrast. Pair the salad with grilled chicken or fish for a complete meal. You can also serve it in taco shells for a fun twist. Try using it as a topping for nachos or a filling for burritos. Serve it chilled for a refreshing dish on hot days. For the full recipe, check out [Full Recipe]. {{image_4}} You can make this Southwest Black Bean Salad your own. One easy way is to swap beans. Use pinto, kidney, or chickpeas. Each option adds a unique taste. You can also add proteins. If you want chicken, grill or sauté it first. For a plant-based option, try cubed tofu. Both add heartiness to your salad. The dressing is key to flavor. You can spice it up by adding jalapeños or hot sauce. This gives a nice kick to the dish. For a creamy twist, mix in some Greek yogurt or sour cream. This adds richness and balances the other flavors. Change your salad with the seasons. In winter, add roasted sweet potatoes or butternut squash. These ingredients provide warmth and comfort. In summer, go for fresh herbs like basil or mint. You can also toss in seasonal fruits like mango or peaches for a refreshing twist. For the full recipe, check out the Southwest Black Bean Fiesta Salad. Store your Southwest Black Bean Salad in an airtight container. This keeps it fresh longer. Use glass or BPA-free plastic containers for best results. In the fridge, it lasts about 3 to 5 days. Yes, you can freeze the salad, but it may change texture. If freezing, use a freezer-safe container. To thaw, place it in the fridge overnight. This helps keep the salad from becoming mushy. To re-serve, take the salad out of the fridge. Give it a gentle stir and check the flavors. If it needs a boost, add more lime juice or salt. This will revive its bright taste. Enjoy the salad fresh for the best experience. For the full recipe, check out the detailed instructions and enjoy every bite! Can I omit certain ingredients? Yes, you can. This salad is very flexible. If you dislike an ingredient, simply leave it out. For example, skip the red onion if you prefer less bite. You can also add other veggies like cucumbers or jalapeños for a twist. What if I don't have lime juice? If you lack lime juice, use lemon juice instead. It gives a similar tang. You can also try vinegar, like apple cider vinegar. Just remember to use a smaller amount, as vinegar can be stronger. How to make it vegan? This salad is already vegan! All ingredients are plant-based. You can enjoy it without worrying about animal products. It’s packed with flavors and nutrients. How long does it take to prepare? The prep time is about 15 minutes. If you chill it, total time is 45 minutes. This allows the flavors to blend nicely. You’ll have a tasty salad ready in no time. Is it gluten-free? Yes, this salad is gluten-free. It uses beans and veggies, which do not contain gluten. It’s a great choice for those with gluten sensitivities. What are the health benefits of black beans? Black beans are very nutritious. They are high in protein and fiber. This helps keep you full. They also contain antioxidants and support heart health. Eating black beans can help stabilize blood sugar too. This blog post showed you how to make a delicious salad. We covered key ingredients like black beans and corn, plus how to prepare and mix them. You learned substitutions for ingredients and their nutritional benefits. I shared tips for flavor and texture, along with creative serving ideas. Remember, feel free to experiment with variations. With these steps, you can enjoy tasty meals while staying healthy. Dive in, get creative, and enjoy every bite!](https://dailydishcraft.com/wp-content/uploads/2025/07/06dcc742-1149-4ebf-8501-efe3d5a35465.webp)
Are you ready to spice up your meals with a dish that’s both fresh and flavorful? This Southwest Black Bean

Are you craving a sweet treat but want to keep it simple? Let’s make Baked Cinnamon Sugar Donut Holes! This
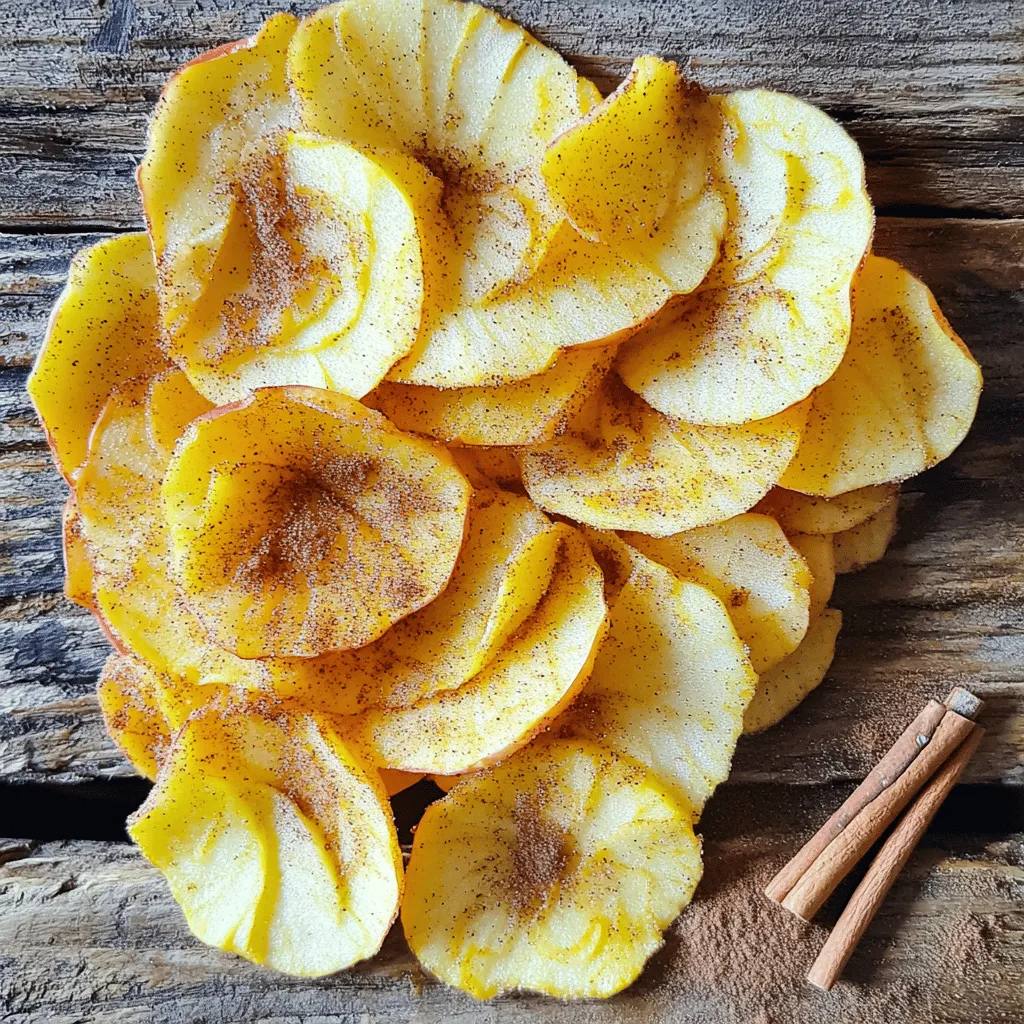
Looking for a fun and healthy snack that’s easy to make? Air fryer apple chips are the perfect solution! With
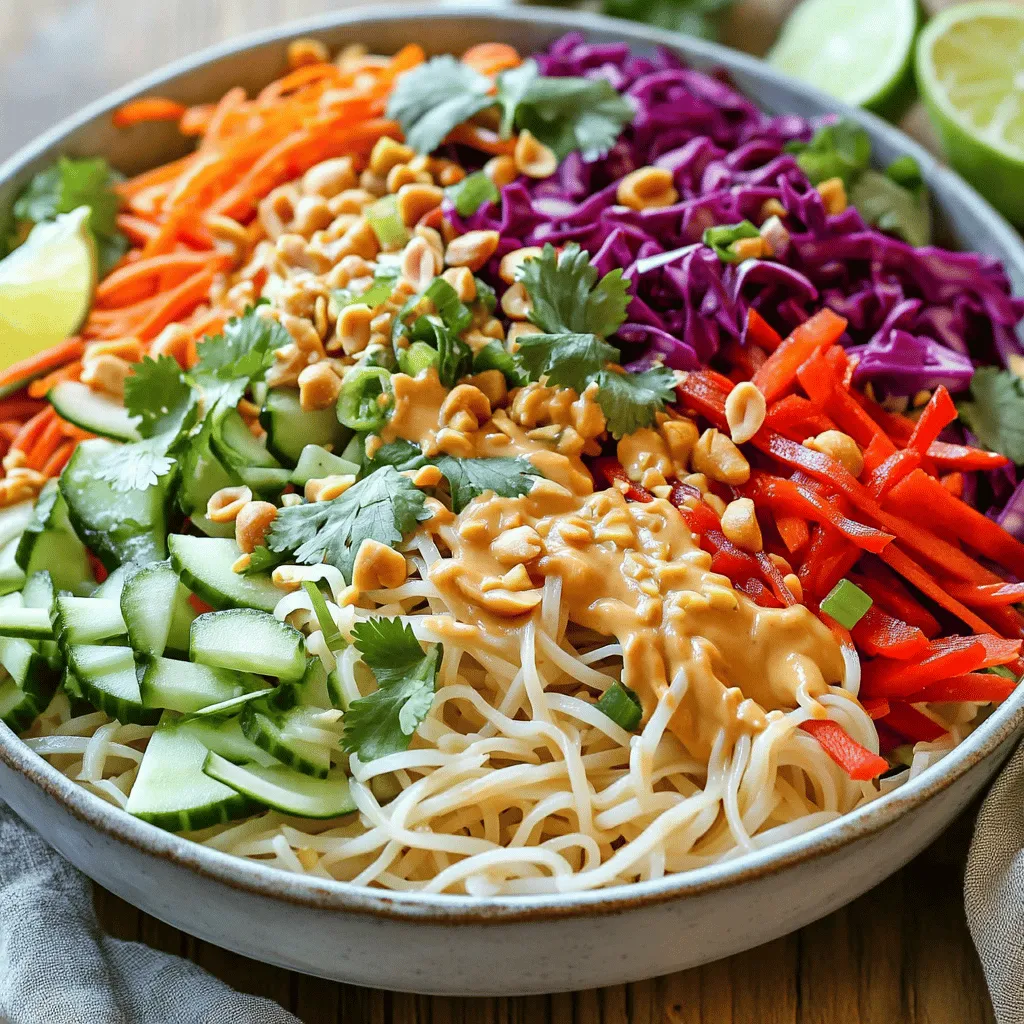
Are you ready to elevate your salad game? This Thai Peanut Noodle Salad packs a punch with fresh veggies, creamy

Craving warm, gooey chocolate chip cookies but don’t need a dozen? I’ve got you covered! This irresistible small batch chocolate

Craving something sweet and easy? These One Bowl Brownie Cookies are the perfect treat! In just a few simple steps,
