Skip to content
DisclaimerTerms Of UseGDPR PolicyCookie Policy

dailydishcraft

  • Home
  • Drinks
  • Appetizers
  • Dinner
  • Dessert
  • About
  • Contact
  • Privacy Policy
DisclaimerTerms Of UseGDPR PolicyCookie Policy

Jessica

- 4 bone-in, skin-on chicken thighs - 1 pound baby potatoes, halved - 1 large red onion, cut into wedges - 3 cloves garlic, minced - 1 cup cherry tomatoes, halved - 1 lemon, zested and juiced The chicken thighs add deep flavor and juiciness. Baby potatoes bring creaminess, while red onion adds sweetness. Garlic and cherry tomatoes give freshness. The lemon brightens everything with its zest and juice. - 3 tablespoons olive oil - 2 teaspoons dried oregano - 1 teaspoon dried thyme - Salt and pepper to taste - Fresh parsley, chopped for garnish Olive oil is key to a rich marinade. Oregano and thyme bring classic Greek flavors that make the dish special. Salt and pepper boost all the tastes. Fresh parsley adds a pop of color and freshness at the end. These ingredients work together to create a flavorful and satisfying meal. You will love how easy it is to prepare this dish in just one pan. {{ingredient_image_2}} - Preheat your oven to 400°F (200°C). This step is key for even cooking. - In a large bowl, mix olive oil, lemon juice, lemon zest, minced garlic, dried oregano, thyme, salt, and pepper. Whisk until smooth. This marinade will add a bright taste. - Take the chicken thighs and coat them well in the marinade. Let them sit for at least 15 minutes. If you have more time, go for an hour for more flavor. - On a large baking sheet, spread halved baby potatoes and onion wedges in a single layer. Drizzle with olive oil, then sprinkle with salt and pepper. Toss to mix. This ensures every bite is tasty. - Place the marinated chicken thighs on top of the potatoes and onions. Make sure they fit snugly. - Scatter halved cherry tomatoes around the chicken and potatoes. This adds a fresh burst of flavor and color. - Bake the dish for about 40-45 minutes. The chicken should hit 165°F (75°C) and the potatoes need to be fork-tender. - For crispy skin, turn on the broiler for 3-5 minutes. Watch it closely to prevent burning. - Once done, let the dish rest for 5 minutes. Before serving, sprinkle with fresh parsley for a pop of color and flavor. To get crispy chicken skin, start with bone-in, skin-on thighs. Pat the skin dry with paper towels. This helps the skin crisp up nicely. When you marinate, don't skip the lemon juice and zest. The acid helps tenderize the meat while adding flavor. For marinating time, aim for at least 15 minutes. If you have more time, go for 30 to 60 minutes. This gives the chicken a chance to soak up all the tasty flavors. The longer it sits, the better it gets. For serving, use a large platter. Arrange the chicken and veggies in a way that looks nice. Drizzle any leftover juices over the top for added flavor. A few lemon wedges on the side can brighten the dish. When it comes to sides, think about a fresh salad or warm pita bread. A light white wine or sparkling water pairs well with this meal. Both enhance the flavors without overpowering them. Pro Tips Marinate Longer for More Flavor: If you have the time, marinate the chicken thighs for up to an hour. This allows the flavors to penetrate deeper, resulting in a juicier and more flavorful dish. Use Fresh Herbs: While dried herbs work well, using fresh oregano and thyme can elevate the dish's flavor profile, adding brightness and freshness to the overall taste. Check for Doneness: Always use a meat thermometer to ensure the chicken reaches an internal temperature of 165°F (75°C). This guarantees that the chicken is safely cooked while remaining juicy. Experiment with Vegetables: Feel free to add other vegetables like bell peppers or zucchini to the mix. They will roast beautifully and add additional flavors and textures to your one-pan meal. {{image_4}} You can switch up the chicken type to fit your taste. Skinless or boneless chicken thighs work well. They still taste great when cooked with the same flavors. You can also use chicken breasts if you prefer leaner meat. For veggies, think about using zucchini or bell peppers. They add color and taste. Zucchini cooks fast and stays tender. Bell peppers give a nice crunch and sweetness. Feel free to mix and match your favorite vegetables. To amp up the taste, consider adding spices like paprika or cumin. Paprika adds a sweet, smoky flavor. Cumin gives a warm, earthy taste that pairs well with chicken. Just sprinkle a little on the chicken before cooking. You can also use different herbs for a fresh twist. Basil and rosemary are great options. Basil adds a sweet touch, while rosemary has a strong, pine-like flavor. Try using fresh herbs for a brighter taste. Just chop them up and sprinkle them over your dish before serving. To store leftovers, you should first let the dish cool. Place the chicken and potatoes in an airtight container. This keeps the food fresh and prevents odors. Store the container in the refrigerator. It will stay good for up to four days. For freezing, use a freezer-safe container. Make sure to leave some space at the top. The dish can last in the freezer for up to three months. To prevent freezer burn, wrap it in plastic wrap before sealing. When you’re ready to eat, you can reheat the dish in the oven. Preheat your oven to 350°F (175°C). Place the food in an oven-safe dish, cover it with foil, and heat it for about 20 minutes. You can also use the microwave. Place a portion on a plate and cover it with a damp paper towel. Heat for 2-3 minutes, checking every minute. To retain flavor and texture, add a splash of olive oil before reheating. This keeps everything moist and tasty. Enjoy your delicious Greek chicken and potatoes just like the first time! How do I know when the chicken is done? You can check the chicken's doneness by using a meat thermometer. The chicken should reach an internal temperature of 165°F (75°C). You can test it by inserting the thermometer into the thickest part of the thigh. The juices should run clear, not pink. If you don’t have a thermometer, the skin should be golden brown and the meat should feel firm. Can I make this dish in advance? Yes, you can prepare this dish ahead of time. Marinate the chicken and store it in the fridge for up to a day. You can also pre-cut the vegetables. Just assemble and bake when you are ready to eat. This saves time and allows the flavors to meld nicely. Can I grill the chicken instead of baking? You can definitely grill the chicken! Marinate it as usual. Then, heat your grill to medium-high. Cook the chicken for about 7-10 minutes on each side. Make sure to watch for flare-ups. This method adds a nice smoky flavor. What can I serve with One Pan Greek Chicken and Potatoes? This dish pairs well with a fresh Greek salad. You could also serve it with crusty bread or a side of tzatziki. Rice or quinoa are great options too, as they soak up the delicious juices. Feel free to mix and match based on what you enjoy! This article covers a simple recipe for One Pan Greek Chicken and Potatoes. You learned about key ingredients, easy steps, and helpful tips. Marinating gives the chicken great flavor, while baby potatoes and red onions add texture. You can even switch out ingredients to suit your taste. Remember to store leftovers properly and reheat them to keep their flavor. I hope you feel inspired to try this dish. It’s flavorful, easy, and perfect for any day. Enjoy your cooking adventure!

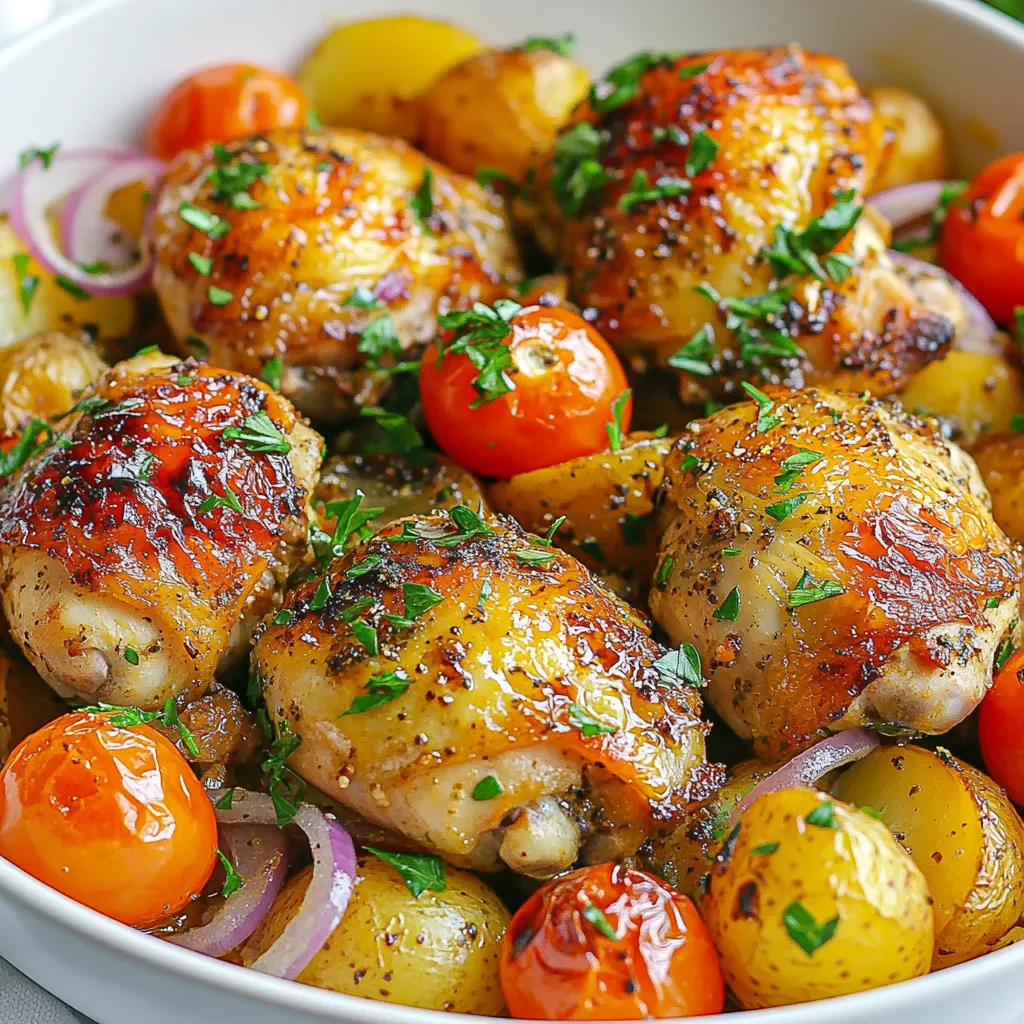
One Pan Greek Chicken and Potatoes Flavorful Meal

Are you ready to serve a delicious meal with minimal cleanup? This One Pan Greek Chicken and Potatoes recipe is

- 4 medium zucchini, sliced into thin rounds - 1 lb ground turkey or chicken - 1 cup pizza sauce - 1 cup shredded mozzarella cheese - 1/2 cup sliced black olives - 1/2 cup diced bell peppers - 1/2 cup finely chopped onion - 2 cloves garlic, minced - 1 teaspoon dried oregano - 1 teaspoon dried basil - 1/2 teaspoon red pepper flakes - Salt and pepper to taste - 1/2 cup grated Parmesan cheese Zucchini is the star of this dish. I love how its mild taste absorbs flavors well. You can choose any color of bell pepper. Each adds a pop of color. Ground turkey or chicken keeps this dish light. You can swap it for your favorite protein too. Pizza sauce is key for that familiar taste. You can use store-bought or make your own. I recommend using fresh garlic and onion. They add depth and warmth. The black olives provide a briny bite. Don't skip the seasoning! Oregano and basil bring that Italian flair. Red pepper flakes add a nice kick. Lastly, the cheese! Mozzarella gives that gooey texture. Parmesan adds a rich finish. Together, these ingredients create a fun and easy meal. {{ingredient_image_2}} Set your oven to 375°F (190°C). Preheating ensures that your casserole cooks evenly. If you skip this step, your dish may not cook well. In a skillet, heat one tablespoon of olive oil over medium heat. Add finely chopped onion and minced garlic. Cook for 3 to 4 minutes until the onions are soft and clear. This step fills your kitchen with a tasty smell. Add ground turkey or chicken to the skillet. Use a spatula to break it up as it cooks. Cook for about 5 to 7 minutes until the meat is browned and not pink. Season it with salt, pepper, oregano, basil, and optional red pepper flakes. Stir to mix all the flavors. In a large bowl, mix the sliced zucchini rounds with a little salt. Let them sit for 10 minutes. This helps pull out extra water, making your dish less soggy. After 10 minutes, pat the zucchini slices dry with a paper towel. Grab a rectangular casserole dish to build your layers. Start by spreading half the pizza sauce on the bottom. Add half of the cooked meat next. Layer half of the zucchini slices on top, followed by half of the black olives, bell peppers, and one-third of the mozzarella cheese. Repeat this layering, ending with the last bit of pizza sauce and mozzarella. Cover the dish tightly with aluminum foil. Bake it in the preheated oven for 25 minutes. After that, take off the foil and bake for another 15 to 20 minutes. You want the cheese to be bubbly and golden. Once done, cool the casserole for about 5 minutes to make slicing easier. To ensure even cooking, always preheat your oven. This helps everything cook uniformly. When layering the casserole, start with a thin layer of sauce. This layer keeps the bottom moist. Sauté the ground meat until brown. This gives a nice flavor base. Avoid soggy zucchini by salting your slices. Let them sit for ten minutes to draw out moisture. After that, pat them dry with a paper towel. This step is key to a great texture. For presentation, cut the casserole into squares. Arrange them on plates and add a garnish. Fresh basil leaves add a pop of color. Drizzle extra pizza sauce around the plate for flair. This enhances the meal's look and flavor. Pair the casserole with a simple side salad. A mix of greens and a light vinaigrette works well. Garlic bread also makes a great side, adding crunch and flavor. If you want an alternative for ground meat, try lentils or mushrooms. Both options add great flavor and texture. You can also use tofu for a vegetarian twist. For a low-carb option, stick to zucchini as your base. You can use cauliflower rice instead of grains. This keeps your meal light and healthy while still being tasty. Pro Tips Use Fresh Zucchini: Select firm, fresh zucchini for the best texture and flavor. Look for ones that are medium-sized and have smooth skin. Customize Your Toppings: Feel free to get creative with toppings! Add your favorite veggies or meats to personalize the casserole to your taste. Let It Rest: Allow the casserole to cool for a few minutes before slicing. This helps the layers set, making it easier to serve. Make It Ahead: This casserole can be assembled a day in advance and stored in the fridge. Just bake it when you’re ready to enjoy! {{image_4}} You can swap meat for plant-based options. Try using lentils, mushrooms, or tempeh. These choices add texture and flavor. You can also mix in extra veggies. Spinach, zucchini flowers, or artichokes work great. This adds color and nutrition. For those who love heat, add more spice! Red pepper flakes are a solid choice. Try jalapeños for a fresh kick. You might also enjoy adding hot sauce in your layers. These spices will transform your dish into a fiery delight. Cheese can change the whole taste! Instead of mozzarella, consider using provolone or gouda. These cheeses offer a smoky flavor. You can also mix in feta for a tangy twist. Each cheese adds its own unique touch. Feel free to experiment with your favorites! To store leftover zucchini pizza casserole, let it cool first. Place it in an airtight container. It stays fresh in the fridge for up to 4 days. If you want the best taste, eat it sooner. For long-term storage, freeze the casserole. Cut it into portions before freezing. Wrap each piece in plastic wrap and foil to prevent freezer burn. It lasts up to 3 months in the freezer. When ready to eat, thaw it overnight in the fridge. You can also thaw it in the microwave if you’re in a hurry. To keep the texture nice, reheating in the oven works best. Preheat the oven to 350°F (175°C) and place the casserole in a baking dish. Cover it with foil to avoid drying out. Warm it for about 20 minutes. If you use the microwave, heat it in short bursts. Check it often to keep it from getting too hot. This way, it stays soft and tasty. To make this dish gluten-free, you can switch the pizza sauce. Look for a brand that is clearly labeled as gluten-free. You can also make your own sauce with crushed tomatoes, herbs, and spices. Use gluten-free breadcrumbs if you want to add a crispy topping. Always check the labels on your ingredients to ensure they are safe for gluten-free diets. Yes, you can prepare this casserole ahead of time. You can layer all the ingredients in the dish and cover it with foil. Store it in the fridge for up to 24 hours before baking. If you plan to freeze it, make sure to use a freezer-safe dish. Just thaw it overnight in the fridge before baking. This casserole pairs well with many side dishes. A fresh green salad with a simple vinaigrette adds a nice touch. Garlic bread or toasted baguette slices also work well. For a heartier meal, serve it with steamed vegetables like broccoli or green beans. You can also add a side of marinara sauce for dipping. In this post, we've explored how to create a delicious zucchini pizza casserole. You learned about key ingredients like zucchini, turkey, and mozzarella. We detailed step-by-step instructions, along with tips and variations. Don’t forget about storage methods for leftovers and reheating options. This dish is flexible, making it perfect for any diet. With these ideas, you can enjoy a tasty meal that’s both healthy and satisfying. Dive in and make it your own!

Zucchini Pizza Casserole Tasty and Simple Dinner Idea

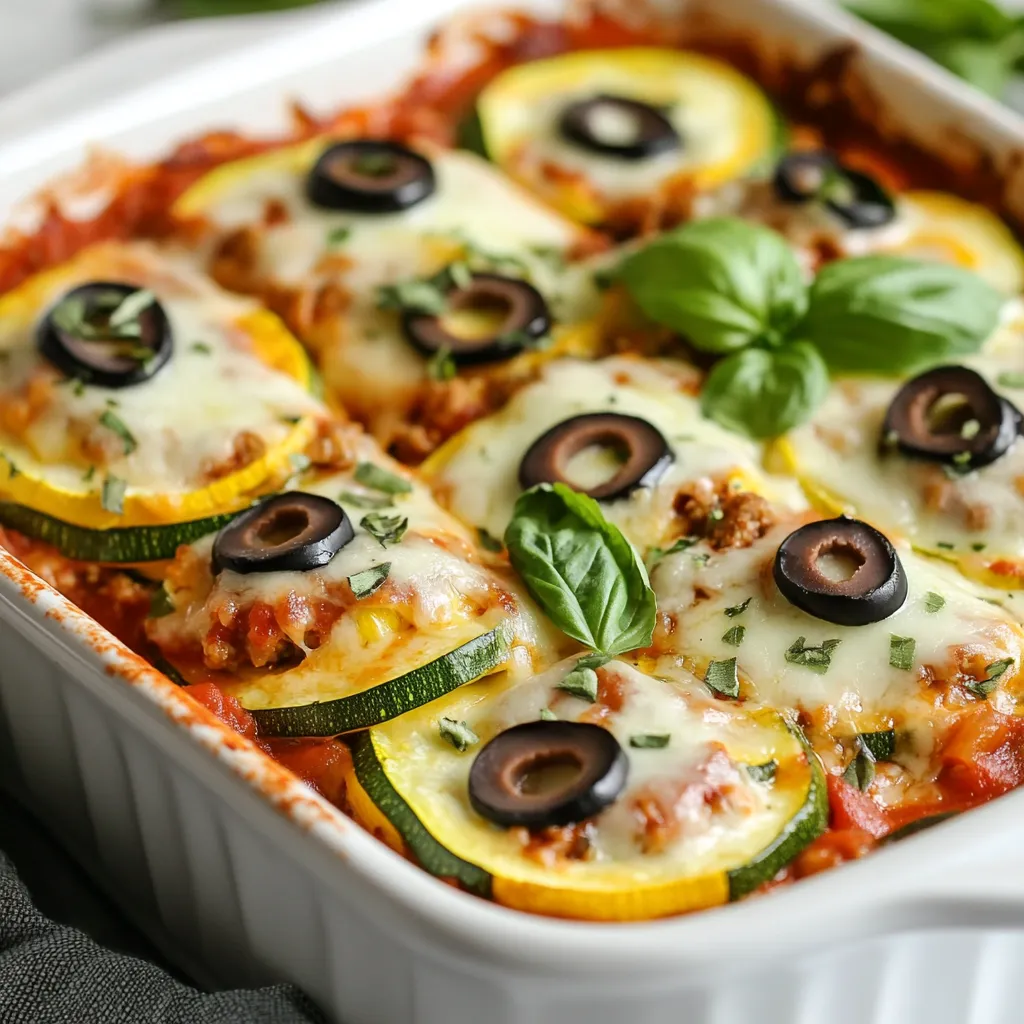
Are you looking for a fun and simple dinner idea? Zucchini Pizza Casserole is your answer! This delightful dish combines

To make Chicken One-Pot Spaghetti, gather these ingredients: - 2 tablespoons extra virgin olive oil - 1 pound boneless, skinless chicken breasts, cut into bite-sized pieces - 1 medium onion, finely chopped - 4 cloves garlic, minced - 1 bell pepper (choose red or yellow for sweetness), diced - 1 medium zucchini, chopped into half-moons - 1 teaspoon dried Italian seasoning - 1/2 teaspoon red pepper flakes (modify to your heat preference) - 1 can (14.5 ounces) diced tomatoes, including their juice - 4 cups low-sodium chicken broth - 8 ounces spaghetti, broken in half for easier mixing - Salt and freshly ground black pepper to taste - Fresh basil leaves, for garnish - Grated Parmesan cheese, for serving When choosing fresh ingredients, look for these tips: - Chicken: Pick firm, pink chicken with no off smells. - Vegetables: Choose bright bell peppers and zucchini with smooth skin. - Onion and garlic: Select heavy onions and garlic with no soft spots. - Tomatoes: Use cans with no dents or bulges for best quality. - Basil: Find fresh basil with vibrant green leaves, free from brown spots. Here are some kitchen tools that will help you make this dish: - Large deep skillet or pot: Essential for cooking everything in one place. - Sharp knife: For cutting chicken and vegetables easily. - Cutting board: A safe surface for chopping. - Measuring spoons: To ensure you add the right amounts of spices. - Wooden spoon: Perfect for stirring the ingredients without scratching your pot. - Ladle: Useful for serving the pasta once it's ready. With these ingredients and tools, you are all set to create a delicious Chicken One-Pot Spaghetti! {{ingredient_image_2}} 1. Heat the oil: Start by heating the extra virgin olive oil in a large pot over medium heat. Make sure it’s hot, but not smoking. 2. Cook the chicken: Add the bite-sized chicken pieces. Season them with salt and black pepper. Cook for about 5-7 minutes until they are browned and cooked through. Once done, take the chicken out and set it aside. 3. Sauté the onions: In the same pot, add the chopped onions. Cook for about 3-4 minutes until they are soft and clear. 4. Add the veggies: Next, mix in the minced garlic, diced bell pepper, and chopped zucchini. Cook for another 3-4 minutes. This helps to soften the veggies. 5. Season the mix: Sprinkle in the dried Italian seasoning and red pepper flakes. Stir well to coat the veggies with the spices. 6. Pour in the liquids: Add the can of diced tomatoes and chicken broth. Stir well and bring it to a gentle boil. This is where the flavors start to combine. 7. Add the pasta: When the mix boils, add the broken spaghetti. Push it down into the liquid. Stir it occasionally to keep the pasta from sticking. 8. Simmer: Lower the heat to medium-low. Let it simmer for about 10-12 minutes. The spaghetti should be al dente, and most of the liquid should be absorbed. 9. Return the chicken: Add the cooked chicken back into the pot. Stir everything together. Taste and adjust with salt and pepper if needed. 10. Final touches: Remove the pot from heat. Let it sit for a few moments. This helps the dish thicken up before serving. - Prep first: Chop all your veggies and chicken before you start cooking. This saves time later. - Use a timer: Set a timer for each cooking step. This helps keep you on track. - Clean as you go: Wash pots and cutting boards while waiting. This keeps your workspace tidy. - Avoid overcooking: Cooking chicken for too long can make it dry. Keep an eye on the time. - Pasta timing: Cooking the spaghetti just right ensures it’s not mushy. Aim for al dente for the best bite. - Letting it sit: Allowing the dish to sit after cooking helps it thicken and lets flavors develop. When making Chicken One-Pot Spaghetti, avoid overcrowding the pot. This can make the chicken steam instead of brown. Brown the chicken in batches if needed. Another mistake is not seasoning each layer. Always add salt and pepper when you cook the chicken, vegetables, and broth. This gives the dish depth. To boost flavor, adjust the Italian seasoning. If you enjoy a stronger taste, add more than one teaspoon. Consider using fresh herbs like basil or oregano instead of dried. They can bring a bright flavor to your dish. You can also add a splash of lemon juice before serving. This will brighten up the entire meal. Start with a hot pot. This helps to sear the chicken and lock in juices. Stir often to prevent sticking. This is key when you add spaghetti. Keep an eye on the cooking time for the pasta. Overcooked spaghetti can ruin the dish. Finally, let the pot sit for a few minutes after cooking. This allows flavors to meld and the sauce to thicken. Pro Tips Choose the Right Pasta: Use whole grain or gluten-free spaghetti for a healthier twist that caters to dietary preferences. Vegetable Variations: Feel free to add or substitute other vegetables like spinach, mushrooms, or carrots for extra nutrition and flavor. Flavor Boost: Incorporate a splash of white wine when sautéing the vegetables to add depth to the dish. Leftover Magic: This dish stores well in the fridge, making it perfect for meal prep. Just reheat with a splash of broth to restore moisture. {{image_4}} You can easily swap some ingredients to fit your taste or what you have on hand. Here are a few ideas: - Chicken: Use turkey or shrimp instead of chicken. Both offer great flavor. - Pasta: Swap spaghetti for penne or fusilli. These shapes hold sauce well. - Broth: Vegetable broth works well if you want a lighter taste. - Tomatoes: Use fresh tomatoes or crushed tomatoes for a different texture. These changes keep the dish fun and fresh! To make this dish vegetarian or vegan, follow these steps: - Chicken Replacement: Use chickpeas or tofu. They both add protein and texture. - Broth: Use vegetable broth for a lighter base. - Cheese: Skip the Parmesan or use a vegan cheese alternative. - Zucchini: Try adding more veggies, like spinach or mushrooms, for depth. These swaps ensure you still enjoy a hearty meal without meat. For those who love heat, here are some spicy twists: - Red Pepper Flakes: Increase the amount for extra spice. Start with one teaspoon. - Chili Powder: Add a teaspoon for a smokier flavor. - Jalapeños: Mix in diced jalapeños for a fresh kick. - Hot Sauce: Drizzle your favorite hot sauce over the finished dish for heat. These options will bring your one-pot spaghetti to the next level! Store any leftover Chicken One-Pot Spaghetti in an airtight container. Make sure to let it cool down first. Place the container in the fridge. It will stay fresh for up to three days. For best taste, eat it within two days. To reheat, use a skillet on low heat. Add a splash of chicken broth or water to keep it moist. Stir often until hot. You can also microwave it. Use a microwave-safe dish and cover it to prevent drying. Heat for one minute, then stir, and heat for another minute if needed. You can freeze Chicken One-Pot Spaghetti, but it's best to separate the chicken from the pasta. Store them in separate containers. This way, the pasta won’t get mushy. When ready to eat, let it thaw in the fridge overnight. Reheat on the stove or microwave, adding a little liquid if needed. Enjoy your meal later without much fuss! The best pasta for one-pot recipes is spaghetti. It cooks well in one pot and absorbs flavor. You can also use fusilli or penne if you prefer. These shapes hold sauce nicely. Just remember to adjust the cooking time based on the pasta type. Always check the package for specific timing. Yes, you can use frozen chicken. Just make sure to thaw it first for even cooking. You can do this in the fridge overnight or use the microwave. If you add frozen chicken directly, increase the cooking time. Ensure the chicken reaches 165°F for safety. To make your dish creamier, add heavy cream or cream cheese. Stir it in after cooking the pasta. You can also use a bit of milk for a lighter option. Adding cheese, like mozzarella or ricotta, enhances creaminess too. Mix it well and enjoy that rich texture! In this article, we explored how to make Chicken One-Pot Spaghetti using fresh ingredients. I shared tips on selecting the best ingredients, essential kitchen tools, and step-by-step cooking instructions. You learned about avoiding common mistakes and enhancing flavors. I also provided variations for different diets and useful storage tips. In conclusion, this meal is easy, tasty, and versatile. Try it out and enjoy a comforting dish your whole family will love.

Chicken One-Pot Spaghetti Easy and Tasty Dinner Dish

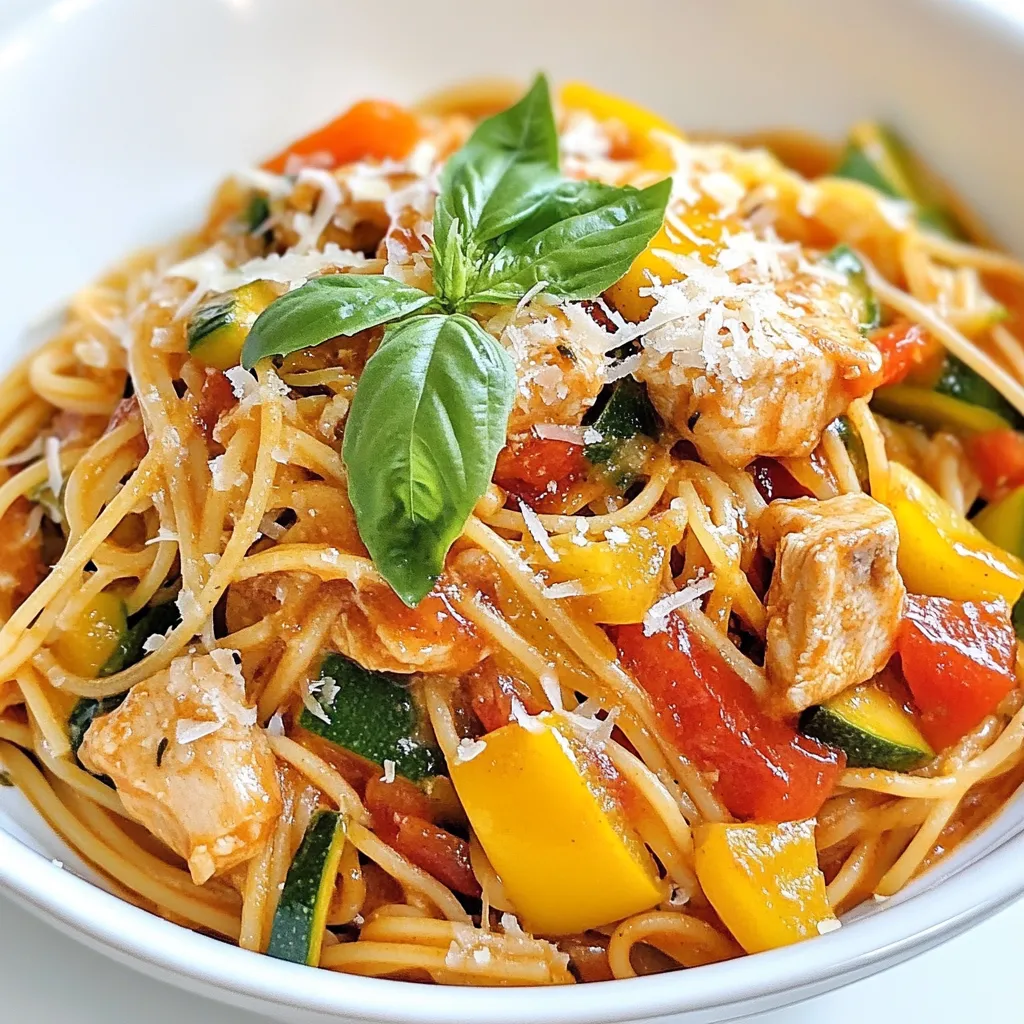
Looking for a quick and tasty dinner? Try my Chicken One-Pot Spaghetti! This easy dish combines savory chicken, flavorful sauce,

- 2 lbs beef chuck roast - 2 dried guajillo chiles, seeds removed - 2 dried ancho chiles, seeds removed - 1 teaspoon ground cumin - 1 teaspoon dried oregano - 1 teaspoon smoked paprika - 4 cloves garlic, finely minced - 1 medium onion, chopped - 4 cups beef broth - 2 tablespoons apple cider vinegar - Salt and freshly ground pepper to taste - Corn tortillas, for serving - Fresh cilantro, chopped (for garnish) - Lime wedges, for serving Gather these ingredients before you start. The beef chuck roast brings a rich taste. The dried guajillo and ancho chiles add a deep flavor. The spices like cumin, oregano, and smoked paprika make it special. Don't forget fresh garlic and onion for a nice base. The beef broth keeps everything moist. Apple cider vinegar gives a nice tang. You can use corn tortillas to hold all this goodness. Top it with fresh cilantro and a squeeze of lime for a fresh kick! The balance of savory and tangy in your tacos will amaze everyone. {{ingredient_image_2}} To start, you need to toast the chiles. Take 2 dried guajillo and 2 dried ancho chiles. Place them in a dry skillet over medium heat. Toast them for about 1-2 minutes. You want them fragrant but not burnt. After toasting, move the chiles to a bowl. Cover them with hot water and let them soak for 15 minutes. This softens them for blending. Now it’s time to make the marinade. In a blender, add the soaked chiles, 4 cloves of minced garlic, 1 teaspoon of ground cumin, 1 teaspoon of dried oregano, and 1 teaspoon of smoked paprika. Pour in 2 tablespoons of apple cider vinegar. Blend until smooth. If it's too thick, add a splash of beef broth. This paste will pack a big flavor punch for the meat. Next, prepare your beef. Use 2 lbs of beef chuck roast. Season it well with salt and pepper. Heat a skillet over medium-high heat. Sear the beef for 3-4 minutes on each side until it’s brown. This step adds depth to the flavor. Layer chopped onion at the bottom of your crockpot. Place the seared beef on top. Spoon the marinade over the beef, and pour the remaining beef broth around it. Cover the crockpot and set it to cook. You can choose low for 8 hours or high for 4 hours. The beef should be fork-tender when done. Once cooked, carefully remove the beef. Place it on a cutting board and use two forks to shred it. Return the shredded beef to the crockpot and mix it with the sauce. To assemble your tacos, warm corn tortillas. You can heat them in a skillet or over an open flame until they are soft. Fill each tortilla with the shredded beef. For a fresh touch, top with chopped cilantro. When serving, plate the tacos with lime wedges. Squeeze some lime juice over the tacos for brightness. You can also serve a small bowl of the cooking liquid for dipping. This adds extra flavor and moisture to each bite. Enjoy your delicious birria tacos! Searing the beef adds depth to the flavor. The heat creates a nice crust. This crust locks in juices and gives a rich taste. I recommend searing for about 3-4 minutes per side. Even if it feels like an extra step, it is worth it. It makes the dish more flavorful and satisfying. You can control the heat by choosing your chiles wisely. Guajillo chiles are mild, while ancho chiles add sweetness. If you want more spice, try adding chipotle chiles. Always taste your marinade before using it. This way, you can adjust the heat to your liking. A little lime juice can also help balance the spice. Corn tortillas are traditional, but you have many choices. Flour tortillas are larger and softer, great for holding the filling. If you prefer gluten-free options, look for corn or almond flour tortillas. You can even use lettuce wraps for a low-carb alternative. Each type brings its own unique taste and texture to your tacos. Pro Tips Choosing the Right Cut: For the best flavor and tenderness, opt for beef chuck roast. It breaks down beautifully during the slow cooking process. Enhancing the Sauce: Feel free to add a bit of chipotle in adobo sauce to the marinade for an extra layer of smokiness and heat. Resting Time: Allow the shredded beef to rest in the sauce for at least 15 minutes before serving to absorb more flavors. Tortilla Tip: For the best texture, lightly fry the corn tortillas in a bit of oil before filling them, creating a delicious crispy edge. {{image_4}} You can switch up the meat in your tacos. Chicken or pork works great! For chicken, use boneless thighs. They stay juicy and tender. For pork, try shoulder or loin cuts. Both will soak up the rich flavors just like beef. Adjust the cooking time if needed. Chicken cooks faster, while pork may need more time. If you want a plant-based taco, try jackfruit or lentils. Jackfruit gives a meaty texture. Shred it after cooking for a perfect bite. Lentils add protein and soak up flavors well. You can also use mushrooms for a rich, earthy taste. Each option will give you a unique twist on the classic dish. Spice things up with more flavors! Add chipotle for a smoky kick. You can also try adding a few bay leaves or cinnamon sticks while cooking. Fresh herbs like thyme or rosemary will add depth too. Feel free to experiment! Each addition makes the dish more exciting and flavorful. Store leftover Birria in an airtight container. Make sure to let it cool first. This helps keep the meat juicy and tasty. Keep it in the fridge for up to three days. Always check for any off smells before eating. If you notice anything strange, it's best to discard it. You can freeze Birria for later meals. Use freezer-safe bags or containers. Make sure to remove as much air as possible. This prevents freezer burn. Label the bags with the date. Birria can last in the freezer for up to three months. Thaw it in the fridge overnight before reheating. To reheat Birria, use a stovetop or microwave. If using the stovetop, place it in a pan over medium heat. Add a splash of beef broth to keep it moist. Stir often until hot. For the microwave, use a microwave-safe bowl. Heat in short bursts and stir in between. Always check the temperature to ensure it’s hot throughout. This keeps the flavor and texture just right. You can serve Birria tacos with many tasty sides. Here are some favorites: - Tangy pickled onions: Their sharp flavor pairs well with the rich beef. - Fresh salsa: A zesty salsa adds a nice crunch and brightness. - Refried beans: Creamy beans make a great side for extra protein. - Mexican rice: Fluffy rice can help balance the meal. - Guacamole: Creamy guacamole adds richness and flavor. These sides enhance the taco experience and bring extra joy to your meal. You want the beef to be very tender before shredding. Here are signs to look for: - Fork-tender: The beef should easily pull apart with a fork. - Juices run clear: When you cut into it, juices should run clear, not pink. - Texture change: The beef should feel soft and break apart with little effort. If you see these signs, your beef is ready to shred. Trust your senses; they guide you well in cooking. Yes, you can prepare Birria tacos ahead of time. Here are some tips: - Cook the beef: You can cook it a day before and store it in the fridge. - Store properly: Keep the cooked beef in an airtight container. - Reheat gently: When ready to eat, gently reheat the beef in a pot. This way, you save time on busy days while still enjoying great flavors. Absolutely! You can swap chiles for different flavors. Here are some options: - Chipotle chiles: They add a smoky flavor and some heat. - Pasilla chiles: These give a dark, rich flavor without too much spice. - Hatch chiles: For a unique twist, these chiles offer a mild flavor. Feel free to mix and match to find your favorite taste. Experimenting can lead to delightful surprises in your cooking! This article covered how to make delicious Birria tacos from scratch. We explored the essential ingredients, like beef chuck roast and dried chiles, and looked at step-by-step cooking instructions. I shared tips for searing the beef and adjusting spice levels to match your taste. We also discussed variations for different diets and storage tips for leftovers. Embrace your creativity in the kitchen. Try different ingredients and make this dish your own!

Crockpot Birria Tacos Divine Flavor in Every Bite

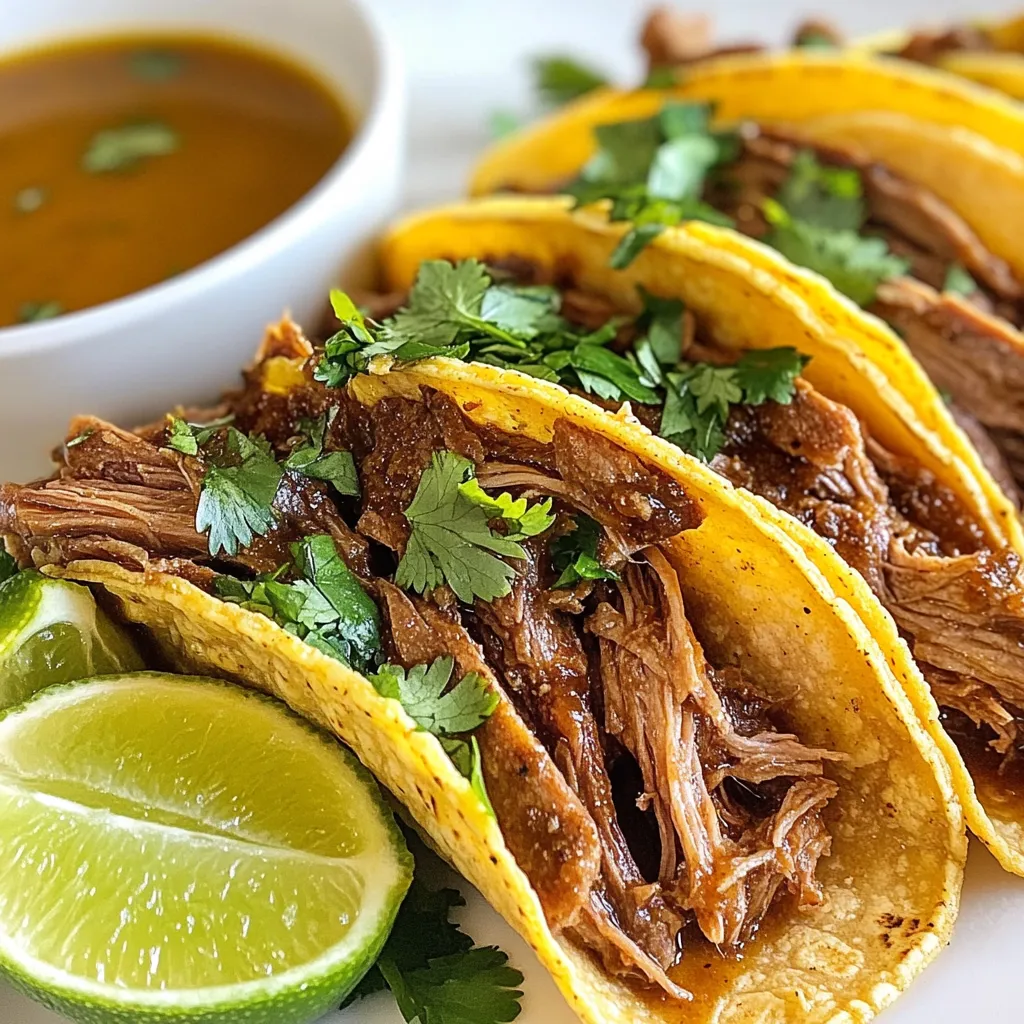
Craving a flavorful treat that’s also easy to make? Let me introduce you to Crockpot Birria Tacos. This dish is

Newer posts
← Previous Page1 … Page90 Page91

dsad

© 2025 dailydishcraft • Built with GeneratePress

Our Policies

  • Copyright Policy
  • Cookie Policy
  • GDPR Policy
  • Privacy Policy
  • Disclaimer
  • Terms Of Use

More Information

  • Home
  • About
  • Contact
  • Appetizers
  • Dessert
  • Dinner
  • Drinks
©2025, dailydishcraft About Back To Top