Skip to content
DisclaimerTerms Of UseGDPR PolicyCookie Policy

dailydishcraft

  • Home
  • Drinks
  • Appetizers
  • Dinner
  • Dessert
  • About
  • Contact
  • Privacy Policy
DisclaimerTerms Of UseGDPR PolicyCookie Policy

Jessica

- 1 lb ground beef - 1/2 lb ground pork (optional) - 1 large onion, finely chopped - 2 cloves garlic, minced - 1/2 cup breadcrumbs - 1/4 cup grated Parmesan cheese - 1 large egg - 1 teaspoon dried thyme - 1 teaspoon salt - 1/2 teaspoon black pepper - Ground pork adds flavor and moisture. If you prefer, use just beef. - Olive oil for cooking helps brown the meatballs. - Fresh parsley for garnish adds color and freshness. These ingredients work together to create a hearty, savory dish. The beef gives a rich flavor, while the onion brings sweetness. The garlic adds depth, and the herbs bring aroma. If you choose to add ground pork, it enhances the meatballs' texture. {{ingredient_image_2}} First, grab a medium skillet and heat 1 tablespoon of olive oil over medium heat. Add 1 large onion, finely chopped. Sauté the onion until it becomes soft and caramelized, which takes about 10 to 12 minutes. Stir in 2 cloves of minced garlic for the last 2 minutes. This adds great flavor. After that, remove the skillet from the heat and let the mixture cool slightly. Next, take a large mixing bowl. Combine 1 pound of ground beef and 1/2 pound of ground pork if you want. You can skip the pork for a beef-only version. Add 1/2 cup of breadcrumbs, 1/4 cup of grated Parmesan cheese, and 1 large egg. Don't forget 1 teaspoon of dried thyme, 1 teaspoon of salt, and 1/2 teaspoon of black pepper. Finally, mix in your cooled onion and garlic mixture. Be gentle when mixing to keep the meatballs tender. Now, it's time to form the meatballs. Preheat your oven to 400°F (200°C). With your hands, shape the meat mixture into 1-inch meatballs. Place them on a baking sheet lined with parchment paper. Make sure they are spaced out evenly. This helps them cook properly. While the meatballs bake, go back to the same skillet you used for the onions. Pour in 1 cup of beef broth and add 1 tablespoon of balsamic vinegar. Bring this to a gentle simmer. Allow it to reduce slightly for about 5 to 7 minutes. This will concentrate the flavors and make the sauce rich. When the meatballs are done baking, carefully transfer them into the skillet with the sauce. Gently coat each meatball in the sauce. Let them simmer together for an additional 5 minutes. This step allows the meatballs to soak in the rich flavor of the sauce. To serve, arrange the meatballs on a platter. Drizzle the savory sauce over them. For a pop of color, garnish with freshly chopped parsley. You can also serve these meatballs with crusty bread or creamy mashed potatoes for a full meal. To make sure your meatballs are tender, avoid overmixing the meat mixture. Mix gently until just combined. Also, adding breadcrumbs helps in keeping them soft. The egg acts as a binder and adds moisture. Using a mix of ground beef and pork can enhance tenderness. If you prefer beef-only, that works too! One common mistake is not cooking the onions enough. Caramelizing onions adds great flavor. If you rush this step, your meatballs might taste flat. Another mistake is baking the meatballs too long. Keep an eye on them to prevent dryness. Also, ensure that the meatballs are evenly spaced on the baking sheet. This helps them cook evenly. To boost flavor, use fresh herbs like parsley for garnish. Fresh herbs brighten the dish. Adding balsamic vinegar to the sauce gives a sweet touch. If you like, add a pinch of crushed red pepper for heat. You can also try different cheeses in the meat mixture. Fontina or Gruyère can add a nice twist. Pro Tips Use Fresh Herbs: Fresh thyme or parsley can elevate the flavor profile of your meatballs. Consider adding them to the meat mixture for a burst of freshness. Chill the Mixture: If you have time, chill the meatball mixture for 30 minutes before forming the meatballs. This helps them hold their shape better while cooking. Don’t Overmix: When combining the ingredients, mix just until combined. Overmixing can lead to tough meatballs, so handle the mixture gently. Garnish Creatively: A sprinkle of freshly chopped chives or a drizzle of balsamic glaze can add visual appeal and an extra layer of flavor to your dish. {{image_4}} You can change the meat in these meatballs. Use ground turkey or chicken for a lighter option. If you love flavor, try lamb for a rich twist. For a beef-only version, simply skip the pork. This makes the dish more budget-friendly. For a vegetarian option, use lentils or quinoa instead of meat. Both add protein and texture. You can also try chickpeas mashed with spices. For a vegan version, replace the egg with a flaxseed mixture. Use vegan cheese or nutritional yeast to keep the cheesy goodness. You can tweak the spices to fit your taste. Add rosemary for a fragrant touch. Smoked paprika brings a nice depth. If you like heat, sprinkle in some red pepper flakes. Fresh herbs like basil or cilantro can brighten the dish. Each choice changes the flavor and makes it unique. After you enjoy your French onion meatballs, let them cool. Place them in an airtight container. Make sure to separate the meatballs from the sauce to keep them fresh. You can store them in the fridge for up to three days. This helps keep the flavors intact and prevents sogginess. When you're ready to eat the leftovers, reheat them gently. You can use a stovetop or microwave. If using the stovetop, place the meatballs and sauce in a pan. Heat over low heat, stirring often until warm. For the microwave, place the meatballs in a bowl. Cover with a damp paper towel and heat in short bursts, checking often. This keeps the meatballs moist and tasty. To freeze your meatballs, arrange them on a baking sheet. Make sure they don’t touch each other. Freeze them for about an hour until solid. Then, transfer them to a freezer-friendly bag. Remove as much air as possible before sealing. They can be frozen for up to three months. When you're ready to eat them, thaw overnight in the fridge before reheating. This keeps them fresh and flavorful. You can serve French onion meatballs with many sides. Here are some favorites: - Crusty bread for dipping in sauce. - Creamy mashed potatoes for a hearty meal. - A simple green salad for freshness. - Pasta for a filling option. These sides balance the rich flavors of the meatballs and sauce. Yes, you can use a slow cooker! To do this: 1. Make the meatballs as directed. 2. Brown them in a skillet first for flavor. 3. Place them in the slow cooker with the sauce. 4. Cook on low for 4-6 hours. This method allows the meatballs to soak up the sauce well. Freezing meatballs is easy. Here’s how: 1. Allow the cooked meatballs to cool completely. 2. Place them on a baking sheet in a single layer. 3. Freeze them for about 1-2 hours. 4. Transfer to a freezer bag or container. 5. Label and date it before sealing. You can store them for up to three months. Yes, making the sauce ahead is a great idea! - Prepare the sauce after cooking the meatballs. - Let it cool, then store it in the fridge. - It stays fresh for 3-4 days. Reheat the sauce when you are ready to serve. This saves time and adds flavor. You now have a complete guide to making French Onion Meatballs. We covered the main ingredients, plus tips for making them tender. I shared step-by-step instructions and variations to suit your taste. Don’t forget the best storage methods to keep leftovers fresh. Experiment with flavors and enjoy your meal. Whether you serve them with pasta or bread, these meatballs will impress!

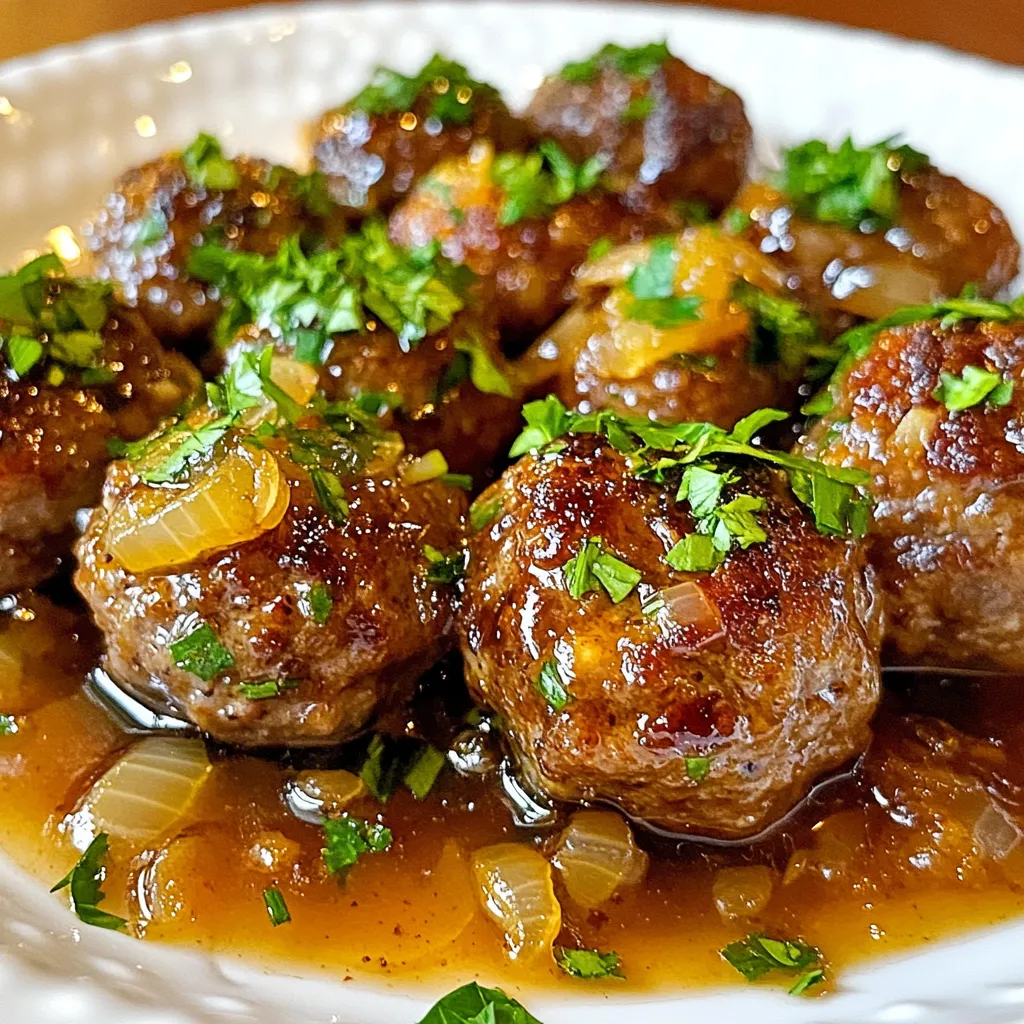
French Onion Meatballs Savory and Hearty Delight

If you’re craving a dish that warms your heart and fills your belly, look no further than French Onion Meatballs!

- 4 cod fillets (approximately 6 oz each) - 4 tablespoons unsalted butter, melted - 4 cloves garlic, finely minced - 1 teaspoon fresh lemon zest - 1 tablespoon fresh parsley, finely chopped - 1 teaspoon smoked paprika (or sweet paprika for a milder flavor) - Salt and freshly cracked black pepper, to taste - Lemon wedges, for serving If you need to swap some ingredients, here are great options: - Use olive oil instead of butter for a lighter option. - Any white fish can replace cod if you prefer. - Dried herbs can work if you lack fresh parsley. For extra flavor, consider these seasonings: - A pinch of cayenne pepper for heat. - Lemon pepper for a zesty twist. - Fresh dill or thyme for a fresh herb taste. These simple swaps can elevate your dish, making it uniquely yours. {{ingredient_image_2}} Start by patting the cod fillets dry with a paper towel. This step is key for getting a nice, crispy outside. If the fillets are wet, they won’t crisp up well. Make sure each fillet is about 6 ounces. This size cooks perfectly in the air fryer. In a small bowl, mix together the melted butter and minced garlic. Add the lemon zest, chopped parsley, smoked paprika, salt, and pepper. Stir until everything is well combined. This mixture will give your cod a rich flavor. Keep some of this mixture aside for later drizzling. Preheat your air fryer to 400°F (200°C) for about 5 minutes. This helps the cod cook evenly. Brush both sides of the fillets with the garlic butter mixture. Then, place the fillets in the air fryer basket. Make sure they are not touching. Cook for 10 to 12 minutes. Check the cod around 8 minutes. It should flake easily with a fork when done. Once the cod is cooked, take it out of the air fryer. Drizzle the reserved garlic butter on top of each fillet. Serve the cod right away with lemon wedges on the side. The lemon adds a bright flavor that pairs well with the fish. For a nice touch, place the fillets on a serving platter. You can sprinkle more chopped parsley on top for color. To make your cod crispy, start by drying each fillet well. Use a paper towel to remove moisture. This step helps the fish crisp up in the air fryer. Next, brush the cod generously with the garlic butter mixture. Ensure even coating on both sides. This adds flavor and promotes that golden crust. Cook the cod at 400°F (200°C) for 10 to 12 minutes. Check the fish at 8 minutes to avoid overcooking. When done, it should flake easily and look opaque. One mistake is overcrowding the air fryer basket. If the fillets are too close, they won’t cook evenly. Always leave space for air to flow around each piece. Another mistake is skipping the drying step. Wet fish will steam instead of crisping up. Lastly, don’t rush the cooking time. Keep an eye on the fish and trust your senses. Use a fork to check for flakiness, which is key to perfect cod. Set your air fryer to preheat before cooking. This helps the fish start cooking right away. Use a light spray of oil if you prefer extra crispiness. Make sure to brush on enough garlic butter for flavor. Don’t forget to save some butter for drizzling after cooking! Always serve the cod hot with fresh lemon wedges. This adds brightness and a zesty kick to each bite. Pro Tips Pat the Fish Dry: Ensuring the cod fillets are dry before seasoning helps achieve a crispy exterior when cooked in the air fryer. Use Fresh Ingredients: Fresh garlic, parsley, and lemon zest will enhance the overall flavor of the dish significantly compared to dried or pre-packaged alternatives. Check for Doneness: Start checking the cod's doneness at the 8-minute mark to ensure it remains moist and doesn't overcook. Extra Garlic Butter: Drizzling additional garlic butter on the cooked cod before serving adds a rich flavor and makes the dish even more indulgent. {{image_4}} You can change the flavor of your cod by using different herbs and spices. Try fresh dill for a bright taste. You can also use thyme or basil for a more aromatic dish. If you love heat, add some crushed red pepper flakes. Experiment with flavors to find what you like best! While cod is delicious, you can use other fish too. Try halibut or tilapia for a similar texture. Salmon works well too, but it has a richer taste. Just keep an eye on the cooking time, as different fish can cook faster or slower than cod. Pair your cod with tasty side dishes to make a complete meal. Steamed veggies like broccoli or green beans add color and nutrients. You can also serve it with a light salad for freshness. For a heartier option, try serving it with quinoa or rice. These sides complement the garlic butter flavor perfectly and make your dish more filling. After enjoying your air fryer cod, let it cool down. Place the cod in an airtight container. Store it in the fridge. It will stay fresh for up to three days. This method keeps the fish moist and tasty. Avoid leaving it out for too long, as it can spoil quickly. To reheat your leftover cod, use the air fryer again. Preheat it to 350°F (175°C). Place the cod in the basket for about 5 to 7 minutes. This method will keep the cod crispy. Check it often to ensure it doesn't overcook. You can also use a microwave if you're in a hurry, but it may not be as crispy. If you want to save cod for later, freezing is a great option. Wrap each fillet tightly in plastic wrap. Then place them in a freezer bag. Remove as much air as possible before sealing. You can freeze the cod for up to three months. When you're ready to enjoy it, thaw it in the fridge overnight before reheating. You should cook cod in an air fryer for about 10 to 12 minutes. Start checking at 8 minutes. The cod is done when it flakes easily with a fork. Cooking time may vary based on your air fryer model and the thickness of the fillets. Always cook until the fish looks opaque throughout. Yes, you can use frozen cod fillets. However, they will need extra cooking time. I recommend adding about 5 to 6 minutes to the cooking time. Remember to check for doneness as you cook. If the fillets are very thick, you may need to adjust the time more. Air fryer cod pairs well with many sides. Here are some ideas: - Steamed vegetables like broccoli or green beans - A fresh salad with lemon vinaigrette - Rice or quinoa for a hearty meal - Mashed potatoes for comfort food These sides not only complement the cod but also enhance the meal's overall appeal. Yes, air fryer cod is a healthy choice! It uses less oil than traditional frying methods. Cod is also low in calories and high in protein. The garlic butter adds flavor without overwhelming the dish. Just be mindful of the butter amount to keep it healthy. Enjoy your meal guilt-free! You now know how to make delicious air fryer cod. We covered the right ingredients, cooking steps, and tips for perfect results. Remember to try different spices and herbs for variety. Don’t forget about storage options to enjoy leftovers later. Air frying makes this dish quick, easy, and tasty. Your meals can be healthy and fun. Experiment with side dishes to complete your plate. Enjoy your tasty air fryer cod and happy cooking!

Air Fryer Cod with Garlic Butter Delightful Recipe

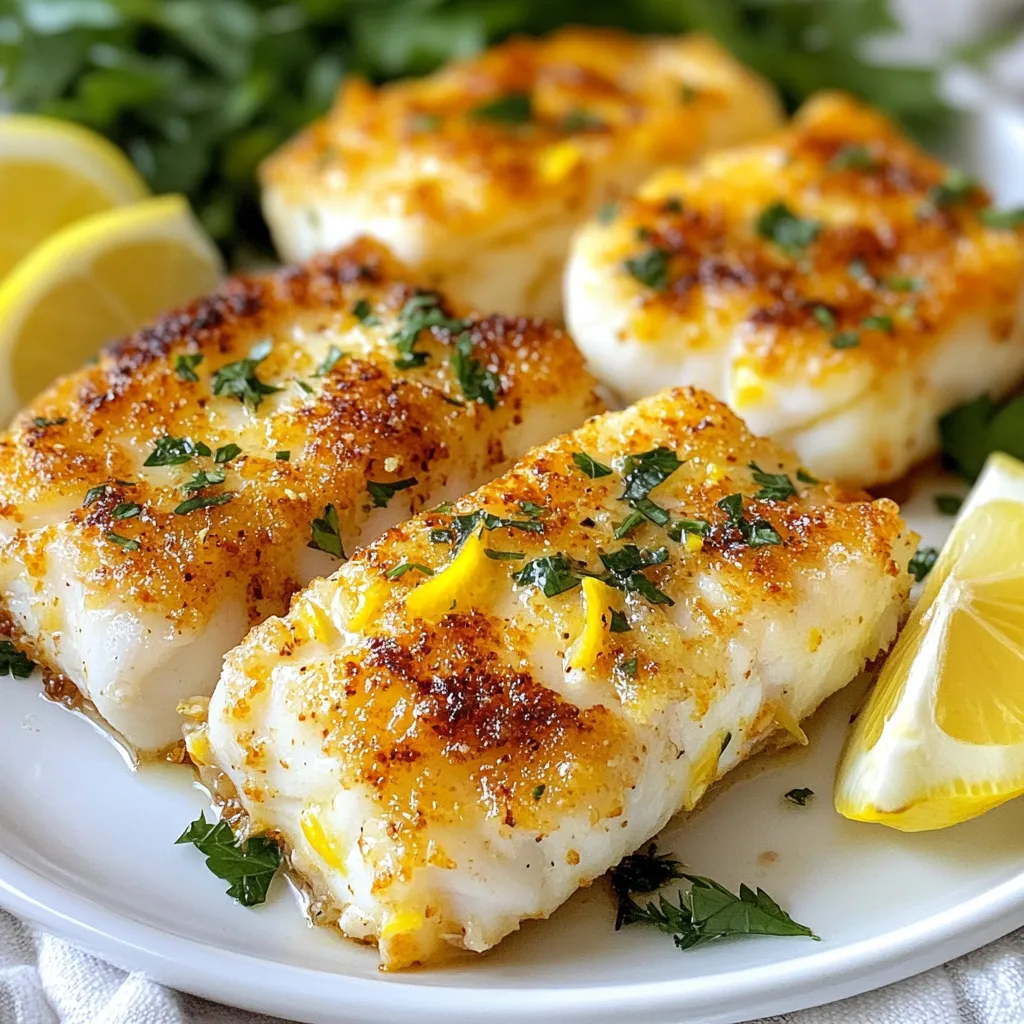
If you crave a quick and tasty meal, this Air Fryer Cod with Garlic Butter recipe is for you. It

To make a tasty Chicken Caesar Salad Pizza, you'll need some simple ingredients. Here’s the list to get you started: - Pre-made or homemade pizza crust - 1 cup cooked chicken breast, shredded - 1 cup romaine lettuce, chopped - 1/2 cup Caesar dressing - 1/2 cup cherry tomatoes, halved - 1/4 cup Parmesan cheese, grated - 1/4 cup croutons, crushed - 1 teaspoon garlic powder - 1 teaspoon olive oil - Salt and pepper to taste Each ingredient plays a key role in creating that fresh and flavorful taste. The chicken adds protein and heartiness. The romaine lettuce gives a crunchy texture, while the Caesar dressing brings a creamy, tangy flavor. The cherry tomatoes add a sweet burst, and the Parmesan cheese provides a salty kick. Croutons finish the dish with extra crunch. Using a pre-made crust saves time, but making your own can add a personal touch. Don’t forget to season the chicken well; garlic powder, salt, and pepper elevate the flavor. Enjoy crafting this dish! {{ingredient_image_2}} First, set your oven to 425°F (220°C). This step is key. A hot oven helps make the crust crispy. Next, take your pizza crust. If you bought one, place it on a baking sheet. If you made your own, roll it into a circle and lay it on your pan. In a bowl, add the shredded chicken. Sprinkle in garlic powder, olive oil, salt, and pepper. Mix it well. Each piece of chicken should be covered in flavor. Spread half of the Caesar dressing on the pizza crust. Leave a small edge around the sides. This helps keep the crust strong. Now, add the seasoned chicken over the dressing. Then, place the halved cherry tomatoes on top. Finally, sprinkle grated Parmesan cheese all over. Put the pizza in your hot oven. Bake it for 10-12 minutes. Look for a golden brown crust. It should be crispy when done. While the pizza bakes, grab another bowl. Toss the chopped romaine with the rest of the Caesar dressing. Make sure all the lettuce is covered. Once the pizza is out of the oven, let it cool for about one minute. Top it with the dressed romaine lettuce. Then, add crushed croutons over everything. Cut the pizza into slices. Serve it right away. If you want, add more grated Parmesan cheese on top. Enjoy your tasty creation! A good crust is key. Start with a quality pre-made crust or make your own. If you use store-bought, choose one that is thick and sturdy. For homemade, use a simple dough recipe. Roll it out evenly. A uniform thickness helps the crust cook well. To get a crispy crust, preheat your oven to 425°F. Place your pizza directly on a hot pizza stone or a baking sheet. This method helps the bottom crisp up. Brush a little olive oil on the crust before baking. It adds flavor and color. Making your own Caesar dressing is easy. Combine 1/2 cup mayonnaise, 1 tablespoon lemon juice, 1 teaspoon Dijon mustard, and 1 clove of minced garlic. Whisk until smooth. Add salt and pepper to taste. This fresh dressing makes your pizza taste even better. Presentation matters. Serve your pizza on a wooden cutting board for a nice touch. Add fresh herbs, like parsley, for color. Offer extra Caesar dressing and grated Parmesan on the side. This lets everyone customize their slices for more fun. Pro Tips Use Fresh Ingredients: Opt for fresh romaine lettuce and high-quality chicken for the best flavor and texture in your pizza. Customize Your Crust: Experiment with different pizza crusts, such as whole wheat or gluten-free, to cater to dietary preferences. Adjust the Dressing: Feel free to add more or less Caesar dressing based on your personal taste; a light drizzle can enhance the flavor without overwhelming the pizza. Make it Extra Crunchy: For added texture, toast your croutons in the oven for a few minutes before topping your pizza. {{image_4}} You can make a great vegetarian Chicken Caesar Salad Pizza. Start by swapping the chicken for grilled veggies. Use bell peppers, zucchini, and mushrooms for flavor. You can also add some chickpeas for extra protein. Keep the Caesar dressing and all other toppings the same. This gives you a fresh twist on the classic. For a gluten-free Chicken Caesar Salad Pizza, use a gluten-free pizza crust. Many stores sell these now. Check the labels to find the best option. You can also make your own crust using almond flour or cauliflower. This way, you can enjoy the flavors without the gluten. Want to mix it up? Here are some tasty ideas: - Add sliced olives for a briny kick. - Try avocado slices for creaminess. - Toss on some artichoke hearts for extra texture. - Use different cheeses like feta or mozzarella. These toppings can make your pizza even more exciting! To keep your Chicken Caesar Salad Pizza fresh, store it in the fridge. First, let the pizza cool completely. Then, place it in an airtight container. You can also wrap it tightly with plastic wrap. This way, it stays fresh for up to three days. When you're ready to eat the leftover pizza, reheating is key. Preheat your oven to 350°F (175°C). Place the pizza on a baking sheet. Heat it for about 10 minutes. This method keeps the crust crispy. You can also use a microwave. If you do, heat it for 30 seconds at a time. This way, you avoid a soggy crust. If you want to save pizza for later, freezing works well. Slice the pizza first, then wrap each slice in plastic wrap. Place the wrapped slices in a freezer-safe bag. Squeeze out as much air as possible. This helps prevent freezer burn. Your pizza can last about two months in the freezer. When you’re ready to enjoy it, thaw in the fridge overnight before reheating. You can use ranch dressing, blue cheese dressing, or a vinaigrette. Each option adds a unique flavor. If you want a lighter choice, try Greek yogurt mixed with lemon juice and garlic. This gives a fresh twist while keeping it creamy. Yes, rotisserie chicken works great! It saves time and adds flavor. Just shred the chicken and mix it with seasonings. Using rotisserie chicken makes this dish faster and still tasty. Chicken Caesar Salad Pizza lasts about 3 to 4 days in the fridge. Store it in an airtight container. To keep it fresh, eat it within this time frame. Yes, you can make this pizza for meal prep. Prepare the pizza and store it uncooked in the fridge. When ready, bake it fresh. You can also store slices for quick meals. This article covered how to make Chicken Caesar Salad Pizza, featuring easy ingredients and steps. You learned to prepare the crust, season the chicken, and layer toppings. I shared tips for a crispy crust and options for variations, including vegetarian and gluten-free. Don't forget how to store leftovers and reheat them. Making this pizza is fun and tasty. Try it out! Your taste buds will thank you. Enjoy your cooking!

Chicken Caesar Salad Pizza Flavorful and Fresh Dish

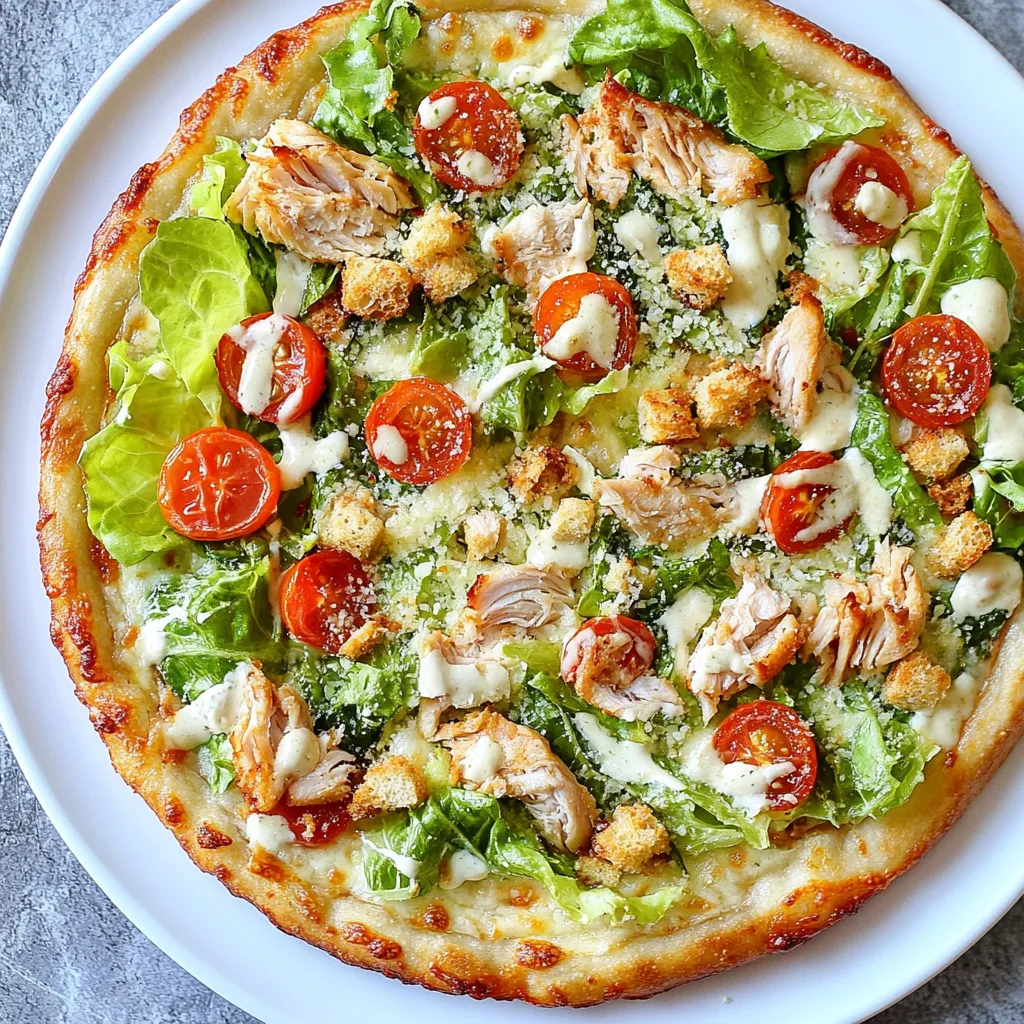
Are you ready to take your pizza game to new heights? Introducing Chicken Caesar Salad Pizza—a fresh twist on two

To make Trail Mix Breakfast Cookies, gather these main ingredients: - 1 cup rolled oats - 1/2 cup almond flour - 1/4 cup honey or maple syrup - 1/2 cup nut butter (choose peanut, almond, or cashew) - 1/2 cup mixed nuts (like walnuts, almonds, or pecans) - 1/2 cup dried fruit (cranberries, raisins, or chopped apricots) - 1/4 cup dark chocolate chips (optional) - 1 teaspoon vanilla extract - 1/2 teaspoon baking powder - 1/4 teaspoon salt - 1/2 teaspoon ground cinnamon These ingredients create a tasty mix that will keep you full. The oats provide fiber, while nut butter adds healthy fats. Feel free to customize your cookies. You can swap almond flour for whole wheat flour. Instead of honey, use agave syrup for a vegan version. Want more crunch? Add seeds like pumpkin or sunflower. You can also mix in coconut flakes or spices like nutmeg for a unique twist. - Rolled oats: Great for heart health and provide lasting energy. - Almond flour: Low in carbs and high in protein and vitamins. - Honey or maple syrup: Natural sweeteners with antioxidants. - Nut butter: Packed with protein and healthy fats for fullness. - Mixed nuts: Offer fiber, protein, and healthy fats. - Dried fruit: Adds natural sweetness and vitamins. - Dark chocolate chips: A treat with antioxidants when used in moderation. - Vanilla extract: Enhances flavor without added sugar. - Baking powder: Helps cookies rise and stay soft. - Salt: Balances sweetness and enhances flavors. - Ground cinnamon: Adds warmth and may help regulate blood sugar. Every ingredient contributes to a wholesome snack, making these cookies not just tasty, but also good for you. {{ingredient_image_2}} 1. Preheat your oven to 350°F (175°C). Line a baking sheet with parchment paper. 2. In a large bowl, mix 1 cup of rolled oats, 1/2 cup of almond flour, 1/2 teaspoon of baking powder, 1/4 teaspoon of salt, and 1/2 teaspoon of ground cinnamon. Use a whisk to blend well. 3. In a second bowl, combine 1/2 cup of nut butter, 1/4 cup of honey or maple syrup, and 1 teaspoon of vanilla extract. Stir until smooth. 4. Pour the wet mix into the dry mix. Fold them together until a thick dough forms. 5. Add 1/2 cup of chopped mixed nuts, 1/2 cup of dried fruit, and 1/4 cup of dark chocolate chips, if using. Mix until evenly spread. 6. Use a cookie scoop or tablespoon to drop dough onto the baking sheet. Leave about 2 inches between each cookie. 7. Slightly dampen your fingers and flatten each dough mound into a disc. This helps them bake evenly. 8. Bake for 12-15 minutes. The edges should be golden brown. The centers should feel set. 9. Let cookies cool on the baking sheet for 5 minutes before moving them to a wire rack. - Ensure your oven is preheated. This helps cookies bake evenly. - Use room temperature nut butter for easier mixing. - Check cookies around the 12-minute mark to avoid overbaking. - Letting them cool on the pan helps them firm up without breaking. - Mixing dry ingredients well prevents clumps. - Be careful not to overmix the dough. It should be thick but not dry. - Flatten the dough lightly. It helps cookies spread and bake uniformly. - Cooling on a wire rack is key. It ensures cookies stay soft and chewy. When making Trail Mix Breakfast Cookies, proper mixing is key. Start with your dry ingredients. Use a whisk to blend the oats, almond flour, baking powder, salt, and cinnamon. Make sure there are no lumps. This ensures even flavor and texture in each bite. Next, mix your wet ingredients separately. Whip together the nut butter, honey or maple syrup, and vanilla until smooth. Slowly add this mix to the dry ingredients. Fold gently to keep the mixture fluffy. This method avoids over-mixing, which can make cookies tough. To get the perfect cookie texture, pay attention to the dough's thickness. It should be thick, not runny. If it feels too dry, add a splash of water or more nut butter. If it's too wet, sprinkle in a bit more almond flour. Make sure to flatten the dough slightly on the baking sheet. This helps them bake evenly and gives a nice shape. Bake them until the edges are golden brown but the center is still soft. They will firm up as they cool. One common mistake is not measuring ingredients correctly. Use measuring cups and spoons for accuracy. Another mistake is skipping the preheat step. Always preheat your oven to ensure even baking. Avoid over-baking too. Check the cookies around 12 minutes. If you let them bake too long, they may turn hard. Lastly, don’t forget to let them cool on a wire rack. This helps keep the cookies chewy. Pro Tips Customize Your Mix: Feel free to personalize your trail mix by adding your favorite nuts, seeds, or even spices like nutmeg for an extra kick. Storage Tips: Store your cookies in an airtight container at room temperature for up to one week, or freeze them for longer shelf life. Make It Vegan: Substitute the honey with maple syrup and ensure your nut butter is free from animal products to keep these cookies vegan-friendly. Experiment with Add-Ins: Try adding coconut flakes, chia seeds, or protein powder to boost the nutritional value and flavor of your cookies. {{image_4}} You can change the nuts and fruits in your trail mix breakfast cookies. Use what you like! For nuts, try cashews, pistachios, or hazelnuts. You can also add seeds like pumpkin or sunflower seeds for extra crunch. For dried fruits, consider using mango, figs, or cherries. These swaps can give your cookies a unique taste. Mixing different ingredients keeps breakfast fun and exciting! If you want a different sweet taste, use other sweeteners. Instead of honey, try agave syrup or coconut sugar. Each option offers a different flavor. Maple syrup is great too; it adds a rich, earthy note. Just remember to adjust the amount. Different sweeteners may change how wet or dry your dough becomes. Taste as you mix and find what makes you smile! You can easily make these cookies gluten-free or vegan. To go gluten-free, use oat flour instead of almond flour. Just make sure your oats are certified gluten-free. For a vegan option, replace honey with maple syrup or agave. Nut butter is usually vegan, but double-check the brand. These changes let everyone enjoy a tasty breakfast cookie! To keep your Trail Mix Breakfast Cookies fresh, store them in an airtight container. Place a piece of parchment paper between layers to prevent sticking. Keep the container in a cool, dry place away from sunlight. This method helps maintain their chewy texture and flavor. Freezing cookies is easy! First, let them cool completely. Then, place cookies in a single layer on a baking sheet. Freeze for about an hour. Once firm, transfer them to a freezer-safe bag or container. Label with the date for easy tracking. You can enjoy these cookies for up to three months! Trail Mix Breakfast Cookies last about a week at room temperature. They stay fresh longer if stored in the fridge. If you freeze them, they can last for months. Just remember to thaw them overnight in the fridge before eating. This keeps them tasty and enjoyable! Yes, you can use different flours. Almond flour is great for a nutty flavor. You can also try oat flour or whole wheat flour. Each flour changes the texture a bit. Almond flour makes cookies soft and moist. Whole wheat flour gives a denser bite. Just remember to check baking times. Different flours may need slight adjustments. To make these cookies healthier, you can reduce the sweetener. Try using less honey or maple syrup. You can also add more dried fruits or seeds. Adding chia seeds or flaxseeds boosts fiber. Swap some of the nut butter with applesauce for less fat. These small changes keep the taste but cut extra calories. You can substitute nut butter with sunflower seed butter. This option is nut-free and still creamy. If you want a low-fat choice, use Greek yogurt. It adds protein and moisture. Each substitute brings a different flavor. Just ensure it matches your taste preferences. Yes, several egg alternatives work well. You can use a flaxseed meal mixed with water. One tablespoon of flaxseed meal mixed with three tablespoons of water equals one egg. Mashed banana or applesauce also works. Each option keeps cookies moist and tender. Just remember, it might change the flavor slightly. You learned about making tasty trail mix breakfast cookies. We covered key ingredients, how to prepare them, and tips for baking. You can mix and match ingredients to fit your taste. Remember to store cookies well to keep them fresh. Enjoy the cookies you create and share them with others. These treats can fit many diets and preferences. Now you have all you need to bake your own trail mix breakfast cookies. Enjoy the process and the delicious results!

Trail Mix Breakfast Cookies Tasty and Nutritious Treat

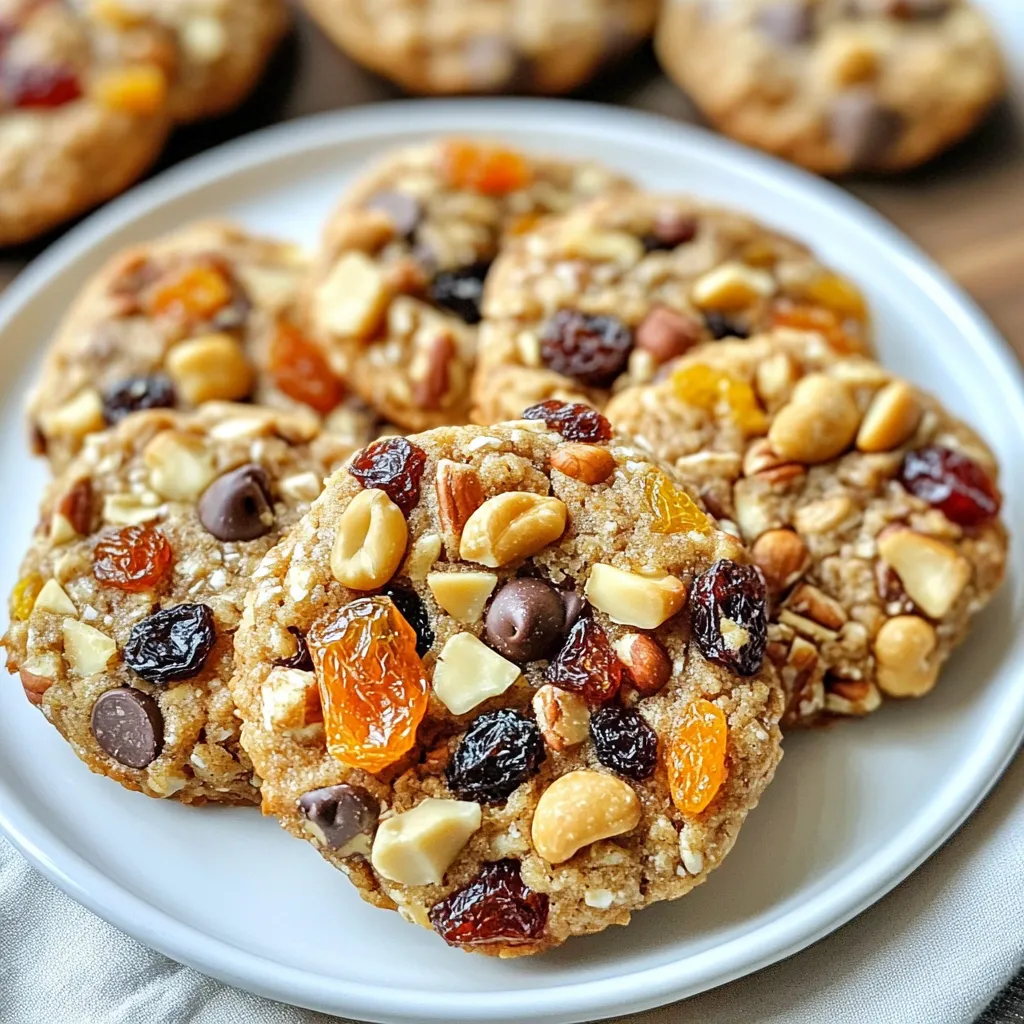
Looking for a quick and tasty breakfast? These Trail Mix Breakfast Cookies are the perfect answer! Packed with nutrients, they

- 8 oz bowtie pasta - 1 lb ground beef - 1 tablespoon extra virgin olive oil - 4 cloves garlic, finely minced - 1 teaspoon dried Italian seasoning - 1/2 teaspoon red pepper flakes (optional for heat) - 1 cup beef broth (preferably low sodium) - 1 cup heavy cream - 1 cup freshly grated Parmesan cheese - Salt and black pepper to taste - Fresh parsley, finely chopped (for garnish) To make Parmesan Garlic Beef Bowtie Pasta, you need some key ingredients. First, grab 8 ounces of bowtie pasta. This shape holds the sauce well, making each bite tasty. Next, get 1 pound of ground beef. This will give your dish a hearty base. You will also need 1 tablespoon of extra virgin olive oil. This oil adds good flavor and helps cook the beef. For seasoning, have 4 cloves of finely minced garlic. Garlic brings out rich flavors in this dish. To add depth, use 1 teaspoon of dried Italian seasoning. If you want a kick, include 1/2 teaspoon of red pepper flakes. For the sauce, you will need 1 cup of beef broth. Low sodium broth is best; it adds flavor without too much salt. Now, for the creaminess, grab 1 cup of heavy cream and 1 cup of freshly grated Parmesan cheese. These ingredients make the sauce rich and smooth. Don’t forget to season with salt and black pepper to taste! Lastly, get fresh parsley for garnish. It adds color and freshness to your dish. With these ingredients, you are ready to create a delicious and creamy pasta dish that everyone will love! {{ingredient_image_2}} 1. Start by boiling a large pot of salted water. 2. Add 8 oz of bowtie pasta. Cook it for 8-10 minutes, or until al dente. 3. Once done, drain the pasta. Be sure to reserve a cup of the pasta cooking water. 1. In a large skillet, heat 1 tablespoon of extra virgin olive oil over medium heat. 2. Add 1 lb of ground beef to the skillet. Cook it for about 5-7 minutes, breaking it apart with a spatula. 3. If there's extra fat, drain it off to keep the dish light and tasty. 1. Next, add 4 cloves of finely minced garlic to the beef, stirring it for 1-2 minutes. 2. Sprinkle in 1 teaspoon of dried Italian seasoning and 1/2 teaspoon of red pepper flakes if you like heat. Mix well. 3. Pour in 1 cup of beef broth. Let it simmer gently for about 5 minutes to blend the flavors. 4. Lower the heat, then stir in 1 cup of heavy cream. Bring it back to a gentle simmer. 5. Gradually add 1 cup of freshly grated Parmesan cheese. Keep stirring until the cheese melts into the sauce. Taste and add salt and black pepper as needed. 1. Now, add the drained bowtie pasta to the skillet. Toss it gently to coat the pasta in the creamy sauce. 2. If the sauce feels too thick, add a splash of the reserved pasta water to reach your desired consistency. This dish is now ready to serve. The creamy sauce and tender pasta create a perfect harmony that is sure to impress! To cook pasta al dente, follow these steps: - Use a large pot with salted water. - Bring the water to a rolling boil. - Add the bowtie pasta and cook for 8-10 minutes. - Test the pasta at the low end of the time. It should be firm but not hard. For a creamy sauce, do not rush the cheese melting process. - Lower the heat before adding the cream. - Stir in the Parmesan cheese slowly for a smooth finish. - If the sauce is thick, add a splash of reserved pasta water. You can boost flavor with simple spices: - Consider adding a pinch of garlic powder for more depth. - A dash of smoked paprika can add warmth without heat. Using quality Parmesan cheese is key. Always choose freshly grated cheese over the pre-grated kind. It melts better and tastes richer. When serving, think about the look of the dish: - Plate the pasta in a large bowl for family style. - For individual servings, stack the bowtie pasta high on the plate. Garnishing can elevate the meal: - Sprinkle extra Parmesan on top for a cheesy finish. - Add a sprig of fresh parsley for a pop of color. - A light drizzle of olive oil adds shine and flavor. Pro Tips Perfect Pasta Texture: To achieve the best texture, ensure your pasta is cooked al dente, as it will continue to cook slightly when mixed with the sauce. Enhance Flavor: For a deeper flavor, consider adding a splash of white wine after browning the beef, allowing it to reduce before adding the broth. Cheese Choices: While Parmesan is classic, feel free to mix in other cheeses like Pecorino Romano for a different flavor profile. Garnish Wisely: Fresh herbs like basil or chives can also be used as a garnish for added flavor and a pop of color, enhancing the dish's presentation. {{image_4}} You can switch out the ground beef in this dish. Try ground turkey or chicken for a lighter option. Both meats work well with the creamy sauce. If you want a bolder taste, use Italian sausage. This adds more flavor, especially if you choose spicy sausage. For a vegetarian meal, use lentils or mushrooms. They give a hearty texture and soak up flavors nicely. If you need a gluten-free dish, choose gluten-free pasta. Many brands offer bowtie shapes made from rice, corn, or quinoa. These options taste great and work well with the sauce. Just cook them according to package directions. Make sure to check the ingredients for any hidden gluten. You can add more flavors to your dish by using vegetables or herbs. Spinach, bell peppers, or zucchini mix well with pasta. Add them when you cook the garlic for a fresh taste. For herbs, try fresh basil or oregano. They bring a nice aroma to the sauce. Experimenting with cheese types can also change the dish. While Parmesan is classic, you can try pecorino or asiago. Both add unique flavors. Mixing cheeses can create a richer taste. Just remember to adjust the amount to keep the dish creamy. To keep your Parmesan Garlic Beef Bowtie Pasta fresh, start with refrigeration. Place the pasta in an airtight container. Make sure to store it in the fridge within two hours of cooking. It can last up to three days this way. For long-term storage, consider freezing it. Divide the pasta into single servings. Use freezer-safe bags or containers. Remove as much air as possible to prevent freezer burn. You can store it for up to three months. When you're ready to eat, just thaw it overnight in the fridge. When it comes to reheating, you have two main options: microwaving or stovetop reheating. For microwaving, place a serving in a microwave-safe bowl. Add a splash of water or cream to keep it moist. Cover it and heat on medium power for one to two minutes. Stir halfway through for even heating. Stovetop reheating gives you creamy results. Put the pasta in a skillet over low heat. Add a bit of broth or cream. Stir until heated through, which usually takes about five minutes. This method helps to revive the creamy sauce and keeps the pasta tasty. You can swap out ground beef for ground turkey or chicken. This cuts fat while keeping flavor. Use whole wheat bowtie pasta for more fiber. Reduce the heavy cream and add more broth instead. You can also add spinach or broccoli for extra nutrients. These small changes keep it tasty and healthy. Yes, you can prepare this dish ahead of time. Cook the pasta and beef separately. Store them in the fridge. When you’re ready to eat, combine them with the sauce and heat gently. This method keeps everything fresh and tasty. Just remember, the pasta may soak up some sauce, so add a bit of water to loosen it up. This dish pairs well with a light salad or garlic bread. A simple Caesar or mixed greens salad adds a nice crunch. For bread, go for a nice crusty loaf or buttery garlic bread. Both options make the meal feel complete and balanced. To store cooked bowtie pasta, let it cool first. Place it in an airtight container. You can keep it in the fridge for up to three days. If you want to freeze it, add a bit of olive oil to prevent sticking. Use it within a month for the best taste. The best way to reheat creamy pasta is on the stove. Add a splash of broth or water to a pan. Heat on low, stirring gently until warmed through. This helps keep the sauce creamy. If you microwave it, use a lower power setting. Stir every minute to avoid hot spots. This post covered making delicious Parmesan Garlic Beef Bowtie Pasta. We discussed the key ingredients, clear cooking steps, and helpful tips. You can enhance flavor and choose different proteins as you like. Remember to store your leftovers properly and know how to reheat them well. This dish is versatile and perfect for any meal. You now have the tools to create a tasty, satisfying dish that everyone will enjoy. Happy cooking!

Parmesan Garlic Beef Bowtie Pasta Delicious and Creamy

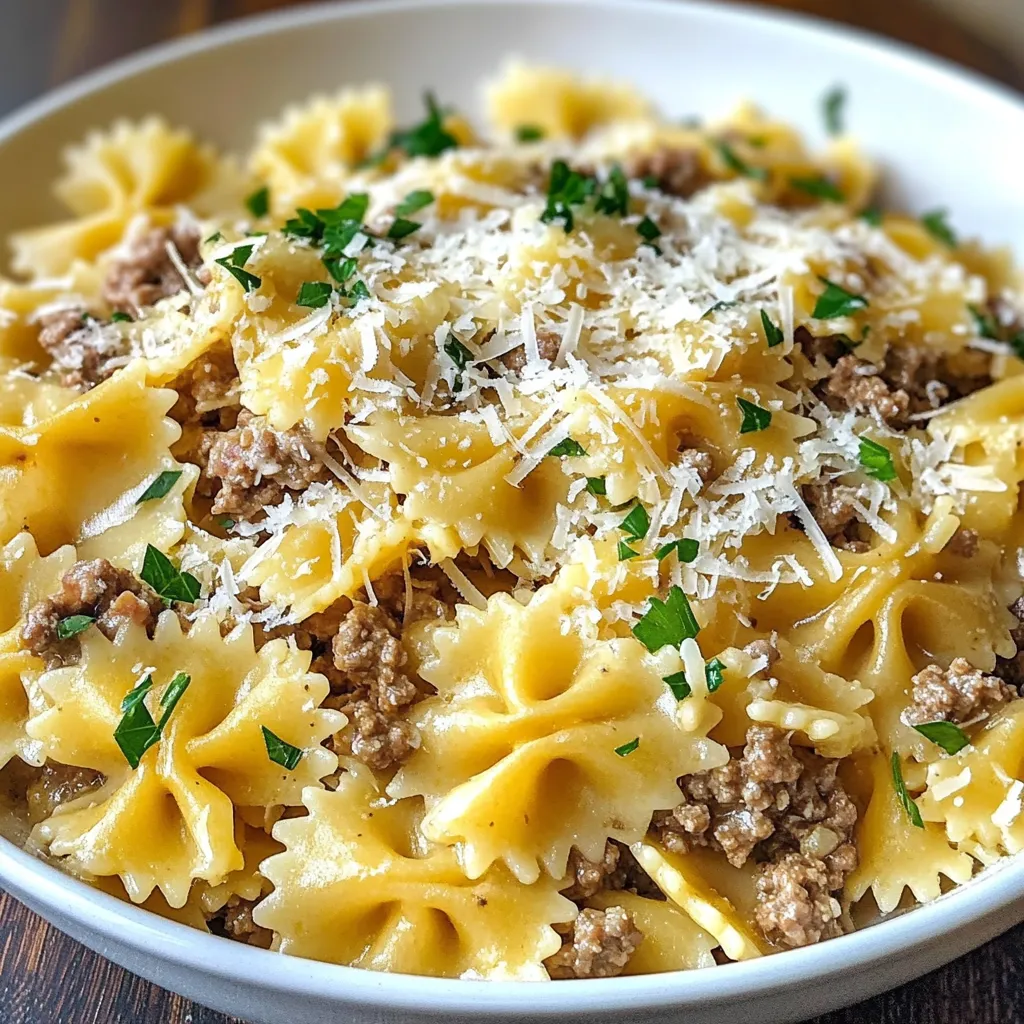
Get ready to dig into a delightful dish that your family will love! This Parmesan Garlic Beef Bowtie Pasta is

- 8 oz penne pasta - 1 pound chicken sausage, sliced into rounds - 3 cloves garlic, finely minced - 1 bell pepper (red or yellow), diced into small pieces - 1 medium zucchini, cut into half-moons Penne pasta is great because it holds sauce well. Chicken sausage adds a nice flavor and protein. Garlic gives a lovely aroma, while bell pepper and zucchini add color and crunch. - 1 cup heavy cream - 1 cup freshly grated Parmesan cheese - 4 cups low-sodium chicken broth Heavy cream makes the sauce rich and smooth. Parmesan cheese adds a salty kick. Low-sodium chicken broth keeps it light and tasty. - 2 tablespoons olive oil - 1 teaspoon Italian seasoning blend - Salt and freshly ground black pepper to taste - Fresh basil leaves, torn for garnish Olive oil helps cook the sausage and veggies. Italian seasoning brings a warm flavor. Salt and pepper enhance the dish, while fresh basil adds a bright touch. {{ingredient_image_2}} Start by heating 2 tablespoons of olive oil in a large pot or Dutch oven over medium heat. Once the oil shimmers, add 1 pound of sliced chicken sausage. Cook the sausage for about 5 to 7 minutes, stirring occasionally. You want it to become nicely browned. Next, add 3 cloves of minced garlic, 1 diced bell pepper, and 1 medium zucchini cut into half-moons. Sauté these ingredients for an additional 3 to 4 minutes. This step helps the vegetables soften and release their sweet flavors. Now it’s time to add the pasta! Carefully pour in 4 cups of low-sodium chicken broth and 8 oz of penne pasta. Stir well to make sure the pasta is fully submerged. Increase the heat to bring the mixture to a gentle boil. Once boiling, reduce the heat to low and cover the pot. Let it simmer for 12 to 15 minutes, stirring occasionally. You want the pasta to be al dente and most of the broth absorbed. After the pasta is cooked, reduce the heat to low again. Stir in 1 cup of heavy cream, 1 cup of freshly grated Parmesan cheese, and 1 teaspoon of Italian seasoning. Mix everything thoroughly until the cheese melts and the pasta becomes coated in a creamy sauce. Taste the dish and add salt and freshly ground black pepper to your liking. Remove the pot from heat and let it sit for a couple of minutes. This helps the sauce thicken slightly. Before serving, garnish with torn fresh basil leaves for a burst of color and flavor. To get that perfect pasta texture, cook the penne to al dente. This means it should be firm yet tender. Keep an eye on it while it simmers. If you find the sauce too thin, leave it on low heat for a bit longer. Stir gently to avoid sticking. If it gets too thick, you can add a little chicken broth to loosen it up. Balance is key! For richer flavors, use fresh herbs like basil or parsley. Fresh herbs add life to any dish. I love using quality grated Parmesan cheese. It melts beautifully and adds depth. Feel free to experiment with different cheeses, too. A sharp cheese can really elevate the dish. Serve your pasta in shallow bowls for a nice look. Sprinkle extra grated Parmesan on top. This adds texture and taste. Don’t forget a few fresh basil leaves for color. Drizzling a bit of olive oil on top can add shine and flavor. These simple tips can make your meal feel special! Pro Tips Choose Quality Sausage: Opt for chicken sausage that is made with high-quality ingredients for the best flavor. Vegetable Variations: Feel free to substitute or add other vegetables like spinach or mushrooms for extra nutrition and flavor. Cheese Options: For a twist, try incorporating different cheeses like mozzarella or a blend of Italian cheeses to enhance creaminess. Leftovers Storage: Store leftover pasta in an airtight container in the fridge for up to 3 days. Reheat with a splash of broth to revive the sauce. {{image_4}} You can easily switch up the chicken sausage and pasta in this dish. If you want a different flavor, try turkey or pork sausage. For a lighter touch, chicken breast works too. As for pasta, penne is great, but you can use rotini, fusilli, or even whole wheat options. Each type gives a new shape and texture. Making this dish fit your diet is simple. To go gluten-free, just pick gluten-free pasta. For a dairy-free meal, swap the heavy cream with coconut milk or a dairy-free cream. You can also skip the cheese or use a nut-based cheese. If you want it vegan, choose plant-based sausage and remove all dairy. Add your own twist by using different spices or cheeses. Want a kick? Try adding crushed red pepper flakes. You might like smoked paprika for a smoky taste. Instead of Parmesan, switch to feta or goat cheese for a tangy flavor. Fresh herbs like thyme or oregano can also boost the taste. Each change offers a new way to enjoy this creamy delight. To keep your creamy chicken sausage pasta fresh, use airtight containers. Glass containers work best, but plastic ones are fine too. Make sure to cool the pasta to room temperature before sealing. Store it in the fridge for up to three days. This way, you can enjoy it later without losing flavor. When you want to enjoy your leftovers, use the stovetop or microwave. For the stovetop, add a splash of broth or cream to the pasta. Heat it on low, stirring gently until warm. This helps keep the sauce creamy. If using the microwave, place the pasta in a bowl and cover it with a damp paper towel. Heat in short bursts, stirring in between, until hot. If you want to save some for later, freezing is a great option. First, let the pasta cool completely. Then, portion it into freezer-safe bags or containers. Squeeze out excess air before sealing. You can freeze it for up to three months. To thaw, move the pasta to the fridge overnight. Reheat it gently on the stovetop, adding a bit of cream if needed for texture. Yes, you can use many types of sausage. Italian sausage adds a nice kick. Turkey or pork sausage works well too. If you prefer a different flavor, try chorizo or smoked sausage. Each type gives a unique taste to the dish. Just make sure to adjust cooking times based on the sausage type. Absolutely! This pasta dish is perfect for meal prep. It stores well in the fridge for up to three days. To meal prep, divide the pasta into containers after cooking. This makes it easy to grab for lunch or dinner. You can reheat it in the microwave or on the stove. Just add a splash of broth or cream to keep it moist. If you want more heat, there are several easy ways to spice it up. Add red pepper flakes when cooking the sausage. You can also mix in diced jalapeños or a splash of hot sauce. For a unique twist, try adding a dash of cayenne pepper. Taste as you go to find your perfect spice level. This blog post covered a creamy pasta recipe featuring chicken sausage and fresh veggies. You learned how to prepare the base, cook the pasta, and create a rich sauce. I shared tips to enhance texture and flavor, plus variations for dietary needs. Remember to store leftovers correctly for best taste. With this knowledge, you can whip up a delicious meal that suits your needs and preferences. Enjoy making this dish your own while impressing your friends and family!

Creamy One-Pot Chicken Sausage Pasta Simple Delight

Are you ready for a dinner that’s easy, creamy, and full of flavor? My Creamy One-Pot Chicken Sausage Pasta is

Start your Santa Fe salad with a fresh and crisp salad base. Use four cups of mixed greens. I like to combine spinach, arugula, and romaine lettuce. These greens add great taste and texture. They also give a lovely color to your salad. Next, let's add some vibrant vegetables and nutritious legumes. Use these ingredients: - 1 cup cherry tomatoes, halved - 1 cup black beans, drained and rinsed - 1 cup corn kernels (you can use fresh or thawed frozen corn) - 1 avocado, diced - 1/2 red onion, thinly sliced - 1/2 cup diced bell pepper (red, yellow, or green) These veggies not only add flavor but also bring a mix of colors. The black beans and corn add protein and fiber, making the salad filling and healthy. To finish, we need some creamy cheese and a fresh garnish. For this, use: - 1/2 cup crumbled feta cheese - 1/4 cup fresh cilantro leaves, chopped The feta cheese adds a salty, creamy touch that pairs well with the other ingredients. The cilantro gives a fresh burst of flavor and a pop of green. It’s the perfect way to elevate your salad! {{ingredient_image_2}} Start by taking a large bowl. Add four cups of mixed greens. I love using spinach, arugula, and romaine for a fresh taste. Mix the greens gently. This step sets the stage for a vibrant salad. Next, layer the veggies. Take one cup of halved cherry tomatoes and sprinkle them on top. Then, add one cup of black beans. Make sure they are drained and rinsed well to remove any extra salt. Toss in one cup of corn, either fresh or thawed from frozen. Now, chop one avocado into small pieces and add that, too. Slice half a red onion very thinly and scatter it over the salad. Finally, include half a cup of diced bell peppers in red, yellow, or green. These colors make the salad pop. To make the dressing, grab a small bowl. Combine a quarter cup of lime juice with two tablespoons of olive oil. Add one teaspoon of ground cumin along with salt and pepper to taste. Whisk all the ingredients until they blend well. Once your dressing is ready, drizzle it over the salad. Gently toss the salad to coat all the ingredients. This helps the flavors mix. To finish, add half a cup of crumbled feta cheese on top and sprinkle a quarter cup of chopped fresh cilantro. This adds a nice touch of flavor and color. Now, your Santa Fe Salad is ready to serve! Make your Santa Fe Salad pop! Use colorful bowls for serving. Bright colors add fun. Top the salad with lime wedges and fresh coriander. This makes a great look. You can also layer the ingredients in a glass bowl. It shows off the beautiful colors. Don’t forget to serve it right after mixing. Freshness is key! You can switch out some ingredients. If you don’t have black beans, try pinto beans. They taste great too! For cheese, use goat cheese instead of feta for a tangy twist. If you want a crunch, add nuts like walnuts or almonds. You can also replace avocado with diced mango for a sweet touch. To boost flavor, add spices! Try a pinch of chili powder for heat. If you love garlic, mix in some minced garlic in the dressing. Fresh herbs like basil or dill can give it a new taste. Adjust salt and pepper to your liking. Use lime juice for a zesty kick. These small changes make a big difference! Pro Tips Frische Zutaten wählen: Verwenden Sie möglichst frische und reife Zutaten, insbesondere bei Avocados und Tomaten, um den besten Geschmack zu erzielen. Vorsicht mit dem Dressing: Fügen Sie das Dressing nach und nach hinzu und vermengen Sie den Salat behutsam, um zu vermeiden, dass die Blätter matschig werden. Variationen ausprobieren: Experimentieren Sie mit anderen Bohnen oder Käsevarianten wie Ziegenkäse für eine neue Geschmacksrichtung. Vorbereitung im Voraus: Sie können die Zutaten im Voraus vorbereiten und erst kurz vor dem Servieren zusammenstellen, um die Frische zu bewahren. {{image_4}} You can boost your Santa Fe salad with proteins. Add grilled chicken, shrimp, or steak. These meats add great flavor and make the salad heartier. For a meatless option, try tofu or chickpeas. Both options give you protein and fit well in the salad. The dressing is key to the salad's taste. While lime and olive oil shine, you can try other dressings too. A spicy ranch or a cilantro-lime vinaigrette works well. If you like a sweet touch, add honey to your lime dressing. Each dressing change will give your salad a new twist. Use seasonal ingredients for fresh flavors. In summer, add ripe peaches or berries. In fall, try roasted pumpkin or apples. These swaps keep the salad exciting and fun. You can always mix in what you find at your local market. The Santa Fe salad can adapt to any season with ease. To keep your Santa Fe Salad fresh, store it in an airtight container. This helps maintain the salad's crispness. Keep the salad and dressing separate if you plan to store leftovers. This way, the greens won’t get soggy. Use the salad within two days for the best taste. You don’t typically reheat Santa Fe Salad. However, if you have warm ingredients like black beans or corn, heat them in a pan over medium heat. Stir frequently until warm. Let them cool a bit before adding to your salad. - Mixed Greens: 3-5 days in the fridge. - Cherry Tomatoes: 3-7 days if stored whole. - Black Beans: 3-4 days if kept in the fridge after opening. - Corn: 3-5 days if fresh; frozen corn can last up to 8 months. - Avocado: 1-2 days once cut; whole avocados last longer. - Red Onion: 7-10 days in the fridge. - Bell Pepper: 3-5 days in the fridge. - Feta Cheese: 5-7 days after opening. Storing ingredients properly ensures your salad stays tasty and fresh for longer! A Santa Fe Salad is a bright and fresh dish. It combines leafy greens with colorful veggies and beans. You get a mix of textures and flavors in every bite. This salad often features ingredients like black beans, corn, and avocado. It also has a zesty lime dressing that adds a nice kick. The salad is a great way to enjoy healthy ingredients while feeling full and satisfied. Yes, you can make Santa Fe Salad ahead of time. It stays fresh for a day in the fridge. However, keep the dressing separate until you are ready to serve. This helps the greens stay crisp. You can also prepare the veggies and beans in advance. Just mix them in right before serving to keep everything fresh and tasty. You can serve Santa Fe Salad in many fun ways. Here are some ideas: - As a main dish: Add grilled chicken or shrimp for protein. - As a side dish: Pair it with tacos or grilled meats. - In a wrap: Use the salad as a filling in a tortilla. - With chips: Serve it with tortilla chips for a crunchy twist. - In bowls: Layer it in bowls for a visually appealing meal. Each way offers a unique taste experience. Enjoy trying different options! In this blog post, we explored the Santa Fe Salad, covering ingredients, step-by-step instructions, and tips. You learned about fresh bases, tasty vegetables, and how to add cheese. I shared ideas for storing leftovers and enhancing flavors. Remember, you can swap ingredients based on your taste. Enjoy creating your own versions of this salad! With a few simple steps, you’ll impress friends and family. Try it out and make it your own!

Santa Fe Salad Zesty and Fresh Flavor Boost

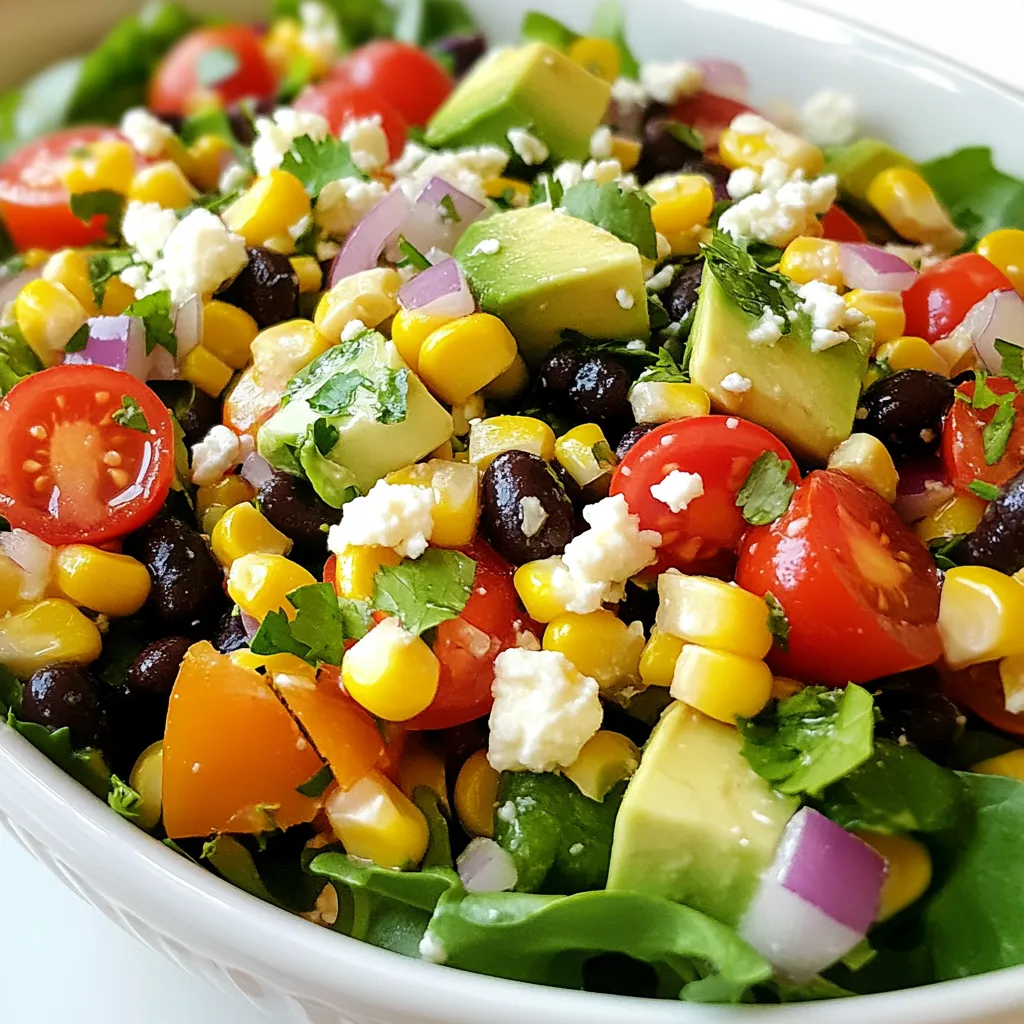
Are you ready to give your meals a burst of flavor? The Santa Fe Salad is a fresh and zesty

- 4 medium sweet potatoes - 2 cups cooked chicken, shredded - 1/2 cup buffalo sauce (adjust according to your spice tolerance) - 1/2 cup Greek yogurt - 1/2 cup shredded sharp cheddar cheese - 1/4 cup finely chopped green onions - Salt and black pepper to taste - Optional: Fresh cilantro leaves for garnish Sweet potatoes shine in this dish. They are sweet, creamy, and nutritious. Choose medium-sized ones for easy handling. They should feel firm and have smooth skin. For the chicken, shredded is best. You can use leftover chicken or store-bought rotisserie chicken. It cuts down on prep time and adds flavor. Buffalo sauce is key for that signature kick. I recommend Frank’s RedHot or Texas Pete for their balance of flavor and spice. If you like it hot, go for a spicier brand. Greek yogurt adds creaminess and tang. Look for full-fat or plain varieties. Fage and Chobani are great choices. They have a rich taste and smooth texture. Gathering these ingredients will set you up for success. Each one plays a part in making these stuffed sweet potatoes a hit! {{ingredient_image_2}} 1. Preheat your oven to 400°F (200°C). This step is key for a good bake. 2. Wash the sweet potatoes well under running water. This removes dirt and grit. 3. Dry each potato with a towel. Use a fork to pierce each potato several times. This lets steam escape while baking. 4. Place the sweet potatoes on a baking sheet lined with parchment paper. This makes cleanup easy. 5. Bake the sweet potatoes for 45 to 60 minutes. They are done when soft and can be pierced easily with a fork. 1. While the sweet potatoes bake, grab a mixing bowl. 2. Add the shredded chicken to the bowl. Pour in the buffalo sauce. 3. Stir the chicken and sauce well. Make sure the chicken gets fully coated. Adjust the buffalo sauce based on your heat preference. You can add more for a spicy kick or less for a milder flavor. 1. After baking, take the sweet potatoes out of the oven. Let them cool for about 5 minutes. 2. Use a sharp knife to slice each potato lengthwise down the middle. Be careful to not cut all the way through. 3. Use a fork to gently mash some of the flesh inside the potato. This creates space for the filling. 4. Spoon the buffalo chicken mixture into each potato pocket. Fill them generously. 5. Top with a dollop of Greek yogurt, a handful of shredded cheddar cheese, and a sprinkle of chopped green onions. This adds flavor and color. 1. Put the stuffed sweet potatoes back into the oven for about 10 minutes. This melts the cheese and makes it bubbly. 2. Keep an eye on them; they are done when the cheese is melted and golden. To achieve perfectly tender sweet potatoes, follow these tips: - Choose medium-sized sweet potatoes for even cooking. - Pierce each potato with a fork to let steam escape. - Bake at 400°F for 45 to 60 minutes. Check for softness with a fork. Balancing buffalo sauce flavors is key. Here’s how: - Start with a mild buffalo sauce if you're sensitive to heat. - Adjust the amount of sauce based on your spice tolerance. - Mix in Greek yogurt for creaminess and a cooling effect. Serve your stuffed sweet potatoes on a bright platter. This makes them pop visually. - Drizzle extra buffalo sauce over the stuffed potatoes for a bold look. - Place chopped green onions on top to add color and freshness. Best garnishes include: - Fresh cilantro leaves for a burst of flavor. - Extra shredded cheese for a cheesy finish. For efficiency in the kitchen, use these tools: - A sharp knife to slice sweet potatoes easily. - A mixing bowl for combining chicken and sauce. - Parchment paper for easy cleanup on your baking sheet. Consider these alternative cooking methods: - Microwave sweet potatoes for quicker cooking. - Grill them for a smoky flavor and charred skin. Pro Tips Choose the Right Sweet Potatoes: Select firm, unblemished sweet potatoes for the best flavor and texture. Look for ones that are similar in size for even cooking. Customize Your Spice Level: Adjust the amount of buffalo sauce based on your preference. Start with a smaller amount and add more if you like it spicier! Add Extra Flavor: Try mixing in some crumbled blue cheese or ranch dressing into the buffalo chicken filling for a creamier texture and added flavor. Presentation Matters: For an appealing presentation, serve the stuffed sweet potatoes on a colorful platter and drizzle with extra buffalo sauce before serving. {{image_4}} For a vegetarian twist, swap the chicken with cooked quinoa or black beans. Both options pack a punch of protein and fiber. If you want a vegan version, use plant-based chicken substitutes mixed with buffalo sauce. Greek yogurt can be replaced with dairy-free yogurt. For gluten-free meals, all ingredients listed are naturally gluten-free. Just check the buffalo sauce label to ensure it meets your needs. Feel free to play with different sauces. Try barbecue sauce for a sweeter take or ranch for a creamy twist. You can mix in veggies like bell peppers or spinach into the buffalo chicken filling for added nutrients. Consider adding some diced celery or carrots for crunch. Don't forget to taste as you go to get the flavors just right. These stuffed sweet potatoes pair great with a fresh garden salad or crispy coleslaw. They add a nice crunch and balance to the meal. For drinks, a cold beer or a refreshing iced tea complements the flavors well. If you prefer non-alcoholic options, a fizzy lemonade works nicely too. Enjoy experimenting with these ideas. To keep your Buffalo Chicken Stuffed Sweet Potatoes fresh, store them in the fridge. Place them in an airtight container. They will stay good for about 3 to 4 days. If you want to store them longer, consider freezing. Wrap each stuffed potato tightly in foil or plastic wrap. Then, place them in a freezer-safe bag. They can last up to 2 months in the freezer. When ready to eat, reheat the stuffed sweet potatoes in the oven. Preheat your oven to 350°F (175°C). Place the potatoes on a baking sheet and cover with foil. This helps keep the filling moist. Heat them for about 20 minutes. You can also use a microwave for quick reheating. Just place them on a microwave-safe plate and cover. Heat for 1 to 2 minutes, checking often. To keep the filling flavorful, add a bit more buffalo sauce or Greek yogurt before reheating. This adds zest and keeps your meal exciting. How do I know when the sweet potatoes are cooked? You can tell when sweet potatoes are done by checking their softness. Use a fork to poke them. If they feel soft and the fork goes in easily, they are ready. Usually, this takes about 45 to 60 minutes at 400°F. Can I use rotisserie chicken for the filling? Yes, using rotisserie chicken is a great idea! It saves time and adds flavor. Just shred the chicken and mix it with buffalo sauce. This shortcut works well for busy days. What can I substitute for Greek yogurt? If you don’t have Greek yogurt, you can use sour cream. Plain yogurt or cottage cheese can also work. These options still keep the dish creamy and tasty. How spicy is the dish with standard buffalo sauce? The spice level depends on the buffalo sauce you choose. Standard buffalo sauce has a mild to medium heat. If you want less heat, use less sauce. If you love spice, feel free to add more! Can I make this recipe in advance? Yes, you can prepare this dish ahead of time! Bake the sweet potatoes and mix the filling. Store them separately in the fridge for up to two days. When you’re ready to eat, just stuff and bake them again for a quick meal. Buffalo chicken stuffed sweet potatoes are a tasty treat. You learned how to prep sweet potatoes, mix the filling, and assemble your dish. Plus, I shared storage tips to keep leftovers fresh. Remember, you can adjust spice levels and explore variations for different diets. Enjoy your cooking adventure! Keep experimenting with flavors and serving ideas. Your meals will always impress!

Buffalo Chicken Stuffed Sweet Potatoes Flavor Boost

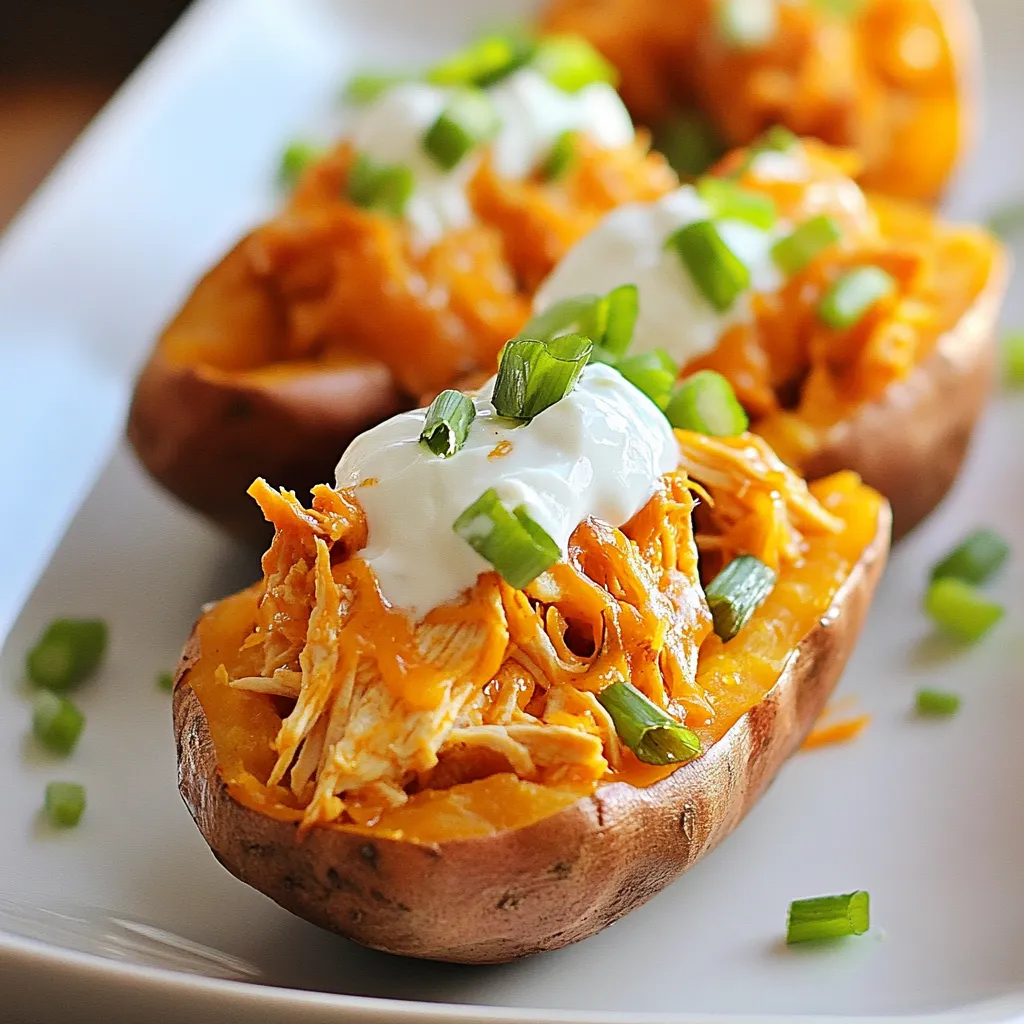
If you’re craving a dish that blends spicy and sweet in every bite, look no further! Buffalo Chicken Stuffed Sweet

- 1 cup creamy ricotta cheese - 1 pound ground beef or turkey - 1/2 cup seasoned breadcrumbs - 1/4 cup freshly grated Parmesan cheese - 2 cloves garlic, finely minced - 1 teaspoon dried oregano - 1 teaspoon fresh basil, finely chopped - 1/2 teaspoon sea salt - 1/4 teaspoon black pepper - 1 jar (24 oz) quality marinara sauce - Fresh parsley, finely chopped, for garnish - Olive oil, for frying These ingredients create a lovely balance of flavors and textures. The creamy ricotta cheese makes the meatballs soft and moist. Ground beef or turkey gives them a hearty base. The seasoned breadcrumbs help bind everything together. Parmesan cheese adds a nice salty kick. Garlic, oregano, and fresh basil bring depth to the dish. Sea salt and black pepper season the meatballs perfectly. Using a quality marinara sauce enhances the overall flavor of your meal. Fresh parsley on top not only looks great but also adds freshness. Olive oil is key for frying. It helps give the meatballs a nice golden crust. Each ingredient plays an important role. Together, they transform simple meatballs into a tasty dish that everyone will love. {{ingredient_image_2}} - In a large mixing bowl, combine: - 1 cup creamy ricotta cheese - 1 pound ground beef or turkey - 1/2 cup seasoned breadcrumbs - 1/4 cup grated Parmesan cheese - 1 large egg, lightly beaten - 2 cloves garlic, minced - 1 teaspoon dried oregano - 1 teaspoon fresh basil, chopped - 1/2 teaspoon sea salt - 1/4 teaspoon black pepper Mix everything with clean hands. Make sure it blends well but don’t overmix. - Take small portions of the mixture and roll them into meatballs. Each should be about 1.5 inches wide. You should make about 20 meatballs. Keep your hands wet to help shape them easily. - Searing the Meatballs: - Heat a skillet over medium heat. Add olive oil until it shimmers. - Add the meatballs in small batches. Don’t crowd the skillet. - Sear for 5-6 minutes, turning them until they are browned on all sides. - Baking Instructions: - Preheat your oven to 375°F (190°C). - In a large baking dish, pour half of the marinara sauce on the bottom. - Place browned meatballs on top, then drizzle with the rest of the sauce. - Cover the dish with aluminum foil. Bake for 20 minutes. - Remove the foil and bake for another 10 minutes, until cooked through. The meatballs should reach an internal temperature of 160°F (70°C). - Let them rest for a few minutes before serving. Garnish with fresh parsley for color. Avoid overmixing your meatball mixture. When you blend the ingredients, do it gently. Use your hands to combine the ricotta, meat, breadcrumbs, and spices. Overmixing can make meatballs tough instead of tender. Aim for a light touch, and you will enjoy soft, juicy meatballs. Fresh herbs and cheese can elevate your meatballs. I love using fresh basil for its bright taste. You can also add a bit of chopped parsley. These herbs will make your dish pop with flavor. Grated Parmesan adds a nice savory touch too. Don't be shy about experimenting with your favorite herbs! To ensure your meatballs are cooked properly, keep an eye on the time. Sear them in the skillet for about 5-6 minutes. Then, bake them in the oven at 375°F (190°C) for 30 minutes. Use a meat thermometer to check for doneness. The inside should reach 160°F (70°C). This way, you ensure safety and flavor in every bite! Pro Tips Use Fresh Herbs: Fresh basil and oregano can significantly enhance the flavor of your meatballs. If possible, opt for fresh over dried for a brighter taste. Don’t Overmix: While mixing the ingredients, be careful not to overwork the meat. This will help keep your meatballs tender and juicy. Experiment with Cheese: For an extra cheesy twist, consider adding mozzarella or fontina cheese into the meatball mixture for a gooey surprise. Rest Before Serving: Allow the meatballs to rest for a few minutes after baking. This helps the juices redistribute, making them even more flavorful and moist. {{image_4}} You can switch out ground beef for ground turkey or chicken. This makes the dish lighter but still tasty. Both options keep the meatballs moist. Ground turkey has less fat, while ground chicken can be just as juicy. Use the same steps in the recipe for all types of meat. If you need a gluten-free option, try using gluten-free breadcrumbs. They work just like regular ones. This swap helps keep the meatballs together while making them safe for those who avoid gluten. Look for brands that are certified gluten-free for the best results. You can spice things up by adding different herbs and veggies. Try mixing in chopped spinach or grated zucchini for extra nutrition. You can also add a pinch of red pepper flakes for heat. Fresh herbs like parsley or thyme can also boost the flavor. Get creative and make the dish your own! Store leftovers in an airtight container. Make sure to cool the meatballs first. They keep well in the fridge for about three days. Reheat them gently in the microwave or on the stove. Adding a little marinara sauce can help keep them moist. You can freeze these meatballs for later use. First, let them cool completely. Next, place them in a single layer on a baking sheet. Freeze until firm, then transfer them to a freezer bag. They can last up to three months in the freezer. To reheat, thaw them overnight in the fridge. Then, bake them in the oven at 350°F (175°C) until heated through, usually about 15-20 minutes. To keep the meatballs tasty, avoid high heat. Low and slow is best. Reheat them in a skillet over medium heat with a splash of marinara sauce. This method helps maintain their flavor and texture. You want them hot, but not dry. - Spaghetti or any pasta of your choice - Garlic bread for a crunchy side - A fresh green salad with light dressing - Roasted vegetables for a healthy option - Polenta for a creamy base These sides complement the rich flavor of the meatballs. You can also drizzle extra marinara sauce over them. This adds a nice touch and keeps everything moist. - Yes, you can make them in advance. - Mix the meatball mixture and shape them into balls. - Place them on a baking sheet and freeze until firm. - Transfer them to a container and store in the freezer. - You can also cook them and store leftovers in the fridge. Making ricotta meatballs ahead saves time when you are busy. Just heat them up later for a quick meal. - Use a meat thermometer to check the temperature. - The center should reach 160°F or 70°C. - Cut one open to check if it’s no longer pink. Cooking meatballs to the right temperature keeps them safe to eat. It also ensures they are juicy and tasty. In this blog post, we explored the key ingredients for ricotta meatballs, from creamy ricotta cheese to perfect seasoning blends. I shared step-by-step instructions for mixing, shaping, and cooking these delicious meatballs. We discussed tips for enhancing flavor and texture, as well as variations for different diets. Remember, testing the meatballs for doneness ensures a safe meal. By following these guidelines, you can create a tasty dish that pleases everyone. Enjoy making and sharing your ricotta meatballs with family and friends!

Ricotta Meatballs That Transform Your Dinner Plans

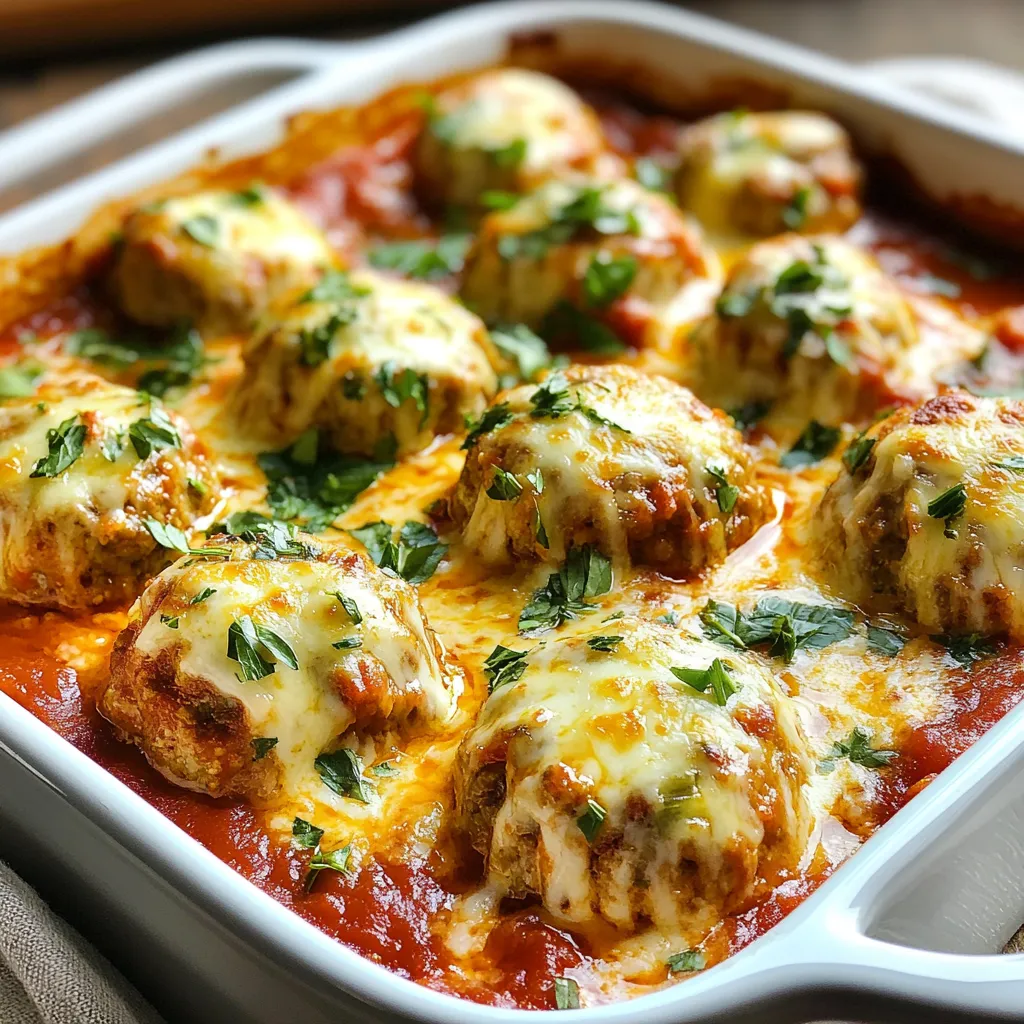
Are you ready to elevate your dinner game? These Ricotta Meatballs pack a delicious punch! With creamy ricotta cheese and

- 8 oz fettuccine or spaghetti - 2 cups chicken breast, diced - 4 tablespoons unsalted butter, divided - 6 cloves garlic, minced - 1 cup cherry tomatoes, halved - 1 cup fresh spinach leaves, tightly packed - 1/2 teaspoon red pepper flakes (optional for added heat) - Salt and freshly ground black pepper, to taste - 1/4 cup grated Parmesan cheese, plus extra for serving - Fresh basil leaves, for garnish When I cook Garlic Butter Chicken Pasta, I love using fresh ingredients. Fresh garlic gives a strong flavor. The chicken breast adds protein and is easy to cook. Butter gives the sauce a rich taste. I often use fettuccine or spaghetti. Both types hold the sauce well. I find that cherry tomatoes add sweetness. They burst and mix well with the garlic. Fresh spinach brings color and nutrients to the dish. Red pepper flakes add a kick, but I skip them sometimes. I prefer to let the other flavors shine. Always taste your food and adjust salt and pepper. For toppings, I sprinkle grated Parmesan on top. It adds a nice salty touch. Fresh basil leaves brighten the dish and look pretty. Choosing good ingredients makes a big difference in taste. {{ingredient_image_2}} - Bring salted water to a boil. - Cook fettuccine or spaghetti until al dente. - Reserve pasta water and drain. Cooking the pasta is the first step. I like to use a large pot. The salt helps flavor the pasta. Cook the pasta according to the package instructions. You want it al dente, which means firm to the bite. Remember to save some pasta water for later. - Melt 2 tablespoons of unsalted butter in a skillet. - Cook diced chicken until golden brown and fully cooked, about 6-8 minutes. - Set chicken aside. Next, heat a skillet over medium heat. Melt 2 tablespoons of unsalted butter. Add the diced chicken to the pan. Cook until golden brown, about 6 to 8 minutes. Make sure it cooks all the way through. Once done, move the chicken to a plate and set it aside. - Sauté minced garlic in remaining butter until fragrant. - Add halved cherry tomatoes and sauté until they burst. - Incorporate spinach and optional red pepper flakes. Now, let’s make the sauce. In the same skillet, add the rest of the butter. Once it melts, add minced garlic. Sauté for about one minute until it smells amazing. Then, toss in the halved cherry tomatoes. Cook them until they burst and soften. Finally, add fresh spinach and red pepper flakes if you like some heat. - Return chicken to the skillet and mix. - Add drained pasta and reserved pasta water. - Stir in grated Parmesan cheese and season to taste. It’s time to combine everything. Add the cooked chicken back to the skillet. Then, add the drained pasta and a splash of reserved pasta water. Toss everything gently with tongs. This helps the pasta soak up all the flavors. Finally, stir in grated Parmesan cheese. Taste and adjust the salt and pepper if needed. - Plate in warm bowls. - Garnish with basil leaves and extra Parmesan cheese. Serve the dish in warm bowls. This keeps it cozy and inviting. Add fresh basil leaves on top for color. You can also sprinkle extra Parmesan cheese if you want more flavor. Enjoy your garlic butter chicken pasta! To cook pasta al dente, boil a large pot of salted water. This adds flavor to your pasta. Add the fettuccine or spaghetti and stir. Follow the package time, but check it a minute early. The pasta should be firm yet tender. Save about half a cup of pasta water before draining. This water helps the sauce stick later. For chicken, season it well. Use salt and freshly ground black pepper. This will bring out the chicken's flavor. Sear the chicken until golden brown. This adds a nice crust and flavor. To adjust spice levels, add red pepper flakes. Start with a small pinch if you are unsure. You can always add more if you like heat. To add more veggies, think of options like bell peppers or zucchini. These can sauté with the tomatoes. They add color and nutrition. For a great plate, use warm bowls. This keeps the pasta hot longer. Twirl the pasta on a fork for a nice look. Garnish ideas go beyond basil. Use chopped parsley for a fresh touch. A sprinkle of extra Parmesan can make it pop. A slice of lemon on the side adds a nice color and scent. Pro Tips Tip Title: Use Fresh Ingredients: Always opt for fresh garlic, tomatoes, and spinach to enhance the flavor of your dish. Fresh ingredients make a significant difference in taste and nutrition. Tip Title: Reserve Pasta Water: Don’t forget to save some pasta water before draining! The starchy water helps to create a creamy sauce that adheres beautifully to the pasta. Tip Title: Adjust Spice Levels: If you prefer a milder dish, feel free to omit the red pepper flakes. You can also add them gradually to taste, ensuring you achieve your desired heat level. Tip Title: Perfectly Cooked Chicken: Ensure your chicken is cooked through by cutting it into small, uniform pieces. This helps in even cooking and prevents dry chicken in your pasta. {{image_4}} You can easily swap the chicken for shrimp or tofu. If you use shrimp, cook it for about 3 to 4 minutes until it turns pink. For tofu, cube it and sauté until golden brown. This change keeps the dish exciting and adds new flavors. Adjust your cook times based on the protein. Shrimp cooks fast, while tofu may need a bit longer to absorb flavors. Consider using whole wheat or gluten-free pasta for a healthier choice. Whole wheat adds fiber, while gluten-free options suit those with dietary restrictions. You can also try different shapes like penne or fusilli. These shapes hold sauce well and add a fun twist to your dish. Experimenting with pasta can truly change your meal. Adding lemon zest gives your dish a bright taste. This zing complements the garlic and butter perfectly. You can also try herbs like thyme or oregano for extra flavor. Spices like smoked paprika can deepen the taste. Mixing in different herbs or spices lets you create your own version of this delightful dish. To store leftover garlic butter chicken pasta, place it in an airtight container. Make sure to cool it to room temperature before sealing. This helps keep it fresh and safe to eat. You can keep it in the fridge for up to three days. When choosing containers, use glass or plastic ones that are safe for the fridge. This helps prevent any unwanted odors and maintains the taste. I like using clear containers so I can see what's inside. If you want to freeze portions, start by letting the pasta cool completely. Then, divide it into single servings. Place each serving in a freezer-safe container or a resealable plastic bag. This helps you grab a meal quickly later. You can freeze it for up to three months. When it’s time to reheat, avoid the microwave if you can. Instead, use a skillet over low heat. Add a splash of water or broth to keep it moist. Stir often to prevent sticking and drying out. This way, your pasta stays creamy and delicious. You can use shrimp, tofu, or turkey. Shrimp cooks quickly and adds a nice flavor. Tofu offers a great vegetarian option. If you choose turkey, pick lean ground turkey for a healthy twist. Adjust cooking times for each protein. Yes, you can! Cook the pasta and chicken in advance. Store them separately in airtight containers. This keeps the pasta from getting mushy. When ready to eat, just reheat and combine. Absolutely! Portion the pasta into containers. Add chicken and sauce to each. You can store it in the fridge for up to three days. For longer storage, freeze the portions. Just remember to leave out fresh herbs until you serve. You can add bell peppers, broccoli, or zucchini. All these veggies work well in garlic butter chicken pasta. Just sauté them with the garlic before adding chicken. This keeps them crisp and flavorful. The best way is to use a skillet. Heat it over medium heat, adding a splash of water. This helps keep the pasta moist. Stir gently until warmed through. You can also use the microwave, but add a bit of water to prevent drying. This blog post shared a simple and tasty garlic butter chicken pasta recipe. You learned about essential ingredients, like chicken, pasta, and fresh veggies. I offered tips for cooking, flavor, and presentation. You also found variations to make the dish your own. Finally, I provided storage info and answered common questions. Try this recipe next time you cook. Enjoy a delicious meal that is easy and fun!

Garlic Butter Chicken Pasta Delight in Minutes

If you crave a quick and tasty meal, you’ll love this Garlic Butter Chicken Pasta recipe. In just minutes, you

Older posts
Newer posts
← Previous Page1 … Page89 Page90 Page91 Next →

dsad

© 2025 dailydishcraft • Built with GeneratePress

Our Policies

  • Copyright Policy
  • Cookie Policy
  • GDPR Policy
  • Privacy Policy
  • Disclaimer
  • Terms Of Use

More Information

  • Home
  • About
  • Contact
  • Appetizers
  • Dessert
  • Dinner
  • Drinks
©2025, dailydishcraft About Back To Top