Skip to content
DisclaimerTerms Of UseGDPR PolicyCookie Policy

dailydishcraft

  • Home
  • Drinks
  • Appetizers
  • Dinner
  • Dessert
  • About
  • Contact
  • Privacy Policy
DisclaimerTerms Of UseGDPR PolicyCookie Policy

Jessica

- 2 large apples (preferably Fuji or Honeycrisp for optimal sweetness), sliced into wedges - 1/4 cup almond butter (or your favorite nut butter) - 1/4 cup Greek yogurt (choose plain or vanilla based on your flavor preference) - 2 tablespoons honey or maple syrup (optional for added sweetness) - 1/4 cup granola (select your favorite blend for texture and taste) - 2 tablespoons mini chocolate chips (or use dark chocolate shavings) - 1/4 teaspoon ground cinnamon - 1 tablespoon chia seeds (for a nutritious boost) - Fresh mint leaves, for garnish When making Healthy Apple Nachos, the type of apples you choose matters. I love using Fuji or Honeycrisp apples. They are sweet and have a nice crunch. Their flavor really stands out. You can also try Granny Smith apples for a tangy kick. Mixing apple types adds great taste and texture. You can add more flavors to your apple nachos! Here are some fun options: - Coconut flakes: They add a tropical twist. - Dried fruit: Raisins or cranberries give a chewy texture. - Nuts: Chopped walnuts or pecans add crunch and healthy fats. - Peanut butter: Swap for almond butter for a new taste. - Yogurt flavors: Try flavored yogurt for a fruity twist. Feel free to mix and match these add-ins. They can make your nachos even more special! For the full recipe, check out the Healthy Apple Nachos section. Start by washing your apples well. Use cold water to remove any dirt. Once clean, remove the cores. Slice the apples into thin wedges. Keep the skin on for color and nutrients. This makes them look and taste great! Next, take your almond butter or favorite nut butter. Arrange the apple slices on a large plate in a single layer. Spread the nut butter evenly over the apples. You can use a spoon or a squeeze bottle. This nutty layer adds a tasty base for your nachos. Now, it’s time to add more flavors! In a bowl, mix Greek yogurt with honey or maple syrup if you want it sweeter. Drizzle this creamy mixture over the apples and nut butter. Then sprinkle granola, mini chocolate chips, and chia seeds on top. Be sure to cover all the apples for a tasty bite. Finish by lightly dusting the nachos with cinnamon. This adds warmth and aroma. Lastly, add fresh mint leaves for a pop of color. Serve immediately to enjoy the crunch and freshness of your healthy apple nachos. For complete details, check the Full Recipe. To make your healthy apple nachos stand out, use a colorful platter. Arrange the apple slices in a fun pattern. You can layer them or overlap for a more dynamic look. Drizzle the almond butter and yogurt creatively for visual appeal. Adding a sprinkle of cinnamon on top not only tastes great but also adds a lovely touch of warmth. Serve extra nut butter and yogurt on the side. This way, guests can enjoy dipping their nachos, making it more interactive and fun! You can easily modify this recipe to fit your taste. If you prefer peanut butter, swap out the almond butter. For nut-free options, try sunflower seed butter or tahini. Greek yogurt can be replaced with dairy-free yogurt for a vegan version. For sweetness, use agave syrup instead of honey or maple syrup. You can also add fresh fruits like bananas or berries for a burst of flavor. Feel free to get creative with toppings, such as coconut flakes or nuts! Healthy apple nachos offer a variety of health benefits. Apples are high in fiber, which aids digestion and keeps you feeling full. Almond butter provides healthy fats and protein, which support heart health. Greek yogurt is rich in probiotics, promoting gut health. Chia seeds are packed with omega-3s and antioxidants, boosting overall wellness. Granola adds crunch and can provide whole grains, depending on the blend. Each ingredient contributes to a tasty snack that nourishes your body! {{image_4}} You can mix and match flavors to make your apple nachos special. Start with the nut butter. Almond butter adds a nice taste, but you can try peanut or cashew butter too. Each nut butter has its own flavor. For a sweet twist, drizzle honey or maple syrup on top. This adds a nice touch to the dish. Consider adding toppings like granola or mini chocolate chips. You can switch up the granola for a fruity mix or even a nutty blend. For chocolate lovers, dark chocolate shavings work well too. These choices enhance flavors and textures, making each bite exciting. The toppings can change with the seasons. In the fall, try adding chopped pecans or walnuts for crunch. A sprinkle of pumpkin spice can give a cozy vibe. During winter, consider using dried cranberries or pomegranate seeds. This adds color and a tangy burst. You can even swap fresh mint for rosemary for a fresh twist. These seasonal changes keep your apple nachos fresh and fun. For a diabetic-friendly version, focus on low-sugar toppings. Use nut butter without added sugar. Greek yogurt is a great choice because it is low in carbs. For sweetness, you can use a sugar substitute like stevia or erythritol. Be mindful of the granola; choose one with low sugar or skip it altogether. Add chia seeds and sprinkle more nuts for healthy fats and protein. This way, you can enjoy apple nachos while keeping your blood sugar steady. For the full recipe, check out Healthy Apple Nachos. To store leftover Healthy Apple Nachos, keep them in an airtight container. This will help keep the apples fresh. Place a paper towel at the bottom of the container. This absorbs extra moisture and keeps the apples crisp. Store the container in the fridge. Use leftovers within two days for the best flavor and texture. To keep your apples fresh longer, store them in a cool, dry place. Apples like colder temperatures, so the fridge works well. Keep apples away from other fruits. Ethylene gas from other fruits can cause apples to ripen too fast. Also, don’t wash apples until you are ready to eat them. Washing can lead to quicker spoilage. There is no need to reheat Healthy Apple Nachos. They taste best cold and fresh. If you want to enjoy them warm, try briefly microwaving them. Heat for just 10 seconds to soften the nut butter and yogurt. Be careful not to overheat, as this can make the apples mushy. Enjoy the nachos fresh for the best experience. Yes, you can! Other fruits work great for this snack. Try pears, bananas, or strawberries. Each fruit adds its own flavor. Just slice them thinly like apples. Keep in mind that different fruits may change the taste and texture. To make Healthy Apple Nachos vegan, swap the Greek yogurt for a plant-based yogurt. Use almond, coconut, or cashew yogurt for a great flavor. Make sure your nut butter is also vegan. Most nut butters are vegan-friendly. You can skip honey too and use maple syrup instead. Healthy Apple Nachos are nutritious and tasty. They offer vitamins from apples, protein from yogurt, and healthy fats from nut butter. Each serving has about 200-300 calories, depending on your toppings. They are rich in fiber, which helps digestion. The chia seeds add omega-3s too, making this snack a healthy choice. You can prepare the toppings in advance. Slice apples just before serving to keep them fresh. If you slice apples early, they may brown. To keep them fresh, soak them in lemon water for a few minutes. Rinse and dry before serving. You can get creative with your toppings! Try adding shredded coconut, dried fruit, or nuts. Seeds like pumpkin or sunflower can add crunch. If you like spice, a sprinkle of cayenne can add heat. Mix and match to find your favorite combo! They are easy to make and packed with nutrients! Apples offer fiber and vitamins. Nut butter adds protein and healthy fats. Greek yogurt gives a creamy texture and more protein. This snack is sweet, crunchy, and satisfying, making it perfect for any time of day. In this post, we explored how to make healthy apple nachos. We covered ingredients, key apple varieties, and optional add-ins. I shared step-by-step instructions for preparing apples and assembling the dish. We also offered tips for presentation and storage. Plus, we discussed fun variations and answered common questions. Healthy apple nachos are delicious and simple. They fit many diets and are great for any season. Enjoy trying different flavors and toppings. Your creative options can make this snack a favorite at any gathering!

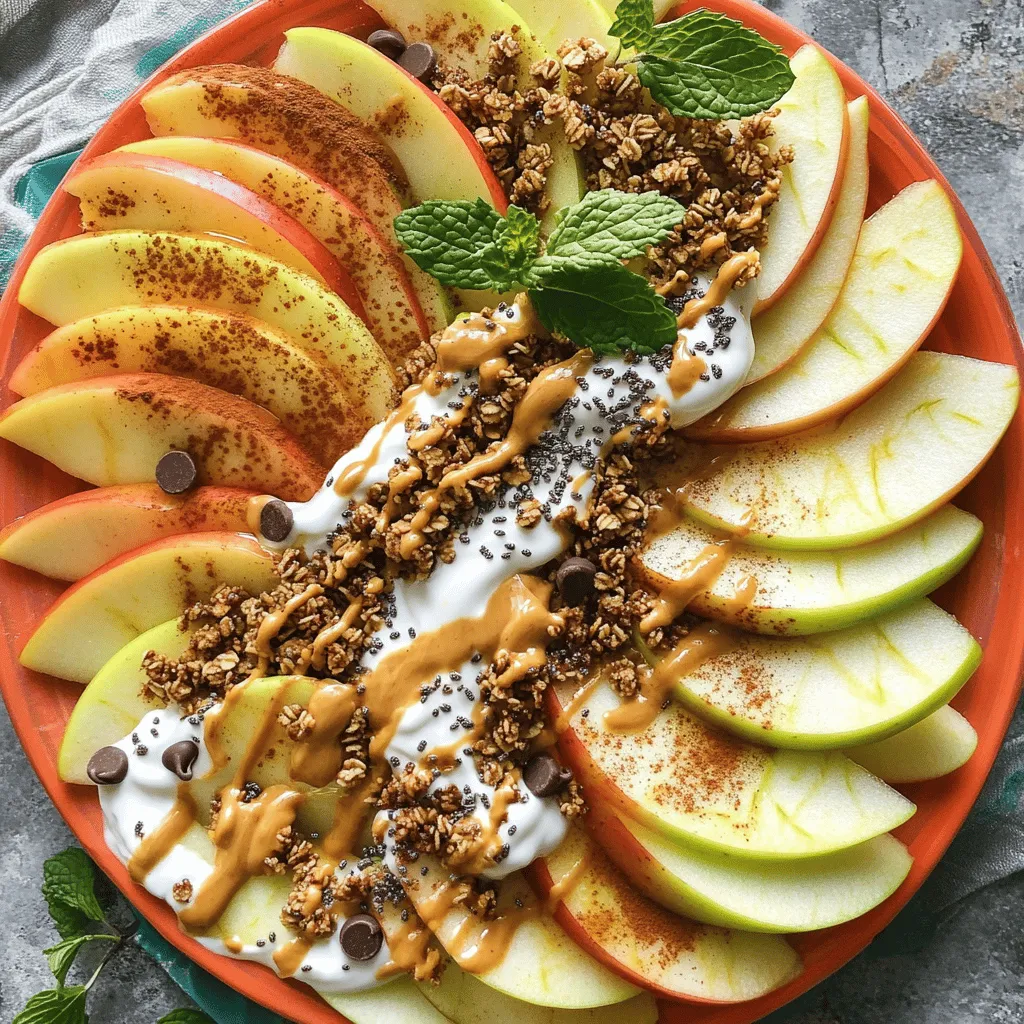
Healthy Apple Nachos Delightful and Simple Snack

Are you looking for a quick, tasty snack? Try Healthy Apple Nachos! This simple treat combines crisp apples and creamy

Here’s what you need to make milk and cookies fudge. Gather these ingredients before you start: - 1 cup sweetened condensed milk - 2 cups semi-sweet chocolate chips - 1 cup crushed cookies (such as Oreos or chocolate chip cookies) - 1/2 cup milk chocolate chips (for topping) - 1/2 teaspoon vanilla extract - Pinch of salt - Optional: Colorful sprinkles or additional cookie pieces for garnish Each ingredient plays a key role. Sweetened condensed milk brings creaminess. Semi-sweet chocolate chips add rich flavor, while crushed cookies give a fun texture. The milk chocolate chips on top make it extra special. The vanilla extract enhances the sweetness, and salt balances it all. Feel free to get creative! You can mix different cookie types or add unique toppings. This recipe is all about enjoying your time in the kitchen. Make sure to check out the Full Recipe for detailed steps on how to put it all together. To start, line an 8x8 inch baking pan with parchment paper. Leave some paper hanging over the edges. This makes it easy to lift the fudge out later. Lightly spray the parchment with non-stick cooking spray. This will help keep the fudge from sticking. Next, melt the chocolate mixture. In a medium saucepan, combine 1 cup of sweetened condensed milk and 2 cups of semi-sweet chocolate chips. Add a pinch of salt. Use low heat and stir the mixture. Keep stirring for 5-7 minutes until it is smooth and melted. Once the chocolate is melted, remove the pan from heat. Stir in 1/2 teaspoon of vanilla extract. Now, fold in 1 cup of crushed cookies. These can be Oreos or chocolate chip cookies. Make sure the cookies are spread evenly through the fudge. Carefully pour the fudge mixture into your prepared baking pan. Use a spatula to spread it evenly across the top. To eliminate air pockets, gently tap the pan against the counter. This helps the fudge settle nicely. For the topping, sprinkle 1/2 cup of milk chocolate chips on top of the fudge. If you want, add more crushed cookies or colorful sprinkles for fun. This makes your fudge look even better! Chill the fudge in your refrigerator for at least 2 hours. This helps it set and become firm. When it is ready, use the overhanging parchment to lift the fudge out of the pan. Place it on a cutting board. Cut the fudge into small squares or rectangles. These bite-sized pieces are perfect for sharing. For a nice presentation, arrange the fudge squares on a decorative platter. You can serve them in small paper cups for a special touch. A sprinkle of cookie crumbs on top adds a lovely finish to your treat. To avoid burning while melting chocolate, always use low heat. High heat can scorch the chocolate, ruining its flavor. Stir the mixture often as it melts. This keeps the chocolate from sticking to the pan. Continuous stirring is key. It helps the chocolate melt evenly. If you stop stirring, you risk clumping. This simple step gives your fudge a smooth texture. When choosing cookies for mixing, think about texture and taste. Crunchy cookies add a nice bite. Soft cookies can make your fudge chewy. Popular choices are Oreos and chocolate chip cookies. For toppings, get creative! Milk chocolate chips are great, but you can try white chocolate or dark chocolate. Consider adding crushed nuts or colorful sprinkles for extra flair. These toppings make your fudge stand out. One common mistake is not stirring enough. This can lead to uneven melting and texture issues. Always keep an eye on your fudge while it cooks. If your fudge does not set properly, it might need more time in the fridge. Make sure it chills for at least two hours. If it’s still soft, give it a little longer. For other mishaps, like crumbly fudge, check your cookie ratio. Too many cookies can make the fudge dry. Stick to the recipe for the best results. You can find the full recipe [here](#). {{image_4}} You can get creative with your milk and cookies fudge. Start by changing the cookie types. Try using peanut butter cookies or even ginger snaps. Each cookie gives a new taste and texture. For the chocolate, swap semi-sweet chips for dark or white chocolate. This change adds a fun twist to the flavor. Making a vegan version is easy! Use coconut milk instead of sweetened condensed milk. Choose dairy-free chocolate chips to keep it plant-based. For gluten-free options, select gluten-free cookies. Check labels to be sure they fit your diet. You can still enjoy fudge without missing out. To make your fudge special, add unique ingredients. Chopped nuts like walnuts or almonds give a great crunch. A drizzle of caramel on top can make it even sweeter. For holidays, think about adding festive sprinkles or a hint of peppermint. These little touches can make a big difference in taste and fun. Feel free to explore these variations and enjoy the process of making this delightful treat. For the complete recipe, check out the Full Recipe for more details! To keep your milk and cookies fudge fresh, store it in an airtight container. This helps prevent moisture from ruining the texture. I recommend using a glass or plastic container with a tight seal. If you stack fudge layers, place parchment paper between them to avoid sticking. When stored in the fridge, your fudge will last about two weeks. Look for signs of spoilage, like a hard or dry texture, or unwanted smells. If it looks or smells off, it's best to toss it. Fresh fudge should stay soft and sweet. Freezing fudge is easy! Here's how to do it step-by-step: 1. Cut the Fudge: First, slice the fudge into squares. 2. Wrap Each Piece: Use plastic wrap to cover each piece tightly. This keeps air out. 3. Place in a Freezer Bag: Put the wrapped fudge in a freezer bag or container. Label it with the date. 4. Freeze: Place the bag in the freezer. Fudge can stay good for up to three months. When you’re ready to enjoy your fudge, remove it from the freezer. - Thawing Tips: Let it sit at room temperature for about 30 minutes. This brings back its soft texture. Enjoy it as is, or use it to top ice cream or desserts. For a delicious treat, try the full recipe for milk and cookies fudge! Making milk and cookies fudge takes about 2 hours and 15 minutes. This includes 15 minutes for prep and 2 hours for chilling. The chilling time is key to firming up the fudge. Trust me, waiting makes it taste even better! Yes, you can use other cookies! Oreos and chocolate chip cookies work great. Feel free to mix it up with peanut butter cookies or even gingersnaps. Just crush them well and fold them into the fudge mixture. To cut fudge, lift it out of the pan using the parchment paper. Use a sharp knife for clean cuts. Wipe the knife between cuts for neat squares. This keeps your fudge looking nice and tidy. - Additional common questions related to fudge making and recipes: - How can I make my fudge creamier? You can add a little more sweetened condensed milk. This helps with creaminess. - Why did my fudge not set? If it does not set, it might need more chilling time. Always check the fridge! - Can I add nuts to my fudge? Absolutely! Chopped nuts add a nice crunch and flavor. Just mix them in with the cookies. In this post, I covered how to make delicious milk and cookies fudge. You learned about the key ingredients, from sweetened condensed milk to crushed cookies. I provided easy steps for preparation, assembling, and chilling your fudge. You also discovered tips for perfect texture and fun variations. Remember, customizing your fudge can make it unique. Don't shy away from trying new flavors. With a little care, you will create a treat that everyone will love. Enjoy making your fudge!

Milk and Cookies Fudge Simple and Tasty Treat

If you love sweet treats, you’re in for a delight! Milk and Cookies Fudge is easy to make and taste

- 4 medium zucchinis - 1 cup grated Parmesan cheese - 1 cup breadcrumbs - Olive oil spray or drizzling oil The base of this dish is the zucchini. Choose firm, fresh zucchinis for the best taste. I love using medium-sized ones, as they hold up well during baking. The cheese adds a rich, salty flavor, and the breadcrumbs give a nice crunch. - Garlic powder - Dried oregano - Smoked paprika - Salt and black pepper Seasoning is key to elevating this dish. Garlic powder gives a savory kick. Dried oregano adds an earthy tone, while smoked paprika brings a hint of smokiness. Salt and black pepper enhance all the flavors, making each bite pop. - Fresh parsley - Lemon wedges Garnishes can make your dish shine. Fresh parsley adds color and freshness. A squeeze of lemon brightens the flavors and gives a zesty finish. For a full guide, check out the Full Recipe. 1. Preheat your oven to 425°F (220°C). This heat helps the zucchini get crispy. 2. Line a baking sheet with parchment paper. This makes for easy cleanup and prevents sticking. 3. In a large bowl, combine grated Parmesan cheese, breadcrumbs, garlic powder, dried oregano, smoked paprika, salt, and black pepper. Mix well so everything is blended together. 1. Take your zucchinis and slice them into 1/4-inch thick rounds. Aim for even slices for uniform cooking. 2. Place the sliced zucchini on a paper towel. Gently press them to absorb moisture. This step is key for a crispy treat. 1. Lightly spray your baking sheet with olive oil. This helps the zucchini not stick. 2. One by one, dip each zucchini slice into the cheese and breadcrumb mix. Make sure each slice is well-coated for a tasty crust. 3. Arrange the coated zucchini slices in a single layer on your baking sheet. If using olive oil, drizzle it over the tops to help them crisp up. 4. Place the baking sheet in your preheated oven. Bake for 20-25 minutes. Look for golden brown tops and tender zucchini. 5. Once done, take them out and let them cool for a few minutes. Just before serving, sprinkle with fresh parsley for a pop of color. Follow the Full Recipe for more detailed steps! To get crispy zucchini, start with moisture removal. Zucchini has a lot of water. If you don’t remove some, it will steam instead of bake. After slicing the zucchini, place the rounds on a paper towel. Press gently to soak up excess water. This step makes a big difference in texture. Next, use the right oven temperature. Preheat your oven to 425°F (220°C). A hot oven helps to crisp the zucchini quickly. It also browns the cheese and breadcrumbs nicely. This way, you get that golden crust we all love. When serving Baked Parmesan Zucchini, presentation matters. Use a rustic wooden platter for a charming look. Add fresh lemon wedges on the side. Their bright color and flavor enhance the dish. A sprinkle of extra parsley on top adds a nice touch, too. For pairing ideas, serve with grilled chicken or fish. The flavors balance well and make a complete meal. You can also enjoy it as a tasty snack or appetizer. Pair it with a zesty dipping sauce for extra fun. For the full recipe, check out Baked Parmesan Zucchini Surprise. {{image_4}} You can switch out the Parmesan cheese for other kinds. Use sharp cheddar for a bold flavor. Mozzarella brings a nice meltiness. Try feta for a tangy twist. Grated pecorino adds saltiness, which is great too. Each cheese gives a new taste to your baked zucchini. Spices can change the whole dish. Add a pinch of red pepper flakes for heat. Italian seasoning gives a nice, herbal taste. Try fresh herbs like basil or thyme for brightness. A squeeze of lemon juice before serving can give it a fresh kick. Don't be afraid to experiment with flavors you love. If you need a gluten-free option, use ground almonds or chickpea flour. Both work well and add a unique flavor. Panko breadcrumbs are a great choice too. They give an extra crunch that you will enjoy. Try using a mix of different breadcrumbs for more texture. For the details on making Baked Parmesan Zucchini, see the [Full Recipe]. For short-term storage, keep your baked Parmesan zucchini in the fridge. Place them in an airtight container. They will stay fresh for up to three days. Before sealing, let them cool to room temperature. This helps prevent moisture buildup. If you want to freeze them, first allow the zucchini to cool completely. Spread the slices on a baking sheet in a single layer. Freeze them for about two hours until firm. Then, transfer the slices to a freezer bag. Remove as much air as possible. They can last for up to three months in the freezer. To reheat your baked Parmesan zucchini, use the oven for best results. Preheat your oven to 350°F (175°C). Place the zucchini in a single layer on a baking sheet. Bake for about 10-15 minutes. This will keep them crispy and warm. You can also use an air fryer. It’s quick and helps to maintain that crunchy texture. Set the air fryer to 350°F (175°C) and heat for about 5-7 minutes. Enjoy your tasty treat just as you did the first time! How can I make baked zucchini more flavorful? To boost flavor, add herbs like thyme or basil. You can also mix in some red pepper flakes for heat. A squeeze of lemon juice right before serving adds a bright taste. Can I use a different type of squash? Yes, you can use yellow squash or pattypan squash. These varieties work well and taste great when baked. Just cut them into similar-sized rounds to ensure even cooking. What should I serve with baked Parmesan zucchini? Baked Parmesan zucchini pairs well with grilled chicken or fish. You can also serve it alongside a fresh salad or pasta. It makes a great side dish or a tasty snack on its own. For a complete guide, check out the Full Recipe for all the details. Baked Parmesan zucchini is a simple, tasty dish. We covered key ingredients, preparation steps, and tips for perfecting this snack. Don’t forget to add your favorite herbs or even different cheeses for fun! Storage is easy, too, so you can savor it later. Enjoy experimenting with flavors and sharing this dish with friends and family. This recipe is sure to become a favorite in your kitchen.

Baked Parmesan Zucchini Flavorful and Crispy Treat

Looking for a tasty snack or side dish that stands out? My Baked Parmesan Zucchini is flavorful and crispy! With

To make a tasty Teriyaki Chicken Casserole, you'll need these main ingredients: - 2 cups cooked white rice - 1 pound boneless, skinless chicken thighs, diced - 1 cup fresh broccoli florets - 1 cup bell peppers, sliced - 1 cup shredded carrots - 1 cup low-sodium teriyaki sauce - 1 cup shredded mozzarella cheese, divided - 2 green onions, chopped - 1 tablespoon sesame seeds - Salt and pepper to taste - 1 tablespoon olive oil When selecting fresh vegetables, look for bright colors and firm textures. For broccoli, choose florets that are deep green. Bell peppers should feel heavy for their size. Carrots should be crisp and not soft. Freshness matters for flavor! You can make this dish healthier by using brown rice instead of white. Brown rice has more fiber and nutrients. Look for low-sodium teriyaki sauce to cut back on salt. You can also add more veggies like snap peas or zucchini for extra nutrition. For the full recipe, check the instructions above! First, you need to preheat your oven to 375°F (190°C). This step is key. A hot oven helps cook the casserole evenly. While the oven heats, grab a 9x13 inch baking dish and grease it lightly. This will help the casserole not stick. Next, let's cook the chicken. Heat 1 tablespoon of olive oil in a large skillet over medium heat. Add 1 pound of diced chicken thighs. Season it with salt and pepper. Sauté the chicken for about 5-7 minutes. You want it browned and cooked through. Stir it often to avoid burning. Now, it's time to add the veggies. Toss in 1 cup each of fresh broccoli florets, sliced bell peppers, and shredded carrots. Cook these for about 3-4 minutes. This way, the veggies will soften but still have some crunch. After that, reduce the heat. Pour in 1 cup of low-sodium teriyaki sauce. Stir everything well. Let it simmer for 2-3 minutes. The flavors will blend beautifully. In a large mixing bowl, combine the cooked rice with the chicken and veggies. Use 2 cups of cooked white rice. Mix in half of the shredded mozzarella cheese and half of the chopped green onions. Fold everything gently. This step is vital for even flavor distribution. Now, transfer this mixture into your greased baking dish. Spread it evenly across the dish. For that cheesy finish, sprinkle the rest of the mozzarella cheese on top. This will create a lovely, gooey layer as it bakes. Cover the casserole dish tightly with aluminum foil. Place it in your preheated oven and bake for 25 minutes. This allows the flavors to meld together. After 25 minutes, carefully remove the foil. Return the casserole to the oven. Bake for an extra 10-15 minutes. You want the cheese to be bubbly and golden brown. Once done, take the casserole out of the oven. Let it rest for a few minutes before serving. This resting time helps the flavors settle. Just before serving, garnish with remaining green onions and a sprinkle of sesame seeds for extra flavor and crunch. For the full recipe, please refer to the earlier sections. Marinating your chicken makes it tastier. I recommend marinating for at least 30 minutes. This gives the teriyaki sauce time to soak in. You can even marinate it overnight for deeper flavor. Try adding a splash of lime juice or garlic for extra kick. You might also consider using soy sauce or honey for a twist. Pair the casserole with simple side dishes. Steamed rice or a fresh salad works well. For a fun touch, serve with chopsticks and forks together. You can also add a sprinkle of sesame seeds on top for extra crunch. This adds visual flair too. To keep your casserole moist, avoid overcooking the chicken. Cook it just until it’s done. If you want a saucy dish, use less rice. Adjust the teriyaki sauce to match your taste. If you love spice, add a pinch of red pepper flakes. Always taste before serving to ensure it’s just right. {{image_4}} You can make teriyaki chicken casserole fit your diet. For gluten-free needs, choose tamari instead of regular soy sauce. Tamari has a rich flavor similar to soy sauce but is made without wheat. Many grocery stores carry gluten-free teriyaki sauce too. If you want plant-based options instead of chicken, try tofu or tempeh. Both soak up the teriyaki sauce well and give a great texture. You can also use chickpeas for a protein punch. Just sauté them with the veggies for a hearty dish. Adding spices and herbs can give your casserole a new twist. Try ginger or garlic powder for extra zing. Fresh herbs like cilantro or basil can brighten the dish. Don’t be afraid to mix and match flavors! You can also add different veggies. Snap peas bring a nice crunch, while zucchini adds moisture. Carrots, bell peppers, and broccoli are great, but don’t be shy to experiment. Fresh corn or baby corn could add some sweetness. When it comes to cheese, you have choices! Cheddar cheese gives a sharp taste, while Monterey Jack melts smoothly. For a twist, blend different cheeses for a unique flavor. If you prefer dairy-free, there are vegan cheese options. Look for brands that melt well, like cashew-based cheese. Some almond or coconut cheese can work too. They may not melt like real cheese, but they can still add creaminess to your casserole. For the full recipe, check out the Teriyaki Chicken Casserole page. To store leftover Teriyaki Chicken Casserole, let it cool first. Place it in a sealed container. This keeps it fresh for up to three days in the fridge. When reheating, use the oven for best results. Preheat the oven to 350°F (175°C). Cover the casserole with foil to prevent it from drying out. Heat for about 20-25 minutes until it’s hot all the way through. You can freeze this casserole before cooking it. Prepare the dish as directed but do not bake it. Instead, cover it tightly with plastic wrap and aluminum foil. This helps prevent freezer burn. You can freeze it for up to two months. When you're ready to cook, take it out of the freezer. Let it thaw in the fridge overnight. Once thawed, bake it in the preheated oven at 375°F (190°C) for about 40-45 minutes. This ensures it cooks evenly. Enjoy your delicious meal! For the complete recipe, you can refer to the [Full Recipe]. To make Teriyaki Chicken Casserole healthier, you can: - Use brown rice instead of white rice for added fiber. - Choose skinless chicken breasts to lower fat content. - Add more vegetables like spinach or zucchini for extra nutrients. - Substitute low-calorie teriyaki sauce or make your own. - Limit cheese or use a lighter cheese option like mozzarella. These tweaks help cut calories while keeping the dish tasty and satisfying. Yes, you can use brown rice! Brown rice adds a nutty taste and more fiber. However, it does take longer to cook. - Cook brown rice for about 30-40 minutes before mixing it in. - Keep in mind that brown rice may make the casserole a bit chewier. - Adjust the cooking time to ensure everything is warm and cooked through. If you want to swap out chicken, consider these options: - Tofu: Firm tofu works well and absorbs flavors nicely. - Tempeh: This has a hearty texture and is great for protein. - Portobello mushrooms: These add a meaty flavor and are packed with nutrients. - Cooked chickpeas: They are a great plant-based protein and add texture. These alternatives can make the dish vegan while still being delicious. To reheat the casserole, follow these steps: - Preheat your oven to 350°F (175°C). - Cover the casserole with foil to keep it moist. - Heat for about 20-25 minutes or until warmed through. - You can also use a microwave; just cover it and heat in 1-minute intervals. This way, the casserole stays flavorful and doesn’t dry out. For the full recipe, check out the cooking instructions above. Teriyaki Chicken Casserole combines fresh ingredients, quick steps, and tasty flavors. We explored key ingredients, cooking tips, and how to avoid common mistakes. Remember to choose fresh veggies and cook your chicken well. Don’t forget to let the casserole rest before serving for the best taste. With these ideas, you can make a delightful meal everyone will enjoy. Enjoy experimenting with the variations to suit your taste!

Teriyaki Chicken Casserole Flavorful Comfort Dish

Are you ready for a dish that warms the heart and satisfies the tummy? This Teriyaki Chicken Casserole blends savory

- 6 cups fresh broccoli florets - 1 medium onion, finely diced - 2 cloves garlic, minced - 4 cups vegetable broth - 2 cups sharp cheddar cheese, shredded - 1 cup heavy cream - 2 tablespoons olive oil Fresh broccoli florets are the star of this dish. They add a vibrant color and packed nutrients. I like to use a medium onion to bring sweetness and depth. Minced garlic adds a warm, aromatic touch. For the broth, vegetable broth works great, enhancing the flavors. Sharp cheddar cheese provides that rich, cheesy goodness. Heavy cream gives the soup a nice, silky texture. - 1 teaspoon paprika - 1 teaspoon salt - ½ teaspoon black pepper - ½ teaspoon nutmeg - Optional spices for added flavor Seasoning is key to making this soup pop. I use paprika for a mild smokiness. Salt and black pepper balance the flavors. Nutmeg rounds it off with a touch of warmth. Feel free to add optional spices, like cayenne or herbs, to suit your taste. - Croutons - Fresh parsley and other toppings Garnishing your soup makes it visually appealing. Croutons add a delightful crunch. Fresh parsley gives a pop of color and freshness. You can also try adding a drizzle of cream for a fancy touch. These garnishes elevate your soup from good to great! For the full recipe, check out the details in the article. Sautéing onions and garlic Start by heating 2 tablespoons of olive oil in a skillet over medium heat. Add 1 medium onion, finely diced. Cook for about 5 minutes. You want the onion to look clear and soft. Then, stir in 2 minced garlic cloves. Cook for 1 to 2 minutes more. The smell will be amazing! Preparing the broccoli While the onion and garlic cook, wash 6 cups of fresh broccoli florets. Cut them into smaller pieces if needed. This helps the broccoli cook evenly and blend well later. Layering and adding broth In your slow cooker, place the broccoli florets first. Spread the sautéed onion and garlic on top of the broccoli. Pour in 4 cups of vegetable broth. Make sure everything is covered with broth. Incorporating seasonings Sprinkle in 1 teaspoon of paprika, 1 teaspoon of salt, ½ teaspoon of black pepper, and ½ teaspoon of nutmeg. Gently stir to mix everything well. This step adds so much flavor! Choosing settings: low vs. high Cover the slow cooker and pick your cooking setting. You can choose low for 4 to 5 hours or high for 2 to 3 hours. Both will work well. Cooking time details Check the broccoli after the cooking time. It should be fork-tender and ready to blend. If it needs more time, just cook a bit longer. Using an immersion blender Once the soup is ready, use an immersion blender right in the slow cooker. This tool makes blending easy. Blend until the soup is smooth and creamy. Traditional blender alternative If you don’t have an immersion blender, pour the soup into a traditional blender in batches. Blend each batch until it’s silky. Be careful with hot soup! After blending, return the soup to the slow cooker. Now, stir in 1 cup of heavy cream and 2 cups of shredded sharp cheddar cheese. Mix until the cheese melts. Taste the soup and adjust the seasoning if needed. Let it cook on low for another 30 minutes. This allows the flavors to mix perfectly. To get that perfect creamy texture, blending is key. I prefer using an immersion blender right in the slow cooker. This method is easy and keeps cleanup minimal. Blend until the soup is smooth. If you want a chunkier texture, blend just half of the soup. If your soup is too thick, simply add more vegetable broth. Stir it in slowly until you reach your desired consistency. For a thicker soup, let it cook longer without the lid. This helps the soup reduce and become richer. To give your soup a flavor boost, experiment with spices and herbs. Add a pinch of garlic powder or a dash of cayenne for heat. Fresh herbs like thyme or basil also work wonders. Just remember to add these toward the end of cooking for the best flavor. Switching up the cheese can make a big difference too. While sharp cheddar is classic, try Gruyère or a blend of cheeses for added depth. Mixing cheeses can give your soup a unique touch. Serving your soup well makes it even more enjoyable. Use rustic bowls to create a warm feel. Top each bowl with crunchy croutons and fresh parsley for color. You can also drizzle a bit of heavy cream on top for a lovely finish. For a fun twist, consider adding some crispy bacon bits or a sprinkle of chili flakes. These garnishes add texture and visual appeal. They also invite everyone to dive right in! {{image_4}} You can make your broccoli cheese soup heartier by adding protein. Chicken is a great choice. Simply cook and shred it before mixing it into the soup. This adds flavor and keeps you full. If you prefer a plant-based option, use beans. White beans or chickpeas work well. They add a nice texture and protein too. You can mix them in during the last 30 minutes of cooking. Feel free to mix other green vegetables into your soup. Spinach or kale can add color and nutrients. Just chop them up and toss them in during the last hour of cooking. You can also adapt the soup to the seasons. In the fall, add squash or sweet potatoes. In the spring, try peas or asparagus for a fresh taste. You can adjust the creaminess to fit your needs. For a dairy-free version, use coconut milk or almond milk instead of heavy cream. This gives a nice flavor while keeping it creamy. If you want a lighter soup, reduce the cream or use half-and-half. This keeps the richness while cutting back on calories. For a thicker soup, use more cheese or add some cream cheese. This will enhance the flavor and texture. Try these variations in your slow cooker broccoli cheese soup for a fun twist! Explore the [Full Recipe] to get started. Store your leftover broccoli cheese soup in an airtight container. Make sure to let it cool first. This helps keep the flavors fresh. In the fridge, it lasts about 3 to 4 days. If you want to enjoy it later, double-check for any signs of spoilage before eating. Freezing this soup is a great option for long-term storage. First, let it cool completely. Then, pour it into freezer-safe containers. Leave a little space at the top for expansion. This soup can stay good for up to 3 months. When you're ready to eat it, move the container to the fridge overnight to defrost. For quick reheating, you can use the microwave or heat it on the stove over low heat. Portion the soup into single servings. This makes it easy to grab for lunch or dinner. Pair it with a simple salad or a slice of crusty bread for a full meal. You can also add some grilled cheese sandwiches on the side for a cozy touch. Keep your meal prep simple and fun! Check out the Full Recipe for more ideas on how to enjoy this creamy delight. Yes, you can use frozen broccoli. It saves time and effort. Frozen broccoli is cut and blanched before freezing. This helps it keep its color and nutrients. You do not need to thaw it before use. Just toss it into the slow cooker. However, note that frozen broccoli may have a softer texture after cooking. If your soup is too thick, add more broth or water. Start with a little at a time. Stir well and check the consistency. If it’s still thick, add more liquid until it reaches your desired texture. You can also blend in some extra cream for a richer taste. Yes, you can make this soup ahead. Cook it as directed and let it cool. Store it in an airtight container in the fridge for up to three days. To reheat, warm it on the stove or in the microwave. Stir well to combine. Crusty bread works well with this soup. Try sourdough or a hearty whole wheat loaf. You can also use soft rolls for a nice touch. Garlic bread is another tasty option. It adds flavor and crunch to each bite. Yes, you can make this soup vegan! Use plant-based cheese instead of dairy cheese. Swap heavy cream with coconut cream or cashew cream. Replace vegetable broth with homemade broth for extra flavor. These changes keep the soup creamy and delicious. You can find the full recipe [here]. This blog post outlined how to make a delicious broccoli cheese soup. We explored the key ingredients, from fresh broccoli to the right cheese. You learned about cooking in a slow cooker and blending to get the perfect texture. I shared tips for enhancing flavor and creative presentation. Finally, we discussed storage methods and tasty variations. This soup is easy to make and can fit many diets. Enjoy exploring all the options!

Slow Cooker Broccoli Cheese Soup Creamy Delight

Are you ready for a creamy, comforting bowl of Slow Cooker Broccoli Cheese Soup? This dish combines fresh broccoli, savory

Gather these ingredients to make delicious carrot cake bars. The flavors mix well, and they create a lovely treat. - 2 cups grated carrots - 1 cup all-purpose flour - 1 cup packed brown sugar - 1/2 cup granulated sugar - 1/2 cup vegetable oil - 3 large eggs - 1 teaspoon vanilla extract - 1 teaspoon ground cinnamon - 1/2 teaspoon ground nutmeg - 1/2 teaspoon baking powder - 1 teaspoon baking soda - 1/2 teaspoon salt - 1/2 cup crushed pineapple, well-drained - 1/2 cup chopped walnuts or pecans (optional) - 1/4 cup shredded coconut (optional) - Cream cheese frosting (for topping) Use fresh ingredients for best results. Grating the carrots adds moisture and flavor. If you like nuts or coconut, add them for extra texture. This recipe is easy and gives you a big batch. You can find the full recipe above to guide you through the steps. Preheating the Oven Start by preheating your oven to 350°F (175°C). This ensures even baking. Preparing the Baking Pan Grab a 9x13-inch baking pan. Grease it lightly or line it with parchment paper. This helps with easy removal later. Combining Sugars and Oil In a large mixing bowl, add brown sugar, granulated sugar, and vegetable oil. Whisk until the mixture is smooth and well blended. Incorporating Eggs and Vanilla Add three large eggs one at a time. Whisk well after each egg. Stir in the vanilla extract until fully combined. Mixing Carrot Ingredients In another bowl, combine the grated carrots with the drained crushed pineapple. You can add nuts or coconut if you like. Combining Dry Ingredients In a separate bowl, sift together the flour, cinnamon, nutmeg, baking powder, baking soda, and salt. Mix well to ensure all dry ingredients are evenly distributed. Blending Wet and Dry Mixtures Gradually add the dry mixture to the wet mixture. Stir gently just until combined. Avoid overmixing to keep the bars tender. Baking and Cooling Steps Fold the carrot mixture into the batter until evenly mixed. Pour the batter into the prepared pan. Bake for 25-30 minutes. The bars are done when a toothpick comes out clean. Let them cool completely in the pan on a wire rack. You can find the complete recipe in the Full Recipe section. Ensuring Moisture in the Bars To keep your carrot cake bars moist, use fresh, finely grated carrots. The moisture in the carrots adds softness. Adding crushed pineapple also helps. Make sure it's well-drained to avoid extra water. The right amount of oil keeps the bars rich and tender. Avoiding Overmixing When mixing your batter, mix just until combined. Overmixing can make the bars tough. Gently fold in the carrots and other ingredients. This keeps the texture light and fluffy. Remember, lumps are okay; they give character to your bars. How to Spread Cream Cheese Frosting Once the bars cool completely, it’s time to frost. Use a spatula to spread cream cheese frosting evenly on top. Start from the center and work your way out. For a smooth finish, dip the spatula in warm water before spreading. Decorative Finishing Touches For a beautiful finish, consider adding a sprinkle of chopped nuts or shredded coconut on top of the frosting. You can also dust with powdered sugar for an elegant touch. Use a piping bag for fun designs if you're feeling creative! Presentation Ideas for Serving Arrange your carrot cake bars on a colorful platter. Add some fresh mint leaves for a pop of color. You can even serve them with a scoop of vanilla ice cream for extra indulgence. Best Time to Serve These bars shine at gatherings and parties. Serve them at afternoon tea or as a sweet dessert after dinner. They also make a great treat for potlucks. You can enjoy them anytime, but they taste best fresh! For the full recipe, follow the instructions above. {{image_4}} You can add spices to make your carrot cake bars pop! Try mixing in ginger or allspice. These spices enhance the flavor and make each bite exciting. You can also substitute ingredients for fun twists. Swap half of the grated carrots for zucchini. This adds moisture and a unique taste. Use different nuts like pecans or almonds for more crunch. Don't forget to sprinkle in some chocolate chips for a sweet surprise! If you need gluten-free options, use almond flour or coconut flour instead of all-purpose flour. These flours work well and keep the bars tasty. Just make sure to check the baking time, as gluten-free flours may bake faster. For vegan alternatives, replace the eggs with flax eggs. Mix one tablespoon of ground flaxseed with three tablespoons of water. Let it sit for a few minutes until it thickens. You can also use a plant-based oil instead of vegetable oil. This keeps your bars rich and flavorful! Want fewer bars? You can halve the recipe easily. Just use a smaller pan and cut the baking time in half. Keep an eye on them as they bake! If you have a big crowd, double the recipe. Use a larger pan and bake for a little longer. These decadent carrot cake bars are sure to delight everyone at your gathering. Enjoy them fresh with a cup of tea or coffee! For the full recipe, check out the recipe section above! To keep your decadent carrot cake bars fresh, use these simple storage tips: - Room Temperature Storage: If you plan to eat the bars within a few days, store them at room temperature. Place them in an airtight container. This method keeps them moist and tasty for up to 3 days. - Refrigeration Tips: For longer storage, pop them in the fridge. Use an airtight container to avoid drying out. They will stay fresh for about a week. Just make sure to let them sit at room temp for a few minutes before serving. - How to Freeze Carrot Cake Bars: To freeze these bars, cut them into squares. Wrap each piece tightly in plastic wrap. Then, place them in a freezer-safe bag or container. This keeps them fresh for up to three months. - Thawing and Reheating Tips: When you’re ready to enjoy, take out the bars and leave them in the fridge overnight. For a warm treat, you can microwave them for about 15 seconds. This will make them soft and delicious again! For the complete recipe, check out the Full Recipe above. How long do carrot cake bars last? Carrot cake bars last about 4 to 5 days at room temperature. Store them in an airtight container to keep them fresh. If you refrigerate them, they can last a week or more. Can I make these bars ahead of time? Yes, you can make these bars ahead of time. They taste even better after a day in the fridge. Just frost them right before serving for the best taste. What is the best way to cut the cake bars? To cut the bars neatly, use a sharp knife. Dip the knife in warm water and wipe it dry before each cut. This method helps create clean edges for each piece. How to make carrot cake bars from scratch? To make carrot cake bars from scratch, combine grated carrots, sugars, eggs, and oil. Then mix in dry ingredients like flour and spices. Pour the batter into a pan and bake. You can find the full recipe above. What to serve with carrot cake bars? Carrot cake bars pair well with coffee or tea. They also go great with a scoop of vanilla ice cream or a dollop of whipped cream for a treat. Can I use other fruits in the recipe? Yes, you can use other fruits. Applesauce or mashed bananas can add moisture. Dried fruits like raisins or cranberries also work well for added flavor and texture. This blog post showed how to make delicious carrot cake bars. We covered the key ingredients, step-by-step instructions, and useful tips. You learned about variations and how to store these treats properly. Making these bars is easy and fun. They are perfect for gatherings or a sweet snack at home. With the right tweaks and storage, they can be enjoyed anytime. Dive into baking, and enjoy the tasty results!

Decadent Carrot Cake Bars Easy and Tasty Treat

Are you ready to bake a treat that’s both easy and delicious? These Decadent Carrot Cake Bars are packed with

- 1.5 pounds baby potatoes, thoroughly washed and halved - 4 tablespoons unsalted butter - 4 cloves garlic, finely minced - 1 cup heavy cream - 1 cup freshly grated Parmesan cheese - 1 teaspoon dried oregano - 1 teaspoon salt - ½ teaspoon freshly ground black pepper - ¼ teaspoon crushed red pepper flakes (optional) - Fresh parsley, finely chopped (for garnish) The baby potatoes are the star of this dish. They are small and tender, making them perfect for soaking up the creamy sauce. When selecting baby potatoes, look for ones that are firm and smooth. This recipe uses unsalted butter to keep the flavor fresh. Garlic adds depth, while heavy cream creates a rich texture. Parmesan cheese gives the sauce its savory notes. Dried oregano brings a hint of herbiness. Salt and black pepper enhance all the flavors. If you like a touch of heat, add crushed red pepper flakes. Finally, fresh parsley adds a pop of color and freshness when you serve the dish. This dish provides a rich source of energy with about 400 calories per serving. The fats mainly come from the butter and cream, making it creamy and satisfying. Each serving has about 25 grams of fat, with 15 grams of protein from the cheese. Carbohydrates come primarily from the potatoes, totaling around 40 grams. - Large pot - Whisk - Measuring cups - Measuring spoons - Serving dish Gather these tools to create your creamy garlic sauce baby potatoes. The large pot is essential for boiling the potatoes. A whisk helps blend the sauce smoothly. Measuring cups and spoons ensure you get the amounts just right. Finally, a serving dish makes for a lovely presentation. For the full recipe, check out the details above. To start, fill a large pot with water. Add a good amount of salt to the water. This will help flavor the potatoes. Bring the water to a rolling boil. Once it boils, carefully add your halved baby potatoes. They will take about 12-15 minutes to cook. You can check if they are done by poking them with a fork. If the fork goes in easily, they are ready. Drain the potatoes and set them aside. In the same pot, turn the heat to medium. Add the unsalted butter and let it melt completely. Now, add the finely minced garlic. Sauté the garlic for about 1-2 minutes. Stir it often to avoid burning. You want it to be fragrant and golden. Now, reduce the heat to medium-low. Pour in the heavy cream and stir well. Gradually add the grated Parmesan cheese while whisking. This will make your sauce creamy and smooth. Next, gently fold the drained baby potatoes back into the pot. Toss them softly in the creamy garlic sauce. Let everything cook together for about 2-3 minutes. This helps the potatoes soak up the delicious flavors. When serving, transfer the creamy garlic potatoes to a dish. Don’t forget to garnish with freshly chopped parsley for a nice touch. For the full recipe, check out the complete list of steps and ingredients to create this delightful dish! - Choosing the right size baby potatoes: Aim for uniform sizes. This helps them cook evenly. Smaller potatoes cook faster, while larger ones take more time. Look for firm potatoes with smooth skin. - How to check potato doneness: Use a fork to test doneness. Insert it into a potato. If it slides in easily, they are done. If you meet resistance, cook them a bit longer. - Adding different seasonings or components: You can play with flavors. Try adding fresh herbs like thyme or basil. A squeeze of lemon juice brightens the sauce. You can also swap Parmesan for another cheese, like Gruyère. - Tips for achieving the perfect consistency: If the sauce is too thick, add a splash of milk or broth. If it's too thin, let it simmer a bit longer. Stirring often ensures a smooth sauce. - Best serving dishes for a visually appealing presentation: A rustic bowl works wonders. It adds charm and warmth. Choose a dish that contrasts with the creamy potatoes to make them pop. - Garnishing ideas with extra cheese and herbs: A sprinkle of extra Parmesan adds flavor and looks great. Fresh parsley brings color and freshness. You can also add a few red pepper flakes for a touch of heat. For the Full Recipe, visit the main recipe section and enjoy making these creamy garlic sauce baby potatoes! {{image_4}} You can easily change the taste of your creamy garlic sauce baby potatoes. One way is to add bacon or other proteins. Crispy bacon adds a smoky touch. You could use chicken or shrimp if you want something different. Just cook the protein first, then mix it with the potatoes and sauce. Another fun idea is to include vegetables like spinach or mushrooms. Spinach adds a nice color and boosts the nutrients. Sauté mushrooms in the garlic butter for a rich flavor. Mixing these veggies makes the dish more colorful and tasty. If you want a vegan version, you can swap butter and cream. Use coconut oil instead of butter. For cream, try using coconut cream or a plant-based cream. Nutritional yeast can give a cheesy flavor without dairy. For gluten-free options, ensure your seasonings are gluten-free. Most spices and herbs are safe. You can also use gluten-free pasta instead of potatoes, creating a new twist on the dish. You can cook the potatoes faster with an Instant Pot. Just add water and set the timer for 8 minutes, then release the pressure. Follow the same sauce steps afterward. If you want a different texture, try baking the potatoes. Toss them with oil and seasonings, then bake until golden. Pour the creamy garlic sauce over them just before serving. This gives a crunchy outside and a creamy inside. To keep your creamy garlic sauce baby potatoes fresh, store them in the fridge. Use a tight-sealing container to keep out air. This helps keep the flavor intact. It’s best to eat leftovers within three days for the best taste. You can reheat these potatoes in the microwave or on the stovetop. For the microwave, place them in a bowl, cover it, and heat in short bursts. Stir often to ensure even warming. If using the stovetop, put them in a pan over low heat. Stir gently to avoid breaking the potatoes. Watch out for the sauce! It can separate if you heat it too fast. Stirring helps keep it smooth. To freeze these potatoes, let them cool first. Place them in a freezer-safe container. Leave some space at the top for expansion. They will last for about two months in the freezer. When it’s time to eat, thaw them overnight in the fridge. Reheat gently to keep the sauce creamy. Avoid reheating too hot to maintain quality. You can tell baby potatoes are ready by checking their texture. They should feel tender when pierced with a fork. If the fork slides in easily, they are done. You can also cut one in half; it should be soft and fluffy inside, not hard or crunchy. Yes, you can prepare this dish ahead. Cook the potatoes and make the sauce, then store them separately in the fridge. Keep them in airtight containers to stay fresh. When you're ready to serve, heat them together on the stove until warm. This way, you save time when it's meal time. Creamy garlic potatoes pair well with many dishes. Try serving them with grilled chicken or steak for a hearty meal. They also go great with roasted vegetables or a light salad. For a cozy dinner, serve them alongside a warm soup. Mix and match to suit your taste. To spice up the sauce, add more crushed red pepper flakes. Start with a bit and taste it. You can also mix in cayenne pepper for more heat. If you love garlic, consider adding minced garlic sautéed in olive oil for a richer flavor. This way, you can customize the heat level to your liking. To sum up, we explored a delicious recipe for creamy garlic baby potatoes. You learned how to make the dish, including tips for perfect potatoes and sauce. Remember, you can customize this dish to fit your taste or dietary needs. Don't hesitate to experiment with flavors and presentation. This recipe is simple and sure to impress at any meal. Enjoy your cooking adventure!

Easy Creamy Garlic Sauce Baby Potatoes Delightful Dish

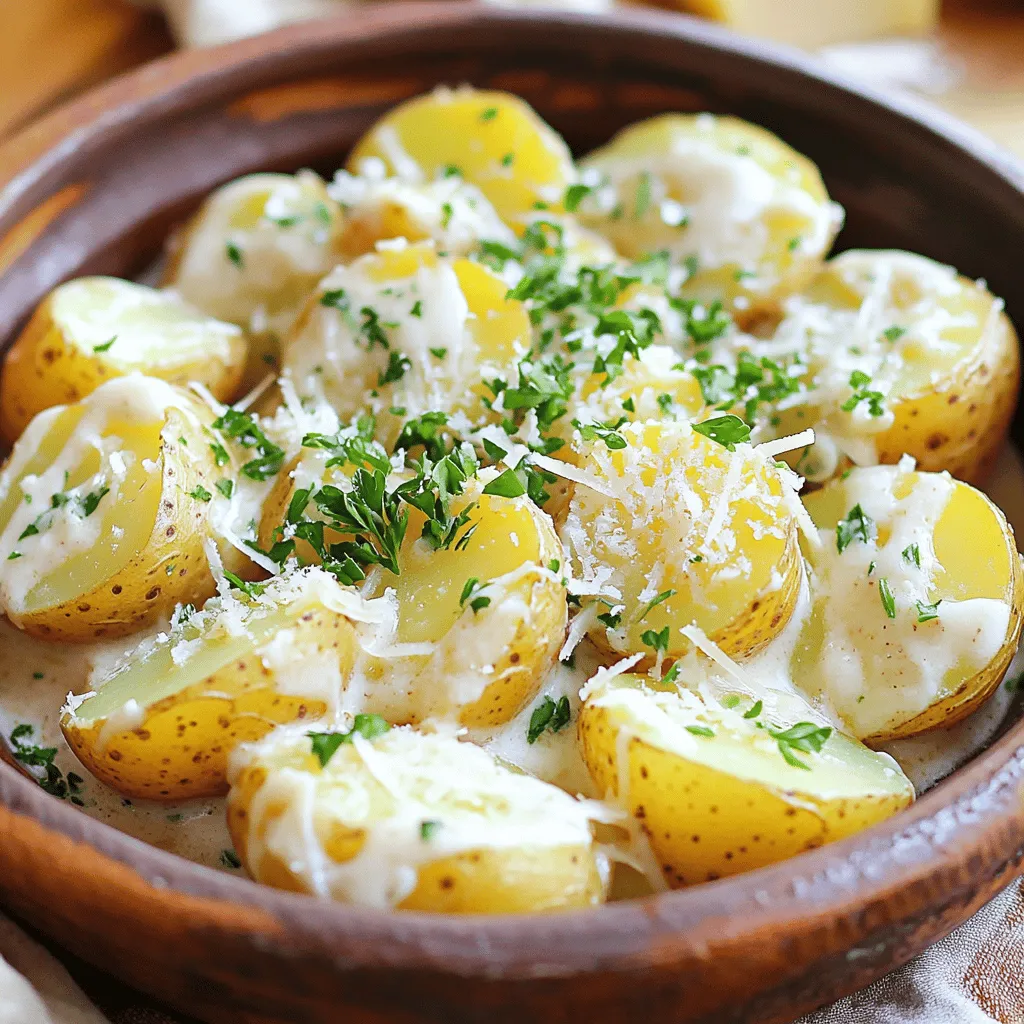
Looking for a quick and tasty side dish? These Easy Creamy Garlic Sauce Baby Potatoes are just what you need!

- 1 cup brown or green lentils, thoroughly rinsed - 1 medium onion, finely chopped - 3 cloves garlic, minced - 1 medium carrot, diced - 1 medium red bell pepper, chopped - 2 teaspoons ground cumin - 1 teaspoon ground coriander - 1 teaspoon ground cinnamon - 1/2 teaspoon smoked paprika - 1/4 teaspoon cayenne pepper (optional) - 1 can (14 oz) diced tomatoes, including juices - 4 cups vegetable broth - 1 cup fresh spinach, roughly chopped - Salt and pepper to taste - 2 tablespoons olive oil - Chopped fresh cilantro or parsley for garnish - Lentil options: You can use brown or green lentils. Both work well. Brown lentils soften more. Green lentils hold their shape better. Choose based on your texture preference. - Vegetable broth alternatives: If you don't have vegetable broth, water works too. You can add more spices to enhance the flavor. - Optional add-ins or toppings: Feel free to add more veggies like zucchini or kale. You can also top with a dollop of yogurt or feta cheese for creaminess. This recipe is simple and flexible. You can mix and match ingredients to suit your taste. For the full recipe, check out the Moroccan Instant Pot Lentils. Start by setting your Instant Pot to the Sauté function. Pour in 2 tablespoons of olive oil and let it heat for about one minute. Once the oil is hot, add 1 medium onion, finely chopped. Cook the onion for 3-4 minutes until it turns soft and fragrant. Then, mix in 3 cloves of minced garlic, 1 medium diced carrot, and 1 medium red bell pepper, chopped. Keep stirring for another 2-3 minutes until these veggies soften a bit. Next, it's time to add spices. Sprinkle in 2 teaspoons of ground cumin, 1 teaspoon of ground coriander, 1 teaspoon of ground cinnamon, and 1/2 teaspoon of smoked paprika. If you like heat, add 1/4 teaspoon of cayenne pepper. Stir these spices into the veggie mix for about 1 minute. This helps the spices release their wonderful aromas. Now, pour in 1 cup of rinsed lentils and 1 can of diced tomatoes, including the juices. Add 4 cups of vegetable broth too. Stir everything well to mix the lentils and veggies evenly. Secure the lid on the Instant Pot, making sure the valve is set to “Sealing.” Select the Manual or Pressure Cook setting, set the timer to 15 minutes, and cook on high pressure. After the cooking time is up, let the pot cool down naturally for about 10 minutes. This is called natural release. After that, carefully switch the valve to “Venting” to let out any remaining steam. Once the pressure is gone, carefully remove the lid. Toss in 1 cup of roughly chopped spinach and stir gently. Let the spinach wilt for a few minutes. Taste your lentil mixture and adjust the seasoning with salt and pepper as needed. For the full recipe, be sure to check the detailed instructions. - Overcooking lentils: This can make them mushy. Always stick to the cooking time. Lentils should remain firm yet tender. - Skipping the natural release: The steam helps finish cooking. If you skip this step, your lentils may be undercooked. Allow at least 10 minutes for natural release. - Adjusting spice levels to taste: Moroccan spices can be bold. Start with less and add more. This way, you control the heat and flavor. - Garnishing ideas to enhance presentation: Fresh herbs like cilantro or parsley add color. A squeeze of lemon brightens the dish. Serve in colorful bowls for a fun touch. - Prepping ingredients in advance: Chop your veggies and measure spices ahead of time. This makes cooking quick and easy. Store them in airtight containers. - Cooking in bulk for meal prep: Make a larger batch and store leftovers. This way, you have ready meals for busy days. Enjoy them throughout the week! {{image_4}} You can make Moroccan Instant Pot lentils even better by adding harissa. Harissa is a spicy paste made from peppers and spices. It brings heat and depth to the dish. Just add a tablespoon when you mix in the spices. This small change makes a big impact! If you want to keep it vegan, you can skip the optional cayenne. The other spices already add great flavor. You can also try adding coconut milk for a creamier texture. This twist keeps the dish comforting and satisfying. You can also swap lentils for quinoa or barley. Both grains cook well in the Instant Pot. They offer different textures and flavors. Quinoa is light and fluffy, while barley adds chewiness. Adding other vegetables is another fun way to change the dish. Try adding diced zucchini or chopped kale. These veggies mix well with the spices. They also boost the nutrition in your meal. Pair your Moroccan lentils with fresh bread or a simple salad. Crusty bread helps soak up the tasty sauce. A side salad adds crunch and freshness to your plate. You can also serve the lentils next to roasted vegetables. Roasted carrots or sweet potatoes make great side dishes. They balance the spices and add sweetness to your meal. For the full recipe, check the recipe section above! To store leftovers, place them in an airtight container. This keeps moisture in and helps prevent spills. Make sure to cool the lentils before sealing the container. The best way to reheat is in the microwave or on the stove. If using the stove, add a splash of water to prevent sticking. You can freeze portions of Moroccan Instant Pot Lentils for later use. Divide them into smaller containers, leaving space for expansion. This helps keep the lentils fresh. To thaw, move a container to the fridge overnight. Reheat on the stove or in the microwave until hot. In the fridge, the dish stays fresh for about five days. Look for signs of spoilage, like an off smell or mold. If you see these signs, do not eat the lentils. Safety first! Store your food wisely for the best taste and health. To add spice, try these ideas: - Increase cayenne pepper to 1/2 teaspoon. - Add a pinch of red pepper flakes. - Mix in harissa paste for extra heat. - Serve with hot sauce on the side. These adjustments will give your lentils a nice kick. Be sure to taste as you go. You want the spice to enhance the dish, not overpower it. Yes, you can use dried lentils. However, you need to adjust cooking times. For dried lentils: - Rinse and soak them for at least 30 minutes. - Increase the cooking time to 25 minutes in the Instant Pot. - Add an extra cup of vegetable broth to ensure they cook properly. Dried lentils may take longer, but they pack great flavor. Moroccan lentils pair well with: - Crusty bread for dipping. - A fresh salad with lemon dressing. - Steamed rice or couscous to soak up the sauce. - Roasted vegetables for added texture. These sides create a well-rounded meal, balancing flavors and textures. Yes, you can adapt this recipe for a regular pot. Use these steps: 1. Sauté the vegetables over medium heat in a large pot. 2. Add spices and mix for 1 minute. 3. Stir in lentils, tomatoes, and vegetable broth. 4. Cover the pot and simmer for 30-35 minutes until lentils are tender. A regular pot takes longer but gives similar results. Absolutely! Moroccan Instant Pot Lentils are great for meal prep. Here are some tips: - Cook a big batch at once and store portions in the fridge. - Keep them in airtight containers for up to 5 days. - Reheat on the stove or in the microwave before serving. They stay tasty and are perfect for quick lunches or dinners. This blog post covered all you need for Moroccan Instant Pot Lentils. You learned about essential ingredients, step-by-step cooking instructions, and helpful tips. We also explored ingredient swaps and serving suggestions to spice things up. Whether you're a novice or an expert, this dish is simple and rewarding. Enjoy the flavors and get creative with adjustments. Cooking should be fun and tasty!

Moroccan Instant Pot Lentils Flavorful and Easy Dish

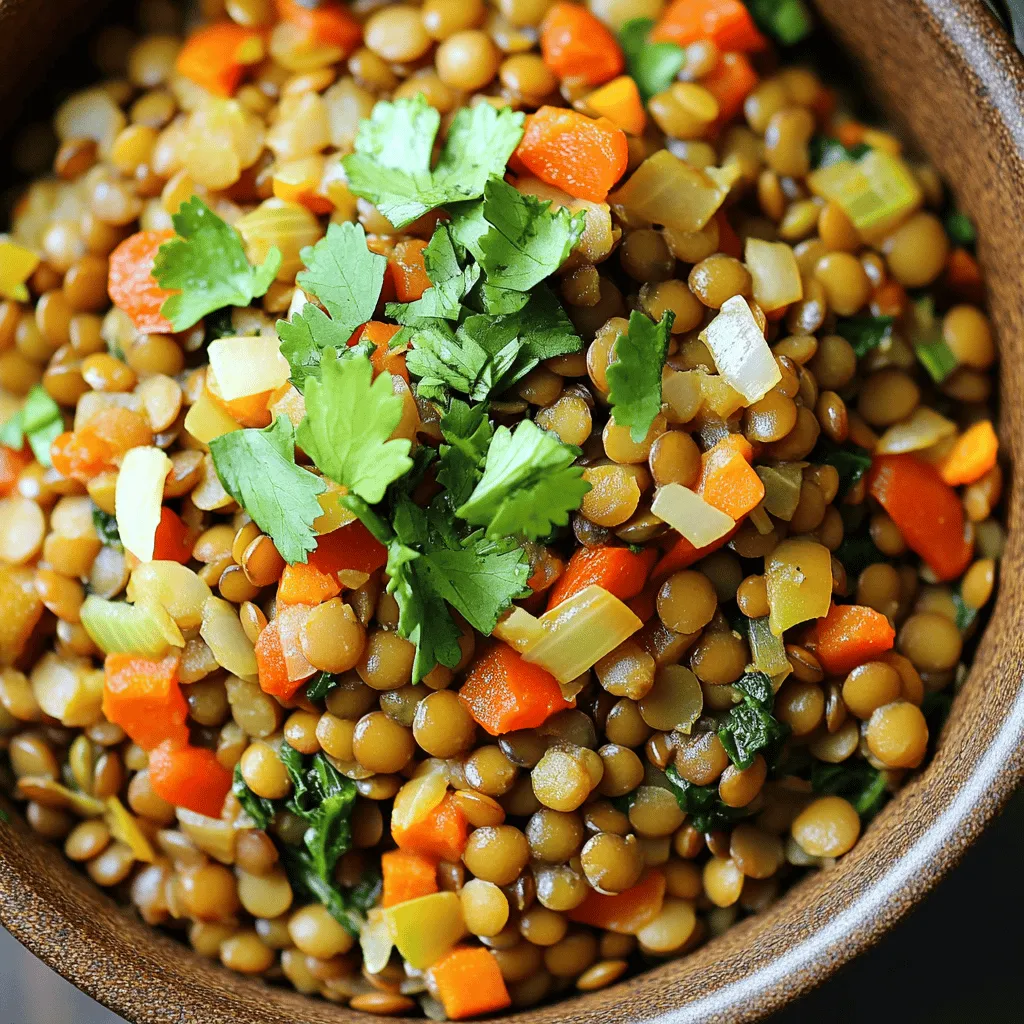
Are you ready to dive into a dish that bursts with flavor? My Moroccan Instant Pot Lentils recipe is not

- 1 pound large shrimp, peeled and deveined - 3 tablespoons honey - 3 tablespoons low sodium soy sauce - 4 cloves garlic, minced - 1 tablespoon fresh ginger, minced - 2 tablespoons sesame oil (or olive oil for a lighter option) - 1 teaspoon red pepper flakes (more or less, depending on your spice preference) - 2 green onions, thinly sliced (for garnish) - A sprinkle of sesame seeds (for garnish) Serve the honey garlic shrimp over warm cooked rice or quinoa. This base soaks up the sweet sauce well. You can also pair it with steamed broccoli or a fresh salad for a balanced meal. Enjoy the vibrant colors and flavors! For a special touch, drizzle any leftover sauce on top and add extra green onions and sesame seeds. This dish truly shines when presented in a bright bowl, making it perfect for sharing. For the complete recipe, visit the [Full Recipe]. Start by making the sauce. In a small bowl, mix the honey and soy sauce. Add minced garlic, ginger, and red pepper flakes. Whisk until all the ingredients blend well. This sauce gives the shrimp great flavor. Next, heat sesame oil in a large skillet over medium-high heat. When the oil shines, add the shrimp in a single layer. Cook the shrimp for about 2-3 minutes. Turn them often until they turn pink and opaque. Then, pour the sauce over the shrimp. Stir gently to coat every shrimp. Let them cook for another 2-3 minutes. This lets the sauce thicken and stick to the shrimp. Once done, remove the skillet from the heat. Garnish the dish with sliced green onions and sesame seeds. Serve the shrimp right away over warm cooked rice or quinoa. This allows the grains to soak up the tasty sauce. For a beautiful presentation, drizzle extra sauce on top and add more green onions and sesame seeds. Enjoy your meal! For the full recipe, check out the details above. To get perfect shrimp, choose large ones. Fresh shrimp works best, but frozen shrimp is fine too. If you use frozen, thaw them in cold water. This keeps them tender. Cook the shrimp until they turn pink and opaque. This usually takes 2-3 minutes per side. Avoid overcooking; it makes shrimp tough. You can easily change the spice level in this dish. If you like heat, add more red pepper flakes. For a milder taste, use less or skip them. Taste the sauce before you pour it on the shrimp. This way, you can adjust if needed. Remember, you can always add spice, but you can't take it away. This honey garlic shrimp is quick, but you can prep ahead. Make the sauce in advance and store it in the fridge. You can also peel and devein the shrimp before cooking. This saves time when you're ready to eat. When you're set to cook, just heat the oil and add the shrimp. It takes just 10 minutes from start to finish. Enjoy your meal! For the full recipe, check out the details. {{image_4}} You can change this recipe to fit your taste. Add veggies like bell peppers or snap peas for color and crunch. You can use maple syrup instead of honey for a different flavor. If you like citrus, add a splash of lime juice to brighten the dish. Swap the soy sauce for coconut aminos for a soy-free option. If you prefer something other than shrimp, try chicken or tofu. Cut chicken into bite-sized pieces and cook it the same way as the shrimp. For tofu, use firm or extra-firm varieties. Press the tofu to remove excess water, then cube it. Cook until golden brown before adding the sauce. Serve this dish in many ways. For a quick meal, serve the shrimp over rice or quinoa. You can also use lettuce wraps for a fresh take. Just spoon the shrimp into large leaves of lettuce and add herbs for flavor. Another idea is to serve it as an appetizer. Use small skewers for easy eating. For the full recipe, check out the link above. After cooking, let the honey garlic shrimp cool down for about 30 minutes. Place the shrimp in an airtight container. Store it in the fridge for up to 2 days. Make sure to keep the shrimp covered to retain its moisture and flavor. If you want to freeze the shrimp, place it in a freezer-safe container. You can also use a freezer bag. Make sure to remove as much air as possible. Honey garlic shrimp can last up to 3 months in the freezer. Thaw it in the fridge overnight before reheating. To reheat, you can use a skillet or microwave. If using a skillet, heat it over low heat. Add a splash of water to keep the shrimp moist. Stir until heated through, about 3-5 minutes. In the microwave, use a microwave-safe dish. Heat in 30-second intervals, stirring in between until warm. Remember, don’t overcook it, or the shrimp will become tough. For the full recipe, check out the details provided above. You can serve honey garlic shrimp with many sides. I love it with rice or quinoa. These grains soak up the sweet sauce. You can also add steamed veggies for color and crunch. Broccoli or snap peas work great. For a fresh touch, try a side salad with light dressing. Adding some crusty bread can help too. It’s perfect for soaking up extra sauce. Yes, you can use frozen shrimp! Just remember to thaw them first. To thaw shrimp, place them in the fridge overnight. If you need them fast, run cold water over them. This will help them thaw quickly. Once thawed, pat them dry before cooking. This way, they will sear nicely and not steam. To make honey garlic shrimp gluten-free, use gluten-free soy sauce. There are many brands available that taste great. You can also use coconut aminos as a tasty alternative. This will keep the flavors close to the original recipe while making it safe for gluten-free diets. Absolutely! Adding vegetables boosts nutrition and flavor. Bell peppers, snap peas, or carrots are great choices. Simply sauté them with the shrimp for a complete meal. This adds color and makes it more filling. The spice level depends on the red pepper flakes. If you prefer mild, use less. If you like it hot, feel free to add more. You can also omit them entirely for a sweet dish. Adjust the spice to your taste to enjoy it fully. Honey garlic shrimp lasts about 2-3 days in the fridge. Store it in an airtight container. When ready to eat, reheat it on the stove. This keeps the shrimp tender and the sauce flavorful. Avoid microwaving, as it can make the shrimp rubbery. Yes, you can prep the sauce ahead of time. Store it in a jar in the fridge. When you’re ready to cook, just add the shrimp. This makes it a quick meal on busy days. You can also cook the shrimp in advance and reheat them later. Reheat honey garlic shrimp on the stove over low heat. This keeps the shrimp juicy and the sauce thick. Stir gently to avoid overcooking. If the sauce is too thick, add a splash of water. This will help loosen it up while heating. Yes, you can use chicken or tofu instead of shrimp. Just adjust the cooking time. Chicken takes longer to cook than shrimp. Tofu works well for a plant-based option. Cook it until golden and crispy for the best flavor. Definitely! Honey garlic shrimp is great for meal prep. It stays good in the fridge for a few days. Just pack it with your favorite grains and veggies. This makes it easy to grab a healthy meal on the go. For the full recipe, check out the detailed steps above! This blog post covered everything you need to know about making honey garlic shrimp. We looked at key ingredients, cooking steps, and serving ideas. I shared tips for perfect shrimp and ways to adjust spice levels. We discussed variations and storage information too. In the end, you have many options to enjoy this dish. Whether you make it spicy or mild, honey garlic shrimp will be a hit. Now, it’s your turn to cook and impress!

10 Minute Honey Garlic Shrimp Quick and Flavorful Meal

Looking for a quick dinner idea? Try my 10-Minute Honey Garlic Shrimp! This dish packs bold flavor and can be

To make white chocolate strawberry cookies, you will need: - 1 cup unsalted butter, softened - 1 cup packed brown sugar - 1/2 cup granulated white sugar - 2 large eggs, at room temperature - 2 teaspoons pure vanilla extract - 2 1/2 cups all-purpose flour - 1 teaspoon baking soda - 1/2 teaspoon sea salt - 1 cup dried strawberries, finely chopped - 1 cup white chocolate chips - Optional: powdered sugar for dusting You can make a few swaps if you need to. For butter, use margarine. For brown sugar, light or dark works just fine. You can also replace eggs with flaxseed meal mixed with water. Just mix 1 tablespoon of flaxseed with 2.5 tablespoons of water. Let it sit for 5 minutes to thicken. If you want a lighter option, you can use half the amount of white sugar. This will still keep your cookies sweet without being too rich. Want to change things up? Here are some fun add-ins: - Chopped nuts like almonds or walnuts for crunch. - White chocolate chunks for extra sweetness. - A dash of almond extract for a unique flavor. - Fresh strawberries, but note they may change the cookie's texture. Feel free to mix and match to find your favorite flavor combo. For the full recipe, check out the detailed steps provided. Start by preheating your oven to 350°F (175°C). This temperature ensures even baking. While the oven heats, line a baking sheet with parchment paper. This step keeps the cookies from sticking. It makes cleaning easier too! In a large mixing bowl, add 1 cup of softened unsalted butter, 1 cup of packed brown sugar, and 1/2 cup of granulated white sugar. Use an electric mixer on medium speed. Beat the mixture for about 3-4 minutes. You want it to be light and fluffy. This process adds air, making your cookies soft and tender. Now, it's time to add the eggs. Add 2 large eggs, one at a time. Mix well after each egg to ensure they blend in fully. Next, add 2 teaspoons of pure vanilla extract. Stir until it's all combined. This mix gives your cookies a rich flavor. Remember, every step builds the taste you will love! To get the best texture, follow these steps. First, use room temperature butter. This helps the dough mix well. Second, do not overmix the dough. Mix just until you see no flour. This keeps the cookies soft and chewy. Lastly, let the cookies cool on a wire rack. This helps them stay fluffy. If you have leftover cookies, store them in a sealed container. Keep them at room temperature. This keeps them fresh for about five days. You can also freeze them. Wrap each cookie in plastic wrap. Then, place them in a freezer bag. They can last up to three months! Make your cookies look fancy with a few simple tricks. Dust them lightly with powdered sugar. This adds a nice touch. You can also serve them on a colorful plate. Pair them with fresh strawberries or a scoop of vanilla ice cream for a delightful treat. For the full recipe, check out the details above! {{image_4}} You can use fresh strawberries instead of dried ones. Fresh strawberries give your cookies a juicy burst of flavor. Start by washing and slicing the strawberries. Remove the green tops and chop them into small pieces. Use about one cup of fresh strawberries in place of the dried ones. You may need to adjust the flour slightly to keep the dough from becoming too wet. Enjoy the fresh taste and bright color in each cookie! Feel free to mix in other flavors too! You can add nuts like pecans or walnuts for crunch. Try using dark chocolate chips for a richer taste. For a tropical twist, add shredded coconut. You can also use lemon zest to brighten the flavor. These variations keep your cookies exciting and fun. Just remember to keep the same base recipe for best results. Making these cookies gluten-free is easy! Substitute regular flour with a gluten-free blend. Ensure that the blend has xanthan gum to help the cookies hold together. For vegan cookies, replace the butter with coconut oil or vegan butter. Use flax eggs instead of regular eggs. Combine one tablespoon of flaxseed meal with three tablespoons of water. Let it sit for a few minutes to thicken. These swaps keep the cookies tasty and enjoyable for everyone. Check the Full Recipe for more tips! To keep your White Chocolate Strawberry Cookies fresh, store them in an airtight container. This helps prevent them from drying out. Place parchment paper between layers of cookies to avoid sticking. Keep the container in a cool, dry place away from sunlight. This method keeps the cookies soft and delicious for days. Freezing cookies is simple and effective. First, let the cookies cool completely. Then, place them on a baking sheet in a single layer. Freeze for about an hour until solid. After that, transfer the cookies to a freezer-safe bag or container. Label the bag with the date and type. They can last up to three months in the freezer. When you're ready to eat them, let them thaw at room temperature. Baked White Chocolate Strawberry Cookies can last for about one week at room temperature. If stored properly in an airtight container, they stay tasty. In the freezer, they can last for up to three months. Just remember, the longer you keep them, the more they may lose their freshness. Enjoy them while they're at their best! For the full recipe, check out the section above. To prevent cookies from spreading, chill the dough before baking. After mixing, cover the dough and place it in the fridge for at least 30 minutes. This helps the butter firm up, which leads to thicker cookies. Also, make sure you measure flour correctly. Too little flour can cause spreading. You can use frozen strawberries, but it’s best to dry them first. Thaw the strawberries and pat them dry with a paper towel. This helps prevent extra moisture in your cookies. Dried strawberries add a nice chewy texture and rich flavor. To soften butter quickly, cut it into small cubes. Spread them on a plate and let them sit at room temperature for about 10-15 minutes. You can also microwave the butter in short bursts, about 5 seconds at a time. Be careful not to melt it, as melted butter changes the cookie texture. For the full recipe, check the details above. You’ve learned about ingredients, steps, and tips for making great cookies. You know how to customize, store, and present your treats. Remember, baking is fun, so feel free to get creative! Use fresh fruit or try gluten-free options to fit your needs. Store cookies well to keep them fresh. Follow these tips to bake cookies your friends and family will love. Enjoy every bite and share the joy of baking!

White Chocolate Strawberry Cookies Delightfully Easy Recipe

Get ready to impress your friends and family with my easy White Chocolate Strawberry Cookies recipe! These soft, chewy cookies

Older posts
Newer posts
← Previous Page1 … Page66 Page67 Page68 … Page75 Next →

dsad

© 2025 dailydishcraft • Built with GeneratePress

Our Policies

  • Copyright Policy
  • Cookie Policy
  • GDPR Policy
  • Privacy Policy
  • Disclaimer
  • Terms Of Use

More Information

  • Home
  • About
  • Contact
  • Appetizers
  • Dessert
  • Dinner
  • Drinks
©2025, dailydishcraft About Back To Top