Skip to content
DisclaimerTerms Of UseGDPR PolicyCookie Policy

dailydishcraft

  • Home
  • Drinks
  • Appetizers
  • Dinner
  • Dessert
  • About
  • Contact
  • Privacy Policy
DisclaimerTerms Of UseGDPR PolicyCookie Policy

Jessica

- 1 ½ cups digestive biscuits, finely crushed - ½ cup unsalted butter, melted - 16 oz cream cheese, softened at room temperature - 1 cup Nutella (plus extra for drizzling) - 1 cup powdered sugar - 1 teaspoon pure vanilla extract - 1 cup heavy whipping cream, chilled These ingredients create a rich and creamy cheesecake. The digestive biscuits give a nice crunch. The cream cheese makes it smooth, and Nutella adds a sweet, chocolatey flavor. - Chocolate shavings - Crushed hazelnuts - Fresh berries These garnishes add a fun touch to your cheesecake. Chocolate shavings offer an extra treat. Crushed hazelnuts add a nice crunch and enhance the hazelnut flavor. Fresh berries bring color and a hint of tartness. - 9-inch springform pan - Mixing bowls - Hand mixer You will need a 9-inch springform pan to hold your cheesecake. Mixing bowls help you combine your ingredients. A hand mixer makes it easier to beat the cream cheese and whip the cream. For the full recipe, check out the Full Recipe link. Start by mixing the crushed digestive biscuits with the melted butter. You want every crumb to be coated in buttery goodness. This takes just a minute or two. Once mixed, transfer this mixture to your springform pan. Use the back of a flat-bottomed glass to press it down firmly. You need a solid base for your cheesecake. After pressing, place the pan in the fridge for about 15 to 20 minutes. This chill time helps the crust firm up. Next, let’s make the filling. In a large bowl, beat the softened cream cheese until it’s smooth. This should take around 2 to 3 minutes with an electric mixer. Once smooth, gradually add the Nutella, powdered sugar, and vanilla extract. Mix until everything combines perfectly. You’ll want a silky texture that looks divine. Now it’s time to whip the cream. In a separate bowl, whip the heavy cream until you see stiff peaks. This step is key to making your cheesecake light. Gently fold half of this whipped cream into the Nutella mixture. Then, fold in the rest of the whipped cream. Take your time with this; you want to keep it airy. Pour this fluffy filling onto your chilled biscuit crust. Smooth the top with a spatula for a nice finish. Cover the pan with plastic wrap or a lid and refrigerate it. Let it chill for at least 4 hours, but overnight is best. This helps the cheesecake set properly. For the complete recipe, check out the [Full Recipe]. To get a creamy and light cheesecake, focus on your whipped cream. Start by whipping the chilled heavy cream until it forms stiff peaks. This means the cream holds its shape well. It should take about 3-5 minutes. When folding the whipped cream into the Nutella mixture, be gentle. Use a spatula and scoop from the bottom, turning the bowl as you mix. This helps keep the air in the cream, making your cheesecake fluffy. If you want a vegan version, swap cream cheese for a plant-based cream cheese. Use coconut cream instead of heavy cream. For a gluten-free option, replace digestive biscuits with gluten-free cookies. Just make sure they are finely crushed. Presentation matters! Serve slices on dessert plates with a drizzle of extra Nutella or chocolate sauce. This adds a rich touch. You can also sprinkle fresh berries or a mint leaf on top for color. Use chocolate shavings and crushed hazelnuts as a final garnish. These little details make your cheesecake look gourmet and inviting. {{image_4}} You can make your no-bake Nutella cheesecake even more exciting. One way is to add flavors like coffee or hazelnut extract. Just a teaspoon of either can boost the taste. It adds a rich depth that pairs well with Nutella. Another idea is to incorporate fruit purees. Think about adding raspberry or strawberry puree. This will give your cheesecake a fruity twist. It adds color and a fresh taste. You can swirl the puree into the cheesecake filling before chilling for a beautiful effect. The base of the cheesecake can change the whole vibe. A classic graham cracker crust is always a winner. It gives a nice crunch and sweetness. But if you want to try something new, consider a brownie crust. This adds a rich, chocolatey flavor. It makes the dessert feel even more indulgent. You can also experiment with cookie crusts. Use Oreos or even gingersnaps for a unique base. Each choice brings a different taste and texture. If you have dietary needs, you can still enjoy this treat. For a nut-free version, simply swap Nutella for a nut-free chocolate spread. You can find many options in stores now. For low-sugar adaptations, use sugar substitutes. There are many sweeteners that taste great. Look for ones that work well in desserts. These variations let everyone enjoy this delicious no-bake Nutella cheesecake. You can find the full recipe above to get started! To keep your no-bake Nutella cheesecake fresh, start by refrigerating it. Place the cheesecake in an airtight container or cover it tightly with plastic wrap. Store it in the fridge for the best taste and texture. If you want to freeze the cheesecake, slice it first. Wrap each slice in plastic wrap and then put them in a freezer-safe bag. This method helps keep the cheesecake fresh and easy to serve later. In the fridge, your no-bake Nutella cheesecake lasts about 5 to 7 days. Check for signs of spoilage. If you see any discoloration or an off smell, it’s best to toss it. When stored properly in the freezer, the cheesecake can last for up to 3 months. Just remember, over time it may lose some flavor and texture. If you freeze the cheesecake, thaw it in the fridge overnight before serving. Avoid using the microwave, as it can ruin the texture. For serving leftovers, take out the slices you want. Let them sit at room temperature for about 15 minutes before eating. This step helps bring back the creamy texture and rich flavor. Enjoy your delicious treat! Yes, you can make this cheesecake ahead of time. I recommend chilling it for at least 4 hours, but overnight is best. This extra time helps the flavors blend well. You can prepare it a day or two before serving. Just keep it covered in the fridge for freshness. Absolutely! You can use any chocolate spread you like. Brands like Jif or Reese's offer great options. If you're feeling adventurous, try a salted caramel spread for a twist. Just remember that the flavor will change based on what you choose. To check if your cheesecake is set, gently shake the pan. If the center jiggles a bit but holds its shape, it’s ready. You can also insert a toothpick into the center. It should come out clean or with a few creamy bits. This tells you the cheesecake has the right texture. This Nutella cheesecake is simple and fun to make. We covered the key ingredients and tools you need. The step-by-step guide helps you create a delicious treat with perfect texture. I shared tips for customizing flavors and ensuring a great presentation. Don’t forget the storage tips for keeping your cheesecake fresh. Most important, you can make this ahead or adapt it to fit different diets. Enjoy the process and impress your friends with this tasty dessert!

No-Bake Nutella Cheesecake Simple and Delicious Treat

Are you ready to impress your friends and family with a dessert that’s both easy and delicious? This No-Bake Nutella

- 5 cups Rice Krispies cereal - 4 cups mini marshmallows - 1/2 cup unsalted butter - 1/2 cup creamy peanut butter (or almond butter for a nut-free option) To make chewy Rice Krispies treats, you need a few key ingredients. First, grab your Rice Krispies cereal. This is the base of the treat. Next, you'll need mini marshmallows. They melt down to create that sweet, gooey texture we all love. Unsalted butter adds richness and helps everything stick together. Lastly, creamy peanut butter gives a tasty twist. If you prefer a nut-free option, almond butter works just as well. - 1 teaspoon vanilla extract - 1/2 teaspoon salt - Toppings (colorful sprinkles, chocolate chips, melted chocolate) Now, let’s talk about optional ingredients. Adding vanilla extract enhances the flavor and makes your treats smell amazing. A pinch of salt balances the sweetness. You can also add fun toppings! Colorful sprinkles bring joy, while chocolate chips add a delicious twist. If you're feeling fancy, drizzle melted chocolate on top. These extras make the treats even more fun and tasty. For the full recipe, check out the complete guide above. - Prepare the pan for easy removal: Start by greasing a 9x13 inch baking pan with cooking spray or lining it with parchment paper. This keeps the treats from sticking and makes them easy to lift out later. - Melt the butter in a saucepan: Place the unsalted butter in a large saucepan. Heat it over low heat, stirring often to melt it evenly. This step is crucial because burnt butter can ruin the flavor. - Add marshmallows and stir: Once the butter melts, add the mini marshmallows to the pan. Keep stirring until they are fully melted and the mixture is smooth and glossy. This should take just a few minutes. - Incorporate peanut butter and mix: After the marshmallows melt, take the saucepan off the heat. Stir in the creamy peanut butter, vanilla extract, and salt. Mix well until everything is smooth and combined. - Add Rice Krispies cereal and fold: With the saucepan off the heat, quickly add the Rice Krispies cereal. Use a spatula or wooden spoon to gently fold the cereal into the marshmallow mix. Be careful not to crush the cereal. You want it to stay light and crispy. - Transfer mixture to the baking pan and press down: Pour the mixture into your prepared baking pan. Use a spatula or your lightly greased hands to press it down evenly. Make sure it’s packed tightly, so it holds its shape when cut. Now you’re ready to enjoy your chewy Rice Krispies treats! For the full recipe, check out the detailed instructions above. To make chewy Rice Krispies treats, start with fresh marshmallows. They melt better and create a soft texture. If your marshmallows are old, they might not melt well. This can lead to hard treats. When mixing your ingredients, do it gently. You want to coat the cereal without crushing it. This keeps the treats light and chewy. When it's time to serve, cut the treats into squares or bars. This makes them easy to grab and enjoy. You can also get creative with toppings. Add colorful sprinkles for fun, or drizzle melted chocolate on top. These extras make the treats look great and taste even better. Enjoy your chewy Rice Krispies treats with friends or family! For the full recipe, check out the details provided above. {{image_4}} You can make chewy Rice Krispies treats nut-free easily. If you want to avoid nut butters, try using sunflower seed butter instead of peanut butter or almond butter. It adds a nice flavor and keeps the treats creamy. If you prefer, you can also simply omit nut butters entirely. The treats will still be delicious and chewy without them. Want to switch things up? You can add cocoa powder to your mixture for a yummy chocolate version. Just mix in about 1/4 cup of cocoa powder with the marshmallows. This will give your treats a rich taste. You can also incorporate flavored extracts like almond or coconut. Just a teaspoon will add a fun twist. These small changes can make your treats even more exciting! To keep your chewy Rice Krispies treats fresh, store them in an airtight container. This will help prevent them from getting hard or stale. It’s best to keep them at room temperature. Avoid the fridge, as that can make them tough. How long do they last? When stored properly, chewy Rice Krispies treats can last up to one week. If you want to keep them longer, you can freeze them. Just wrap them tightly in plastic wrap and place them in a freezer bag. They can stay good for up to three months in the freezer. When ready to eat, let them thaw at room temperature. For more easy cooking tips, check out the Full Recipe. Yes, you can use regular marshmallows. Just cut them into smaller pieces to help them melt faster. Mini marshmallows melt more evenly, which helps keep the treats chewy. If you do use regular marshmallows, expect a slightly different texture. To keep your treats soft and chewy, avoid overcooking the marshmallows. Stir them until melted, then mix in the Rice Krispies quickly. Cool them at room temperature, not in the fridge. Storing them in an airtight container will also help maintain their softness. Use a sharp knife to cut the treats. Lightly grease the knife with butter or cooking spray to prevent sticking. Cut them into squares or rectangles, depending on your preference. For cleaner cuts, press down firmly without sawing. Absolutely! You can add mix-ins for extra flavor. Try chocolate chips, nuts, or dried fruit. You can also sprinkle colorful toppings like sprinkles or drizzle melted chocolate on top. Just mix them in before you spread the mixture into the pan. For the full recipe, refer to the original instructions. You now have a simple guide to make chewy Rice Krispies treats at home. We covered the main and optional ingredients, step-by-step instructions, and tips for the best texture. I also shared some fun variations and storage tips to keep your treats fresh. These treats are easy to customize, so enjoy creating your perfect snack. Whether you add toppings or try nut-free options, there’s something for everyone. Happy cooking!

Chewy Rice Krispies Treats Easy and Fun Recipe

Are you ready to whip up a sweet treat that’s easy and fun? In this blog post, I’ll guide you

To make tasty breakfast burritos with potatoes and eggs, gather these ingredients: - 4 large eggs - 2 medium-sized potatoes, peeled and diced - 1 small red onion, finely chopped - 1 red bell pepper, diced - 1 cup shredded cheese (cheddar or pepper jack) - 4 large flour tortillas - 1 tablespoon olive oil - 1 teaspoon ground cumin - 1 teaspoon smoked paprika - Salt and black pepper, to taste - Fresh cilantro, chopped (for garnish) - Salsa or hot sauce (for serving) These ingredients blend together to create a delicious breakfast. The potatoes add a hearty touch, while the eggs bring a lovely fluffiness. The spice from cumin and paprika gives a warm flavor that you will love. Don't forget the cheese! It melts beautifully and brings everything together. You can find the full recipe [here](#). To start, you need to cook the potatoes. Fill a medium pot with cold water. Add a good pinch of salt to the water. This will help to flavor the potatoes. Bring the water to a boil. Once boiling, add the diced potatoes. Cook them for about 10 minutes, or until tender. You can check by poking them with a fork. After cooking, drain the potatoes and let them cool a bit. Heat your olive oil in a large skillet over medium heat. You want the oil hot enough to sizzle when you add the veggies. Add the chopped onion and diced pepper to the skillet. Stir them for about 3-4 minutes. You want them soft and fragrant. This step builds great flavor. Next, crack your eggs into a bowl. Whisk them well until frothy. Add the ground cumin, smoked paprika, salt, and pepper. Mix until everything is combined. Pour this mixture into the skillet with the veggies. Cook gently, stirring with a spatula. Scramble the eggs until just set, which takes about 3-5 minutes. Now, it’s time to mix everything. Gently fold in the drained potatoes with the eggs and veggies. Stir until well combined and heated through. Add half of the shredded cheese to the mix. Stir until it melts and blends in nicely. This adds creaminess to your filling. Take a flour tortilla and lay it flat. Spoon a good amount of the egg and potato mix in the center. Don’t forget to sprinkle some remaining cheese on top. Fold in the sides of the tortilla first. Then, roll it tightly from the bottom up. This helps keep all the filling inside. Repeat with the rest of the tortillas. Clean the skillet and set it back on medium-high heat. Place the burritos seam-side down into the skillet. Toast them for about 2-3 minutes on each side. You want them to turn a nice golden brown color and get crispy. This step adds a satisfying crunch to your burritos. For the full recipe, click [Full Recipe]. - Achieving the Best Flavor Combinations Start with fresh ingredients. Use ripe vegetables for sweetness. The spices, like cumin and paprika, add depth. Don’t skip the cheese; it brings creaminess. Mix everything while cooking to blend flavors well. - How to Avoid Soggy Burritos Drain the potatoes well after cooking. Ensure the veggie mix is not too wet. Use a good tortilla that can hold the filling. Toast the burritos in a hot pan for crispiness. Serve them right away to keep them warm. - Dairy-Free Alternatives Swap cheese with dairy-free options like cashew cheese. Use nut milk instead of regular milk in the egg mix. Nutritional yeast adds a cheesy flavor without dairy. - Vegan Options Replace eggs with tofu or chickpea flour. Cook them just like scrambled eggs. Use plant-based cheese for a creamy texture. You can also add more veggies for a hearty meal. - Best Sides to Serve with Breakfast Burritos Fresh fruit adds a sweet touch. A simple green salad brightens the plate. Serve with crispy hash browns for extra crunch. - Creative Toppings and Garnishes Try avocado slices for creaminess. Add a dollop of sour cream for tang. Fresh salsa or pico de gallo gives it a kick. Chopped cilantro adds flavor and color to your burrito. For the full recipe, check the complete guide to create your perfect breakfast burritos. {{image_4}} You can make tasty vegetarian breakfast burritos by adding more vegetables. Try zucchini, spinach, or mushrooms for extra flavor. These veggies add color and nutrients. To customize for dietary needs, swap the eggs for scrambled tofu. This gives you a plant-based option that still feels hearty. Always check labels if you are gluten-free or dairy-free. Want more protein? Add crispy bacon or sausage to your burritos. Cook them in the same skillet before adding your veggies. You can also try turkey bacon for a lighter choice. If you follow a different diet, consider beans or lentils. These options pack protein and fiber into your meal. To bring heat to your dish, add diced jalapeños or a dash of cayenne pepper. This gives your burritos a nice kick. For a flavor boost, try spices like chili powder or onion powder. Experiment with your favorite spices to make the burritos your own. Adjust the heat level to match your taste. For the complete recipe, refer to the [Full Recipe]. To keep your leftover burritos fresh, wrap them tightly in foil or plastic wrap. Place them in an airtight container. This method helps prevent moisture loss and keeps them tasty. You can store them in the fridge. Leftover burritos stay good for about 3 to 4 days. If you want to save burritos for later, freezing is a great option. First, let them cool completely. Then, wrap each burrito in foil or plastic wrap. Place the wrapped burritos in a freezer-safe bag. Seal it tight to keep out air. Frozen burritos can last for up to 2 to 3 months. To thaw, take a burrito out of the freezer. Put it in the fridge overnight or use the microwave. If using the microwave, set it on defrost. To reheat burritos without losing their crunch, you have a few options. The best method is to use a skillet. Heat the skillet over medium heat. Place the burrito in the skillet for about 5 to 7 minutes. Flip it halfway to get both sides warm and crisp. You can also use the oven. Preheat it to 350°F (175°C). Wrap the burrito in foil and bake for 15 to 20 minutes. This method keeps the filling warm and prevents dryness. Avoid reheating in the microwave unless you're in a hurry. If you do, use a damp paper towel. This helps keep the burrito from drying out. To make gluten-free breakfast burritos, choose gluten-free tortillas. Many brands offer tasty options. You can find them at most grocery stores. Just follow the same steps as you would with regular tortillas. Make sure all ingredients are gluten-free. This way, everyone can enjoy them! Yes, you can use other types of cheese. Try mozzarella, feta, or even goat cheese. Each cheese brings a unique flavor. Use what you like best! Just make sure it melts well for a creamy texture. The best way to reheat breakfast burritos is in the oven. Preheat it to 350°F (175°C). Wrap the burritos in foil to keep them moist. Heat for about 15-20 minutes. You can also use a microwave. This is quick but may make them a bit soggy. To make breakfast burritos ahead of time, prepare the filling first. Then, assemble the burritos. Wrap them tightly in foil or plastic wrap. Store them in the fridge for up to three days. They’re great for quick breakfasts! Good toppings for breakfast burritos include sour cream, guacamole, and salsa. Fresh cilantro and green onions add great flavor. You can also sprinkle hot sauce for some heat. Choose your favorites for a tasty touch! Yes, breakfast burritos can be made in advance. Follow the steps for making them. Store them in the fridge or freezer. Just reheat when you’re ready to eat. This makes breakfast easy and fun! For the full recipe, check out the Breakfast Burritos with Potatoes and Eggs 🥔 section. In this post, I covered how to make tasty breakfast burritos with easy steps. You learned about the key ingredients and how to prepare each one. I shared tips for storing and reheating your burritos for the best taste. Breakfast burritos are fun to make and customize. Explore different flavors and fillings to suit your taste. With practice, you can master your own perfect burrito. Enjoy your cooking journey and make delicious meals!

Tasty Breakfast Burritos with Potatoes and Eggs Recipe

Start your day with a burst of flavor! This Tasty Breakfast Burritos with Potatoes and Eggs Recipe is perfect for

To make Pumpkin Pie Spiced Almonds, you need a few simple items. Gather these ingredients to create a delicious snack that packs a flavor punch. - 2 cups raw almonds - 2 tablespoons melted coconut oil - 3 tablespoons brown sugar - 1 teaspoon pumpkin pie spice - 1/2 teaspoon sea salt - 1/4 teaspoon vanilla extract - 1/4 teaspoon ground cinnamon - 1/4 teaspoon freshly grated nutmeg (if available) Each ingredient plays a key role. The raw almonds serve as the base. Coconut oil helps the spices stick. Brown sugar adds a sweet touch, while the pumpkin pie spice brings warmth. Sea salt balances the sweetness. Vanilla extract adds depth. Ground cinnamon and nutmeg enhance the autumn flavors. This combination makes a perfect snack for fall. You can enjoy them on their own or use them to top salads and desserts. This recipe is not only easy but also fun to make, and it tastes great. For the full recipe, check out the earlier section. 1. Preheat the oven: Start by setting your oven to 350°F (175°C). This step helps the almonds cook evenly. 2. Prepare the baking sheet: Line a baking sheet with parchment paper. This makes it easy to clean up later. 3. Mix the spiced coating: In a large bowl, combine melted coconut oil, brown sugar, pumpkin pie spice, sea salt, vanilla extract, ground cinnamon, and nutmeg. Whisk well until you have a smooth mixture. 1. Adding almonds to the mixture: Pour the raw almonds into the bowl with the spiced mixture. This is where the magic happens! 2. Ensuring even coating: Stir the almonds well. Make sure each almond is coated with the spice mix. This ensures every bite is full of flavor. 1. Spreading on the baking sheet: Once coated, spread the almonds on the prepared baking sheet in a single layer. This helps them roast nicely. 2. Baking and stirring for even browning: Bake the almonds for 15-20 minutes. Halfway through, stir them to get even browning. Keep an eye on them, as they can burn quickly! 3. Cooling the almonds: After baking, take them out and let them cool on the baking sheet. They will get crispier as they cool down. These simple steps lead to a delicious treat! For the full recipe, check the details above. To achieve optimal crispiness, ensure you bake the almonds at the right temperature. Preheat your oven to 350°F (175°C). Spread the almonds in a single layer on the baking sheet. Stir them halfway through baking to ensure even roasting. Watch them closely, as they can burn quickly. Once golden brown, let them cool completely. They will become crispier as they cool. Storing leftover spiced almonds can be easy. Place them in an airtight container after they cool. Keep them in a cool, dry place to maintain freshness. If stored properly, they can last for up to two weeks. You can present the almonds in fun and creative ways. Try using a decorative bowl to make them stand out. For a cute gift, fill a mason jar with the spiced almonds. Add a ribbon for a nice touch. Sprinkling extra spices or fresh pumpkin seeds on top can enhance the look. Pairing ideas with beverages can elevate your snack time. These spiced almonds go well with apple cider or a warm cup of tea. For a festive touch, serve them alongside holiday cocktails. You can also enjoy them with cheese or dried fruits for a tasty snack plate. {{image_4}} You can swap out brown sugar for other sweeteners. Honey and maple syrup work well. They add a nice touch of flavor. If you choose honey, use a bit less than the sugar. Honey is sweeter, so adjust accordingly. Maple syrup can give a nice earthy note. Just remember to use the same amount as the sugar. Want to mix it up? Try adding chocolate! Dark chocolate pairs great with these almonds. Melt some chocolate and drizzle it over the cooled almonds. Another option is to experiment with spices. You might like adding cayenne for a kick. Or try cardamom for a warm twist. These small changes can make your Pumpkin Pie Spiced Almonds unique and fun. For the full recipe, check out the detailed steps above. To keep your Pumpkin Pie Spiced Almonds fresh, use airtight containers. These will protect them from air and moisture. Glass jars work well, too, and they look nice on a shelf. Store the almonds in a cool, dark place. Avoid direct sunlight and heat, as these can spoil your tasty snack. These spiced almonds can last up to two weeks when stored properly. However, they taste best within the first week. Check for signs of spoilage. If you notice any strange smells or if they feel soft, it's time to toss them. Always trust your senses! To make Pumpkin Pie Spiced Almonds, you start by preheating your oven to 350°F (175°C). Next, you prepare a baking sheet by lining it with parchment paper. In a large bowl, mix melted coconut oil, brown sugar, pumpkin pie spice, sea salt, vanilla extract, ground cinnamon, and nutmeg. Stir until smooth. Add raw almonds and toss to coat each one. Spread the almonds evenly on the baking sheet. Bake for 15-20 minutes, stirring halfway. Keep an eye on them to avoid burning. Once golden, let them cool on the sheet. This makes a tasty snack or delightful gift. For the detailed steps, check the Full Recipe. You can find pre-made Pumpkin Pie Spiced Almonds at many grocery stores. Health food stores often carry them too. Look for them in the snack aisle or near the nuts section. Online retailers also sell them, making it easy to find your favorite brand. Yes, Pumpkin Pie Spiced Almonds are healthy! Almonds are rich in nutrients. They provide protein, healthy fats, and fiber. They can help with heart health and weight management. The spices add flavor without extra calories. The sugar content is low compared to many snacks, making them a better choice. Enjoy them in moderation for a healthy treat! You now know how to make pumpkin pie spiced almonds. We explored the ingredients and the step-by-step process to create them. We shared tips for perfecting your almonds and gave ideas for serving. Plus, we looked at tasty variations and storage methods. These almonds are a delicious snack or gift. Try them out, and enjoy the great flavor! Happy cooking!

Pumpkin Pie Spiced Almonds Tasty and Simple Recipe

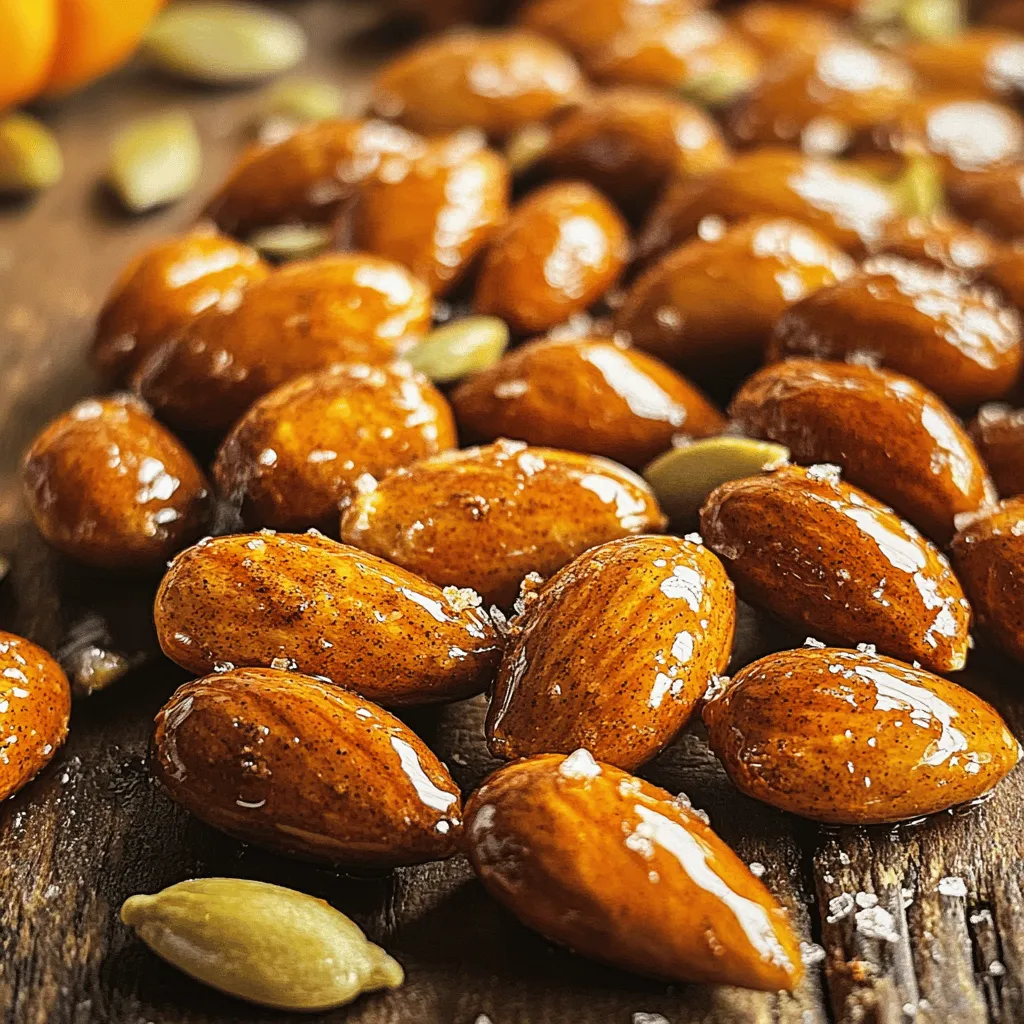
Fall is here, and it’s time for cozy flavors! I’ll show you how to make Pumpkin Pie Spiced Almonds. This

- 1 can (15 oz) chickpeas, drained and rinsed - 2 medium potatoes, peeled and diced into 1-inch cubes - 1 large onion, finely chopped - 3 cloves garlic, minced - 1 tablespoon fresh ginger, grated - 1 can (14 oz) coconut milk - 1 cup vegetable broth - 2 ripe tomatoes, chopped into small pieces - 2 tablespoons curry powder - 1 teaspoon cumin seeds - 1/2 teaspoon turmeric powder - 1/2 teaspoon red chili powder (adjust based on desired heat level) - Salt, to taste - 2 tablespoons vegetable oil - Fresh cilantro leaves, roughly chopped, for garnish If you lack chickpeas, use lentils or white beans. For potatoes, sweet potatoes work well too. If you need a dairy-free option, coconut milk is perfect. You can swap curry powder with garam masala for a different flavor. Use vegetable stock if you prefer a lighter broth. When choosing potatoes, look for firm ones with no sprouts or blemishes. Select onions that are dry and papery. For tomatoes, pick ones that feel slightly soft and are vibrant in color. Fresh ginger should be firm and smooth. Always check for canned goods with no dents on the can. This ensures quality and freshness. I hope these tips help you gather the best ingredients for your Chickpea and Potato Delight Curry. Check out the Full Recipe for more details! Start by gathering all your ingredients. You will need: - 1 can (15 oz) chickpeas, drained and rinsed - 2 medium potatoes, peeled and diced into 1-inch cubes - 1 large onion, finely chopped - 3 cloves garlic, minced - 1 tablespoon fresh ginger, grated - 1 can (14 oz) coconut milk - 1 cup vegetable broth - 2 ripe tomatoes, chopped into small pieces - 2 tablespoons curry powder - 1 teaspoon cumin seeds - 1/2 teaspoon turmeric powder - 1/2 teaspoon red chili powder (adjust based on desired heat level) - Salt, to taste - 2 tablespoons vegetable oil - Fresh cilantro leaves, roughly chopped, for garnish Make sure to have everything ready. This makes cooking smooth and fun. Heat vegetable oil in a large pot over medium heat. Once hot, add cumin seeds. Cook them for about 1 minute. You want them to sizzle and pop. This brings out their flavor. Next, add the chopped onion and cook until it turns soft, about 5 minutes. Stir often. Then, add minced garlic and grated ginger. Cook for 1-2 minutes until fragrant. Now, add the diced potatoes. Sprinkle salt, turmeric, curry powder, and red chili powder. Stir well so the potatoes are coated. Add chopped tomatoes and cook for another 2-3 minutes. They should start to soften. Pour in vegetable broth and coconut milk. Stir to mix everything. Raise the heat to bring the mixture to a boil, then lower it to maintain a gentle simmer. Add the chickpeas and cover the pot. Let it simmer for 20-25 minutes. Check the potatoes with a fork; they should be tender. Taste the curry and adjust the seasoning if needed. If it's too thick, add a bit more broth or water. Once cooked, remove from heat and serve warm. Garnish with fresh cilantro. Sautéing is key here. It helps build layers of flavor. Start with cumin seeds for a rich base. Cooking the onion, garlic, and ginger together creates a fragrant mix. Coating the potatoes with spices is essential. This adds depth to the dish. Simmering allows the flavors to meld nicely. It also softens the potatoes and chickpeas. Finally, garnishing with fresh cilantro adds brightness. It makes the dish visually appealing and fresh. Enjoy your Chickpea and Potato Curry with rice or warm naan. For the full recipe, check the earlier sections. To get the best flavor from your chickpea and potato curry, start with fresh spices. Use whole spices like cumin seeds for a stronger aroma. Toast them in oil before adding other ingredients. This step releases their oils and enhances their taste. Coconut milk adds creaminess and a subtle sweetness. Pair it with ripe tomatoes for a nice balance. Lastly, taste as you cook. Adjust salt and spices to your liking for the best results. One common mistake is not cooking the onions long enough. They should be soft and slightly golden. This adds depth to your dish. Another mistake is rushing the simmering phase. Letting the curry simmer allows flavors to blend. Avoid using too much water as well. A thick curry is more flavorful and satisfying. Lastly, don’t forget to taste and adjust. Small tweaks can make a big difference. If you want to spice up your curry, try adding fresh herbs like cilantro or mint. A squeeze of lime juice adds brightness. For extra heat, include chopped green chilies with the onions. You can also experiment with different spices. Try garam masala for warmth or coriander powder for a fresh twist. If you like a richer taste, add a spoonful of peanut butter or tahini. All these ideas elevate your chickpea and potato curry to new heights. {{image_4}} This dish is both vegan and gluten-free. You can enjoy it worry-free! The main ingredients, like chickpeas and potatoes, are naturally vegan. Just stick to vegetable broth and coconut milk to keep it plant-based. You can boost this curry with more protein or veggies. Try adding cooked lentils, tofu, or even paneer. For veggies, mix in spinach, peas, or bell peppers. These additions make the dish more filling and colorful. Change the spices to create new flavors. If you want a smoky taste, add smoked paprika. For a fresh twist, try a dash of garam masala at the end. Experimenting with spices makes this curry a fun dish to personalize. You can find the full recipe [here](#). After enjoying your Chickpea and Potato Curry, let it cool down. Place it in an airtight container. You can store it in the fridge for up to four days. Make sure to label it with the date. This way, you know how fresh it is! When you're ready to eat the leftovers, reheat them on the stove or in the microwave. If using the stove, place the curry in a pot over low heat. Stir it often to avoid burning. If using the microwave, cover it lightly. Heat in short bursts, stirring in between, until it’s hot. To freeze your Chickpea and Potato Curry, let it cool completely first. Then, pour it into freezer-safe bags or containers. Remove as much air as possible to prevent freezer burn. You can keep it frozen for up to three months. When you want to eat it, thaw it in the fridge overnight before reheating. Yes, you can use canned potatoes. They save time and work well. Just drain and rinse them first. Cut them into smaller pieces if needed. Canned potatoes will cook faster, so add them later in the process. To add spice, use more red chili powder. You can also add fresh green chilies. Adjust based on your heat preference. Taste as you go to find the right balance. Remember, it’s easy to add spice, but hard to take it out! This curry pairs well with fluffy rice or warm naan bread. You can also serve it with a side salad for freshness. For extra flavor, add mango chutney or yogurt. These sides will enhance your meal and add more color to your plate. For the complete recipe, check out the Chickpea & Potato Delight Curry section in this article. Enjoy cooking this simple yet flavorful dish! This blog post covered essential ingredients and gave smart tips for cooking. I shared how to prepare fresh produce and suggested substitutes to match your needs. You learned key cooking techniques and how to avoid common mistakes. We explored tasty variations for different diets and provided tips on storing your leftovers. Remember, cooking is fun, so don’t hesitate to experiment with flavors and ingredients. Enjoy your culinary journey with the Chickpea and Potato Delight Curry!

Chickpea and Potato Curry Flavorful and Simple Dish

Welcome to the world of Chickpea and Potato Curry, a dish that’s both easy and flavorful! I’ll show you how

- 300g Korean rice cakes (tteok) - 1 cup fish cakes, sliced - 2 tablespoons gochujang (Korean chili paste) - 1 tablespoon gochugaru (Korean chili flakes) - 1 tablespoon soy sauce - 1 tablespoon sugar - 3 cups water or anchovy broth - 1 tablespoon sesame oil - 1 cup mozzarella cheese, shredded - 2 green onions, finely chopped - 1 tablespoon sesame seeds, for garnish To make Cheese Tteokbokki, you need some key ingredients. First, the Korean rice cakes are the star of the dish. They give that chewy texture we love. Next, fish cakes add flavor and protein. Gochujang and gochugaru bring heat and depth. The soy sauce and sugar balance the spice perfectly. You can use water or anchovy broth for a tasty sauce base. Finally, the mozzarella cheese makes everything creamy and delicious. Don’t forget the green onions and sesame seeds for garnish! - You can swap fish cakes for tofu or mushrooms for a veggie twist. - Try different cheeses like cheddar or gouda for new flavors. - If you don’t have anchovy broth, plain water works just fine. These substitutions can keep the dish fresh. They help you cater to different tastes or dietary needs. - Cooking pan - Measuring cups and spoons - Stirring utensil Having the right tools is important. A good cooking pan helps with even heating. Use measuring cups and spoons for precise amounts. A sturdy stirring utensil will help mix everything well. For the full recipe, check out Cheese Tteokbokki Delight . To start, you need to prepare the rice cakes. If you have hard or refrigerated rice cakes, soak them in warm water for about 30 minutes. This softens them and makes them chewy. If you use fresh rice cakes, you can skip this step entirely. They are ready to go! Next, let’s make the sauce. In a large pan, pour in 3 cups of water or anchovy broth. Add 2 tablespoons of gochujang, 1 tablespoon of gochugaru, 1 tablespoon of soy sauce, and 1 tablespoon of sugar. Stir until everything blends well and the sauce is smooth. This sauce is key to the dish's rich flavor. Now, it’s time to cook. Bring the sauce to a gentle boil over medium heat. Carefully add the soaked rice cakes and 1 cup of sliced fish cakes into the pan. Stir gently to coat them with the sauce. Let it simmer on low heat for about 10-15 minutes. Stir occasionally to make sure everything cooks evenly, and the rice cakes become tender. After simmering, it’s time for the finishing touches. Drizzle 1 tablespoon of sesame oil over the top and stir gently. This adds a wonderful aroma. Then, sprinkle 1 cup of shredded mozzarella cheese over the tteokbokki. Cover the pan with a lid and let the cheese melt for about 2-3 minutes. The result is a creamy, cheesy delight! Now your Cheese Tteokbokki is ready to enjoy. Don't forget to check the Full Recipe for more details! To make your Cheese Tteokbokki even better, adjust the spice levels. If you like it hot, add more gochujang and gochugaru. For a milder taste, reduce these ingredients. You can also add extra toppings like boiled eggs, green onions, or even kimchi. These toppings bring more flavor and color. Simmering is key to making great tteokbokki. It helps the rice cakes soak up the sauce. Keep an eye on it and stir often. This way, everything cooks evenly and tastes amazing. When it’s time to add cheese, cover the pan with a lid. This helps the cheese melt perfectly. You want it stretchy and gooey, just like in the best street food. For a beautiful presentation, serve the Cheese Tteokbokki in a shallow bowl. If you want something special, use a sizzling hot stone dish. This keeps the dish warm and adds a nice touch. Serve it with pickled radish on the side. The cool crunch of the radish pairs well with the hot tteokbokki. Enjoy it warm and fresh for the best taste! {{image_4}} To make a vegetarian version, skip the fish cakes. Use a mix of colorful vegetables instead. You can add mushrooms, bell peppers, or even zucchini. These will add great flavor and texture. This version is still delicious and satisfying. You won’t miss the fish cakes at all! If you like heat, boost the spice! Add more gochujang and gochugaru. Start with an extra half tablespoon of each. This will give your tteokbokki a fiery kick. Adjust to your taste. It’s perfect for those who love spicy food. Get creative! Try adding non-Korean ingredients for a unique twist. Think about adding cooked shrimp or chicken for extra protein. You can also experiment with different cheeses. Cheddar or pepper jack can give a fun flavor change. Just remember, the cheese should melt nicely. Enjoy making it your own! For the full recipe, check out Cheese Tteokbokki Delight . To store leftover Cheese Tteokbokki, place it in an airtight container. Make sure it cools down first. Store it in the fridge for up to three days. This helps keep the flavors fresh and tasty. Reheating Cheese Tteokbokki can be tricky. You want to keep it chewy and not soggy. The best way is to use a pan. Add a splash of water to help steam it. Heat it over low to medium heat. Stir often until it’s warm. This method helps keep the cheese gooey and the rice cakes soft. Yes, you can freeze Cheese Tteokbokki! If you want to save some for later, let it cool completely. Then, place it in a freezer-safe container. It’s best to eat it within one month. When you're ready to eat, let it thaw in the fridge overnight. Reheat it in a pan, just like before. This keeps it nice and tasty! Cheese Tteokbokki is a popular Korean dish. It features chewy rice cakes in a spicy sauce. The dish also includes fish cakes and gooey cheese. Its origins trace back to street food in Korea. Many enjoy it for its rich flavors and texture. Yes, Cheese Tteokbokki is spicy. The main spice comes from gochujang, a chili paste. You can adjust the spice levels by changing the amount of gochujang. For less heat, use less gochujang or add more cheese. This helps balance the spice with creaminess. To make Cheese Tteokbokki in advance, prepare the sauce and rice cakes first. Store them in separate containers in the fridge. When ready to eat, heat the sauce and add the rice cakes. Finish by melting the cheese just before serving. Yes, you can use other cheeses besides mozzarella. Cheddar cheese gives a sharp flavor. Cream cheese adds a rich creaminess. Other options include gouda or provolone for a unique twist. Experiment to find your top choice! Cheese Tteokbokki pairs well with many side dishes. Pickled radish adds a refreshing crunch. A simple salad can balance the rich flavors. Serve with steamed veggies or kimchi for added zing. These sides enhance the overall meal experience. For the full recipe, check out Cheese Tteokbokki Delight . In this blog post, we explored how to make delicious Cheese Tteokbokki, a Korean dish loved by many. We covered essential ingredients, cooking steps, and tips to enhance flavor. You learned about variations like vegetarian options and how to store leftovers. Tteokbokki brings joy and comfort. With these easy steps, you can create a tasty dish at home. Enjoy experimenting and make it your own!

Cheese Tteokbokki Flavorful Delight in Every Bite

If you love a cheesy twist on classic Korean flavors, Cheese Tteokbokki is for you! This dish offers a perfect

- 1 pound large shrimp, peeled and deveined - 4 tablespoons unsalted butter, melted - 4 cloves garlic, finely minced - 1 teaspoon smoked paprika - 1 teaspoon fresh lemon zest - ½ cup freshly grated Parmesan cheese - ¼ cup panko breadcrumbs - 2 tablespoons fresh parsley, finely chopped - Salt and freshly ground black pepper to taste - Lemon wedges for serving To make garlic parmesan baked shrimp, start with fresh, high-quality shrimp. This dish shines with the right ingredients. You need large shrimp that are peeled and deveined. The butter brings richness, while garlic adds sharpness. Next, seasoning is key. Smoked paprika gives a warm flavor, and lemon zest brightens it all up. Freshly grated Parmesan cheese adds a salty, nutty taste. Panko breadcrumbs give a satisfying crunch on top. Finally, parsley adds freshness and color. Don't forget salt and pepper to taste. Lemon wedges serve as a great garnish. They also add a zesty kick when squeezed over the shrimp. For the complete instructions, check the Full Recipe. - Preheat the oven to 400°F (200°C). This helps cook the shrimp evenly. - In a mixing bowl, whisk together the melted butter, minced garlic, smoked paprika, and lemon zest. This creates a tasty garlic butter mix. - Add the peeled and deveined shrimp to the garlic butter mixture. Make sure each shrimp is coated well. - Season with salt and freshly ground black pepper. This adds flavor to your shrimp. - Transfer the coated shrimp to a baking dish. Spread them out in a single layer for even cooking. - In a separate bowl, prepare the topping mixture by combining Parmesan cheese, panko breadcrumbs, and chopped parsley. This mixture adds a crunchy texture. - Evenly sprinkle this topping over the shrimp in the baking dish. - Bake the shrimp for 12-15 minutes or until they turn pink and opaque. The topping should be golden brown. For the complete details, check the Full Recipe. - Ensure shrimp are arranged in a single layer for even cooking. This helps them cook properly and prevents steaming. - Adjust seasonings according to your taste. If you love garlic, add more! - Serve family-style in the baking dish for a cozy feel. You can also use individual plates for a nice touch. - Garnish with fresh parsley and lemon wedges. This adds color and a burst of flavor! - Pair the baked shrimp with a side salad for a fresh crunch. Crusty bread is also great for soaking up the garlic butter. - Enjoy with a glass of white wine or sparkling water. Both drinks will complement the flavors well. For more details, check the Full Recipe. {{image_4}} To make your dish pop, consider these easy tweaks. Cayenne pepper adds a nice kick. Just a sprinkle can change the whole vibe. You can also swap in different cheeses. Mozzarella or cheddar works great. Each cheese offers a unique taste that can complement the shrimp perfectly. Don’t have shrimp? No problem! You can substitute scallops or chicken for a different flavor. Both options cook well and soak up the garlic butter. For a gluten-free version, switch to gluten-free breadcrumbs. This small swap allows everyone to enjoy this dish without worry. Want to cater to plant-based eaters? You can create a vegan version! Look for plant-based shrimp alternatives. These options mimic the taste and texture of shrimp. You can use the same garlic butter mix and topping for a delightful meal. Everyone can enjoy this dish, no matter their diet. To keep your garlic parmesan baked shrimp fresh, store them in an airtight container. This helps to lock in flavor and moisture. You can keep them in the fridge for up to 2 days. After that, the shrimp may lose their taste and texture. When reheating, the best method is to use an oven. Preheat it to 350°F (175°C). Place the shrimp in a baking dish and cover with foil. Heat for about 10 minutes. Avoid using a microwave, as it can make the shrimp rubbery and dry. If you want to store the shrimp for longer, freezing is a good choice. Place the cooled shrimp in a freezer-safe bag. Make sure to remove excess air before sealing. For best quality, use within 2 months. When ready to eat, thaw the shrimp overnight in the fridge. This keeps them safe and tasty. Baking garlic parmesan shrimp takes about 12 to 15 minutes. Look for the shrimp to turn pink and opaque. The topping should be golden brown. This short time makes it a quick dish to prepare. Yes, you can use frozen shrimp. They save time and are easy to find. Just make sure to thaw them before cooking. Frozen shrimp may have extra water, which can affect the texture. Fresh shrimp provide a firmer bite and better flavor. You can serve garlic parmesan shrimp with many sides. A fresh salad adds crunch. Garlic bread pairs well for dipping. Steamed vegetables or rice also complement the dish nicely. The lemon flavor in the shrimp goes well with light, bright sides. Yes, this recipe works well for meal prep. Cook the shrimp and store it in containers. It stays good in the fridge for about two days. You can reheat it in the oven or microwave later. This makes it easy to have a tasty meal ready. You can find the Full Recipe in our recipe section. It has all the details you need to make this dish. This recipe for garlic parmesan baked shrimp is simple and delicious. You learned the key ingredients, step-by-step instructions, and helpful tips. Variations let you customize flavors or adapt for diets. Store extras for later enjoyment. This dish is perfect for any meal and easy to share with family and friends. Enjoy creating a tasty meal that impresses everyone at the table. Your kitchen is ready for this tasty adventure!

Garlic Parmesan Baked Shrimp Savory and Quick Dish

If you’re craving a quick and tasty meal, look no further! Garlic Parmesan Baked Shrimp is a simple dish that

- 1 cup pancake mix - 1/2 cup water - 2 tablespoons pure maple syrup - 1/2 teaspoon ground cinnamon - 4 slices of cooked bacon - 4 large eggs - 4 slices of American cheese - Butter for cooking These main ingredients create a sweet and savory flavor. The pancake mix forms the base. The maple syrup and cinnamon add a delightful touch. The bacon and cheese provide a nice contrast. - Powdered sugar for dusting Adding powdered sugar is a fun way to sweeten your muffins. It makes them look nice too. You can skip it if you want a less sweet treat. Start by mixing the pancake ingredients. In a large bowl, combine 1 cup of pancake mix, 1/2 cup of water, 2 tablespoons of pure maple syrup, and 1/2 teaspoon of ground cinnamon. Stir until the mixture is smooth. The batter should be thick but pourable. A smooth batter helps your pancakes rise and cook evenly. Heat a non-stick skillet over medium heat. Add a thin layer of butter to grease the pan. Pour a small amount of batter into the skillet to make round pancakes. Each pancake should be about 4 inches wide. Cook for 2-3 minutes, or until bubbles appear on the surface. Flip the pancakes carefully and cook for another 2 minutes until they turn golden brown. Remove them from the skillet and set aside. In the same skillet, add your cooked bacon slices. Heat them until they are nice and crispy. Once cooked, place the bacon on a paper towel to absorb excess grease. Next, crack the eggs into the skillet. Cook them sunny-side up, or to your liking. Sprinkle a little salt and pepper on the eggs for extra flavor. Start with one pancake round on a plate. Layer a slice of American cheese on top, then add a crispy piece of bacon. Carefully place one cooked egg on top of the bacon. Finish with another pancake round to complete the muffin. This layering adds great texture and taste. For a nice touch, you can dust the tops of the muffins with powdered sugar. Serve them warm for the best flavor. Pair your McGriddle Muffins with fresh fruit or a side of yogurt for a balanced meal. Enjoy your tasty breakfast treat! - Overmixing pancake batter: When you mix too much, the pancakes can get tough. Mix just until combined for a fluffy result. - Cooking on too high heat: High heat can burn the outside while leaving the inside raw. Use medium heat for even cooking. - Techniques for a clean flip: Wait until bubbles form on the surface before flipping. This shows the pancake is ready. - Tools that can help: A good spatula is key. Look for a thin, flexible spatula to slide under the pancake easily. - Suggestions for additional spices or toppings: Try adding a pinch of nutmeg or a dash of vanilla to the batter for extra flavor. You can also top with fresh fruit or whipped cream. - Experimenting with different types of cheese: While American cheese is classic, consider using cheddar or pepper jack for a tasty twist. {{image_4}} You can swap bacon for plant-based options. Try veggie bacon or tempeh. These choices give a nice crunch. You can also choose different egg styles. Scrambled eggs or tofu scramble work well. This way, you keep the flavor but make it meat-free. Mix in fruits like blueberries or chocolate chips for a sweet twist. These add a burst of flavor in every bite. For a fun kick, add spicy ingredients. Jalapeños or hot sauce can bring heat. These twists make your McGriddle Muffins unique. For gluten-free muffins, use gluten-free pancake mix. There are many brands available. This allows you to enjoy the same great taste. To maintain flavor and texture, add extra spices or vanilla. This keeps your muffins moist and delicious. Explore these variations to find your favorite! Each option brings something special to your plate. Check the Full Recipe for more ideas. To store leftover McGriddle Muffins, let them cool completely. Place them in an airtight container. This keeps them fresh and safe. You can also wrap each muffin in plastic wrap. This method helps to avoid drying out. Use a container that seals tight to prevent air exposure. To freeze McGriddle Muffins, first let them cool down. Then, wrap each muffin in plastic wrap. After that, place them in a freezer-safe bag or container. This keeps them fresh for a longer time. When you want to eat one, take it out and thaw it in the fridge overnight. To reheat, you can warm it in the microwave for about 30 seconds or heat it in a skillet until hot. McGriddle Muffins last about 3 to 5 days in the fridge. If you freeze them, they can last up to 3 months. Always check for signs of spoilage. If the muffins smell off or have mold, it's best to throw them away. Proper storage makes sure you enjoy these tasty treats later! For the complete recipe, check the Full Recipe. Yes, you can make McGriddle Muffins ahead of time. Once cooked, let them cool. Store them in an airtight container. Keep them in the fridge for up to three days. You can also freeze them. Wrap each muffin in plastic wrap and place them in a freezer bag. They will last for about a month. When you're ready to eat, just reheat them in the microwave or oven. To make McGriddle Muffins healthier, consider these swaps: - Use whole wheat pancake mix instead of regular. - Substitute turkey bacon for pork bacon. - Choose egg whites or egg substitutes instead of whole eggs. - Replace American cheese with a low-fat cheese option. - Add fresh veggies like spinach or tomatoes for more nutrients. You can enjoy McGriddle Muffins with several tasty sides: - Fresh fruit like berries or sliced bananas. - A light salad with mixed greens. - Yogurt with honey and nuts for extra protein. - Coffee or fresh orange juice to drink. For the complete McGriddle Muffins recipe, check the [Full Recipe]. This blog covers how to make McGriddle Muffins. We explored key ingredients, like pancake mix and bacon, along with optional toppings. I detailed steps for preparing, cooking, and assembling your muffins for the best taste. We also discussed tips to avoid common mistakes and enhance flavors. You can adapt recipes for vegetarian or gluten-free diets, making this dish flexible. Store leftovers properly to maintain freshness. With these insights, you're ready to enjoy delicious McGriddle Muffins anytime!

McGriddle Muffins Delightfully Easy Breakfast Treat

Start your day right with my McGriddle Muffins! These delightfully easy breakfast treats combine soft pancakes with savory bacon, eggs,

- 1 lb (450g) chicken breast, cut into bite-sized pieces - 1 cup buttermilk (or plain yogurt substitute) - 1 cup all-purpose flour - 1 tsp smoked paprika - 1 tsp garlic powder - 1 tsp onion powder - ½ tsp cayenne pepper (adjust according to your heat preference) - Salt and black pepper to taste To make Crispy Bang Bang Chicken, you need fresh chicken breast. Cut it into small, bite-sized pieces. This helps the chicken cook evenly and stay juicy. Soak the chicken in buttermilk. This gives it a tender texture and adds flavor. If you don't have buttermilk, plain yogurt works just fine. Next, mix the dry ingredients. Combine all-purpose flour with the seasonings. I like to use smoked paprika for a nice depth of flavor. Garlic powder and onion powder add savory notes. If you like heat, cayenne pepper is your friend. Don't forget to season with salt and black pepper. This will make your chicken taste amazing. - ½ cup mayonnaise - 2 tbsp sweet chili sauce - 1 tbsp sriracha (more or less to suit your spice level) - 1 tbsp honey - 1 tsp fresh lime juice For the Bang Bang sauce, start with mayonnaise. It gives a creamy base. Mix in sweet chili sauce for a hint of sweetness. If you want some heat, add sriracha. Adjust the amount based on your spice preference. A touch of honey balances the flavors nicely. Finally, squeeze in some fresh lime juice for brightness. - Recommended oils: vegetable oil or peanut oil When frying, oil choice matters. I recommend using vegetable or peanut oil. They have high smoke points, perfect for frying crispy chicken. Heat the oil until it reaches 350°F (175°C) for the best results. For the full recipe, check the details above. You'll make a dish everyone will love! Start by combining the chicken with buttermilk, salt, and pepper. This step is key. The buttermilk makes the chicken juicy and tender. Make sure each piece is well-coated. Cover the bowl and let it sit in the fridge. Aim for at least 30 minutes, but 1-2 hours is best for flavor. Next, prepare the coating. In a medium bowl, whisk together the flour, smoked paprika, garlic powder, onion powder, cayenne pepper, and a little more salt and pepper. This mix gives the chicken its crunchy crust. Make sure it’s well blended for even flavor. Now, let’s cook the chicken. Heat oil in a skillet until it reaches 350°F. Use a thermometer to check the temperature. While the oil heats, take the marinated chicken out. Let excess buttermilk drip off. Coat each piece in the flour mixture, shaking off the extra flour. Carefully place the chicken in the hot oil. Fry in batches to avoid crowding. Cook each batch for about 4-5 minutes. You want them golden brown and crispy. Use a slotted spoon to remove the chicken and place it on paper towels. This will soak up extra oil. For the full recipe, refer to the recipe section above. Enjoy the crispy goodness you’ve created! To make the best Crispy Bang Bang Chicken, focus on frying. Avoid overcrowding the pan. If you add too many pieces, they won’t cook evenly. Each piece needs space to fry well. Use a thermometer to check the oil temperature. Aim for 350°F (175°C). This helps achieve that perfect golden crust. Proper marination time is key. Marinate your chicken for at least 30 minutes. For deeper flavor and better texture, aim for 1-2 hours. After marinating, let the excess buttermilk drip off. This step is vital before dredging in flour. A dry surface helps the coating stick better, making your chicken extra crispy. The Bang Bang sauce can be your canvas. Adjust sweetness and spice levels to fit your taste. If you like sweeter sauce, add more honey. If you want more heat, increase the sriracha. Taste as you go! This personalization will make your dish truly yours. For the full recipe, check out the detailed instructions provided. {{image_4}} If you want a lighter version, try an oven-baked Bang Bang chicken. This method keeps the crunch without frying. Preheat your oven to 425°F (220°C). After marinating the chicken, coat it and place it on a baking sheet. Bake for about 20-25 minutes until golden and crispy. Another option is to swap chicken for tofu. This vegetarian alternative is just as tasty. Press the tofu to remove extra water, then slice and marinate it just like the chicken. Get creative with your spices and sauces. You can add curry powder for an Indian twist or smoked paprika for a deeper flavor. Try different sauces like teriyaki or a spicy peanut sauce. Fresh herbs can also make a big difference. Adding cilantro or basil can brighten the dish. Just chop them up and mix them in with your sauce or sprinkle on top. Crispy Bang Bang chicken shines when served with steamed rice. The rice helps balance the spicy sauce. A fresh salad is another great pair. It adds crunch and freshness to the meal. You can serve this dish as an appetizer, too. Just cut the chicken into smaller pieces for easy sharing. This way, everyone can enjoy a taste of that delightful flavor explosion. For the full recipe, be sure to check the instructions above. Store any leftover chicken in an airtight container. It can last in the fridge for 3-4 days. Make sure to let it cool down first. This way, it stays fresh and safe to eat. You can freeze the fried chicken, but do this before adding the sauce. Place the chicken in a safe freezer bag. When you want to enjoy it again, thaw it in the fridge overnight. Reheat it in the oven for the best taste and crispiness. Keep any leftover Bang Bang sauce in a container. It stays good in the fridge for up to 1 week. This sauce is perfect for dipping or drizzling on other dishes. Enjoy the flavor for days after making your crispy Bang Bang chicken. For the full recipe, check out the full recipe link. To make crispy chicken, marinate it first. Use buttermilk for flavor and moisture. This step helps the coating stick. Next, coat the chicken pieces in seasoned flour. The flour gives the chicken a crunchy outer layer. When frying, keep the oil hot, around 350°F. Fry in small batches. This prevents steaming and keeps the chicken crispy. Use a slotted spoon to drain excess oil after frying. Yes, you can use frozen chicken. Thaw it in the fridge overnight for best results. If you're in a hurry, run it under cold water. Once thawed, cut it into bite-sized pieces. Marinate the chicken in buttermilk just like fresh chicken. This helps retain moisture and flavor. Crispy Bang Bang chicken pairs well with many side dishes. Here are some ideas: - Steamed rice for a filling meal - Fresh salad with crunchy veggies - Sweet potato fries for extra flavor - Coleslaw for a refreshing crunch - Garlic bread to soak up the sauce These sides balance the dish's richness and add variety. Enjoy your meal! Crispy Bang Bang Chicken is a treat you can make at home. Start with marinated chicken, coat it in a seasoned flour mix, and fry until crispy. The bang bang sauce, made from simple ingredients, adds a sweet and spicy kick. Remember to let excess buttermilk drip and don’t overcrowd the pan for the crispiest results. You can even customize it to fit your taste! Store leftovers properly or swap chicken for tofu for a healthier option. Enjoy this fun dish with rice or a salad. I hope you try making this delicious recipe!

Crispy Bang Bang Chicken Delightful Flavor Explosion

Are you ready for a flavor-packed adventure? Crispy Bang Bang Chicken is a delightful treat that transforms simple ingredients into

The main stars of this comforting dish are tortellini and fresh vegetables. Tortellini brings a delightful, chewy texture to the soup. You can use cheese tortellini for a creamy taste. For the veggies, I love using a mix of colorful options. Carrots, bell peppers, and zucchini not only add flavor but also brighten the dish. Spinach adds a nice green touch and boosts nutrition. Fresh herbs and spices play a big role too. Dried oregano and basil give a warm, Italian flavor. Using fresh herbs at the end enhances the soup's taste. It makes each bowl feel special. Each serving of veggie-loaded tortellini soup has about 250 calories. This varies based on the brand of tortellini you choose. The soup is rich in key nutrients. It offers vitamins A and C from the vegetables. These vitamins help support your immune system. The tortellini adds some protein and carbs to keep you full. If you want a dairy-free option, use vegan tortellini. Many brands now offer plant-based options that are just as tasty. You can also swap out vegetables depending on what’s in season. Try butternut squash in the fall or asparagus in spring. Feel free to mix and match based on your tastes and what you have at home. For the full recipe, check the section above. Enjoy your cooking! To make your veggie-loaded tortellini soup, start with your vegetables. Chop them into small pieces. This helps them cook evenly. Here’s how to do it quickly: - Peel and dice the onion. - Mince the garlic. - Slice the carrots and chop the celery. - Dice the bell pepper and zucchini. When handling garlic, you want to avoid burning it. Sauté garlic for just one minute. Stir it often. If it burns, it can make your soup taste bitter. Now, let’s get cooking! Heat one tablespoon of olive oil in a large pot over medium heat. Add the diced onion and sauté for about 3-4 minutes. The onion should be soft and clear. Next, add the minced garlic and stir for one minute. Then, toss in the sliced carrots and chopped celery. Cook these for about 5-6 minutes. They should start to soften. After that, mix in the diced bell pepper and zucchini. Cook for another 4-5 minutes until they are tender. Pour in one can of diced tomatoes and six cups of vegetable broth. Season with dried oregano, dried basil, salt, and pepper. Bring the soup to a boil. Once it’s boiling, lower the heat and let it simmer for 10-15 minutes. This lets the flavors blend well. Then, add the tortellini. Cook it according to the package directions, usually about 3-5 minutes. The tortellini will float when it’s done. Finally, stir in one cup of chopped spinach. Let it wilt for about 2 minutes. Before serving, taste your soup. Adjust the seasoning with more salt or pepper if you like. Serve it hot! Ladle the soup into bowls. For extra flavor, sprinkle with grated Parmesan cheese and fresh parsley or basil. Enjoy your warm, veggie-loaded tortellini soup! For a full recipe, check out the [Full Recipe]. To store veggie-loaded tortellini soup for meal prep, let it cool before placing it in containers. Use airtight containers to keep it fresh. It can stay in the fridge for up to three days. For longer storage, freeze the soup in freezer-safe bags. Lay the bags flat to save space. When reheating, do it slowly on the stove or in the microwave. Add a splash of broth or water to keep it from getting too thick. Stir often to help it heat evenly. This way, you keep all the great flavors. Want to spice up your soup? Add chili flakes for a kick. You can also try smoked paprika for a warm flavor. If you enjoy herbs, fresh basil or even thyme can brighten the taste. Using homemade stock boosts the flavor a lot. It often has less salt and more depth than store-bought options. If you use store-bought, choose low-sodium to control the salt level better. Pair your soup with crusty bread for a nice crunch. A simple green salad also works well. It adds freshness and balances the meal. For gatherings, serve the soup in big bowls. Add a sprinkle of Parmesan cheese and fresh herbs on top. This makes it look impressive. You can even drizzle a bit of olive oil for a shiny finish. People will love it! For the full recipe, check out the complete guide. {{image_4}} You can easily make this soup vegetarian or vegan. Just swap the cheese tortellini for a vegan option. Many brands offer plant-based tortellini now. This way, you keep the soup rich and creamy without any dairy. If you need a gluten-free option, use gluten-free pasta. There are many choices available. Look for brands that make gluten-free tortellini. Always check the package for cooking times. You want your pasta to be tender but not mushy. I love to change the veggies based on what’s in season. In the fall, try adding squash or sweet potatoes. They add a nice sweetness to the soup. In summer, fresh tomatoes and corn work great. They bring a burst of flavor. Frozen vegetables are also a smart choice. They are convenient and still nutritious. You can add them straight to the pot without thawing. This makes prep super quick. Spice up your soup with unique flavors. Try adding cumin or coriander for an earthy taste. A pinch of smoked paprika can also add a nice depth. These spices can change the whole feel of the dish. You can look to other cuisines for inspiration. Add a touch of Italian herbs for a classic flavor. Or, try some Thai chili paste for a spicy kick. The world of flavors is vast, and your soup can be too! For the complete recipe, check out the [Full Recipe]. To keep your veggie-loaded tortellini soup fresh, store it in airtight containers. Let the soup cool down before sealing. This helps prevent excess moisture inside the container. If you have leftovers, place them in the fridge. They will stay good for up to three days. For longer storage, you can freeze the soup. Use freezer-safe containers or bags. Leave some space at the top, as the soup will expand when frozen. When stored properly, veggie-loaded tortellini soup lasts about three days in the fridge. In the freezer, it can last for up to three months. To tell if the soup has gone bad, look for changes in color or smell. If it smells sour or off, do not eat it. Also, check for any signs of mold. When in doubt, throw it out. Reheat the soup on the stove over low heat. Stir it often to avoid sticking. This helps keep the taste and texture intact. If the soup seems too thick, add a splash of vegetable broth or water. You can also use the microwave for reheating. Just heat it in short intervals, stirring in between. This ensures even heating. Always check the temperature before eating. Yes, frozen tortellini works great in this soup. When using frozen tortellini, add it directly to the pot. No need to thaw it first. Just follow the cooking time on the package, usually around 3-5 minutes. The tortellini will cook quickly in the hot soup. This saves time and keeps things simple. Plus, it adds a nice texture to your soup. To add heat, try a few easy tricks. You can add red pepper flakes while cooking. Start with a pinch and taste as you go. If you want more heat, add a bit more. Another option is to use diced jalapeños or a splash of hot sauce. These add a nice kick without changing the soup's flavor too much. To make your soup more filling, consider adding proteins. Beans are a great choice. Canned chickpeas or white beans work well. Just drain and rinse them before adding. If you prefer meat, cooked chicken is a tasty option. Shred it and stir it in just before serving. It makes the soup even more satisfying. This blog post explored how to make veggie-loaded tortellini soup. We covered essential ingredients, nutrition, and substitutions. You learned step-by-step instructions for preparation and cooking, along with helpful tips. We discussed variations for dietary needs and seasonal changes. Lastly, we shared storage info and reheating techniques. Enjoy making this soup! It’s easy, nutritious, and delicious. Feel free to experiment with ingredients to make it your own. Happy cooking!

Veggie-Loaded Tortellini Soup Nourishing Comfort Bowl

Looking for a cozy meal that’s quick and loaded with flavor? This Veggie-Loaded Tortellini Soup is your answer! Packed with

Older posts
Newer posts
← Previous Page1 … Page61 Page62 Page63 … Page76 Next →

dsad

© 2025 dailydishcraft • Built with GeneratePress

Our Policies

  • Copyright Policy
  • Cookie Policy
  • GDPR Policy
  • Privacy Policy
  • Disclaimer
  • Terms Of Use

More Information

  • Home
  • About
  • Contact
  • Appetizers
  • Dessert
  • Dinner
  • Drinks
©2025, dailydishcraft About Back To Top