Skip to content
DisclaimerTerms Of UseGDPR PolicyCookie Policy

dailydishcraft

  • Home
  • Drinks
  • Appetizers
  • Dinner
  • Dessert
  • About
  • Contact
  • Privacy Policy
DisclaimerTerms Of UseGDPR PolicyCookie Policy

Jessica

- 1 cup canned pumpkin puree - 1/2 cup vegetable oil - 1 cup brown sugar, packed - 1/2 cup granulated sugar - 2 large eggs - 2 teaspoons vanilla extract - 2 cups all-purpose flour - 1 teaspoon baking powder - 1 teaspoon baking soda - 1 teaspoon ground cinnamon - 1/2 teaspoon ground nutmeg - 1/4 teaspoon ground ginger - 1/2 teaspoon salt The main ingredients for your muffins start with canned pumpkin puree. It gives these muffins their rich flavor and moist texture. Next, we have vegetable oil. It helps keep the muffins soft. Brown sugar adds depth and sweetness, while granulated sugar balances the flavors. Eggs and vanilla extract bind everything together and add more taste. - 8 ounces cream cheese, softened - 1/4 cup granulated sugar - 1 large egg - 1 teaspoon vanilla extract The cream cheese swirl needs just a few simple ingredients. Softened cream cheese creates a smooth and rich layer. Granulated sugar sweetens the cream cheese. One egg helps hold the swirl together, while vanilla extract adds a lovely aroma. - 1/2 cup chopped walnuts Chopped walnuts are optional but add a nice crunch to the muffins. They also boost flavor and nutrition. If you like nuts, feel free to mix them in. {{ingredient_image_2}} - Preheating the oven: Start by preheating your oven to 350°F (175°C). This step is key for even baking. - Preparing muffin tin: Line a muffin tin with paper liners or grease it lightly. This helps the muffins come out easily. - Combining wet ingredients: In a big bowl, mix the canned pumpkin puree, vegetable oil, brown sugar, granulated sugar, eggs, and vanilla extract. Blend until the mixture is smooth. - Mixing dry ingredients and combining: In another bowl, whisk together the flour, baking powder, baking soda, cinnamon, nutmeg, ginger, and salt. Slowly add this dry mix to the wet mix. Stir gently until just combined. A few lumps are okay. If you like, fold in chopped walnuts for extra crunch. - Preparing the cream cheese mixture: In a separate bowl, mix the softened cream cheese, granulated sugar, egg, and vanilla extract. Beat until creamy with no lumps. - Swirling the cream cheese into the batter: Spoon about one tablespoon of the pumpkin batter into each muffin cup. Add a dollop of the cream cheese mix on top. Use a toothpick to swirl the cream cheese into the pumpkin batter. Finish with another tablespoon of pumpkin batter over the swirl. - Filling the muffin cups: Fill each muffin cup just to the top. This allows for nice rising. - Baking time and doneness check: Bake the muffins for 18-22 minutes. They are done when a toothpick inserted in the center comes out clean or with a few moist crumbs. - Cooling muffins: Let the muffins cool in the tin for about 5 minutes. Carefully move them to a wire rack to cool completely. - Presentation tips: Serve the muffins warm or at room temperature. For a pretty touch, dust with powdered sugar and add a sprig of mint. Enjoy the look and taste of these delightful treats! - Avoiding overmixing: Mix the batter gently. Overmixing can make the muffins tough. A few lumps are fine! - Ensuring even baking: Fill each muffin cup to the same level. This helps them bake evenly and rise well. - Suggestions for spices and add-ins: Add nutmeg or ginger for a warm kick. You can also mix in chocolate chips or dried cranberries for extra flavor. - Pairing with toppings: Try a sprinkle of cinnamon sugar on top before baking. This adds a sweet crunch. - Measuring ingredients properly: Use the right tools. A kitchen scale helps ensure you get the correct amounts. This is key for great results. - Checking for doneness: Insert a toothpick in the center of a muffin. If it comes out clean or with a few crumbs, they are ready! If not, bake a few more minutes. Pro Tips Use Fresh Spices: For the best flavor, opt for freshly ground spices instead of pre-ground ones. This will enhance the aroma and taste of your muffins. Check for Doneness: To ensure your muffins are perfectly baked, insert a toothpick into the center. It should come out clean or with a few moist crumbs, not wet batter. Cool Completely: Allow the muffins to cool completely on a wire rack before storing. This prevents them from becoming soggy and maintains their texture. Experiment with Add-ins: Feel free to customize your muffins by adding chocolate chips, dried cranberries, or other nuts for extra flavor and texture. {{image_4}} You can make these pumpkin cream cheese swirl muffins even better by adding some fun flavors. - Adding chocolate chips: Stir in a cup of chocolate chips for a rich twist. The sweet chocolate contrasts nicely with the pumpkin. You can use dark, milk, or even white chocolate chips. Each choice brings a new flavor to your muffins. - Incorporating cranberries or raisins: Mix in a half cup of dried cranberries or raisins. This adds a chewy texture and a touch of sweetness. Cranberries give a tart burst, while raisins add a warm flavor. If you want a healthier muffin, you can make a few easy swaps. - Using whole wheat flour: Replace all-purpose flour with whole wheat flour. This adds fiber and nutrients to your muffins. They will taste heartier, and you won't lose any of the pumpkin flavor. - Substituting sugars: You can use natural sweeteners instead of brown and granulated sugars. Try honey or maple syrup. Just adjust the liquid in the recipe to keep the batter right. You can also make these muffins gluten-free with some careful choices. - Recommended gluten-free flours: Use a gluten-free flour blend that includes rice flour or almond flour. These blends often work well in baking and can give a great texture. - Adjusting other ingredients: When you use gluten-free flour, you might need to add extra moisture. Consider adding a bit more pumpkin puree or a splash of milk to keep the muffins soft and moist. Once your muffins cool, store them in an airtight container. This keeps them fresh and moist. If you leave them out, they can dry out quickly. For best results, place parchment paper between layers to avoid sticking. These muffins stay tasty for about 3 to 5 days at room temperature. To freeze your muffins, first, let them cool completely. Wrap each muffin in plastic wrap tightly. Then, place them in a freezer bag or container. This helps prevent freezer burn. They can last up to three months in the freezer. When you’re ready to eat them, take the muffins out and thaw them. You can let them sit at room temperature or use the microwave for a quick thaw. Enjoy them warm for the best taste! These muffins can stay fresh for about 3-4 days at room temperature. Store them in an airtight container. If you want them to last longer, keep them in the fridge, where they can stay good for up to a week. Yes, you can make these muffins in advance. Bake them and let them cool completely. Then, store them in an airtight container. They taste great fresh, but they also hold up well over time. If you want to swap cream cheese, you can use Greek yogurt or mascarpone cheese. Both options add creaminess and taste great in this recipe. Just remember, the texture might change slightly, but they will still be yummy. Yes, these muffins freeze well. Once they cool, wrap them tightly in plastic wrap. Place them in a freezer bag or container. They can last for about 2-3 months in the freezer. When you're ready to eat, just thaw them at room temperature or warm them in the oven. You learned how to make delicious pumpkin muffins from scratch. We covered key ingredients, steps, and helpful tips. Remember to check your measurements and avoid overmixing to get the best texture. You can mix in nuts, chocolate, or even try gluten-free options. Store your muffins properly to keep them fresh. Enjoy baking and sharing your tasty creations!

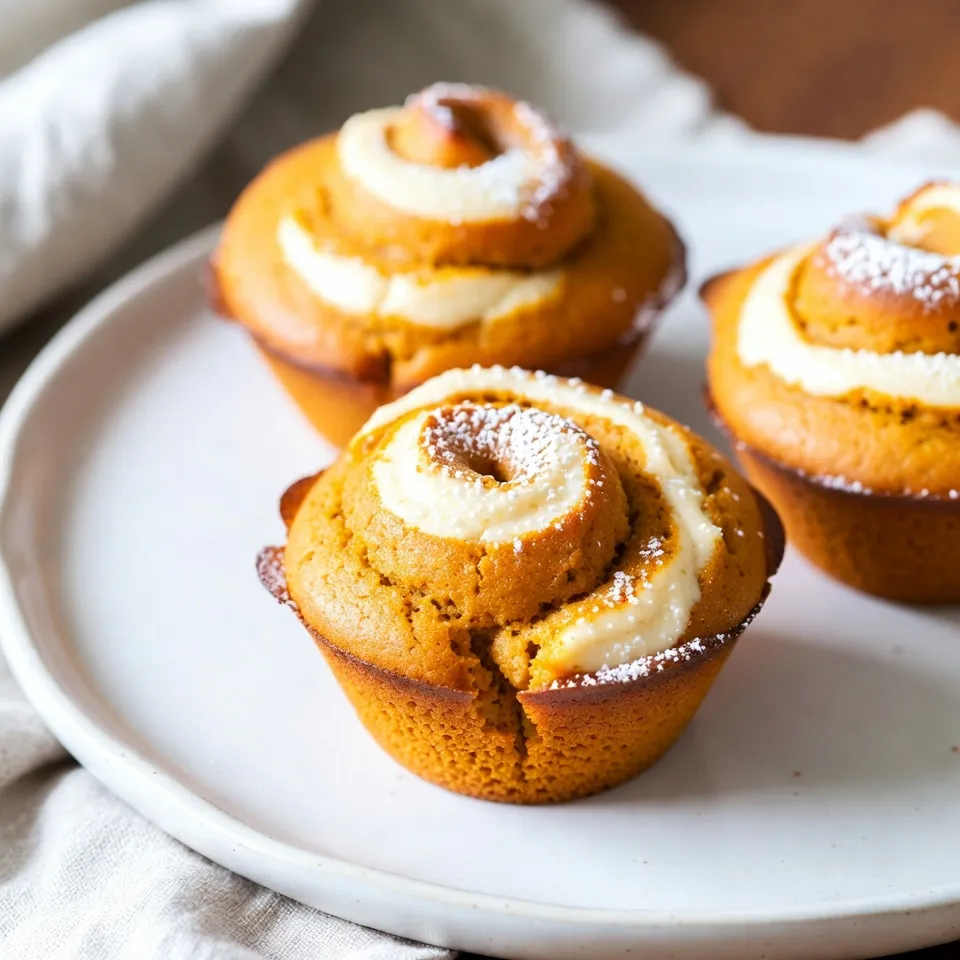
Pumpkin Cream Cheese Swirl Muffins Irresistible Treat

Pumpkin Cream Cheese Swirl Muffins are the perfect fall treat! Imagine a warm muffin, filled with delicious pumpkin flavor and

To make cinnamon sugar pretzel bites, gather these key ingredients: - 1 ½ cups warm water (between 110°F and 115°F) - 2 tablespoons granulated sugar - 2 teaspoons active dry yeast - 4 cups all-purpose flour - ½ cup baking soda - 1 teaspoon salt - ½ cup unsalted butter, melted - ½ cup granulated sugar (for coating) - 2 tablespoons ground cinnamon You can add a few extra touches to enhance the flavor: - Coarse sea salt (for sprinkling on top) - A drizzle of caramel or chocolate sauce for dipping Having the right tools makes cooking easier: - Large mixing bowl - Wooden spoon or dough hook - Baking sheets - Parchment paper - Slotted spoon - Floured surface for kneading These ingredients and tools set you up for success. Enjoy making these tasty snacks! {{ingredient_image_2}} Start by gathering your ingredients. In a large bowl, combine 1 ½ cups of warm water, 2 tablespoons of sugar, and 2 teaspoons of active dry yeast. Stir gently. Let this mixture sit for about 5 minutes. You will know it’s ready when it becomes frothy. This froth shows that the yeast is alive and ready to work. After the yeast mixture is frothy, add 4 cups of all-purpose flour and 1 teaspoon of salt. Mix this together using a wooden spoon or a dough hook until a rough dough forms. Next, place the dough on a floured surface. Knead the dough with your hands for about 5 minutes. You want it to feel smooth and elastic. Shape it into a ball and place it in a greased bowl. Cover the bowl with a kitchen towel. Let the dough rise in a warm spot for about 1 hour. It should double in size. While the dough rises, preheat your oven to 450°F. Prepare two baking sheets by lining them with parchment paper. In a large pot, bring 10 cups of water to a boil. Carefully add ½ cup of baking soda to the boiling water. Watch it bubble! Once the dough has risen, punch it down gently to release air. Transfer it to a floured surface. Divide the dough into small portions. Roll each portion into ropes about 1 inch thick and cut them into bite-sized pieces. Working in batches, place the pretzel bites into the boiling water for about 30 seconds. Use a slotted spoon to remove them and let them drain on paper towels. In a shallow bowl, mix ½ cup of granulated sugar with 2 tablespoons of ground cinnamon. Dip each boiled pretzel bite into melted butter, coating them well. Then roll them in the cinnamon sugar mixture for a sweet touch. Place the coated bites on your prepared baking sheets, spacing them about 1 inch apart. If you want, sprinkle some coarse sea salt on top. Bake them in the oven for 10 to 12 minutes, until they turn golden brown and puffed. Once done, take them out and let them cool for a few minutes before enjoying! To get the best texture for your cinnamon sugar pretzel bites, you must knead the dough well. Knead it for about 5 minutes until it feels smooth. This helps develop gluten, making your bites soft yet chewy. Be sure to let the dough rise in a warm place. A good rise leads to fluffy pretzel bites. Watch out for water that’s too hot when mixing with yeast. If it’s too hot, it can kill the yeast. Stick to warm water, between 110°F and 115°F. Also, don’t skip the boiling step. Boiling gives pretzels their classic crust. Lastly, avoid overcrowding the baking sheet. Space the bites out to ensure they bake evenly. Serve your cinnamon sugar pretzel bites warm for the best taste. They pair well with sweet dips. Try chocolate or caramel sauce for a fun twist. You can also sprinkle some coarse sea salt on top for a salty-sweet combo. Present them in a cute basket lined with a cloth for a lovely touch. Pro Tips Use the Right Temperature: Ensure your water is between 110°F and 115°F for optimal yeast activation, which is crucial for a fluffy texture. Kneading Technique: Knead the dough until it is smooth and elastic; this develops gluten for a chewy pretzel bite. Boiling Matters: Don’t skip the boiling step! It gives pretzels their characteristic texture and flavor; just 30 seconds is enough. Coating Variation: For an extra twist, try adding vanilla extract to your melted butter or mix in some nutmeg with the cinnamon sugar for a unique flavor. {{image_4}} You can change the flavor of your pretzel bites with spices. Try adding nutmeg for warmth or ginger for a zing. You can even mix in cardamom for an exotic twist. These spices will give your snacks a unique taste. Just sprinkle them in with the cinnamon. If you love cheese, try stuffing your pretzel bites. Use cheese like cheddar or mozzarella. After rolling your dough, flatten it into circles. Place a small amount of cheese in the center. Fold the dough over the cheese and seal it tight. Boil and bake as usual. The melted cheese inside will delight you! Besides cinnamon sugar, explore other sweet coatings. You can use cocoa powder for a chocolatey taste. Mix powdered sugar with vanilla for a sweet glaze. For a fruity twist, try powdered freeze-dried fruit. These options let you customize your pretzel bites for any craving! To keep your cinnamon sugar pretzel bites fresh, store them in an airtight container. Let them cool completely before sealing. This helps keep them soft and tasty. You can keep them at room temperature for up to two days. If you want to store them longer, the fridge is a good option. They will last up to a week in the fridge. When you're ready to enjoy leftover pretzel bites, preheat your oven to 350°F (175°C). Place the bites on a baking sheet and cover them with foil to prevent drying. Heat for about 10 minutes. You can also use the microwave, but they may become chewy. Heat them for about 20-30 seconds, checking to avoid overheating. If you want to freeze your pretzel bites, first let them cool completely. Then, place them in a single layer on a baking sheet. Freeze them for about an hour until firm. After that, transfer them to a freezer bag or container. They can last up to three months in the freezer. When ready to eat, let them thaw in the fridge overnight. Reheat them as mentioned earlier for the best taste. Yes, you can use instant yeast. It works faster than active dry yeast. You can skip the frothing step. Just mix it with the flour and salt. This saves time in your prep. These bites pair well with many dips. Try warm chocolate or caramel sauce. You can also serve them with cream cheese frosting. If you prefer something savory, try cheese sauce. Each dip will add a new flavor twist. You can find pre-made pretzel bites at many grocery stores. Look in the frozen section or snack aisle. Some bakeries also sell fresh pretzel bites. You can even check local food markets or online stores. To make gluten-free pretzel bites, use a gluten-free flour blend. Many blends work well for baking. Make sure it has a good structure, like almond or oat flour. The process remains the same. Just follow the recipe steps as usual. In this blog post, we covered how to make delicious pretzel bites from start to finish. You learned about the key ingredients, tools, and step-by-step instructions. We shared tips for texture, common mistakes, and great serving ideas. You also discovered fun variations and how to store your bites properly. Remember, making pretzel bites can be fun and easy. With practice, you will create the best snacks to share with friends and family. Now, grab your ingredients and start baking! Enjoy the process and the tasty results.

Cinnamon Sugar Pretzel Bites Irresistible Snack Treat

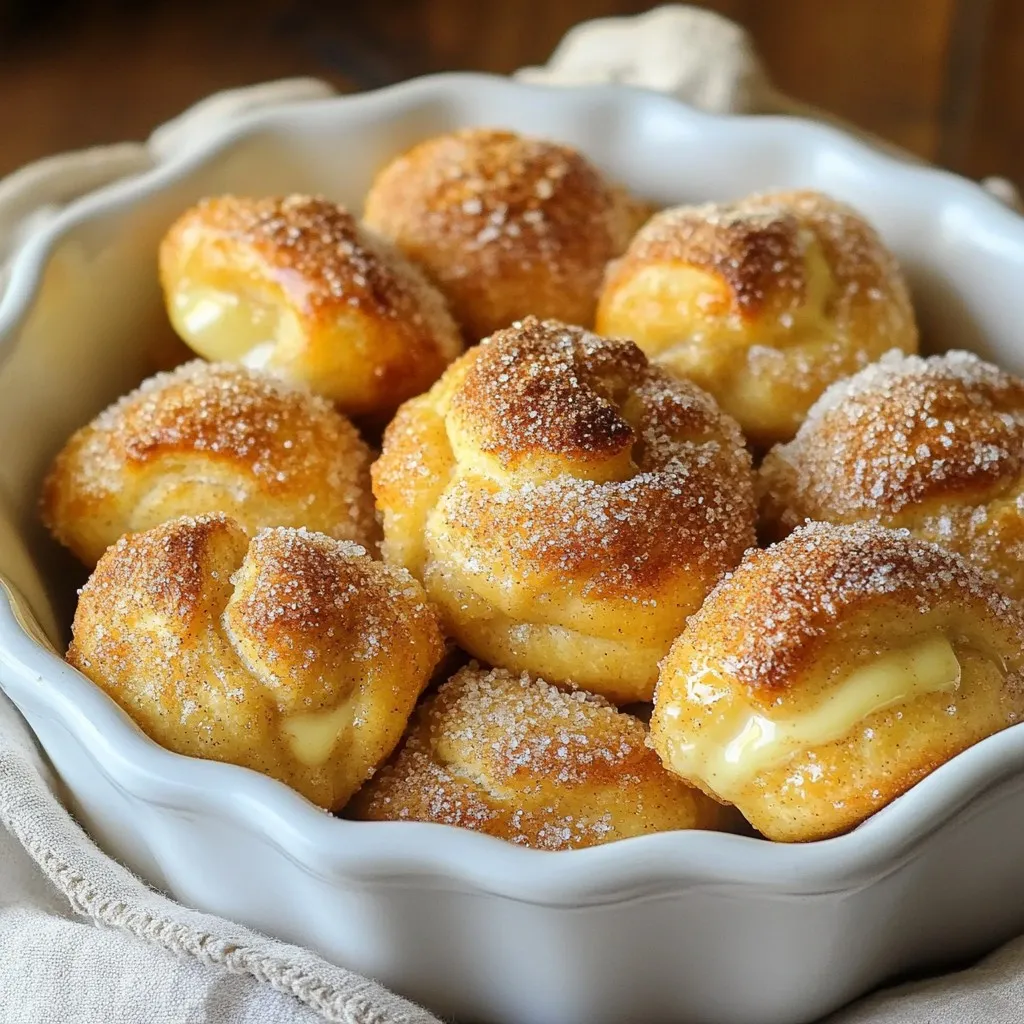
Do you crave a snack that’s both sweet and salty? Cinnamon Sugar Pretzel Bites are here to satisfy that need!

- Pumpkin puree: This is the star of our muffins. It gives them a rich flavor and moist texture. You can use canned puree or make your own from fresh pumpkins. - Cream cheese: This soft cheese creates a creamy filling. It contrasts well with the spiced pumpkin batter. Make sure it’s softened to mix well. - Granulated and brown sugar: These sugars add sweetness. Granulated sugar gives a clean taste, while brown sugar adds depth and moisture. - Chopped pecans or walnuts: Adding nuts gives your muffins a nice crunch and flavor. You can choose one or both for texture. - Vanilla extract: This is a great way to boost flavor. It adds warmth and sweetness to the muffins. {{ingredient_image_2}} Start by preheating your oven to 350°F (175°C). This step is key for even baking. Next, prepare your muffin tin. You can line the cups with paper liners or grease them with non-stick spray. Lining helps you easily remove the muffins later without any mess. In a medium bowl, add 1/2 cup of softened cream cheese, 1/2 cup of granulated sugar, and 1/2 cup of brown sugar. Use an electric mixer or a whisk to beat these ingredients until smooth and creamy. Set this mixture aside. It will be your tasty filling. In a large bowl, combine 1 cup of pumpkin puree, 1/2 cup of vegetable oil, 2 large eggs, and 1 teaspoon of vanilla extract. Whisk these ingredients together until they blend well. You want a uniform mixture for the best muffins. In another bowl, sift together 1 1/2 cups of all-purpose flour, 1 teaspoon of baking powder, 1 teaspoon of baking soda, 1 teaspoon of ground cinnamon, 1/2 teaspoon of ground nutmeg, 1/2 teaspoon of salt, and 1/4 teaspoon of ground ginger. Sifting helps mix the dry ingredients and aerates the flour. This makes your muffins light and fluffy. To assemble, fill each muffin cup halfway with the pumpkin batter. Then, add about 1 tablespoon of the cream cheese filling on top. Cover the cream cheese with more batter until the cups are about 3/4 full. This layering gives you a nice surprise filling after baking. Bake your muffins in the preheated oven for 18-22 minutes. Check for doneness by inserting a toothpick into the center of a muffin. If it comes out clean, your muffins are ready. Once they are baked, let them cool in the tin for about 5 minutes. After that, move them to a wire rack to cool completely, allowing air to circulate. Overmixing batter: To keep muffins soft, mix gently. When you combine wet and dry ingredients, stir until just blended. Lumps are okay. Overmixing makes muffins tough. Ensuring even baking: Place your muffin tin in the center of the oven. This helps heat circulate evenly. Rotate the tin halfway through baking for best results. Tips for smooth filling: Start with soft cream cheese. This makes it easy to blend. Mix it with the sugars until creamy. Use an electric mixer for a smooth texture. If you want, add a touch of vanilla for extra flavor. Best mixing bowls: Use a large mixing bowl for wet ingredients. A medium bowl works well for dry ingredients. Choose bowls with a non-slip base for easier mixing. Muffin tins: A non-stick muffin tin is great for easy release. If you use paper liners, make sure they fit well in the cups. This helps keep your muffins intact. These simple tips will help you make perfect pumpkin cream cheese muffins every time! Pro Tips Use Room Temperature Ingredients: For the best texture, ensure your cream cheese and eggs are at room temperature before mixing. This helps create a smooth batter and a tender muffin. Don’t Overmix the Batter: When combining the wet and dry ingredients, mix just until incorporated. Overmixing can lead to tough muffins, so be gentle! Experiment with Spices: Feel free to adjust the spices to your preference. Adding a pinch of cloves or allspice can enhance the warm flavors of the muffins. Store for Freshness: To keep the muffins fresh, store them in an airtight container at room temperature for up to 3 days or freeze them for longer storage. {{image_4}} If you want to make these muffins gluten-free, use special flour blends. Look for a mix labeled "1:1" gluten-free flour. This blend often has a mix of rice flour, potato starch, and xanthan gum. You can also try almond flour or coconut flour. Just remember, you may need to adjust the liquid in the recipe. To make these muffins vegan, swap the eggs and cream cheese with plant-based options. Use flaxseed meal mixed with water to replace eggs. For each egg, mix 1 tablespoon of flaxseed with 2.5 tablespoons of water. Let it sit until it thickens. For cream cheese, use a vegan cream cheese spread. It tastes great and makes the muffins just as creamy. Want to spice things up? Add some extra flavor! Try mixing in chopped chocolate or dried fruit like cranberries. You can also sprinkle in more spices like allspice or cloves for warmth. Topping your muffins with a mix of sugar and cinnamon before baking adds a sweet crunch. These small changes can make your muffins even more delightful. Store your pumpkin cream cheese muffins at room temperature for the best taste. Place them in an airtight container. This keeps them fresh for up to three days. If you want them to last longer, store them in the fridge. In the fridge, they can last about a week. Just remember, the fridge may make them a bit dry. Freezing muffins is easy! First, let them cool completely. Then, wrap each muffin in plastic wrap. After that, place them in a freezer bag. Make sure to squeeze out all the air before sealing. They can stay in the freezer for up to three months. When you want to enjoy one, just take it out and let it thaw. You can also pop it in the microwave for about 20-30 seconds to warm it up. Know when your muffins are past their prime. If they look dry or hard, it’s time to toss them. Also, if you notice any mold, don’t eat them. Use your senses! If they smell off or taste stale, it’s best to let them go. Keeping track of how long you stored them helps, too. Remember, freshness is key to enjoying every bite! Yes, you can use homemade pumpkin puree. Fresh pumpkin has a great flavor. It may have a different texture than canned pumpkin. You want your puree to be thick and not watery. If you make it at home, roast the pumpkin first. This brings out the sweetness. To check if the muffins are done, use a toothpick. Insert it into the center of a muffin. If it comes out clean, your muffins are ready. Look for a golden-brown color on top. They should spring back when touched lightly. These muffins pair well with many things. Try serving them with warm maple syrup. A side of whipped cream also works great. You can enjoy them with coffee or tea for a cozy treat. They make a nice snack or breakfast option. Yes, you can make mini muffins! Just adjust the baking time. Mini muffins usually bake for about 10 to 15 minutes. Fill the mini cups about halfway, just like with regular muffins. This way, they will still have that lovely cream cheese filling. Pumpkin cream cheese muffins blend rich flavors and warm spices. This guide helped you with ingredients, steps, and storage tips. Remember to avoid overmixing and use quality pans for best results. Try different variations to keep things fun, like gluten-free or vegan options. Store your muffins carefully, so they stay fresh. Enjoy these muffins with coffee or tea for a perfect treat. Happy baking!

Pumpkin Cream Cheese Muffins Quick and Tasty Recipe

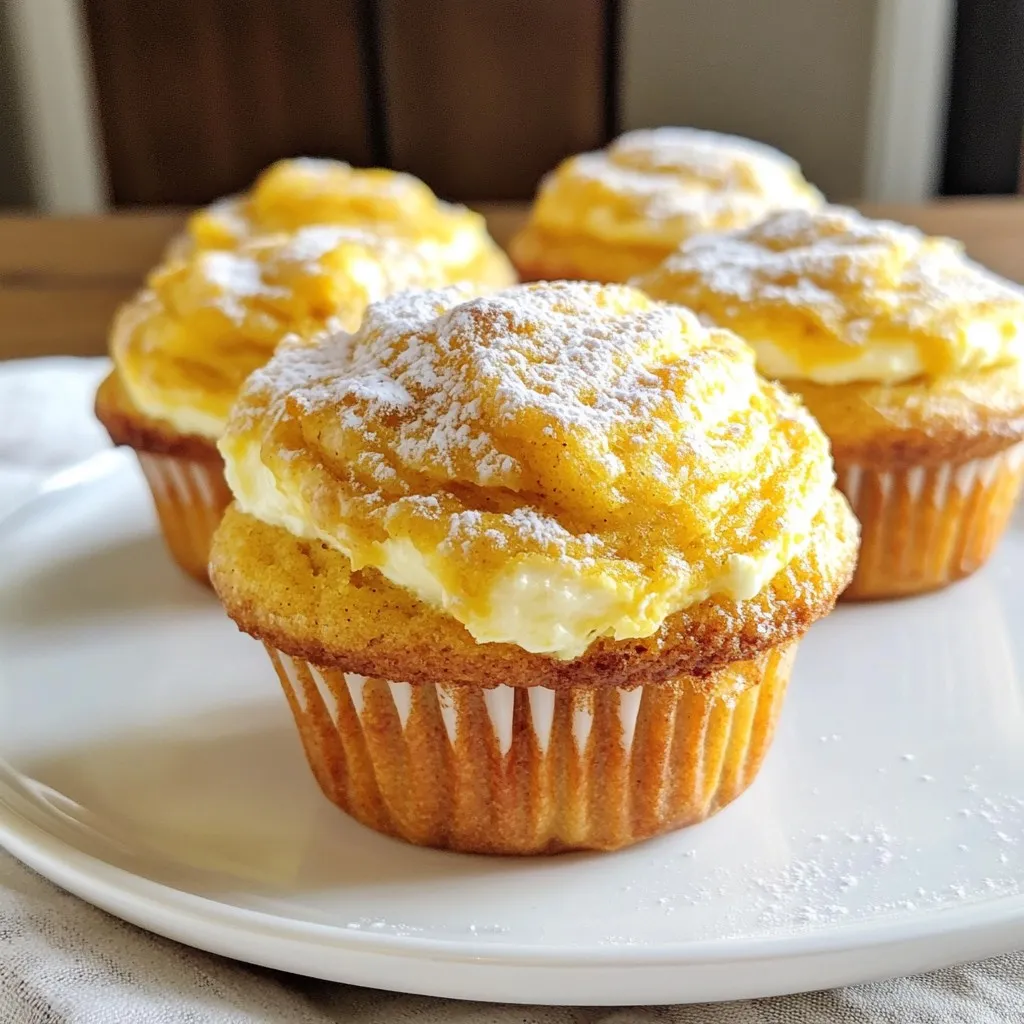
If you crave a warm, delicious treat, pumpkin cream cheese muffins are just the answer. They blend the rich taste

- 1 can (15 oz) chickpeas, thoroughly drained and rinsed - 3 tablespoons sesame oil - 2 tablespoons soy sauce (or tamari for gluten-free) - 1 tablespoon honey or maple syrup - 1 tablespoon rice vinegar - 2 teaspoons minced garlic - 2 teaspoons freshly grated ginger - 1 tablespoon sesame seeds - 2 green onions, finely chopped - Sea salt and freshly ground black pepper - Fresh cilantro, chopped (optional) To make the best sticky sesame chickpeas, you need fresh and high-quality ingredients. The main star is the chickpeas. Use a can of chickpeas. Rinse and drain them well. This helps remove excess salt and ensures they get crispy. Next, you need sesame oil. This oil has a nutty flavor that pairs well with the other ingredients. For the savory element, grab soy sauce. If you prefer gluten-free, use tamari. Sweetness comes from honey or maple syrup. Both work well, depending on your taste. Rice vinegar adds a nice tang. Garlic and ginger are key for flavor. Minced garlic adds aroma, while fresh ginger brings warmth. Sesame seeds give a nice crunch. Don't forget the green onions. They add color and fresh taste. Lastly, season with sea salt and black pepper. You can add fresh cilantro if you like. It enhances the dish even more. These ingredients come together to create a dish that is both easy and flavorful. {{ingredient_image_2}} First, grab a large skillet. Pour in 3 tablespoons of sesame oil. Heat it over medium heat. Wait until the oil shimmers but does not smoke. This means it's ready. Then, add 2 teaspoons of minced garlic and 2 teaspoons of freshly grated ginger. Sauté them for about 1 minute. You want them fragrant and slightly golden. Next, gently stir in your drained and rinsed chickpeas. Use one 15 oz can for this recipe. Ensure all the chickpeas are well coated with the oil. Cook them for about 5 to 7 minutes. Stir occasionally until they become crispy and golden brown. You want a nice crunch for the best texture. Now, let's make the sauce. In a small bowl, whisk together 2 tablespoons of soy sauce, 1 tablespoon of honey (or maple syrup for a vegan option), and 1 tablespoon of rice vinegar. Mix until combined. Pour this sauce over the chickpeas in the skillet. Stir gently to coat them evenly. Let the mixture simmer for another 3 to 4 minutes. This helps the sauce thicken and caramelize. Finally, sprinkle 1 tablespoon of sesame seeds over the chickpeas. Stir frequently and cook for one more minute. This will toast the seeds and enhance their flavor. Remove the skillet from the heat. Season the dish with sea salt and freshly ground black pepper. Transfer the sticky chickpeas to a serving dish. Top with finely chopped green onions and optional fresh cilantro for a pop of color. To get crispy chickpeas, first, dry them well after rinsing. A paper towel works great for this. Heat the oil until it's hot, but not smoking. Cook the chickpeas until they turn golden brown. This usually takes about 5 to 7 minutes. Stir them gently to avoid breaking. If you want more sweetness, add a bit more honey or maple syrup. For saltiness, taste and adjust with soy sauce or salt. If you need a vegan option for sweetener, use maple syrup instead of honey. It adds a nice flavor. For a gluten-free dish, swap soy sauce with tamari. This keeps the taste rich without the gluten. Sticky sesame chickpeas pair well with rice or salad. You can serve them warm as an appetizer or over a bed of greens for a main dish. If you have leftovers, try adding them to wraps or grain bowls for lunch. They also taste great in a stir-fry! Pro Tips Use Fresh Ingredients: Fresh garlic and ginger will enhance the flavor of your dish significantly. Try to use them instead of powdered alternatives for the best results. Adjust Sweetness: Depending on your taste, you can adjust the amount of honey or maple syrup. Start with a small amount and add more as needed to achieve your desired level of sweetness. Experiment with Toppings: Feel free to add other toppings such as crushed peanuts, red pepper flakes, or even a squeeze of lime for an extra layer of flavor and texture. Serve with Sides: These sticky chickpeas pair wonderfully with steamed rice, quinoa, or a fresh salad, making them a versatile addition to your meal. {{image_4}} You can change the flavor of your sticky sesame chickpeas quite easily. If you like heat, add chili flakes or a splash of sriracha. This will give your dish a spicy kick. For a different taste, try adding vegetables like bell peppers or broccoli. They add color and crunch. You can sauté them with garlic and ginger for more flavor. If you need to serve more people, scale up the recipe. Just double or triple the ingredients. This way, you can delight your guests with tasty chickpeas. You can also make bite-sized appetizers by scooping the chickpeas onto small crackers or cucumber slices. They make great finger foods for parties. For those with nut allergies, this recipe is safe. It does not use nuts at all. Also, this dish is kid-friendly. The sweet and savory sauce appeals to young taste buds. You can adjust the sweetness by using less honey or maple syrup if needed. This way, everyone can enjoy these sticky sesame chickpeas. To keep your sticky sesame chickpeas fresh, store them in an airtight container. Let the chickpeas cool down before putting them away. They can last in the fridge for up to three days. If you notice any moisture, use a paper towel inside the container to absorb it. This helps keep them from getting soggy. When reheating sticky sesame chickpeas, use a skillet for the best results. Heat the skillet over medium heat. Add a splash of water or oil to help keep the chickpeas moist. Stir them frequently to avoid burning. You can also use a microwave, but the texture may not be as good. Heat them in short bursts, stirring in between. Yes, you can freeze sticky sesame chickpeas! Place cooled chickpeas in a freezer-safe bag or container. Be sure to remove as much air as possible to prevent freezer burn. They will stay good for up to three months. When you’re ready to eat, thaw them in the fridge overnight before reheating. This keeps their flavor and texture intact. You can pair sticky sesame chickpeas with many dishes. Here are a few ideas: - Rice: Serve over white or brown rice for a filling meal. - Quinoa: This adds protein and nutty flavors to your plate. - Salad: A fresh salad balances the sticky sweetness of the chickpeas. - Noodles: Toss them with soba or rice noodles for a fun twist. - Vegetables: Roasted or steamed veggies make a great side. Yes, you can make sticky sesame chickpeas ahead of time. Here are some tips: - Storage: Keep them in an airtight container in the fridge for up to 3 days. - Reheat: Warm them on the stove or in the microwave before serving. - Flavor: The flavors deepen when stored, making them even tastier! - Meal Prep: Make a big batch for quick meals throughout the week. You can add heat to sticky sesame chickpeas easily. Here are some ways: - Chili Flakes: Sprinkle red pepper flakes while cooking for warmth. - Sriracha: Drizzle sriracha into the sauce for a spicy kick. - Ginger: Add extra minced ginger for a sharp, zesty flavor. - Hot Sauce: Mix in your favorite hot sauce right before serving. This recipe for sticky sesame chickpeas is simple and tasty. You learned about key ingredients like chickpeas, sesame oil, and honey. We went through step-by-step instructions for cooking and making a delicious sauce. I also shared helpful tips on perfecting texture and flavor. Finally, variations, storage, and reheating were covered. Try this dish and enjoy its great taste! You can serve it with many sides. Don’t hesitate to get creative with flavors. Enjoy cooking!

Sticky Sesame Chickpeas Flavorful and Easy Recipe

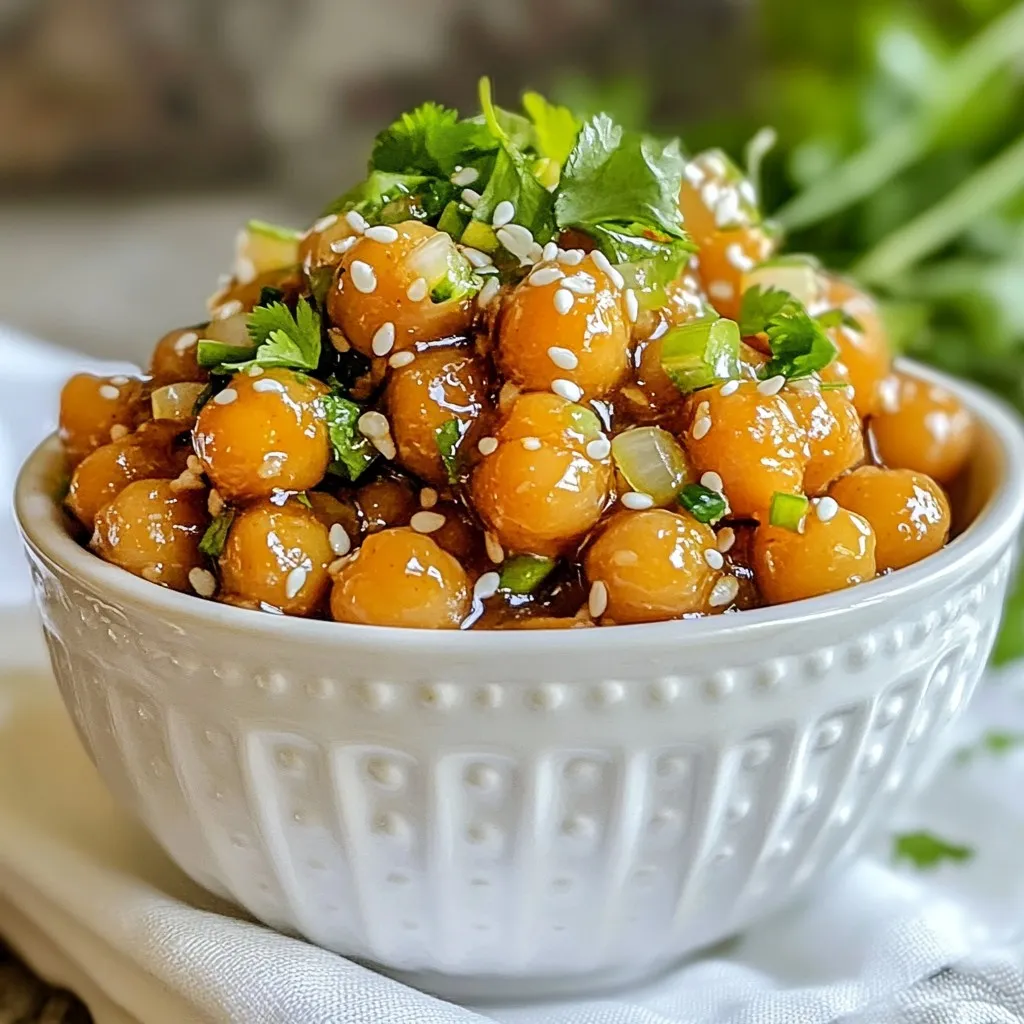
Looking for a quick and tasty meal? These Sticky Sesame Chickpeas are your answer! With simple ingredients and easy steps,

To make Salted Caramel Pretzel Bark, gather these simple ingredients: - 2 cups mini pretzels - 1 cup semi-sweet chocolate chips - 1 cup caramel sauce (store-bought or homemade) - 1 teaspoon sea salt - 1/2 cup crushed nuts (optional, such as pecans or almonds) You can make your bark even better with some fun add-ins. Consider these options: - Dried fruit like cranberries or cherries for a fruity twist. - Sprinkles for a festive touch. - Sea salt caramel bits for a flavor boost. If you need to swap some ingredients, here are some ideas: - Use dark chocolate chips instead of semi-sweet for a richer taste. - Try different types of pretzels, like sticks or rods, if you can't find mini ones. - Use a nut butter instead of crushed nuts if you want a nutty flavor without the crunch. These ingredients help create the sweet and salty mix that makes this treat special. Enjoy the process of making your bark, and have fun experimenting with flavors! {{ingredient_image_2}} Start by preheating your oven to 350°F (175°C). This heat will help toast the pretzels. Line a baking sheet with parchment paper. This will make it easy to lift the bark off later. Spread 2 cups of mini pretzels on the lined baking sheet. Make sure they are in a single layer. This helps them toast evenly. Bake the pretzels for about 5-7 minutes. Keep an eye on them as they should be golden and smell nice. Once done, take them out and let them cool for a few minutes. Next, grab a small saucepan and pour in 1 cup of caramel sauce. Heat it over medium-low heat. Stir often until it's smooth and easy to pour. If the caramel is too thick, add a splash of water or cream. Once ready, drizzle the warm caramel over the toasted pretzels. Make sure each pretzel gets coated in that sweet goodness. Now, take a microwave-safe bowl and add 1 cup of semi-sweet chocolate chips. Microwave the chips in 30-second bursts. Stir after each burst until the chocolate is melted and smooth. This step creates a lovely chocolate layer. Use a spoon or piping bag to drizzle the melted chocolate over the caramel-covered pretzels. If you want, sprinkle 1/2 cup of crushed nuts over the bark. This adds extra crunch and flavor. Finish by sprinkling 1 teaspoon of sea salt over the chocolate and caramel. This touch of salt makes the sweet flavors pop. Let the bark cool at room temperature until the chocolate sets. For a quicker method, place it in the fridge for about 30 minutes. Once set, break the bark into pieces and enjoy this delightful treat! To get the best texture for your salted caramel pretzel bark, follow these steps. Start by using mini pretzels. Their small size allows for more even coverage. Toasting the pretzels for 5-7 minutes enhances their crunch. Make sure they cool before adding the caramel and chocolate. This keeps everything from getting soggy. Drizzle the chocolate in thin lines for a beautiful look. Let the bark cool completely, either at room temperature or in the fridge. This ensures a nice, firm bite. If you have leftover bark, store it properly to keep it fresh. Place it in an airtight container. You can layer the pieces with parchment paper to avoid sticking. Keep it in a cool, dry place. This helps maintain its crispness. The bark can last up to a week, but it’s so good, it might not last that long! Avoid these common mistakes for perfect bark. First, don’t overcrowd the pretzels on the baking sheet. This can lead to uneven baking. Second, use warm caramel. If it’s too cold, it won’t coat the pretzels well. Lastly, don’t skip the sea salt. It adds a great contrast to the sweet caramel and chocolate. Pro Tips Use Fresh Caramel: For the best flavor, opt for fresh, homemade caramel if you have the time. It will elevate the taste of your bark significantly! Experiment with Chocolate: Try using different types of chocolate, such as dark or white chocolate, to customize the flavor profile of your pretzel bark. Chill for Quick Setting: If you're in a hurry, placing the bark in the refrigerator will help it set faster without compromising texture. Mix Up Your Nuts: Feel free to mix different types of nuts for added texture and flavor. Almonds, pecans, or even walnuts can make great additions! {{image_4}} You can switch up the chocolate in your bark. Use white chocolate or dark chocolate for different tastes. White chocolate gives a creamy touch, while dark chocolate adds a rich flavor. Both options blend well with the salty pretzels and sweet caramel. Just melt and drizzle as you would with semi-sweet chocolate. If you're avoiding nuts, just skip them! The pretzel bark still tastes amazing without nuts. You can add extra pretzels or even crushed cookies for crunch. This keeps the treat safe for those with nut allergies. Get creative for the holidays! For Halloween, add orange and black sprinkles. In December, use festive colors or even peppermint bits for a fresh taste. This can make your salted caramel pretzel bark a fun treat for any occasion. Just change the toppings to fit the season, and you’ll have a hit dessert every time. To keep your salted caramel pretzel bark fresh, store it in an airtight container. This helps to prevent moisture from ruining the crisp texture. You can use wax paper or parchment paper between layers to avoid sticking. Keep the container in a cool, dry place, away from direct sunlight. When stored properly, the bark can last up to two weeks. However, it tastes best within the first week. After that, the pretzels may lose some crunch. If you want to enjoy the bark longer, freezing is a great option. To freeze the bark, first, let it cool completely. Cut it into pieces and wrap each piece in plastic wrap. Place the wrapped pieces in a freezer-safe bag or container. This way, you can enjoy a piece whenever you crave something sweet. The bark can stay frozen for up to three months. When ready to eat, simply thaw at room temperature for about 30 minutes. Enjoy! Yes, you can use homemade caramel sauce. Making your own caramel adds a personal touch. Just follow a simple caramel recipe, and you will have a rich flavor. Cook sugar until it melts and turns golden. Add butter and cream for that creamy texture. Allow it to cool before drizzling over pretzels. Mini pretzels are the best choice for this bark. Their small size makes them easy to coat. They also add a great crunch. You can also use regular pretzels or chocolate-covered ones for a twist. Just ensure they are firm enough to hold the toppings. To make this bark gluten-free, choose gluten-free pretzels. Many brands offer gluten-free options that taste just as good. Always check the label to ensure no gluten is present. The rest of the ingredients, like chocolate and caramel, are usually gluten-free. Yes, feel free to add other toppings! Crushed nuts like pecans or almonds work great. You can also use sprinkles, coconut flakes, or even candies. Get creative! Each topping adds a unique flavor and crunch to your bark. Just make sure not to overdo it, so every bite remains balanced. This blog post covered the tasty journey of making pretzel bark. We looked at the right ingredients, step-by-step instructions, and some handy tips to avoid mistakes. We also explored flavorful variations, storage advice, and answered common questions. Making pretzel bark is fun and easy. With this guide, you can create a treat that impresses everyone. Enjoy experimenting and sharing your delicious results!

Salted Caramel Pretzel Bark Irresistible Sweet Treat

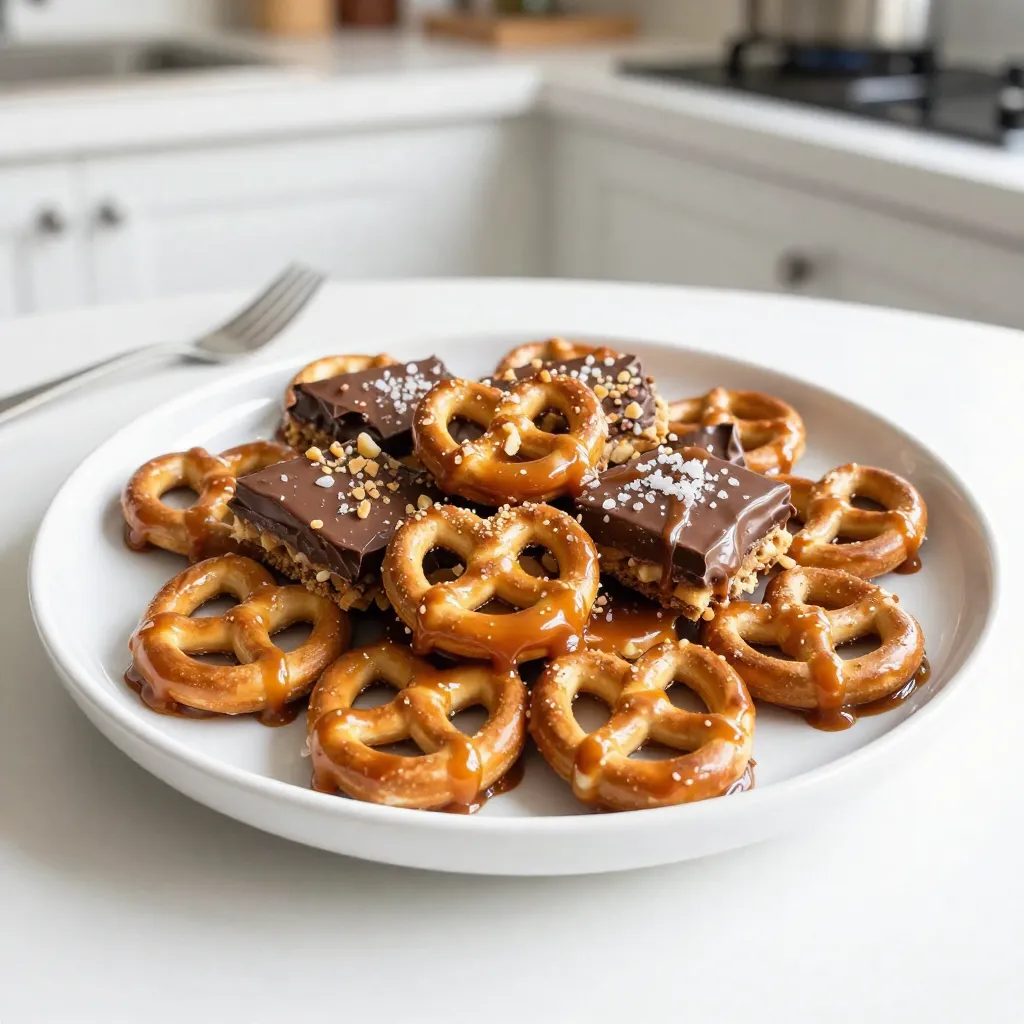
Are you ready to indulge in a sweet and salty masterpiece? In this blog post, I’ll show you how to

- 8 oz fusilli pasta (or your choice of pasta shape) - 1 cup cherry tomatoes, halved - 1 cup fresh mozzarella balls, halved - 1 cup fresh basil leaves, torn into pieces - 1/4 cup sun-dried tomatoes, finely chopped - 1/4 cup pistachios, roughly chopped - 2 tablespoons balsamic glaze - 3 tablespoons extra virgin olive oil - Salt and freshly ground black pepper to taste When choosing pasta, I suggest using fusilli. Its shape holds the dressing well. You can use any pasta you like, such as penne or rotini. Pick a shape that excites you! Fresh ingredients are key to this salad. Look for ripe, juicy cherry tomatoes and high-quality mozzarella. The basil should be bright green and fragrant. Fresh herbs make a big difference in flavor. For quality ingredients, always check for freshness. If you can, buy from local farmers' markets. They often have the best produce. Choose extra virgin olive oil for its rich taste. The balsamic glaze should be thick and sweet. Avoid cheap brands that lack flavor. {{ingredient_image_2}} - Boiling and Salting Water: First, fill a large pot with water. Make sure to add enough salt so the water tastes like the sea. This adds flavor to the pasta. - Achieving Al Dente Texture: Bring the water to a rolling boil. Add the fusilli pasta and cook for 8-10 minutes. You want it to be firm but not hard. - Draining and Cooling the Pasta: Once cooked, drain the pasta in a colander. Rinse it under cold water to stop the cooking. Let it cool completely before mixing. - Halving Cherry Tomatoes and Mozzarella: While the pasta cooks, take your cherry tomatoes and mozzarella balls. Cut them in half to make them easy to eat. - Chopping Sun-Dried Tomatoes and Pistachios: Next, finely chop the sun-dried tomatoes. Then, roughly chop the pistachios. This adds a nice crunch to your salad. - Preparing Fresh Basil Leaves: Take fresh basil leaves and tear them into smaller pieces. This helps release their flavor when added to the salad. - Mixing Ingredients in a Bowl: In a large bowl, add the cooled pasta. Then, mix in the halved cherry tomatoes, mozzarella, torn basil, sun-dried tomatoes, and pistachios. - Adding Dressings and Seasonings: Drizzle the balsamic glaze and olive oil over the salad. Add a pinch of salt and freshly ground black pepper for taste. - Tossing the Salad Properly: Gently toss everything together. Use a folding motion, so all the ingredients get covered in the dressing. - Recommended Chilling Time: To let the flavors blend, cover the salad. Place it in the fridge for at least 15-30 minutes. - Serving Temperature Tips: You can serve the salad cold or at room temperature. It tastes great either way. - Presentation Suggestions: For a beautiful look, serve your salad in a decorative bowl. Garnish with extra basil and a drizzle of balsamic glaze. This makes it look as good as it tastes! Adjusting Flavor Profiles You can tweak flavors in this dish. Add more balsamic glaze for sweetness. If you like a salty bite, toss in more feta cheese. You can also mix in lemon juice for a fresh kick. Each change can make your salad unique and personal. Making Ahead of Time This salad is great for meal prep. You can make it a day in advance. Just store it in the fridge. The flavors develop better overnight. Just remember to add nuts right before serving for the best crunch! Ensuring Proper Texture For the best texture, cook the pasta to al dente. This means it should be firm but not hard. Rinse it under cold water to stop cooking. This keeps the pasta from getting mushy. Fresh mozzarella should be soft but not falling apart. It adds the perfect creaminess. Overcooking Pasta Be careful not to overcook your pasta. It should have a bite, not be mushy. Follow the package instructions closely. Check the pasta a minute or two early. Neglecting to Season Don't forget to season your salad. A pinch of salt can enhance all the flavors. Freshly ground black pepper adds a nice touch. Seasoning is key to a bold taste. Skipping the Chilling Process Let your salad chill in the fridge for at least 15 minutes. This helps the flavors mix well. Skipping this step can lead to a dull taste. Chilling makes every bite more delicious! Pro Tips Cook Pasta Al Dente: To achieve the perfect texture, ensure your pasta is cooked al dente, which means it should be firm to the bite. This prevents it from becoming mushy once combined with the dressing. Fresh Ingredients Matter: Use the freshest cherry tomatoes and mozzarella you can find for the best flavor. Fresh basil also adds a vibrant aroma that enhances the overall dish. Customize Your Nuts: Pistachios add a unique crunch, but feel free to substitute with other nuts like pine nuts or walnuts based on your preference or availability. Let It Chill: Allow the salad to rest in the refrigerator for at least 30 minutes before serving. This helps the flavors meld and creates a more delicious experience. {{image_4}} Alternative Cheese Choices While fresh mozzarella shines in Caprese pasta salad, you can switch it up. Try feta cheese for a tangy kick. Goat cheese adds creaminess, too. If you like a stronger flavor, use aged cheddar. Each choice changes the taste, giving you new options to explore. Seasonal Vegetable Additions Add seasonal vegetables to boost flavor and nutrition. In summer, toss in zucchini or bell peppers. In fall, roasted butternut squash adds warmth. Fresh peas or asparagus work great in spring. Each season brings fresh veggies to keep your salad exciting. Protein Enhancements Want to make it heartier? Grilled chicken is a perfect choice. It adds protein and flavor without overpowering the salad. For a vegetarian option, try chickpeas or white beans. These options keep your salad filling and satisfying. Gluten-Free Pasta Options If you need gluten-free pasta, choose rice or quinoa pasta. Many brands offer great texture and taste. They work well with the salad's flavors, so you won’t miss the gluten at all. Vegan Ingredient Swaps For a vegan twist, replace mozzarella with vegan cheese or avocado. This keeps the creaminess while making it plant-based. Use maple syrup or a splash of lemon juice in place of balsamic glaze for a sweet touch without animal products. Low-Calorie Ingredient Adjustments To lighten the salad, reduce the olive oil or use a spray oil. You can also cut back on cheese or skip it altogether. Add more veggies to bulk it up. This way, you enjoy the salad without as many calories. To keep your Caprese pasta salad fresh, use airtight containers. These containers help lock in flavor and moisture. Glass containers work great and do not retain odors. You can also use plastic containers if you prefer. Always make sure to let the salad cool completely before sealing it. This prevents condensation, which can make the salad soggy. Refrigeration Duration Tips Store your salad in the fridge. It will stay fresh for about 3 days. After that, the ingredients may lose their texture and flavor. If you see any signs of spoilage, discard it to avoid food waste. Best Practices for Reheating Pasta Salads Pasta salads are best enjoyed cold. If you prefer to heat it, do so gently. Place the salad in a microwave-safe dish. Heat it for short intervals, about 10 to 15 seconds at a time. Stir in between to ensure even heating. Flavor Retention Tips When Reheating To keep flavors bright, add a splash of olive oil or balsamic glaze before heating. This addition can revive the taste and texture of the salad. Avoid overcooking, as this can make the pasta mushy. You can store Caprese Pasta Salad in the fridge for up to three days. After this, the ingredients may lose their freshness. To keep it tasty, use an airtight container. Yes, you can make this salad ahead of time. Prepare it a few hours before serving. The flavors blend better when it sits in the fridge. If you don't have balsamic glaze, use balsamic vinegar. Mix it with a little honey for sweetness. This gives you a similar taste. Caprese Pasta Salad is best served cold. Chilling it enhances the flavors. You can enjoy it right from the fridge or at room temperature. This blog post covered how to create a delicious Caprese Pasta Salad. We discussed ingredient choices, cooking methods, and assembling the salad. I provided tips to enhance flavor and avoid common mistakes. Variations for different diets and proper storage techniques ensure you can enjoy this dish anytime. In summary, perfecting your Caprese Pasta Salad is easy and fun. Follow these steps, and you’ll impress everyone with a tasty meal!

Caprese Pasta Salad Fresh and Flavorful Delight

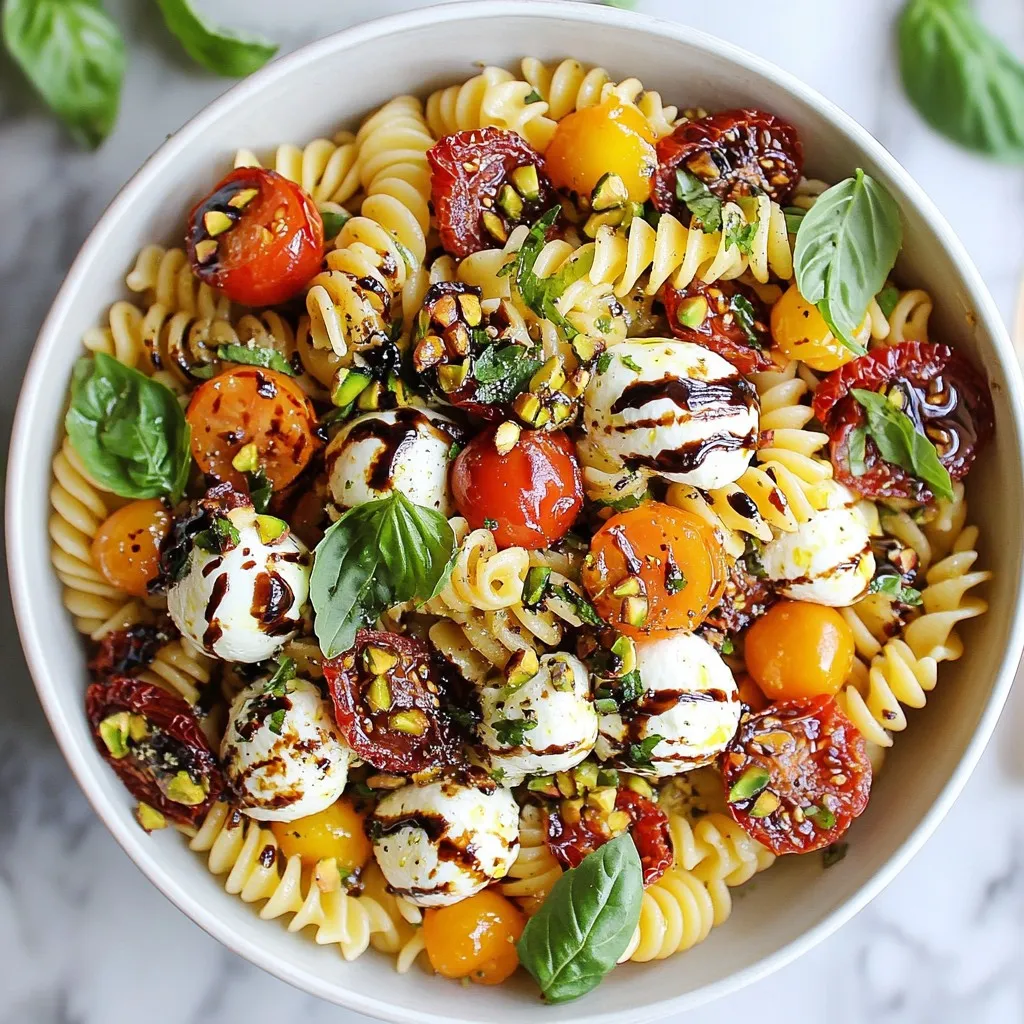
Welcome to the world of Caprese Pasta Salad, a fresh and flavorful delight! If you crave a dish that bursts

- 1/2 cup unsalted butter, melted - 1 cup granulated sugar - 2 large eggs - 1 teaspoon vanilla extract - 1/3 cup unsweetened cocoa powder - 1/2 cup all-purpose flour - 1/4 teaspoon salt - 1/4 teaspoon baking powder - 1 cup fresh raspberries - 8 oz cream cheese, softened - 1/4 cup granulated sugar - 1 large egg - 1 teaspoon vanilla extract - 1/2 cup fresh raspberries (for swirls) I love using fresh ingredients for my Raspberry Cheesecake Brownies. The butter gives the brownie base a rich taste. Granulated sugar adds sweetness, making each bite delightful. Eggs help bind everything together and make the brownies fluffy. I always add a touch of vanilla extract. It enhances the flavors and makes the dessert smell amazing. Unsweetened cocoa powder is key for that deep chocolate flavor. Flour gives structure, while salt balances the sweetness. Baking powder helps the brownies rise. For the cheesecake layer, softened cream cheese is a must. It makes the layer creamy and smooth. I mix in more granulated sugar to sweeten it, then add an egg for richness. Another splash of vanilla extract brings everything together. The fresh raspberries add a burst of flavor and color. Using fresh raspberries throughout makes these brownies shine. You can see the swirls and specks of red, making each square look pretty. They taste great, too! This mix of flavors and textures makes Raspberry Cheesecake Brownies a real treat. {{ingredient_image_2}} - Preheat the oven to 350°F (175°C). - Grease or line an 8x8-inch baking pan with parchment paper. - Combine melted butter and sugar until smooth. - Add eggs and vanilla, mixing thoroughly. - Sift cocoa powder, flour, salt, and baking powder into the mixture. - Gently fold the dry ingredients into the wet mixture. - Pour half of the brownie batter into the pan. - Prepare and layer the cheesecake mixture. - Add raspberries and remaining brownie batter, then swirl. - Bake for 30-35 minutes and check doneness with a toothpick. - Allow to cool in the pan and refrigerate for at least 2 hours before slicing. When you make Raspberry Cheesecake Brownies, each step is key. The brownie base needs to be rich and fudgy. Mixing the butter and sugar well is important for that smooth texture. When you add eggs and vanilla, make sure they blend in fully. This adds moisture and flavor. Sifting the dry ingredients helps avoid lumps. Folding them gently into the wet ingredients ensures you don’t lose that fudgy texture. Overmixing can lead to dry brownies, so be careful! Assembling the layers is where the fun begins. Pour half of the batter into the pan first. This creates a solid base. Next, the cheesecake layer adds creaminess. Spoon it over the brownie base, but don’t mix too much. You want nice, pretty swirls. Adding fresh raspberries brings a tart flavor that balances the sweetness. After pouring the rest of the brownie batter, swirl again. It’s a visual treat! Baking time is crucial. I check around 30 minutes. A toothpick should come out with a few moist crumbs, not wet batter. When they are done, let them cool in the pan before chilling in the fridge. This helps them set up nicely. Then, you can slice them into perfect squares. Enjoy your delicious treat! - Avoid overmixing to keep brownies fudgy. Overmixing can lead to dry brownies. - Make sure your butter and eggs are at room temperature. This helps create a smooth batter. - Dust with powdered sugar for a pretty touch. It adds sweetness and style. - Serve with a scoop of vanilla ice cream. The creaminess pairs well with the tartness. - Add a pinch of sea salt for a gourmet touch. It brings out the sweet flavor. - Incorporate lemon zest in the cheesecake for a citrusy twist. This adds freshness and brightness. Pro Tips Use Room Temperature Ingredients: Ensure your cream cheese and eggs are at room temperature before mixing. This helps create a smoother cheesecake layer without lumps. Don’t Overmix the Batter: When combining the dry ingredients with the wet, mix just until combined. Overmixing can lead to dense brownies instead of the desired fudgy texture. Choose Ripe Raspberries: For the best flavor, select fresh, ripe raspberries. They should be plump and slightly fragrant, adding sweetness to the brownies. Cool Before Cutting: Allow the brownies to chill in the refrigerator for at least 2 hours before cutting. This helps them set properly and makes slicing easier. {{image_4}} You can make a vegan version of these brownies. Use egg replacers like flax eggs or applesauce. Swap the cream cheese for dairy-free cream cheese. This way, you still enjoy the creamy cheesecake layer without dairy. If you need gluten-free options, almond flour works well in place of all-purpose flour. Just remember, almond flour may change the texture a bit. Feel free to play with the flavors! Instead of raspberries, you can try blueberries or strawberries. Both will add a fun twist. You can also experiment with different chocolate types in the brownie base. Dark chocolate gives a rich taste, while milk chocolate adds sweetness. When serving, cut brownies into larger squares for a big treat. For a fun party, mini squares are a hit too! Present the brownies on a dessert platter. Add toppings like whipped cream or extra berries for a lovely look. Dust some powdered sugar on top for an elegant finish. - Refrigerate brownies for optimal freshness. - Store in an airtight container. Keeping your Raspberry Cheesecake Brownies in the fridge helps them stay moist and tasty. An airtight container keeps air out, so they won’t dry out. You can enjoy them for days! - Wrap brownies tightly in plastic wrap. - Place them in a freezer bag for extra protection. To freeze, wrap each brownie well in plastic wrap. Then, put them in a freezer bag. This method keeps them fresh for later. When you want one, just thaw it in the fridge overnight. Raspberry Cheesecake Brownies last up to one week in the fridge. In the freezer, they can stay good for up to three months. Just remember to check for any freezer burn if they sit too long. Enjoy your sweet treats! Yes, you can use frozen raspberries. They may change the texture a bit. Frozen berries can make the brownies more wet. Fresh raspberries hold their shape better and add a nice tart flavor. If you use frozen, let them thaw and drain excess juice first. Check the brownies at 30 minutes. Use a toothpick in the center. It should come out with a few moist crumbs, not wet batter. The top will look set and slightly puffed. If it jiggles too much, bake for a few more minutes. Yes, you can prepare the brownie base ahead. Mix it and store it in the fridge for one day. Just make sure to cover it tightly. When you are ready, spread it in the pan and add the cheesecake layer. Avoid overmixing the batter. This can make brownies tough. Mix just until all ingredients blend. Also, make sure your oven is preheated. An oven that is not hot enough can lead to uneven baking. Keep an eye on the baking time for the best results. To add more chocolate flavor, try adding chocolate chips. You can also use dark cocoa powder instead of regular. This gives a deeper chocolate taste. Another option is to drizzle melted chocolate over the top before serving. Enjoy the rich flavor! These Raspberry Cheesecake Brownies combine rich flavors and a fun texture. We began by mixing the brownie base and cheesecake layer, adding bright raspberries for a tasty twist. With the right baking and cooling time, you’ll enjoy a treat everyone loves. Remember to store them well to keep them fresh. Have fun trying different flavors or dietary tweaks. By following this guide, you can make a delicious dessert that impresses any crowd. Enjoy baking!

Raspberry Cheesecake Brownies Irresistible Sweet Treat

Indulging in Raspberry Cheesecake Brownies is a treat you won’t want to miss! With a rich, fudgy brownie base and

- 2 ripe bananas, thoroughly mashed - 1/2 cup unsweetened cocoa powder - 1/2 cup granulated sugar - 1/4 cup brown sugar, packed firmly - 1/3 cup vegetable oil - 2 large eggs, at room temperature - 1 teaspoon pure vanilla extract - 1 1/2 cups all-purpose flour - 1 teaspoon baking powder - 1/2 teaspoon baking soda - 1/4 teaspoon salt - 1 cup semi-sweet chocolate chips - 1/4 cup chopped walnuts (optional) Let's break down the measurements. You need two ripe bananas. They should be very soft for the best flavor. For sweetness, mix 1/2 cup of granulated sugar with 1/4 cup of packed brown sugar. The cocoa powder adds a rich taste, so use 1/2 cup. The oil keeps the muffins moist. Use 1/3 cup of vegetable oil. For the binding, add two large eggs. They should be at room temperature for even mixing. One teaspoon of pure vanilla extract adds great flavor. Next, for the dry ingredients, you need 1 1/2 cups of all-purpose flour, 1 teaspoon of baking powder, 1/2 teaspoon of baking soda, and 1/4 teaspoon of salt. Finally, for that double chocolate goodness, you’ll want 1 cup of semi-sweet chocolate chips. If you like nuts, add 1/4 cup of chopped walnuts. You can make these muffins even more fun! Add 1/4 cup of chopped walnuts for a nice crunch. If you want a twist, try adding a pinch of cinnamon or a splash of almond extract. Both options will bring new flavors to your muffins. Enjoy experimenting! {{ingredient_image_2}} First, preheat your oven to 350°F (175°C). This step is key for even baking. While the oven warms up, take a muffin tin. You can line it with paper liners or spray it with non-stick spray. This keeps the muffins from sticking. In a large bowl, mash the two ripe bananas with a fork. Add half a cup of granulated sugar, a quarter cup of packed brown sugar, and one-third cup of vegetable oil. Crack in two large eggs and add one teaspoon of pure vanilla extract. Mix everything together until it's smooth. A whisk or fork works great for this. Next, grab a separate bowl. Sift together one and a half cups of all-purpose flour, half a cup of unsweetened cocoa powder, one teaspoon of baking powder, half a teaspoon of baking soda, and a quarter teaspoon of salt. Sifting helps break up lumps and makes sure everything mixes well. Now it’s time to combine the wet and dry mixtures. Gradually add the dry mix to the wet mix. Stir gently until just combined. Don’t worry about lumps! After that, fold in one cup of semi-sweet chocolate chips. If you like nuts, add a quarter cup of chopped walnuts for a nice crunch. Spoon the batter into the muffin cups until they are two-thirds full. This gives the muffins room to rise. Place the muffin tin in the preheated oven. Bake for 18-20 minutes. Check if they’re done by inserting a toothpick in the center. If it comes out clean or with a few moist crumbs, they are ready. Let the muffins cool in the pan for about five minutes. Then, transfer them to a wire rack to cool completely. For soft, moist muffins, use ripe bananas. The riper, the better! They add natural sweetness too. Make sure to mash them well, so there are no big chunks. Mixing the wet and dry ingredients gently helps keep the batter light. Overmixing can create tough muffins. You want that perfect, tender bite. Start by mixing the wet ingredients well. Combine the mashed bananas, sugars, oil, eggs, and vanilla until smooth. In another bowl, sift the dry ingredients. This step removes lumps and blends them evenly. When combining, add the dry to the wet slowly. Stir just until everything is mixed. A few lumps are fine. To keep your muffins fresh, let them cool completely. Store them in an airtight container. They can last up to three days at room temp. For longer storage, you can freeze them. Wrap each muffin in plastic wrap, then place in a freezer bag. Thaw at room temp when you're ready to enjoy one! Pro Tips Use Ripe Bananas: The riper the bananas, the sweeter and more flavorful your muffins will be. Look for bananas with plenty of brown spots for the best results. Don’t Overmix: When combining wet and dry ingredients, mix just until combined. Overmixing can lead to dense muffins, so a few lumps are perfectly fine! Customize Your Add-ins: Feel free to experiment with different mix-ins such as nuts, dried fruit, or even peanut butter chips for a unique spin on your muffins. Check for Doneness: For the perfect muffins, insert a toothpick into the center. If it comes out clean or with a few moist crumbs, they’re ready to be taken out of the oven. {{image_4}} If you want to make these muffins nut-free, just leave out the walnuts. This change keeps the muffins soft and tasty. You can also add seeds instead, like sunflower or pumpkin seeds, for a bit of crunch. They add a nice texture without the nuts. You can mix things up with some spices or extracts. A pinch of cinnamon adds warmth and depth. You might also try a splash of almond or coconut extract for a twist. These flavors blend well with the banana and chocolate. They can elevate your muffins to a new level of deliciousness. To make gluten-free double chocolate banana muffins, swap the all-purpose flour for a gluten-free blend. Make sure your blend contains xanthan gum. This helps mimic the texture of regular flour. The muffins will still be moist and tasty. You won't miss the gluten at all! To keep your double chocolate banana muffins fresh, place them in an airtight container. They stay good at room temperature for up to three days. If you live in a humid area, store them in the fridge for extra freshness. Always let the muffins cool completely before storing them to avoid sogginess. Freezing is a great way to save muffins for later. Wrap each muffin in plastic wrap or foil. Then, place them in a freezer bag. They can stay frozen for up to three months. When you want to enjoy one, just pull it out and let it thaw at room temperature. To heat your muffins, use the microwave for about 15 to 20 seconds. This warms them up nicely. If you prefer a crispy top, pop them in the oven at 350°F for about 5 to 7 minutes. Enjoy them warm for the best taste! Yes, you can swap some ingredients. Use applesauce for oil. It keeps the muffins moist. You can also use honey instead of sugar for a healthier option. If you have no cocoa powder, try using carob powder. Just keep in mind that it will change the flavor a bit. You can check the muffins after 18 minutes. Insert a toothpick in the center. If it comes out clean or with a few moist crumbs, they are ready! If it comes out wet, bake them a few more minutes. Keep an eye on them to avoid overbaking. Absolutely! You can make the batter the night before and store it in the fridge. Just remember to bake them in the morning. If you want to bake them ahead, cool the muffins and store in an airtight container. They stay fresh for about three days. We explored muffin-making in detail, covering ingredients, steps, tips, and storage. You learned how to mix wet and dry ingredients, fold in chocolate chips, and bake muffins to perfection. Remember to try variations for added fun, like nut-free or gluten-free options. Store them properly to keep them fresh. With these tips, you can make delicious muffins that everyone will enjoy. Happy baking!

Delicious Double Chocolate Banana Muffins Recipe

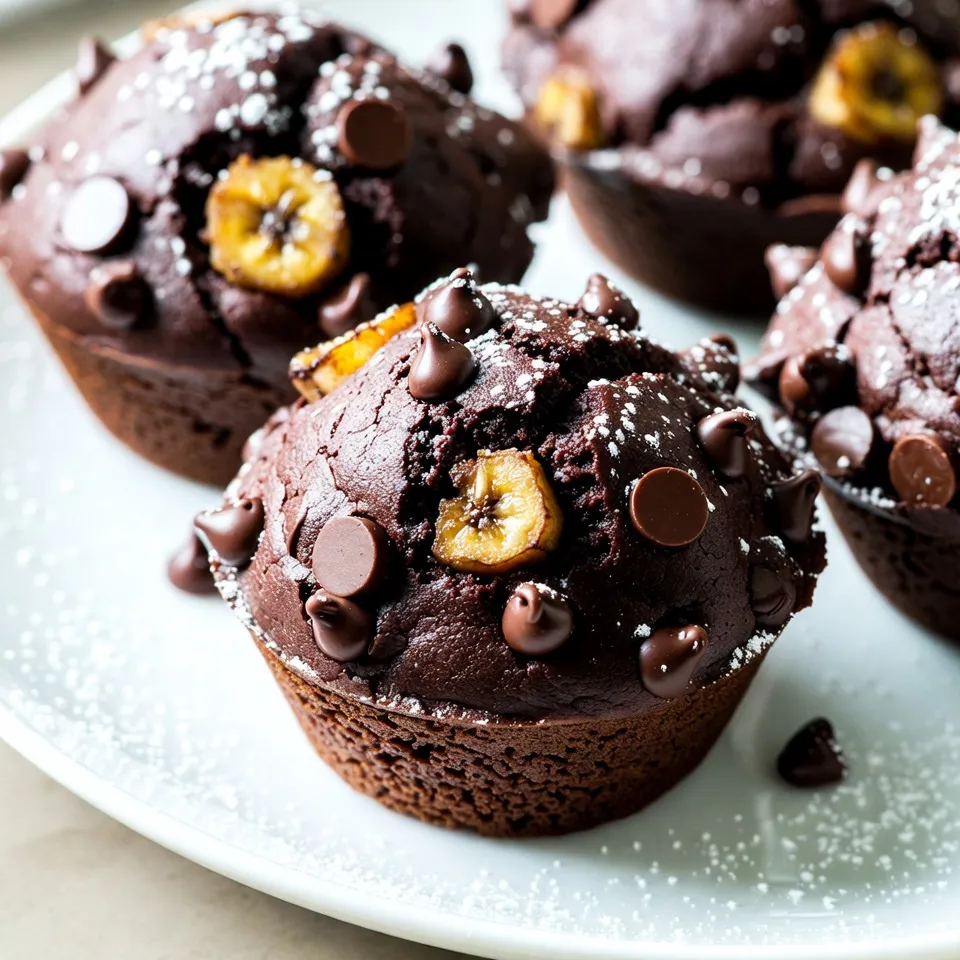
Craving something sweet and delightful? Get ready for my delicious Double Chocolate Banana Muffins! These muffins mix ripe bananas with

- 1 cup fresh raspberries (plus extra for garnish) - 1 tablespoon granulated sugar - 1 cup cream cheese, softened to room temperature - 1/2 cup powdered sugar - 1 teaspoon pure vanilla extract - 1 cup heavy whipping cream - 1/2 cup graham cracker crumbs - 2 tablespoons unsalted butter, melted - Pinch of sea salt You need fresh raspberries for the best taste. They bring a sweet and tart flavor. The granulated sugar helps to enhance the raspberries' natural sweetness. Cream cheese is key for that rich, creamy texture. Make sure it’s softened for easy mixing. Powdered sugar gives a nice sweetness without graininess. Vanilla extract adds depth to the flavor. Heavy whipping cream creates a light and fluffy mousse. It’s essential to whip it well to get those stiff peaks. Graham cracker crumbs make the base crunchy and fun. Mixing them with melted butter helps them stick together. Finally, a pinch of sea salt balances the sweetness and elevates the flavors. With these ingredients, you’ll create delightful raspberry cheesecake mousse cups that are sure to impress! {{ingredient_image_2}} 1. In a small bowl, combine 1 cup of fresh raspberries and 1 tablespoon of granulated sugar. 2. Gently mash some raspberries with a fork. This helps release their juices. 3. Set this mixture aside for about 10 minutes. This makes the raspberries taste better. 1. In a medium bowl, beat 1 cup of softened cream cheese until smooth. 2. Gradually add 1/2 cup of powdered sugar and 1 teaspoon of pure vanilla extract. 3. Keep mixing until the mixture is creamy and free of lumps. 1. In a large bowl, pour in 1 cup of heavy whipping cream. 2. Use a mixer to whip the cream on high speed. 3. Stop when stiff peaks form. This makes the mousse light and airy. 1. Gently fold the whipped cream into the cream cheese mixture. 2. Use a spatula and mix until they are fully combined. 3. Carefully fold in the macerated raspberries, keeping some chunks for texture. 1. In a small bowl, mix 1/2 cup of graham cracker crumbs with 2 tablespoons of melted butter and a pinch of sea salt. 2. Stir until the mixture is even. 1. Divide the graham cracker mix into small dessert cups. 2. Press down slightly to make an even base layer. 3. Spoon the raspberry cheesecake mousse over the crust, filling the cups almost to the top. 4. Cover the cups with plastic wrap and chill in the fridge for at least 2 hours. 5. Before serving, garnish with extra raspberries and a sprinkle of crushed graham crackers. How to whip cream to stiff peaks To whip cream, pour the heavy cream into a clean bowl. Use a handheld mixer or a stand mixer. Start mixing on low speed, then increase to high. Keep whipping until you see stiff peaks. This means the cream stands tall without drooping. Tips for folding ingredients When combining the whipped cream and cream cheese mix, use a spatula. Gently scoop from the bottom and fold over the top. This method keeps your mousse light and airy. Avoid stirring too hard, as it can deflate the cream. Suggestions for additional flavorings You can add lemon zest for a bright touch. A teaspoon of lemon juice also boosts flavor. Other options include vanilla bean seeds or a splash of almond extract. Each adds a unique twist to the classic taste. Serving in clear cups for visual appeal Use clear cups to show off the layers of your mousse. This makes the dessert look fancy and inviting. The bright pink of the raspberries stands out beautifully against the white mousse. Garnishing tips with mint and additional berries Top each cup with fresh raspberries and a mint sprig for color. You can also sprinkle crushed graham crackers on top. These garnishes add texture and make the dessert look even more delicious. Pro Tips Use Room Temperature Ingredients: Allow your cream cheese to soften at room temperature for easier mixing and a smoother texture in your mousse. Whip Cream to Stiff Peaks: Ensure your heavy whipping cream is whipped to stiff peaks for a light and airy mousse that holds its shape well. Garnish for Presentation: Use fresh mint leaves or a sprinkle of graham cracker crumbs on top of each cup for an attractive finishing touch. Chill Before Serving: Refrigerate the mousse cups for at least 2 hours before serving to enhance flavors and ensure the mousse sets properly. {{image_4}} You can easily change the flavors of these mousse cups. Swap the raspberries for strawberries or blueberries for a fresh twist. Both fruits will add a sweet and fruity taste. You can also add chocolate or lemon flavors. Mix in some melted chocolate for a rich touch, or use lemon zest for a bright zing. If you want a gluten-free version, use crushed nuts or gluten-free cookies for the crust. Almonds or oats work well here. For a dairy-free option, you can replace the cream cheese with a dairy-free cream cheese. Use coconut cream instead of heavy cream for a lighter feel. To make these mousse cups even better, pair them with different sauces or toppings. A drizzle of chocolate sauce or a fruit compote can enhance the flavors. You can also sprinkle some crushed graham crackers on top for added crunch. Each of these touches makes the dessert even more special. To keep your Raspberry Cheesecake Mousse Cups fresh, store them in the refrigerator. Place them in an airtight container or cover them with plastic wrap. This will help prevent them from absorbing odors from other foods. These mousse cups can stay fresh in the fridge for about 3 days. After that, the texture may change, and they might not taste as great. Can you freeze Raspberry Cheesecake Mousse Cups? Yes, you can freeze them, but it's best to freeze them without the graham cracker base. The crust can become soggy when thawed. To freeze, place the mousse in freezer-safe containers. Leave some space at the top, as the mousse may expand. When ready to eat, thaw them in the fridge overnight. Avoid using a microwave, as this can ruin the texture. Enjoy your mousse cups within 1 month for the best taste. Raspberry mousse can last for about 3 to 4 days in the fridge. To keep it fresh, store the mousse cups in an airtight container. Make sure they are covered well to prevent drying out. If you see any change in texture or smell, it's best to toss it. Yes, you can make this recipe ahead of time. In fact, it tastes even better when chilled. Prepare the mousse and layer it in the cups. Then, cover them with plastic wrap and place them in the fridge. You can make them up to 2 days in advance. Just remember to add the garnish right before serving. If you can't use cream cheese, there are a few good options. You can try Greek yogurt for a lighter taste. Another option is mascarpone cheese, which adds a rich flavor. For a dairy-free choice, use a vegan cream cheese. Just note that this may change the final taste a bit. Yes, Raspberry Cheesecake Mousse Cups can be gluten-free. Just use gluten-free graham crackers for the crust. Many brands offer gluten-free options that taste great. Always check the labels to ensure there are no hidden gluten ingredients. This way, everyone can enjoy this tasty treat! This article covered how to make Raspberry Cheesecake Mousse Cups. You learned about the key ingredients and step-by-step instructions. We also shared tips for best flavor and presentation. You have options for flavor variations and dietary needs. Lastly, storage methods help maintain freshness. Try making this sweet treat for any occasion. Enjoy the process and impress your friends and family!

Raspberry Cheesecake Mousse Cups Easy and Tasty Treat

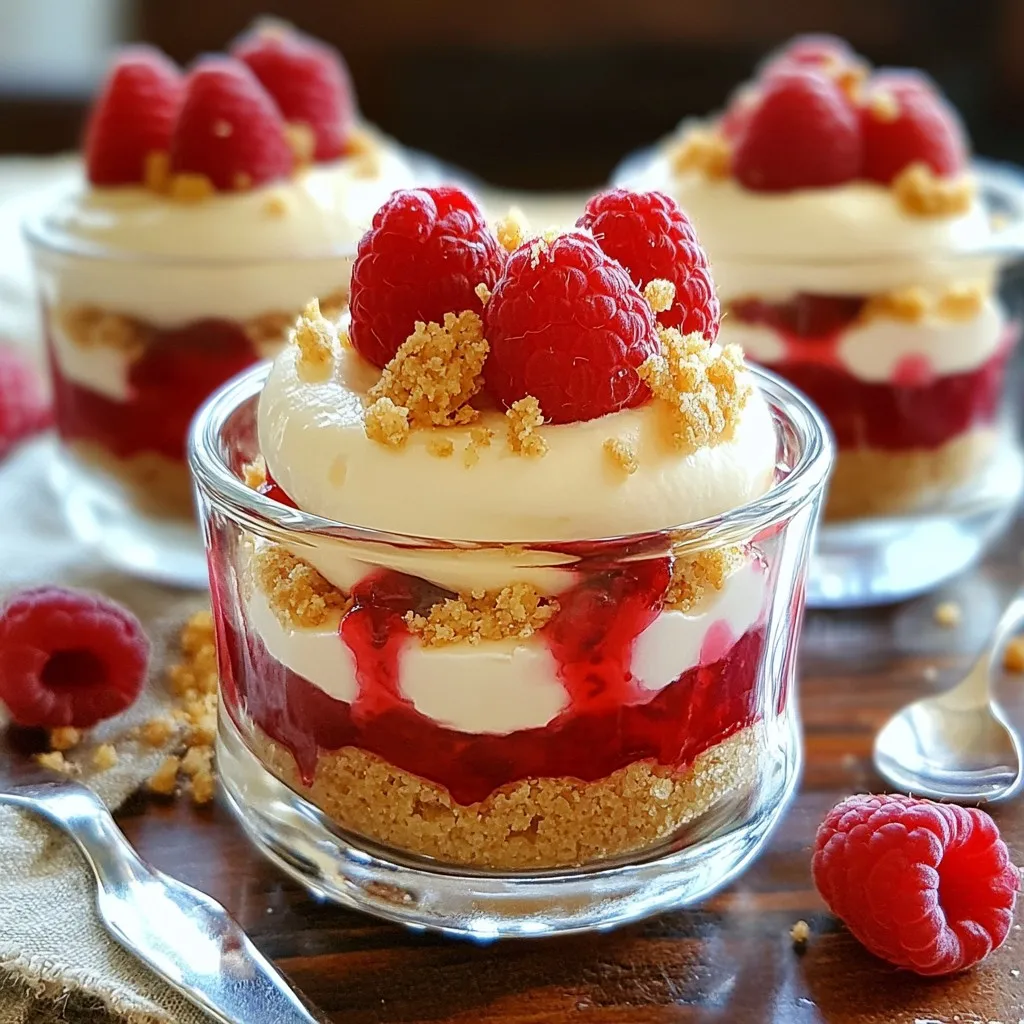
Welcome to a delicious adventure with Raspberry Cheesecake Mousse Cups! These easy and tasty treats are the perfect dessert for

To make these dulce de leche thumbprint cookies, you will need: - 1/2 cup unsalted butter, softened to room temperature - 1/2 cup granulated sugar - 1/4 cup packed dark brown sugar - 1 large egg yolk - 1 teaspoon pure vanilla extract - 1 1/2 cups all-purpose flour - 1/2 teaspoon baking powder - 1/4 teaspoon fine sea salt - 1/2 cup dulce de leche, for filling - 1/4 cup chopped toasted pecans (optional, for garnish) If you have allergies, here are some easy swaps: - Butter: Use coconut oil or a dairy-free butter. - Egg: Substitute with 1/4 cup applesauce or a flax egg (1 tablespoon ground flaxseed + 2.5 tablespoons water). - Flour: Use a gluten-free all-purpose flour blend. - Nuts: Omit pecans if you have a nut allergy or use sunflower seeds. Garnishes can make these cookies even better. Here are some ideas: - Chopped toasted pecans: For a nice crunch. - Drizzle of chocolate: Melted chocolate adds a sweet touch. - Powdered sugar: A light dusting gives a nice finish. - Sea salt flakes: A sprinkle can enhance the sweet flavor. These ingredients and substitutions help create the perfect dulce de leche thumbprint cookies. Enjoy the process and feel free to personalize! {{ingredient_image_2}} Start by gathering all your ingredients. Here’s what you need: - 1/2 cup unsalted butter, softened to room temperature - 1/2 cup granulated sugar - 1/4 cup packed dark brown sugar - 1 large egg yolk - 1 teaspoon pure vanilla extract - 1 1/2 cups all-purpose flour - 1/2 teaspoon baking powder - 1/4 teaspoon fine sea salt - 1/2 cup dulce de leche, for filling - 1/4 cup chopped toasted pecans (optional, for garnish) Make sure your butter is soft. This helps it mix well with the sugars. Preheat your oven to 350°F (175°C) and line a baking sheet with parchment paper. This will keep your cookies from sticking. In a large bowl, cream the softened butter, granulated sugar, and brown sugar together. Use an electric mixer for about 2-3 minutes until the mix is light and fluffy. Next, add the egg yolk and vanilla extract. Mix again until everything is smooth. In another bowl, sift together the flour, baking powder, and salt. This step helps your cookies rise and keep a nice texture. Slowly add this dry mix to the wet ingredients. Mix on low speed until the dough forms. Be careful not to overmix; this can make your cookies tough. Now, use a tablespoon to scoop out the dough. Roll each scoop into a ball about 1 inch in diameter. Place the balls on the prepared baking sheet, leaving about 2 inches between each one. With your thumb or the back of a teaspoon, press down in the center of each ball. This creates the thumbprint that will hold the dulce de leche. Fill each thumbprint with about a teaspoon of dulce de leche. Let it mound a little for a nice look. If you want, sprinkle chopped toasted pecans around the edges for added crunch. Bake your cookies in the preheated oven for 12–15 minutes. Keep an eye on them until the edges turn light golden brown. Once done, let them cool on the baking sheet for about 5 minutes. After that, transfer them to a wire rack to cool completely. Enjoy the sweet, creamy taste of these thumbprint cookies! To avoid overmixing the dough, mix slowly. Combine wet and dry ingredients on low speed. Stop mixing as soon as you see no flour. Overmixing can make cookies tough. You want a soft dough that holds together. To ensure even baking, place cookies on a lined sheet pan. Leave space between each cookie. This helps heat circulate. Rotate the baking sheet halfway through baking. This step helps all cookies bake evenly. Keep an eye on them for the perfect golden edges. For a beautiful presentation, arrange cookies on a nice plate. Dust them lightly with powdered sugar. This adds a touch of elegance. For extra flair, serve with whipped cream. Guests can dip their cookies for a fun twist! Pro Tips Chill the Dough: Refrigerate the dough for 30 minutes before baking to help the cookies hold their shape and prevent spreading too much. Fresh Dulce de Leche: If possible, use homemade dulce de leche for a richer flavor; it’s easier than you think and elevates the cookies significantly. Variety of Fillings: Experiment with different fillings like raspberry jam or chocolate ganache for a fun twist on the classic thumbprint cookie. Even Baking: Bake in batches and ensure that your baking sheets are cool before adding a new batch of dough to prevent uneven baking. {{image_4}} You can switch up the filling for these cookies. Instead of dulce de leche, try using chocolate ganache or fruit jam. Chocolate ganache is rich and smooth. To make it, just melt chocolate with cream. This gives a tasty twist. Jam adds fruitiness. Choose your favorite jam, like raspberry or apricot. The options are endless, and each filling brings a unique flavor. Want to add some crunch? Use different nuts for garnish. Chopped walnuts or almonds work great. You can even skip the nuts if you prefer a nut-free version. Just remember, the nuts add a nice texture and flavor. They pair well with the sweetness of the filling. Experiment with what you have on hand! You can make these cookies special for holidays. For Christmas, add some peppermint extract to the dough. Top with crushed candy canes. For fall, try pumpkin spice in the dough and add a cream cheese filling. These seasonal twists can make your cookies festive and fun. It’s a great way to enjoy them all year round! To keep your dulce de leche thumbprint cookies fresh, store them in an airtight container. This will help keep them soft and moist. Place parchment paper between layers if stacking them. This simple step prevents sticking. Store them at room temperature for up to five days. You can freeze these cookies for future treats. Start by placing the cooled cookies on a baking sheet in a single layer. Freeze them for about an hour until firm. Then, transfer them to a freezer bag or container. They will stay fresh for about three months. When you're ready to eat, let them thaw at room temperature. To maintain the best taste, keep cookies away from heat or sunlight. A cool, dry place is ideal. You can also add a slice of bread in the container. This helps keep the cookies soft by absorbing excess moisture. Enjoy your cookies whenever you want! Yes, you can use homemade dulce de leche. In fact, it often tastes richer than store-bought. To make it, simmer sweetened condensed milk for about 1-2 hours. Stir it often to avoid burning. Let it cool before using it in your cookies. This personal touch makes the cookies even special. To freeze dulce de leche thumbprint cookies, first let them cool completely. Then, place them in a single layer on a baking sheet. Freeze for about an hour, until firm. After that, transfer them to an airtight container or a freezer bag. They can last up to three months. When you're ready to enjoy them, just thaw at room temperature. Yes, you can make these cookies gluten-free. Simply substitute all-purpose flour with a gluten-free blend. Many blends work well, so choose one that you like. Just make sure it has xanthan gum to help with texture. Enjoy your delicious cookies without the gluten! You now have all the tools to make delicious thumbprint cookies. We covered ingredients, including substitutes for allergens and garnishes to enhance flavor. The step-by-step guide ensures you can prep, mix, and bake like a pro. I shared tips to avoid overmixing and the best ways to present your cookies. You also learned about variations and how to store them. I hope you feel confident to try this recipe. Enjoy baking and sharing your tasty treats!

Dulce de Leche Thumbprint Cookies Tasty and Simple Recipe

Are you ready to indulge in a sweet treat that’s simple to make? In this blog post, I’ll guide you

Older posts
Newer posts
← Previous Page1 Page2 Page3 … Page122 Next →

dsad

© 2026 dailydishcraft • Built with GeneratePress

Our Policies

  • Copyright Policy
  • Cookie Policy
  • GDPR Policy
  • Privacy Policy
  • Disclaimer
  • Terms Of Use

More Information

  • Home
  • About
  • Contact
  • Appetizers
  • Dessert
  • Dinner
  • Drinks
©2026, dailydishcraft About Back To Top