Skip to content
DisclaimerTerms Of UseGDPR PolicyCookie Policy

dailydishcraft

  • Home
  • Drinks
  • Appetizers
  • Dinner
  • Dessert
  • About
  • Contact
  • Privacy Policy
DisclaimerTerms Of UseGDPR PolicyCookie Policy

Jessica

To make these meatballs, you will need: - 1 lb of ground beef or ground turkey - 1/2 cup of breadcrumbs - 1/4 cup of grated Parmesan cheese - 1/4 cup of fresh parsley, finely chopped - 1 large egg These main ingredients create a tasty base. The ground beef gives you a rich flavor. Ground turkey is a leaner choice. Breadcrumbs provide texture and help the meatballs hold together. Parmesan adds a nice, cheesy touch. Fresh parsley gives a burst of color and freshness. The egg acts as a binder for the mixture. For the glaze, gather: - 1 cup of cranberry sauce (store-bought or homemade) - Zest from 1 medium orange - 2 tablespoons of fresh orange juice - 1 tablespoon of low-sodium soy sauce - 1 teaspoon of Dijon mustard The glaze is the star of the dish. Cranberry sauce provides sweetness and tartness. Orange zest and juice give a bright citrus flavor. Soy sauce adds depth and umami. Dijon mustard gives a slight kick that balances the sweetness. Don't forget to include: - 1 teaspoon of garlic powder - 1/2 teaspoon of onion powder - Salt and freshly ground pepper to taste These seasonings are key to enhancing the meatball flavor. Garlic powder and onion powder deepen the taste. Salt and pepper bring out all the flavors in the dish. Adjust these to your liking for a perfect bite. For the full recipe, follow the detailed instructions to make these delicious meatballs! 1. Preheat the oven to 375°F (190°C). 2. Line a baking sheet with parchment paper. This helps with cleanup. 3. In a large bowl, mix the ground beef or turkey, breadcrumbs, and Parmesan cheese. 4. Add the chopped parsley, egg, garlic powder, onion powder, salt, and pepper. 5. Use your hands or a spatula to blend everything well. 1. Scoop out portions of the meat mixture. 2. Roll them into small balls, about 1 inch wide. 3. Place the meatballs on the baking sheet, leaving space between them. 1. Bake the meatballs for about 20 minutes. They should be golden brown. 2. While they bake, make the glaze. 3. In a saucepan, mix cranberry sauce, orange zest, orange juice, soy sauce, and Dijon mustard. 4. Stir and simmer for 5 minutes to combine the flavors. 5. After baking, move the meatballs to the glaze and coat them well. 6. Return the coated meatballs to the baking sheet and bake for 5 more minutes. 7. Serve warm and enjoy the tasty treat! For the full recipe, check out the details above. To make great meatballs, focus on even cooking and texture. Use a mix of ground beef and breadcrumbs. I like to aim for a ratio of 1 pound of meat to 1/2 cup of breadcrumbs. This keeps them moist and tasty. Don’t overmix your ingredients, as this can make them tough. Gently combine the meat, herbs, and spices. This will help keep a light texture. Achieving the right glaze thickness is key. Start with 1 cup of cranberry sauce. Add 2 tablespoons of orange juice for the best flavor. If it's too thick, add a splash of water. If it’s too thin, let it simmer longer on medium heat. For flavor enhancement, consider adding a pinch of cinnamon or a splash of balsamic vinegar. These small tweaks add depth to the dish. Cranberry orange glazed meatballs pair well with many sides. Serve them over fluffy rice or creamy mashed potatoes. For a fresh taste, add a side of steamed green beans or a crisp salad. Garnish the meatballs with extra parsley or orange zest for a pop of color. This makes the dish more appealing and fun to eat. Explore different serving ideas to find your favorite! For the complete recipe, check out the [Full Recipe]. {{image_4}} You can switch the meat in this recipe. Ground chicken or pork works well. For a vegetarian twist, use lentils or chickpeas. They give you a great taste and texture. If you need gluten-free options, you can use gluten-free breadcrumbs. This keeps the dish light and tasty. Spices can add a nice kick. Try adding a pinch of cayenne pepper or smoked paprika. Fresh herbs like thyme or rosemary can make it unique. You can also swap the cranberry sauce for other fruit spreads, like raspberry or apricot. This change offers a different flavor profile while keeping it delicious. These meatballs are great for any occasion. Serve them as a fun appetizer at parties. Just make them smaller for easy bites. For a cozy dinner, serve them over rice or pasta. They also shine during holidays, adding a festive touch to your table. You can also use them in a meatball sub for a fun twist. Check out the Full Recipe for more ideas! After cooking, let the meatballs cool down. Place them in an airtight container. Glass or plastic containers work great for this. Make sure the lid seals tightly. This keeps the meatballs fresh and tasty. To freeze meatballs, first, let them cool completely. Arrange them in a single layer on a baking sheet. Freeze them for one to two hours until firm. Then, transfer the meatballs to a freezer bag. Remove as much air as you can. Meatballs can last in the freezer for up to three months. When you are ready to eat, thaw them in the fridge overnight. Reheat in the oven or microwave until hot. Cooked meatballs can last in the fridge for about three to four days. Always check for bad smells or color changes. If they smell sour or look strange, it's best to toss them. Fresh meatballs are always the tastiest! Yes, you can prepare these meatballs ahead of time. I often make the meatballs and glaze the night before. This saves time when you want to serve a tasty meal. You can store the raw meatballs in the fridge for up to a day. Just cover them well to keep them fresh. If you want to freeze them, place the raw meatballs on a baking sheet first. Freeze them until firm, then transfer them to a freezer bag. This way, you can cook them later without losing flavor. These meatballs pair well with many sides. You can serve them with rice or mashed potatoes. The sweet glaze complements the creamy texture of potatoes. Fresh salad or steamed veggies work great too. A side of crusty bread helps soak up the glaze. For a fun twist, try them in a slider with a small bun. To check if your meatballs are done, use a meat thermometer. The internal temperature should reach 165°F. If you don’t have a thermometer, cut one meatball in half. The inside should be no longer pink, and the juices should run clear. Baking them until golden brown also helps ensure doneness. Enjoy your delicious meal with peace of mind! In this article, I shared a tasty recipe for Cranberry Orange Glazed Meatballs. You learned about the key ingredients, from ground beef or turkey to the flavorful glaze. I went over simple steps for preparation, baking, and glazing. We explored tips for perfecting your meatballs and variations to customize your dish. Lastly, I covered storage tips to keep your meatballs fresh. Enjoy making these meatballs for any occasion. They are versatile and sure to impress.

Cranberry Orange Glazed Meatballs Flavorful Dinner Dish

Looking for a delicious twist on dinner? Try Cranberry Orange Glazed Meatballs! This simple dish combines juicy meatballs with a

To make lemon garlic roasted shrimp, gather these simple items: - 1 pound large shrimp, peeled and deveined - 4 cloves garlic, finely minced - 1/4 cup extra virgin olive oil - Fresh juice of 2 juicy lemons - Zest of 1 lemon, finely grated - 1 teaspoon smoked paprika - 1 teaspoon red pepper flakes - Sea salt and freshly cracked black pepper - Fresh parsley, finely chopped When buying shrimp, look for these signs of freshness: - Color: Fresh shrimp should be a light pink or grayish color. - Smell: They should smell like the ocean, not fishy. - Texture: The flesh should feel firm and springy. - Shell: Make sure the shells are shiny and not slimy. Always ask your fishmonger about where the shrimp come from. Local shrimp often tastes better. To prepare this dish, you will need these tools: - Mixing bowl: For combining the marinade. - Whisk: To blend the marinade well. - Baking sheet: For roasting the shrimp. - Parchment paper: For easy cleanup. - Spatula: To toss the shrimp in the marinade. Having the right tools makes your cooking process smooth and fun. Check the [Full Recipe] for more details. First, set your oven to 400°F (200°C). This heat is perfect for roasting shrimp. While the oven warms up, grab a baking sheet and line it with parchment paper. This step helps with easy cleanup later. In a large mixing bowl, add the olive oil, minced garlic, lemon juice, and lemon zest. Then, toss in the smoked paprika, red pepper flakes, sea salt, and black pepper. Whisk the mix well until all the ingredients blend. The smell will be amazing! Next, add the cleaned shrimp to the bowl with the marinade. Use your hands or a spatula to mix. Make sure all the shrimp get a nice coat of the marinade. Let them sit for about 15 minutes. This time helps the shrimp soak in all that flavor. Once the shrimp is marinated, spread them out on the baking sheet in a single layer. This helps them cook evenly. Place the baking sheet in your hot oven and roast for 8-10 minutes. They’re done when they turn pink and look just cooked. When ready, take them out and sprinkle fresh parsley on top. Serve them up and enjoy! For the full recipe, check out the detailed instructions earlier in the article. To get shrimp just right, focus on timing. Cook them for 8 to 10 minutes. They turn pink when done. Overcooking makes shrimp tough. Keep an eye on them. If you use large shrimp, they need a bit more time. For smaller shrimp, cut down the cooking time. To boost flavor, try adding fresh herbs. Basil, cilantro, or dill work well. You can also add lemon slices on top while roasting. This gives a fresh taste. For a kick, use more red pepper flakes. Experiment with different spices like cumin or coriander. Each adds a unique touch. If shrimp stick to the pan, use parchment paper. This helps with easy removal. If your shrimp are bland, check the seasoning. A touch of salt or lemon juice can help. If they are too salty, soak them in cold water for a few minutes. For leftover shrimp, add them to salads or pasta. They make great meals! For the full recipe, check the section above. {{image_4}} You can make this dish even better by adding vegetables. Try bell peppers, zucchini, or asparagus. These veggies roast well and add color to your plate. Just chop them into bite-sized pieces. Toss them in the marinade with the shrimp. They will soak up all the tasty flavors. This mix gives you a full meal in one pan. If you like heat, adjust the spice level. You can add more red pepper flakes if you want more kick. For a milder dish, reduce the amount or leave them out. You can also try adding a pinch of cayenne pepper for a different flavor. This lets you customize the heat to your taste. Feel free to experiment with different marinades. You can use honey for a sweet touch. Or swap lemon juice for lime juice for a fresh twist. Adding fresh herbs like basil or cilantro can bring new flavors. Try these ideas to keep the dish exciting. You can always find your favorite combination. For the complete recipe, check out the Full Recipe. After you enjoy your lemon garlic roasted shrimp, store any leftovers right away. Place them in an airtight container. This keeps them fresh. You can store them in the fridge for up to three days. Make sure the shrimp cool down before sealing the container. This helps prevent moisture buildup. To reheat your shrimp, use the oven for best results. Preheat your oven to 350°F (175°C). Spread the shrimp on a baking sheet. Warm them for about 5-7 minutes. This keeps the shrimp tender and avoids overcooking. You can also use a microwave. Just heat them in short bursts, checking often. If you want to save shrimp for later, freezing is a great option. Place the shrimp in a freezer-safe bag. Remove as much air as you can before sealing. They can stay fresh in the freezer for up to three months. When ready to use, thaw the shrimp in the fridge overnight before reheating. You’ll still enjoy their great flavor! For the full recipe, check the bottom of the article. You can tell when shrimp are done when they turn bright pink. The flesh should be opaque, not clear. Cooked shrimp curl into a C shape. If they form an O shape, they may be overcooked. Trust your eyes and your taste! Yes, you can use frozen shrimp. Just make sure to thaw them first. Place them in the fridge overnight or run them under cold water for a quick thaw. After thawing, pat them dry with a paper towel. This helps the marinade stick better. Lemon garlic roasted shrimp pairs well with many sides. Try serving them with rice or a fresh salad. Garlic bread makes a great addition too! You can also serve them with pasta for a heartier meal. You can find the full recipe for Lemon Garlic Roasted Shrimp in our recipe section. It has all the details you need to create this dish at home. In this blog, we explored how to make delicious lemon garlic roasted shrimp. We covered the key ingredients, tips for choosing fresh shrimp, and essential cooking tools. I provided step-by-step instructions for prepping, marinating, and roasting shrimp to perfection. We discussed flavor enhancements, storage tips, and more. Remember, with a few simple tricks, you can impress anyone at the dinner table. Enjoy experimenting with different flavors and variations for a fresh twist. Happy cooking!

Lemon Garlic Roasted Shrimp Savory and Simple Dish

Looking for a simple and savory dish? You’ve come to the right place! My Lemon Garlic Roasted Shrimp will wow

- 4 large eggs, hard-boiled and chopped - 1 ripe avocado, peeled and mashed - 2 tablespoons Greek yogurt (or mayonnaise) - 1 tablespoon Dijon mustard - 1 tablespoon fresh lemon juice - 1/4 cup red onion, finely chopped - 1/4 cup celery, finely chopped - Salt and pepper to taste - 4 large whole wheat or spinach tortillas - Fresh baby spinach or crisp lettuce leaves For this recipe, I start with the main ingredients that bring flavor and nutrition together. The hard-boiled eggs provide protein, while the avocado adds healthy fats. Greek yogurt or mayonnaise adds creaminess. The Dijon mustard and lemon juice give a zesty kick. The additional ingredients, like red onion and celery, add crunch and flavor. I love the fresh taste of spinach or lettuce in the wraps. They make each bite fresh and light! You can find the Full Recipe [here](#). This recipe is not only easy to make but also packs a nutritious punch. Enjoy these wraps as a quick lunch or a light dinner. - Place the eggs in a pot and cover with water. - Bring water to a boil, then let sit covered for 12 minutes. - Transfer eggs to an ice bath, cool, peel, and chop. Hard-boiling eggs is simple. Start by placing them in a pot. Cover them with cold water. Bring the water to a boil on high heat. Once it boils, cover the pot and remove it from heat. Let the eggs sit for 12 minutes. This method cooks the eggs evenly. After 12 minutes, cool the eggs quickly in an ice bath. This step makes peeling easier. Once cool, peel the eggs and chop them into small pieces. - Mix mashed avocado, Greek yogurt (or mayonnaise), Dijon mustard, and fresh lemon juice. - Fold in the chopped red onion and celery. Next, you need to prepare the avocado mixture. In a large bowl, add the mashed avocado. If you want creaminess, use Greek yogurt or mayonnaise. Add Dijon mustard and fresh lemon juice for flavor. Mix these ingredients until smooth. Then, gently fold in chopped red onion and celery. These add crunch and flavor to the salad. - Fold chopped hard-boiled eggs into the avocado mixture. - Season with salt and pepper to taste. Now it’s time to combine everything. Carefully fold the chopped hard-boiled eggs into your avocado mixture. Be gentle so the eggs stay chunky. Season this mixture with salt and pepper. Taste it to make sure it’s just right for you. - Lay tortillas flat, place spinach or lettuce, add egg salad mixture, then roll tightly. To make the wraps, lay out your tortillas on a clean surface. Place fresh baby spinach or crisp lettuce leaves on each tortilla. Then, spoon the avocado egg salad mixture onto the tortillas. Spread it out evenly. Start rolling the tortilla tightly from one end. Fold in the sides as you go. This keeps all the yummy filling inside. Enjoy your fresh and healthy avocado egg salad wraps! For the complete recipe, check out the Full Recipe. - Use ripe avocados for creaminess. They should feel soft but not mushy. - Don’t mash the eggs too much for texture. Leave some chunks for a nice bite. - Arrange wraps on a bright platter. This makes them look fresh and inviting. - Garnish with slices of fresh vegetables. Use tomatoes, cucumbers, or radishes for color. - Use vegan mayo for a plant-based version. This keeps the dish creamy without eggs. - Substitute Greek yogurt with dairy-free alternatives. Options like coconut yogurt work well. For more ideas, check the full recipe for Avocado Egg Salad Wraps! {{image_4}} You can change the protein in your wraps for a new twist. Use chicken or tuna for a protein-packed alternative. Both add great flavor and texture. If you want a vegetarian option, add beans. Black beans or chickpeas work well. They give you protein while keeping it plant-based. To make your avocado egg salad even more exciting, add spices. A sprinkle of paprika or cayenne gives a nice kick. If you like fresh tastes, try adding herbs. Dill or cilantro can brighten the dish. These simple changes can take your wraps to a new level. If you want to lower carbs, swap the tortillas for lettuce leaves. They make a fresh and crunchy wrap. For those with gluten sensitivities, try gluten-free tortillas. They work just as well and keep the meal enjoyable. Store any leftover avocado egg salad in an airtight container. It will stay fresh in the fridge for up to 2 days. Keep it sealed to avoid drying out. This way, you can enjoy the flavors later without losing quality. If you want to save some for later, wrap the salad tightly. Use plastic wrap first, then cover it with foil. This helps prevent freezer burn. Remember, the texture may change after freezing, so it’s best to eat it fresh. You can enjoy the salad cold right from the fridge. If you prefer it warm, reheat it gently in the microwave. Heat just until warm, not hot. This way, you keep the creamy texture and flavor intact. For a quick meal, serve it in a fresh wrap or on a bed of greens. You can use mayonnaise instead of Greek yogurt. If you want a dairy-free option, try vegan mayo. Yes, you can make the filling in advance. Just store it in the fridge. Keep the tortillas separate. Assemble the wraps right before you eat. Hard-boiled eggs can stay fresh for up to one week in the fridge. Make sure you store them in a sealed container. Absolutely! You can use any leafy green or lettuce. Choose what you like best for your wrap. Yes, this recipe is perfect for meal prep. Just keep the filling and tortillas separate until you are ready to eat. Enjoy making these tasty wraps! Check out the Full Recipe for all the details. This article covered how to make tasty avocado egg salad wraps step by step. We discussed essential and extra ingredients, how to boil eggs, and how to put everything together. You also learned tips for perfecting your wraps and explored fun variations. Remember, these wraps are healthy and easy to make. Whether you enjoy them fresh or meal prep for later, they can fit into any lunch plan. Experiment with flavors to find your favorite combination. Enjoy every bite and make it your own!

Avocado Egg Salad Wraps Healthy and Simple Meal

Looking for a quick, healthy meal that’s bursting with flavor? My Avocado Egg Salad Wraps might just become your new

- 2 ripe bananas, peeled - 1 cup rolled oats - 1/4 cup honey or pure maple syrup - 1/2 cup plain yogurt or unsweetened applesauce - 2 large eggs - 1 teaspoon baking soda - 1 teaspoon pure vanilla extract - 1/2 teaspoon ground cinnamon - 1/4 teaspoon salt - 1/2 cup chocolate chips or chopped nuts (optional) The ingredients for these muffins offer great health benefits. Ripe bananas provide potassium and fiber, helping your heart and digestion. Rolled oats add whole grains, which give energy and keep you full. Honey or maple syrup acts as a natural sweetener, giving you a healthier option than sugar. Yogurt boosts protein and calcium, which are good for your bones. Eggs add more protein and help bind the muffins together. Ground cinnamon helps regulate blood sugar and adds flavor without extra calories. You can swap ingredients based on your needs. For a vegan option, replace eggs with flax eggs or chia seeds. Use dairy-free yogurt or applesauce for a lactose-free version. If you want to cut sugar, try using mashed dates instead of honey or maple syrup. Instant oats can work if you are in a pinch, but rolled oats give better texture. You can also use nuts or seeds instead of chocolate chips for a healthier twist. For the full recipe, refer to the earlier section. First, preheat your oven to 350°F (175°C). This step is key to baking. Next, prepare your muffin tin. You can line it with paper liners or lightly grease it with oil. This helps the muffins come out easily. Now, it’s time to blend. In a high-speed blender, add the ripe bananas, rolled oats, honey or maple syrup, yogurt or applesauce, and the eggs. Don’t forget the baking soda, vanilla extract, ground cinnamon, and salt. Blend on high speed until it is smooth. If needed, stop to scrape the sides with a spatula. This ensures everything mixes well. If you want added texture, fold in chocolate chips or nuts after blending. Carefully pour the batter into your prepared muffin tin. Fill each muffin cavity about two-thirds full. This gives the muffins room to rise. Place the tin in the oven and bake for 18-20 minutes. Check with a toothpick; it should come out clean or with a few crumbs. Once done, let the muffins cool in the tin for 5 minutes. Then, transfer them to a wire rack. This helps them cool evenly. Enjoy your Banana Oat Blender Muffins with a drizzle of honey for extra sweetness! You can find the Full Recipe for more detailed steps. To get the best texture in your muffins, use ripe bananas. They should be spotty and soft. This adds natural sweetness and moisture. Blend the mixture well. You want it smooth and creamy. If you leave lumps, the muffins may not rise evenly. Fill the muffin cups only two-thirds full. This gives them space to puff up nicely. One common mistake is overmixing the batter. Blend just enough to combine the ingredients. Overmixing makes the muffins tough. Avoid using unripe bananas. They lack the sweetness and flavor you need. Also, do not skip the resting time after baking. Letting them cool helps improve the texture. Serve these muffins warm for the best taste. Try drizzling honey on top for extra sweetness. Adding sliced bananas on the side makes it look pretty. You can also enjoy them with yogurt or a nut butter spread. These muffins pair well with a cold glass of milk or a warm cup of tea. For the full recipe, check out the detailed instructions! {{image_4}} You can easily make these muffins gluten-free. Just use gluten-free oats. For a vegan version, swap eggs for flax eggs. Mix one tablespoon of ground flaxseed with three tablespoons of water. Let it sit for five minutes to thicken. Replace yogurt with plant-based options like almond or coconut yogurt. These changes keep the muffins tasty and healthy. Feel free to get creative with flavors! You can add mix-ins like berries, nuts, or dried fruits. Chocolate chips give a sweet touch, while nuts add a nice crunch. Adding spices like nutmeg or ginger can also enhance the flavor. A teaspoon of vanilla or almond extract makes the muffins even more delicious. These muffins are perfect for breakfast or snacks. You can make standard-sized muffins or mini ones for bite-sized treats. If you want larger muffins, just fill the cups more. Adjust baking time if you change the size. Mini muffins may bake in about 12-15 minutes, while larger ones might take a few extra minutes. Check with a toothpick to see if they are done. After baking, let your muffins cool fully on a wire rack. Once cooled, place them in an airtight container. This keeps them fresh for up to 3 days. If you want to keep them longer, consider freezing them. Storing muffins in a cool, dry place helps maintain their soft texture. To freeze your Banana Oat Blender Muffins, wrap each muffin tightly in plastic wrap. Then, place the wrapped muffins in a freezer bag. Make sure to squeeze out as much air as possible before sealing. They can stay fresh in the freezer for up to 3 months. When you're ready to eat one, just pull it out and thaw it at room temperature. To reheat your muffins, use a microwave or an oven. For the microwave, heat one muffin for about 15 to 20 seconds. This warms it up without drying it out. If you prefer the oven, preheat it to 350°F (175°C) and bake the muffin for about 5 to 10 minutes. This method gives it a nice, warm texture. Enjoy your muffins warm for the best taste! To make Banana Oat Blender Muffins, gather your ingredients first. You need ripe bananas, rolled oats, honey or maple syrup, yogurt or applesauce, eggs, baking soda, vanilla extract, cinnamon, salt, and optional chocolate chips or nuts. Start by preheating your oven to 350°F (175°C). Prepare your muffin tin by lining it with paper liners or greasing it. Next, blend all your ingredients in a high-speed blender. Blend until smooth, making sure to scrape the sides if needed. Then, fold in any chocolate chips or nuts if you want. Pour the batter into the muffin tin, filling each cup about two-thirds full. Bake for 18-20 minutes, or until a toothpick comes out clean. Let the muffins cool on a wire rack. For the full recipe, check the details above. Yes, you can use instant oats instead of rolled oats. Instant oats will change the texture, making your muffins a bit softer and denser. If you prefer a heartier muffin, I suggest sticking with rolled oats. Rolled oats give a nice chewiness and help the muffins rise better. These muffins can last about 3-5 days when stored properly. Keep them in an airtight container at room temperature. If you want them to last longer, you can freeze them. They stay good in the freezer for up to three months. Just make sure to wrap them well in plastic wrap or a freezer bag. When ready to eat, thaw them overnight in the fridge or warm them in the microwave. You've learned about the key ingredients, their benefits, and how to make banana oat blender muffins. We discussed preparations, baking, and tips to get the best results. Consider variations for different diets and flavors. Lastly, storing and reheating your muffins helps them stay fresh longer. Keep experimenting with these muffins and enjoy the delight they bring! Your kitchen is now a place for tasty, healthy treats. Happy baking!

Banana Oat Blender Muffins Easy Healthy Recipe

Looking for a simple and healthy treat? These Banana Oat Blender Muffins are perfect! With just a few ingredients and

- 6 cups fresh baby spinach - 1 cup strawberries - 1 cup blueberries - 1 cup raspberries - 1/2 cup crumbled feta cheese - 1/2 cup candied walnuts - 1/4 red onion - 1/4 cup balsamic glaze - 2 tablespoons olive oil - Salt and pepper to taste This Summer Berry Spinach Salad is fresh and bright. Each bite bursts with flavor. The base is made from six cups of fresh baby spinach. This gives a crisp, green foundation for the salad. I love using fresh spinach because it is full of nutrients. Next, I add one cup each of strawberries, blueberries, and raspberries. These berries bring color and sweetness. The strawberries should be hulled and sliced thin. The blueberries and raspberries need only a good rinse. They add juicy bites that balance the greens. For a creamy touch, I sprinkle half a cup of crumbled feta cheese. The feta adds a salty flavor that contrasts the sweet fruits. Then, I include half a cup of candied walnuts. They give a sweet crunch and make each bite exciting. I slice a quarter of a red onion very thin. This adds a little sharpness to the mix. For the dressing, I whisk together a quarter cup of balsamic glaze and two tablespoons of olive oil. This dressing is sweet and tangy. It ties all the flavors together. I season it with salt and pepper to taste. This salad is not just a meal; it’s an experience. You can find the Full Recipe to prepare this delightful dish. Enjoy the process as you create something colorful and tasty! 1. Start with 6 cups of fresh baby spinach. Wash it under cold water. Use a salad spinner to dry the leaves well. 2. Take 1 cup of strawberries. Hull them to remove the green tops. Slice them thinly. 3. Rinse 1 cup of blueberries and 1 cup of raspberries under cool water. Drain them well. 1. In a large bowl, combine the dried spinach with the sliced strawberries, blueberries, and raspberries. 2. Gently toss the fruits with the spinach to mix them well. 3. Add 1/2 cup of crumbled feta cheese for a creamy touch. Then sprinkle in 1/2 cup of candied walnuts to add some crunch. 1. In a small bowl, whisk together 1/4 cup of balsamic glaze and 2 tablespoons of olive oil. 2. Add a pinch of salt and freshly cracked pepper to taste. Mix until you have a smooth dressing. 3. Drizzle this dressing over the salad. Toss gently to coat everything well without bruising the berries. You can find the detailed recipe here: [Full Recipe]. For a stunning display, use a large, shallow platter. This lets all the colors pop. You can also serve in individual bowls for a more personal touch. To impress, top each bowl with a few whole berries. A drizzle of extra balsamic glaze adds a nice finish. I recommend using extra virgin olive oil for the best flavor. It pairs perfectly with the berries and greens. You can also try avocado oil for a different taste. If you want a change, consider a honey mustard dressing or a citrus vinaigrette. These options add a refreshing twist to your salad. To keep your spinach fresh, wash it just before use. Pat the leaves dry to avoid wilting. Store the spinach in a container lined with paper towels. This helps absorb moisture and keeps it crisp. Keep the berries and other ingredients separate until assembly. This way, they stay fresh and delicious. {{image_4}} You can easily change fruits in this salad. Instead of strawberries, try peaches or blackberries. These fruits add unique flavors that mix well with spinach. You can also switch the feta cheese for a dairy-free option like tofu or avocado. This keeps the salad creamy without using dairy. Feel free to get creative with dressings. A creamy dressing like ranch or yogurt can add richness. For a fresh twist, try a citrus-based dressing. Lemon or orange juice mixed with olive oil brightens the flavors. You can also add herbs for extra zest. Boost the nutrition by adding protein. Grilled chicken makes the salad hearty. Chickpeas are a great plant-based option too. They add fiber and protein. You can throw in more nuts or seeds, like almonds or sunflower seeds, for a crunchy texture and healthy fats. These add-ins make your meal more filling and balanced. For the full recipe, check out the [Full Recipe]. To store leftovers of your Summer Berry Spinach Salad, place it in an airtight container. This keeps the salad fresh for about 1 to 2 days. To maintain freshness, avoid adding the dressing until you're ready to eat. This way, the spinach stays crisp and the berries remain juicy. If you notice any wilting, remove those leaves before storing. Prep ingredients in advance for easy assembly. Wash and dry the spinach, and store it in a separate container. Slice the strawberries and store them in a small bowl. Keep blueberries and raspberries in their original containers to avoid squishing them. For salads, use clear containers to show off the vibrant colors. This makes it easy to grab and go. You can layer the ingredients, with the spinach at the bottom and berries on top, to keep them fresh longer. You can store this salad for up to two days in the fridge. Keep it in an airtight container. To keep the spinach fresh, store the dressing separately. Add the dressing just before serving. This helps avoid soggy leaves. Yes, you can use frozen berries. They are a great option, especially in winter. Just thaw them and drain excess water. This keeps your salad from getting watery. Fresh berries taste best, but frozen ones work well too. If you want a dairy-free option, try using avocado or chickpeas. Both add creaminess and flavor. You can also use goat cheese or mozzarella for different tastes. Each option gives a unique twist to your salad. Absolutely! All the ingredients in Summer Berry Spinach Salad are gluten-free. This makes it safe for anyone with gluten sensitivities. Always check labels on your ingredients to ensure safety. Enjoy this fresh dish worry-free! This blog post covers a fresh and tasty Summer Berry Spinach Salad. We discussed the key ingredients, easy steps for preparation, and tips for serving. You can swap fruits and dressings to fit your taste. Always focus on freshness to keep your salad vibrant. With these tips, you can enjoy a healthy, colorful dish anytime. Try making this salad for quick meals or special occasions. You'll impress everyone with its flavor and nutrition. Enjoy your cooking journey with this salad!

Summer Berry Spinach Salad Fresh and Flavorful Recipe

Looking for a vibrant, fresh salad that bursts with flavor? This Summer Berry Spinach Salad is your answer! With sweet

- 1 cup cornmeal - 1 cup all-purpose flour - 1 tablespoon baking powder - 1/2 teaspoon baking soda - 1/2 teaspoon salt - 1 cup buttermilk - 2 large eggs - 1/4 cup melted butter - 1/4 cup honey (optional) - 1 cup shredded sharp cheddar cheese - 1-2 jalapeños, finely chopped Let’s dive into the ingredients that make this cheddar jalapeño cornbread sing. First, we have our dry ingredients, which form the base. Cornmeal gives that classic cornbread texture. The all-purpose flour adds lightness. Baking powder and baking soda help it rise. Salt brings out the flavors. Next, we move to the wet ingredients. Buttermilk adds richness and tang. The eggs bind everything together and add moisture. Melted butter gives a great taste and texture. If you want a hint of sweetness, add honey. Finally, the best part—our add-ins! Sharp cheddar cheese brings a savory depth. Jalapeños add a spicy kick. You can adjust the jalapeño amount based on how much heat you like. For the full recipe, check out the details above. These ingredients combine to create a delightful cornbread that’s perfect for any meal. - Preheat oven to 400°F (200°C). - Grease a cast-iron skillet or baking dish. Start by heating your oven. This step is key for fluffy cornbread. Greasing the skillet helps the cornbread come out easily later. I love using a cast-iron skillet for that nice crust. - Combine cornmeal, flour, baking powder, baking soda, and salt. In a large bowl, mix the dry items well. Use a whisk to blend them. This ensures even flavor and texture in your cornbread. I often sift the flour to avoid lumps. - Whisk buttermilk, eggs, and melted butter; add honey if desired. In a separate bowl, combine the wet ingredients. Whisk until smooth and creamy. Adding honey can give a touch of sweetness. I find it balances the heat from jalapeños nicely. - Pour wet ingredients into dry and stir until just combined. Now, pour the wet mix into the dry mix. Stir gently until they just come together. It’s okay if some lumps remain. Over-mixing can make your cornbread tough. - Gently incorporate cheddar and jalapeños into batter. Fold in the shredded cheddar and chopped jalapeños. This step adds flavor and heat. Make sure everything is evenly mixed so every bite bursts with flavor. - Pour into prepared skillet and bake for 20-25 minutes. Pour the batter into your greased skillet. Smooth the top with a spatula. Bake until the top is golden brown. A toothpick should come out clean when inserted in the middle. For the complete recipe, check out the Full Recipe section. To keep your cornbread moist, avoid over-mixing the batter. When you mix too much, the bread can turn dense. Instead, mix until just combined. A few lumps are okay! Also, always use fresh ingredients. Fresh buttermilk and eggs make a big difference in flavor and texture. You can enhance the taste by trying different cheese types. Cheddar works great, but you might love pepper jack or even feta. Feel free to adjust the jalapeño amount based on how spicy you want it. If you love heat, add more jalapeños. For a milder cornbread, use fewer. Presentation matters! Serve your cornbread warm from the skillet for a rustic look. You can add a sprinkle of shredded cheddar on top. For a pop of color, garnish with fresh herbs like cilantro or parsley. This not only looks good but also adds fresh flavor. {{image_4}} You can make your cornbread sweeter by adding more honey or sugar. If you love a touch of sweetness, try adding an extra tablespoon of honey. This small change makes a big difference. The honey gives the cornbread a nice golden color and a soft texture. It also pairs well with the sharp cheddar. You can adjust the sweetness to fit your taste. For those who crave heat, consider adding diced green chilies or hotter peppers. You can use serrano or habanero peppers for a fiery twist. Just remember to adjust the amount based on your spice level. Mixing in these peppers adds a bold flavor to your cornbread. It will surely excite your taste buds. Don't hesitate to swap out cheddar for different types of cheese. Pepper jack cheese adds a creamy texture and a bit of spice. Feta cheese offers a tangy flavor that contrasts nicely with the cornbread's sweetness. Each cheese brings its unique taste and can change the whole dish. Feel free to experiment with your favorite cheeses for a fun twist on the classic. For the full recipe, check out the details in the Full Recipe section. To store cornbread at room temperature, let it cool completely. Wrap it in plastic wrap or foil. This keeps the cornbread fresh and moist. You can also place it in an airtight container. It will last for about 2-3 days. If you notice any signs of drying, add a piece of bread to the container. This can help keep the cornbread soft. For long-term storage, freezing is best. Cut the cornbread into squares or wedges. Wrap each piece tightly in plastic wrap. Then, place them in a freezer bag. Be sure to squeeze out any air. This helps prevent freezer burn. Cornbread can stay frozen for up to three months. When you’re ready to enjoy it, you can thaw it in the fridge overnight. To reheat cornbread without losing moisture, use the oven. Preheat it to 350°F (175°C). Place the cornbread on a baking sheet. Cover it with foil to keep moisture in. Heat for about 10-15 minutes. You can also use the microwave. Place a piece of cornbread on a plate. Add a damp paper towel over it. Heat in short bursts of 20-30 seconds. This keeps it moist and warm. For best results, enjoy it fresh after baking. For the full recipe, check out the earlier section. Cornbread can turn dry for a few reasons. Overmixing the batter is one cause. If you mix too much, it makes the bread dense. Using old or stale ingredients can also lead to dryness. Make sure your baking powder is fresh. Also, baking for too long will dry it out. To keep cornbread moist, mix the batter until just combined. Always check the oven towards the end of baking. Yes, you can! Adding more flavors makes cornbread fun. You can mix in cooked bacon bits for a savory touch. Chopped herbs like chives or cilantro can add freshness. For a sweeter taste, try adding blueberries or corn kernels. You can also swap out cheddar for pepper jack for extra spice. Just remember to keep the main flavors balanced. You can tell cornbread is ready when the top is golden brown. Insert a toothpick into the center. If it comes out clean, your cornbread is done. Another sign is a slight bounce when you press the top. The edges should pull away from the pan. Always trust your senses; the smell will be delightful! To make cornbread gluten-free, swap the all-purpose flour with a gluten-free blend. Look for blends designed for baking. Ensure all other ingredients are gluten-free too. Cornmeal is naturally gluten-free, so you’re good there! Just follow the Full Recipe for best results. Enjoy the same great flavor without gluten! In this guide, I covered the recipe for rich, tasty cornbread. We discussed key ingredients like cornmeal, flour, and cheese. I explained step-by-step how to mix and bake the batter. You learned tips to enhance flavor and ensure moisture. Remember, you can customize this cornbread to your taste with add-ins. Enjoy experimenting and savoring your creation. With fresh ingredients and simple steps, you’ll make a cornbread worth sharing!

Cheddar Jalapeño Cornbread Flavorful and Easy Recipe

Get ready to spice up your dinner table with my Cheddar Jalapeño Cornbread! This recipe is easy to follow and

- 1 medium head of cauliflower, cut into bite-sized florets - 1 cup all-purpose flour - 1 cup water - 1 teaspoon garlic powder - 1 teaspoon onion powder - 1 teaspoon paprika - 1/2 teaspoon salt - 1/2 teaspoon black pepper - 1 cup buffalo sauce (store-bought or homemade) - 2 tablespoons olive oil For this recipe, the cauliflower is the star. Choose a medium head, and cut it into small, even florets. This helps them cook evenly. The batter gives the bites a nice crunch. Mixing all-purpose flour with water and spices forms a smooth coating. Garlic and onion powder add depth, while paprika gives a pleasant color. - Buffalo sauce options (store-bought vs. homemade) - Suggested garnish (fresh parsley) You can choose between store-bought or homemade buffalo sauce. Store-bought saves time, while homemade lets you control the spice. For a fresh touch, chop some parsley to sprinkle on top. It adds color and a hint of flavor. These ingredients make your buffalo cauliflower bites not just tasty but also a feast for the eyes. For the complete recipe, check out the Full Recipe. First, preheat your oven to 450°F (230°C). This high heat helps the bites get crispy. Next, line a baking sheet with parchment paper. This will keep the bites from sticking and make cleanup easy. In a large bowl, add 1 cup of all-purpose flour and 1 cup of water. Then, mix in 1 teaspoon of garlic powder, 1 teaspoon of onion powder, 1 teaspoon of paprika, 1/2 teaspoon of salt, and 1/2 teaspoon of black pepper. Whisk these ingredients until you have a smooth batter without lumps. This batter will coat the cauliflower and give it a nice crunch. Now, add the cauliflower florets to the batter. Gently toss them to coat each piece well. Spread the coated florets in a single layer on the baking sheet. Make sure they are not crowded, as this will help them crisp up nicely. Bake them for about 20 minutes until they start to turn golden brown. While the cauliflower bakes, mix 1 cup of buffalo sauce with 2 tablespoons of olive oil in a small bowl. Stir well to combine. After 20 minutes, take the baking sheet out. Use tongs to transfer the baked cauliflower into the buffalo sauce mixture. Toss gently until every floret is covered in sauce. Return the sauced cauliflower to the baking sheet in a single layer. Bake again for another 10-15 minutes. This will make them extra crispy and give them a slight char. Once they are done, remove them from the oven and let them cool for a few minutes. Before serving, sprinkle fresh parsley on top for a pop of color. Enjoy your buffalo cauliflower bites! For a complete recipe, refer to the Full Recipe. To make your buffalo cauliflower bites crispy, follow these tips: - Baking Tips: Always preheat your oven to 450°F (230°C). This high heat helps to create a crunchy texture. Use parchment paper on your baking sheet to keep them from sticking. - Spacing Florets: When you spread the cauliflower on the baking sheet, give them space. If they touch, they will steam instead of bake. This can lead to soggy bites. Keep them in a single layer for the best crunch. Want to boost the flavor of your bites? Here are some suggestions: - Spice Adjustments: You can change the spice level by adding more garlic powder or a pinch of cayenne pepper. This will add heat without overwhelming the flavor. - Homemade Buffalo Sauce: Using homemade buffalo sauce can take your bites to the next level. You can mix hot sauce with melted butter and a bit of vinegar for a perfect blend. This way, you control the heat and flavor to match your taste! These tips will help you create buffalo cauliflower bites that are not only crispy but also packed with tasty flavors. {{image_4}} Frying buffalo cauliflower bites gives a different texture. If you want them crispy all over, try frying instead of baking. 1. Heat oil: Use about 1 inch of vegetable oil in a deep pan and heat it to 350°F (175°C). 2. Prepare cauliflower: Follow the same steps to coat the cauliflower with batter. 3. Fry in batches: Carefully add a few florets at a time to the hot oil. Fry for about 5-7 minutes, until golden and crispy. 4. Drain and season: Once done, place the fried bites on paper towels to absorb excess oil. Immediately toss them in buffalo sauce. This method makes the bites extra crunchy! You can easily swap some ingredients to suit your needs. - Gluten-free flour alternatives: Use almond flour, chickpea flour, or gluten-free all-purpose flour. Each option works well and keeps the batter light. - Vegan options for batter ingredients: Replace water with unsweetened plant milk. This adds a rich flavor while keeping it vegan. You can also add a bit of ground flaxseed mixed with water as an egg substitute for extra binding. These swaps keep your buffalo cauliflower bites tasty while meeting different dietary needs. For the full recipe, you can refer back to the beginning! To keep your buffalo cauliflower bites fresh, store them properly. First, let the leftovers cool to room temperature. Then, place them in an airtight container. You can refrigerate them for up to three days. If you want to keep them longer, freezing is a great option. Just wrap them tightly in plastic wrap and place them in a freezer bag. They can stay frozen for up to two months. Reheating these bites can be tricky. You want to keep them crispy. The best method is to use an oven. Preheat your oven to 375°F (190°C). Spread the cauliflower bites on a baking sheet. Bake them for about 10-15 minutes. This will help restore their crunch. You can also use an air fryer if you have one. Just set it to 350°F (175°C) and heat for 5-7 minutes. This method also keeps them crispy and delicious. Can I make buffalo cauliflower bites ahead of time? Yes, you can prepare these bites ahead of time. You can coat the cauliflower in batter and bake it. Then, store the baked florets in the fridge for up to two days. When ready to eat, just add the buffalo sauce and bake again. This keeps them crispy and flavorful. What dipping sauces pair well with buffalo cauliflower bites? Buffalo cauliflower bites taste great with several dipping sauces. Ranch dressing is a classic choice. Blue cheese dressing adds a nice tang. You can also try a creamy avocado dip for a fresh twist. Each sauce brings out different flavors, so feel free to mix and match! How do I adjust spice levels for different palates? To adjust the spice level, choose a milder buffalo sauce. You can mix in some honey or yogurt for sweetness and creaminess. If you want more heat, add cayenne pepper to the batter or use a hotter sauce. Taste as you go to find the right balance for you. Is it possible to make these bites in an air fryer? Yes, you can make buffalo cauliflower bites in an air fryer! Preheat your air fryer to 400°F (200°C). Cook the battered florets for about 12-15 minutes, shaking the basket halfway through. This method gives you a crispy texture while using less oil. Perfect for a quick and healthy snack! You learned how to make delicious buffalo cauliflower bites. We covered ingredients, preparation, baking, and storage tips. You now have techniques for crispiness and flavor boosts. Remember, you can tweak the recipe to fit your taste. Whether you choose to bake or fry, these bites will be a hit. Store leftovers properly to keep them tasty. Enjoy experimenting with sauces and spice levels. Buffalo cauliflower is not just easy; it's fun! Share this recipe with friends and enjoy it together. Happy cooking!

Buffalo Cauliflower Bites Crispy and Simple Recipe

Looking for a tasty, easy snack? Buffalo Cauliflower Bites are your answer! These crispy bites pack all the flavor of

For a tasty batch of spicy garlic edamame, you need just a few key ingredients. Here’s what you will need: - 1 pound fresh or frozen edamame in pods - 4 tablespoons extra virgin olive oil - 4 cloves garlic, finely minced - 1 tablespoon red pepper flakes (adjust for spice level) - 1 tablespoon soy sauce - 1 teaspoon toasted sesame oil - 1 teaspoon freshly squeezed lime juice - Salt, to taste - Toasted sesame seeds, for garnish - Chopped green onions, for garnish Each ingredient plays a vital role in building flavor. The edamame offers a nutty base. The olive oil gives richness, while garlic adds depth. Red pepper flakes bring the heat, and soy sauce adds umami. Lime juice brightens the dish, making it fresh. For garnishes, toasted sesame seeds add crunch. Chopped green onions offer a burst of color and flavor. These little touches make your dish pop! Check out the Full Recipe for detailed instructions that will help you create this simple yet flavorful snack. 1. Cooking edamame according to package instructions If you use frozen edamame, boil a large pot of salted water. Add the edamame pods and cook for 3 to 5 minutes. They should be tender but still firm. Drain and set aside. 2. Sautéing garlic and spices In a large skillet, pour in the olive oil. Heat it over medium heat until it shimmers. Add the minced garlic and sauté for 1 to 2 minutes. Stir it often until it smells great and turns golden. Be careful not to burn it. 3. Combining ingredients in the skillet Add red pepper flakes, soy sauce, and toasted sesame oil to the skillet. Stir well and let it simmer for 1 minute. Now, gently fold in the cooked edamame. Make sure every pod gets coated with the spicy garlic mix. Sauté for another 2 to 3 minutes until everything is heated through. 1. Adding lime juice and seasoning Remove the skillet from heat. Drizzle the mixture with fresh lime juice. Season it with salt to taste, then stir everything together for an even flavor. 2. Transfer to the serving dish Move the spicy edamame to a serving bowl. Their bright color will catch the eye. Top it with toasted sesame seeds and chopped green onions just before serving. For full details, refer to the Full Recipe. To get the best garlic flavor, use fresh garlic. Mince it finely for a strong taste. Sauté the garlic in olive oil over medium heat. Watch it closely, so it does not burn. A golden color means it is ready. This step adds a rich aroma and depth to the dish. You can adjust spice levels by using red pepper flakes. Start with one tablespoon, then taste the mix. If you want it spicier, add more flakes a little at a time. This way, you control the heat. Spicy garlic edamame pairs well with many dishes. Serve it with sushi or rice for a great meal. You can also enjoy it as a snack with drinks. To enhance presentation, use a rustic bowl for serving. Scatter toasted sesame seeds on top for crunch. Add chopped green onions for a pop of color. Place lime wedges around the bowl. This adds zest and invites enjoyment. For the full recipe, check out Fiery Garlic Edamame Delight. {{image_4}} You can change the taste of spicy garlic edamame by adding different spices or sauces. For example, try adding a splash of sriracha for extra heat. You can also mix in some ginger for a bright, fresh flavor. If you want a smoky touch, add smoked paprika. Other vegetables can also join the fun. Toss in some sliced bell peppers or snap peas to add color and crunch. You might even try mushrooms for an earthy flavor. Each addition can give your edamame a unique twist. Spicy garlic edamame is naturally vegan and gluten-free, making it great for many diets. If you want to make it even healthier, focus on the oil. Swap the olive oil for avocado oil if you prefer. You can also replace edamame with other legumes. Chickpeas or black beans work well too. They will soak up the sauce and provide a different texture. This change can keep your snack fresh and fun. For the full recipe, check out the spicy garlic edamame delight! To keep your spicy garlic edamame fresh, cool them down quickly. Place the leftovers in a shallow container. This helps them cool faster and stay safe. Use an airtight container for the best results. Store them in the fridge for up to three days. When you refrigerate edamame, make sure they are at room temperature first. This stops moisture buildup, which can cause sogginess. If you want to save them longer, consider freezing. When it's time to eat your leftovers, you want them to taste great. For reheating, I suggest using a skillet. Heat the skillet on medium and add a little olive oil. Add the edamame and stir them for a few minutes. This method keeps them crispy and flavorful. You can also use the microwave. Place them in a microwave-safe bowl and cover it. Heat in short bursts, stirring in between, to avoid overcooking. If you want to store your edamame for a long time, freeze them. Place cooled edamame in a freezer bag, removing as much air as possible. They can last for up to three months. For more about making this delicious snack, check out the Full Recipe. What is the best way to cook frozen edamame? The best way to cook frozen edamame is to boil them. Start by bringing a large pot of salted water to a boil. Add the frozen edamame and cook for 3-5 minutes, or until they are tender but still firm. Drain the edamame and set them aside. This method keeps the edamame bright green and delicious. Can I use shelled edamame for this recipe? Yes, you can use shelled edamame! It will change the texture a bit. Shelled edamame cooks faster and is easier to eat. Just adjust the cooking time to about 2-3 minutes in the boiling water. Add the shelled edamame to the spicy garlic mix for a quick snack. Caloric and nutritional breakdown of spicy garlic edamame One serving of spicy garlic edamame has about 150 calories. It provides 9 grams of protein, 10 grams of fat, and 5 grams of carbs. The garlic and spices add flavor with minimal calories. Health benefits of edamame and garlic Edamame is rich in protein and fiber. This makes it great for muscle repair and digestion. Garlic has many health benefits too. It may boost your immune system and has anti-inflammatory properties. Together, they make a tasty and healthy snack. What can I use instead of soy sauce? If you need a soy sauce alternative, try tamari or coconut aminos. Both give a salty flavor without gluten. You can also use liquid aminos for a similar taste. Alternatives for olive oil and sesame oil? For olive oil, you can use avocado oil or canola oil. These options have a mild taste. If you need a sesame oil substitute, try peanut oil. It adds a nutty flavor that works well with the spices. In this blog post, I walked you through making spicy garlic edamame. We covered key ingredients, step-by-step instructions, and helpful tips. You learned how to get the best garlic flavor and adjust spice levels. We also explored variations for different tastes and dietary needs. Lastly, I shared storage tips to keep your leftovers fresh. Enjoy this dish's vibrant flavor and nutritious benefits. Now, you can impress your friends and family with your cooking skills!

Spicy Garlic Edamame Flavorful and Simple Snack

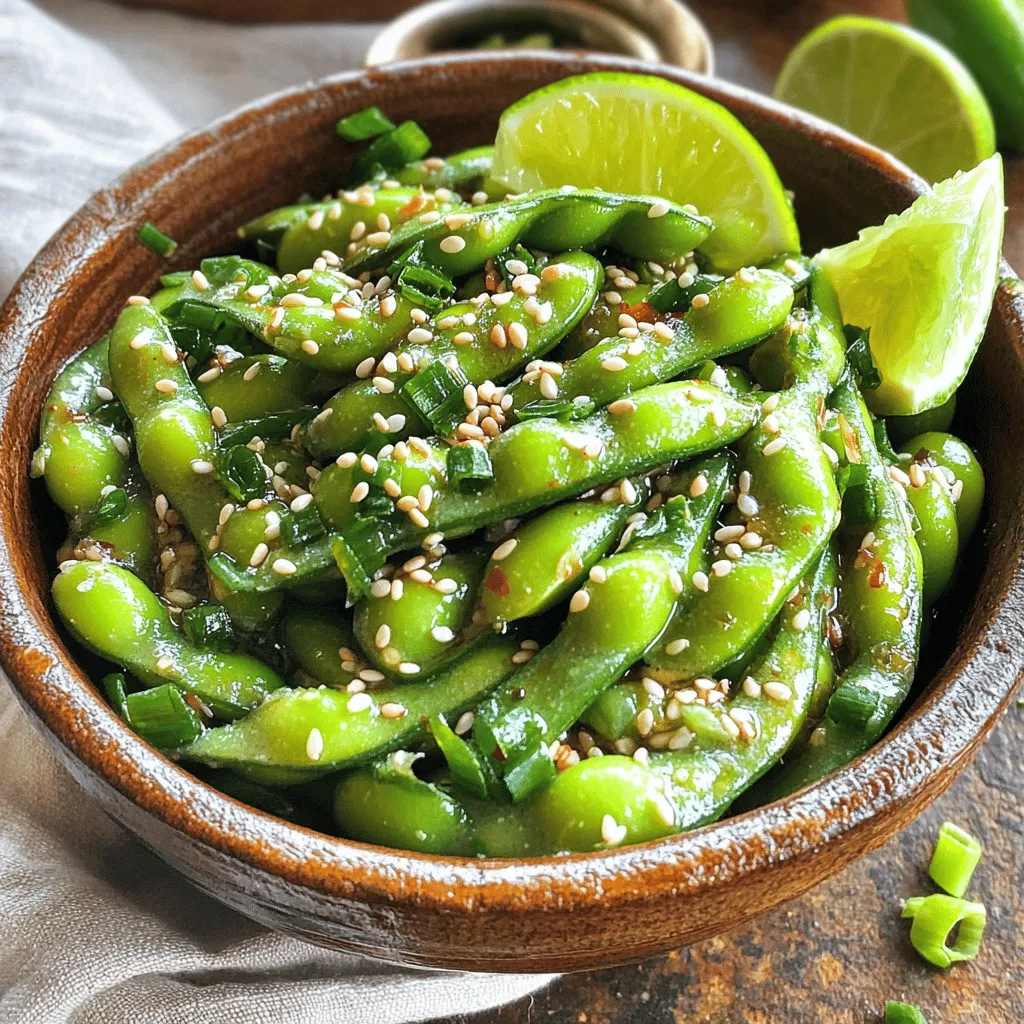
Are you ready to elevate your snacking game? My Spicy Garlic Edamame recipe is packed with bold flavors and is

- 1 can (15 oz) black beans, rinsed and drained - 1 can (15 oz) sweet corn, drained - 1 red bell pepper, diced into small cubes - 1 green bell pepper, diced into small cubes - 1 small red onion, finely chopped - 1 cup cherry tomatoes, halved - 1 ripe avocado, diced into bite-sized pieces - 1/4 cup fresh cilantro, finely chopped - 2 tablespoons fresh lime juice - 1 tablespoon extra virgin olive oil - 1 teaspoon ground cumin - 1 teaspoon chili powder - Salt and freshly ground black pepper to taste These ingredients combine to create a fresh and vibrant Southwest Black Bean Salad. Each component adds flavor, texture, and nutrition to the dish. The black beans provide protein and fiber, while the sweet corn adds a pop of sweetness. The bell peppers and cherry tomatoes bring a crisp bite, and the avocado offers creamy richness. - Alternative beans: You can use pinto beans or kidney beans if you prefer. Both add unique flavors. - Fresh vs canned: Fresh ingredients are great, but canned beans and corn save time. Just rinse and drain. - Lime juice substitutes: If you don’t have lime juice, lemon juice works well. It adds a similar tangy flavor. - Caloric content: This salad is around 200 calories per serving, making it a healthy choice. - Macronutrient breakdown: Each serving has about 9g of protein, 8g of fat, and 30g of carbs. - Health benefits of key ingredients: Black beans are high in fiber, which helps digestion. Avocado provides healthy fats. Bell peppers are full of vitamins A and C. This salad is not just tasty; it’s also good for you. The mix of colorful ingredients makes it a feast for both the eyes and the stomach. For a full step-by-step guide, check out the Full Recipe. 1. Start by rinsing and draining the black beans. This helps remove extra salt and makes them taste fresh. 2. Next, drain the sweet corn. This adds a nice sweetness to the salad. 3. Now, chop the red and green bell peppers into small cubes. They add crunch and color. 4. Finely chop the red onion. This gives a nice sharp flavor. 5. Halve the cherry tomatoes. Their juiciness brightens up the dish. 6. Finally, dice the avocado into bite-sized pieces. This brings creaminess to the salad. 1. In a large bowl, combine the black beans and sweet corn. This will be the hearty base for your salad. 2. Add the diced red and green bell peppers, chopped onion, and halved cherry tomatoes. Stir gently to mix. 3. Carefully fold in the diced avocado and chopped cilantro. Be gentle to keep the avocado intact. 4. In a small bowl, whisk together the lime juice, olive oil, cumin, chili powder, salt, and pepper. This dressing packs a lot of flavor. 5. Drizzle the dressing over the salad mixture and toss gently. Make sure everything gets coated. 1. Taste your salad. Adjust the seasoning if needed. Add more salt, pepper, or lime juice to your liking. 2. For the best flavor, chill the salad in the fridge for at least 30 minutes. This lets the flavors blend well. For the full recipe, check out the details above. Enjoy this fresh and vibrant Southwest Black Bean Salad! To boost the flavor, marinate the salad for at least 30 minutes. This helps the taste blend well. You can add more spices like smoked paprika or cayenne pepper for extra heat. These spices bring a smoky profile that pairs nicely with the beans. To keep avocado from becoming mushy, add it last. Fold it in gently. Use fresh veggies like bell peppers, corn, and onions for a nice crunch. Toasted nuts or seeds can also add a delightful texture contrast. Pair the salad with grilled chicken or fish for a complete meal. You can also serve it in taco shells for a fun twist. Try using it as a topping for nachos or a filling for burritos. Serve it chilled for a refreshing dish on hot days. For the full recipe, check out [Full Recipe]. {{image_4}} You can make this Southwest Black Bean Salad your own. One easy way is to swap beans. Use pinto, kidney, or chickpeas. Each option adds a unique taste. You can also add proteins. If you want chicken, grill or sauté it first. For a plant-based option, try cubed tofu. Both add heartiness to your salad. The dressing is key to flavor. You can spice it up by adding jalapeños or hot sauce. This gives a nice kick to the dish. For a creamy twist, mix in some Greek yogurt or sour cream. This adds richness and balances the other flavors. Change your salad with the seasons. In winter, add roasted sweet potatoes or butternut squash. These ingredients provide warmth and comfort. In summer, go for fresh herbs like basil or mint. You can also toss in seasonal fruits like mango or peaches for a refreshing twist. For the full recipe, check out the Southwest Black Bean Fiesta Salad. Store your Southwest Black Bean Salad in an airtight container. This keeps it fresh longer. Use glass or BPA-free plastic containers for best results. In the fridge, it lasts about 3 to 5 days. Yes, you can freeze the salad, but it may change texture. If freezing, use a freezer-safe container. To thaw, place it in the fridge overnight. This helps keep the salad from becoming mushy. To re-serve, take the salad out of the fridge. Give it a gentle stir and check the flavors. If it needs a boost, add more lime juice or salt. This will revive its bright taste. Enjoy the salad fresh for the best experience. For the full recipe, check out the detailed instructions and enjoy every bite! Can I omit certain ingredients? Yes, you can. This salad is very flexible. If you dislike an ingredient, simply leave it out. For example, skip the red onion if you prefer less bite. You can also add other veggies like cucumbers or jalapeños for a twist. What if I don't have lime juice? If you lack lime juice, use lemon juice instead. It gives a similar tang. You can also try vinegar, like apple cider vinegar. Just remember to use a smaller amount, as vinegar can be stronger. How to make it vegan? This salad is already vegan! All ingredients are plant-based. You can enjoy it without worrying about animal products. It’s packed with flavors and nutrients. How long does it take to prepare? The prep time is about 15 minutes. If you chill it, total time is 45 minutes. This allows the flavors to blend nicely. You’ll have a tasty salad ready in no time. Is it gluten-free? Yes, this salad is gluten-free. It uses beans and veggies, which do not contain gluten. It’s a great choice for those with gluten sensitivities. What are the health benefits of black beans? Black beans are very nutritious. They are high in protein and fiber. This helps keep you full. They also contain antioxidants and support heart health. Eating black beans can help stabilize blood sugar too. This blog post showed you how to make a delicious salad. We covered key ingredients like black beans and corn, plus how to prepare and mix them. You learned substitutions for ingredients and their nutritional benefits. I shared tips for flavor and texture, along with creative serving ideas. Remember, feel free to experiment with variations. With these steps, you can enjoy tasty meals while staying healthy. Dive in, get creative, and enjoy every bite!

Southwest Black Bean Salad Flavorful and Fresh Recipe

Are you ready to spice up your meals with a dish that’s both fresh and flavorful? This Southwest Black Bean

To make baked cinnamon sugar donut holes, you need simple ingredients that create a big flavor. Here’s what you’ll need: - 1 cup all-purpose flour - 1/2 cup granulated sugar - 1/2 teaspoon baking powder - 1/4 teaspoon baking soda - 1/4 teaspoon salt - 1/2 teaspoon ground cinnamon - 1/4 cup unsweetened applesauce - 1/4 cup milk - 1 large egg - 2 tablespoons melted butter - 1/2 teaspoon vanilla extract - 1/4 cup granulated sugar (for coating) - 1 tablespoon ground cinnamon (for coating) These ingredients come together easily. The applesauce adds moisture and a bit of sweetness. The cinnamon gives that warm flavor we all love. You will enjoy how quick this recipe is. You can find the full recipe at the end of this section. It's simple to follow and uses common kitchen staples. Getting these items ready ensures your baking will go smoothly. First, you need to preheat your oven to 350°F (175°C). This step is key for even baking. While the oven heats, grease a mini muffin tin with non-stick cooking spray. This ensures your donut holes pop out easily after baking. In a medium bowl, whisk together your dry ingredients. You will need 1 cup of all-purpose flour, 1/2 cup of granulated sugar, 1/2 teaspoon of baking powder, 1/4 teaspoon of baking soda, 1/4 teaspoon of salt, and 1/2 teaspoon of ground cinnamon. Make sure to blend them well. If you see lumps, break them up. In another bowl, mix your wet ingredients. Use 1/4 cup of unsweetened applesauce, 1/4 cup of milk, 1 large egg, 2 tablespoons of melted butter, and 1/2 teaspoon of vanilla extract. Stir until this mixture is smooth. Now, pour the wet mixture into the bowl of dry ingredients. Gently stir the batter until just combined. It’s important not to overmix. Doing so might make your donut holes dense instead of light and fluffy. Using a spoon or a small ice cream scoop, fill each cup of the prepared mini muffin tin about 3/4 full with the batter. This ensures they have room to rise without spilling over. Place the tin in your preheated oven. Bake for about 10-12 minutes. You’ll know they are done when the tops are golden brown and a toothpick comes out clean from the center. While your donut holes bake, prepare the cinnamon sugar. In a shallow bowl, mix together 1/4 cup of granulated sugar and 1 tablespoon of ground cinnamon. Stir well to blend the two together. Once baked, let the donut holes cool in the pan for about 5 minutes. Then, transfer them to a wire rack to cool slightly. While they are still warm, toss each donut hole in the cinnamon sugar mixture. Make sure they are fully coated for that sweet goodness. Enjoy them warm for the best flavor! To get that soft, fluffy bite, use room temperature ingredients. This helps the batter mix better. Be careful not to overmix. Stir until just combined; this keeps your donut holes airy. Also, using applesauce adds moisture without making them heavy. Fill your muffin tin evenly. This ensures all donut holes bake at the same rate. If you have a mini muffin tin, use it! These small treats cook faster and are easier to eat. Rotate the tin halfway through baking for a golden color all around. Want to spice it up? Add nutmeg or vanilla extract to the batter. Both add depth and warmth. You can also experiment with the coating. Try mixing in a bit of cocoa powder or citrus zest with your cinnamon sugar. It’s fun to play with flavors! Check out the Full Recipe for more ideas. {{image_4}} You can add nutmeg or vanilla bean for extra flavor. Nutmeg gives a warm, spicy note. Just add a pinch when mixing your dry ingredients. For vanilla bean, scrape the seeds from one pod and mix them into the wet ingredients. This adds a rich, aromatic taste that pairs well with cinnamon. If you want a healthier twist, try whole wheat flour. It adds fiber and nutrients. Replace the all-purpose flour with whole wheat flour in a 1:1 ratio. The donut holes will taste great and still be fluffy. You might notice a slightly nuttier flavor, which many enjoy. You can take these donut holes to the next level with a glaze. A chocolate glaze is perfect for chocolate lovers. Melt chocolate chips with a bit of butter and dip the tops of the donut holes. For a maple glaze, mix powdered sugar with maple syrup and a splash of milk. Drizzle it over the donut holes for a sweet, sticky finish. For the full recipe, visit the section above. To keep your baked cinnamon sugar donut holes fresh, store them in an airtight container. This helps lock in moisture and flavor. Place a paper towel at the bottom to absorb excess moisture. You can store them at room temperature for up to 2 days. If you want to keep them longer, refrigeration is a good option. Just remember, they might lose some softness in the fridge. When you're ready to enjoy your donut holes again, reheating is key. Preheat your oven to 350°F (175°C). Place the donut holes on a baking sheet for about 5-7 minutes. This will warm them through and help them regain some of their original texture. You can also use a microwave, but only heat them for about 10-15 seconds. This option is quicker but may not keep them as fluffy. Freezing your donut holes is easy and a great way to save some for later. First, let them cool completely. Then, place them in a single layer on a baking sheet. Freeze them for about 1-2 hours until firm. Once frozen, transfer them to a freezer-safe bag or container. Label it with the date. They can be stored in the freezer for up to 3 months. When you're ready, thaw them in the fridge overnight or at room temperature for a few hours. Enjoy them warm for the best taste! Yes, you can use mashed banana or yogurt. Both options add moisture and flavor. If you prefer, try a nut butter for a different taste. Each substitute will change the flavor slightly, but they all work well in this recipe. To make gluten-free donut holes, swap all-purpose flour with a gluten-free blend. Look for a blend that contains xanthan gum for the best results. This will help mimic the texture of regular flour and give you light, tasty donut holes. Baked donut holes stay fresh for about three days. Store them in an airtight container at room temperature. If you want them to last longer, refrigerate them for up to a week. Just remember, they taste best when fresh! Yes, you can use a regular muffin tin! Just fill each cup halfway. Bake them a bit longer, around 12-15 minutes. Keep an eye on them; they should be golden brown and spring back when touched. Check for a golden top and a toothpick inserted into the center. If it comes out clean, your donut holes are ready. They should feel springy when touched. Underbaking slightly is okay; they will continue cooking out of the oven. You learned about making delicious donut holes with simple ingredients. We covered how to mix dry and wet ingredients, bake, and coat them. I shared tips for the best texture and flavor, plus storage information. Now, you can enjoy these tasty treats at home. Experiment with flavors or healthier options. Making donut holes is fun and rewarding, so get creative! Your kitchen will smell amazing. Enjoy baking!

Baked Cinnamon Sugar Donut Holes Quick and Easy Treat

Are you craving a sweet treat but want to keep it simple? Let’s make Baked Cinnamon Sugar Donut Holes! This

Older posts
Newer posts
← Previous Page1 … Page13 Page14 Page15 … Page91 Next →

dsad

© 2025 dailydishcraft • Built with GeneratePress

Our Policies

  • Copyright Policy
  • Cookie Policy
  • GDPR Policy
  • Privacy Policy
  • Disclaimer
  • Terms Of Use

More Information

  • Home
  • About
  • Contact
  • Appetizers
  • Dessert
  • Dinner
  • Drinks
©2025, dailydishcraft About Back To Top