Skip to content
DisclaimerTerms Of UseGDPR PolicyCookie Policy

dailydishcraft

  • Home
  • Drinks
  • Appetizers
  • Dinner
  • Dessert
  • About
  • Contact
  • Privacy Policy
DisclaimerTerms Of UseGDPR PolicyCookie Policy

Jessica

- 8 oz penne pasta - 1 pound chicken sausage, sliced into rounds - 3 cloves garlic, finely minced - 1 bell pepper (red or yellow), diced into small pieces - 1 medium zucchini, cut into half-moons Penne pasta is great because it holds sauce well. Chicken sausage adds a nice flavor and protein. Garlic gives a lovely aroma, while bell pepper and zucchini add color and crunch. - 1 cup heavy cream - 1 cup freshly grated Parmesan cheese - 4 cups low-sodium chicken broth Heavy cream makes the sauce rich and smooth. Parmesan cheese adds a salty kick. Low-sodium chicken broth keeps it light and tasty. - 2 tablespoons olive oil - 1 teaspoon Italian seasoning blend - Salt and freshly ground black pepper to taste - Fresh basil leaves, torn for garnish Olive oil helps cook the sausage and veggies. Italian seasoning brings a warm flavor. Salt and pepper enhance the dish, while fresh basil adds a bright touch. {{ingredient_image_2}} Start by heating 2 tablespoons of olive oil in a large pot or Dutch oven over medium heat. Once the oil shimmers, add 1 pound of sliced chicken sausage. Cook the sausage for about 5 to 7 minutes, stirring occasionally. You want it to become nicely browned. Next, add 3 cloves of minced garlic, 1 diced bell pepper, and 1 medium zucchini cut into half-moons. Sauté these ingredients for an additional 3 to 4 minutes. This step helps the vegetables soften and release their sweet flavors. Now it’s time to add the pasta! Carefully pour in 4 cups of low-sodium chicken broth and 8 oz of penne pasta. Stir well to make sure the pasta is fully submerged. Increase the heat to bring the mixture to a gentle boil. Once boiling, reduce the heat to low and cover the pot. Let it simmer for 12 to 15 minutes, stirring occasionally. You want the pasta to be al dente and most of the broth absorbed. After the pasta is cooked, reduce the heat to low again. Stir in 1 cup of heavy cream, 1 cup of freshly grated Parmesan cheese, and 1 teaspoon of Italian seasoning. Mix everything thoroughly until the cheese melts and the pasta becomes coated in a creamy sauce. Taste the dish and add salt and freshly ground black pepper to your liking. Remove the pot from heat and let it sit for a couple of minutes. This helps the sauce thicken slightly. Before serving, garnish with torn fresh basil leaves for a burst of color and flavor. To get that perfect pasta texture, cook the penne to al dente. This means it should be firm yet tender. Keep an eye on it while it simmers. If you find the sauce too thin, leave it on low heat for a bit longer. Stir gently to avoid sticking. If it gets too thick, you can add a little chicken broth to loosen it up. Balance is key! For richer flavors, use fresh herbs like basil or parsley. Fresh herbs add life to any dish. I love using quality grated Parmesan cheese. It melts beautifully and adds depth. Feel free to experiment with different cheeses, too. A sharp cheese can really elevate the dish. Serve your pasta in shallow bowls for a nice look. Sprinkle extra grated Parmesan on top. This adds texture and taste. Don’t forget a few fresh basil leaves for color. Drizzling a bit of olive oil on top can add shine and flavor. These simple tips can make your meal feel special! Pro Tips Choose Quality Sausage: Opt for chicken sausage that is made with high-quality ingredients for the best flavor. Vegetable Variations: Feel free to substitute or add other vegetables like spinach or mushrooms for extra nutrition and flavor. Cheese Options: For a twist, try incorporating different cheeses like mozzarella or a blend of Italian cheeses to enhance creaminess. Leftovers Storage: Store leftover pasta in an airtight container in the fridge for up to 3 days. Reheat with a splash of broth to revive the sauce. {{image_4}} You can easily switch up the chicken sausage and pasta in this dish. If you want a different flavor, try turkey or pork sausage. For a lighter touch, chicken breast works too. As for pasta, penne is great, but you can use rotini, fusilli, or even whole wheat options. Each type gives a new shape and texture. Making this dish fit your diet is simple. To go gluten-free, just pick gluten-free pasta. For a dairy-free meal, swap the heavy cream with coconut milk or a dairy-free cream. You can also skip the cheese or use a nut-based cheese. If you want it vegan, choose plant-based sausage and remove all dairy. Add your own twist by using different spices or cheeses. Want a kick? Try adding crushed red pepper flakes. You might like smoked paprika for a smoky taste. Instead of Parmesan, switch to feta or goat cheese for a tangy flavor. Fresh herbs like thyme or oregano can also boost the taste. Each change offers a new way to enjoy this creamy delight. To keep your creamy chicken sausage pasta fresh, use airtight containers. Glass containers work best, but plastic ones are fine too. Make sure to cool the pasta to room temperature before sealing. Store it in the fridge for up to three days. This way, you can enjoy it later without losing flavor. When you want to enjoy your leftovers, use the stovetop or microwave. For the stovetop, add a splash of broth or cream to the pasta. Heat it on low, stirring gently until warm. This helps keep the sauce creamy. If using the microwave, place the pasta in a bowl and cover it with a damp paper towel. Heat in short bursts, stirring in between, until hot. If you want to save some for later, freezing is a great option. First, let the pasta cool completely. Then, portion it into freezer-safe bags or containers. Squeeze out excess air before sealing. You can freeze it for up to three months. To thaw, move the pasta to the fridge overnight. Reheat it gently on the stovetop, adding a bit of cream if needed for texture. Yes, you can use many types of sausage. Italian sausage adds a nice kick. Turkey or pork sausage works well too. If you prefer a different flavor, try chorizo or smoked sausage. Each type gives a unique taste to the dish. Just make sure to adjust cooking times based on the sausage type. Absolutely! This pasta dish is perfect for meal prep. It stores well in the fridge for up to three days. To meal prep, divide the pasta into containers after cooking. This makes it easy to grab for lunch or dinner. You can reheat it in the microwave or on the stove. Just add a splash of broth or cream to keep it moist. If you want more heat, there are several easy ways to spice it up. Add red pepper flakes when cooking the sausage. You can also mix in diced jalapeños or a splash of hot sauce. For a unique twist, try adding a dash of cayenne pepper. Taste as you go to find your perfect spice level. This blog post covered a creamy pasta recipe featuring chicken sausage and fresh veggies. You learned how to prepare the base, cook the pasta, and create a rich sauce. I shared tips to enhance texture and flavor, plus variations for dietary needs. Remember to store leftovers correctly for best taste. With this knowledge, you can whip up a delicious meal that suits your needs and preferences. Enjoy making this dish your own while impressing your friends and family!

Creamy One-Pot Chicken Sausage Pasta Simple Delight

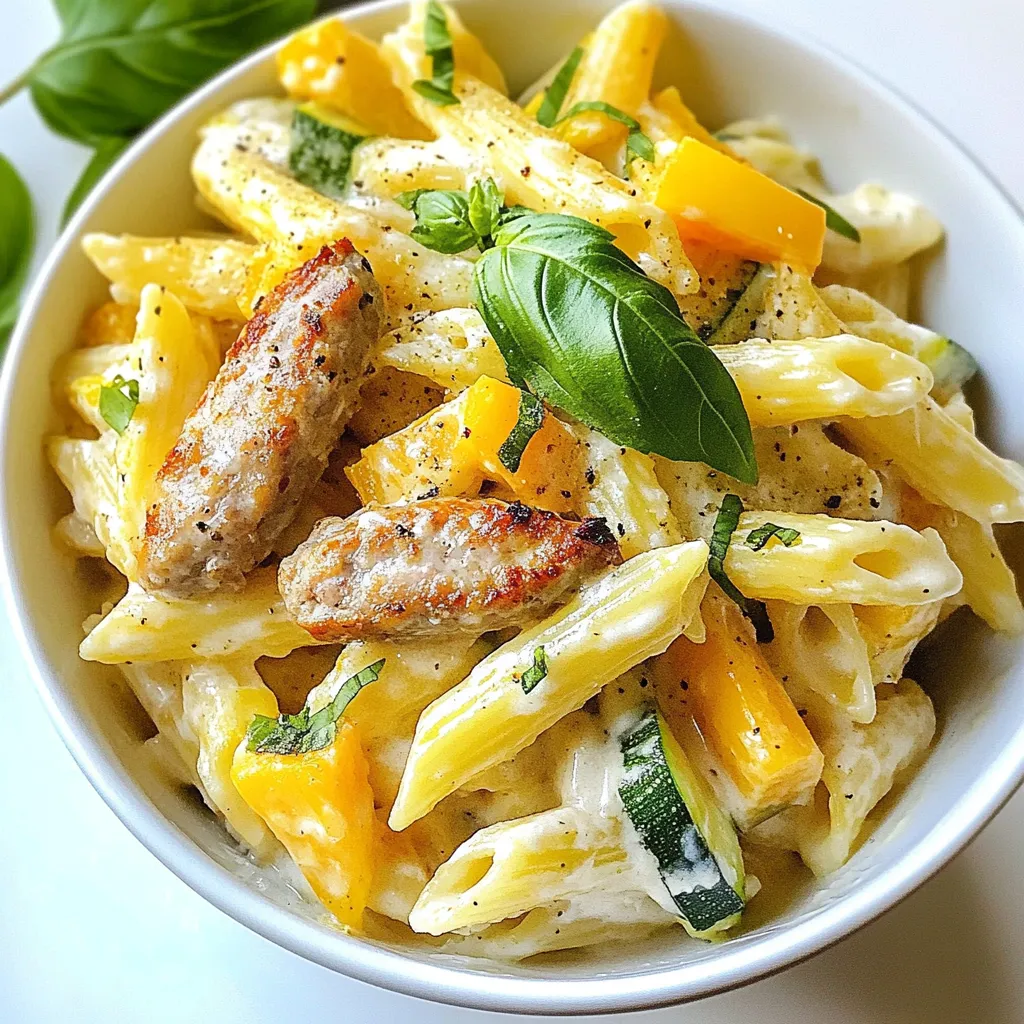
Are you ready for a dinner that’s easy, creamy, and full of flavor? My Creamy One-Pot Chicken Sausage Pasta is

- 1 ½ cups graham cracker crumbs - 1/3 cup granulated sugar - 1/2 cup unsalted butter, melted - 2 cups sweetened condensed milk - 3/4 cup fresh key lime juice - 1 tablespoon lime zest - 3 large egg yolks - Pinch of salt - Whipped cream - Lime slices When making these key lime pie bars, each ingredient plays a key role. The graham cracker crust is both crunchy and sweet. It holds the filling inside. The combination of graham cracker crumbs and sugar makes it perfect. The melted butter helps bind it all together. The filling is what makes these bars stand out. Sweetened condensed milk gives it a creamy texture. Fresh key lime juice brings a bright, tangy flavor. Lime zest adds a burst of aroma. The egg yolks help set the filling, giving it a smooth finish. For garnishes, whipped cream adds a nice touch. Lime slices make the bars look fancy. They also give extra flavor. You can use any of these toppings to make your bars even better. Enjoy the process of making these delightful treats! {{ingredient_image_2}} 1. Preheat your oven to 350°F (175°C). This step is key for a perfect crust. 2. In a mixing bowl, combine 1 ½ cups of graham cracker crumbs and 1/3 cup of granulated sugar. Make sure they mix well. 1. Pour in 1/2 cup of melted butter. Stir until it looks crumbly. You want it to feel like wet sand. 2. Take this mixture and press it into an 8x8 inch baking pan. Use your fingers or a measuring cup to press it down evenly. 3. Bake the crust for 8-10 minutes. Look for a light golden color. Once baked, set it aside to cool slightly. 1. In a separate bowl, whisk together 2 cups of sweetened condensed milk, 3/4 cup of fresh key lime juice, 1 tablespoon of lime zest, and 3 large egg yolks. 2. Add a pinch of salt. Keep whisking until it’s smooth with no lumps. 1. Carefully pour the key lime filling over the cooled crust. Use a spatula to spread it evenly. 2. Bake for another 15-20 minutes. The filling should be set but still slightly jiggly in the center. 3. After baking, let the bars cool to room temperature. Then, chill them in the refrigerator for at least 3 hours until firm. 4. Once chilled, slice them into squares. If you like, top each square with whipped cream and a slice of lime. To make a great crust, start by pressing the crumbs evenly. Use the back of a measuring cup or your fingers. Make sure it is compact and smooth. This helps the crust hold its shape. Bake it for 8 to 10 minutes. You want it to turn a light golden color. This golden hue adds flavor and crunch. For a smooth filling, whisk the ingredients well. Combine the sweetened condensed milk, lime juice, lime zest, egg yolks, and salt in a bowl. Keep whisking until there are no lumps. This step is crucial for a creamy texture. If lumps appear, your bars won’t be as smooth. A well-mixed filling ensures every bite is nice and tangy. When serving, get creative! You can add a dollop of whipped cream on top. A slice of lime can add a nice touch too. These little extras make the bars pop. For drinks, pair them with a refreshing iced tea or lemonade. The cool drinks balance the tartness of the bars. Enjoy making these tasty treats! Pro Tips Use Fresh Key Limes: For the best flavor, always use fresh key limes instead of bottled juice. The zest and juice from fresh limes will provide a vibrant and zesty taste that is characteristic of key lime pie. Cooling is Key: Allow the bars to cool at room temperature before refrigerating. This step helps the filling set properly and enhances the overall texture. Perfectly Cut Bars: For clean cuts, use a sharp knife and rinse it under hot water before slicing. Wipe the knife between cuts to maintain neat edges on your key lime bars. Garnish Wisely: A dollop of whipped cream and a slice of lime not only add elegance but also enhance the flavor contrast. You can also sprinkle some lime zest for added texture and flavor. {{image_4}} You can make these bars even more fun! Add coconut for a tropical twist. Just mix in 1/2 cup of shredded coconut into the filling. You can also try using other citrus fruits. Blood oranges or tangerines can give a unique flavor. Experiment with what you like! Next, think about the crust. You can use crushed vanilla wafers or chocolate cookies instead of graham crackers. Each option will give your bars a new taste. Don’t be afraid to play with flavors! If you need gluten-free options, try using gluten-free graham crackers. They work just as well as regular ones. You can also make the filling dairy-free. Use coconut milk or almond milk sweetened condensed milk. It gives the bars a nice flavor while keeping them creamy. Always check the labels to ensure your substitutes fit your needs. This way, everyone can enjoy these tasty bars! Making mini versions is a great idea! Just use a smaller baking dish, like a 9x5 inch pan. Adjust the ingredients to about half of what you need for the full size. This allows you to create bite-sized treats. When baking mini bars, keep an eye on the time. Bake them for about 12-15 minutes. They should be set but still jiggle a bit in the center. This will keep them soft and easy to eat! Store your key lime pie bars in the fridge. This keeps them fresh and cool. If you leave them at room temp, they can spoil faster. Always cover them with plastic wrap or foil. This prevents them from drying out or picking up other smells. You can freeze key lime pie bars for a longer shelf life. First, let them cool completely in the fridge. Then, cut them into squares. Wrap each square tightly in plastic wrap. Place the wrapped bars in a freezer-safe bag or container. When you're ready to enjoy them, thaw them in the fridge overnight. This way, they stay tasty and fresh. In the fridge, key lime pie bars last about 5 to 7 days. If you freeze them, they can stay good for up to 3 months. Just remember to keep them well-wrapped to avoid freezer burn. Enjoy your delicious treats whenever you want! Yes, you can use regular limes. However, the taste will change. Key limes are smaller and have a more intense flavor. They give the bars a special tang. If you use regular limes, your bars will taste more sour. I recommend mixing half key limes and half regular limes for a balanced flavor. Look for a few signs during baking. The edges will look firm. The center should be slightly jiggly but not liquid. When you gently shake the pan, it should not ripple too much. After cooling, the filling will firm up more in the fridge. You have options! You can use digestive biscuits or vanilla wafers for the crust. Crushing these can give a nice flavor. If you want a nutty taste, try almond flour mixed with a bit of sugar. Just make sure to add enough butter to hold it together. Key lime pie bars are a tasty treat you can easily make at home. We discussed the simple ingredients, like the graham cracker crust and key lime filling. I shared step-by-step baking instructions for perfect results. Remember, you can adjust flavors and even swap ingredients for dietary needs. With these tips, you can impress anyone with your baking skills. Enjoy your delicious key lime pie bars and don’t forget to share them!

Key Lime Pie Bars Delightful and Tangy Treat Recipe

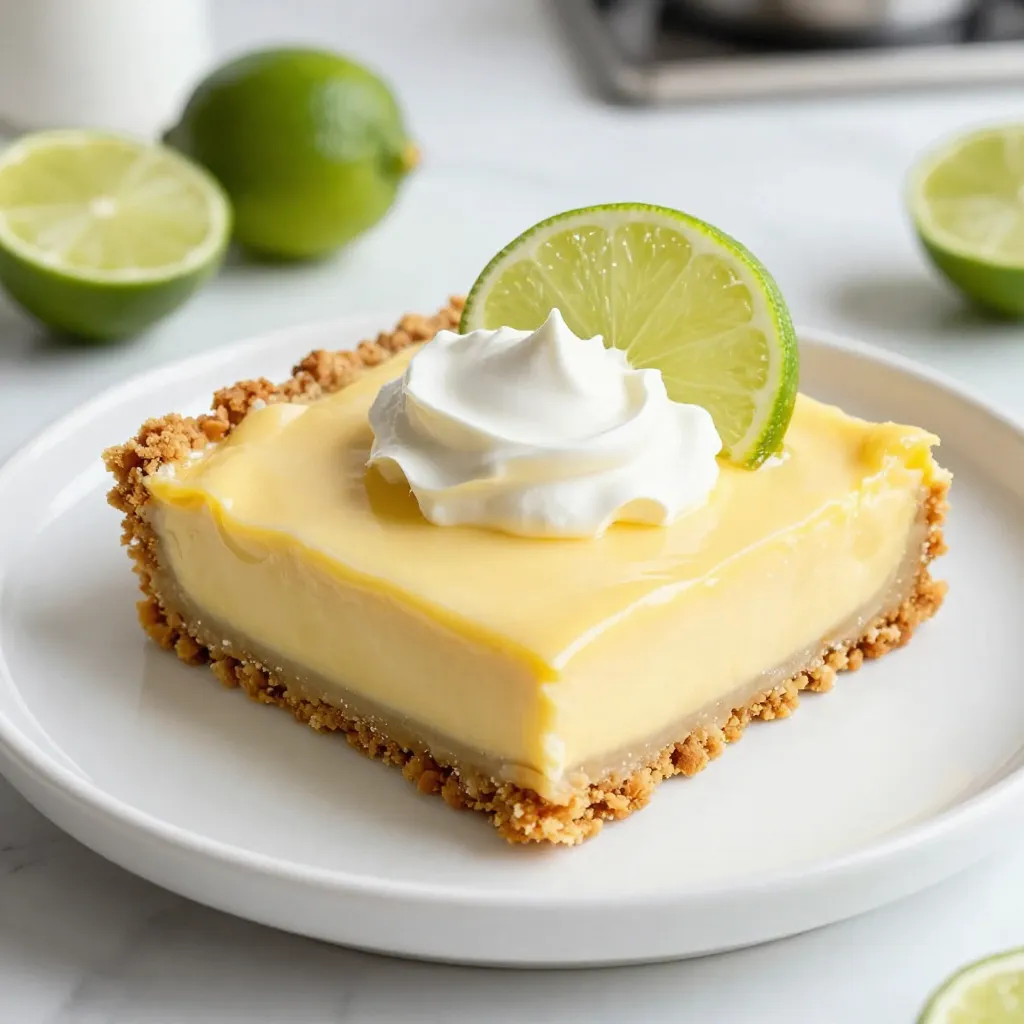
If you crave a sweet yet tangy treat, you’ll love my Key Lime Pie Bars. These bars pack a punch

Here’s what you need to make an Iced Matcha Dalgona Latte. Gather these items before you start: - 2 tablespoons matcha powder - 2 tablespoons hot water - 2 tablespoons sugar (adjust to your taste) - 1 cup milk (choose dairy or plant-based) - 1/2 cup ice cubes - A pinch of sea salt - Whipped cream for topping Matcha powder is key for that vibrant green color and rich flavor. Hot water helps dissolve the matcha. Sugar sweetens the drink, making it more enjoyable. Milk adds creaminess, while ice keeps it refreshingly cold. You can add sea salt for a flavor boost. Whipped cream can make it feel extra special. Make sure to use good quality matcha powder. It makes a big difference in taste. The brighter the color, the better the quality! Keep these tips in mind, and you’ll create a latte that impresses. {{ingredient_image_2}} Mixing Matcha and Hot Water Start by measuring 2 tablespoons of matcha powder. Place it in a bowl. Add 2 tablespoons of hot water. Use a bamboo whisk or electric mixer to mix. Whisk until the mixture is smooth and frothy. This step is key for a great flavor. Achieving Creamy Dalgona Consistency Next, gradually add 2 tablespoons of sugar to your matcha mix. Keep whisking for about 2 to 4 minutes. You want a thick and creamy texture. This is what makes the matcha layer rich and delightful. Filling the Glass with Ice and Milk Take a tall glass and fill it with ½ cup of ice cubes. Pour in 1 cup of your choice of milk, leaving some space at the top. You can use dairy or plant-based milk based on your preference. This cools the drink and makes it refreshing. Topping with Matcha Mixture Now, gently spoon the creamy matcha mixture over the milk. This creates a beautiful layered look. The green matcha should sit on top of the white milk. It’s a feast for the eyes before you even take a sip! Adding Sea Salt and Whipped Cream For a unique twist, sprinkle a pinch of sea salt on top of the matcha. It enhances the flavors and adds a special touch. If you want to indulge more, add a dollop of whipped cream on top. This makes the drink even creamier and more special. Enjoy your iced matcha dalgona latte! Mix it up before sipping to blend the flavors together. - Choosing High-Quality Matcha: Always pick the best matcha you can find. Look for vibrant green powder. High-quality matcha has a sweet, grassy taste. Cheap matcha can taste bitter or dull. - Proper Mixing Techniques: Use a bamboo whisk or electric mixer. Add hot water to matcha powder. Mix it well until it is smooth and frothy. This step is key for good flavor. A well-mixed matcha will stand out in your drink. - Timing for Creaminess: Whip the matcha and sugar together for about 2 to 4 minutes. The longer you whip, the creamier it gets. A thick and fluffy texture makes your drink feel special. - Adjusting Sugar to Taste: Start with 2 tablespoons of sugar, then taste. If you want it sweeter, add more sugar bit by bit. Everyone likes different levels of sweetness, so make it yours! - Presentation Tips for Visual Appeal: Use a clear glass for serving. This shows the beautiful layers of matcha and milk. It looks great and makes you want to take a photo. Add a simple straw for easy sipping. - Recommended Additions: Sprinkle a pinch of sea salt on top. This boosts the flavors. You can also add whipped cream for a richer treat. Consider adding flavored syrups for fun twists! Pro Tips Use Quality Matcha: Opt for high-quality matcha powder for the best flavor and vibrant color in your latte. Adjust Sweetness: Feel free to adjust the amount of sugar according to your taste; you can also substitute with honey or agave syrup. Chill Your Glass: For an extra refreshing drink, chill your glass in the freezer for a few minutes before preparing your latte. Experiment with Milk: Try different types of milk, such as almond or oat milk, to discover your preferred flavor combination. {{image_4}} You can add your favorite flavored syrups to this drink. Vanilla or caramel syrup can give a nice twist. Just mix in about one tablespoon before adding the milk. You could also try infusing with other ingredients. A dash of cinnamon or a hint of mint adds a fun kick. If you want to change the sweetener, you have options. Try honey, agave, or maple syrup instead of regular sugar. Each sweetener brings a unique taste. For milk, think outside the box! Almond, oat, or coconut milk work great. These options offer dairy-free choices and alter the flavor too. In summer, this iced drink is a refreshing treat. You can make it even cooler by blending the ice into the matcha mix. This gives a slush-like texture that’s perfect for hot days. In winter, warm it up! Instead of ice, use steamed milk and skip the ice cubes. Add a sprinkle of nutmeg for a cozy vibe. To keep your Iced Matcha Dalgona Latte fresh, use a clean glass jar. Pour any leftover latte into the jar. Seal it tight and place it in the fridge. This way, you can enjoy it later without losing flavor. If you want to warm your latte, use a microwave or a small pot. Heat it slowly to keep the creamy texture. Stir gently as it warms up. Avoid boiling, as this can ruin the texture and taste. Matcha powder can last up to a year if stored well. Keep it in a cool, dark place. Dairy milk has a shorter life, about a week after opening. Plant-based milk can last longer, usually up to 10 days. Always check dates on the package to be safe. A Dalgona latte is a trendy drink that is creamy and fluffy. It started in South Korea and became popular worldwide. The drink has a whipped coffee or matcha layer on top of milk. You mix the two layers when you drink it. This gives a fun look and a great taste. Yes, you can easily make this recipe vegan. Simply swap dairy milk for plant-based milk. Almond, soy, or oat milk work great. For the sugar, use any sweetener that fits your diet. This way, you keep the creamy texture without using animal products. An Iced Matcha Dalgona Latte usually has around 250-300 calories. This depends on the type of milk and sugar you use. If you choose low-fat or unsweetened milk, you can lower the calorie count. Yes, you can make a Dalgona latte without matcha. Just replace matcha with instant coffee or cocoa powder. Mix it with hot water and sugar the same way. This gives you a different flavor but keeps the fun whipped texture. You learned how to make an Iced Matcha Dalgona Latte. We covered key ingredients like matcha powder, sugar, and milk, plus tips to enhance flavor. You now know how to blend a creamy matcha blend and add personal touches with options like whipped cream. Experiment with flavors and variations to find your favorite. Remember to store your matcha well for the best taste. Enjoy making this fun drink at home as both a treat and a creative project.

Iced Matcha Dalgona Latte Perfectly Creamy Drink

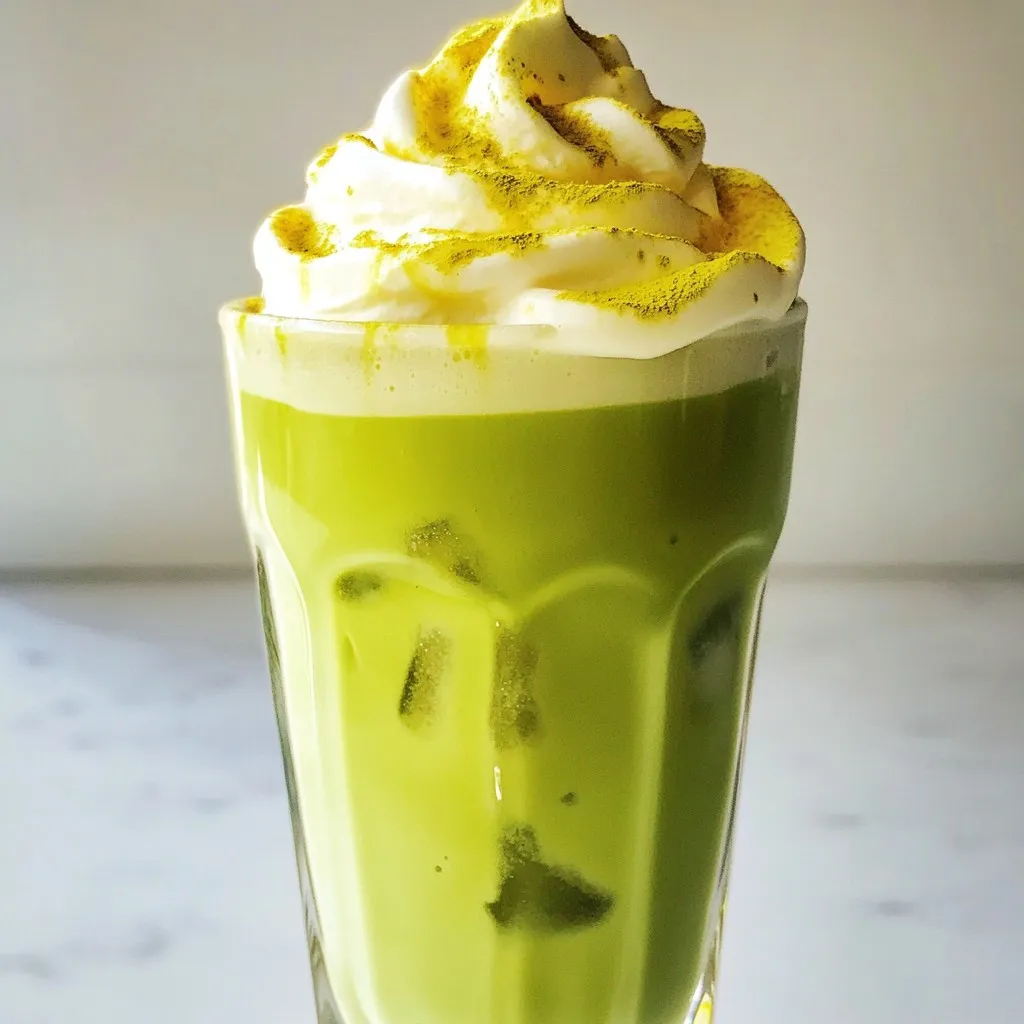
If you’re craving a drink that’s both refreshing and creamy, look no further! The Iced Matcha Dalgona Latte is your

To make Chili Lime Grilled Corn, you'll need a few simple ingredients. Gather these fresh items to get started: - 4 ears of fresh corn, husked - 2 tablespoons chili powder - 1 tablespoon smoked paprika - 1 teaspoon garlic powder - Zest and juice of 1 lime - 3 tablespoons extra virgin olive oil - Salt, to taste - Crumbled feta cheese (optional, for topping) - Fresh cilantro, finely chopped (for garnish) - Lime wedges (for serving) Each ingredient plays an important role. The corn is sweet and crunchy. The chili powder and smoked paprika add warmth and depth. Garlic powder gives it a savory kick. Lime zest and juice bring brightness. Olive oil helps the spices stick and adds a rich flavor. If you like cheese, crumbled feta adds a creamy touch. Fresh cilantro gives it a nice color and zest. Lime wedges are perfect for extra tang when serving. Make sure to choose the freshest corn you can find. The better the corn, the better the dish will taste. Now that you have your ingredients, you’re ready to start grilling! {{ingredient_image_2}} 1. Preheat your grill to medium-high heat. This makes sure the corn cooks well. 2. In a bowl, mix chili powder, smoked paprika, garlic powder, lime zest, and olive oil. 3. Add a pinch of salt. Use a fork to mix until smooth. 1. Husk the corn and remove silk strands. Make sure the corn is clean. 2. Use a brush or your hands to coat the corn with the chili lime mixture. Cover every inch for the best flavor. 3. Place the corn on the grill. Grill it for 10-12 minutes. Turn it a few times to get an even char. Corn should be tender and golden brown. 1. Once off the grill, squeeze fresh lime juice over the corn. This adds a bright flavor. 2. If you like, sprinkle crumbled feta cheese on top for creaminess. 3. Garnish with fresh cilantro. Serve hot with lime wedges for extra zing. When you choose corn, look for bright green husks. The husks should be tightly wrapped around the corn. Check for plump kernels that are firm to the touch. Fresh corn should smell sweet. Avoid any ears with brown spots or dry husks. The best corn is harvested in the morning. Try to pick corn that was picked the same day. This ensures maximum sweetness and tenderness. To get perfect grill marks, preheat your grill to medium-high heat. This helps to sear the corn quickly. Place the corn directly on the grates. Grill for about 10-12 minutes. Turn the corn every few minutes. This helps to cook it evenly on all sides. You want a nice golden-brown color. Don’t rush this process; the char adds deep flavor. For extra flavor, consider adding cayenne pepper or cumin. These spices can give your corn a nice kick. You can also try adding lime zest to your chili-lime mix. Marinade the corn for at least 30 minutes if you can. This allows the flavors to soak in better. Crumbled feta cheese adds creaminess. Fresh cilantro gives a burst of freshness. Pro Tips Choose Fresh Corn: Opt for corn that is bright yellow or golden in color with tightly packed kernels for the best sweetness and flavor. Grill Temperature: Preheating the grill is essential. A medium-high heat ensures even cooking and a nice char without burning the corn. Flavor Boost: For an extra kick, consider adding a pinch of cayenne pepper to the chili-lime mixture for a spicy twist. Serving Suggestions: Pair the grilled corn with a side of avocado salad or tortilla chips to complement the flavors and create a festive meal. {{image_4}} You can change the spice mix for a new flavor. Try using cayenne for heat. Add cumin for a smoky touch. A blend of Italian herbs gives a fresh twist. If you want something sweet, use cinnamon and brown sugar. Each spice mix can change the taste of your corn. So, have fun and experiment with what you love! You can make chili lime corn in the oven or stovetop. For the oven, preheat it to 400°F (200°C). Place the corn on a baking sheet. Brush on the chili lime mixture and roast for 20 minutes. Turn the corn halfway to get even cooking. On the stovetop, boil the corn for 5-7 minutes. Then, coat it with the chili lime mix and sear it in a hot pan for extra flavor. If you want a dairy-free option, just skip the feta cheese. You can use a vegan cheese or nutritional yeast instead. These choices add creaminess without dairy. You can also try avocado or a squeeze of extra lime juice for a rich taste. Making it vegan is easy, and it still tastes amazing! To store grilled corn properly, let it cool first. Place the corn in an airtight container. You can also wrap it in plastic wrap. Keep it in the fridge. It stays fresh for up to three days. If you want to keep it longer, freezing is a good option. When reheating grilled corn, you have a few good options. The best method is to use the grill. Preheat it to medium heat. Place the corn on the grill for about five minutes. Turn it often to heat evenly. You can also use the microwave. Wrap the corn in a damp paper towel. Heat it for about one minute. Check it often to avoid drying it out. Yes, you can freeze grilled corn! Start by cutting the kernels off the cob. Place them in a freezer-safe bag. Remove as much air as possible before sealing. Label the bag with the date. Frozen corn can last for up to six months. When ready to use, thaw the corn in the fridge overnight. You can then reheat it or add it to your dishes. Grill corn for 10-12 minutes on medium-high heat. Turn it every few minutes. This helps it cook evenly. Look for golden-brown color and tender kernels. Yes, you can prepare corn in advance. Grill it earlier and let it cool. Wrap the corn in foil and store it in the fridge for up to two days. When ready to serve, reheat on the grill for a few minutes. Chili Lime Grilled Corn goes great with tacos, grilled meats, or summer salads. You can also serve it with rice dishes or as a side for barbecues. Enjoy it alongside fresh guacamole or spicy salsa for a burst of flavor. Grilling corn with chili lime is an easy and tasty way to enjoy summer. We covered selecting fresh corn, preparing the chili lime mix, and grilling to perfection. I shared tips for enhancing flavors and offered variations to suit your taste. Don’t forget safe storage and reheating methods for leftovers. Enjoy your delicious creations with friends or family. This dish will surely impress at your next gathering!

Chili Lime Grilled Corn Flavorful Summer Side Dish

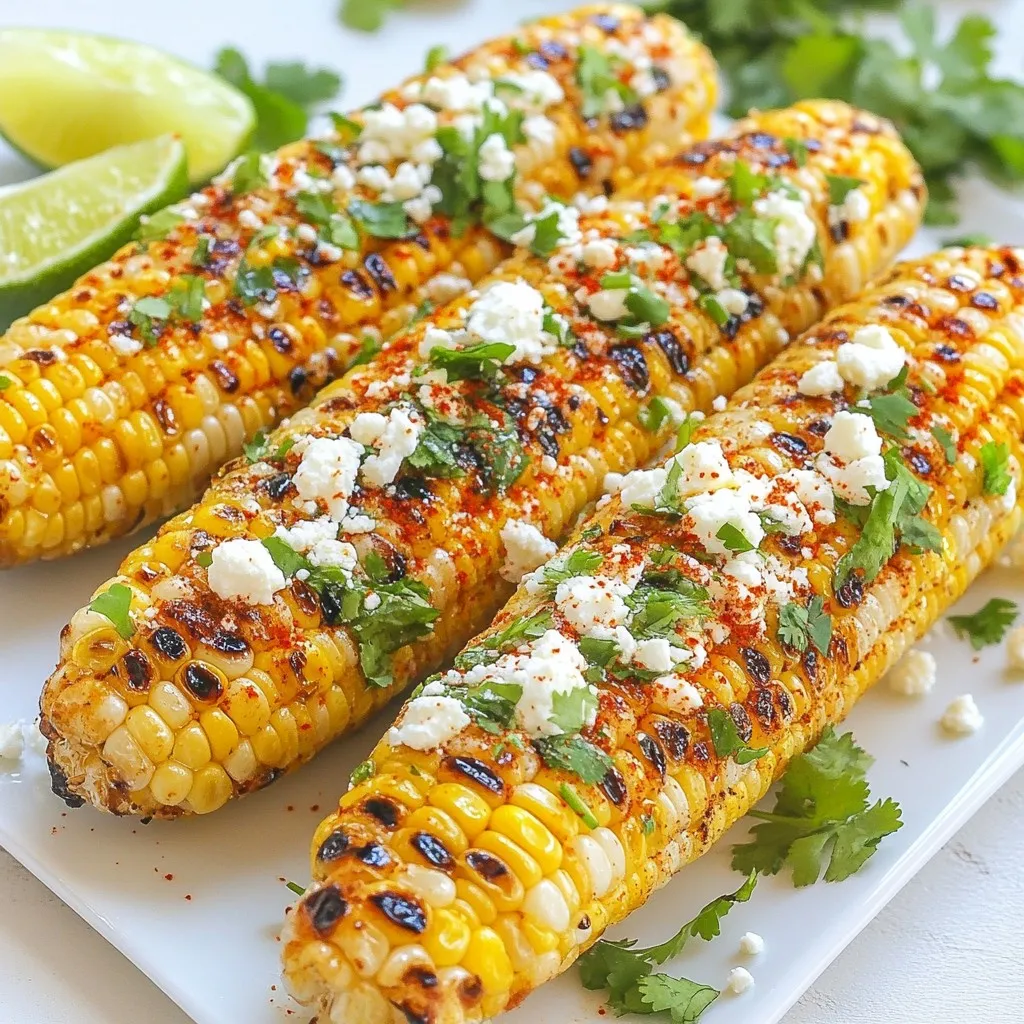
Summer is the perfect time for BBQs and fresh flavors. If you want an easy and tasty side dish, you’ll

- 1 cup quinoa, thoroughly rinsed - 2 cups vegetable broth - 1 cup cherry tomatoes, halved - 1 cup black beans, drained and rinsed - 1 ripe avocado, diced - 1 cup corn (fresh or thawed if using frozen) - 1/2 cup red onion, finely chopped - 1/2 cup fresh cilantro, roughly chopped - 1/4 cup freshly squeezed lime juice (approximately 2 limes) - 2 tablespoons extra virgin olive oil - 1 teaspoon ground cumin - Salt and freshly ground pepper, to taste For this salad, measuring is key. Use a standard measuring cup for dry ingredients like quinoa. Rinse quinoa well to get rid of bitterness. For liquids, like vegetable broth and lime juice, use a liquid measuring cup. When dicing or chopping, aim for even pieces for better texture. - 1 cup quinoa: Rinse thoroughly to remove the saponin. - 2 cups vegetable broth: Adds flavor to the quinoa. - 1 cup cherry tomatoes: Halve them for easy eating. - 1 cup black beans: Drain and rinse to reduce sodium. - 1 ripe avocado: Choose one that is slightly soft. - 1 cup corn: Fresh corn gives the best taste; frozen is fine. - 1/2 cup red onion: Finely chop for a milder flavor. - 1/2 cup fresh cilantro: Roughly chop for freshness. - 1/4 cup lime juice: Freshly squeezed is best. - 2 tablespoons olive oil: Use extra virgin for richness. - 1 teaspoon ground cumin: Adds a warm, earthy flavor. - Salt and pepper: Adjust to your taste. You can swap some ingredients based on what you have. Here are some ideas: - Replace quinoa with rice or farro for a different base. - Use black-eyed peas or chickpeas instead of black beans. - Swap cherry tomatoes for diced bell peppers for crunch. - If you don’t have fresh corn, canned corn works too. - Use green onions instead of red onion for a milder taste. - For lime juice, lemon juice can be a good substitute. - If you dislike cilantro, parsley adds freshness without the strong taste. Adjusting ingredients can make this salad your own while keeping it delicious! {{ingredient_image_2}} To start, take one cup of quinoa. Rinse it well under cool water. This removes any bitter taste. Then, place it in a medium saucepan. Add two cups of vegetable broth to the pot. Bring this mixture to a boil over high heat. Once it boils, reduce the heat to low. Cover the pot with a lid and let it simmer. Cook for about 15 minutes until the quinoa is fluffy. All the broth should be absorbed. After cooking, remove it from heat and let it cool completely. While the quinoa cools, grab a large mixing bowl. Add one cup of halved cherry tomatoes. Next, include one cup of black beans that are drained and rinsed. Then, add one ripe diced avocado. Toss in one cup of corn, fresh or thawed from frozen. Next, finely chop half a cup of red onion and add it to the bowl. Finally, add half a cup of roughly chopped fresh cilantro. Gently mix these ingredients together. Be careful not to mash the avocado. Now, take a small bowl to make the dressing. Squeeze the juice from two limes into the bowl. Measure out a quarter cup of lime juice. Then, add two tablespoons of extra virgin olive oil. Sprinkle in one teaspoon of ground cumin. Season with salt and freshly ground pepper to taste. Whisk all the ingredients together until they blend well. The dressing should be smooth and well combined. Once the quinoa has cooled, add it to the large bowl with the mixed ingredients. Pour the dressing over everything and gently toss it. Make sure all the ingredients are nicely coated with the dressing. Taste the salad and adjust the flavors if needed. You can add more lime juice or salt to suit your taste. For the best flavor, cover the salad with plastic wrap. Refrigerate it for at least 30 minutes. This allows the flavors to meld together beautifully. To make quinoa fluffy, rinse it first. This helps remove the bitter coating called saponin. Use two cups of vegetable broth for one cup of quinoa. This adds great flavor while cooking. Bring the broth to a boil, then reduce the heat to simmer. Cover it and let it cook for about 15 minutes. When done, let it cool completely. Fluff it with a fork before mixing it into your salad. You can boost the salad's taste in a few ways. Adding fresh lime juice gives it a bright kick. Ground cumin adds warmth and depth. If you like spice, try adding some diced jalapeño. For extra zest, toss in some chopped bell peppers. Don't forget to taste and adjust the seasoning. This ensures the salad is just right for your palate. Serve this salad in a large bowl for sharing or on individual plates. Garnish with extra cilantro leaves for a pop of color. Lime wedges on the side add a fresh touch. This salad pairs well with grilled chicken or shrimp for a complete meal. You can also enjoy it as a light lunch or a side dish. For best flavor, chill it in the fridge for at least 30 minutes before serving. Pro Tips Perfectly Fluffy Quinoa: Make sure to rinse the quinoa thoroughly before cooking to remove its natural coating, which can make it taste bitter. This step is essential for a light and fluffy texture. Add More Flavor: For an extra flavor boost, consider adding minced garlic or diced jalapeños to the salad. These will complement the cilantro and lime beautifully. Customize Your Veggies: Feel free to mix and match your vegetables based on what's in season or what you have on hand. Bell peppers, cucumbers, or radishes can add a nice crunch. Make Ahead: This salad can be made a day in advance. It actually tastes better after sitting in the fridge for a while, as the flavors meld together! {{image_4}} You can easily boost the protein in your salad. Add cooked chicken, shrimp, or tofu. Each option pairs well with the fresh flavors. For a quick meal, try canned chickpeas. They add protein and texture without extra work. This salad is perfect for everyone. It’s vegetarian and can be vegan too. Just skip the cheese or add a vegan cheese option. You can also use lime juice instead of rice vinegar in dressings. Change up the ingredients based on what you have. In spring, add asparagus or peas. In summer, try zucchini or bell peppers. Fall brings squash or sweet potatoes. Winter is great for roasted root veggies. Always keep it fresh and fun! To keep your cilantro lime quinoa salad fresh, store it in the fridge. Use an airtight container for best results. This keeps out air and moisture. The salad will stay good for up to three days. If you notice any changes in smell or color, it’s best to toss it. You can freeze the salad, but it's not ideal. The avocado may not thaw well. If you still want to freeze it, do so without the avocado. Store the rest in a freezer-safe container. It can last up to three months. When ready to eat, thaw in the fridge overnight. For the best taste, eat the salad within three days of making it. If you plan to make it ahead, leave out the avocado until serving. This keeps it fresh and bright. Always check for signs of spoilage before eating. Enjoy it while it’s fresh for the best flavor! Yes, you can make this salad ahead of time. It tastes even better after chilling. I suggest preparing it a few hours before serving. This way, the flavors mix well. Just keep it in the fridge until you are ready to serve. This salad pairs well with many dishes. You can serve it with grilled chicken or fish. It also goes great with tacos or burritos. If you want a light meal, serve it with a slice of crusty bread. The options are endless! Yes, quinoa is gluten-free. It makes a great choice for those with gluten sensitivities. Quinoa is a healthy grain packed with protein. You can enjoy it in many dishes without worry. In this post, we explored how to make a tasty Cilantro Lime Quinoa Salad. We covered all the ingredients, including helpful measurement tips and good substitutions. You learned simple steps for cooking the quinoa and mixing it with flavor-packed dressing. Plus, I shared tips for making the quinoa fluffy and fun serving ideas. Quinoa is great with added protein or seasonal swaps. Remember to store it well for freshness. This salad is easy to prep ahead, making it a perfect choice for busy days. Enjoy your cooking and the bright flavors of this dish!

Cilantro Lime Quinoa Salad Fresh and Flavorful Dish

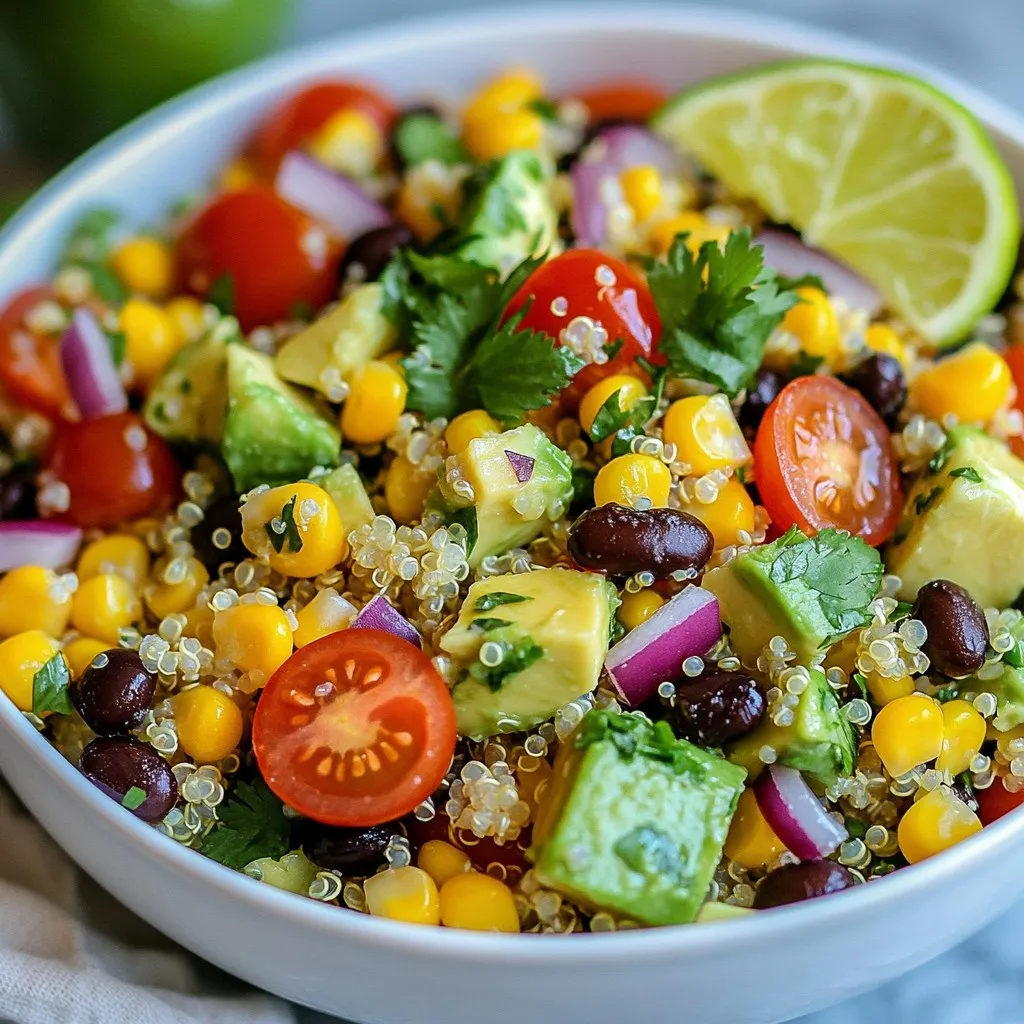
Looking for a fresh and flavorful dish? Cilantro Lime Quinoa Salad is the answer! This vibrant salad is packed with

To create delicious Pesto Chicken Stuffed Shells, gather these simple ingredients: - 12 jumbo pasta shells - 1 cup cooked chicken, shredded - 1 cup basil pesto (store-bought or homemade) - 1 cup ricotta cheese - 1 cup mozzarella cheese, shredded (plus extra for topping) - 1/2 cup grated Parmesan cheese - 1 garlic clove, minced - 1 tablespoon olive oil - Salt and black pepper to taste - Fresh basil leaves for garnish Each ingredient plays a special role in making this dish stand out. The jumbo pasta shells hold all the tasty filling. The cooked chicken adds protein and flavor. Basil pesto brings a fresh, herby taste, while ricotta and mozzarella create a creamy texture. Grated Parmesan adds a savory kick. Garlic gives a nice aroma, and olive oil helps everything blend well. Salt and pepper round out the flavor. Finally, fresh basil leaves are great for garnish and add color. You can easily swap ingredients based on your taste. Try using turkey instead of chicken or a different cheese for variety. This dish is fun and flexible! {{ingredient_image_2}} - Preheat the oven: Start by preheating your oven to 375°F (190°C). This makes sure your stuffed shells bake evenly. - Cook the pasta shells: Boil a large pot of salted water. Add 12 jumbo pasta shells and cook for 10-12 minutes until al dente. Drain them and spread on a baking sheet to cool. This helps prevent sticking. - Prepare the filling: In a mixing bowl, combine 1 cup of shredded cooked chicken, 1 cup of basil pesto, 1 cup of ricotta cheese, 1 minced garlic clove, half of 1 cup of shredded mozzarella, and 1/2 cup of grated Parmesan cheese. Season with salt and black pepper. Stir well until creamy. - Stuff the shells: Take each cooled shell and fill it with the chicken mixture. Use a spoon or piping bag for easy filling. Pack the filling gently but firmly to keep it in. - Arrange in the baking dish: Spread a thin layer of pesto on the bottom of a greased baking dish. Place the stuffed shells in the dish with the opening facing up. This allows the sauce to seep inside. - Top with pesto and cheese: Drizzle the rest of the basil pesto over the shells. Then sprinkle the remaining mozzarella cheese on top for that gooey finish. - Bake the stuffed shells: Cover the dish tightly with aluminum foil to keep moisture in. Bake for 20 minutes. Remove the foil and bake for an extra 10 minutes until the cheese is bubbly and golden brown. - Garnish and serve: After baking, let the dish cool for a few minutes. Add fresh basil leaves on top for color and flavor before serving. Enjoy the delightful burst of flavors in every bite! - How to avoid sticky pasta shells: To prevent your jumbo shells from sticking, cook them in plenty of salted boiling water. Stir gently while cooking. Once done, drain and lay them flat on a baking sheet. This helps them cool without sticking. - Best practices for mixing the filling: Use a large bowl when mixing your filling. Combine shredded chicken, basil pesto, ricotta, minced garlic, and cheeses. Mix gently but well, ensuring every bite is packed with flavor. This makes for a creamy, tasty filling. - Techniques for perfect stuffing: Use a spoon or piping bag to fill your shells. Start at one end and push the filling in slowly. Don’t overfill; leave a little space at the top for baking. This helps the filling stay inside while it cooks. - Ideal pairings with the dish: Pair your stuffed shells with a fresh salad or garlic bread. A light white wine, like Pinot Grigio, goes well too. These options complement the flavors without overwhelming them. - Presentation tips for serving: Serve the stuffed shells on a large platter for a stunning display. Add fresh basil leaves around the dish for color. Drizzling balsamic reduction over the top adds visual flair and extra flavor. Pro Tips Use Fresh Ingredients: Opt for fresh basil and high-quality cheese for a more vibrant flavor in your stuffed shells. Make Ahead: Prepare the stuffed shells a day in advance and store them in the refrigerator. Bake just before serving for a quick meal. Experiment with Proteins: Substitute the chicken with cooked shrimp or sautéed vegetables for a different twist on this dish. Customize the Sauce: Feel free to mix in some marinara sauce with the pesto for a richer flavor and a touch of acidity. {{image_4}} You can make tasty changes to this recipe. If you want to switch the chicken, try cooked turkey or even shredded pork. For a vegetarian option, use sautéed mushrooms or spinach instead. When it comes to cheese, ricotta is classic, but you can use cottage cheese for a lighter option. For mozzarella, feel free to try a smoked version for a unique flavor. You can also use homemade pesto for freshness. Making it is easy with fresh basil, garlic, nuts, and olive oil. Store-bought pesto is quick and convenient if you're short on time. For those needing gluten-free options, use gluten-free pasta shells. They hold the filling just as well. Vegetarians can swap the chicken for beans or lentils, keeping the rich flavors intact. If you want a dairy-free meal, choose plant-based cheese. Nutritional yeast can add a cheesy taste, too. With these options, everyone can enjoy pesto chicken stuffed shells! To keep your Pesto Chicken Stuffed Shells fresh, follow these tips: - Refrigeration tips for leftovers: Place the leftovers in an airtight container. Store them in the fridge for up to 3 days. Make sure to let them cool down before sealing. - Freezing guidelines for stuffed shells: If you want to freeze, wrap each shell tightly in plastic wrap. Place them in a freezer-safe bag or container. They can last up to 3 months in the freezer. When it's time to enjoy the leftovers, reheating is key. Here’s how: - Best methods for reheating: The oven works best for reheating stuffed shells. Preheat your oven to 350°F (175°C). Place the shells in a baking dish and cover with foil. Heat for about 20 minutes, or until hot. - How to keep the dish moist when reheating: To keep the shells moist, add a splash of water or extra pesto before covering. This adds steam and helps prevent dryness. Yes, you can prepare these stuffed shells in advance. After filling the shells, you can cover them and place them in the fridge. Baking them later is easy. Just remember to bake them a bit longer if they are cold from the fridge. These stuffed shells pair well with a fresh salad or garlic bread. You can add a light tomato sauce for extra flavor. A side of roasted vegetables also makes a great match. Stuffed shells can last about three to five days in the fridge. Store them in an airtight container to keep them fresh. Make sure to check for any signs of spoilage before eating. Yes, you can use other pasta shapes like manicotti or even large conchiglie. Just make sure the pasta can hold the filling well. Adjust cooking times based on the pasta you choose. You learned how to make Pesto Chicken Stuffed Shells from start to finish. We covered the key ingredients and step-by-step instructions. I also shared helpful tips, variations, and storage advice. This dish is easy to customize and store. Remember, you can enjoy it fresh or reheat leftovers. I hope you try making these stuffed shells soon. They are a tasty, crowd-pleasing meal that will leave you satisfied.

Pesto Chicken Stuffed Shells Flavorful Dinner Delight

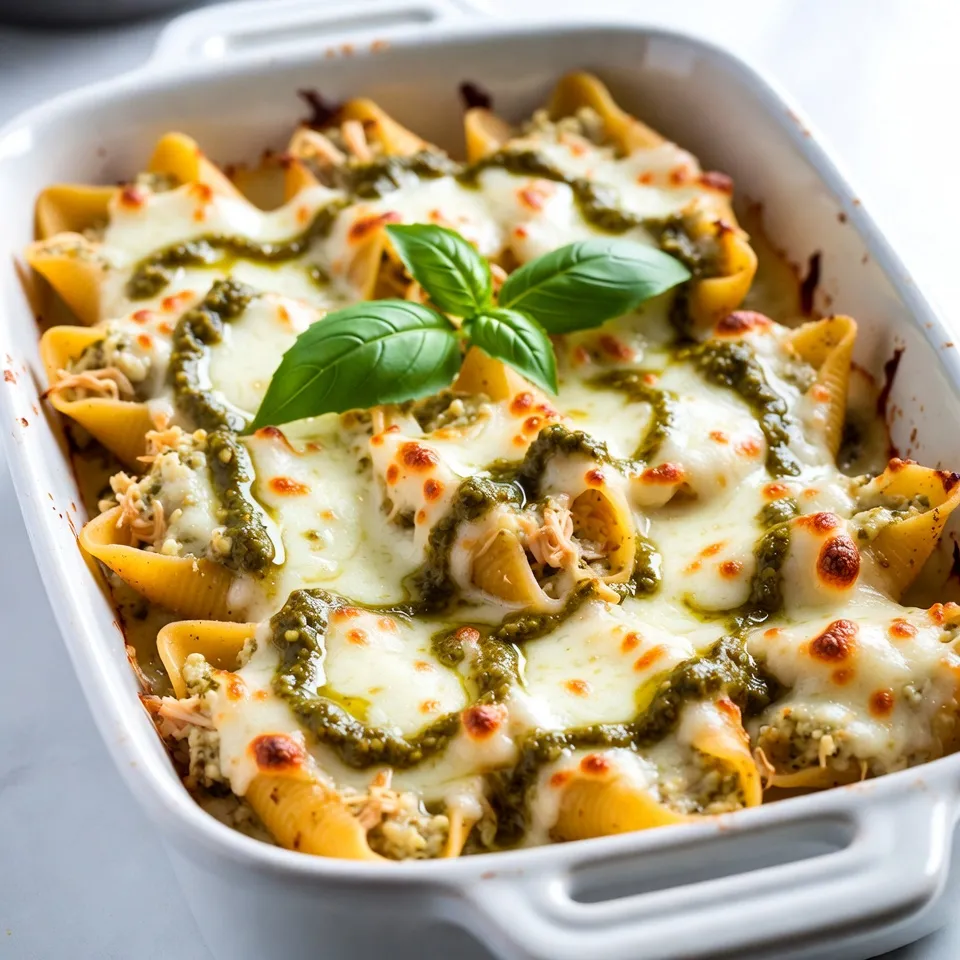
Craving a dinner that’s both easy and delicious? Look no further than Pesto Chicken Stuffed Shells! This dish combines creamy

- 1 pound boneless, skinless chicken breasts - 1 can (15 oz) black beans, drained and rinsed - 1 can (15 oz) corn kernels, drained - 1 can (14.5 oz) diced tomatoes with green chilies - 4 cups chicken broth - 1 medium onion, diced - 2 cloves garlic, minced - 1 teaspoon chili powder - 1 teaspoon cumin - ½ teaspoon smoked paprika - 1 lime, juiced - Salt and pepper to taste The main ingredients in this soup bring a lot of flavor. First, the chicken adds protein and sweetness. It cooks quickly in the Instant Pot and stays juicy. The black beans and corn add texture and a nice contrast. They make the soup hearty. Diced tomatoes with green chilies give it a mild kick and a bright color. The spices like chili powder, cumin, and smoked paprika boost the taste. They create a warm, inviting aroma that fills your kitchen. - Avocado - Tortilla strips - Cheese and cilantro Garnishes are a fun way to make your soup special. Diced avocado adds creaminess and a fresh taste. You can use store-bought or homemade tortilla strips for crunch. They give your soup a classic touch. Shredded cheese melts nicely on top, adding richness. Fresh cilantro provides a vibrant finish and a burst of flavor. You can pick and choose your favorites to make the soup your own! {{ingredient_image_2}} Sautéing Onions and Garlic Start by turning on the sauté setting on your Instant Pot. Add a splash of oil once the pot is hot. Toss in the diced onion and sauté for about 3 to 4 minutes. Wait until the onions look soft and smell great. Then, add the minced garlic and cook for another minute. This step brings out the rich aroma in your soup. Seasoning the Chicken While the onions and garlic cook, grab the chicken. Season both sides with salt, pepper, chili powder, cumin, and smoked paprika. This mix adds a depth of flavor. Once seasoned, place the chicken in the pot. Make sure it sits among the sautéed onions and garlic for a tasty blend. Adding Ingredients to the Pot Next, it’s time to add more ingredients. Pour in 4 cups of chicken broth. Then, add the can of diced tomatoes with their juices. Next, stir in the drained black beans and corn. Gently mix everything together, but don’t disturb the chicken too much. This helps keep the chicken juicy. Setting the Cooking Function Close the lid tightly on the Instant Pot. Ensure the valve is set to sealing. Select the high-pressure cooking function and set the timer for 15 minutes. This cooking time is perfect for tender chicken and flavorful broth. Shredding the Chicken When the cooking cycle is done, carefully do a quick release to let the steam out. Wait until the steam stops before opening the lid. Use tongs to take out the chicken breasts. Place them on a cutting board and shred them with two forks. Then, return the shredded chicken back into the pot. Mix it well with the soup. Adding Lime Juice and Adjusting Seasoning Squeeze the juice from one lime into the pot. This adds a fresh, zesty flavor. Stir everything together again. Taste your soup and adjust with more salt and pepper if needed. This step is key for making the flavors pop. Enjoy your delicious Instant Pot Chicken Tortilla Soup! - Best practices for sautéing: Start with a hot pot. Add a bit of oil before the onions. This helps them cook evenly. Cook the onions until they are soft and shiny. This step makes the soup taste great. Add garlic next. This brings out a nice aroma. - Ensuring the right consistency: Make sure you add enough chicken broth. This helps the soup stay soupy. If it gets too thick, add more broth or water. You want a mix that is rich but not too thick. - Adding extra spices: While the soup cooks, you can boost flavor. Try adding a touch more chili powder or cumin. If you like heat, add some cayenne pepper. Just a little goes a long way! - Using fresh ingredients: Fresh lime juice gives the soup a bright taste. Always use fresh cilantro for garnish. It adds color and flavor. Fresh veggies like bell peppers can also add a nice crunch. - Presentation ideas: Ladle the soup into colorful bowls. Top with crispy tortilla strips and diced avocado. A sprinkle of cheese makes it look gourmet. Add lime wedges on the side for a pop of color and flavor. - Pairing options for a complete meal: Serve with a side of warm bread or chips. A simple green salad can balance the soup. This way, you have a hearty and satisfying meal. Pro Tips Use Fresh Ingredients: Fresh herbs and vegetables can elevate the flavor profile of your soup, making it taste vibrant and delicious. Customize the Heat: Adjust the level of spiciness by adding more chili powder or including fresh jalapeños for an extra kick! Let it Rest: Allowing the soup to sit for a few minutes after cooking helps the flavors meld together for a more cohesive taste. Garnish Generously: Don't skimp on toppings! A good amount of avocado, cheese, and cilantro adds texture and flavor to your bowl. {{image_4}} You can swap chicken for turkey in this recipe. Turkey gives the soup a nice flavor. If you want a vegetarian dish, use beans or lentils. Both options keep the soup filling and tasty. Want to add more veggies? Try bell peppers, zucchini, or carrots. These veggies add color and crunch. You can mix them in when you sauté the onions. This step helps them cook well and blend with the soup’s flavor. If you like heat, add jalapeños or serrano peppers. Chop them finely and toss them in while cooking. You can also use hot sauce for extra spice. Start with a little and taste as you go. Adjust to find your perfect heat level. To store leftovers, cool the soup first. Place it in an airtight container. You can keep it in the fridge for up to three days. Be sure to allow it to cool before sealing. This helps maintain its great taste and texture. If you want to store the soup longer, freezing is a good option. Use freezer-safe bags or containers. Leave some space for expansion, as liquids expand when frozen. The soup can last up to three months in the freezer. Label the bags with the date for easy tracking. When it’s time to enjoy your soup again, reheating is easy. You can use the stove or microwave. For the stove, heat it over medium heat until warm. Stir it often to keep the flavor even. If using the microwave, heat in short bursts, stirring in between. This way, you keep the taste just right. Yes, you can use frozen chicken. Just add a few extra minutes to the cooking time. Set the timer for about 20 minutes instead of 15. The soup will still come out tasty! To spice things up, add diced jalapeños or a splash of hot sauce. You can also increase the chili powder to your taste. Remember to start with a little. You can always add more heat! You can make this soup in advance. Just store it in an airtight container in the fridge. It will stay fresh for 3 to 4 days. When you're ready to eat, heat it on the stove or in the microwave. The flavors will blend even better over time! This blog post covered how to make a tasty chicken soup in the Instant Pot. We discussed main ingredients like chicken, beans, and spices. I shared tips for cooking, enhancing flavors, and serving ideas. You can try variations with different proteins or add more veggies. Remember, this soup is easy to store and reheat. With these steps, you can enjoy a quick and satisfying meal anytime. Enjoy your cooking adventure!

Instant Pot Chicken Tortilla Soup Flavorful and Easy

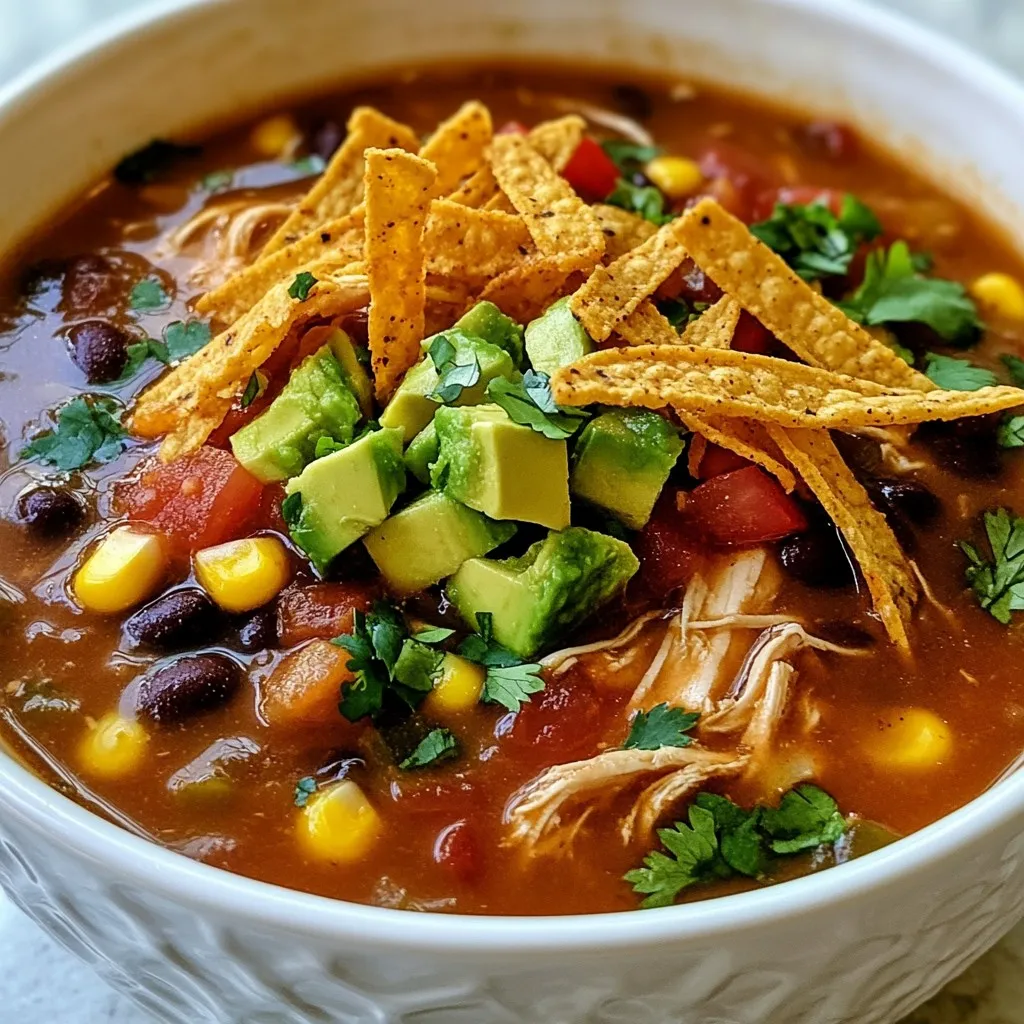
Are you ready for a warm, tasty meal that’s quick and easy? My Instant Pot Chicken Tortilla Soup is packed

Kale is the star of this dish. You need four cups of fresh kale. First, remove the tough stems. Chop the leaves into bite-sized pieces. This makes it easy to eat and mix with other ingredients. Kale is rich in vitamins. It adds a healthy crunch to your salad. Sweet potatoes bring a warm, sweet flavor. Use one cup of sweet potatoes. Peel and cube them before roasting. Toss the cubes in olive oil, salt, and pepper. Roast them at 400°F for 25-30 minutes. They should be golden and tender. Roasting enhances their sweetness. - 1/2 cup pomegranate seeds, fresh for a burst of juicy flavor - 1/4 cup sliced almonds, toasted for extra crunch - 1/4 cup feta cheese, crumbled for a creamy touch - 1/4 cup dried cranberries, adding a hint of sweetness These add color and texture. Pomegranate seeds are juicy and bright. Almonds give a nice crunch. Feta cheese adds creaminess and tang. Dried cranberries bring sweetness. Together, these ingredients balance the salad. They create a flavorful and nutritious dish. {{ingredient_image_2}} First, preheat your oven to 400°F (200°C). Take your sweet potatoes and peel them. Cut them into small cubes. Place the cubes in a bowl and add a splash of olive oil. Sprinkle with salt and pepper. Toss them well to coat. Spread the cubes out on a baking sheet. Roast them for 25 to 30 minutes. Stir them halfway through to ensure even cooking. When they are golden and tender, take them out and let them cool a bit. Next, grab a large mixing bowl and add the chopped kale. Pour 1 teaspoon of olive oil over the kale. Add a pinch of salt. Now, it’s time to massage the kale. Use your hands to squeeze and rub the leaves gently. Do this for about 3 to 5 minutes. This process softens the kale and makes it easier to eat. The leaves will shrink in size and become tender. In a small bowl or jar, combine the rest of the olive oil, apple cider vinegar, and Dijon mustard. Add salt and pepper to taste. Whisk or shake the mixture well until it is smooth and mixed. Taste the dressing and adjust the seasoning if needed. This dressing will add a bright flavor to the salad. In the bowl with the massaged kale, add the roasted sweet potatoes, fresh pomegranate seeds, toasted sliced almonds, crumbled feta cheese, and dried cranberries. Gently mix everything together. Make sure the kale combines well with all the other ingredients. Each bite will have a little bit of everything. Now, take your prepared dressing and drizzle it evenly over the salad. Use tongs to toss the salad gently. This helps coat all the ingredients with the dressing. Make sure each component gets some flavor. Transfer the colorful salad to a large serving bowl. You can also serve it on individual plates. For a nice touch, top with extra pomegranate seeds and a sprinkle of sliced almonds. The added crunch and color make the salad even more appealing. Enjoy every bite! To make kale tender, you need to massage it. Start with fresh, clean kale. Use your hands to tear the leaves into smaller pieces. Add 1 teaspoon of olive oil and a pinch of salt. Rub the kale between your fingers. Do this for about 3-5 minutes. You will notice the leaves darken and soften. This step makes the kale easier to eat and tastier. Roasting sweet potatoes brings out their natural sweetness. Preheat your oven to 400°F (200°C). Peel and cube the sweet potatoes into bite-sized pieces. Toss them in a bowl with olive oil, salt, and pepper. Spread them evenly on a baking sheet. Roast for 25-30 minutes. Stir halfway through for even cooking. They should be golden and soft when done. Make your dressing ahead of time for quick use. Combine olive oil, apple cider vinegar, Dijon mustard, salt, and pepper in a jar. Shake well to mix. Store the dressing in the fridge for up to a week. Shake again before using. This dressing adds a great tangy flavor to your kale salad. Pro Tips Choose Fresh Kale: Opt for bright green, crisp kale leaves without any wilting or yellowing for the best flavor and texture. Perfectly Roasted Sweet Potatoes: Ensure even cooking by cutting sweet potatoes into uniform cubes and tossing them halfway through roasting. Massage the Kale Well: Take your time when massaging the kale; this not only tenderizes it but also enhances its flavor. Flavor Balance: Adjust the dressing ingredients according to your taste; adding a bit more vinegar or mustard can enhance the salad's tanginess. {{image_4}} You can change some ingredients in the Winter Kale Salad to suit your taste. If you don't like feta cheese, try goat cheese or skip it for a dairy-free option. For the almonds, use walnuts or sunflower seeds for a different crunch. If sweet potatoes are not your favorite, roasted beets add color and a sweet flavor. You can also replace pomegranate seeds with fresh berries, like blueberries or strawberries. This salad is easy to adapt for different diets. For a vegan version, omit the feta cheese or choose a plant-based alternative. Make sure the mustard and other dressings are gluten-free. The salad is naturally gluten-free, so you can enjoy it without worry. If you want a nut-free option, replace the almonds with pumpkin seeds. You can add seasonal ingredients to keep the salad fresh. In winter, try adding roasted Brussels sprouts or sliced apples for a crisp bite. As spring approaches, consider adding fresh herbs like mint or parsley for bright flavor. In summer, fresh corn or cherry tomatoes bring sweetness and color. Make these changes to keep the salad exciting all year round! To store leftovers, place the salad in an airtight container. This keeps it fresh. If you separate the dressing, it will last longer. Store the dressing in a small jar. Keep both in the fridge for best results. I do not recommend freezing this salad. The kale and other fresh ingredients do not freeze well. They lose their texture and flavor. It’s best to enjoy it fresh. If you have leftover roasted sweet potatoes, you can freeze them separately. In the fridge, the salad lasts about 2-3 days. The taste will fade over time. Make sure to check for any signs of spoilage. If it looks or smells off, it’s better to toss it. Enjoy your salad while it is fresh! Yes, you can. Spinach, arugula, or Swiss chard work well. Each green adds its own flavor. If you prefer a milder taste, try using spinach. Arugula gives a peppery kick. Swiss chard brings a slight sweetness. Just wash and prepare them like kale. You can use goat cheese or ricotta for a creamy texture. If you want a vegan option, try avocado. Nutritional yeast also adds a cheesy flavor without dairy. Each choice will give your salad a unique twist. The salad stays fresh for about 2-3 days in the fridge. Store it in an airtight container. If you dress it before storing, it may become soggy. Keep the dressing separate until ready to eat for best results. Yes, you can prepare most parts in advance. Roast the sweet potatoes and store them. You can also wash and chop the kale. Just wait to add the dressing until you are ready to serve. This will keep everything crisp and fresh. This blog shared how to make a fresh and tasty salad. We looked at key ingredients like kale, sweet potatoes, and fun extras like pomegranate seeds and feta. You learned step-by-step how to prepare each part. I shared tips for great results, variations for different diets, and how to store leftovers. A fresh salad boosts health and taste. Try different ingredients to keep it fun! Enjoy the process and make it yours.

Winter Kale Salad Flavorful and Nutritious Dish

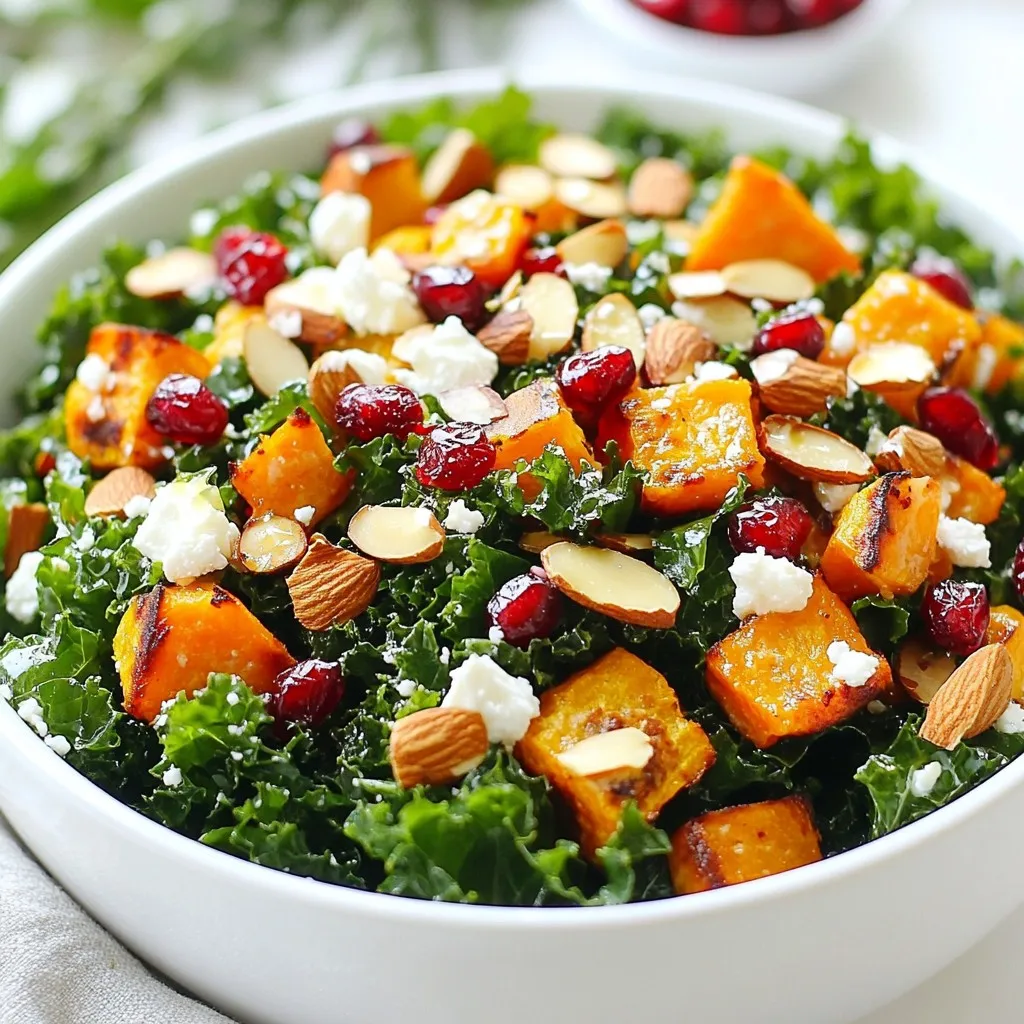
Looking for a vibrant and healthy dish to brighten your winter meals? Let me introduce you to my delicious Winter

Start your Santa Fe salad with a fresh and crisp salad base. Use four cups of mixed greens. I like to combine spinach, arugula, and romaine lettuce. These greens add great taste and texture. They also give a lovely color to your salad. Next, let's add some vibrant vegetables and nutritious legumes. Use these ingredients: - 1 cup cherry tomatoes, halved - 1 cup black beans, drained and rinsed - 1 cup corn kernels (you can use fresh or thawed frozen corn) - 1 avocado, diced - 1/2 red onion, thinly sliced - 1/2 cup diced bell pepper (red, yellow, or green) These veggies not only add flavor but also bring a mix of colors. The black beans and corn add protein and fiber, making the salad filling and healthy. To finish, we need some creamy cheese and a fresh garnish. For this, use: - 1/2 cup crumbled feta cheese - 1/4 cup fresh cilantro leaves, chopped The feta cheese adds a salty, creamy touch that pairs well with the other ingredients. The cilantro gives a fresh burst of flavor and a pop of green. It’s the perfect way to elevate your salad! {{ingredient_image_2}} Start by taking a large bowl. Add four cups of mixed greens. I love using spinach, arugula, and romaine for a fresh taste. Mix the greens gently. This step sets the stage for a vibrant salad. Next, layer the veggies. Take one cup of halved cherry tomatoes and sprinkle them on top. Then, add one cup of black beans. Make sure they are drained and rinsed well to remove any extra salt. Toss in one cup of corn, either fresh or thawed from frozen. Now, chop one avocado into small pieces and add that, too. Slice half a red onion very thinly and scatter it over the salad. Finally, include half a cup of diced bell peppers in red, yellow, or green. These colors make the salad pop. To make the dressing, grab a small bowl. Combine a quarter cup of lime juice with two tablespoons of olive oil. Add one teaspoon of ground cumin along with salt and pepper to taste. Whisk all the ingredients until they blend well. Once your dressing is ready, drizzle it over the salad. Gently toss the salad to coat all the ingredients. This helps the flavors mix. To finish, add half a cup of crumbled feta cheese on top and sprinkle a quarter cup of chopped fresh cilantro. This adds a nice touch of flavor and color. Now, your Santa Fe Salad is ready to serve! Make your Santa Fe Salad pop! Use colorful bowls for serving. Bright colors add fun. Top the salad with lime wedges and fresh coriander. This makes a great look. You can also layer the ingredients in a glass bowl. It shows off the beautiful colors. Don’t forget to serve it right after mixing. Freshness is key! You can switch out some ingredients. If you don’t have black beans, try pinto beans. They taste great too! For cheese, use goat cheese instead of feta for a tangy twist. If you want a crunch, add nuts like walnuts or almonds. You can also replace avocado with diced mango for a sweet touch. To boost flavor, add spices! Try a pinch of chili powder for heat. If you love garlic, mix in some minced garlic in the dressing. Fresh herbs like basil or dill can give it a new taste. Adjust salt and pepper to your liking. Use lime juice for a zesty kick. These small changes make a big difference! Pro Tips Frische Zutaten wählen: Verwenden Sie möglichst frische und reife Zutaten, insbesondere bei Avocados und Tomaten, um den besten Geschmack zu erzielen. Vorsicht mit dem Dressing: Fügen Sie das Dressing nach und nach hinzu und vermengen Sie den Salat behutsam, um zu vermeiden, dass die Blätter matschig werden. Variationen ausprobieren: Experimentieren Sie mit anderen Bohnen oder Käsevarianten wie Ziegenkäse für eine neue Geschmacksrichtung. Vorbereitung im Voraus: Sie können die Zutaten im Voraus vorbereiten und erst kurz vor dem Servieren zusammenstellen, um die Frische zu bewahren. {{image_4}} You can boost your Santa Fe salad with proteins. Add grilled chicken, shrimp, or steak. These meats add great flavor and make the salad heartier. For a meatless option, try tofu or chickpeas. Both options give you protein and fit well in the salad. The dressing is key to the salad's taste. While lime and olive oil shine, you can try other dressings too. A spicy ranch or a cilantro-lime vinaigrette works well. If you like a sweet touch, add honey to your lime dressing. Each dressing change will give your salad a new twist. Use seasonal ingredients for fresh flavors. In summer, add ripe peaches or berries. In fall, try roasted pumpkin or apples. These swaps keep the salad exciting and fun. You can always mix in what you find at your local market. The Santa Fe salad can adapt to any season with ease. To keep your Santa Fe Salad fresh, store it in an airtight container. This helps maintain the salad's crispness. Keep the salad and dressing separate if you plan to store leftovers. This way, the greens won’t get soggy. Use the salad within two days for the best taste. You don’t typically reheat Santa Fe Salad. However, if you have warm ingredients like black beans or corn, heat them in a pan over medium heat. Stir frequently until warm. Let them cool a bit before adding to your salad. - Mixed Greens: 3-5 days in the fridge. - Cherry Tomatoes: 3-7 days if stored whole. - Black Beans: 3-4 days if kept in the fridge after opening. - Corn: 3-5 days if fresh; frozen corn can last up to 8 months. - Avocado: 1-2 days once cut; whole avocados last longer. - Red Onion: 7-10 days in the fridge. - Bell Pepper: 3-5 days in the fridge. - Feta Cheese: 5-7 days after opening. Storing ingredients properly ensures your salad stays tasty and fresh for longer! A Santa Fe Salad is a bright and fresh dish. It combines leafy greens with colorful veggies and beans. You get a mix of textures and flavors in every bite. This salad often features ingredients like black beans, corn, and avocado. It also has a zesty lime dressing that adds a nice kick. The salad is a great way to enjoy healthy ingredients while feeling full and satisfied. Yes, you can make Santa Fe Salad ahead of time. It stays fresh for a day in the fridge. However, keep the dressing separate until you are ready to serve. This helps the greens stay crisp. You can also prepare the veggies and beans in advance. Just mix them in right before serving to keep everything fresh and tasty. You can serve Santa Fe Salad in many fun ways. Here are some ideas: - As a main dish: Add grilled chicken or shrimp for protein. - As a side dish: Pair it with tacos or grilled meats. - In a wrap: Use the salad as a filling in a tortilla. - With chips: Serve it with tortilla chips for a crunchy twist. - In bowls: Layer it in bowls for a visually appealing meal. Each way offers a unique taste experience. Enjoy trying different options! In this blog post, we explored the Santa Fe Salad, covering ingredients, step-by-step instructions, and tips. You learned about fresh bases, tasty vegetables, and how to add cheese. I shared ideas for storing leftovers and enhancing flavors. Remember, you can swap ingredients based on your taste. Enjoy creating your own versions of this salad! With a few simple steps, you’ll impress friends and family. Try it out and make it your own!

Santa Fe Salad Zesty and Fresh Flavor Boost

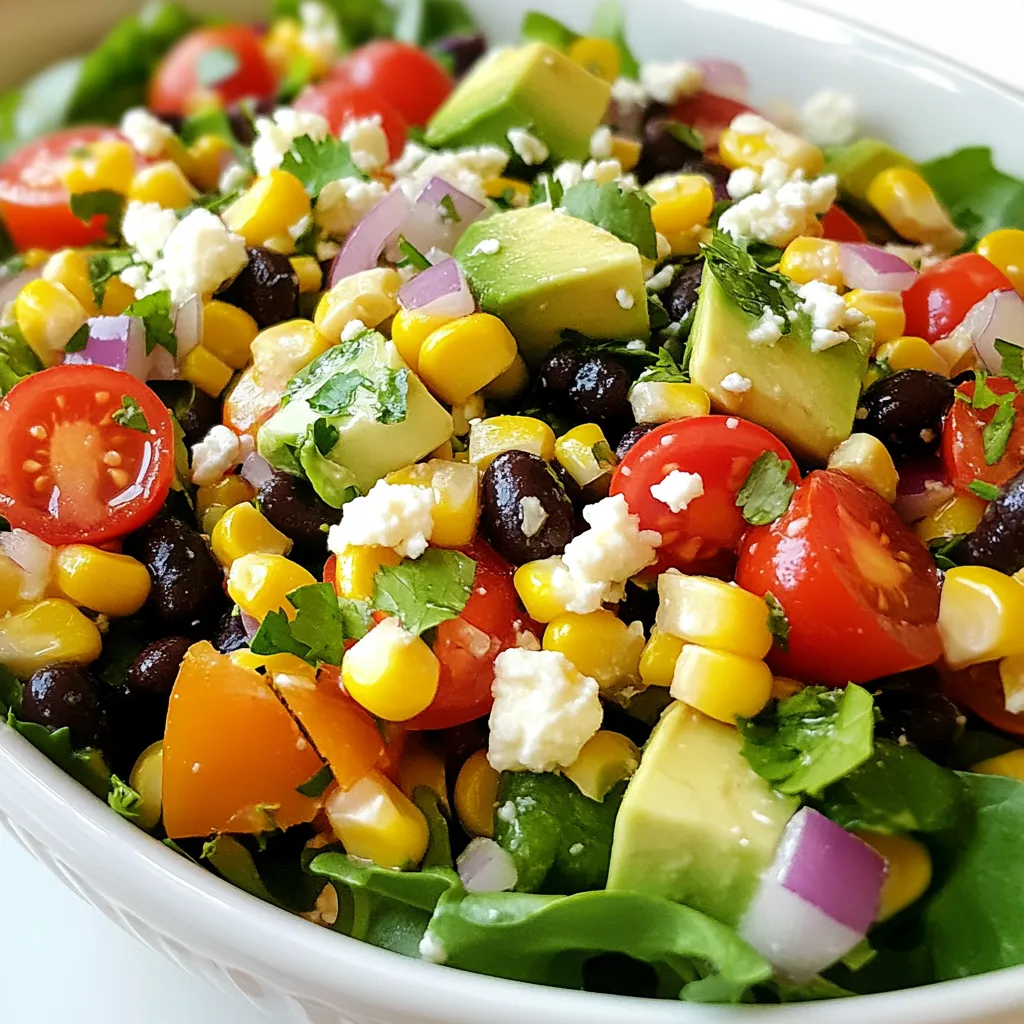
Are you ready to give your meals a burst of flavor? The Santa Fe Salad is a fresh and zesty

- 1 lb chicken tenders - 2 cups buttermilk - 1 tablespoon hot sauce (adjust to your spice preference) - 2 cups all-purpose flour - 1 teaspoon paprika - 1 teaspoon garlic powder - 1 teaspoon onion powder - 1 teaspoon freshly ground black pepper - 1 teaspoon salt - Oil for frying (vegetable or canola preferred) To make my buttermilk fried chicken tenders, you need some key ingredients. First, get fresh chicken tenders. They are juicy and cook well. Next, use buttermilk and hot sauce. This mix makes the chicken tender and adds great taste. The flour mixture is also important. Combine all-purpose flour with spices like paprika, garlic powder, and onion powder. This blend gives the chicken a tasty outer layer. Don't forget salt and pepper to boost the flavors. - Different spices or herbs - Variety of dipping sauces You can also add your favorite spices or herbs to the flour mix. Think about using cayenne for heat or dried herbs for extra flavor. For dipping sauces, try honey mustard, ranch, or even barbecue sauce. These add a fun touch to your meal. Feel free to get creative! {{ingredient_image_2}} First, you need to make the marinade. In a big bowl, mix 2 cups of buttermilk with 1 tablespoon of hot sauce. Whisk it well until it is smooth. This step adds flavor and moisture to the chicken. Next, immerse 1 pound of chicken tenders in the buttermilk mix. Make sure every piece is covered. Cover the bowl with plastic wrap. Refrigerate for at least 2 hours, but overnight is even better. This time allows the chicken to absorb all the tasty goodness. Now it's time to coat the chicken. In a separate bowl, mix 2 cups of all-purpose flour with 1 teaspoon of paprika, garlic powder, onion powder, black pepper, and salt. Stir it well so the spices blend evenly. Take the chicken tenders out of the buttermilk. Let the extra buttermilk drip off. Dredge each tender in the flour mixture. Press gently to ensure a good coat sticks to the chicken. This step is key for achieving that crispy texture you want. To cook the chicken, you need to heat oil in a deep skillet or frying pan. Pour in enough oil to cover the chicken halfway. Heat the oil to about 350°F (175°C). This temperature is crucial for crispy chicken. Carefully add the coated chicken tenders to the hot oil. Fry them in batches to avoid overcrowding. Cook each side for about 4 to 6 minutes, or until they are golden brown. Make sure the chicken reaches an internal temperature of 165°F (74°C). When done, transfer the tenders to a wire rack over a baking sheet lined with paper towels. This lets excess oil drip off. Enjoy your crispy and flavorful buttermilk fried chicken tenders! To get your chicken tenders extra crispy, start with the right coating. Use a mix of flour and spices. I like to add paprika, garlic powder, and onion powder for flavor. Make sure to press the flour mixture onto the chicken. This helps it stick better. Frying temperature matters too. Heat your oil to about 350°F (175°C). This is the sweet spot for a golden brown crust. If the oil is too cool, the chicken will absorb oil and become greasy. If it’s too hot, you risk burning the outside while the inside stays raw. Always check the internal temperature for doneness. Your chicken should reach 165°F (74°C) to be safe to eat. Use a meat thermometer for accuracy. This helps guarantee that your chicken is juicy and fully cooked. When it comes to frying oil disposal, let the oil cool after use. Then, pour it into a container. You can throw it away with your regular trash. Never pour oil down the sink, as it can cause clogs. For a great serving, arrange the chicken tenders on a large platter. This makes your dish look inviting. Add fresh parsley on top for color. It adds a nice touch that catches the eye. Serve the tenders with bowls of your favorite dipping sauces. Options like honey mustard or ranch dressing work well. This not only enhances the flavor but also makes for a fun meal. Pro Tips Marinate Longer: For the best flavor and tenderness, marinate the chicken tenders overnight. This allows the buttermilk to fully penetrate the meat, resulting in juicier tenders. Use a Thermometer: To achieve perfectly cooked chicken, use a meat thermometer to check that the internal temperature reaches 165°F (74°C). Maintain Oil Temperature: Keep an eye on the oil temperature while frying. If the oil is too cool, the chicken will absorb excess oil; if it's too hot, the coating may burn before the chicken cooks through. Rest Before Serving: Allow the fried chicken tenders to rest on a wire rack after frying. This helps maintain their crispy texture and prevents them from becoming soggy. {{image_4}} You can change the heat of your chicken tenders easily. Try different hot sauces. For a mild kick, you might use Frank's RedHot. If you want a fiery touch, go for Sriracha or a spicy habanero sauce. Mixing these sauces into the buttermilk adds flavor and fun. You can also switch up the coating. Instead of just flour, try using cornmeal. Cornmeal gives a nice crunch. You can even mix some crushed crackers for extra texture. Experimenting with spices is a great way to make your tenders unique. Add some cayenne pepper or smoked paprika for a twist. Pair your chicken tenders with tasty sides. Coleslaw is a fresh choice that balances the crunch. You could also serve them with crispy fries for a classic meal. A simple green salad can add some color and freshness. Don't forget about dipping sauces! Honey mustard is sweet and tangy, while ranch dressing is creamy and rich. You might even enjoy a spicy mayo or a zesty barbecue sauce. These pair well with the crispy tenders and make each bite even better. To store your leftover chicken tenders, let them cool first. Place them in an airtight container. This keeps them fresh for up to three days. When you’re ready to enjoy them again, reheat in an oven at 350°F (175°C). This helps restore their crispiness. You can also use a skillet over medium heat. Just add a little oil to help them warm up nicely. If you want to save some tenders for later, freezing works well. Place cooled, cooked tenders in a freezer-safe bag. Remove as much air as possible before sealing. They can last up to three months in the freezer. When you’re ready to eat, thaw them overnight in the fridge. For the best taste, reheat them in the oven or air fryer. This keeps them crispy and delicious. I recommend marinating the chicken for at least 2 hours. For the best flavor and tenderness, try to let it sit overnight. This allows the buttermilk to break down proteins in the chicken. It makes the tenders juicy and packed with flavor. The best oils for frying chicken tenders are vegetable oil or canola oil. They have high smoke points, which means they can cook well without burning. This helps achieve that crispy texture we all love. They also have a neutral taste, letting the chicken shine through. Yes, you can bake these chicken tenders for a healthier option. Preheat your oven to 400°F (200°C). Place the coated tenders on a baking sheet lined with parchment paper. Bake for about 20-25 minutes, flipping halfway through. Make sure they reach an internal temperature of 165°F (74°C) for safety. To make gluten-free chicken tenders, simply swap all-purpose flour for a gluten-free flour blend. You can also use cornstarch or almond flour for a crunchier texture. Just remember to check your hot sauce for gluten. With these changes, you can enjoy crispy tenders without the gluten! To make tasty chicken tenders, you need key ingredients like chicken, buttermilk, and seasoned flour. Follow the steps for marinating, coating, and frying. Use tips for crispiness and safety for great results. Don’t forget to explore variations and side dishes to mix things up. Proper storage is also crucial for leftovers. Enjoy making this dish, and don’t shy away from experimenting. Your perfect chicken tender awaits!

Buttermilk Fried Chicken Tenders Crispy and Flavorful

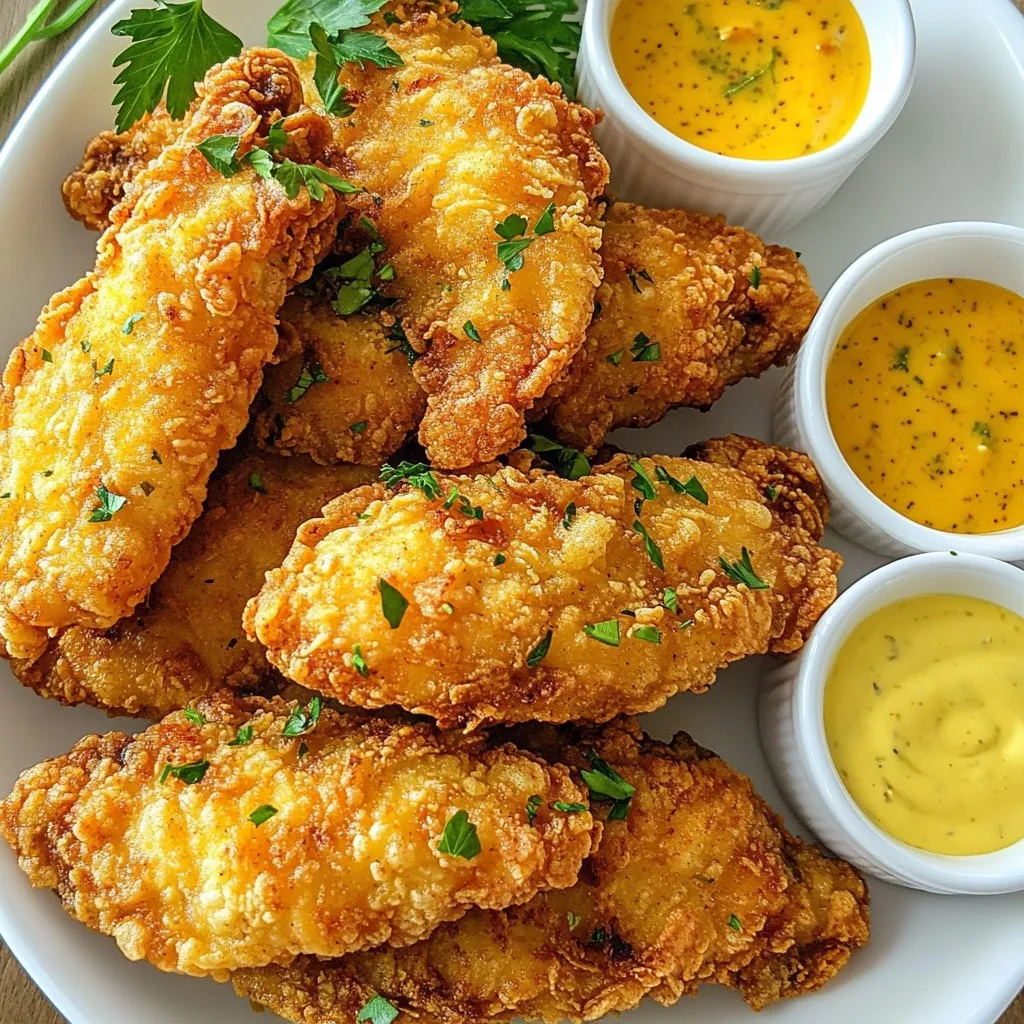
Are you ready to dive into the world of crispy and flavorful Buttermilk Fried Chicken Tenders? This recipe transforms simple

Older posts
Newer posts
← Previous Page1 … Page119 Page120 Page121 Page122 Next →

dsad

© 2026 dailydishcraft • Built with GeneratePress

Our Policies

  • Copyright Policy
  • Cookie Policy
  • GDPR Policy
  • Privacy Policy
  • Disclaimer
  • Terms Of Use

More Information

  • Home
  • About
  • Contact
  • Appetizers
  • Dessert
  • Dinner
  • Drinks
©2026, dailydishcraft About Back To Top