Skip to content
DisclaimerTerms Of UseGDPR PolicyCookie Policy

dailydishcraft

  • Home
  • Drinks
  • Appetizers
  • Dinner
  • Dessert
  • About
  • Contact
  • Privacy Policy
DisclaimerTerms Of UseGDPR PolicyCookie Policy

Jessica

To make S'mores Rice Krispie Treats, you need some key ingredients. Here’s what you will need: - 5 cups Rice Krispies cereal - 1 bag (10 oz) mini marshmallows - 1/4 cup unsalted butter - 1 cup graham cracker crumbs - 1/2 teaspoon pure vanilla extract - 1 cup chocolate chips (semi-sweet or milk chocolate) - Extra mini marshmallows for topping These ingredients create a tasty balance of flavors and textures. You can change your S'mores Rice Krispie Treats by adding personal touches. Here are some fun ideas: - Peanut butter for a nutty flavor - Sea salt for a sweet and salty vibe - Toasted coconut for a tropical twist - Different types of chocolate chips, like dark or white chocolate These options can make your treats unique and exciting! Using quality ingredients makes a big difference. Here are some brands I trust: - Rice Krispies: Kellogg's is a classic choice. - Mini marshmallows: Jet-Puffed mini marshmallows melt well. - Unsalted butter: Look for Land O'Lakes for great flavor. - Graham crackers: Honey Maid offers a nice sweetness. - Chocolate chips: Ghirardelli or Nestlé are both reliable options. Choosing these brands can help you achieve the best taste and texture in your treats! {{ingredient_image_2}} Start by greasing a 9x13 inch baking dish. You can use butter or non-stick spray. This step keeps the treats from sticking when you cool them. In a large saucepan, melt 1/4 cup of unsalted butter over medium heat. Once it’s melted, add in a 10 oz bag of mini marshmallows. Stir until they’re all melted. You want a smooth and gooey mixture. Remove the pan from heat when done. Next, stir in 1/2 teaspoon of pure vanilla extract. Now add 1 cup of graham cracker crumbs. Mix well until everything is combined. It should feel thick and sticky, like caramel. Gradually fold in 5 cups of Rice Krispies cereal. Use a gentle motion to coat each piece with the marshmallow mix. The texture should be sticky but hold together well. Now, fold in 1 cup of chocolate chips. Make sure they are evenly spread out. You can save some to sprinkle on top later for a nice look. Carefully pour the mixture into the prepared baking dish. Use a spatula or parchment paper to press it down firmly. This helps make a nice, even layer. Sprinkle extra mini marshmallows and any reserved chocolate chips on top. Lightly press them into the surface so they stick. Let the treats cool at room temperature for about 30 minutes. This helps them firm up. Once cool, use a sharp knife to cut them into squares or rectangles. These treats are best enjoyed warm. You can also store them in an airtight container for up to a week. They make a great snack anytime! For a fun twist, serve on a colorful platter and drizzle melted chocolate on top before cutting. To get the best texture in your S'mores Rice Krispie Treats, you must mix well. After melting the butter and marshmallows, stir until smooth. When adding the Rice Krispies, fold gently. This keeps them crispy. If you press too hard, the treats become dense. A light touch ensures they stay fluffy. One common mistake is not greasing the dish enough. If you skip this step, your treats will stick. Another mistake is using too many marshmallows. This can make your treats overly gooey. Stick to the recipe for balance. Finally, don’t rush the cooling process. Let them cool for at least 30 minutes. This helps them set properly. To keep your S'mores Rice Krispie Treats fresh, use an airtight container. They last up to a week. Place parchment paper between layers to avoid sticking. If they get hard, simply microwave them for a few seconds. This will soften them up again. Enjoy your treats at any time! Pro Tips Use Fresh Ingredients: Always ensure your marshmallows and chocolate chips are fresh for the best flavor and texture in your treats. Customize Your Chocolate: Feel free to mix different types of chocolate chips, like dark and white chocolate, for a unique flavor combination. Press Firmly: When transferring the mixture to the baking dish, press it down firmly to create dense, chewy squares that hold together well. Experiment with Mix-Ins: Add in nuts, peanut butter, or other favorite candies to create your own twist on these classic treats. {{image_4}} You can add peanut butter for a tasty twist. Start by melting 1/2 cup of creamy peanut butter with the butter and mini marshmallows. This adds a rich flavor and a creamy texture. Mix in the Rice Krispies and chocolate chips as usual. The peanut butter brings a new layer of taste to the classic treat. For a healthier version, swap out the regular butter for coconut oil. Use natural peanut butter instead of the creamy kind. You can also switch mini marshmallows for a healthier brand or use homemade marshmallows. Choose dark chocolate chips for less sugar. These changes keep the fun while making it a bit better for you. You can change the flavors based on the seasons. In fall, add pumpkin spice to the mix. In winter, try peppermint extract for a fresh taste. In summer, mix in fresh berries or lemon zest. These seasonal flavors make your S'mores Rice Krispie Treats fun and festive all year round. Get creative with your choices! To keep your S'mores Rice Krispie Treats fresh, store them in an airtight container. This helps to keep them soft and chewy. Do not expose them to air, as this can make them hard. Place a piece of wax paper between layers if stacking. This way, they won’t stick together. When stored properly, these treats can last up to a week. They taste best within the first few days. After that, they may lose some of their gooey texture, but they still taste great. If you notice they are getting dry, a quick zap in the microwave can bring back some softness. You can freeze S'mores Rice Krispie Treats for longer storage. Wrap them tightly in plastic wrap, then place them in a freezer bag. They can last up to three months in the freezer. When you're ready to eat, thaw them in the fridge overnight. Enjoy them as a sweet treat any time! Yes, you can use regular marshmallows. You will need about 10-12 large marshmallows. Just make sure to melt them fully. They will give the same yummy flavor. The texture may be slightly different but still delicious. To make these treats gluten-free, use gluten-free Rice Krispies. Check the label on the graham crackers too. Many brands offer gluten-free options. This way, everyone can enjoy them! Absolutely! You can add nuts like walnuts or pecans. You can also try other toppings like crushed candy bars or sprinkles. Just fold them into the mixture before pressing it into the dish. This adds crunch and fun flavors. The best way to cut the treats is with a sharp knife. Lightly grease the knife with butter or cooking spray. This helps the knife glide through the treats. Cut them into squares or rectangles while they are still slightly warm. Yes, S'mores Rice Krispie Treats are great for kids! They are fun, sweet, and easy to eat. Kids love the gooey marshmallows and chocolate. Just be sure to keep an eye on young ones while enjoying this treat! You now know the key ingredients and steps for making S'mores Rice Krispie Treats. We covered essential tips, variations, and storage options. These treats are easy to customize for any taste. Remember to avoid common mistakes for the best texture. With a bit of creativity, you can make them your own. Enjoy these treats at any gathering. They are sure to please everyone. Now, grab your ingredients and start creating sweet memories today!

S’mores Rice Krispie Treats Simple and Tasty Recipe

Do you love s’mores? How about Rice Krispie Treats? If you said yes to both, you’ll love this simple recipe!

- 1 lb (450g) boneless chicken breast, thinly sliced - 2 tablespoons vegetable oil - 4 cloves garlic, minced - 2-3 Thai bird's eye chilies, finely chopped - 1 red bell pepper, sliced into thin strips - 1 cup green beans, trimmed and cut into 1-inch pieces - 1 onion, sliced into wedges - 2 tablespoons fish sauce - 1 tablespoon soy sauce - 1 tablespoon oyster sauce - 1 teaspoon sugar - 1 cup fresh Thai basil leaves The chicken is the star of this dish. Thin slices cook fast and stay juicy. Use boneless chicken breast for best results. The garlic and chilies add great flavor but can also bring heat. Adjust the amount of chilies based on your spice preference. The vegetables, like red bell pepper and green beans, add color and crunch. - Regular basil (if you can't find Thai basil) - Tofu or shrimp (as alternative proteins) If you don't have Thai basil, regular basil works in a pinch. It won't taste exactly the same but will still be tasty. For proteins, try using shrimp or tofu. They absorb flavors well and make nice substitutions. - Best sides: steamed broccoli, sautéed bok choy, or a simple salad - Recommended rice: jasmine rice for its fragrant taste Pair your spicy Thai basil chicken with steamed broccoli or sautéed bok choy for extra greens. A fresh salad also works well. Jasmine rice is the best choice here. Its fluffy texture complements the dish perfectly. {{ingredient_image_2}} - Preparing chicken and vegetables: Start by slicing the boneless chicken breast into thin strips. This helps the chicken cook evenly. Next, wash and chop your vegetables. Slice the red bell pepper into thin strips, and cut the onion into wedges. Trim the green beans and cut them into 1-inch pieces. Finally, mince the garlic and chop the Thai bird's eye chilies. Keep everything ready for quick cooking. - Making the sauce blend: In a small bowl, mix the fish sauce, soy sauce, oyster sauce, and sugar. Whisk them together until they blend well. This sauce adds a rich flavor to your dish. Set this aside for later. - Stir-frying technique: Heat 2 tablespoons of vegetable oil in a large pan or wok over medium-high heat. Once the oil is hot, add the minced garlic and chopped chilies. Sauté for about 30 seconds. This will release a fragrant aroma. Then, add the sliced chicken to the pan. Stir-fry for 5 to 7 minutes. Make sure to keep stirring so the chicken cooks all the way through. It should be no longer pink. - Ensuring perfect doneness: After the chicken is cooked, toss in the onion, red bell pepper, and green beans. Stir-fry for another 3 to 4 minutes. You want the veggies to be bright and slightly tender. This keeps them crunchy and fresh. Pour your sauce mixture over the stir-fried chicken and vegetables. Toss everything to coat well. Let it cook for an extra 2 minutes. This helps the flavors mix together. - Incorporating basil: Remove the pan from heat. Gently fold in the fresh Thai basil leaves. Stir just until the basil wilts, which takes about a minute. The heat will release its lovely aroma. - Serving tips for presentation: Serve the spicy Thai basil chicken over warm jasmine rice. For a beautiful touch, garnish with extra Thai basil leaves and slices of fresh chili. You can also add lime wedges on the side. This adds a zesty kick to your dish. Enjoy your colorful and tasty meal! Fresh ingredients matter a lot in this dish. Use fresh Thai basil for the best taste. It has a unique aroma that dried herbs can't match. Fresh chili peppers add heat and flavor. You can adjust spice levels by choosing fewer or more chilies. Start with two if you prefer milder heat. Use a wok or a large pan for even cooking. A wok heats quickly and cooks food fast. Keep your heat high while stir-frying. This helps to lock in flavors and keep chicken juicy. Aim for five to seven minutes for the chicken. The vegetables need three to four minutes to stay crunchy. If your sauce tastes too salty, add a splash of water. This helps balance the flavor. For bland sauce, mix in more soy sauce or fish sauce. You can also add a bit more sugar to enhance sweetness. If it's too spicy, add coconut milk for creaminess and to cool it down. Pro Tips Use Fresh Ingredients: Fresh Thai basil and crisp vegetables enhance the flavor and texture of your stir-fry, making it vibrant and delicious. Control the Spice Level: Adjust the number of Thai bird's eye chilies based on your heat preference, or use milder peppers if you enjoy less spice. Don't Overcook the Chicken: Stir-fry the chicken until just cooked through to keep it juicy and tender. Overcooking can make it dry and tough. Garnish for Presentation: Add extra Thai basil leaves and lime wedges when serving for a visually appealing dish and a fresh burst of flavor. {{image_4}} You can switch the chicken for other proteins. Tofu is a great choice for a vegetarian meal. Just press it to remove excess water and cut it into cubes. Shrimp also works well. Cook it until it turns pink and firm. You can even use ground meat like beef or pork. Cook it thoroughly, breaking it apart as it browns. For a plant-based version, use tofu or tempeh. Both soak up flavors well. Adjust flavors by adding more soy sauce or a dash of lime juice. You can also use mushrooms for a meaty texture. Mix in extra veggies like carrots or bell peppers. This adds color and nutrition. Try different spices to give your dish a new twist. For a Indian flair, add garam masala or cumin. A Mexican spin could use jalapeños and cilantro. You can swap Thai basil with mint or cilantro for a fresh taste. Get creative with your ingredients and make this dish your own! - Refrigeration tips: Store your spicy Thai basil chicken in an airtight container. It stays fresh for up to three days. Make sure it cools completely before sealing. This helps keep the moisture inside without making it soggy. - Freezing options: You can freeze leftovers, too. Place it in a freezer-safe container. It lasts for about one month. Just remember to divide it into smaller portions for quicker thawing. - Best methods to retain flavor: Reheat in a skillet over medium heat. Add a splash of water or oil to keep it moist. Stir often for even heating. This method keeps the flavors fresh and vibrant. - Avoiding sogginess: Avoid using the microwave if you can. If you must, use a microwave-safe dish. Cover loosely to prevent steam build-up, which can make it soggy. - Guidelines for freshness: Always check for freshness. If stored properly in the fridge, consume within three days. In the freezer, aim to eat it within one month. - Signs of spoilage: Look for off smells or changes in color. If the chicken has a slimy texture, it’s best to discard it. Trust your senses; they guide you well with food safety. Spicy Thai basil chicken is a popular Thai dish. It features chicken stir-fried with fresh Thai basil and spicy chilies. The dish has a rich, savory flavor that comes from fish sauce and oyster sauce. It is quick to make and full of vibrant colors and textures. Culturally, this dish represents the bold flavors of Thai cuisine. It highlights the use of fresh herbs and spices. Eating spicy Thai basil chicken connects you to the warm, lively street food culture of Thailand. Yes, you can easily adjust the heat level. To make it less spicy, use fewer bird's eye chilies. You can also remove the seeds for a milder taste. Try using sweet bell peppers or a pinch of black pepper as alternatives. These options will add flavor without the heat. You can serve spicy Thai basil chicken with jasmine rice. The rice absorbs the tasty sauce and balances the spice. For sides, consider fresh spring rolls or a light cucumber salad. These dishes add crunch and freshness, making your meal complete. In this post, I covered every aspect of making Spicy Thai Basil Chicken. You learned about the key ingredients, preparation steps, and cooking techniques. I provided tips for authentic flavors and shared variations, including vegetarian options. Cooking can be fun and rewarding. With the right tools and fresh ingredients, you will create a delicious meal. Follow these steps, and enjoy serving this dish. Happy cooking!

Spicy Thai Basil Chicken Flavorful Dinner Delight

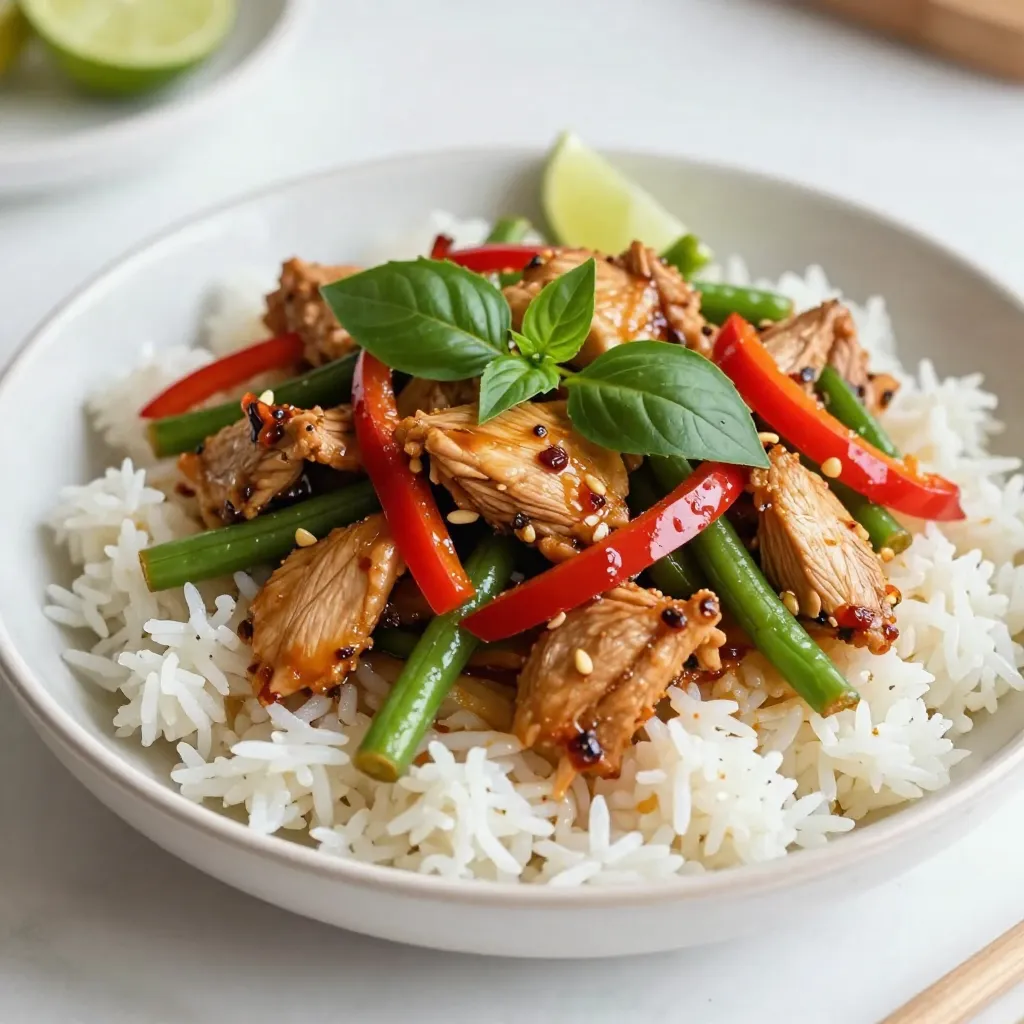
Looking to spice up your dinner routine? Look no further than Spicy Thai Basil Chicken! This vibrant dish combines tender

To make Strawberry Cheesecake French Toast, gather these simple ingredients: - 8 slices of thick bread (brioche or challah for a rich taste) - 4 oz cream cheese (softened at room temperature) - 1/4 cup granulated sugar - 1 teaspoon pure vanilla extract - 2 large eggs - 1/2 cup whole milk - 1/2 teaspoon ground cinnamon - 1 cup fresh strawberries (hulled and sliced) - 1/4 cup strawberry jam - Butter (for cooking) - Powdered sugar (for a delightful dusting) - Fresh mint leaves (optional, for garnish) These ingredients create a sweet and creamy treat. The thick bread holds the filling well, while the cream cheese adds richness. Fresh strawberries bring a vibrant flavor, and the jam gives a nice finish. Don’t skip the powdered sugar; it makes each bite feel special. The mint leaves can brighten the dish’s look and taste. {{ingredient_image_2}} First, gather your cream cheese, sugar, and vanilla. In a bowl, mix the softened cream cheese with the sugar and vanilla extract. Beat it with a hand mixer or whisk until it is smooth and creamy. Make sure there are no lumps. The right consistency should be spreadable but not too runny. If it seems too thick, you can add a splash of milk to help. Now, take four slices of your chosen bread. Spread a generous layer of the cream cheese mixture on one side of each slice. Next, take your fresh strawberries and slice them. Evenly layer the sliced strawberries on top of the cream cheese. Place the remaining four slices of bread on top to create your sandwiches. Press down gently to help keep everything together. In a shallow dish, crack two large eggs. Add the milk and ground cinnamon to the eggs. Whisk this mixture until it is well combined. Heat a skillet or griddle over medium heat. Add a pat of butter to the skillet and let it melt. Once melted, dip each sandwich into the egg mixture quickly. Let it soak for just a few seconds on each side. Transfer the sandwiches to the hot skillet. Cook them for about 3-4 minutes on each side until golden brown and a little crispy. While the French toast cooks, take a small saucepan and pour in your strawberry jam. Warm it over low heat for about 2-3 minutes, stirring often. Once the French toast is done, remove it from the skillet. Let it cool for a minute, then slice each sandwich diagonally into quarters for a nice look. Serve the warm French toast drizzled with the warm strawberry jam. For extra sweetness, dust it lightly with powdered sugar. If you want, add fresh mint leaves for a nice touch. I love using brioche or challah for this recipe. Both breads are soft and rich. Their texture holds the cream cheese and egg mix well. If you want a twist, try sourdough or whole grain bread. You can even use gluten-free bread if needed. Just ensure it is thick enough to hold everything together. Cooking French toast requires the right heat. I recommend medium heat for even cooking. If your skillet is too hot, the outside burns before the inside cooks. Aim for a golden-brown color on both sides. That's when you know it's perfect. Keep an eye on it and flip when needed. Fruits can change the taste of this dish. You can use blueberries, raspberries, or even bananas. Each fruit adds its unique flavor. Adding a sprinkle of nutmeg or a dash of vanilla can also enhance the taste. For extra fun, top it with whipped cream or a drizzle of maple syrup. Mixing flavors keeps it exciting! Pro Tips Choose the Right Bread: Opt for thick slices of brioche or challah for a rich and custardy French toast base that holds up well to soaking. Perfect Cream Cheese Mixture: Ensure your cream cheese is softened to room temperature for easy spreading and a smooth texture. Soak Just Right: Allow the sandwiches to soak in the egg mixture just long enough to absorb flavor without becoming too soggy. Serving Suggestions: For an extra touch, consider adding whipped cream or a scoop of vanilla ice cream on top for a delicious dessert twist. {{image_4}} You can swap strawberries for other fruits. Raspberries add a tart twist. Blueberries bring sweetness and color. Bananas offer a creamy texture. Mixing fruits creates a burst of flavor. Try combining strawberries and bananas for a fun mix. Each fruit adds its own charm, making this dish unique. To make this dish lighter, use low-fat cream cheese. You can also try dairy-free cream cheese. Reducing the sugar helps keep it healthy too. Use natural sweeteners like honey or maple syrup. These options keep the taste rich while cutting calories. Want a savory version? Add cheese like feta or goat cheese. You can mix herbs into the egg batter for a fresh taste. This gives the French toast a whole new vibe. Think of it as breakfast and lunch in one! A savory French toast can surprise your taste buds. To store leftover French toast, let it cool first. Place the slices in an airtight container. This keeps them fresh for up to three days. If you have leftover cream cheese mixture, store it in a separate container in the fridge. Use it within a week for the best flavor. The best way to reheat French toast is in an oven. Preheat the oven to 350°F (175°C). Place the slices on a baking sheet for about 10 minutes. This method keeps the outside crispy. The microwave is quicker but may make the toast soggy. If you use the microwave, heat on medium power for about 30 seconds. Check for warmth and repeat if needed. You can freeze cooked French toast. Let it cool completely, then place the slices in a freezer-safe bag. Remove as much air as you can before sealing. The French toast can last up to three months in the freezer. To thaw, place it in the fridge overnight. Reheat in the oven or microwave as mentioned earlier. This helps maintain its delicious texture. Yes, you can use stale bread for French toast. Stale bread absorbs the egg mixture well. It helps create a nice, soft texture inside. Fresh bread can become too soggy. Using stale bread gives you the best results. To make this recipe gluten-free, choose gluten-free bread. Look for brands like Udi’s or Canyon Bakehouse. These breads work well and still taste great. You can use gluten-free brioche or challah for richness too. You can serve fresh fruit, like blueberries or bananas, for a complete meal. Adding crispy bacon or sausage gives a nice savory balance. A dollop of whipped cream also pairs well. Enjoy with a cup of coffee or tea. Yes, you can prep this recipe ahead. Make the cream cheese mixture and assemble the sandwiches the night before. Cover them and store in the fridge. In the morning, just dip and cook. This saves time for busy mornings. In this post, we explored how to make delicious Strawberry Cheesecake French Toast, from the key ingredients to cooking tips. We covered the best bread choices, assembly, and serving ideas. Remember, you can customize your French toast with different fruits or flavors. Whether you want a sweet breakfast or a savory twist, the options are endless. Enjoy creating this tasty treat, and impress your family or friends with your skills.

Strawberry Cheesecake French Toast Irresistible Delight

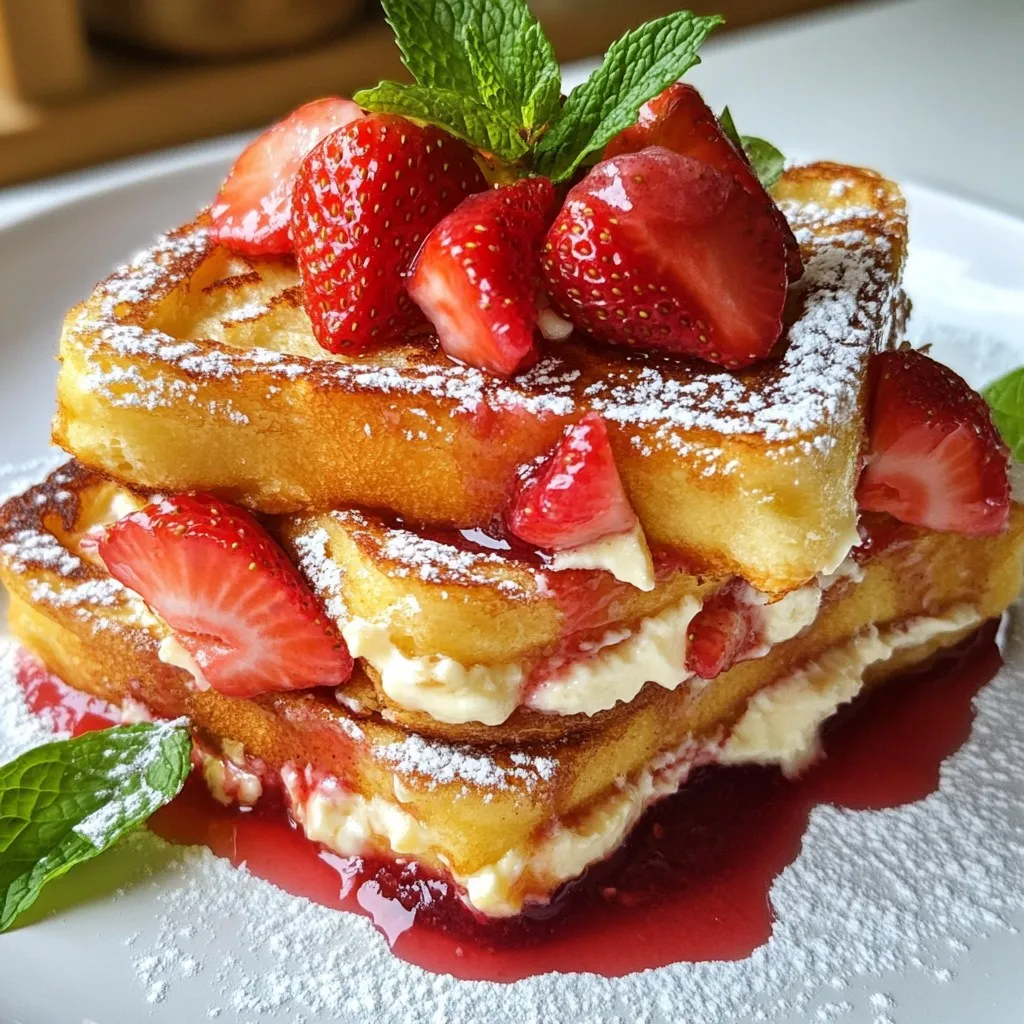
If you love sweet breakfasts, wait until you try Strawberry Cheesecake French Toast. This dish mixes creamy cheesecake with fresh

- 2 cups strawberries, hulled and sliced - 1 cup blueberries - 2 ripe kiwis, peeled and diced - 1 large mango, diced - 1 medium-sized banana, sliced - 3 tablespoons honey - 2 tablespoons fresh lime juice - Zest of 1 lime - 1 tablespoon fresh mint leaves, finely chopped - Mixing bowl - Whisk Gathering the right ingredients makes this recipe a breeze. Using fresh fruits ensures a vibrant and tasty salad. Strawberries, blueberries, kiwis, mango, and banana create a colorful mix. Each fruit brings its own sweet charm. Next, the honey lime dressing adds a zesty kick. Honey gives sweetness, while lime juice adds a bright flavor. The zest of lime enhances this dressing even more. Finally, fresh mint leaves add a refreshing touch. Now, you need only a mixing bowl and a whisk. These tools help blend the dressing and toss the salad. With these ingredients and tools ready, you set the stage for a delightful dish. {{ingredient_image_2}} To start, gather your fruit. Wash 2 cups of strawberries and slice them. Next, rinse 1 cup of blueberries and set them aside. Peel and dice 2 ripe kiwis into small pieces. Then, take 1 large mango, dice it, and add it to the bowl. Finally, slice 1 medium-sized banana and toss it in as well. Place all these colorful fruits into a large mixing bowl. The colors alone will make you smile! Now, let’s make the dressing. In a small bowl, whisk together 3 tablespoons of honey, 2 tablespoons of fresh lime juice, and the zest of 1 lime. Keep whisking until the mixture is smooth. You want all the flavors to blend nicely. The sweet honey and tangy lime work perfectly together. Next, it’s time to combine everything. Drizzle the honey-lime dressing over the fruit in the large bowl. Grab a large spoon and gently toss the salad. Be careful! You don’t want to mash the fruits. Just mix until every piece is coated in that tasty dressing. Finally, sprinkle finely chopped mint leaves on top and give it one last gentle toss. Let the salad rest for about 10 minutes. This step helps the fruits release their juices and meld the flavors together. Choosing ripe fruits is key for a sweet, tasty salad. Look for vibrant colors and slight softness. These signs show the fruit is ready to eat. For the honey, you can adjust the amount to fit your taste. If you like it sweeter, add a little more honey. If you prefer a lighter flavor, use less. To serve this salad, use a clear bowl for a colorful display. Layer the fruits for a beautiful look. You can garnish with fresh mint leaves. A slice of lime on the bowl's rim adds a nice touch. This makes your salad not just tasty but also pretty. You can prepare the salad ahead of time. Just keep it in the fridge for up to two hours before serving. This way, the flavors will mix well. If you need to make it even earlier, store the fruits and dressing separately. Mix them together right before serving for the best taste. Pro Tips Use Fresh Fruits: Always opt for ripe, seasonal fruits to enhance the flavor and sweetness of your salad. Chill Before Serving: Refrigerate the fruit salad for about 30 minutes before serving to elevate its freshness and flavor. Add Citrus Zest: Incorporating citrus zest like orange or lemon can add an extra layer of flavor to your fruit salad. Experiment with Nuts: For added crunch and nutrition, consider topping your fruit salad with toasted nuts such as almonds or walnuts. {{image_4}} You can switch up the fruits in this salad based on what's in season. Try using peaches or cherries in the summer. In the fall, apples or pears work great. You can even add citrus fruits like oranges or grapefruits for a bright twist. These fruits bring a nice zing and pair well with the honey-lime dressing. If you want to make this salad vegan, just use maple syrup instead of honey. This keeps the sweet flavor while keeping it plant-based. For those with gluten concerns, this dish is naturally gluten-free. All ingredients are safe, so everyone can enjoy it worry-free. To add some texture, consider tossing in nuts or granola. Almonds, walnuts, or pecans add a nice crunch. You could also sprinkle on some granola for a fun twist. This makes the salad heartier and gives it a satisfying bite. Just remember to mix gently to keep the fruits intact. To keep your honey lime fruit salad fresh, store it in an airtight container. This helps to keep moisture in and air out. If you use a glass container, it's easier to see the vibrant colors. You should refrigerate the salad right after serving. The salad will stay fresh for up to three days. After that, the fruits may become mushy and lose flavor. Can you freeze honey lime fruit salad? I don't recommend it. Freezing can change the texture of the fruits. When you thaw them, they may become watery and mushy. If you want to freeze it anyway, separate the fruits first. This way, you can thaw only what you need. Thaw the fruits in the fridge overnight for the best results. To prevent waste, it's best to serve the salad in small portions. Aim for a serving size of about one cup per person. This way, everyone can enjoy the salad without leftovers. If you have a large crowd, consider making two batches instead of one big bowl. This helps keep the salad fresh and tasty! You can make Honey Lime Fruit Salad a few hours ahead. Start by preparing the fruits as usual. Then, mix the honey-lime dressing separately. Keep the dressing and fruit in separate containers. This way, your fruits stay fresh and do not get soggy. When you are ready to serve, combine the two. Toss gently and let it sit for about ten minutes. This lets the flavors blend well. Yes, you can use different fruits! Try seasonal fruits for the best taste. For summer, add peaches or nectarines. In fall, use apples or pears. You can also mix in citrus fruits like oranges or grapefruits. Each fruit brings a unique flavor. Just make sure to keep the balance of sweet and tart. This salad is very healthy! It is packed with vitamins and minerals. The berries provide antioxidants. Kiwis and mangoes are full of vitamin C. Bananas add potassium for heart health. Honey gives a natural sweetness without added sugar. The fresh mint also aids digestion. Overall, this salad offers a tasty way to enjoy healthy fruits. This post explored the steps to make a delicious Honey Lime Fruit Salad. We looked at fresh fruits like strawberries, blueberries, and mango. You learned how to make a sweet honey-lime dressing and how to mix everything without mashing the fruit. Remember, using ripe fruits boosts flavor, and you can even add nuts for crunch. Storing leftovers properly keeps them fresh longer. Enjoy this tasty salad for a healthy treat or snack!

Honey Lime Fruit Salad Refreshing and Light Delight

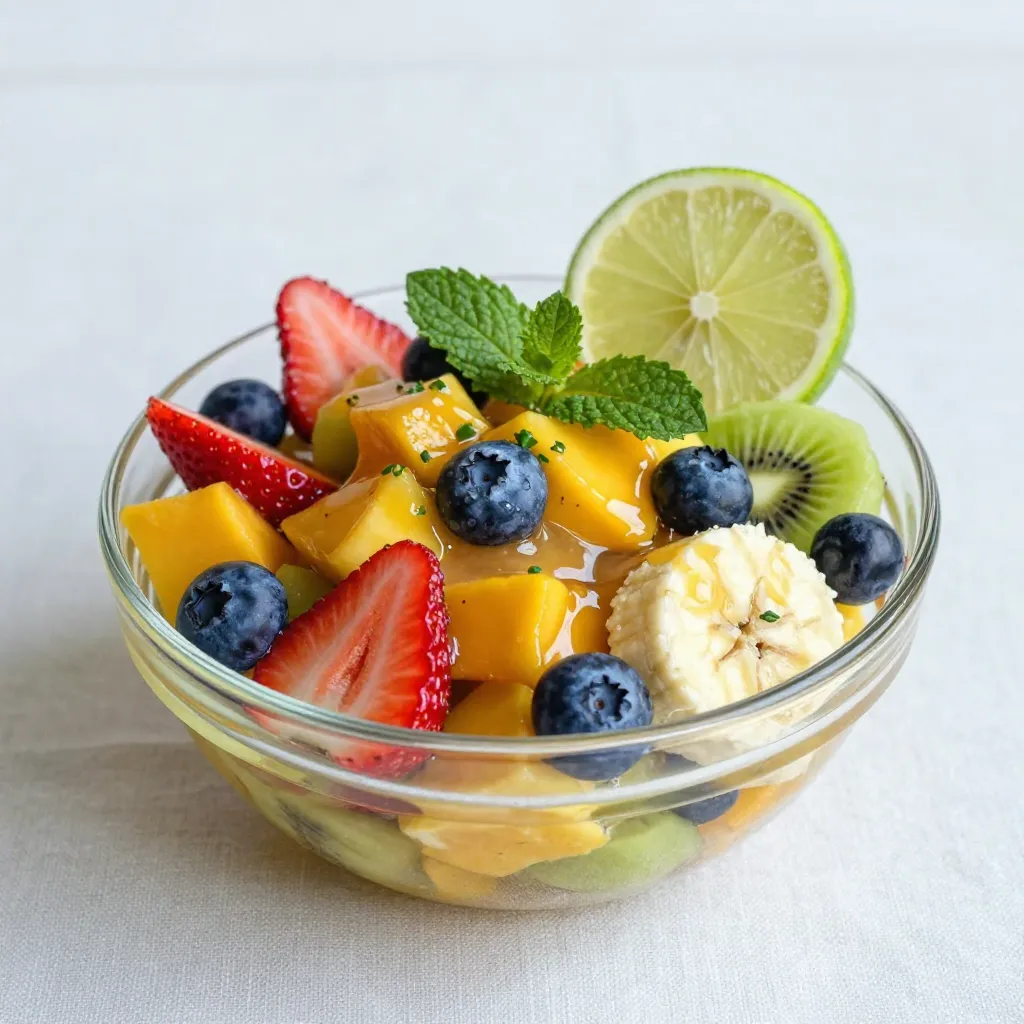
Looking for a simple, tasty treat? My Honey Lime Fruit Salad brings a burst of flavor and color to the

To make a tasty Greek orzo pasta salad, you need the following ingredients: - 1 cup orzo pasta - 1 cup cherry tomatoes, halved - 1 cucumber, diced into small pieces - 1/2 red onion, finely chopped - 1/2 cup Kalamata olives, pitted and sliced - 1/2 cup feta cheese, crumbled - 1/4 cup fresh parsley, roughly chopped - 3 tablespoons extra virgin olive oil - 2 tablespoons red wine vinegar (or fresh lemon juice) - 1 teaspoon dried oregano - Salt and freshly cracked black pepper, to taste You can boost flavor with these options: - Fresh lemon zest for a citrus kick - Chopped bell peppers for crunch - Artichoke hearts for a Mediterranean twist - A pinch of red pepper flakes for heat This salad is not just delicious; it’s nutritious too! Here’s what you can expect per serving (about 1 cup): - Calories: 250 - Protein: 6g - Carbohydrates: 30g - Fat: 12g - Fiber: 3g - Sugars: 2g This salad is vibrant and full of healthy ingredients. It’s perfect for lunch or a side at dinner. {{ingredient_image_2}} To start, grab a big pot and fill it with water. Add a pinch of salt for taste. Bring the water to a rolling boil. Once it bubbles, add 1 cup of orzo pasta. Cook it for about 8 to 10 minutes. You want it to be al dente, which means firm but not hard. After cooking, drain the pasta and rinse it under cold water. This stops the cooking and cools it down. In a large mixing bowl, combine the cooled orzo with the other ingredients. Add 1 cup of halved cherry tomatoes, 1 diced cucumber, and 1/2 finely chopped red onion. Next, toss in 1/2 cup of sliced Kalamata olives and 1/2 cup of crumbled feta cheese. Mix gently. Be careful not to break the feta, as you want those nice chunks. In a small bowl, whisk together the dressing. Use 3 tablespoons of extra virgin olive oil and 2 tablespoons of red wine vinegar. If you prefer, you can use fresh lemon juice instead of vinegar. Add 1 teaspoon of dried oregano, plus a pinch of salt and pepper. This dressing gives the salad a zesty flavor. Now, pour the dressing over the orzo mix. Toss everything together gently. Use a folding motion to keep the ingredients intact. Just before serving, fold in 1/4 cup of roughly chopped fresh parsley. Taste the salad and adjust the seasoning with extra salt and pepper, if needed. For the best flavor, cover the salad and chill it in the fridge for at least 30 minutes. This lets all the flavors blend. When ready to serve, present the salad in a large bowl. You can garnish it with more parsley and a sprinkle of feta for a beautiful touch. Enjoy! To cook orzo just right, start with a big pot. Fill it with water and add a nice pinch of salt. Bring it to a rolling boil. Once the water is boiling, add 1 cup of orzo pasta. Cook it for about 8 to 10 minutes. You want it to be al dente, so it has a slight bite. After cooking, drain the orzo and rinse it under cold water. This cools it down and stops the cooking process. When cutting vegetables, keep your tools sharp. A sharp knife makes clean cuts. For cherry tomatoes, cut them in half. This helps release their juice. For cucumbers, dice them into small pieces for even bites. A finely chopped red onion adds flavor without overpowering. Always be careful and use a cutting board. This keeps your work area safe and clean. To boost the flavors in your salad, use a zesty dressing. Whisk together 3 tablespoons of extra virgin olive oil and 2 tablespoons of red wine vinegar. You can swap the vinegar for fresh lemon juice for a bright taste. Add 1 teaspoon of dried oregano for an aromatic touch. Don’t forget to season with salt and freshly cracked black pepper. This simple dressing ties all the flavors together in your Greek orzo pasta salad. Pro Tips Cook Orzo to Perfection: Ensure you cook the orzo until it is al dente, as it will continue to absorb flavors and moisture from the dressing once mixed. Use Fresh Ingredients: Fresh vegetables and herbs elevate the dish, so opt for the ripest cherry tomatoes and crisp cucumbers for the best flavor. Customize Your Dressing: Feel free to experiment with different herbs or add a dash of garlic powder to the dressing for an extra flavor kick. Chill for Best Flavor: Refrigerating the salad for at least 30 minutes allows the flavors to meld, making every bite more delicious. {{image_4}} You can boost your Greek orzo pasta salad with protein. Cooked chicken or shrimp makes it heartier. Grilled chicken adds a nice smoky flavor. Shrimp cooks quickly and brings a sweet taste. Just chop the protein into bite-sized pieces. Mix it right into the salad. If you're looking for vegetarian options, add chickpeas or black beans. They add protein and fiber. For a vegan twist, skip the feta cheese or use a vegan substitute. Nutritional yeast can give a cheesy flavor without dairy. Fresh herbs like basil or mint can also brighten your salad. Make this salad even more exciting with seasonal swaps. In summer, toss in fresh bell peppers or ripe avocados. In fall, try diced butternut squash or roasted sweet potatoes. Seasonal veggies keep your salad fresh and vibrant all year. Just remember to cut them small so they blend well. Store your Greek Orzo Pasta Salad in an airtight container. This keeps it fresh and tasty. Make sure to let the salad cool before sealing it. If you have extra dressing, keep it separate. This will keep the salad from getting soggy. When ready to eat, drizzle the dressing on top. In the fridge, your Greek Orzo Pasta Salad lasts about 3 to 5 days. Keep it in the airtight container for best results. Check for any signs of spoilage, like odor or color changes. If it looks or smells off, it’s best to toss it out. Freezing orzo salad is not ideal. The texture of the vegetables and feta may change. If you want to freeze it, use a freezer-safe container. The salad can last about 2 months. To eat, thaw it in the fridge overnight. Add fresh herbs and dressing before serving to boost flavor. Orzo pasta is a small, rice-shaped pasta. It is made from durum wheat semolina. This gives it a firm texture and a nice bite. You can find orzo in many stores, often in the pasta aisle. It cooks quickly, making it perfect for salads like Greek orzo pasta salad. Yes! You can use many types of cheese in this salad. Feta is traditional, but you could try ricotta or mozzarella. Goat cheese also works well and adds a creamy texture. Just remember to crumble or dice the cheese before adding it to the salad. To make a gluten-free version, use gluten-free orzo pasta. Many brands offer this option made from rice or quinoa. Follow the same cooking steps. The rest of the ingredients, like vegetables and dressing, are often gluten-free too. Always check labels to be sure. Absolutely! In fact, making Greek orzo pasta salad ahead of time helps the flavors blend. You can prepare it a day in advance. Just store it in the fridge in an airtight container. Give it a quick stir before serving to refresh the flavors. This salad pairs well with many dishes. It makes a great side for grilled meats, like chicken or lamb. You can also serve it with fish or a nice vegetable platter. It’s perfect for summer picnics or potlucks. Enjoy it as a light lunch on its own, too! Greek Orzo Pasta Salad combines fresh ingredients, tasty dressing, and easy steps. We explored essential and optional ingredients to suit your taste. You learned to cook orzo and mix the salad with herbs. Tips helped you cook perfectly and slice veggies safely. You can even customize it with proteins or seasonal swaps. In closing, this salad is versatile, fun, and good for you. Enjoy making it your way and sharing with friends. Dive into this delicious dish and watch it become a favorite!

Greek Orzo Pasta Salad Fresh and Flavorful Delight

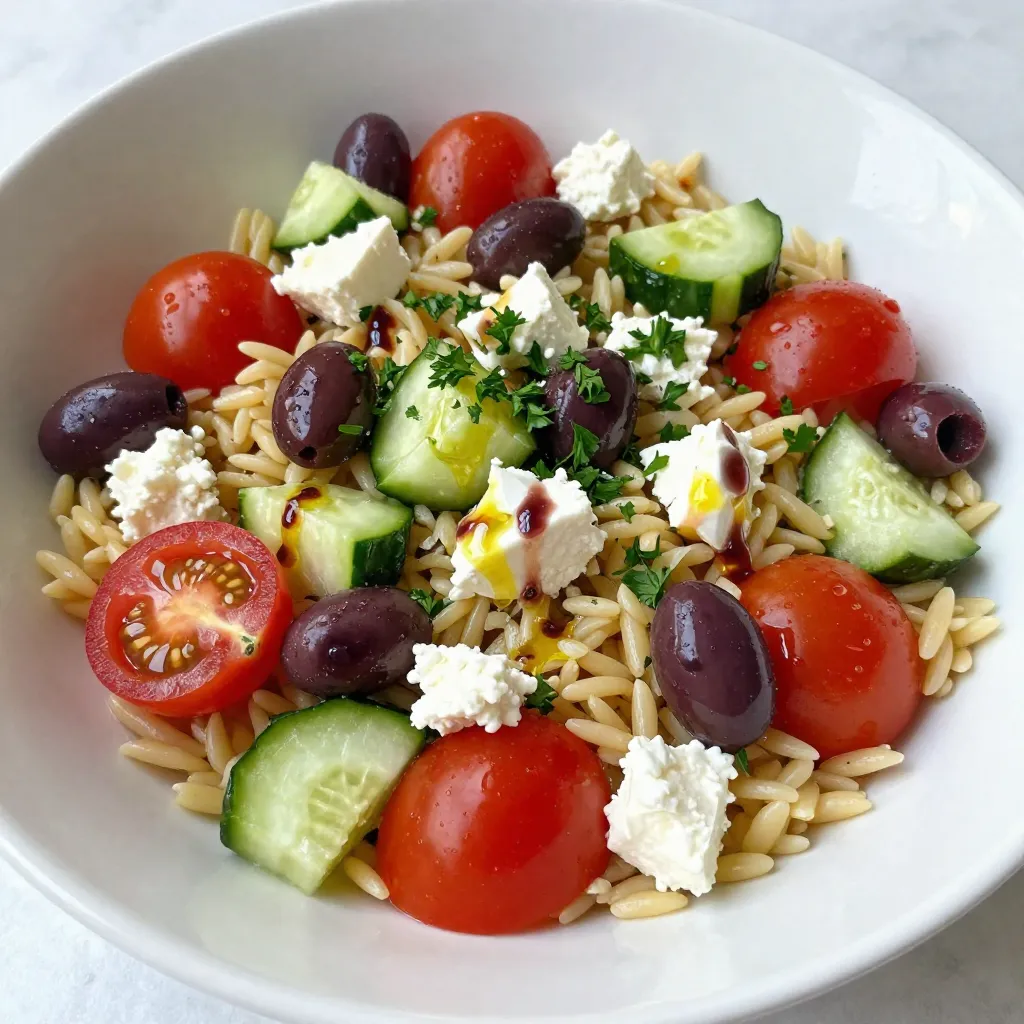
If you’re looking to elevate your summer meals, Greek Orzo Pasta Salad is a must-try! This dish is a vibrant

For these tasty tacos, you need just a few key items. Here are the main ingredients: - 1 lb large shrimp, peeled and deveined - 2 tablespoons Sriracha sauce - Juice from 2 fresh limes - 1 tablespoon extra virgin olive oil - 1 teaspoon garlic powder - 1 teaspoon ground cumin - Salt and freshly cracked pepper to taste - 8 small corn or flour tortillas These ingredients come together to make a zesty and flavorful dish. The shrimp provide protein and a great texture. Sriracha adds heat, while lime juice brings a fresh kick. Toppings can make your tacos even better. Here are some great options to try: - 1 cup red cabbage, finely shredded - 1 ripe avocado, sliced - 1/4 cup fresh cilantro, roughly chopped - Lime wedges for garnish These toppings add crunch, creaminess, and freshness. You can mix and match them based on what you enjoy. The choice of tortilla affects the taco experience. You can use: - Corn tortillas for a classic taste - Flour tortillas for a softer bite Both types work well. Choose based on your preference for flavor and texture. {{ingredient_image_2}} Start by grabbing a mixing bowl. Add 1 pound of large shrimp, peeled and deveined. Pour in 2 tablespoons of Sriracha sauce and juice from 2 fresh limes. Next, add 1 tablespoon of extra virgin olive oil, 1 teaspoon of garlic powder, and 1 teaspoon of ground cumin. Season with salt and freshly cracked pepper to taste. Mix well to coat the shrimp evenly. Let the shrimp sit in the marinade for 15 to 20 minutes. This helps the shrimp soak up all the tasty flavors. While the shrimp marinates, heat a skillet over medium-high heat. Once hot, add the marinated shrimp. Cook the shrimp for 2 to 3 minutes on each side. Look for them to turn bright pink and opaque. This shows that they are done. Remove the shrimp from the heat and set them aside. In a separate skillet or over an open flame, warm 8 small corn or flour tortillas. Heat them for about 30 seconds on each side. This makes them soft and easy to fold. To assemble the tacos, place a handful of finely shredded red cabbage on each tortilla. Add a few cooked shrimp on top. Then, add slices of ripe avocado and a sprinkle of roughly chopped cilantro. For extra zest, serve the tacos with lime wedges on the side. Enjoy your flavorful Sriracha Lime Shrimp Tacos! To boost the flavor in your tacos, focus on fresh ingredients. Use fresh lime juice instead of bottled for a zesty kick. You can also add more Sriracha for heat. Try mixing in fresh herbs like cilantro. They add freshness and depth. For a crunch, consider adding pickled onions or jalapeños. These add texture and flavor contrast. Cooking shrimp perfectly is key. Start with large, fresh shrimp. They cook faster and taste better. Always marinate the shrimp for at least 15 minutes. This allows the flavors to blend. When cooking, heat your skillet until it's very hot. Cook the shrimp for 2 to 3 minutes on each side. They should turn bright pink and opaque. Don't overcrowd the pan; cook in batches if needed. Overcooked shrimp becomes rubbery, so stay alert. For a stunning taco display, use a colorful platter. Arrange the tacos neatly, and add lime wedges for a pop of color. You can sprinkle extra cilantro on top for a fresh touch. Consider using small bowls for any toppings like avocado or cabbage. This way, guests can customize their tacos. A vibrant presentation makes the meal more inviting! Pro Tips Marinate for Maximum Flavor: Letting the shrimp marinate for at least 20 minutes allows the flavors to penetrate deeply, enhancing the overall taste of the tacos. Perfectly Cooked Shrimp: Cook the shrimp just until they turn bright pink and opaque; overcooking can make them rubbery. Aim for about 2-3 minutes per side. Warm Tortillas Properly: Warming tortillas in a dry skillet or directly over a flame adds a slight char and makes them more pliable, improving the overall texture. Fresh Garnishes Matter: Use fresh cilantro and lime wedges to elevate the dish. They add brightness and a burst of flavor that complements the shrimp perfectly. {{image_4}} If you want a change from shrimp, try other proteins. Chicken works well and cooks quickly. Just marinate it with the same Sriracha and lime mix. Fish, like tilapia or cod, is also great. These options give you a new flavor while keeping it easy. You can make these tacos vegetarian or vegan too. Use grilled portobello mushrooms for a meaty texture. Cauliflower is another tasty choice; roast it with spices for added flavor. For a vegan twist, try chickpeas. They absorb flavors well and add protein. Want more heat? Add extra Sriracha to the shrimp or mix it into the toppings. If you prefer mild, reduce the Sriracha or use a mild sauce. You can also serve the tacos with a cooling sauce, like yogurt or sour cream, to balance the spice. To store leftover shrimp tacos, first separate the shrimp from the tortillas. Place the shrimp in an airtight container. Make sure to let them cool before sealing. For the tortillas, wrap them in plastic wrap or foil. This keeps them fresh and prevents them from drying out. You can store both in the fridge for up to three days. When you’re ready to enjoy your tacos again, reheating is key. For the shrimp, use a skillet over medium heat. Cook for about two to three minutes until they are warm. Avoid overcooking to keep the shrimp tender. For the tortillas, warm them in the skillet for about 30 seconds on each side. This helps to bring back their softness. If you want to save the shrimp or other ingredients, freezing is a great option. Place cooked shrimp in a freezer bag. Remove as much air as possible before sealing. You can freeze the shrimp for up to three months. For the tortillas, you can stack them with parchment paper in between. Wrap them well and freeze. When ready, thaw in the fridge before reheating. To keep shrimp tender, avoid overcooking them. Cook shrimp for just 2 to 3 minutes per side. Look for a bright pink color and a firm texture. If shrimp cook too long, they turn rubbery. Marinating shrimp also helps, as it adds flavor and moisture. Yes, you can use frozen shrimp. Just be sure to thaw them first. Place shrimp in the fridge overnight or run them under cold water. After thawing, pat them dry before marinating. This helps the marinade stick and flavors shine through. These tacos pair well with many sides. You might serve them with: - Cilantro lime rice - Black beans - Grilled corn on the cob - A fresh green salad These sides complement the flavors of the shrimp and add variety to your meal. Enjoy your taco night! This article covered how to make delicious Sriracha Lime Shrimp Tacos. You learned about key ingredients, cooking methods, and useful tips. Explore flavor variations and storage methods to keep your tacos fresh. Enjoy experimenting with different toppings and proteins to find what you love. With these steps, you can craft amazing tacos to impress everyone. Now, it’s your turn to get started and enjoy great meals!

Sriracha Lime Shrimp Tacos Flavorful and Easy Recipe

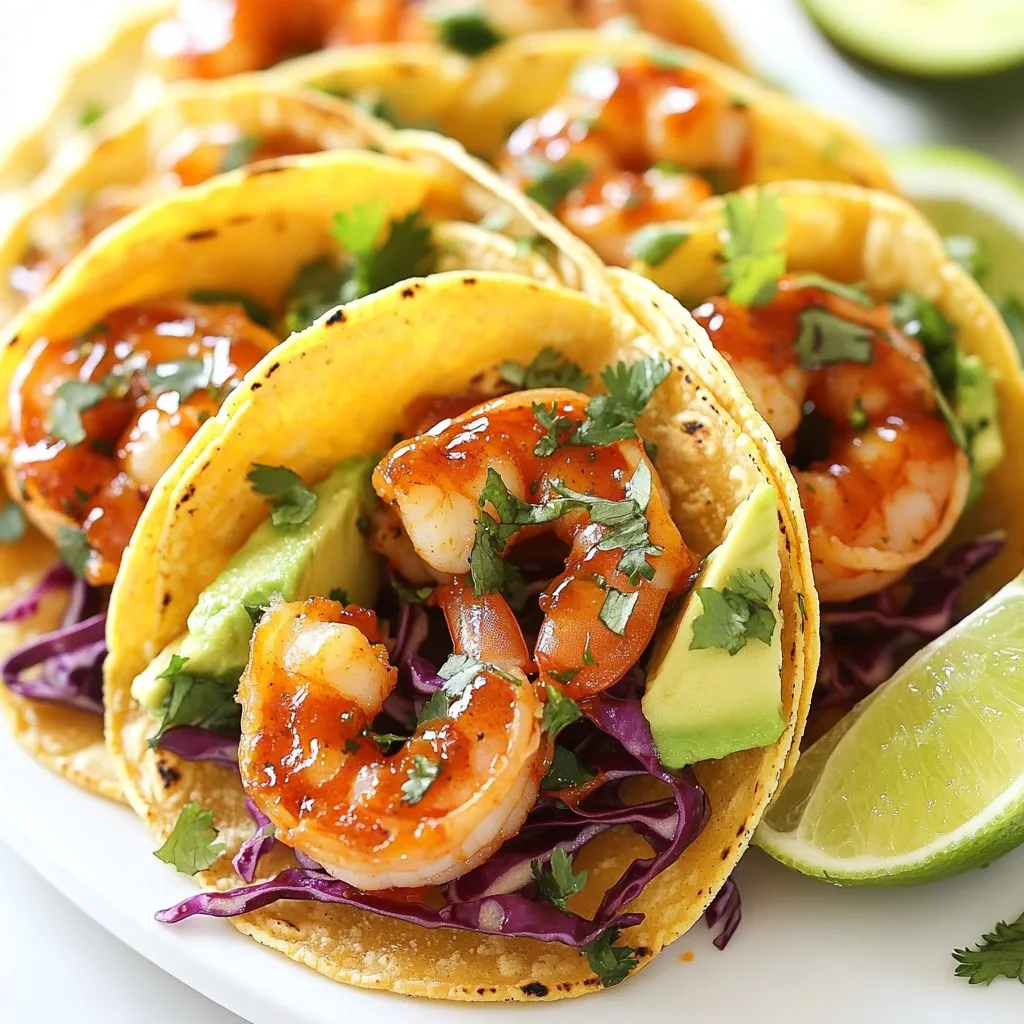
Ready for a flavor blast? These Sriracha Lime Shrimp Tacos are the perfect blend of spice and zest. In this

- 1 ½ cups all-purpose flour - ½ teaspoon baking soda - ¼ teaspoon baking powder - ¼ teaspoon salt - 1 teaspoon ground cinnamon - 1 teaspoon pumpkin pie spice - ½ cup unsalted butter, softened - 1 cup granulated sugar, plus extra for rolling - ½ cup brown sugar, packed - 1 large egg - ½ teaspoon vanilla extract - ½ cup pumpkin puree In baking, accurate measurements matter. Here are the units used: - Cups: A standard measuring cup is for dry and wet ingredients. - Teaspoons: These are for smaller amounts of spices and baking powder. - Large egg: This is the size commonly used in recipes. Choose fresh ingredients for the best flavor in your cookies. - For flour, look for a brand that feels fine and soft. - Use pure vanilla extract, not imitation, for rich taste. - Select canned pumpkin that has no added sugar or spices. - Check the butter for freshness; it should smell good and be firm. - Ensure spices are fresh; old spices lose their flavor. Using quality ingredients makes a big difference in your cookies. Enjoy the process of choosing them! {{ingredient_image_2}} First, preheat your oven to 350°F (175°C). This step makes sure your cookies bake evenly. While the oven warms up, line two baking sheets with parchment paper. This helps cookies not stick and makes cleanup easy. In a medium bowl, combine the all-purpose flour, baking soda, baking powder, salt, cinnamon, and pumpkin pie spice. Use a whisk to mix them well. This ensures all the spices blend evenly into your cookies. Set this bowl aside for later. In a large bowl, use an electric mixer to beat the softened butter, granulated sugar, and brown sugar. Mix on medium speed for about 2-3 minutes. You want this mix to be fluffy and light. This step adds air to your cookies, making them soft. Next, add the large egg, vanilla extract, and pumpkin puree to the butter-sugar mix. Beat everything together until it’s smooth and mixed well. The pumpkin puree adds moisture and a lovely fall flavor to your cookies. Now, slowly add the dry ingredient mix to the wet mixture. Use a low speed on your mixer. Mix just until they are combined. Don’t overmix! You want a soft dough, not a tough cookie. Take about 1.5 tablespoons of dough and roll it into a ball in your hands. In a small bowl, mix ¼ cup of granulated sugar with 1 teaspoon of cinnamon. Roll each dough ball in this mix until well coated. This gives your cookies a sweet, spiced crust. Place your dough balls on the lined baking sheets. Make sure to leave about 2 inches between each ball. Bake them for 10-12 minutes. The edges should be lightly golden, but the center can look soft. This keeps the cookies chewy. Once baked, take the cookies out and let them cool on the baking sheets for 5 minutes. After that, transfer them to a wire rack to cool completely. This step helps them set properly and makes them easier to eat. When making pumpkin spice snickerdoodles, some mistakes can lead to less-than-perfect cookies. Here are a few to watch for: - Overmixing the dough: Mixing too much can make cookies tough. Stop when just combined. - Using cold butter: Cold butter does not cream well. Always use softened butter for the right texture. - Not measuring flour correctly: Too much flour can make cookies dry. Scoop flour lightly, then level it off. - Skipping the chill time: Chilling the dough for 30 minutes helps cookies keep their shape during baking. Follow these dos and don'ts for the best pumpkin spice snickerdoodles: - Do use fresh pumpkin pie spice for the best flavor. - Do keep the oven door closed while baking. Opening it can cause cookies to collapse. - Don't bake cookies too long. They should look slightly underbaked in the center. - Don't skip the cooling time on the baking sheets. This helps them set properly. To make your cookies even more delightful, try these tips: - Add a pinch of nutmeg: A little nutmeg can boost the fall flavors in your cookies. - Mix in chopped nuts: Walnuts or pecans add a nice crunch and depth to each bite. - Use brown sugar: This adds moisture and a rich flavor, making your cookies soft and chewy. - Experiment with different sugars: Try using coconut sugar for a unique taste and color. These tips can help you create the perfect pumpkin spice snickerdoodles every time you bake! Pro Tips Use Fresh Pumpkin Puree: For the best flavor, use homemade pumpkin puree or high-quality canned puree. Fresh puree enhances the moistness and richness of the cookies. Chill the Dough: If time permits, chill the dough for about 30 minutes before baking. This helps the cookies maintain their shape and prevents them from spreading too much. Perfect Baking Time: Keep an eye on the cookies while baking. They should be lightly golden around the edges but still soft in the center for the perfect texture. Experiment with Spices: Feel free to adjust the spices according to your taste. Adding a pinch of nutmeg or ginger can elevate the flavor profile of your snickerdoodles! {{image_4}} To make gluten-free pumpkin spice snickerdoodles, swap regular flour for gluten-free flour. You can use a blend designed for baking. This keeps the texture soft and chewy. The flavors will still shine through. Just ensure all other ingredients are gluten-free too. For a vegan option, replace butter with coconut oil or vegan butter. Use a flax egg instead of a regular egg. Mix one tablespoon of ground flaxseed with two tablespoons of water. Let it sit for a few minutes to thicken. This keeps the cookies moist and tasty while meeting vegan needs. You can add nuts or chocolate chips for a fun twist. Chopped pecans or walnuts give a nice crunch. Dark chocolate chips add a sweet touch. Mix in about half a cup of your choice into the dough before baking. This adds flavor and texture, making each bite exciting! To keep your pumpkin spice snickerdoodles fresh, store them in an airtight container. This will help them stay soft and chewy. Place parchment paper between layers to avoid sticking. If you want to keep them longer, consider freezing. You can freeze the cookie dough or the baked cookies. For dough, scoop and roll into balls. Place them on a baking sheet and freeze until solid. Then, transfer the dough balls to a zip-top bag. For baked cookies, let them cool completely. Wrap each cookie in plastic wrap, then place in a freezer-safe container. This way, you can enjoy them later! When stored properly, baked cookies last about one week at room temperature. If you refrigerate them, they stay fresh for about two weeks. Frozen cookie dough can last for up to three months. Baked cookies keep well for about three months in the freezer. Enjoy them at their best! Snickerdoodles are unique due to their soft, chewy texture. They get their name from the cinnamon-sugar coating. This sweet topping adds a warm flavor that regular cookies often lack. Plus, Snickerdoodles use cream of tartar. This gives them a slight tang and helps them rise. Yes, you can use canned pumpkin puree in this recipe. It saves time and works well. Just make sure to use pure pumpkin, not pumpkin pie filling. This keeps the flavors balanced. Canned puree also has a nice, smooth texture, perfect for these cookies. To prevent spreading, chill your dough for 30 minutes before baking. This makes the fat firm up. Also, make sure you measure your flour correctly. Too little flour can lead to flat cookies. Lastly, don’t overmix the dough; mix until just combined. The best way to reheat leftover cookies is in the oven. Preheat it to 350°F (175°C). Place the cookies on a baking sheet for about 5 minutes. This makes them warm and soft again. You can also use the microwave, but only for a few seconds to avoid dryness. You can customize the spice flavor easily! Add extra cinnamon or try nutmeg for a different taste. You can also mix in some ginger or allspice for a unique twist. Just remember to adjust the amounts to keep the balance right. You now have a complete guide to making delicious Pumpkin Spice Snickerdoodles. You learned about the best ingredients and how to measure them accurately. We also covered easy steps for mixing and baking, along with tips for avoiding mistakes. Variations, like gluten-free and vegan options, expand your choices. Lastly, you discovered how to store or freeze your cookies effectively. Baking can be fun and rewarding, so go ahead and create your perfect batch today! Enjoy your tasty treats and share them with others!

Pumpkin Spice Snickerdoodles Delightful Fall Treat

Are you ready to embrace fall with a warm, spicy treat? Pumpkin Spice Snickerdoodles combine the cozy flavors of pumpkin

To make White Chocolate Peppermint Bark, you need a few simple ingredients. Here’s what you will need: - 2 cups white chocolate chips - 1 tablespoon coconut oil (or vegetable shortening) - 1/2 cup crushed peppermint candies (or candy canes) - 1/2 teaspoon peppermint extract (optional) - A pinch of sea salt These ingredients come together to create a sweet and minty treat. The white chocolate chips provide a creamy base. The coconut oil helps the chocolate melt smoothly. Crushed peppermint adds a delightful crunch and flavor. You can enhance the taste with peppermint extract, but it’s not a must. Lastly, a pinch of sea salt balances the sweetness perfectly. This recipe is not only delicious but also easy to make. You can find all these ingredients in any grocery store. If you want to make it even more special, you can choose high-quality chocolate and fresh peppermint candies. Enjoy the process of creating this festive delight! {{ingredient_image_2}} - Line a 9x9 inch baking pan with parchment paper. - Leave overhang for easy removal. This step is key. The parchment paper helps you lift the bark out easily. Make sure the paper hangs over the edges a bit. This will save you from wrestling with the bark later. - Combine white chocolate chips and coconut oil in a microwave-safe bowl. - Microwave in intervals until smooth. Start by adding the white chocolate chips and coconut oil together. The oil makes the chocolate creamy. Microwave in 30-second bursts. After each burst, stir well. This helps the chocolate melt evenly. It usually takes about 1 to 1.5 minutes. - Pour melted chocolate into the pan and spread evenly. - Sprinkle crushed peppermint candies and add a pinch of sea salt. Once the chocolate is smooth, pour it into the lined pan. Use a spatula to spread it out evenly. Next, while it’s still warm, sprinkle the crushed peppermint candies on top. Press them down gently so they stick well. A pinch of sea salt adds a nice touch. It makes the sweet flavors pop. - Refrigerate until firm, about 1-2 hours. - Lift out of the pan using parchment overhang and break into pieces. Now, it’s time to chill! Place the pan in the fridge for about 1 to 2 hours. This sets the bark perfectly. Once it’s firm, lift the bark out using the parchment paper. Breaking it into pieces can be fun! You can make them big or small, just how you like. To get smooth white chocolate, you must stir it often while melting. This keeps it from burning. If your microwave is 1000 watts, heat the chocolate for 30 seconds. Then stir. Repeat this until it is fully melted. For lower wattages, you may need to add a few extra seconds. Always keep an eye on it to prevent overheating. To make the bark even tastier, add peppermint extract. This gives it a richer flavor. Use only half a teaspoon for best results. Also, choose high-quality white chocolate chips. Good chocolate melts better and tastes great. Display your peppermint bark on a festive platter. This makes it look special for the holidays. You can sprinkle whole peppermint candies around the edges for extra charm. If you want to gift it, wrap pieces in clear cellophane. Tie them with a colorful ribbon to make them pop. Pro Tips Use High-Quality Chocolate: The better the chocolate, the better the bark will taste. Look for a brand with good cocoa butter content for a smooth melt. Chill the Bark Quickly: To achieve a clean break when cutting or breaking the bark, chill it in the refrigerator rather than at room temperature. Experiment with Flavors: Feel free to customize your bark by adding nuts, dried fruits, or different extracts to match your taste preferences. Store Properly: Keep the bark in an airtight container at room temperature or in the refrigerator to maintain its freshness and prevent melting. {{image_4}} You can spice up your white chocolate peppermint bark easily. Consider adding nuts like almonds or walnuts. They add a nice crunch. Dried fruit like cranberries or cherries also works well. These add a sweet and chewy texture. You can even try flavored extracts. Almond or orange extracts can give a fun twist to the taste. While white chocolate is classic, you can switch it up. Dark chocolate or milk chocolate can create rich flavors. Each type brings its own unique taste. For a fun look, swirl in colored chocolate melts. This creates a beautiful marbled effect. It’s a great way to impress your guests. Think outside the box when it comes to seasonal themes. You can add seasonal candies like caramel or toffee bits. This adds a festive touch. You can also adapt your bark for different holidays. Use sprinkles for birthdays or red and green colors for Christmas. This makes your bark a treat for any occasion. To keep your white chocolate peppermint bark fresh, store it in a cool place. Wrap each piece in plastic wrap or wax paper. This helps keep it from drying out. Place the wrapped pieces in an airtight container. A glass jar or a plastic food container works well. Make sure the container is clean and dry before adding the bark. Your peppermint bark will last about two weeks in the fridge. If you keep it in a cool, dry spot, it may last a bit longer. Look for signs of spoilage, like a change in texture or a white film on the surface. If it smells off or tastes stale, it’s best to toss it. Enjoy your festive treat! Yes, you can! Dark or milk chocolate works well too. Each type gives a unique taste. Dark chocolate has a rich flavor, while milk chocolate adds creaminess. Try mixing different chocolates for a fun twist. Just remember, the melting times may vary. Always melt carefully to avoid burning. Not really, but it adds great flavor! If you want a stronger mint taste, use it. If you skip it, your bark will still taste good. The crushed peppermint candies on top will still give a nice minty crunch. Experiment to see what you like best! Yes, you can freeze it! Cut the bark into pieces before freezing. Place it in an airtight container. It will stay fresh for about two months. To thaw, just leave it at room temperature. Avoid using the microwave, as it can change the texture. Crushing peppermint candies is easy! You can place them in a zip-lock bag and use a rolling pin. Or, use a food processor for finer pieces. If you like big chunks, just smash them lightly. Always cover them to keep the mess contained! You now have all the details to create delicious white chocolate peppermint bark. Begin by measuring your ingredients, melting chocolate, and assembling everything in a pan. Don’t forget to refrigerate it until firm. Remember, you can experiment with flavors and storage to make this treat even better! Enjoy your sweet snack or give it as a gift. With a few simple steps, you’ll impress friends and family with your tasty creation!

White Chocolate Peppermint Bark Festive Treat Recipe

Get ready to indulge in a delightful holiday treat! This White Chocolate Peppermint Bark recipe is simple and fun. With

- 1 lb ground beef - 1/2 lb ground pork (optional) - 1 large onion, finely chopped - 2 cloves garlic, minced - 1/2 cup breadcrumbs - 1/4 cup grated Parmesan cheese - 1 large egg - 1 teaspoon dried thyme - 1 teaspoon salt - 1/2 teaspoon black pepper - Ground pork adds flavor and moisture. If you prefer, use just beef. - Olive oil for cooking helps brown the meatballs. - Fresh parsley for garnish adds color and freshness. These ingredients work together to create a hearty, savory dish. The beef gives a rich flavor, while the onion brings sweetness. The garlic adds depth, and the herbs bring aroma. If you choose to add ground pork, it enhances the meatballs' texture. {{ingredient_image_2}} First, grab a medium skillet and heat 1 tablespoon of olive oil over medium heat. Add 1 large onion, finely chopped. Sauté the onion until it becomes soft and caramelized, which takes about 10 to 12 minutes. Stir in 2 cloves of minced garlic for the last 2 minutes. This adds great flavor. After that, remove the skillet from the heat and let the mixture cool slightly. Next, take a large mixing bowl. Combine 1 pound of ground beef and 1/2 pound of ground pork if you want. You can skip the pork for a beef-only version. Add 1/2 cup of breadcrumbs, 1/4 cup of grated Parmesan cheese, and 1 large egg. Don't forget 1 teaspoon of dried thyme, 1 teaspoon of salt, and 1/2 teaspoon of black pepper. Finally, mix in your cooled onion and garlic mixture. Be gentle when mixing to keep the meatballs tender. Now, it's time to form the meatballs. Preheat your oven to 400°F (200°C). With your hands, shape the meat mixture into 1-inch meatballs. Place them on a baking sheet lined with parchment paper. Make sure they are spaced out evenly. This helps them cook properly. While the meatballs bake, go back to the same skillet you used for the onions. Pour in 1 cup of beef broth and add 1 tablespoon of balsamic vinegar. Bring this to a gentle simmer. Allow it to reduce slightly for about 5 to 7 minutes. This will concentrate the flavors and make the sauce rich. When the meatballs are done baking, carefully transfer them into the skillet with the sauce. Gently coat each meatball in the sauce. Let them simmer together for an additional 5 minutes. This step allows the meatballs to soak in the rich flavor of the sauce. To serve, arrange the meatballs on a platter. Drizzle the savory sauce over them. For a pop of color, garnish with freshly chopped parsley. You can also serve these meatballs with crusty bread or creamy mashed potatoes for a full meal. To make sure your meatballs are tender, avoid overmixing the meat mixture. Mix gently until just combined. Also, adding breadcrumbs helps in keeping them soft. The egg acts as a binder and adds moisture. Using a mix of ground beef and pork can enhance tenderness. If you prefer beef-only, that works too! One common mistake is not cooking the onions enough. Caramelizing onions adds great flavor. If you rush this step, your meatballs might taste flat. Another mistake is baking the meatballs too long. Keep an eye on them to prevent dryness. Also, ensure that the meatballs are evenly spaced on the baking sheet. This helps them cook evenly. To boost flavor, use fresh herbs like parsley for garnish. Fresh herbs brighten the dish. Adding balsamic vinegar to the sauce gives a sweet touch. If you like, add a pinch of crushed red pepper for heat. You can also try different cheeses in the meat mixture. Fontina or Gruyère can add a nice twist. Pro Tips Use Fresh Herbs: Fresh thyme or parsley can elevate the flavor profile of your meatballs. Consider adding them to the meat mixture for a burst of freshness. Chill the Mixture: If you have time, chill the meatball mixture for 30 minutes before forming the meatballs. This helps them hold their shape better while cooking. Don’t Overmix: When combining the ingredients, mix just until combined. Overmixing can lead to tough meatballs, so handle the mixture gently. Garnish Creatively: A sprinkle of freshly chopped chives or a drizzle of balsamic glaze can add visual appeal and an extra layer of flavor to your dish. {{image_4}} You can change the meat in these meatballs. Use ground turkey or chicken for a lighter option. If you love flavor, try lamb for a rich twist. For a beef-only version, simply skip the pork. This makes the dish more budget-friendly. For a vegetarian option, use lentils or quinoa instead of meat. Both add protein and texture. You can also try chickpeas mashed with spices. For a vegan version, replace the egg with a flaxseed mixture. Use vegan cheese or nutritional yeast to keep the cheesy goodness. You can tweak the spices to fit your taste. Add rosemary for a fragrant touch. Smoked paprika brings a nice depth. If you like heat, sprinkle in some red pepper flakes. Fresh herbs like basil or cilantro can brighten the dish. Each choice changes the flavor and makes it unique. After you enjoy your French onion meatballs, let them cool. Place them in an airtight container. Make sure to separate the meatballs from the sauce to keep them fresh. You can store them in the fridge for up to three days. This helps keep the flavors intact and prevents sogginess. When you're ready to eat the leftovers, reheat them gently. You can use a stovetop or microwave. If using the stovetop, place the meatballs and sauce in a pan. Heat over low heat, stirring often until warm. For the microwave, place the meatballs in a bowl. Cover with a damp paper towel and heat in short bursts, checking often. This keeps the meatballs moist and tasty. To freeze your meatballs, arrange them on a baking sheet. Make sure they don’t touch each other. Freeze them for about an hour until solid. Then, transfer them to a freezer-friendly bag. Remove as much air as possible before sealing. They can be frozen for up to three months. When you're ready to eat them, thaw overnight in the fridge before reheating. This keeps them fresh and flavorful. You can serve French onion meatballs with many sides. Here are some favorites: - Crusty bread for dipping in sauce. - Creamy mashed potatoes for a hearty meal. - A simple green salad for freshness. - Pasta for a filling option. These sides balance the rich flavors of the meatballs and sauce. Yes, you can use a slow cooker! To do this: 1. Make the meatballs as directed. 2. Brown them in a skillet first for flavor. 3. Place them in the slow cooker with the sauce. 4. Cook on low for 4-6 hours. This method allows the meatballs to soak up the sauce well. Freezing meatballs is easy. Here’s how: 1. Allow the cooked meatballs to cool completely. 2. Place them on a baking sheet in a single layer. 3. Freeze them for about 1-2 hours. 4. Transfer to a freezer bag or container. 5. Label and date it before sealing. You can store them for up to three months. Yes, making the sauce ahead is a great idea! - Prepare the sauce after cooking the meatballs. - Let it cool, then store it in the fridge. - It stays fresh for 3-4 days. Reheat the sauce when you are ready to serve. This saves time and adds flavor. You now have a complete guide to making French Onion Meatballs. We covered the main ingredients, plus tips for making them tender. I shared step-by-step instructions and variations to suit your taste. Don’t forget the best storage methods to keep leftovers fresh. Experiment with flavors and enjoy your meal. Whether you serve them with pasta or bread, these meatballs will impress!

French Onion Meatballs Savory and Hearty Delight

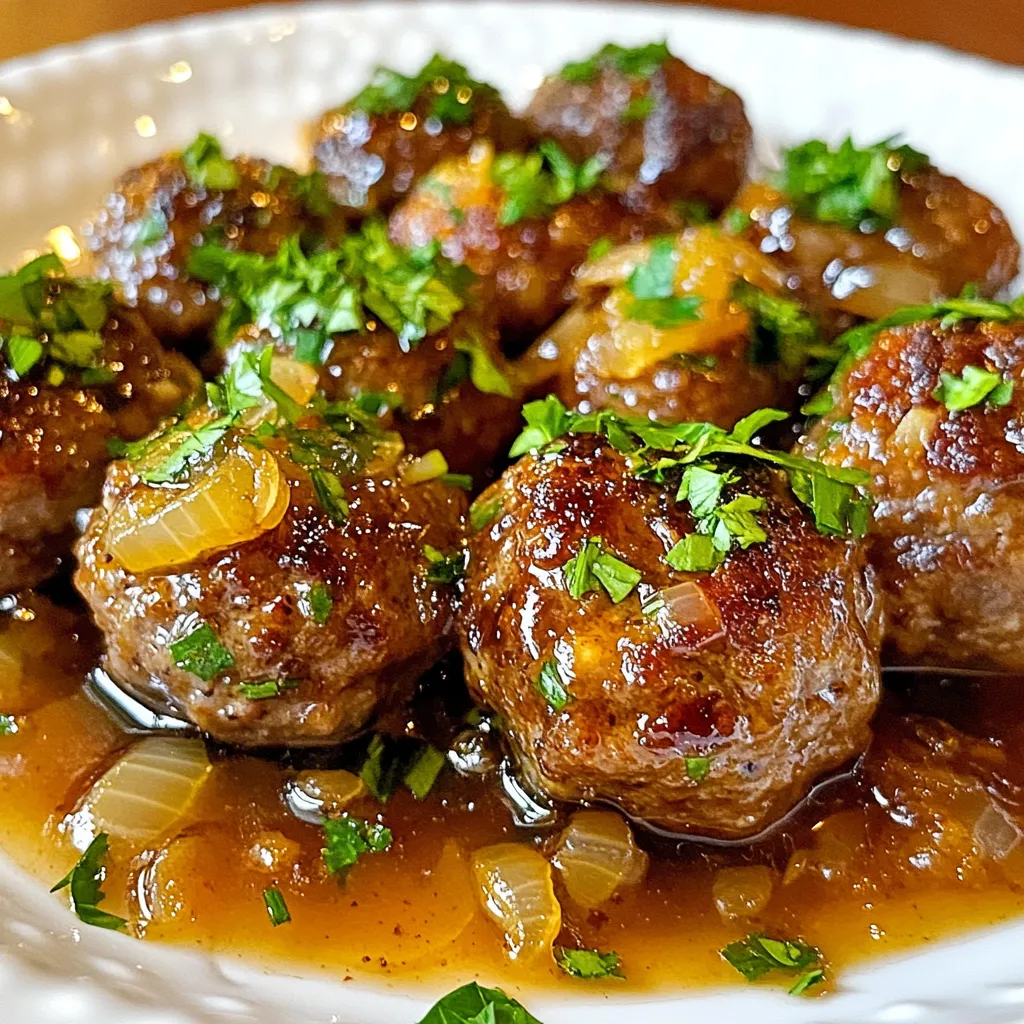
If you’re craving a dish that warms your heart and fills your belly, look no further than French Onion Meatballs!

To make maple glazed carrots, you need the following items: - 1 lb baby carrots, peeled - 3 tablespoons pure maple syrup - 2 tablespoons unsalted butter - 1 teaspoon fresh thyme leaves, finely chopped - Salt and pepper, to taste - 1 tablespoon fresh lemon juice You can enhance the look and taste of your dish with these garnishes: - Sesame seeds, for garnish (optional) These maple glazed carrots are not just tasty; they are also good for you! Here’s a quick breakdown: - Calories: About 120 per serving - Fat: 5g - Carbohydrates: 18g - Fiber: 4g - Protein: 1g These carrots bring a mix of sweetness and health benefits. They are a great side dish for any meal! {{ingredient_image_2}} Start by peeling 1 pound of baby carrots. This gives them a nice look. Next, fill a medium saucepan with about 2 cups of water. Bring it to a boil. Once boiling, add the carrots. Cook them for 5 to 7 minutes. You want them tender but still crisp. After that, drain the carrots and set them aside. This step ensures they stay fresh and vibrant in color. Now, use the same saucepan. Lower the heat to medium. Add 2 tablespoons of unsalted butter. Let it melt fully. Swirl the pan to help the butter coat the bottom. This step is key for flavor. Once melted, add the cooked carrots back into the pan. Toss them gently to coat with the butter. Next, drizzle in 3 tablespoons of pure maple syrup. Stir well to mix everything. Add 1 teaspoon of finely chopped fresh thyme for a lovely herbal note. Season with salt and pepper to taste. Lastly, squeeze in 1 tablespoon of fresh lemon juice. Toss the carrots again for 3 to 5 minutes. This warms them through and helps the glaze stick. Once done, remove from heat. Transfer to a serving dish. If you like, sprinkle with sesame seeds for crunch. Enjoy this tasty side dish! To make a great glaze, use pure maple syrup. It adds rich flavor. Start with unsalted butter. Melt it gently on medium heat. This keeps the butter from burning. Add the cooked carrots and toss them in the butter. Then, drizzle in the maple syrup. Stir until the carrots are well coated. This process ensures every bite is sweet and buttery. To keep carrots crisp, don't cook them too long. Boil baby carrots for just 5 to 7 minutes. They should be tender but still firm. Drain and set them aside. This step prevents mushy carrots that lose their texture. Remember, it’s better to undercook than overcook. You can always cook them more later. Seasoning is key to making your dish pop. Use fresh thyme for a nice herbal touch. Add salt and pepper to taste. A splash of fresh lemon juice brightens the flavor. It balances the sweetness of the maple syrup. If you want extra texture, sprinkle sesame seeds on top. This adds a delightful crunch to your dish. Pro Tips Fresh Herbs: Using fresh thyme enhances the flavor of the maple glaze, adding a fragrant aroma and depth. Dried thyme can be used in a pinch, but fresh is always best. Maple Syrup Quality: Opt for pure maple syrup over imitation syrup for a richer, more authentic sweetness. The flavor difference will elevate your dish significantly. Carrot Size: Uniform-sized carrots ensure even cooking. If using larger carrots, consider cutting them into similar-sized pieces for consistent tenderness. Serving Suggestions: These glazed carrots pair beautifully with roasted meats or can be served cold as part of a salad. Experiment with adding nuts for an extra crunch! {{image_4}} You can swap out maple syrup for honey or agave nectar. Both options add sweetness. Honey gives a floral taste, while agave is mild. Use the same amount as the maple syrup, three tablespoons. Mix in other veggies for more color and flavor. Try using sliced bell peppers or zucchini. These veggies cook quickly and add a nice crunch. Just adjust the cooking time as needed. Thyme is great, but you can also use rosemary or parsley. Rosemary adds a piney taste, while parsley gives freshness. Use one teaspoon of chopped rosemary or two teaspoons of chopped parsley for a new twist. To store leftover maple glazed carrots, let them cool first. Place them in an airtight container. They will stay fresh in the fridge for up to four days. If you plan to eat them later, try not to mix them with other foods. This helps keep their flavor strong. When you want to reheat the carrots, use a microwave or a pan. If using a microwave, place the carrots in a bowl. Add a splash of water to keep them moist. Heat for one to two minutes, stirring halfway. If using a pan, warm them over low heat. Stir often until they are hot. This method helps keep the glaze sticky and tasty. You can freeze maple glazed carrots if you want to save them for later. First, let the carrots cool completely. Then, transfer them to a freezer-safe bag. Remove as much air as possible before sealing. They can stay fresh in the freezer for up to three months. When you are ready to eat them, thaw in the fridge overnight. Reheat them gently to keep the glaze intact. Yes, you can use frozen carrots. They are convenient and save time. Just make sure to thaw them first. This way, they will cook evenly and blend well with the glaze. To caramelize the carrots, cook them longer in the glaze. After adding the maple syrup, allow them to cook for an extra few minutes. Stir them gently to avoid burning. This will enhance their natural sweetness and give a rich flavor. These carrots pair well with many dishes. You can serve them alongside roasted chicken or grilled fish. They also make a great side for a holiday meal. Add them to a salad for a sweet touch. Enjoy them with any dish that needs a pop of color and flavor! In this post, we explored how to make maple glazed carrots from start to finish. We covered the important ingredients, step-by-step cooking, and helpful tips to get it just right. We also looked at variations to suit your tastes and discussed how to store leftovers. Maple glazed carrots are a delicious side dish that can enhance any meal. Whether you’re cooking for family or friends, these tips will help you impress everyone at the table. Enjoy your cooking!

Maple Glazed Carrots Delightful Side Dish Recipe

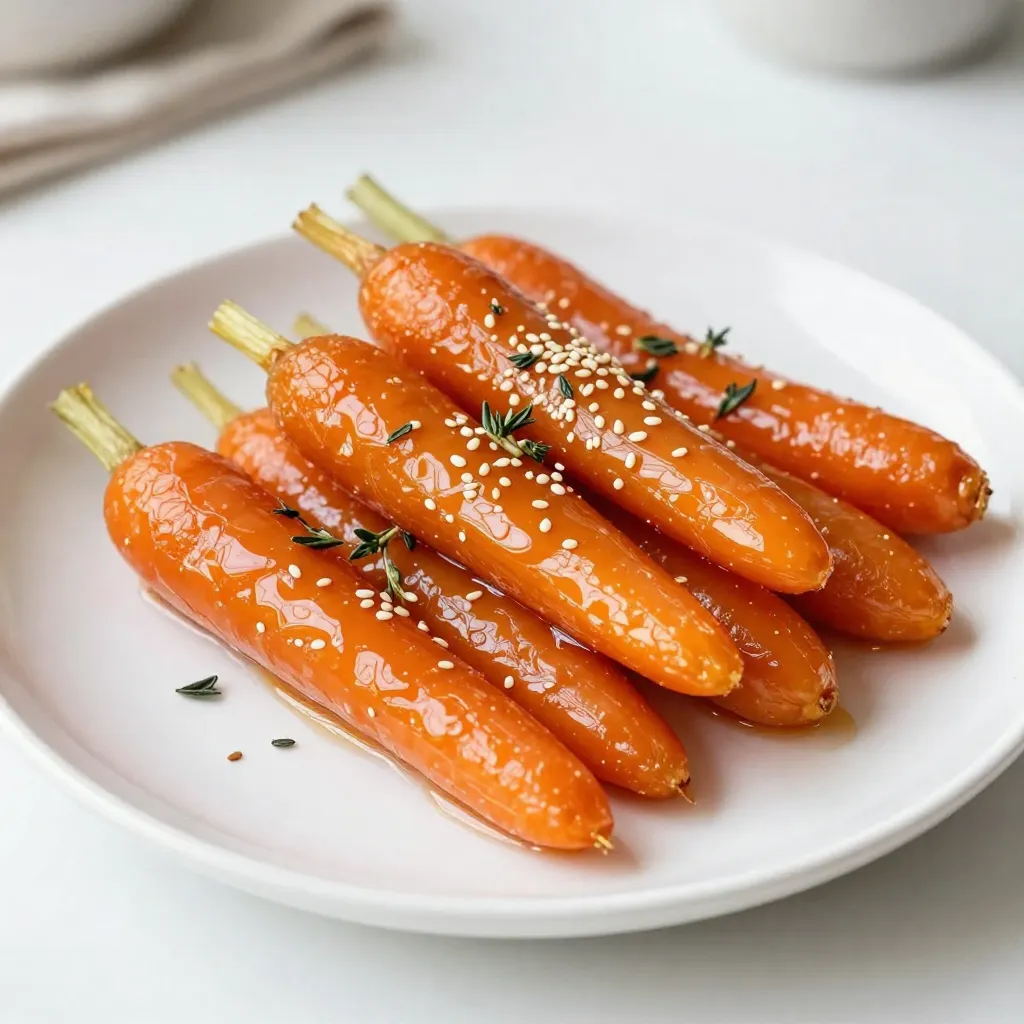
Maple glazed carrots are a tasty side dish that everyone loves. With just a few simple ingredients, you can transform

Older posts
Newer posts
← Previous Page1 … Page116 Page117 Page118 … Page122 Next →

dsad

© 2026 dailydishcraft • Built with GeneratePress

Our Policies

  • Copyright Policy
  • Cookie Policy
  • GDPR Policy
  • Privacy Policy
  • Disclaimer
  • Terms Of Use

More Information

  • Home
  • About
  • Contact
  • Appetizers
  • Dessert
  • Dinner
  • Drinks
©2026, dailydishcraft About Back To Top