Skip to content
DisclaimerTerms Of UseGDPR PolicyCookie Policy

dailydishcraft

  • Home
  • Drinks
  • Appetizers
  • Dinner
  • Dessert
  • About
  • Contact
  • Privacy Policy
DisclaimerTerms Of UseGDPR PolicyCookie Policy

Jessica

- 2 cups brown rice - 4 cups vegetable broth (or water) - 1 small onion, finely chopped - 2 cloves garlic, minced - 1 diced carrot - 1 diced celery stalk - 1 cup frozen peas - 2 tablespoons olive oil - 1 teaspoon ground cumin - 1 teaspoon turmeric - 1 teaspoon salt - 1/2 teaspoon black pepper - Fresh parsley, chopped (for garnish) Gathering the right ingredients is key for this dish. Brown rice serves as the hearty base. I love its nutty flavor and chewy texture. Vegetable broth adds depth, but you can use water if needed. The onion and garlic bring a wonderful aroma to the mix. Next, I add diced carrots and celery for crunch and sweetness. Frozen peas add color and a pop of taste. The seasonings elevate the dish. Olive oil keeps it moist and rich. Ground cumin and turmeric bring warmth and beautiful color. Salt and black pepper ensure balance, while fresh parsley adds a bright finish. Each ingredient plays a role in making this pilaf flavorful and filling. You can easily adjust the amounts based on your taste or what you have on hand. Enjoy making this simple, yet delicious dish! {{ingredient_image_2}} Start by rinsing the brown rice under cold water. This step is key. It removes extra starch. Without rinsing, the rice can turn gummy. Drain the rice well and set it aside. Next, set your Instant Pot to sauté mode. Add two tablespoons of olive oil. Once the oil is hot, toss in one small onion, finely chopped, and two cloves of minced garlic. Sauté for about three to four minutes. Stir until the onion turns soft and clear. Now, it’s time to add some color and crunch. Incorporate one diced carrot and one diced celery stalk into the pot. Continue to stir for another three to four minutes. The vegetables should soften nicely. Then, sprinkle in one teaspoon of ground cumin, one teaspoon of turmeric, one teaspoon of salt, and half a teaspoon of black pepper. Toast the spices for about one minute. This step boosts their flavors. Mix in the rinsed brown rice with the sautéed vegetables and spices. Stir well to combine everything. Then, pour in four cups of vegetable broth or water. Make sure the rice is well mixed with the liquid. Close the Instant Pot lid tightly. Set the valve to sealing. Cook on manual high pressure for 22 minutes. Once done, let the pot release pressure naturally for 10 minutes. After that, switch the valve to venting to release any remaining steam. After opening the lid, fold in one cup of frozen peas. Stir gently to mix them in. Let the pilaf sit for about five minutes. This warms the peas and makes them tender. Finally, fluff the rice with a fork before serving. This helps separate the grains for a perfect dish. To avoid gummy rice, rinse the brown rice well before cooking. Rinsing removes excess starch. This step is key for fluffy rice. Drain the rice thoroughly and set it aside. You can elevate the taste with extra spices. Try adding paprika or cayenne for a kick. Fresh herbs like thyme or rosemary also work great. Pair your pilaf with vegetables like bell peppers or zucchini. These add color and nutrition to your dish. If you switch to other types of rice, adjust the cooking time. White rice cooks faster, so reduce the time by about 10 minutes. At high altitudes, increase the cooking time by a few minutes for best results. Pro Tips Rinse Your Rice: Thoroughly rinse the brown rice before cooking to remove excess starch, which helps achieve a non-gummy texture. Sauté for Flavor: Don't skip the sautéing step! It enhances the flavors of the aromatics and spices, giving your pilaf a rich taste. Natural Pressure Release: Allowing the Instant Pot to naturally release pressure for 10 minutes helps the rice finish cooking and makes it fluffier. Garnish for Freshness: Adding freshly chopped parsley not only brightens the dish visually but also adds a burst of fresh flavor to the pilaf. {{image_4}} You can easily add protein to make this dish heartier. Here are some options: - Chicken: Cook diced chicken thighs or breasts in the Instant Pot before adding rice. Use the sauté mode first, then add the rice and broth. - Shrimp: Add shrimp in the last few minutes of cooking. They cook quickly and bring a nice flavor. - Tofu: For a vegetarian option, use firm tofu. Cube it and sauté it along with the onions and garlic. This adds texture and protein. If you're feeling adventurous, try different grains: - Quinoa: Quinoa cooks faster than brown rice. Adjust the liquid to 1.5 cups per cup of quinoa. - Mixed Grains: You can combine brown rice with other grains like farro or barley. Just make sure to adjust the cooking time and liquid based on the grains used. Mix up the flavors to suit your taste. Here are some ideas: - Mediterranean: Add olives, sun-dried tomatoes, and feta cheese. Use lemon juice for brightness. - Indian: Use spices like garam masala or curry powder. Add toasted cashews for crunch. - Asian-inspired: Stir in soy sauce or sesame oil. Top with green onions and sesame seeds for a nice finish. These variations can help you create a dish that fits your taste and needs. Enjoy experimenting! After enjoying your Instant Pot brown rice pilaf, store any leftovers in the fridge. Use an airtight container to keep it fresh. This dish lasts about 4 to 5 days in the fridge. Always let the pilaf cool down before sealing it in a container. This step helps prevent moisture buildup. If you want to keep your pilaf longer, freezing is a great option. Allow the pilaf to cool completely. Then, scoop it into freezer-safe bags or containers. Make sure to remove as much air as possible before sealing. This way, it can last about 2 to 3 months in the freezer. When it’s time to eat, defrost the pilaf in the fridge overnight. To reheat, you can use the microwave or stovetop. Add a splash of water to keep it moist. Heat until it’s warm throughout. Enjoy your pilaf without losing its savory flavors! Cooking brown rice in an Instant Pot takes about 22 minutes at high pressure. After cooking, let the pressure release naturally for 10 minutes. This helps the rice finish cooking and become fluffy. Yes, you can use brown rice instead of white rice in this recipe. Brown rice adds more fiber and nutrients. Just remember that brown rice takes longer to cook than white rice. You can serve brown rice pilaf with many dishes. It pairs well with grilled chicken, roasted vegetables, or a fresh salad. You can also top it with nuts or seeds for extra crunch. To adjust the recipe for more servings, simply double or triple the ingredients. Keep the same cooking time. The Instant Pot can handle larger amounts, but avoid overfilling it to ensure even cooking. Yes, you can use chicken broth or beef broth instead of vegetable broth. This change will add more flavor. If you want a lighter taste, you can also use water. In this blog post, we explored how to make a delicious brown rice pilaf in an Instant Pot. We covered key ingredients like brown rice, vegetable broth, onions, and garlic. I shared helpful tips for texture and flavor, as well as variations like adding protein or different grains. Cooking can be fun and simple. With a few ingredients and steps, you can enjoy a tasty dish. Remember to experiment with flavors to find what you love! Enjoy your cooking adventure!

Instant Pot Brown Rice Pilaf Flavorful and Filling Dish

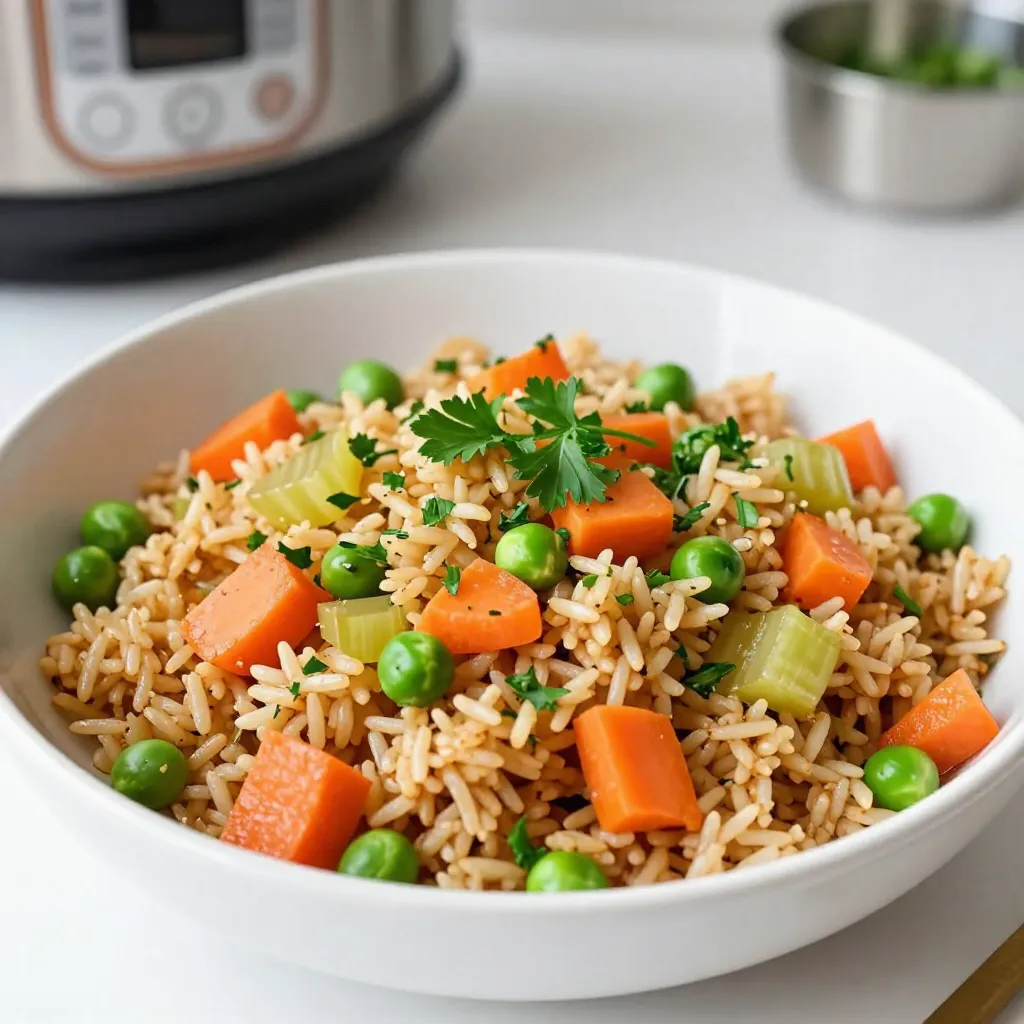
If you crave a warm, hearty dish that’s simple to make, you’re in the right place! My Instant Pot Brown

To make Coconut Almond Granola Clusters, you need: - 2 cups rolled oats - 1 cup unsweetened shredded coconut - 1 cup chopped almonds - 1/2 cup almond butter - 1/3 cup honey or maple syrup - 1/4 cup melted coconut oil - 1/2 teaspoon pure vanilla extract - 1/2 teaspoon sea salt - 1/2 teaspoon ground cinnamon You can add your favorite dried fruits for extra flavor. Try: - 1/3 cup dried cranberries - Other dried fruits like raisins or apricots Let’s break down the nutrition of these key ingredients: - Rolled oats: Great source of fiber and energy. They help keep you full. - Unsweetened shredded coconut: Adds healthy fats and a nice flavor. - Chopped almonds: Packed with protein, fiber, and vitamin E. They support heart health. - Almond butter: Provides healthy fats and protein, making it a creamy delight. - Honey or maple syrup: Natural sweeteners that add flavor and energy. - Melted coconut oil: Contains medium-chain triglycerides for quick energy. - Vanilla extract: Enhances flavor and adds a comforting aroma. - Sea salt: Balances sweetness and brings out the flavors. - Ground cinnamon: Offers antioxidants and a warm spice taste. Each ingredient plays a role in making these clusters not just tasty but also nutritious. {{ingredient_image_2}} First, heat the oven to 325°F (165°C). This helps the granola bake evenly. Line a baking sheet with parchment paper. This step makes cleanup easy and prevents sticking. In a big bowl, add 2 cups of rolled oats, 1 cup of shredded coconut, and 1 cup of chopped almonds. Sprinkle in 1/2 teaspoon of sea salt and 1/2 teaspoon of ground cinnamon. Mix well so all the dry ingredients blend together. In a separate bowl, combine 1/2 cup of almond butter, 1/3 cup of honey or maple syrup, and 1/4 cup of melted coconut oil. Add 1/2 teaspoon of pure vanilla extract. Whisk until smooth. This mixture binds the granola. Pour the wet mixture over the dry ingredients. Stir gently to coat everything well. Then, use your hands to grab small amounts and squeeze them into clusters. Place these clusters on the baking sheet, leaving space between each one. Put the baking sheet in the oven. Bake for 20-25 minutes. Halfway through, stir the mixture for even browning. The granola should become a nice golden brown when it’s ready. After baking, take the sheet out of the oven. Let the granola cool completely on the sheet. It will harden as it cools. Once cooled, break larger clusters if you like smaller bites. Store them in an airtight container at room temperature for up to two weeks. Enjoy your delicious coconut almond granola clusters! To make great clusters, you need to squeeze the mix tightly. When you form the clusters, use your hands to pack them. Aim for about 2-3 tablespoons of the mixture per cluster. This helps them stick together when baking. If the clusters are too loose, they may fall apart. Even baking is key for good granola. Spread the clusters on the baking sheet with some space in between. This allows hot air to flow around them. Stir the mixture halfway through baking. This helps them brown evenly and prevents burning. Keep an eye on them as they bake. They should be golden brown when ready. You can change the flavor with fun add-ins. Try different nuts like walnuts or pecans. Seeds like chia or flaxseed add health benefits too. Dried fruits, like cranberries or apricots, give sweetness. For a spice kick, add nutmeg or ginger. Mix and match to find your favorite combo! Pro Tips Use Fresh Ingredients: Always opt for fresh almonds and coconut for the best flavor and crunch in your granola clusters. Adjust Sweetness: Feel free to modify the amount of honey or maple syrup based on your preferred sweetness level. Experiment with Add-Ins: Try adding other nuts or seeds, such as walnuts or sunflower seeds, for additional texture and nutrition. Store Properly: Ensure that your granola clusters are completely cooled before storing them to maintain their crunchiness. {{image_4}} You can switch up the nuts in your clusters. Try using walnuts, pecans, or hazelnuts. Each nut brings its unique flavor and crunch. For seeds, consider pumpkin or sunflower seeds. These add extra nutrition and a nice texture to your granola. If you want a different flavor, explore sweeteners. You can use agave syrup, brown sugar, or even coconut sugar. Each sweetener will change the taste a bit. Maple syrup adds a rich flavor, while honey gives a floral note. Experiment to find what you like best. Spices can enhance your granola. Try adding nutmeg, ginger, or cardamom for warmth. For a health boost, include chia seeds or flaxseeds. These superfoods increase fiber and nutrients. You can also mix in cacao nibs for a chocolatey twist. To keep your coconut almond granola clusters fresh, store them in an airtight container. This prevents air from making them stale. You can keep them at room temperature. Avoid direct sunlight or heat sources that may affect their quality. If you want, you can also refrigerate them for longer freshness. Check for signs that your granola clusters are no longer good. If they smell off or have a strange texture, it’s time to toss them. Staleness can also show up if they lose their crunch. If the clusters feel soft or soggy, they are past their prime. When stored properly, your granola clusters can last up to two weeks. After that, they may lose their flavor and crunch. If you refrigerate them, they can last a bit longer, up to a month. Just remember to check for freshness before enjoying them! Yes, you can! If you want to skip the nuts, use seeds instead. Pumpkin seeds or sunflower seeds work great. They add crunch and nutrition. You can also use extra oats or coconut to fill the space. You can use peanut butter, cashew butter, or sunflower seed butter. Each option gives a different flavor. Choose one that suits your taste. Just make sure it is smooth for easy mixing. Absolutely! You can try agave syrup, brown rice syrup, or coconut nectar. Each sweetener will change the flavor a bit. Pick one that you enjoy, and adjust the amount to your taste. To make these clusters gluten-free, use certified gluten-free oats. Regular oats often contain gluten. Check labels to ensure they are safe. All other ingredients in this recipe are naturally gluten-free. Yes, these granola clusters are healthy! They are rich in fiber, healthy fats, and protein. The oats provide energy, while the coconut adds flavor and nutrition. Enjoy them as a snack or breakfast boost. If your granola clusters get stale, bake them again! Spread them out on a baking sheet. Bake at 300°F (150°C) for about 10 minutes. Keep an eye on them to avoid burning. This will help restore their crunch. Now you know how to make tasty coconut almond granola clusters. I covered key ingredients, step-by-step instructions, and tips for the best results. You can mix flavors and customize the recipe to fit your taste. Remember to store your granola properly to keep it fresh. With these tips, you can bake healthy snacks that everyone will love. Enjoy your tasty creations and feel proud of your homemade granola!

Coconut Almond Granola Clusters Nutritious Snack Idea

Looking for a tasty and healthy snack? Coconut Almond Granola Clusters are your solution! As an expert in nutritious eats,

- 4 large russet potatoes - 1 cup ground turkey or beef - 1 packet taco seasoning - 1 cup shredded cheddar cheese - 1 cup black beans, drained and rinsed - 1 cup diced tomatoes - ½ cup sour cream - ½ cup sliced jalapeños (fresh or pickled) - ¼ cup chopped green onions - Olive oil - Salt and pepper to taste When making loaded taco potato skins, choose fresh russet potatoes. They are sturdy and crisp up well. You can use ground turkey for a leaner option or beef for a richer flavor. The taco seasoning adds great taste and makes it easy to prepare. For toppings, black beans give protein and texture. Diced tomatoes add freshness. Sour cream balances the heat from jalapeños. Green onions bring a nice crunch and color. You will need olive oil to help the skins crisp up. Don’t forget salt and pepper to enhance all the flavors. These ingredients work together to create a tasty and satisfying treat. {{ingredient_image_2}} First, scrub the russet potatoes under cold water. Make sure to remove all dirt. After cleaning, dry the potatoes with a towel. Take a fork and pierce each potato several times. This allows steam to escape while baking. Next, rub each potato with olive oil. Sprinkle them generously with salt and pepper for added flavor. Preheat your oven to 400°F (200°C). Place the seasoned potatoes on the oven rack or a baking sheet. Bake them for about 45-60 minutes. You know they’re done when they are crispy outside and soft inside. While the potatoes bake, heat a skillet over medium heat. Add the ground turkey or beef to the pan. Cook until it is browned, breaking it up with a spatula. Once the meat is fully cooked, add the taco seasoning. Stir it in well. If needed, add a splash of water to help mix. Let it cook for 5 more minutes to blend the flavors. After baking, take the potatoes out and let them cool for a few minutes. Cut each potato in half lengthwise. Use a spoon to scoop out some potato flesh, leaving a thin layer on the skin. Brush the insides of each hollowed skin with olive oil. This helps them get crispy. Place the skins cut side down on a baking sheet. Bake them for another 10-15 minutes until they are crispy. Take the potato skins out of the oven and flip them over. Spoon the seasoned taco meat into each skin. Next, add black beans and diced tomatoes on top. Sprinkle shredded cheddar cheese over everything. Place the filled potato skins back in the oven for 5-10 minutes. Bake until the cheese melts and bubbles. Finally, drizzle sour cream on top, and add sliced jalapeños and chopped green onions for extra flavor. To make sure your potato skins turn out crispy, follow these steps: - Choose large russet potatoes. They have thicker skins and hold up well. - Pierce each potato with a fork several times. This helps steam escape while baking. - Rub olive oil on the skins. This adds flavor and helps with crispiness. - Bake the potatoes until they are soft inside and crispy outside. This usually takes about 45-60 minutes at 400°F (200°C). - After scooping out the insides, brush the skin again with olive oil. This step is key for getting that nice crunch. Add extra flavor to your loaded potato skins with these ideas: - Use smoked paprika for a smoky kick. It pairs well with the taco seasoning. - Try adding chili powder or cumin for more depth in taste. - Fresh herbs like cilantro or parsley can brighten the dish. - For a tangy touch, mix in lime juice with your sour cream. - You can also add more toppings like corn, avocado, or even a drizzle of hot sauce. Presentation matters! Here are some fun ideas to serve your potato skins: - Arrange the filled skins on a large platter. This makes them easy to grab. - Garnish with extra green onions and sliced jalapeños for color. - Place a small bowl of salsa or guacamole on the side for dipping. - Consider adding a few lime wedges for a fresh burst of flavor. - For a festive touch, serve with a colorful side salad to balance the meal. Pro Tips Choose the Right Potatoes: For the best texture, opt for russet potatoes, which are fluffy and hold up well when baked. Enhance Flavor with Toppings: Don’t hesitate to customize your toppings! Try adding avocado, cilantro, or corn for extra flavor and texture. Serve Immediately: These potato skins are best enjoyed hot and fresh from the oven, so serve them right after baking for maximum crispiness. Make Ahead: You can prepare the potato skins and filling in advance. Simply bake them, fill them, and then reheat before serving for a quick option. {{image_4}} You can swap out ground turkey or beef for ground chicken. This gives a lighter option. You can also try plant-based meat. Many brands offer tasty alternatives. They can match the flavor well. Just season them with taco spices as you would with meat. For a meatless filling, use black beans or refried beans. Add corn for sweetness and texture. Diced bell peppers can add crunch. You can also use mushrooms for a savory taste. Top with cheese and keep the rest the same. Different cheeses can change the taste. Try pepper jack for heat or a blend of cheeses for depth. You can also mix in spices. Cumin or smoked paprika can add a nice twist. Experiment to find your favorite flavor combo! To store leftovers, let the potato skins cool first. Place them in an airtight container. Keep them in the fridge for up to three days. This helps maintain their taste and texture. When you’re ready to eat, take them out and prepare to reheat. To freeze filled potato skins, let them cool completely. Place them in a single layer on a baking sheet. Once frozen, transfer them to a freezer-safe bag. They can stay frozen for up to three months. This makes a great meal prep option for busy days. To reheat and keep the skins crispy, use an oven. Preheat it to 375°F (190°C). Place the potato skins on a baking sheet. Heat them for about 10-15 minutes. This keeps the outside crispy while warming the inside. Avoid using the microwave, as it can make them soggy. To make Loaded Taco Potato Skins healthier, start with these tips: - Use sweet potatoes instead of russet potatoes. - Choose lean ground turkey over beef to cut fat. - Opt for low-fat cheese or a smaller amount of cheese. - Add more veggies like bell peppers or corn for extra fiber. - Swap sour cream for Greek yogurt for added protein. These changes help reduce calories while keeping the taste great. Yes, you can prepare Loaded Taco Potato Skins ahead of time. Here’s how: - Bake the potatoes and hollow them out. - Store the potato skins in the fridge for up to 2 days. - Cook the taco meat and store it in a separate container. - When ready to serve, fill the skins and bake them. This saves time and keeps the flavors fresh. You can customize your Loaded Taco Potato Skins with many toppings. Here are some ideas: - Avocado or guacamole for creaminess. - Fresh cilantro for a burst of flavor. - Salsa or pico de gallo for added zest. - Queso cheese for a cheesy twist. - Sliced olives for a salty kick. Feel free to mix and match based on what you like! You can make Loaded Taco Potato Skins easily by following the steps outlined. Start with fresh russet potatoes, flavorful meat, and tasty toppings. This dish is fun and full of flavor. You can adjust ingredients to suit your taste. Remember, storage and heating tips keep leftovers delicious. Enjoy your cooking adventure and impress friends with these tasty skins. They will love the flavors and textures you create! Happy cooking!

Loaded Taco Potato Skins Savory and Satisfying Treat

Craving a bold and tasty snack? These Loaded Taco Potato Skins are your answer! With crispy potatoes stuffed with seasoned

- 1 lb Brussels sprouts, halved - 2 tablespoons extra-virgin olive oil - Sea salt and freshly ground black pepper, to taste - 3 tablespoons natural honey - 2 tablespoons Sriracha sauce (adjust to taste) - 1 tablespoon low-sodium soy sauce - 1 tablespoon apple cider vinegar - 2 cloves garlic, finely minced - 1 teaspoon toasted sesame seeds - 2 green onions, thinly sliced To make Honey Sriracha Brussels sprouts, you need fresh ingredients. Start with one pound of Brussels sprouts. Halve them to help them cook evenly. Use good-quality extra-virgin olive oil. This oil adds flavor and helps the sprouts roast well. Season with sea salt and black pepper. These simple flavors bring out the best in the sprouts. Next, let’s talk about the honey Sriracha sauce. You will mix three tablespoons of natural honey. This sweet ingredient balances the heat from the Sriracha. Add two tablespoons of Sriracha sauce. You can adjust this based on your taste. If you like heat, add more! Include one tablespoon of low-sodium soy sauce for depth. Add one tablespoon of apple cider vinegar for tang. Finally, mix in two cloves of finely minced garlic. This adds a lovely aroma and flavor. For garnishing, you can use one teaspoon of toasted sesame seeds. These add a nice crunch. Slice two green onions thinly for a fresh touch. Together, these ingredients create a tasty and colorful dish. {{ingredient_image_2}} - Preheat your oven to 400°F (200°C) and line a baking sheet with parchment paper. - Toss the halved Brussels sprouts in a big bowl with extra-virgin olive oil. Add sea salt and black pepper to taste. Make sure each sprout gets a nice coat of oil and seasoning. - Spread the Brussels sprouts cut-side down on the prepared baking sheet. Roast them for 20-25 minutes without flipping. This helps them caramelize and get crispy. - While the sprouts roast, whisk together honey, Sriracha sauce, soy sauce, apple cider vinegar, and minced garlic in a bowl. Taste the sauce and adjust the Sriracha if you want more heat. - After 20-25 minutes, take the Brussels sprouts out of the oven. Drizzle the honey Sriracha sauce over them. Toss gently to coat each sprout with the glaze. - Return the sprouts to the oven for an additional 5-7 minutes. This step lets the sauce caramelize and stick to the sprouts nicely. To get the best flavor from your Brussels sprouts, coat them well. Use two tablespoons of extra-virgin olive oil. This helps the seasonings stick. Sprinkle in sea salt and freshly ground black pepper to taste. Toss them until each sprout shines. When roasting, flip the sprouts halfway through. This step helps them caramelize evenly and adds a nice crunch. Do you like heat? You can change the spice level by adding more Sriracha. Start with two tablespoons and taste the sauce. If you want it hotter, add more. If the dish is too spicy, just add more honey. This sweetens the mix and balances the heat. Make your dish look great! Use any glaze left on the baking sheet when serving. Drizzle it over the Brussels sprouts for extra flavor. For a pop of color, sprinkle red pepper flakes on top. This gives a nice kick and makes the dish visually appealing. Pro Tips Adjust the Heat: If you prefer a milder flavor, reduce the Sriracha sauce to 1 tablespoon, or substitute with a milder hot sauce. Perfect Roasting: For extra crispy Brussels sprouts, ensure they are spread out in a single layer on the baking sheet without overcrowding. Flavor Boost: Consider adding a splash of lime juice or zest to the honey Sriracha sauce for an additional layer of flavor. Storage Tips: Leftover Brussels sprouts can be stored in an airtight container in the fridge for up to 3 days. Reheat in the oven for the best texture. {{image_4}} If you need a vegan option, use maple syrup instead of honey. This change keeps the sweetness while making it plant-based. You can also swap fresh garlic for garlic powder. This option cuts down on prep time and still gives great flavor. Want to make it crunchier? Add nuts like almonds or pecans. They give a nice texture contrast. You can also mix in other colorful veggies, like bell peppers or carrots. This not only adds flavor but also makes the dish more appealing. For a zesty kick, add lime juice. It brightens up the dish and balances the sweetness. Fresh herbs like cilantro or parsley can also enhance the taste. They add freshness and make your dish look beautiful. Store your Honey Sriracha Brussels sprouts in an airtight container. They will stay fresh for up to 3 days in the fridge. If you can, keep the sauce separate. This helps avoid soggy sprouts. You can reheat the Brussels sprouts in the microwave or the oven. Heat them until they are warmed through. Be careful not to overcook them. This keeps the texture nice and firm. I do not recommend freezing Brussels sprouts. Freezing changes their texture. You may end up with soggy or mushy sprouts when you thaw them. Enjoy them fresh for the best taste! Yes, you can prepare the Brussels sprouts and sauce in advance. However, it’s best to roast them fresh for the best taste. The flavor shines when they are served hot and just out of the oven. These sprouts pair well with grilled meats, rice dishes, or as a side for holiday meals. They add a nice kick and balance to any main dish. Try them beside chicken, steak, or even tofu for a delicious meal. Fresh Brussels sprouts are recommended for the best texture. They roast to a nice crispness that frozen ones may lack. If you only have frozen sprouts, they can work in a pinch. Just adjust roasting times to ensure they cook through. Yes, it can be made vegan by substituting honey with maple syrup. This swap keeps the sweetness while making the dish plant-based. You still get that tasty glaze that makes the sprouts shine! This recipe for Honey Sriracha Brussels sprouts is easy and packed with flavor. You learned how to roast the sprouts, create a tasty sauce, and add fun garnishes. Adjust the spice and sweetness to fit your taste. Feel free to mix in other veggies or nuts for variety. Enjoy your delicious creation as a side dish or on its own. With these tips, your Brussels sprouts will shine at every meal!

Honey Sriracha Brussels Sprouts Flavorful and Easy Dish

Looking for a dish that’s both tasty and easy to make? Honey Sriracha Brussels Sprouts are the answer! This vibrant

To make creamy sun-dried tomato gnocchi, you need a few key ingredients: - 1 pound gnocchi (store-bought or homemade) - 1 cup sun-dried tomatoes packed in oil, drained and chopped - 2 cups heavy cream - 1 cup freshly grated Parmesan cheese - 3 cloves garlic, minced - 1 teaspoon dried basil - 1 teaspoon dried oregano - Salt and black pepper to taste - Fresh basil leaves for garnish - 2 tablespoons extra virgin olive oil These ingredients come together to create a dish bursting with flavor. The sun-dried tomatoes give a sweet, tangy taste that pairs well with the rich cream and cheese. You can add several ingredients to enhance your creamy sun-dried tomato gnocchi: - Sautéed spinach for a pop of color and nutrition. - Crushed red pepper flakes for heat. - Cooked chicken or shrimp for added protein. These add-ins offer extra layers of flavor and texture, making your dish even more delightful. If you have dietary restrictions, here are some substitutions: - Use gluten-free gnocchi for a gluten-free option. - Swap heavy cream with coconut cream for a dairy-free dish. - Nutritional yeast can replace Parmesan cheese for a vegan version. These options keep the dish tasty while accommodating various diets. You can still enjoy creamy sun-dried tomato gnocchi with these simple tweaks! {{ingredient_image_2}} To cook gnocchi, fill a large pot with water. Add a generous pinch of salt. Bring the water to a rolling boil. Then, add the gnocchi. Cook them based on package instructions, usually around 2-3 minutes. You will know they are done when they float to the surface. Once cooked, drain the gnocchi well and set them aside. This step is key to ensure a great texture. In a large skillet, heat the olive oil over medium heat. Once the oil is warm, add minced garlic. Sauté it for about 1 minute. Watch it closely, so it does not burn. Next, add the chopped sun-dried tomatoes. Sprinkle in the dried basil and oregano. Stir the mix and cook for another 2 minutes. This will bring out the rich flavors of the tomatoes and herbs. Now, pour the heavy cream into the skillet. Increase the heat slightly to bring the mixture to a gentle simmer. After it starts simmering, lower the heat. Gradually add the grated Parmesan cheese. Stir continuously until the cheese melts and the sauce becomes smooth. If the sauce is too thick, add a splash of reserved pasta water. This will help you reach the perfect creamy consistency. Finally, add the cooked gnocchi to the skillet. Gently toss them in the creamy sun-dried tomato sauce until they are well coated. Taste the dish and season with salt and freshly ground black pepper as needed. To make sure your sauce is creamy, start by heating the heavy cream slowly. This helps it blend well with the other ingredients. When you add Parmesan cheese, stir it in gradually. If the sauce feels too thick, add a splash of pasta water. This water helps thin it out while adding flavor. Fresh herbs can really boost the taste of your dish. After cooking, sprinkle some fresh basil leaves on top. They add a bright flavor that complements the sun-dried tomatoes. You can also use parsley or chives if you like. Experiment with different herbs to find your favorite mix. To keep your gnocchi from getting mushy, watch the cooking time closely. They usually take about 2-3 minutes to cook. Once they float, they are done. Drain them right away and toss them gently in the sauce. This helps keep their shape and texture, making each bite delightful. Pro Tips Use Fresh Ingredients: Whenever possible, opt for fresh basil and high-quality sun-dried tomatoes to enhance the flavor profile of your dish. Perfect Gnocchi Cooking: Be sure to cook the gnocchi until they float to the surface, indicating they are done. Overcooking can lead to a mushy texture. Adjust Sauce Consistency: If your sauce is too thick, gradually add reserved pasta water until you reach your desired creaminess. Garnish Creatively: For a refined look, consider adding a drizzle of balsamic reduction or a sprinkle of chili flakes along with the fresh basil. {{image_4}} You can make this dish vegetarian with ease. Simply swap the heavy cream for a plant-based cream. Look for options made from nuts or soy. Instead of Parmesan cheese, use a vegan cheese that melts well. This keeps the creaminess while making it plant-based. For a vegan option, use nutritional yeast. It adds a cheesy flavor without dairy. This way, you enjoy a rich taste while keeping it friendly for all diets. Add protein to your creamy sun-dried tomato gnocchi for a heartier meal. Chicken works great in this dish. Cook diced chicken in the skillet before adding garlic. Sauté until it’s golden and cooked through, then follow the usual recipe. Shrimp is another tasty choice. Add peeled and deveined shrimp after sautéing the garlic. Cook until they turn pink and opaque. This adds a lovely seafood twist to the dish. Either option gives you a filling meal that delights. Spinach and peas can elevate this dish's flavor and nutrition. Stir in fresh spinach just before adding the gnocchi. It wilts down quickly and adds a nice color. You can also use frozen peas. Add them to the cream sauce while it simmers. They brighten the dish with sweetness and add texture. Both swaps keep the dish vibrant and tasty while packing in more nutrients. To store leftover gnocchi, place it in an airtight container. Make sure to let it cool first. This helps keep the gnocchi fresh. You can store it in the fridge for up to three days. If you plan to eat it later, avoid adding the sauce. This way, the gnocchi stays firm and does not get soggy. When you're ready to enjoy your leftover gnocchi, reheating is key. First, add a splash of water or cream to a skillet. This keeps the gnocchi moist. Heat the skillet on medium-low. Add the gnocchi and gently stir it. This method warms it evenly without drying it out. You can also reheat it in the microwave. Use a microwave-safe dish and cover it with a damp paper towel. Heat in short bursts, stirring in between, until warm. If you want to save gnocchi for later, freezing is a great option. First, let it cool completely. Then, place it in a freezer-safe container or bag. Make sure to squeeze out all the air to prevent freezer burn. You can freeze it for up to three months. When you're ready to eat, thaw it in the fridge overnight. Reheat as mentioned before for the best taste. This way, you can enjoy a rich and flavorful dish anytime! Yes, you can make gnocchi from scratch. To do this, you will need potatoes, flour, and egg. First, boil the potatoes until they are soft. Then, let them cool and peel them. Mash the potatoes until smooth. Combine the mashed potatoes with flour and egg to form a dough. Roll the dough into ropes and cut it into small pieces. Finally, shape the pieces with a fork for that classic gnocchi look. This process adds a personal touch to your dish. If you want a lighter option, you can use half-and-half or whole milk. For a dairy-free alternative, try coconut milk or cashew cream. Each substitute will change the flavor and thickness. You may need to adjust the cooking time as well. Keep in mind that these alternatives might not give you the same rich taste as heavy cream, but they can still be delicious. Creamy gnocchi can last in the fridge for about 3 to 5 days. Store it in an airtight container to keep it fresh. When you are ready to eat, reheat it gently on the stove. You can add a splash of water or broth to help loosen the sauce. This way, it stays creamy and tasty. In this article, we explored the key ingredients for creamy sun-dried tomato gnocchi. You learned step-by-step cooking methods and tips for perfect flavor. We also looked at variations and storage tips to help you enjoy this dish later. Remember, cooking should be fun and flexible. Don’t hesitate to tweak recipes to suit your taste. With the right ingredients and techniques, you’ll create a warm, comforting meal every time. Enjoy your cooking journey!

Creamy Sun-Dried Tomato Gnocchi Rich and Flavorful Dish

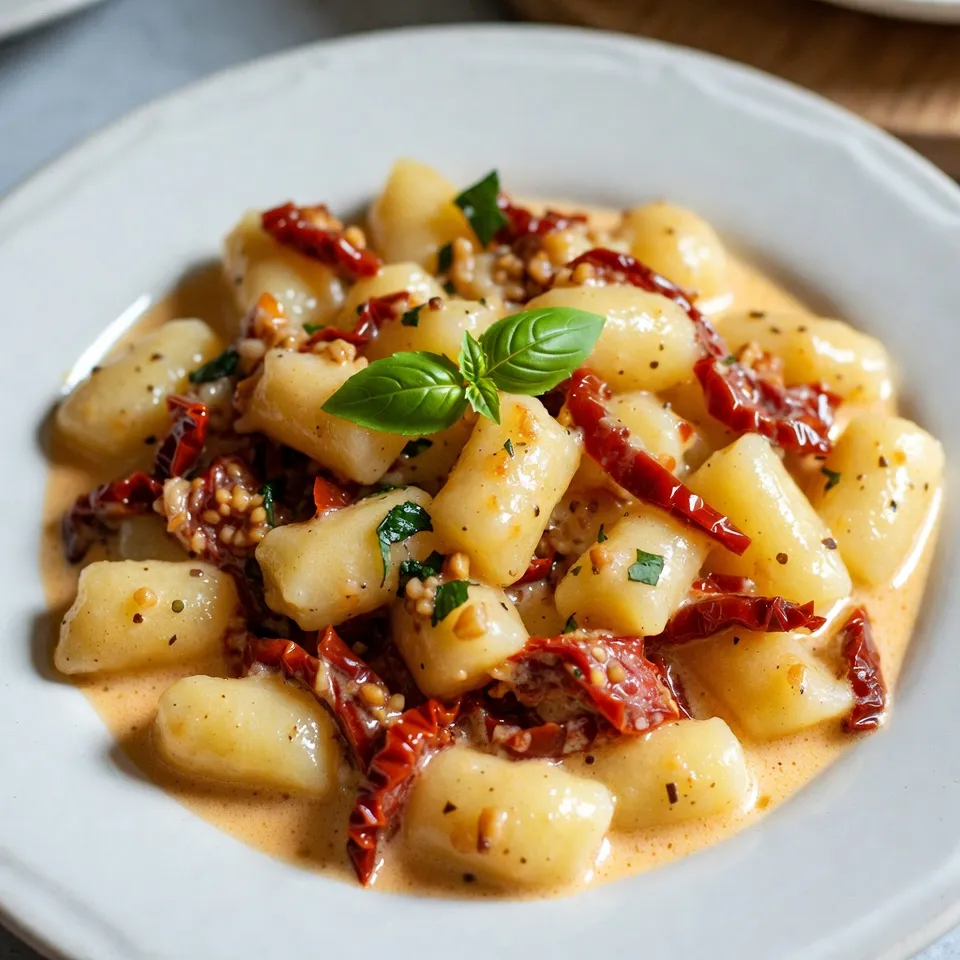
Get ready to indulge in a dish that bursts with flavor: Creamy Sun-Dried Tomato Gnocchi! In this post, I’ll share

For Spicy Peanut Noodles, you need simple yet tasty ingredients. Here’s what you'll need: - 8 oz. rice noodles - 1/4 cup creamy peanut butter - 2 tablespoons soy sauce - 1 tablespoon sesame oil - 1 tablespoon honey or maple syrup - 2 tablespoons sriracha (adjust for heat) - 1 garlic clove, minced - 1 teaspoon freshly grated ginger - 1 cup shredded carrots - 1 bell pepper (red or yellow), julienned - 1/2 cup cucumber, julienned - 1 green onion, sliced - 1/4 cup chopped peanuts (for garnishing) - Fresh cilantro for garnish - Lime wedges for serving To make your dish pop, consider these garnishes: - Sliced green onions for freshness - Chopped peanuts for crunch - Fresh cilantro for a burst of flavor - Lime wedges to add a zesty touch For added crunch, top with roasted chickpeas or crispy tofu. A sprinkle of sesame seeds can elevate both the look and taste. You can swap out some ingredients if needed: - Use gluten-free noodles if you need a gluten-free option. - Almond butter or sunflower seed butter can replace peanut butter. - Agave syrup works well instead of honey or maple syrup. - You can choose any mild oil if sesame oil is not available. These swaps keep the recipe flexible while still packing in the flavor. {{ingredient_image_2}} To cook the rice noodles, bring a big pot of water to a boil. Add 8 ounces of rice noodles. Cook them based on the package directions until they are just a bit firm. This usually takes about 4 to 6 minutes. After cooking, drain the noodles in a colander. Rinse them under cold water to stop the cooking. This keeps them from getting too soft. Set the noodles aside to cool. Next, make the peanut sauce. In a medium bowl, add 1/4 cup of creamy peanut butter. Pour in 2 tablespoons of soy sauce and 1 tablespoon of sesame oil. Add 1 tablespoon of honey or maple syrup for sweetness. For heat, include 2 tablespoons of sriracha, but you can adjust this based on how spicy you like it. Add 1 minced garlic clove and 1 teaspoon of grated ginger. Whisk the mix together until it is smooth. If it seems too thick, add a tablespoon of warm water to thin it out. Now, let’s mix the veggies. In a large bowl, add 1 cup of shredded carrots, 1 julienned bell pepper (red or yellow), and 1/2 cup of julienned cucumber. Toss them gently to mix. Next, add the cooled rice noodles to the bowl. Drizzle the peanut sauce over the noodles and veggies. Toss everything together until all the noodles and veggies are well coated with the sauce. Enjoy your flavorful and spicy peanut noodles! To make the best peanut sauce, start with creamy peanut butter. Mix it with soy sauce, sesame oil, honey or maple syrup, sriracha, garlic, and ginger. Use a whisk for smoothness. If the sauce seems thick, add warm water, one tablespoon at a time. This helps you get the right texture for easy mixing with noodles. First, boil a large pot of water. Add rice noodles and cook them as per package instructions. Watch them closely; they should be just al dente, not mushy. Once cooked, drain and rinse with cold water. This stops the cooking and keeps them from sticking together. Store leftovers in an airtight container. They stay fresh in the fridge for up to three days. When ready to eat, you can reheat them in a pan over low heat. Add a splash of water or extra sauce to keep the noodles moist. Enjoy them warm for the best taste! Pro Tips Adjust the Heat: If you prefer a milder dish, reduce the sriracha or substitute it with a milder chili sauce. Fresh Ingredients: Use fresh vegetables for the best flavor and crunch. Consider adding bell peppers of different colors for a vibrant dish. Meal Prep Friendly: This dish can be made ahead of time. Store the salad and sauce separately in the fridge and combine just before serving. Texture Variations: Experiment with toppings like sesame seeds, crispy fried shallots, or even avocado for added creaminess. {{image_4}} You can make spicy peanut noodles vegetarian or vegan by leaving out honey. Instead, use maple syrup for sweetness. You can also add more veggies. Try bell peppers, broccoli, or snap peas. This keeps your dish colorful and healthy. For extra protein, you can add chicken, tofu, or shrimp. Cook the chicken in strips until it's golden brown. For tofu, cube it and pan-fry until crispy. Shrimp cooks quickly, so add them in the last few minutes of cooking. This makes the noodles heartier and more filling. To change the heat level, adjust the sriracha. If you want more spice, add a bit more. For a milder taste, use less. You can also add chili flakes or fresh jalapeños for an extra kick. To enhance the flavor, consider adding lime juice or fresh herbs like basil or mint. This gives your dish a fresh twist! To keep your spicy peanut noodles fresh, store them in an airtight container. Make sure to let the noodles cool completely before sealing them. This helps prevent moisture buildup. If you have leftover peanut sauce, store it separately. This keeps the noodles from becoming soggy. Leftover spicy peanut noodles last up to three days in the fridge. Always check for any signs of spoilage before eating. If the noodles smell off or look strange, throw them away. You can freeze the spicy peanut noodles for up to one month. Place them in a freezer-safe bag or container. Make sure to remove as much air as possible. When ready to eat, thaw them overnight in the fridge. Reheat in a pan over low heat, adding a splash of water if needed. This helps bring them back to life! If you need a peanut butter substitute, try sunflower seed butter. It has a similar creamy texture. You can also use almond butter or cashew butter. Both add a nice flavor. For a nut-free option, tahini works well too. Remember, each substitute will change the taste a bit. Test small amounts to find what you like best. Yes, you can make these noodles ahead of time. Prepare the noodles and sauce, then mix them right before serving. If you store the noodles and sauce separately, they stay fresh. Keep them in the fridge. This way, they will taste great when you’re ready to eat. Just toss everything together and enjoy! Many sides pair well with Spicy Peanut Noodles. Try a simple cucumber salad for a cool bite. Steamed broccoli or snap peas add more color and crunch. You can also serve it with spring rolls for a fun twist. If you like protein, consider grilled chicken or shrimp on the side. These options balance the meal and make it more filling. Spicy Peanut Noodles offer a tasty blend of flavors and textures. We explored key ingredients, step-by-step cooking, and useful tips for the perfect meal. Variations allow you to customize it to your taste. You learned how to store leftovers and even found answers to common questions. Enjoy making this dish and share it with others! With these tips, your noodles will shine every time you cook. Happy eating!

Spicy Peanut Noodles Quick and Flavorful Delight

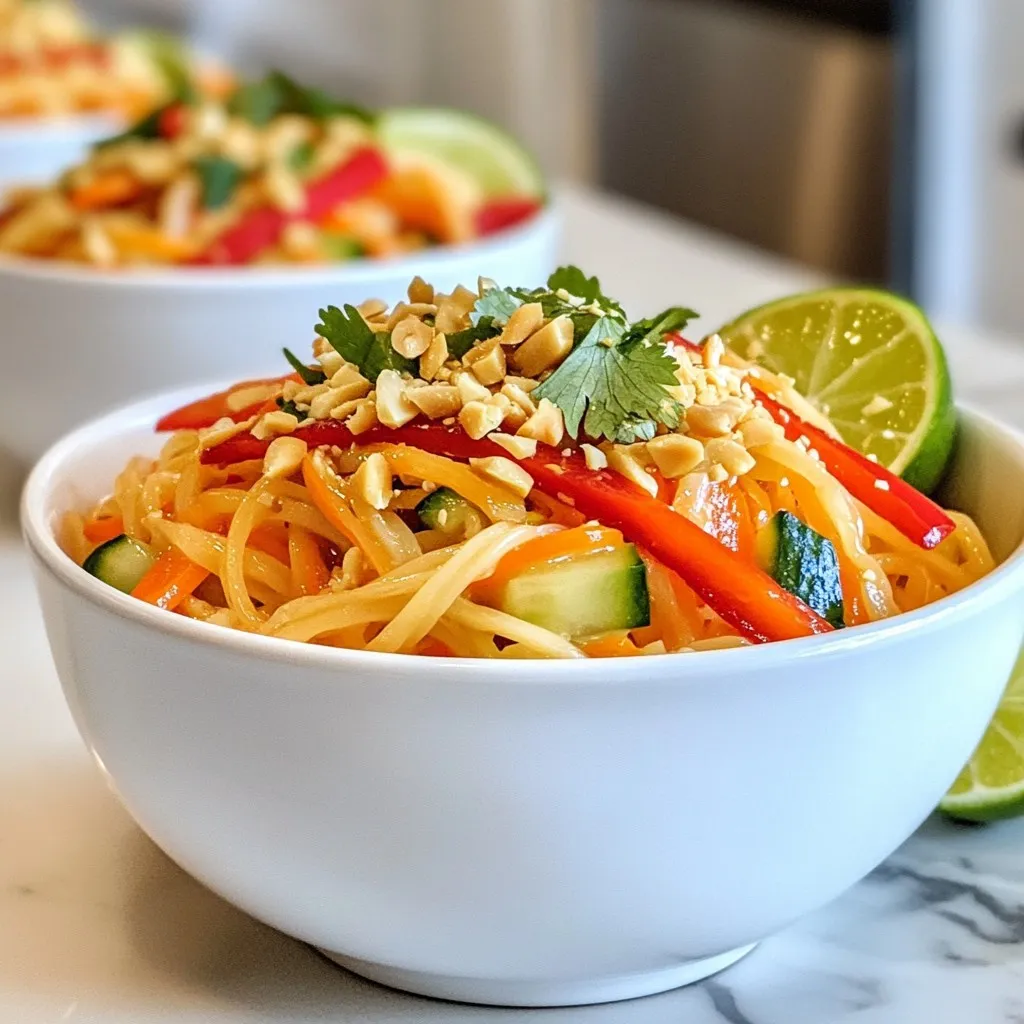
Are you ready for a meal that’s quick, easy, and packed with flavor? Spicy Peanut Noodles deliver just that! This

To make your Iced Caramel Macchiato Copycat, gather these ingredients: - 1 cup of freshly brewed espresso (or bold brewed coffee) - 1 cup of milk (choose between dairy or your favorite non-dairy alternative) - 2 tablespoons of rich vanilla syrup - 2 tablespoons of silky caramel sauce - A handful of ice cubes - Whipped cream (optional for a delectable topping) - Extra caramel sauce for a delightful drizzle These simple items give your drink that bold flavor. You can easily adjust this recipe for dietary needs. Here are some options: - Use almond, oat, or soy milk instead of dairy milk. - Try sugar-free vanilla syrup if you want to cut back on sugar. - Use a dairy-free caramel sauce for a vegan option. These swaps help make the drink fit your diet while keeping it delicious. If you run out of an ingredient, don’t worry! Here are some easy substitutions: - If you don’t have espresso, use strong brewed coffee. - Any sweet syrup can replace vanilla syrup. Maple syrup works well. - For a lighter drink, use skim milk or a low-fat milk alternative. These substitutions allow you to enjoy your macchiato no matter what you have on hand. {{ingredient_image_2}} To start, brew your espresso or strong coffee. You want it bold for that rich taste. If you don’t have an espresso machine, no worries! Just use a French press or a drip coffee maker. Once it’s brewed, let it cool for a few minutes. This step is key because hot coffee can melt the ice too fast. Grab a large glass for your drink. Pour 2 tablespoons of vanilla syrup into the bottom first. This syrup adds a sweet touch. Next, fill the glass halfway with ice cubes. Make sure there’s space for the milk and espresso. Now, pour in 1 cup of milk. You can use any milk you like—dairy or non-dairy. Stop pouring when you have about an inch of space left at the top. This is where the magic happens. Slowly pour your cooled espresso over the back of a spoon. This trick helps the espresso float on top of the milk, creating beautiful layers. Now, drizzle 2 tablespoons of caramel sauce over the top. Watch it cascade down the sides of the glass. For an extra treat, add whipped cream on top. Finish by drizzling more caramel sauce for a sweet touch. Finally, stir gently to mix everything together before you sip. Enjoy your homemade iced caramel macchiato! To get the best flavor in your iced caramel macchiato, use fresh espresso. Fresh coffee makes a big difference. If you do not have espresso, strong brewed coffee works too. Choose a bold roast for a rich taste. Use good quality vanilla syrup; it adds sweetness and depth. Make sure your caramel sauce is smooth and thick for the best drizzle. Presentation is key to enjoy your drink. Use a tall glass to show off the layers. Start with the vanilla syrup at the bottom. Pour the milk slowly to keep the layers. When you add the espresso, pour it over the back of a spoon. This trick helps it float beautifully. Top with whipped cream for a nice touch. Drizzle more caramel sauce on top for extra sweetness. Avoid using hot espresso; it can melt your ice too fast. Let it cool first. Don’t rush the layering; take your time to pour each ingredient slowly. If you want a sweeter drink, add more vanilla syrup or caramel sauce. Lastly, don’t skip the whipped cream; it adds creaminess and looks great. With these tips, your iced caramel macchiato will be a hit! Pro Tips Espresso Temperature: Allow your espresso to cool slightly before adding it to the drink; this prevents the ice from melting too quickly and diluting your beverage. Layering Technique: Pour the espresso over the back of a spoon to create beautiful layers that not only look great but also enhance the drinking experience. Milk Choices: Experiment with different types of milk, such as oat or almond, to customize the flavor and creaminess of your macchiato to your liking. Whipped Cream Delight: For an extra indulgent treat, try flavoring your whipped cream with a hint of vanilla or a sprinkle of cinnamon before adding it to your drink. {{image_4}} You can add different flavors to your iced caramel macchiato. Try hazelnut, almond, or even chocolate syrup. Just swap out the vanilla syrup for any of these. You can keep the same amount, about 2 tablespoons. This change gives your drink a fun twist. Each flavor will change the taste in a special way. Experiment with what you like best! For a dairy-free or vegan version, choose non-dairy milk. Almond milk, oat milk, or coconut milk work well. These options keep your iced caramel macchiato creamy and tasty. Use the same measurement, 1 cup, as you would with regular milk. Always check labels to ensure your syrups are vegan. This way, you enjoy a delicious drink while sticking to your diet! You can make your iced caramel macchiato sweeter or less sweet. If you want it sweeter, add more vanilla syrup or caramel sauce. Just one extra tablespoon can make a big difference. If you prefer less sweetness, use less syrup or caramel. You can also skip the whipped cream if you want to cut back on sugar. Adjust to match your taste and enjoy every sip! If you have extra iced caramel macchiato, store it in the fridge. Use an airtight container to keep it fresh. It's best to drink it within 24 hours. The ice will melt, but the flavor should still be good. If you want to save the layers, keep the milk and espresso separate. If you brewed too much coffee, you can reheat it. Pour the leftover coffee into a pot or microwave-safe cup. Heat it gently on the stove or microwave. Be careful not to overheat; this can change the taste. Ideally, enjoy your coffee fresh. - Espresso or Coffee: Use within 24 hours for best taste. - Milk: Check the date on the carton. Usually good for about a week after opening. - Vanilla Syrup: Lasts a few months if stored in a cool place. - Caramel Sauce: Can stay fresh for several months, but check for any signs of spoilage. - Ice Cubes: Best used within a few weeks to avoid freezer burn. Knowing how to store your ingredients helps keep your iced caramel macchiato tasting great! You can use strong brewed coffee instead. Just brew a cup of bold coffee. Let it cool down a bit. This keeps the ice from melting too fast. Follow the same steps as the espresso version. Pour the coffee over the milk for that nice, layered look. Yes, cold brew works great! It has a smooth taste. Just make sure it’s strong enough. Use about 1 cup of cold brew. Follow the same steps in the recipe. Pour it gently over the milk to keep those layers. You can use any milk you like. Dairy milk gives a rich flavor. Almond or oat milk is great for a lighter taste. Coconut milk adds a fun twist. Choose what you enjoy most for your drink. The flavor will change with each milk type, so feel free to experiment! You learned how to craft a great iced caramel macchiato. We covered key ingredients, swaps for diets, and step-by-step instructions. Tips helped you avoid mistakes and improve flavor. We explored fun variations like iced versions and vegan choices. Finally, we shared storage info and answered common questions. Enjoy making this drink at home. It’s a delicious treat you can share with friends!

Iced Caramel Macchiato Copycat Bold Flavor Recipe

Who doesn’t love a refreshing iced caramel macchiato on a warm day? In this guide, I’ll show you how to

- 2 cups all-purpose flour - 2 teaspoons instant yeast - 1 teaspoon granulated sugar - 1 teaspoon salt - 3/4 cup warm water (about 110°F or 43°C) - 1/4 cup high-quality olive oil - 2 cups mozzarella cheese, shredded - 1/2 cup Parmesan cheese, grated - 4 cloves garlic, minced - 1 tablespoon fresh parsley, finely chopped - 1 teaspoon dried Italian herbs (such as oregano, basil, or thyme) - Melted butter for brushing You can use other flours if you like. Almond flour or whole wheat flour can work well. For a vegan dish, try vegan cheese. Many brands offer good melt options. If you need gluten-free, use a gluten-free flour blend. It will change the texture a bit but still tastes great. {{ingredient_image_2}} To start, gather your dry ingredients: - 2 cups all-purpose flour - 2 teaspoons instant yeast - 1 teaspoon granulated sugar - 1 teaspoon salt In a big bowl, mix these together. Next, add the wet ingredients: - 3/4 cup warm water (about 110°F or 43°C) - 1/4 cup olive oil Stir with a wooden spoon until a dough forms. Now, place the dough on a floured surface. Knead it for 5-7 minutes until it feels smooth and elastic. If it sticks, sprinkle more flour. Once kneaded, shape the dough into a ball. Put it in an oiled bowl. Cover it with a damp cloth and let it rise in a warm spot for about 1 hour. The dough should double in size. When it’s ready, punch it down gently. This helps release the air. For the cheesy filling, grab a small bowl. Mix together: - 2 cups shredded mozzarella cheese - 1/2 cup grated Parmesan cheese - 4 cloves minced garlic - 1 tablespoon finely chopped fresh parsley - 1 teaspoon dried Italian herbs Mix well until everything is blended. This filling will give your tree great flavor! Once the dough is ready, roll it out on a floured surface into a rectangle. Aim for about 12x18 inches in size. Cut the dough into 2x2 inch squares. Take each square and place a tablespoon of the cheese mixture in the center. Gather the corners and pinch them to seal. Now, arrange these pouches in a tree shape on a baking sheet lined with parchment paper. Make sure to create a trunk at the bottom using 3-4 squares. Preheat your oven to 375°F (190°C). After assembling, cover the tree with a cloth. Let it rise for another 30 minutes. This second rise helps make the dough fluffy. Before baking, brush melted butter over the top for a golden finish. Bake for 20-25 minutes. Keep an eye on it! The tree should be golden brown with bubbling cheese inside. To make the dough just right, you'll want a smooth and elastic texture. Start by mixing the flour, yeast, sugar, and salt well. As you add warm water and olive oil, stir carefully. Knead the dough for about 5-7 minutes. If it feels sticky, sprinkle a bit more flour. This helps you avoid a mess and makes it easier to shape later. Adding herbs or spices can really boost the taste. Fresh parsley, garlic, and dried Italian herbs work great. You can even try adding crushed red pepper for some heat. For a tasty garlic butter topping, mix melted butter with minced garlic and a pinch of salt. Brush this mix on the dough before baking. It adds a nice, rich flavor. When it comes to serving, presentation matters! You can garnish your pull-apart tree with fresh herbs or cherry tomatoes around it. This adds color and makes it look festive. Serve it on a beautiful platter at your holiday gathering. It’s fun for guests to pull apart the cheesy pouches and enjoy a warm, cheesy treat together. Pro Tips Use Fresh Ingredients: For the best flavor, use fresh garlic and high-quality cheeses. Fresh ingredients will enhance the overall taste of your pull-apart tree. Control the Dough Consistency: If your dough is too sticky, add flour gradually until you achieve a smooth, elastic texture. This will make it easier to shape your tree. Customize the Cheese: Feel free to mix different cheeses, such as cheddar or gouda, for a unique flavor profile. Experimenting with cheese combinations can create exciting variations. Serve with Dipping Sauces: Consider serving your cheesy tree with marinara sauce or a garlic herb dip for added flavor and enjoyment. It makes for a delightful appetizer experience! {{image_4}} You can change the cheese in this recipe to suit your taste. Try using cheddar for a sharper flavor. Gouda adds a nice creaminess. For a tangy kick, use feta or blue cheese. You can also combine different cheeses for a layered taste. Incorporate other fillings too! Add cooked spinach or sun-dried tomatoes for a new twist. You could even include cooked bacon or sausage for extra flavor. These options make your pull-apart tree even more special. To make this dish vegan, swap out the cheese for plant-based options. Many vegan cheeses melt well and taste great. Use almond milk or soy milk to replace the warm water for a dairy-free version. For low-carb or keto diets, use almond flour instead of all-purpose flour. You can also reduce the sugar. This way, you can enjoy the same delicious taste while sticking to your diet. You can create holiday-themed trees too! Use red and green ingredients like roasted red peppers or fresh basil. For a winter theme, add some fresh rosemary for a pine-like flavor. Seasonal flavors also work well. In fall, try pumpkin spice or sage. In spring, add fresh herbs like dill or chives. These variations keep your Cheesy Garlic Pull-Apart Tree exciting for every occasion! To store leftovers, wrap your Cheesy Garlic Pull-Apart Christmas Tree in plastic wrap. Place it in an airtight container. This keeps it fresh for up to three days. For best results, let it cool completely before wrapping. For reheating, preheat your oven to 350°F (175°C). Place the tree on a baking sheet and cover it with foil. Heat it for about 10-15 minutes. This method keeps the cheese gooey and the bread soft. To freeze the pull-apart tree, let it cool first. Then wrap it tightly in plastic wrap and aluminum foil. This helps prevent freezer burn. You can freeze it for up to two months. When you’re ready to enjoy it, remove it from the freezer. Thaw it in the fridge overnight. After thawing, reheat it in the oven at 350°F (175°C) for 15-20 minutes. In the fridge, your cheesy tree stays fresh for about three days. After that, the bread may become hard. Look for signs of spoilage. If it smells bad or has mold, it’s time to toss it. Fresh cheese should have a pleasant smell, and the bread should feel soft and springy. If your dough feels sticky, add flour slowly. Start with one tablespoon at a time. Knead the dough after each addition. Keep adding until the dough feels smooth. This way, you get the right texture. You can use whole wheat flour, but it changes the texture. Whole wheat is denser and adds fiber. It may make the dough less fluffy. If you mix it with all-purpose flour, you can balance the flavors. This cheesy treat pairs well with many sides. Try fresh veggies like cherry tomatoes or bell peppers. You can also serve a light salad. A warm bowl of marinara sauce for dipping is a great choice too. Look for a golden brown color on the dough. You should see cheese bubbling out from the seams. Tap the bottom; it should sound hollow. These signs tell you that your pull-apart bread is done. You’ve learned how to create a fun, festive cheesy garlic pull-apart Christmas tree. We covered the ingredients, from all-purpose flour to the herbs. You saw how to make the dough and assemble the tree. I shared tips for perfecting your dough, enhancing flavor, and presenting it nicely. Remember, you can customize it for diets and occasions. With a little practice, you’ll impress everyone at the holiday gathering! Enjoy baking and sharing this special treat.

Cheesy Garlic Pull-Apart Christmas Tree Delight

Looking for a festive treat that will impress your guests? This Cheesy Garlic Pull-Apart Christmas Tree Delight is just what

To make Strawberry Banana Oatmeal Cookies, you will need a few simple ingredients. Each one plays a key role in creating a tasty treat. Here’s what you will need: - 1 cup rolled oats - 1 ripe banana, thoroughly mashed - 1/2 cup fresh strawberries, chopped into small pieces - 1/4 cup almond butter (or your preferred nut butter) - 1/4 cup honey or maple syrup - 1/2 teaspoon vanilla extract - 1/2 teaspoon baking powder - 1/4 teaspoon salt - 1/2 teaspoon ground cinnamon - 1/4 cup chopped walnuts or pecans (optional) These ingredients blend together to create soft, chewy cookies that burst with flavor. The oats provide a hearty base. The banana adds natural sweetness and moisture. Fresh strawberries give a juicy pop. Almond butter brings richness, while honey or maple syrup enhances the sweetness. Each spice, like cinnamon, adds warmth. If you want a crunch, try adding walnuts or pecans. They give texture and nutty flavor. This cookie recipe is flexible. You can swap ingredients based on what you have. Enjoy the process of mixing, baking, and, of course, tasting your cookies! {{ingredient_image_2}} First, you need to get your oven ready. Preheat it to 350°F (175°C). This step is key for even baking. Next, line a baking sheet with parchment paper. This helps the cookies not stick and makes cleanup easy. In a medium bowl, mash one ripe banana until it’s smooth. Then, add in 1/4 cup of almond butter. This gives the cookies a nice nutty flavor. Next, pour in 1/4 cup of honey or maple syrup for sweetness. Finally, add 1/2 teaspoon of vanilla extract. Use a fork or whisk to mix these until they blend well. The mixture should be smooth and creamy. Take another bowl and add 1 cup of rolled oats. This is the base of your cookies. Next, add 1/2 teaspoon of baking powder, 1/4 teaspoon of salt, and 1/2 teaspoon of ground cinnamon. Whisk these dry ingredients together until they are mixed evenly. This step ensures your cookies rise nicely and have great flavor. Now, slowly add the dry mix to the wet mix. Stir continuously until no dry bits remain. This helps create a nice dough. Then, gently fold in 1/2 cup of chopped fresh strawberries. If you like nuts, you can add 1/4 cup of chopped walnuts or pecans too. Be careful not to crush the strawberries. You want those juicy bits to stay whole for flavor. Using a tablespoon or cookie scoop, spoon out the dough onto the prepared baking sheet. Leave about 2 inches between each mound for spreading. Bake the cookies in your preheated oven for 12-15 minutes. They should turn golden brown around the edges and feel set in the middle. Once they’re done, let them cool on the sheet for 5 minutes. After that, move them to a wire rack to cool completely. This step is important for getting that chewy texture just right. Choosing ripe bananas is key. Look for bananas with brown spots. They are sweeter and mash easily. This adds great flavor to your cookies. When using strawberries, fresh ones are best. They provide a juicy burst in each bite. If fresh ones are not available, frozen strawberries can work too. Just make sure to thaw and drain them well. This stops the cookies from getting soggy. You want chewy cookies, right? The key is to not overmix the dough. Once you add the dry ingredients, mix just until combined. This keeps your cookies soft. Cooling is also important. After baking, let the cookies sit on the sheet for five minutes. This helps them set. Then, move them to a wire rack. It allows air to flow around them. This keeps them chewy and not hard. For serving, display the cookies on a nice plate. Add a few fresh strawberries next to them for color. This makes your treat look fancy. You can garnish the cookies by lightly dusting them with powdered sugar. It adds a sweet finish. Pair them with a cup of tea or coffee for a lovely snack. Pro Tips Use Overripe Bananas: The riper the banana, the sweeter and more flavorful your cookies will be. Look for bananas with brown spots for the best results. Chill the Dough: If you find the dough too sticky, chill it in the refrigerator for about 30 minutes. This will make it easier to scoop and shape. Variations with Spices: Feel free to experiment with spices like nutmeg or ginger to add a unique flavor twist to your cookies. Storing Cookies: Store the cookies in an airtight container at room temperature for up to a week. For longer freshness, refrigerate or freeze them. {{image_4}} You can change the taste of your cookies easily. Adding chocolate chips gives a sweet twist. Use about 1/2 cup of your favorite chips. They melt and mix well with the fruity flavors. Another option is to switch the nut butter. If you don’t like almond butter, try peanut or cashew butter. Each type brings a unique taste to your cookies. If you need gluten-free cookies, use gluten-free oats. They work just like regular oats. For sweeteners, try maple syrup or agave nectar instead of honey. Both options keep the cookies sweet and tasty without gluten. You can make nut-free cookies too. Just leave out any nuts from the recipe. For the nut butter, use sunflower seed butter or soy nut butter. These options keep the cookies creamy without nuts, great for schools or kids with allergies. To keep your cookies fresh, use an airtight container. A glass jar or plastic box works well. Store them at room temperature for up to a week. If you want them to last longer, keep them in the fridge. This can help maintain their taste and texture. You can freeze these cookies for up to three months. To freeze, place them in a single layer on a baking sheet. Once frozen, transfer them to a freezer-safe bag. Make sure to remove as much air as possible. To thaw, leave them at room temperature for about 30 minutes. To maintain texture, do not microwave them. Instead, let them sit out or place them in the oven at a low heat. This way, they stay chewy and delicious. Yes, you can. Applesauce works well as a substitute. Use 1/4 cup of applesauce for each banana. This will keep the cookies moist and sweet. To make these cookies vegan, replace honey with maple syrup. Use a plant-based nut butter. This keeps the recipe delicious without any animal products. One mistake is over-mixing the dough. This can make the cookies tough. Another mistake is using unripe bananas. They should be fully ripe for the best flavor. Yes, you can use quick oats. They will change the texture slightly, making cookies a bit softer. Rolled oats give a chewier cookie, but quick oats will still taste great. Look for a golden brown edge. The center should feel set but soft. If you press gently, they should spring back. Let them cool for a chewy texture. These cookies combine simple ingredients like oats, bananas, and strawberries to create tasty treats. You learned how to prep, mix, and bake them step by step. I shared tips for texture and storage, plus fun variations for added flavor. Remember, these cookies are easy to customize, making them your own. I hope you enjoy baking and sharing these delightful cookies with friends and family. They are sure to please!

Strawberry Banana Oatmeal Cookies Easy and Tasty Treat

Looking for an easy and tasty treat? Let’s whip up some Strawberry Banana Oatmeal Cookies! These cookies are simple to

- 1 cup green or brown lentils, thoroughly rinsed - 2 cups vegetable broth - 1 tablespoon olive oil - 1 small onion, finely diced - 2 cloves garlic, minced - 1 bell pepper, diced (red or green) - 1 medium-sized carrot, coarsely grated - 1 can (15 oz) of tomato sauce - 2 tablespoons of tomato paste - 1 tablespoon of maple syrup Lentils are the star here. They add protein and fiber, making this dish filling. Vegetable broth keeps the lentils moist and adds flavor. Olive oil helps sauté the veggies, giving them a nice texture. Onions, garlic, and bell peppers create a strong base for our sloppy joes. Don't forget the grated carrot for a touch of sweetness. - 1 tablespoon of apple cider vinegar - 1 tablespoon of vegan Worcestershire sauce - 1 teaspoon of smoked paprika - 1/2 teaspoon of chili powder - Salt and black pepper to taste - Whole grain burger buns for serving - Fresh parsley, finely chopped, for garnish The apple cider vinegar and vegan Worcestershire sauce add depth to the dish. Smoked paprika gives it a warm, smoky flavor. Chili powder adds a bit of spice, which you can adjust to your taste. Salt and pepper round out the flavors. Serve on whole grain buns for a healthy touch, and don't forget fresh parsley for a pop of color and freshness. {{ingredient_image_2}} 1. Start by placing 1 cup of rinsed lentils in a medium pot. 2. Add 2 cups of vegetable broth to the pot. 3. Bring the mixture to a boil over high heat. 4. Once boiling, lower the heat and simmer uncovered for 20 to 25 minutes. 5. Cook until the lentils are tender but still firm. 6. Drain any excess liquid and set the lentils aside. 1. In a large skillet, heat 1 tablespoon of olive oil over medium heat. 2. Add 1 finely diced onion and sauté for about 2 to 3 minutes. 3. Cook until the onion is translucent and fragrant. 4. Now, add 2 minced garlic cloves, 1 diced bell pepper, and 1 grated carrot. 5. Sauté these for another 3 to 4 minutes until they soften. 1. Stir in the cooked lentils with the sautéed vegetables. 2. Add 1 can of tomato sauce, 2 tablespoons of tomato paste, and 1 tablespoon of maple syrup. 3. Pour in 1 tablespoon of apple cider vinegar and 1 tablespoon of vegan Worcestershire sauce. 4. Sprinkle in 1 teaspoon of smoked paprika and 1/2 teaspoon of chili powder. 5. Add salt and black pepper to taste. 6. Mix everything well until combined. 7. Lower the heat and let it simmer for 10 to 15 minutes. 8. Stir occasionally and taste to adjust seasonings as needed. To cook lentils, start by rinsing them well. This helps remove any dust or debris. Place the rinsed lentils in a pot with vegetable broth. Bring this mix to a boil, then lower the heat and let it simmer. For green or brown lentils, cook for about 20 to 25 minutes. If you use red lentils, reduce the time to about 15 minutes. Always check your lentils. They should be tender but not mushy. To make your lentil sloppy joes even tastier, add spices like cumin or oregano. A pinch of cayenne can add heat, while a touch of garlic powder gives depth. If you want more sweetness, increase the maple syrup slightly. For acidity, a bit more apple cider vinegar brightens the flavors. Taste as you go. Adjust until it feels just right. Toasting your burger buns adds a nice crunch. You can use a toaster or broil them in the oven for a minute or two. Serve your lentil mixture on the toasted buns. For a complete meal, pair them with carrot sticks or a fresh salad. This adds color and extra nutrients to your plate. Enjoy the flavors and textures together! Pro Tips Soaking Lentils: For a quicker cooking time and improved digestibility, consider soaking lentils in water for a few hours before cooking. Flavor Enhancements: Experiment with additional spices like cumin or oregano for a more complex flavor profile in your Sloppy Joes. Texture Variations: If you prefer a smoother texture, pulse the lentil mixture in a food processor for a few seconds before serving. Make Ahead: This lentil filling can be made in advance and stored in the refrigerator for up to 3 days, making it perfect for meal prepping! {{image_4}} You can switch lentils for other proteins. Chickpeas are a great choice. They add a nice texture and taste. Black beans also work well, bringing a rich flavor. For extra crunch, try adding tempeh or quinoa. Tempeh gives a hearty bite, while quinoa adds lightness. Each option brings a unique twist to your sloppy joes. Want more heat? Add jalapeños to the mix. They pack a punch and enhance the flavor. If you prefer sweet and savory, swap maple syrup for agave. You can also try different syrups like date syrup for a rich taste. Adjust these spices to fit your mood and your guests’ preferences. If you're gluten-free, choose gluten-free burger buns. Many tasty options are available in stores now. You can also use low-sodium vegetable broth. This keeps your dish healthier and lets you control the saltiness. These small changes can make this meal fit your dietary needs without losing flavor. To store leftover lentil sloppy joes, first let them cool down. Place them in an airtight container. They can stay fresh in your fridge for about 3 to 5 days. Always check for signs of spoilage before eating. This helps you enjoy them longer without waste. To freeze the lentil mixture, let it cool completely. Then, transfer it to a freezer-safe container or a zip-top bag. Make sure to remove excess air before sealing. The mixture can last in the freezer for about 3 months. When ready to eat, thaw it overnight in the fridge. Reheat it on the stove or in the microwave until hot. For quick meals, you can prepare the lentil mixture in advance. Store it in individual portions. Use clear containers to see what’s inside. Label each container with the date and contents. This makes it easy to grab a meal when you need it. Yes, you can make this lentil sloppy joe mix ahead of time. It stores well in the fridge. To prepare in advance, cook the lentils and mix them with the sauce. Let the filling cool, then place it in an airtight container. You can also toast the buns just before serving for the best taste. The lentil sloppy joes last about 4 to 5 days in the fridge. Make sure to store them properly in a sealed container. If you have leftover filling, you can keep it separate from the buns to maintain their crispness. Always check for any signs of spoilage before eating. Absolutely! You can swap ingredients based on your taste or what you have. For lentils, you can use canned lentils for faster prep. If you’re out of bell pepper, try zucchini or mushrooms. Maple syrup can be replaced with agave or brown sugar. Get creative and use what you love! This blog post covers making delicious lentil sloppy joes. You learned about main ingredients like lentils and vegetables. We also explored tips for cooking perfect lentils and enhancing flavor with spices. Variations included using different proteins and dietary modifications. Lastly, we discussed storage methods for leftovers and meal prep tips. Enjoy making this dish that is hearty and flexible. With these easy steps, you can create a satisfying meal. Don't forget to try different variations to suit your taste!

Vegan Lentil Sloppy Joes Flavorful and Simple Meal

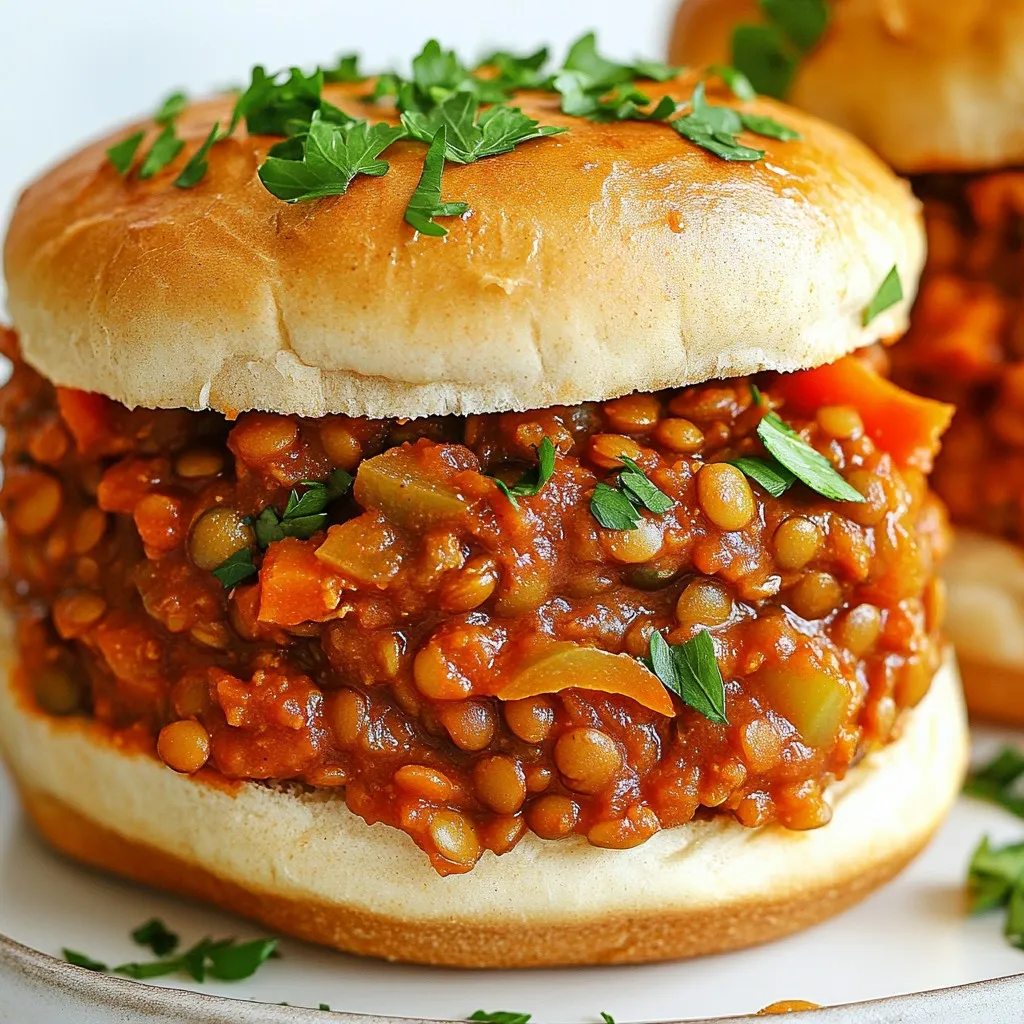
Are you craving a quick, satisfying meal that’s packed with flavor? Try my Vegan Lentil Sloppy Joes! This tasty dish

Older posts
Newer posts
← Previous Page1 … Page115 Page116 Page117 … Page122 Next →

dsad

© 2026 dailydishcraft • Built with GeneratePress

Our Policies

  • Copyright Policy
  • Cookie Policy
  • GDPR Policy
  • Privacy Policy
  • Disclaimer
  • Terms Of Use

More Information

  • Home
  • About
  • Contact
  • Appetizers
  • Dessert
  • Dinner
  • Drinks
©2026, dailydishcraft About Back To Top