Skip to content
DisclaimerTerms Of UseGDPR PolicyCookie Policy

dailydishcraft

  • Home
  • Drinks
  • Appetizers
  • Dinner
  • Dessert
  • About
  • Contact
  • Privacy Policy
DisclaimerTerms Of UseGDPR PolicyCookie Policy

Jessica

- 1 ½ cups all-purpose flour - 1 teaspoon baking powder - ½ teaspoon baking soda - ¼ teaspoon salt - ½ cup unsalted butter, softened - 1 cup granulated sugar - 2 large eggs - 1 teaspoon vanilla extract - 1 teaspoon finely grated lemon zest - ½ cup fresh lemon juice - ½ cup buttermilk - 1 cup fresh strawberries, pureed - ½ cup powdered sugar - 1 teaspoon lemon juice When making Strawberry Lemonade Cupcakes, you need both dry and wet ingredients. The dry ingredients include flour, baking powder, baking soda, and salt. These form the base of your cupcake. For the wet ingredients, you will use softened butter, sugar, eggs, vanilla, lemon zest, lemon juice, buttermilk, and pureed strawberries. The combination of these elements creates a moist and flavorful cake. For the frosting, you will need powdered sugar and lemon juice. This simple frosting adds a sweet and tangy finish to your cupcakes. Gather all these ingredients before starting. This step helps you stay organized and makes the baking process smooth. {{ingredient_image_2}} - Preheat oven to 350°F (175°C). - Prepare muffin tin with cupcake liners. Start by setting your oven. This step is key. Get it nice and hot. While it warms, grab your muffin tin. Line it with cupcake liners. This will help keep your cupcakes from sticking. - Combine flour, baking powder, baking soda, and salt. Next, take a bowl. Add 1 ½ cups of all-purpose flour. Then, mix in 1 teaspoon of baking powder, ½ teaspoon of baking soda, and ¼ teaspoon of salt. Whisk these dry ingredients well. This helps everything blend. - Beat softened butter and granulated sugar until fluffy. Now, grab a larger bowl. Add ½ cup of softened butter. Also, add 1 cup of granulated sugar. Use an electric mixer to beat them together. You want the mix to be light and fluffy. This should take about 3-4 minutes. - Incorporate eggs, vanilla extract, and lemon zest. Crack 2 large eggs into the bowl, one at a time. Mix well after each egg. Now, add 1 teaspoon of vanilla extract and 1 teaspoon of finely grated lemon zest. Keep mixing until it’s all combined. - Alternate adding lemon juice and buttermilk with flour mixture. Turn your mixer to a low speed. Now, add ½ cup of fresh lemon juice. Follow this with ½ cup of buttermilk. Then, add some of your flour mix. Alternate between the wet and dry until combined. Start and end with the flour. Be careful not to overmix. - Fold in pureed strawberries and spoon into liners. Take 1 cup of pureed strawberries. Gently fold this into the batter. This adds a fresh touch. Now, spoon the batter into your lined cupcake tins. Fill each about two-thirds full. - Bake for 18-20 minutes and cool. Place your muffin tin in the oven. Bake for about 18-20 minutes. Check with a toothpick. If it comes out clean, they’re done. Let them cool in the pan for 5 minutes. Then, move them to a wire rack to cool completely. - Mix powdered sugar with lemon juice until smooth. While your cupcakes cool, make the frosting. In a small bowl, mix ½ cup of powdered sugar with 1 teaspoon of lemon juice. Beat until smooth. If it’s too thick, add a splash of water. - Frost cooled cupcakes and garnish with strawberries. Once the cupcakes are cool, frost each one. Use a generous amount of lemon frosting. For the final touch, add a fresh strawberry slice on top. Enjoy your delightful Strawberry Lemonade Cupcakes! Using room temperature ingredients is key. When butter and eggs are at room temperature, they mix better. This helps create a light and airy batter. Cold ingredients can lead to dense cupcakes. Mixing the batter just right is important too. Overmixing can cause cupcakes to be tough. I recommend mixing until you see no dry flour. Then, gently fold in the pureed strawberries. This keeps the cupcakes soft and tender. To get the ideal creamy frosting, start with soft butter. Mix it well with powdered sugar and lemon juice. If your frosting is too thick, add a little water. This helps reach the right creamy consistency. If you want to add color, use food coloring. A few drops can make your frosting pop. You can match it to your cupcakes or go wild with colors. Just remember, a little goes a long way! Watch out for underbaking. Cupcakes should bake for 18-20 minutes. Use a toothpick to check doneness. If it comes out clean, your cupcakes are ready. If not, give them more time. Don’t overfill your cupcake liners. Fill each one about two-thirds full. This allows room for rising and prevents overflow. Too much batter can lead to messy cupcakes. Pro Tips Use Room Temperature Ingredients: Make sure your eggs, butter, and buttermilk are at room temperature before mixing. This helps create a smoother batter and ensures even baking. Don't Overmix the Batter: When combining the wet and dry ingredients, mix just until combined. Overmixing can lead to dense cupcakes rather than light and fluffy ones. Adjust Baking Time: Ovens can vary, so keep an eye on your cupcakes as they bake. Check for doneness a minute or two before the suggested time to avoid overbaking. Experiment with Toppings: Feel free to add other toppings such as whipped cream or a drizzle of lemon glaze for an extra burst of flavor on your cupcakes. {{image_4}} To make vegan strawberry lemonade cupcakes, you need to replace eggs and butter. Use flaxseed meal mixed with water as an egg substitute. Mix one tablespoon of flaxseed meal with three tablespoons of water. Let it sit for a few minutes until it becomes gel-like. For butter, you can use coconut oil or any vegan butter. Both options will keep your cupcakes moist and tasty. If you want a gluten-free version, choose a good gluten-free flour blend. Look for a mix that contains rice flour, almond flour, or tapioca flour. These blends work well and can hold moisture. You might also want to add a little extra baking powder to help the cupcakes rise. This helps keep the texture light and fluffy. You can change the flavor by adding other berries or citrus. Raspberries or blueberries can add a new twist. Simply fold in one cup of your chosen berry after mixing the batter. For a citrus kick, try using lime zest and lime juice instead of lemon. This gives the cupcakes a fresh and zesty taste that is sure to please. To keep your Strawberry Lemonade Cupcakes fresh, store them at room temperature. Place them in an airtight container. This method keeps them soft and moist for up to three days. If you have a warm kitchen, it’s best to keep them in a cool spot, away from sunlight. If you prefer, you can refrigerate the cupcakes. Just make sure to cover them well. This will help them last for about a week. However, the cold may change their texture slightly. Freezing your cupcakes is a great way to enjoy them later. First, let the cupcakes cool completely. Then, wrap each cupcake tightly in plastic wrap. Place them in a freezer-safe bag or container. This way, they won’t get freezer burn. You can freeze them for up to three months and still enjoy their bright flavors. When you’re ready to enjoy your frozen cupcakes, take them out of the freezer. Remove the plastic wrap and place them on a plate. Let them thaw at room temperature for about an hour. This method keeps the cupcakes moist and tasty. You can also warm them slightly in the microwave for 10-15 seconds if you like them warm. To keep your cupcakes moist, use room temperature ingredients. This includes butter, eggs, and buttermilk. They mix better and trap air, which helps with rising. Also, be careful not to overbake. Check the cupcakes a minute or two early. If a toothpick comes out clean, they are done. Lastly, adding pureed strawberries gives extra moisture. Yes, you can make the batter ahead of time. Store it in an airtight container in the fridge for up to 24 hours. Before baking, let the batter sit at room temperature for about 30 minutes. This helps it rise well when you bake. If you want to swap out strawberries, try raspberries or blueberries. Both fruits can give a nice flavor. You can also use peach or mango puree for a tropical twist. Each fruit will change the taste, so be bold and experiment! To reduce the sweetness, cut back on sugar. You can lower the granulated sugar by 1/4 cup. Adding a pinch of salt can balance flavors, too. Another idea is to use unsweetened fruit puree instead of sweetened. Absolutely! Boxed cake mix can save time. Use it as a base, then mix in fresh lemon juice and pureed strawberries. This way, you still get that yummy flavor. Follow the box instructions for baking times. You now know the steps to make delicious strawberry lemonade cupcakes. Start with the right ingredients and follow the mixing process closely. Remember to use room temperature items to get the best texture. Avoid common mistakes for perfect results. You can also explore fun variations or storage tips as you enjoy these treats. With practice, you'll perfect this recipe and impress friends and family with your baking skills. Enjoy every bite of your sweet creation!

Strawberry Lemonade Cupcakes Fresh and Flavorful Treat

Looking for a delightful twist on classic cupcakes? These Strawberry Lemonade Cupcakes are a fun, fresh treat everyone will love!

To make mango coconut overnight oats, you will need the following ingredients: - 1 cup rolled oats - 1 cup unsweetened coconut milk - 1 ripe mango, diced into bite-sized pieces - 1 tablespoon chia seeds - 2 tablespoons honey or maple syrup (adjust to taste) - 1 teaspoon pure vanilla extract - 1/4 teaspoon ground cinnamon - A pinch of salt - Optional toppings: shredded coconut, sliced almonds, fresh mint leaves These ingredients come together to create a creamy and fruity breakfast. Rolled oats form the base, soaking up the coconut milk. The ripe mango adds sweet and juicy bites, while chia seeds give a nice texture. You can adjust the sweetness with honey or maple syrup, depending on your taste. Cinnamon and vanilla enhance the overall flavor, making it feel special. A pinch of salt balances the sweetness and rounds out the taste. The optional toppings let you get creative. Adding shredded coconut or almonds gives more crunch, and fresh mint adds a pop of color and flavor. Using fresh and high-quality ingredients will make your overnight oats even more delicious. Choose ripe mango for the best taste. This way, you start your day with a bright and tasty treat! {{ingredient_image_2}} To start, grab a mixing bowl. Combine 1 cup of rolled oats, 1 tablespoon of chia seeds, and a pinch of salt. Mix them well. This ensures even distribution of the dry ingredients. You want all the oats and seeds to be mixed nicely. In another bowl, pour in 1 cup of unsweetened coconut milk. Add 2 tablespoons of honey or maple syrup, 1 teaspoon of pure vanilla extract, and 1/4 teaspoon of ground cinnamon. Whisk these together until smooth. A good mix makes the flavors blend well. Now, take the coconut milk mix and pour it over the oats. Stir gently to coat all the oats. Be thorough; you want every oat covered in the milk. Next, carefully fold in the diced mango, keeping the mango pieces whole. If you like, set aside some mango for topping later. Cover your bowl with plastic wrap. You can also divide the mix into mason jars for easy serving. Place it in the fridge. Let it sit overnight or for at least 4 hours. This step helps the oats soak up the milk, giving them a creamy texture. When morning comes, take your oats out of the fridge. Stir the mix well. If it’s too thick for your taste, add a splash more coconut milk. Serve in bowls or jars. Top with the reserved mango, a sprinkle of shredded coconut, sliced almonds, and fresh mint leaves. This makes your meal look and taste great! To get that perfect creamy texture, you can adjust the liquid ratios. If your oats seem too thick, add a little more coconut milk. If they are too runny, use less liquid next time. This small tweak can make a big difference. Using different types of milk can also help. Almond milk, oat milk, or even soy milk can change the flavor and texture. Try them out to see which you like best! You can make your oats even more delicious by adding spices or extracts. A pinch of nutmeg or ginger can add warmth. You can also use almond or coconut extract for extra flavor. For sweetness, you can swap honey for maple syrup or agave. Adjust these to fit your taste. Remember, a little goes a long way! Preparing in batches can save you time. Make a few jars at once and store them in the fridge. This way, breakfast is ready for several days. Storing for future breakfasts is easy. Use airtight jars to keep your oats fresh. You can enjoy these tasty treats all week long! Pro Tips Use Fresh Mango: For the best flavor, make sure to use a ripe, fresh mango. This will enhance the sweetness and overall taste of your overnight oats. Adjust Sweetness: Taste your mixture before refrigerating. Depending on the ripeness of your mango, you may want to adjust the amount of honey or maple syrup to suit your preference. Make Ahead: These overnight oats can be prepared up to 3 days in advance. Store them in airtight containers for a quick and healthy breakfast option. Experiment with Toppings: Feel free to get creative with your toppings! Try adding sliced bananas, nuts, or seeds for added texture and flavor. {{image_4}} You can easily swap the mango for other fruits. Try using berries, like strawberries or blueberries, for a tart twist. Peaches and apples also work well. Just be mindful of the season. In summer, fresh peaches shine, while fall brings crisp apples. Each fruit adds its own charm to the dish. Want to add more protein? Stir in some yogurt or a scoop of protein powder. Greek yogurt adds creaminess and protein. You can also sprinkle nuts and seeds on top. Almonds, walnuts, or sunflower seeds all add crunch and extra nutrients. Choose what you enjoy most! If you follow a dairy-free or vegan diet, it’s easy to adapt this recipe. Make sure that all your ingredients are plant-based. Use maple syrup instead of honey for sweetness. You can also try agave nectar or coconut sugar. These swaps keep your oats tasty and meet your needs. How long can they last in the fridge? Mango coconut overnight oats can last up to 5 days in the fridge. They stay fresh and tasty when stored properly. Container recommendations Use airtight containers like mason jars or plastic food containers. This keeps oats from drying out and helps retain their flavor. How to freeze overnight oats If you want to keep them longer, freezing is a great option. Place the oats in freezer-safe containers. Leave some space at the top for expansion. Thawing and preparing before serving To thaw, move the container to the fridge overnight. When ready to eat, stir well. You may need to add a bit of coconut milk to adjust the texture. You can use quick oats, but the texture will change. Quick oats cook faster and absorb liquid more quickly. This may lead to a mushy consistency. Rolled oats keep a chewy texture, which is great for overnight oats. Soaking overnight oats for at least 4 hours is best. This allows the oats to absorb the coconut milk fully. For a creamier texture, soak them overnight. This gives you a smooth and delicious breakfast. Yes, overnight oats are quite healthy. They are high in fiber and can aid digestion. The oats provide complex carbs, while chia seeds add omega-3 fatty acids. Using coconut milk keeps it dairy-free and adds a tropical flavor. You can also lower calories by adjusting the sweetener. Yes, you can batch cook this recipe. Prepare several jars at once and store them in the fridge. They stay fresh for up to 5 days. Use airtight containers to keep them from drying out. This makes breakfast quick and easy all week long. This article covered making delicious overnight oats. We explored the ingredients, preparation steps, and tips for perfect texture. You learned how to create variations and storage options, ensuring your oats stay fresh. Remember, you can adapt this recipe with your favorite fruits or spices. Overnight oats are healthy and easy to prepare in advance. Embrace the fun of customizing your breakfast while enjoying the convenience and nutrition that overnight oats provide. Now, get ready to enjoy your creamy and flavorful breakfast tomorrow!

Mango Coconut Overnight Oats Tasty and Easy Recipe

Looking for a quick and tasty breakfast? Mango Coconut Overnight Oats are perfect for you! This easy recipe combines creamy

- 2 cups rolled oats - 2 medium apples, peeled, cored, and diced into small cubes - 1 cup unsweetened applesauce - 1 cup milk (dairy or almond milk for a non-dairy option) - 1/2 cup brown sugar (or use maple syrup for a healthier choice) - 2 teaspoons ground cinnamon, plus more for garnish - 1 teaspoon pure vanilla extract - 1/2 teaspoon baking powder - 1/4 teaspoon salt - 1/2 cup chopped nuts (walnuts or pecans work beautifully) - 1/4 cup raisins (optional for added sweetness) - Fresh apple slices for garnish In this recipe, you can swap ingredients easily. If you want a nut-free dish, leave out the nuts. You can use any apple variety you like. Honey can replace brown sugar if you prefer. For a dairy-free option, almond milk works well. Use maple syrup instead of brown sugar for a lighter touch. Using fresh apples gives a crisp texture and bright flavor. Dried apples can add a sweet, chewy bite, but they can absorb moisture. If you use dried apples, soak them in warm water for about 10 minutes first. This helps soften them, making a nice mix with the oats. Always choose what fits your taste best! {{ingredient_image_2}} First, I preheat my oven to 350°F (175°C). I grab a 9x9-inch baking dish and lightly grease it. You can use non-stick spray or a little butter. This helps the bake not stick later. Next, I take a large mixing bowl. I add 2 cups of rolled oats. Then, I measure 1/2 teaspoon of baking powder, 1/4 teaspoon of salt, and 2 teaspoons of ground cinnamon. I mix these dry ingredients well. I want them to blend evenly. In another bowl, I blend the diced apples, 1 cup of unsweetened applesauce, and 1 cup of milk. You can use dairy or almond milk here. I also add 1/2 cup of brown sugar or maple syrup for sweetness. Lastly, I pour in 1 teaspoon of pure vanilla extract. I mix this until it is smooth and well combined. I slowly pour the wet mixture into the bowl of dry ingredients. I stir gently until everything is just combined. I want to avoid overmixing. If I’m adding nuts or raisins, I fold them in carefully now. Then, I transfer the oatmeal mixture to the prepared baking dish. I spread it out evenly. Now, I place the baking dish into the oven. I bake for 30 to 35 minutes. I know it’s done when the top looks golden brown and feels firm. After baking, I take it out and let it cool for about 10 minutes. This makes it easier to slice. I can then cut it into squares and serve. To get the best texture in your Apple Cinnamon Oatmeal Bake, use rolled oats. They hold their shape well and create a nice chew. Avoid quick oats as they may turn mushy. Also, don’t overmix the batter. Gently combine wet and dry ingredients until just mixed. This helps keep a light texture. For extra flavor, consider adding a pinch of nutmeg or a splash of lemon juice. These small tweaks can elevate your dish. If you love sweetness, swap brown sugar for maple syrup. This gives a richer taste and a hint of caramel. Adding nuts like walnuts or pecans adds crunch and depth. Serve your oatmeal bake warm with fresh apple slices on top. A sprinkle of cinnamon enhances the visual appeal. You can drizzle honey or maple syrup for extra sweetness. For a creamy touch, add a dollop of yogurt. This makes a great breakfast or snack that everyone will love. Pro Tips Use Fresh Apples: For the best flavor, choose fresh, crisp apples like Honeycrisp or Fuji. They add sweetness and texture to the bake. Adjust the Sweetness: Feel free to modify the amount of brown sugar or maple syrup based on your personal sweetness preference. You can also reduce it for a healthier option! Customize with Spices: Experiment with adding a pinch of nutmeg or ginger for an extra layer of flavor. These spices complement the cinnamon beautifully. Make It Ahead: This oatmeal bake can be prepared the night before. Simply refrigerate the mixture and bake in the morning for a quick breakfast! {{image_4}} You can add different nuts and fruits to your Apple Cinnamon Oatmeal Bake. Here are some tasty options: - Nuts: Chopped walnuts or pecans bring crunch. You can also use slivered almonds or hazelnuts. - Fruits: Try adding chopped pears or dried cranberries for extra flavor. Fresh berries like blueberries or strawberries can also work well. Mix and match these ingredients to create your own unique version. If you want to make this dish healthier, swap some ingredients for better options: - Sugar: Use maple syrup instead of brown sugar. It adds sweetness without refined sugar. - Milk: Almond milk or oat milk is a great dairy-free option. Use unsweetened varieties to cut down on sugar. - Oats: For a fiber boost, consider using steel-cut oats instead of rolled oats. Just note that they may need longer to cook. These small changes can make a big difference. You can easily adapt this recipe for vegan and gluten-free diets: - Vegan: Simply replace regular milk with any plant-based milk. Use maple syrup instead of brown sugar. - Gluten-Free: Make sure your oats are certified gluten-free. Many brands offer gluten-free rolled oats. With these swaps, everyone can enjoy a warm and cozy dish! After you bake your Apple Cinnamon Oatmeal Bake, let it cool. Once cool, slice it into squares. Store your squares in an airtight container. Keep the container in the fridge. This dish stays fresh for up to five days. If you want to keep it longer, freezing is a great option. To reheat, take out a square and place it on a microwave-safe plate. Heat it in the microwave for about 30 seconds. Check if it’s warm enough. If not, heat for another 10 to 15 seconds. You can also reheat in the oven. Preheat to 350°F (175°C) and warm for about 10 minutes. If you want to freeze your oatmeal bake, wrap each square tightly in plastic wrap. Then, place them in a freezer bag. Label the bag with the date. You can freeze it for up to three months. When you’re ready to enjoy, just take out a square and thaw it in the fridge overnight before reheating. You can use instant oats, but the texture will change. Instant oats cook faster and absorb more water. This may result in a mushy bake. I recommend sticking with rolled oats for the best results. They give a nice chew and hold their shape well in the bake. To boost protein, add Greek yogurt or protein powder. You can mix in 1/2 cup of Greek yogurt with the wet ingredients. If using protein powder, start with 1/4 cup and adjust the liquid if needed. You can also add nuts like walnuts or pecans, which add healthy fats and protein. The best apples for baking are firm and tart varieties. I love using Granny Smith apples for their crispness and tang. Honeycrisp apples are also great as they stay firm and add natural sweetness. Choose apples that hold their shape well when baked for the best texture in your dish. In this post, we explored the key ingredients, step-by-step instructions, and helpful tips for your recipe. We also discussed fun variations and storage tips to keep your dish fresh. The right ingredients, technique, and storage can make your cooking shine. Experiment and enjoy making this delicious dish! You can create something special for yourself and others.

Apple Cinnamon Oatmeal Bake Comforting and Easy Recipe

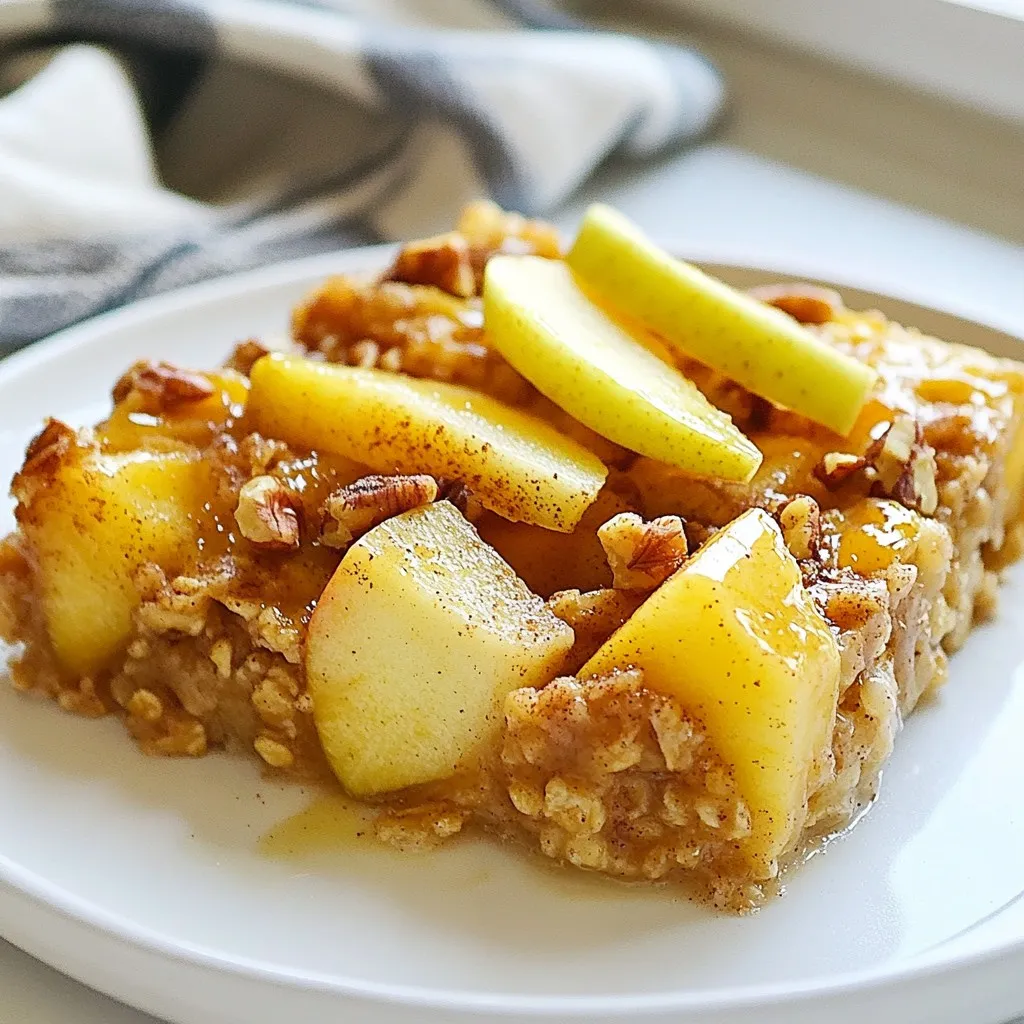
Looking for a warm and cozy breakfast that’s easy to make? I’ve got you covered! This Apple Cinnamon Oatmeal Bake

- 4 tilapia fillets - 4 tablespoons unsalted butter - 4 cloves garlic, minced - Juice of 1 lemon - Zest of 1 lemon - 1 teaspoon dried oregano - 1 teaspoon chopped fresh parsley (for garnish) - Salt and pepper, to taste The key to this dish is fresh, simple ingredients. I always choose tilapia fillets that are bright and firm. Make sure your butter is unsalted, so you can control the flavor. Garlic adds a nice punch, and using fresh cloves is best. Lemon juice and zest create a bright taste. The zest brings in that extra zing. Dried oregano adds a touch of earthiness that complements the fish. I like to finish with fresh parsley for color and a fresh touch. Remember, the salt and pepper help highlight all these flavors. Seasoning is vital, so don’t skip it! Each bite should burst with garlic, lemon, and herbs. {{ingredient_image_2}} - First, dry the tilapia fillets using paper towels. - Season both sides with salt and pepper. This step helps the fish get a good sear and adds flavor. - In a large skillet, melt butter over medium heat. - Once melted, add minced garlic. Sauté for one minute until it smells good. Watch the garlic closely; if it burns, it will taste bitter. - Pour in lemon juice and add lemon zest. Stir this mixture well. - Let it simmer for two minutes. This helps the flavors blend and become tasty. - Carefully place the seasoned tilapia fillets in the skillet. - Cook for 3-4 minutes on one side. Look for a golden color and flakiness. - Flip the fillets gently with a spatula. Cook for another 2-3 minutes until fully cooked. - While the tilapia cooks, sprinkle dried oregano on top. This adds a nice herbal taste. - Once done, transfer the fillets to plates. Spoon the garlic butter sauce over each fillet for extra flavor. - For a fresh touch, garnish with chopped parsley before serving. Enjoy your meal! To check if your tilapia is done, look for flakiness. When you poke it with a fork, it should break apart easily. The fish should also be opaque, not translucent. This means it's safe to eat. Avoid overcooking by watching the time closely. Cook the first side for 3-4 minutes and the other side for 2-3 minutes. I recommend using a timer to help you stay on track. You can boost the taste of your tilapia with extra spices. Try adding paprika, thyme, or even a dash of cumin for a unique twist. If you like heat, sprinkle in some chili flakes. This adds a nice kick without overwhelming the dish. A little goes a long way, so start small and adjust to your taste. For plating, place the fillets carefully on a clean plate. Drizzle the garlic butter sauce over each piece. This not only adds flavor but makes the dish look great. Add a sprinkle of fresh parsley for color. You can also serve lemon wedges on the side. They add brightness and let guests add more lemon if they like. Serve with steamed veggies or rice for a complete meal. Pro Tips Pat the Fillets Dry: Ensuring the tilapia is dry before cooking will help achieve a perfect sear and prevent it from steaming in the pan. Monitor Garlic Closely: Garlic can burn quickly, so keep a close eye on it while sautéing to avoid a bitter taste in your dish. Use Fresh Herbs: Fresh parsley not only adds color but also enhances the overall flavor. Consider using fresh oregano for an even more vibrant taste. Choose the Right Pan: A non-stick skillet works best for cooking tilapia, ensuring that the delicate fillets don’t stick and break apart during flipping. {{image_4}} You can easily change the taste of your Garlic Butter Lemon Tilapia. - Add capers for a briny twist that brightens the dish. - Use fresh herbs like thyme or basil to infuse extra flavor. These small changes can make your meal feel new and exciting. Experimenting with flavors keeps your cooking fresh and fun. If you have dietary needs, this dish can adapt well. - For a gluten-free option, ensure your butter is gluten-free. - Use dairy-free butter instead of regular butter to make it dairy-free. These swaps allow everyone to enjoy this tasty dish while meeting their dietary needs. Pair your Garlic Butter Lemon Tilapia with sides that complement its flavors. - Steamed vegetables or a fresh salad balance the richness of the fish. - Fluffy rice or quinoa makes a great base for the tilapia. These choices enhance the meal and make for a delightful dining experience. To keep your Garlic Butter Lemon Tilapia fresh, store leftovers in the fridge. Place the fillets in an airtight container. This will help keep them moist and tasty. Make sure to eat them within 2-3 days for the best taste. For reheating, use a skillet over low heat. Add a touch of butter or olive oil to avoid drying out the fish. Heat each side for about 2-3 minutes. This keeps the flavors intact and ensures a delicious meal again. If you want to save Garlic Butter Lemon Tilapia for later, freezing is a great option. Wrap each fillet tightly in plastic wrap. Then, place them in a freezer-safe bag. Be sure to squeeze out as much air as possible. This helps prevent freezer burn. You can freeze it for up to 3 months. When you're ready to cook, thaw the fillets in the fridge overnight. If you're short on time, you can thaw them in cold water, changing the water every 30 minutes. Cook the tilapia right after thawing for the best flavor and texture. You can tell tilapia is done by its texture. Cooked tilapia should be opaque and flake easily with a fork. If you poke it gently, the flesh should separate cleanly. This is a sign that it is fully cooked. Look for a light golden color on the outside, too. When it reaches this point, it's ready to be enjoyed! Yes, you can use frozen tilapia! Just make sure to thaw it properly. Place the fillets in the fridge overnight for the best results. If you're short on time, you can also run them under cold water for about 30 minutes. Adjust your cooking time slightly if they are still a bit icy. This way, you still get that amazing garlic butter flavor. Garlic butter lemon tilapia pairs well with many sides. Here are some tasty options: - Steamed vegetables like broccoli or asparagus - Fluffy rice or quinoa for a hearty base - A light salad with fresh greens and a lemon vinaigrette - Roasted potatoes for a comforting touch These sides will complement the flavors and make your meal even better! To wrap up, we've explored the key ingredients for Garlic Butter Lemon Tilapia and how to prepare them step by step. You learned about the cooking method, tips for perfect flavor, and ways to present your dish beautifully. Cooking can be simple and rewarding when you apply these techniques. Don't hesitate to make variations that suit your taste. With proper storage, you can enjoy leftovers too. Enjoy your culinary journey and serve the best tilapia dish that impresses your family and friends.

Garlic Butter Lemon Tilapia Quick and Flavorful Dish

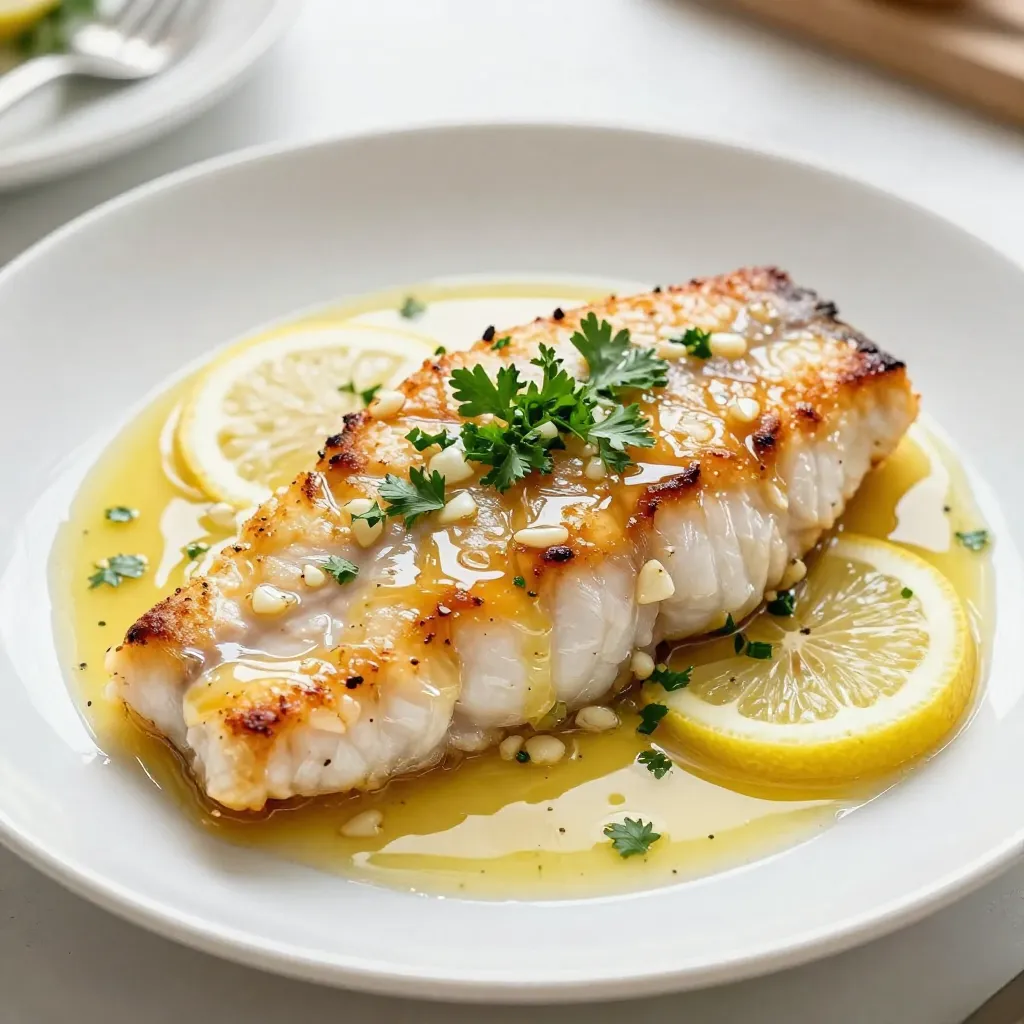
Are you ready to make a tasty meal in just 20 minutes? Garlic Butter Lemon Tilapia is a quick, flavorful

- 4 boneless, skinless chicken breasts - 1 cup fresh basil pesto - 8 oz fresh mozzarella cheese, sliced - 1 cup cherry tomatoes, halved - 2 tablespoons extra virgin olive oil - Salt and freshly ground black pepper, to taste - 1 teaspoon garlic powder - 1 teaspoon Italian seasoning blend - Fresh basil leaves for garnish You need four chicken breasts. Each breast will hold the filling well. Use one cup of pesto. This adds rich flavor. Slice eight ounces of mozzarella cheese. You want enough cheese for each chicken breast. A cup of cherry tomatoes helps add color and sweetness. Use two tablespoons of olive oil for cooking. Salt and pepper will season the dish perfectly. One teaspoon of garlic powder and one teaspoon of Italian seasoning blend enhance the taste. Fresh basil leaves make a nice touch at the end. If you don’t have chicken breasts, you can use thighs. They stay juicy and tender. For pesto, consider using sun-dried tomato spread. It gives a different taste but works well. If fresh mozzarella is not available, use shredded mozzarella. It melts nicely but may not look as pretty. Cherry tomatoes can be swapped with diced bell peppers. They roast well and add a sweet crunch. Use any cooking oil if you don’t have olive oil. Canola or vegetable oil works too. {{ingredient_image_2}} 1. Preheat your oven to 375°F (190°C). This step helps the chicken cook evenly. 2. Take the chicken breasts and slice a pocket into the thickest part. Be careful not to cut all the way through. 3. Season each chicken breast with salt, pepper, garlic powder, and Italian seasoning inside and out. This adds great flavor. 4. Spread about 2 tablespoons of basil pesto inside each pocket. Then, place 2 slices of fresh mozzarella in the pocket. 5. Use toothpicks to close the openings, keeping the filling secure. 1. In a large, oven-safe skillet, heat 2 tablespoons of olive oil over medium-high heat. Wait until the oil shimmers. 2. Add the stuffed chicken breasts to the skillet. Sear each side for about 4-5 minutes. Look for a golden brown color and a crispy texture. 1. After searing, transfer the skillet to the preheated oven. Bake for 20-25 minutes. The chicken should reach an internal temperature of 165°F (75°C). 2. In the last 10 minutes of baking, scatter halved cherry tomatoes around the chicken. They will roast and add sweetness. 3. Once done, remove the skillet from the oven and let the chicken rest for 5 minutes. Gently take out the toothpicks. 4. Serve the chicken with extra pesto on top and garnish with fresh basil leaves for a beautiful touch. To make your chicken full of flavor, season well. Use salt, black pepper, garlic powder, and Italian seasoning both inside and outside. This simple step helps each bite burst with taste. Stuff the chicken with fresh basil pesto and mozzarella for even more flavor. The combination will make your taste buds dance! Dry chicken can ruin your meal. To keep it juicy, don’t overcook. Use a meat thermometer to check for an internal temperature of 165°F (75°C). This ensures it stays moist. Also, let the chicken rest for about 5 minutes after baking. This helps the juices settle back into the meat, making it deliciously tender. Toothpicks keep your stuffing safely inside. After filling each chicken pocket, use them to close the openings. Insert them straight through the chicken to hold the filling. Be careful when removing them after cooking, as they can be hot. This simple tool helps you serve a neat and tasty dish. Pro Tips Use Fresh Ingredients: The quality of your pesto and mozzarella can significantly enhance the flavor of this dish. Opt for fresh, high-quality ingredients for the best results. Perfectly Sear for Flavor: Ensure your skillet is hot enough before adding the chicken. A good sear creates a delicious crust that locks in juices and adds depth to the flavor. Rest Before Serving: Let the stuffed chicken rest for a few minutes after baking. This allows the juices to redistribute, resulting in a more tender and flavorful bite. Customize Your Filling: Feel free to add other ingredients to the filling, such as sun-dried tomatoes or spinach, for additional flavor and nutrition. Get creative! {{image_4}} You can change the filling to match your taste. Consider using sun-dried tomatoes for a rich, tangy flavor. Spinach adds a nice color and healthy touch. Or try artichoke hearts for a twist. You can even mix in some cooked quinoa for added texture and nutrition. While fresh mozzarella is great, other cheeses work well too. Try provolone for a sharper taste. Goat cheese adds a creamy texture and unique flavor. If you love blue cheese, it can give an excellent kick. You might also enjoy mixing cheeses for a delightful blend. Adding veggies boosts flavor and nutrition. Bell peppers offer sweetness and crunch. Zucchini slices bring moisture and a mild taste. Mushrooms add an earthy depth. You can also toss in some fresh herbs like thyme or parsley for extra freshness. Don't be afraid to get creative! To keep your leftover Pesto Mozzarella Stuffed Chicken fresh, place it in an airtight container. Make sure to cool it to room temperature first. Store it in the fridge for up to three days. If you want to keep it longer, consider freezing it. When ready to eat your leftovers, reheat the chicken in the oven for the best results. Preheat your oven to 350°F (175°C). Place the chicken in an oven-safe dish and cover it with foil. Heat for about 15-20 minutes until warm. You can also use a microwave, but it may not keep the chicken crispy. To freeze your stuffed chicken, wrap each piece tightly in plastic wrap. Then, place the wrapped chicken in a freezer bag. Label the bag with the date. This way, you can enjoy it later! It will stay fresh for up to three months. To thaw, move the chicken to the fridge a day before cooking. The safe internal temperature for cooked chicken is 165°F (75°C). Use a meat thermometer to check. Insert it into the thickest part of the chicken to get an accurate reading. Cooking your chicken to this temperature makes sure it is safe to eat. It also keeps the meat juicy and tender. Yes, you can prepare this recipe ahead of time. Stuff and sear the chicken earlier in the day. Place it in the fridge after searing. When you are ready, bake it as instructed. This saves time and makes it easy to serve a delicious meal. Just remember to adjust the baking time if the chicken is cold. This stuffed chicken goes well with many sides. Here are some great options: - Garlic bread for a nice, warm touch. - A fresh green salad for crunch and brightness. - Roasted vegetables like zucchini or bell peppers for added flavor. - Creamy mashed potatoes to soak up the juices. Each of these sides enhances the meal and makes it more enjoyable. Choose what you like best! This blog post outlined how to make Pesto Mozzarella Stuffed Chicken. We covered key ingredients, the cooking process, and helpful tips. I shared variations and storage tips to keep your meal fresh. Remember, juicy chicken needs the right temperature and moisture. Don’t skip the fun additions like different cheeses or veggies. With these steps, your chicken dish will shine. Now, you can enjoy a delicious meal, whether cooking for yourself or friends. Cooking can be easy and fun!

Pesto Mozzarella Stuffed Chicken Flavorful Dinner Recipe

Are you ready to impress your family with a delicious dinner? My Pesto Mozzarella Stuffed Chicken is an easy dish

To make creamy avocado pasta, you need simple and fresh ingredients. Here’s what you will need: - Ripe avocados - Extra virgin olive oil - Garlic - Lemon juice - Fresh basil leaves - Red chili flakes (optional) - Sea salt and black pepper - Pasta of choice - Grated Parmesan cheese (optional) - Cherry tomatoes for garnish Ripe avocados are key. They should feel soft when you gently squeeze them. Extra virgin olive oil adds rich flavor. Fresh garlic gives the dish a nice kick. Lemon juice brightens the taste. Fresh basil leaves make everything smell great. If you like heat, add red chili flakes. Use sea salt and black pepper to enhance flavors. Choose any pasta you like, but spaghetti works well. Grated Parmesan cheese adds a savory touch, but it’s not needed. Finally, cherry tomatoes make a colorful garnish. These ingredients come together to create a creamy and delicious meal that’s easy to make. {{ingredient_image_2}} To start, bring a large pot of water to a boil. Add a good amount of salt. This step adds flavor to the pasta. Once boiling, add 12 ounces of spaghetti. Cook it according to the package instructions, usually about 8 to 10 minutes. You want it to be tender but still firm. Before you drain the pasta, save about 1/2 cup of the starchy pasta water. This water helps the sauce stick better later. Drain the pasta in a colander and set it aside. While the pasta cooks, grab two ripe avocados. Peel and pit them, then scoop the flesh into a blender. Add 2 tablespoons of extra virgin olive oil, 2 minced garlic cloves, and the juice of one lemon. Toss in 1/4 cup of chopped fresh basil leaves and a pinch of red chili flakes if you like a little heat. Add sea salt and black pepper to taste. Blend everything on high until it’s smooth and creamy. If it’s too thick, you can add some reserved pasta water bit by bit. This will help you get the perfect creamy texture. In a large mixing bowl, combine the drained pasta with the avocado sauce. Gently toss the pasta so it gets fully coated in the creamy sauce. If you want to add a touch of richness, fold in 1/4 cup of grated Parmesan cheese. This step is optional but adds a lovely savory flavor. To serve, place the creamy avocado pasta on plates. For a pop of color, garnish with halved cherry tomatoes. You can also add a sprinkle of fresh black pepper or more basil leaves on top. It looks nice and tastes even better! Enjoy your delicious dish! To make creamy avocado pasta, you need ripe avocados. Look for avocados that yield slightly when you press gently. A dark green or black skin often means ripeness. If they feel hard, let them sit at room temperature for a few days. If you can’t find fresh avocados, consider using ripe bananas or blended peas. They won’t taste the same, but they can add creaminess. To enhance the flavor, adjust the seasoning as you blend. Start with sea salt and black pepper. You can always add more later. If you want a kick, mix in red chili flakes. For extra flavor, try adding sun-dried tomatoes or grilled chicken. Fresh herbs like cilantro or parsley can also brighten the dish. To prevent pasta from sticking, stir it well during the first few minutes of cooking. Use a large pot with plenty of water. This helps keep the pasta moving. When blending the sauce, ensure your blender is powerful. Blend until the sauce is smooth and creamy. If it’s too thick, add some reserved pasta water. This will help you reach the right consistency. Pro Tips Use Ripe Avocados: Ensure your avocados are perfectly ripe for the creamiest texture. They should yield slightly to gentle pressure when squeezed. Customize Your Pasta: Feel free to experiment with different types of pasta, such as whole wheat or gluten-free, to match your dietary preferences. Extra Flavor Boost: Consider adding a handful of spinach or kale to the blender for added nutrients and a pop of color in your sauce. Serving Temperature: This dish is best served immediately after preparation. If you need to store leftovers, keep them in an airtight container in the fridge for up to a day. {{image_4}} You can use many types of pasta for this dish. Here are some options: - Gluten-free options: Use gluten-free pasta made from rice or corn. They cook well and taste great. - Alternatives to spaghetti: Try penne, fusilli, or even zoodles (zucchini noodles) for a fun twist. Adding ingredients can make your dish more exciting. Consider these options: - Adding vegetables: Toss in some spinach, peas, or cherry tomatoes for color and nutrients. - Incorporating proteins: Chicken or shrimp can boost the protein in the meal. Sauté them separately and mix them in. You can make this dish vegan-friendly easily. Here’s how: - Substitutes for Parmesan cheese: Try nutritional yeast for a cheesy flavor without dairy. - Dairy-free adjustments to the sauce: Replace any cream or cheese with a bit of nut milk for creaminess. These variations let you customize your creamy avocado pasta to fit your taste. Enjoy the cooking process! To keep your creamy avocado pasta fresh, store it in an airtight container. Make sure to place it in the fridge right away. This will help the flavors stay strong. Leftovers can last about 2 to 3 days. If you wait too long, the avocado may brown and change taste. When reheating pasta, use the stove for the best results. Place the pasta in a pan over low heat. Add a splash of water or olive oil. Stir gently to warm it up. This will help maintain the creaminess of the sauce. Avoid using the microwave, as it can make the sauce dry. You can freeze avocado pasta, but be careful. Freezing can change the texture of the avocado. If you want to freeze it, do so before mixing in any cheese. Place the pasta in a freezer-safe bag or container. When you want to eat it, thaw it in the fridge overnight. Reheat gently on the stove, adding water to restore creaminess. To keep your avocado sauce fresh, store it properly. Use an airtight container. Press plastic wrap directly on the surface of the sauce. This limits air contact and slows browning. You can also add a bit more lemon juice. The acid helps slow down oxidation. If you need it for later, keep it in the fridge. Use it within a day for the best taste and color. Yes, you can prep parts of the dish ahead. Cook the pasta and store it in the fridge. Keep it in an airtight container. Make the avocado sauce and store it separately. Combine them right before serving for the best flavor. If you make it a day early, be sure to check for browning. Use the tips above to keep it fresh. Many sides pair well with creamy avocado pasta. Here are a few ideas: - Garlic bread: Crunchy and buttery, it’s always a hit. - Green salad: A light salad adds freshness to the meal. - Roasted veggies: Try zucchini or bell peppers for color and taste. - Grilled chicken: For added protein, grilled chicken works great. - Wine: A light white wine can complement the dish nicely. These options enhance the meal and add variety. Enjoy experimenting! This blog post showed you how to make a creamy avocado pasta dish. You learned about the best ingredients and cooking methods. I shared tips for selecting ripe avocados and enhancing the flavor. You also found ways to store leftovers and reheating methods. In the world of pasta, this recipe stands out. Simple steps and fresh ingredients create a meal that impresses. Try this dish for a quick dinner or a fancy gathering. Enjoy every bite while knowing you can customize it to your taste. Happy cooking!

Creamy Avocado Pasta Simple and Flavorful Dish

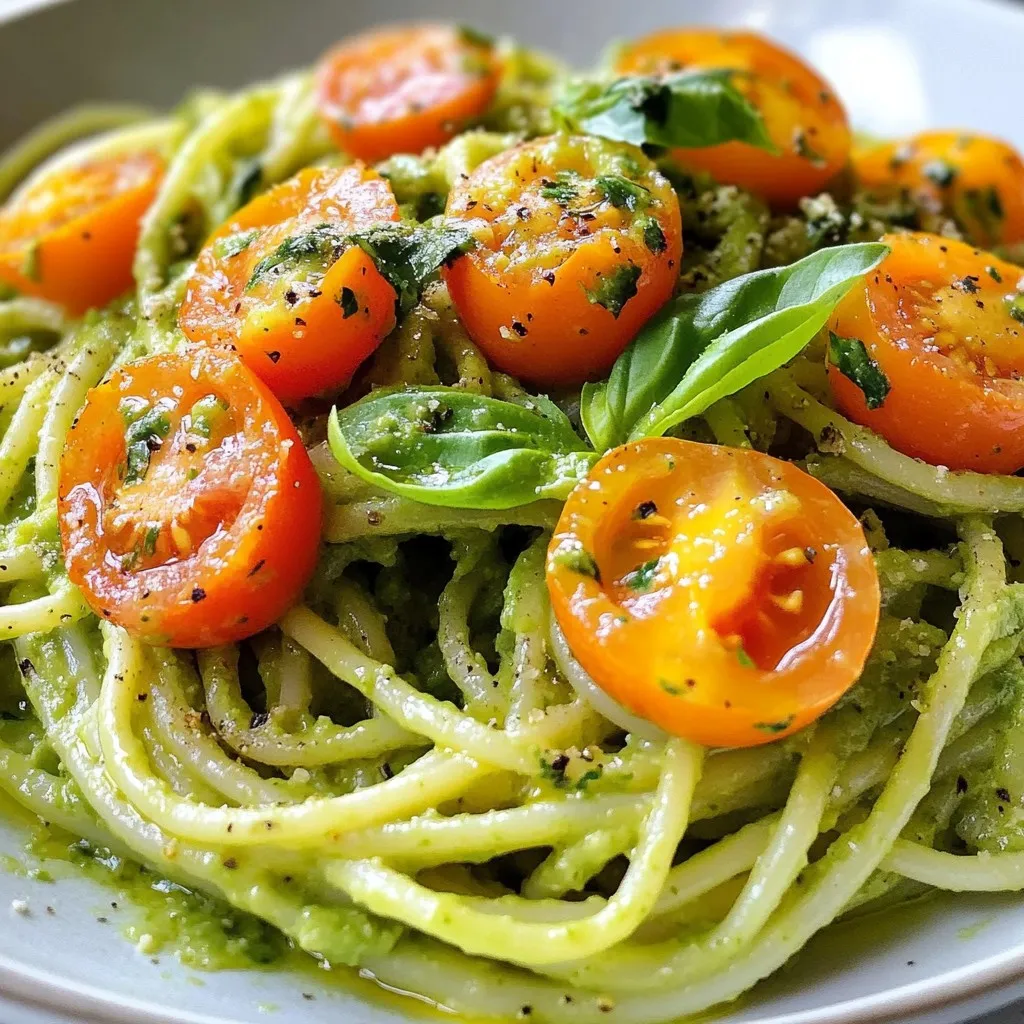
Looking for a quick and tasty meal? Discover how to make Creamy Avocado Pasta! This dish features ripe avocados, garlic,

- 4 boneless, skinless chicken breasts - 1 cup fresh spinach, finely chopped - 1 cup marinated artichoke hearts, drained and roughly chopped - 1 cup cream cheese, softened at room temperature - 1/2 cup grated parmesan cheese - 1/2 cup shredded mozzarella cheese - 2 cloves garlic, finely minced - 1 teaspoon onion powder - Salt and pepper to taste - 1 tablespoon olive oil - Fresh herbs (such as parsley or basil) for garnish To make your Spinach Artichoke Stuffed Chicken, gather these ingredients. Each one plays a key role in building flavor. The chicken breasts provide a tasty base, while the spinach and artichokes add nutrition and zest. Cream cheese brings creaminess, and both parmesan and mozzarella offer a rich, cheesy finish. Don't forget the garlic! It adds depth to our filling. Onion powder enhances the taste without overpowering it. You can adjust the salt and pepper to your liking. Finally, olive oil helps achieve a nice sear on the chicken. Fresh herbs brighten up the dish. With these ingredients ready, you are set to create a meal that impresses. Trust me, your friends and family will love it! {{ingredient_image_2}} - Preheat your oven to 375°F (190°C). This ensures even cooking. - In a bowl, mix the chopped spinach and artichokes. - Soften cream cheese at room temperature for easy mixing. - Place each chicken breast on a board. - Carefully butterfly each breast by slicing it horizontally, creating a pocket. - Fill the pocket with the spinach-artichoke mixture, pressing it in gently. - If you want, use toothpicks to secure the openings. - Heat olive oil in a large skillet over medium-high heat. - Place the stuffed chicken in the skillet and sear for 3-4 minutes per side. - Once golden brown, transfer the skillet to the preheated oven. - Bake for 25-30 minutes until the chicken reaches 165°F (74°C). - Let the chicken rest for 5 minutes before serving. - How to correctly butterfly chicken: Place the chicken breast flat on a cutting board. Use a sharp knife to slice it horizontally, but don’t cut all the way through. This creates a pocket for your filling. - Ensuring even cooking: Sear the chicken on medium-high heat for a few minutes on each side. This gives it a nice crust. Then bake until it's fully cooked. This method keeps the chicken juicy and tender. - Pairing with sides: I love serving this stuffed chicken with sautéed greens or roasted vegetables. They add color and flavor, making your plate look stunning. - How to garnish for visual appeal: Sprinkle fresh herbs like parsley or basil on top. A drizzle of balsamic reduction can also enhance the look and flavor of your dish. - Overfilling the chicken: Don’t stuff too much filling inside the chicken. It can spill out while cooking and make a mess. A generous but moderate amount works best. - Not allowing chicken to rest: After baking, let your chicken rest for about 5 minutes. This step helps keep the juices in, giving you a tender bite every time. Pro Tips Use Fresh Ingredients: Fresh spinach and high-quality marinated artichokes will elevate the flavor of the filling, making your dish more vibrant and delicious. Don’t Overstuff: While it may be tempting to fill the chicken breasts to the brim, overstuffing can cause the filling to spill out during cooking. A generous but manageable amount is best. Perfect Searing: Ensure your skillet is hot before adding the chicken. A good sear locks in moisture and adds a beautiful golden color. Rest the Chicken: Allowing the chicken to rest after baking is crucial. This step helps redistribute the juices, resulting in a more tender and juicy bite. {{image_4}} You can switch up the cheeses if you want. Try using goat cheese or ricotta. Both add a nice twist to the dish. If you like more flavor, mix in sun-dried tomatoes or diced bell peppers. These add color and taste. For gluten-free options, check your cheese labels. Most are safe, but always verify. You can use almond flour instead of breadcrumbs if you want some crunch. For low-carb options, skip the cream cheese and use a low-carb cheese blend. This keeps the dish light but still creamy. Want a kick? Add cayenne pepper to the stuffing for some heat. Italian seasoning also works well for a savory touch. Fresh herbs like thyme or dill can brighten the dish. Use these herbs to garnish for added flavor and a pop of color. To store leftovers, let the chicken cool down first. Place the stuffed chicken in an airtight container. Glass containers work great, but plastic ones are fine too. Be sure to cover it well to keep it fresh. You can keep it in the fridge for up to four days. The best way to reheat stuffed chicken is in the oven. Preheat your oven to 350°F (175°C). Place the chicken in a baking dish and cover it with foil. This keeps the moisture in. Heat for about 20 minutes or until warmed through. You can also use a microwave if you’re in a hurry. Just be careful not to overcook it, as it can dry out. Yes, you can freeze Spinach Artichoke Stuffed Chicken! Wrap each piece tightly in plastic wrap. Then, put them in a freezer-safe bag. This way, they stay fresh for up to three months. When you’re ready to eat, thaw it in the fridge overnight. To reheat, follow the oven method mentioned above for the best results. Yes, you can prepare the stuffed chicken in advance. Stuff the chicken breasts and store them in the fridge for up to a day. This allows the flavors to meld. When ready to cook, just sear and bake as directed. The best way to check chicken doneness is with a meat thermometer. Insert it into the thickest part. The chicken should reach 165°F (74°C). If you don't have a thermometer, cut into the chicken. The juices should run clear, and the meat should no longer be pink. Many sides go well with this dish. Consider these options: - Sautéed mixed greens - Roasted vegetables - Garlic bread - Creamy mashed potatoes - Quinoa salad These sides enhance the meal and provide a balanced plate. Yes, you can use frozen spinach. Just make sure to thaw and drain it well. Squeeze out excess moisture to avoid a soggy filling. This makes it easier to mix with the other ingredients. To serve more people, simply multiply the ingredients by the number of servings you need. For example, if you want to serve eight, double the ingredients. Cook in batches if needed to ensure even cooking. In this post, we explored how to make Spinach Artichoke Stuffed Chicken. You learned about the key ingredients, step-by-step instructions, and important tips for cooking. We also looked at tasty variations and storage options. Remember, this dish is not just about taste; it also shows off your cooking skills. With the right ingredients and steps, you can impress anyone at dinner. Enjoy creating this delicious meal!

Savory Spinach Artichoke Stuffed Chicken Recipe

Are you ready to add a delicious twist to your dinner routine? This savory Spinach Artichoke Stuffed Chicken recipe offers

- 1 pound large shrimp, peeled and deveined - ¼ cup fresh cilantro, finely chopped - 2 tablespoons extra virgin olive oil - Zest and juice of 2 fresh limes - 2 cloves garlic, minced - 1 teaspoon ground cumin - 1 teaspoon chili powder - Salt and freshly ground black pepper to taste - Wooden or metal skewers Gathering the right ingredients is key for great flavor. Start with fresh shrimp. They should be large, peeled, and deveined. This makes them easy to eat and helps them soak up the marinade. Next, get fresh cilantro. I love its bright flavor. It's a must for this dish. You will also need extra virgin olive oil, which adds richness. Fresh limes are essential too. You’ll want both the zest and juice. They give the shrimp a nice tang. For spices, grab minced garlic, ground cumin, and chili powder. They add warmth and depth to the dish. Finally, salt and black pepper bring out all the flavors. Don’t forget skewers! If you use wooden ones, soak them in water first. This helps prevent burning on the grill. Now you are ready to make a delicious meal! {{ingredient_image_2}} To make the marinade, start by taking a large bowl. Whisk together these ingredients: - 2 tablespoons extra virgin olive oil - Zest and juice of 2 fresh limes - 2 cloves garlic, minced - ¼ cup fresh cilantro, finely chopped - 1 teaspoon ground cumin - 1 teaspoon chili powder - Salt and freshly ground black pepper to taste Make sure you blend everything well. This mix creates a bright and zesty flavor for your shrimp. Next, add 1 pound of peeled and deveined shrimp to the marinade. Stir gently to coat every shrimp fully. Cover the bowl with plastic wrap. Put it in the fridge for at least 30 minutes. If you have time, let it marinate for up to 2 hours for better flavor. The longer they sit, the tastier they get! If you are using wooden skewers, soak them in water for 15-20 minutes. This step stops them from burning on the grill. Preheat your grill to medium-high heat. Thread the marinated shrimp onto the skewers, 4-5 shrimp per skewer. Make sure to space them evenly. Place the skewers on the grill. Cook them for about 2-3 minutes on each side. Look for the shrimp to turn a bright pink color and become opaque. This means they are done. Avoid overcooking, as this can make them tough. Once cooked, remove the skewers from the grill. Serve hot, with lime wedges and extra cilantro for garnish. Marinating shrimp adds great flavor. I recommend marinating for at least 30 minutes. For the best taste, marinate up to 2 hours. Fresh ingredients make a big difference. Use fresh lime juice and cilantro for bright flavors. The olive oil helps keep shrimp moist. Don't skip the garlic, cumin, and chili powder; they add depth. The grill should be medium-high heat. This helps the shrimp cook evenly and get a nice sear. If you use wooden skewers, soak them in water for 15-20 minutes. This prevents burning. When grilling, place shrimp on the grill carefully. Make sure they are spaced apart. This helps them cook well without sticking. Presentation matters. Serve your skewers with lime wedges and extra cilantro. This adds a pop of color and flavor. You can also sprinkle some sliced green onions on top. A dash of chili flakes can add a bit of spice. Remember, we eat with our eyes first! Pro Tips Marinate for Maximum Flavor: For the best taste, allow the shrimp to marinate for at least 1 hour. This lets the flavors penetrate the shrimp more deeply. Skewer Smartly: Ensure shrimp are evenly spaced on the skewers to promote even cooking. Avoid overcrowding to let heat circulate properly. Perfectly Cooked Shrimp: Watch closely while grilling; shrimp cook quickly. They are done when they turn opaque and curl slightly, usually about 2-3 minutes per side. Freshness Matters: Use the freshest shrimp you can find for the best flavor and texture. Look for shrimp that smell like the ocean and have a firm texture. {{image_4}} To amp up the heat, add chili flakes or jalapeño to the marinade. This brings a kick that pairs well with the shrimp. I love the extra flavor and warmth it adds. Mix in about a teaspoon of chili flakes or a finely chopped jalapeño. Adjust to your taste. If you want mild, start small. You can experiment with other herbs like parsley or basil. This adds a new twist to the classic flavor. Try using fresh parsley for a milder taste. Basil can give a sweet touch that works great with lime. These herbs still complement the shrimp while adding different notes. Pair the skewers with sides like rice, salad, or grilled vegetables. Rice makes a nice base to soak up the marinade. A crunchy salad adds freshness and texture. Grilled veggies bring color and more flavor. These sides make your meal complete and satisfying. To store leftover shrimp skewers, place them in an airtight container. This keeps them fresh. Refrigerate them right away. They will last for about 2 days. After that, the shrimp may lose their taste and texture. When it’s time to reheat, the oven works best. Preheat it to 350°F (175°C). Place the skewers on a baking tray. Cover them with foil to keep moisture in. Heat for about 10 minutes. This method keeps the shrimp juicy. You can also use a microwave, but be careful. Heat in short bursts of 30 seconds. Check often to avoid overcooking. Overcooked shrimp can become rubbery. Enjoy your flavorful leftovers! Yes, you can use frozen shrimp. First, thaw them safely. Place the shrimp in a bowl of cold water for about 15-20 minutes. You can also leave them in the fridge overnight. After thawing, rinse them under cold water and pat them dry. This helps the marinade stick better. If you don’t like cilantro, you have options. Try parsley for a milder flavor. Basil gives a sweet touch. Mint adds a refreshing twist. Each herb changes the dish's taste, so choose what you like best. Perfectly cooked shrimp turn pink and opaque. They should curl slightly but not tightly. If they look rubbery, you overcooked them. Keep an eye on them while grilling. This way, they stay juicy and tender. This blog post shows you how to make tasty shrimp skewers. You learned about ingredients, from shrimp to spices. I explained how to prepare, marinade, and grill your shrimp perfectly. Tips on better flavor and serving ideas were included too. In the end, you can enjoy a flavorful meal with ease. Don’t hesitate to try variations or serve with your favorite sides. Enjoy grilling your delicious shrimp!

Cilantro Lime Shrimp Skewers Easy Grilling Delight

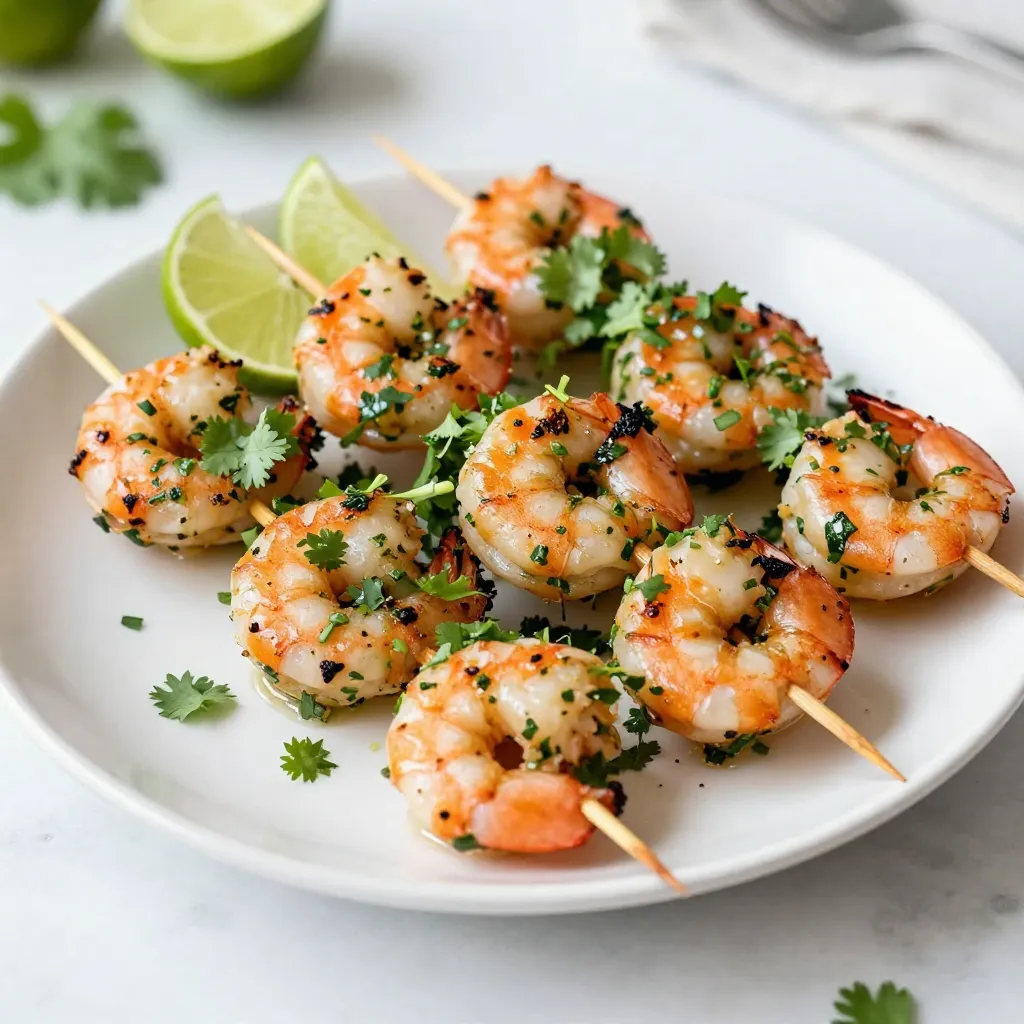
Get ready for a flavor explosion with these Cilantro Lime Shrimp Skewers! This easy grilling delight combines fresh ingredients and

For Tangy Dill Potato Salad, you need: - 2 pounds baby potatoes, halved - 1 cup creamy Greek yogurt - 2 tablespoons tangy Dijon mustard - 2 tablespoons apple cider vinegar - 1 tablespoon fresh dill, finely chopped - 1 teaspoon garlic powder - 1 teaspoon onion powder - Sea salt and freshly cracked black pepper to taste - 1/2 cup celery, finely diced - 1/2 cup red bell pepper, finely diced - 2 green onions, sliced You may switch some ingredients to suit your taste: - Use sour cream instead of Greek yogurt for a richer flavor. - Swap Dijon mustard for yellow mustard if you prefer milder taste. - Replace apple cider vinegar with lemon juice for a fresh twist. - Try using fresh herbs like parsley if you can’t find dill. Fresh ingredients make a big difference in flavor and texture. They add brightness and crunch to your salad. Using fresh dill gives a vibrant taste that dried herbs cannot match. Fresh vegetables, like celery and bell peppers, add a nice crunch, making each bite enjoyable. Always choose the best quality ingredients when cooking. This ensures your Tangy Dill Potato Salad tastes and looks its best. {{ingredient_image_2}} Start by filling a large pot with water. Add a generous pinch of salt. Bring the water to a boil. Carefully place the halved baby potatoes into the pot. Cook them for 15 to 20 minutes. They should be soft but still firm when done. Test them with a fork. If they poke easily, they are ready. Drain the potatoes in a colander. Let them cool for a few minutes. This step helps the flavors mix better later. While the potatoes cool, grab a mixing bowl. Add 1 cup of creamy Greek yogurt to the bowl. Next, add 2 tablespoons of tangy Dijon mustard. Pour in 2 tablespoons of apple cider vinegar. This gives a nice zing! Add 1 tablespoon of finely chopped fresh dill. Sprinkle in 1 teaspoon of garlic powder and 1 teaspoon of onion powder. Whisk all these ingredients together. Mix until the dressing is smooth and creamy. Once the potatoes are cool, transfer them to the bowl with the dressing. Toss the potatoes gently. Ensure every piece is coated with the creamy mix. Now, fold in 1/2 cup of finely diced celery for crunch. Add 1/2 cup of diced red bell pepper for a hint of sweetness. Finally, mix in 2 sliced green onions for a mild onion flavor. Season the salad with sea salt and freshly cracked black pepper. Taste as you go for the best flavor. Cover the bowl and chill in the fridge for at least 30 minutes. This lets all the flavors blend nicely. To get the best texture in your potato salad, choose the right potatoes. Baby potatoes work great because they are creamy and tender. Boil them until fork-tender, but not mushy. This takes about 15 to 20 minutes. Drain them well and let them cool. This keeps the potatoes firm and prevents them from getting soggy. To amp up the flavor, use fresh ingredients. Fresh dill gives a bright taste that pops. The tangy Dijon mustard and apple cider vinegar add zest and depth. Mix everything well so every bite is full of flavor. Letting the salad chill for at least 30 minutes allows the flavors to blend. This makes each bite a tasty surprise. For the best taste, serve the potato salad cold. Chilling it in the fridge helps the flavors meld. Aim for a serving temperature of around 40°F. This is cool enough to enjoy but not too cold to mask the flavors. You can garnish with fresh dill or slices of boiled eggs for a nice touch. Pro Tips Use Fresh Ingredients: For the best flavor, opt for fresh dill and crisp vegetables. Fresh herbs can elevate the taste of your potato salad significantly. Adjust the Dressing: Feel free to modify the dressing ingredients according to your taste. More mustard can add a tangy kick, while additional yogurt can make it creamier. Chill for Flavor: Allow the potato salad to chill in the refrigerator for at least 30 minutes. This resting time lets the flavors meld beautifully, enhancing the overall taste. Serve with a Twist: Consider adding a sprinkle of paprika or a dash of hot sauce on top before serving for an extra layer of flavor and a pop of color. {{image_4}} You can switch up the dressing for Tangy Dill Potato Salad. Try using sour cream instead of Greek yogurt. It gives a rich taste. You can also use vegan mayo for a dairy-free option. For a kick, add more mustard or a splash of lemon juice. Feel free to mix in other veggies. Chopped pickles or capers add a briny flavor. You can also use diced carrots for sweetness. For a crunch, consider adding radishes. Fresh herbs like parsley or basil can brighten the dish, too. This potato salad is already gluten-free! The ingredients do not include gluten. If you use store-bought dressings, check the labels. Some may contain gluten. Using homemade dressings ensures you stay gluten-free. Enjoy this dish worry-free at your next meal! To store your Tangy Dill Potato Salad, place it in an airtight container. Make sure the lid is tight to keep air out. This helps the salad stay fresh. You can keep it in the fridge for up to 3 days. If you want, you can also cover the bowl with plastic wrap. Freezing potato salad can change its texture. If you want to freeze it, do not add any fresh veggies like celery or green onions. You can prepare the salad without these ingredients. Place it in a freezer-safe container or bag. Remove as much air as you can. You can freeze it for up to a month. When you thaw it, mix in fresh veggies for a better taste. Reheating potato salad isn’t always needed. It’s best served cold. If you prefer it warm, use low heat. Place it in a pot and stir gently. Add a splash of yogurt or vinegar if it seems dry. Heat it only until warm, not hot. This keeps the flavors nice and fresh. Yes, you can make Tangy Dill Potato Salad ahead of time. This salad tastes even better when it sits. Prepare it a day before your meal. Just cover it and store it in the fridge. The flavors will blend nicely, making it more delicious. I recommend using baby potatoes for this recipe. They cook evenly and have a great texture. Their small size makes them perfect for bite-sized pieces. If you can't find baby potatoes, you can use red or Yukon gold potatoes. Just cut them into smaller pieces for even cooking. Potato salad can last in the fridge for about three to five days. Make sure you keep it in an airtight container. Check for any off smells or changes in texture before eating. If it looks or smells strange, it’s best to toss it out. In this article, we covered key ingredients, steps, and tips for making Tangy Dill Potato Salad. Using fresh ingredients is vital for great taste. I shared ways to enhance flavor and texture, plus easy variations to suit your needs. Storing leftovers correctly ensures this dish stays tasty longer. Remember, good potato salad can elevate any meal. Explore these ideas and enjoy your delicious creation!

Tangy Dill Potato Salad Simple and Flavorful Side

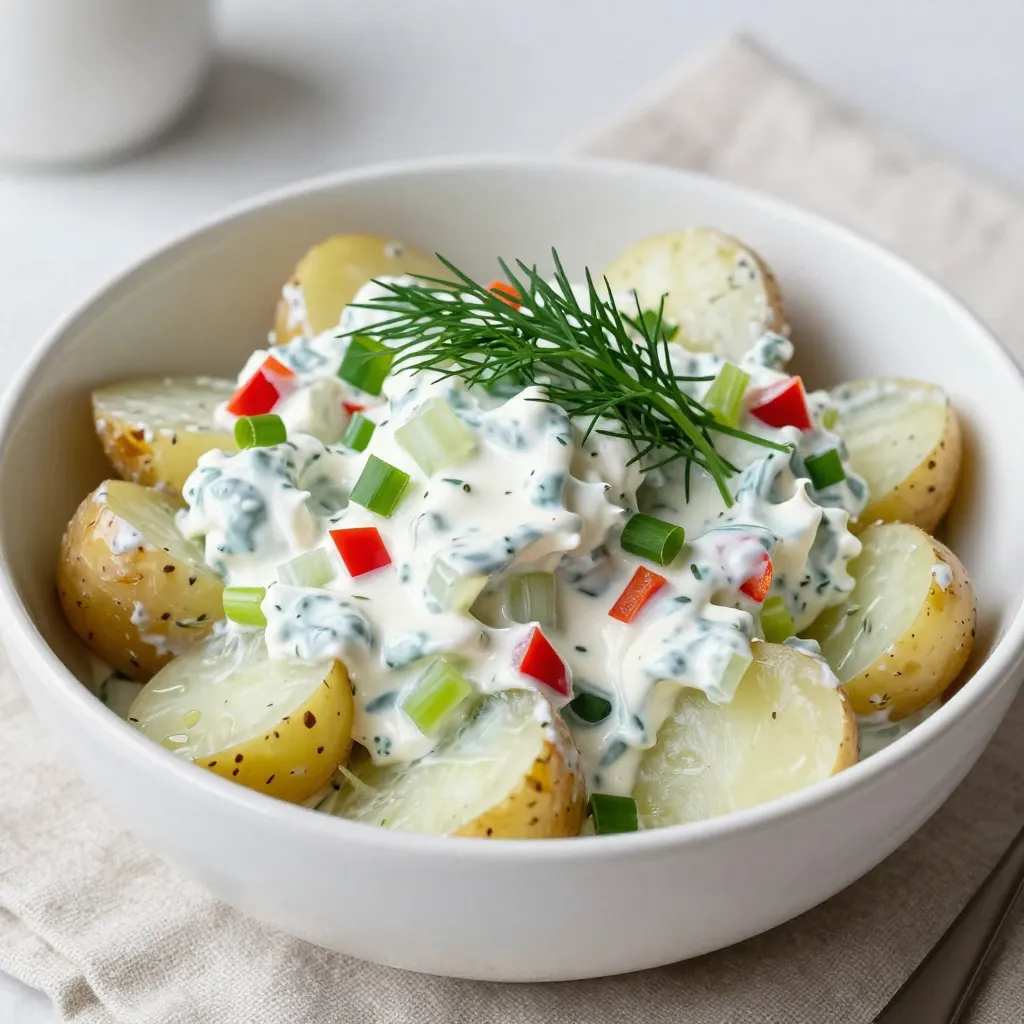
If you want a side dish that packs a punch, try my Tangy Dill Potato Salad. This simple recipe combines

- 2 salmon fillets - 1 cup jasmine rice - 1/4 cup soy sauce - 2 tablespoons honey or maple syrup - 1 tablespoon rice vinegar - 1 teaspoon grated fresh ginger - 2 cloves garlic, minced - 1 tablespoon sesame oil - 1 cup broccoli florets - 1 carrot, julienned - 2 green onions, thinly sliced - Sesame seeds, for garnish - Salt and pepper, to taste For Teriyaki Salmon Rice Bowls, you need a few main ingredients. First, the salmon fillets are the stars of this dish. They bring rich flavor and healthy omega-3 fats. Next is jasmine rice, known for its soft texture and lovely aroma. This rice serves as the base of your bowl. The teriyaki sauce is the heart of this recipe. It combines soy sauce, honey or maple syrup, rice vinegar, grated ginger, and minced garlic. This mix gives your salmon a sweet and savory glaze. The sesame oil adds a nice nutty flavor to the fish and veggies. Don't forget the veggies! Broccoli florets and julienned carrots add color and crunch. They also bring vitamins and minerals to your meal. Lastly, garnish your bowls with sliced green onions and sesame seeds. They add a pop of flavor and make your dish look great. This ingredient list is simple but full of flavor. It makes the Teriyaki Salmon Rice Bowls easy to prepare. You can enjoy a delicious meal in about 30 minutes! {{ingredient_image_2}} To start, rinse the jasmine rice under cold water. This helps remove extra starch, so the rice won't be sticky. Keep rinsing until the water runs clear. In a medium saucepan, combine 1 cup of rinsed rice with 2 cups of water or vegetable broth. Bring this to a boil. Once boiling, reduce the heat to low, cover, and let it simmer for 15 minutes. The rice should be tender when done. Remove it from heat and fluff with a fork for a light, airy texture. Tips for Fluffy Rice: - Use a fork to fluff the rice gently. - Let it sit covered for a few minutes after cooking. For the teriyaki sauce, gather these ingredients: 1/4 cup soy sauce, 2 tablespoons honey or maple syrup, 1 tablespoon rice vinegar, 1 teaspoon grated fresh ginger, and 2 cloves of minced garlic. In a small bowl, whisk these together until well mixed. A good balance of sweet and salty makes the sauce shine. Importance of Sauce Balance: - Adjust sweetness with honey or syrup. - Taste before using to make sure you like it. Heat 1 tablespoon of sesame oil in a large skillet over medium heat. Season both sides of the salmon fillets with salt and pepper. Place them skin-side down in the hot skillet. Cook for 4-5 minutes. The skin should turn crispy and golden brown. Tips for Achieving Crispy Skin: - Don’t move the salmon while it cooks. - Make sure the pan is hot before adding the fish. Now, gently flip the salmon fillets over. Pour the teriyaki sauce over them. Keep cooking for another 3-4 minutes. Baste the salmon with the sauce while it cooks. This step adds flavor and moisture. Cook until the salmon is fully done, reaching an internal temperature of 145°F. In the same skillet, add 1 cup of broccoli florets and 1 julienned carrot. Stir-fry these for about 3-4 minutes. You want them tender but still bright and crunchy. Maintaining Vegetable Crunch: - Stir-fry quickly over high heat. - Avoid overcooking to keep that nice texture. To create the rice bowls, start with a generous scoop of fluffy jasmine rice at the bottom of each bowl. Place the teriyaki salmon fillet on top, then add the sautéed broccoli and carrots beside it. Layering Tips for Presentation: - Use a bowl with high sides for a neat stack. - Arrange colors for visual appeal. Finally, garnish with thinly sliced green onions and a sprinkle of sesame seeds for added flavor and crunch. Enjoy your beautiful and tasty teriyaki salmon rice bowl! - Ideal cooking temperature: Cook the salmon until it reaches 145°F. This ensures it is safe and tender. Use a meat thermometer for accuracy. - Seasoning suggestions: I love using salt and pepper. You can also add garlic powder or onion powder for extra flavor. A sprinkle of sesame seeds gives a nice crunch. - Substituting different rice types: You can use brown rice or sushi rice instead of jasmine rice. Each type brings a unique taste and texture. - Flavoring the rice with herbs: Try mixing in fresh herbs like cilantro or parsley. This adds a fresh kick to your rice. - Adjusting sweetness and saltiness: If you like it sweeter, add more honey or maple syrup. For more saltiness, increase the soy sauce a little. - Adding heat with chili: If you want a spicy kick, add red pepper flakes or a dash of sriracha. This balances the sweetness of the teriyaki sauce. Pro Tips Choose Fresh Salmon: Look for vibrant, shiny skin and a pleasant ocean smell when selecting salmon. Freshness greatly enhances the flavor of your dish. Perfectly Cooked Rice: For extra fluffy jasmine rice, let it rest covered for 10 minutes after cooking. This helps to steam the rice and achieve the perfect texture. Customize Your Vegetables: Feel free to add other vegetables like bell peppers or snap peas. Just ensure they are cut into similar sizes for even cooking. Garnish for Visual Appeal: Adding sliced green onions and sesame seeds not only enhances flavor but also adds a beautiful finishing touch to your rice bowls. {{image_4}} You can make a tasty vegetarian teriyaki bowl using tofu or tempeh. Both options soak up flavors well. - Using tofu or tempeh: Press tofu to remove water. Cut it into cubes. Cook in the skillet with sesame oil until golden. Tempeh adds a nutty taste. Slice it thin and cook it the same way. - Alternative sauces to use: Instead of the teriyaki sauce, try soy sauce with maple syrup. You can add a splash of rice vinegar for tang. If you crave seafood, shrimp or white fish can work great. They cook quickly and pair well with teriyaki flavors. - Using shrimp or other fish: For shrimp, peel and devein. Cook them in the skillet until pink. White fish like cod or halibut is also good. Season and cook just like the salmon. - Cooking methods for seafood alternatives: Sauté shrimp or fish in sesame oil. Cook until golden brown. Make sure to check for doneness to avoid overcooking. Adding seasonal vegetables makes the dish fresh and colorful. You can use what’s in season or what you have on hand. - Suggestions for seasonal options: In spring, try asparagus or snap peas. In summer, zucchini and bell peppers are great. In fall, add butternut squash or Brussels sprouts. - How to adapt to available produce: Chop veggies into bite-sized pieces for even cooking. Adjust cooking times based on the vegetable type. Always aim for a mix of colors for a vibrant bowl. To keep your Teriyaki Salmon Rice Bowls fresh, follow these steps: - Cool Down: Let the dish cool to room temperature first. - Use Airtight Containers: Store the rice bowls in airtight containers. This helps prevent moisture loss. - Separate Components: If possible, store the salmon, rice, and veggies in separate containers. This keeps everything fresh. When it’s time to enjoy your leftovers, use these methods: - Salmon: Reheat salmon in a skillet over low heat. Cover it to keep it moist. - Rice: Add a splash of water and microwave the rice. Stir halfway through to heat evenly. - Vegetables: Sauté vegetables in a pan for a few minutes. This brings back their crunch and flavor. By following these tips, your Teriyaki Salmon Rice Bowls will taste great even on day two! You can store Teriyaki Salmon Rice Bowls in the fridge for up to three days. Make sure to place them in an airtight container. If you want to keep them longer, consider freezing them for up to three months. Just thaw in the fridge before reheating. Yes, you can use other fish like trout or tilapia. Both options work well with teriyaki sauce. If you prefer shellfish, shrimp is also a tasty choice. Just adjust the cooking time based on the fish type you select. You can pair these bowls with simple sides like edamame or a fresh cucumber salad. Steamed green beans or a seaweed salad also complement the flavors nicely. Feel free to get creative and add your favorite sides! Absolutely! You can prepare the teriyaki sauce ahead of time and store it in the fridge for up to a week. Just make sure to give it a good stir before using it. You can even freeze it for longer storage. Jasmine rice is a great choice for these bowls. Its fluffy texture and slight sweetness pair well with the teriyaki sauce. You can also use brown rice for a heartier option or sushi rice for a stickier texture. Just adjust cooking times as needed. In this blog post, we explored how to make Teriyaki Salmon Rice Bowls. We covered the main ingredients and detailed steps, from cooking rice to glazing the salmon. I shared tips for perfecting each element and suggested tasty variations. You now have the tools to create a delicious meal. Enjoy experimenting with flavors and ingredients. Your kitchen creations can impress anyone. Happy cooking!

Teriyaki Salmon Rice Bowls Flavorful and Easy Recipe

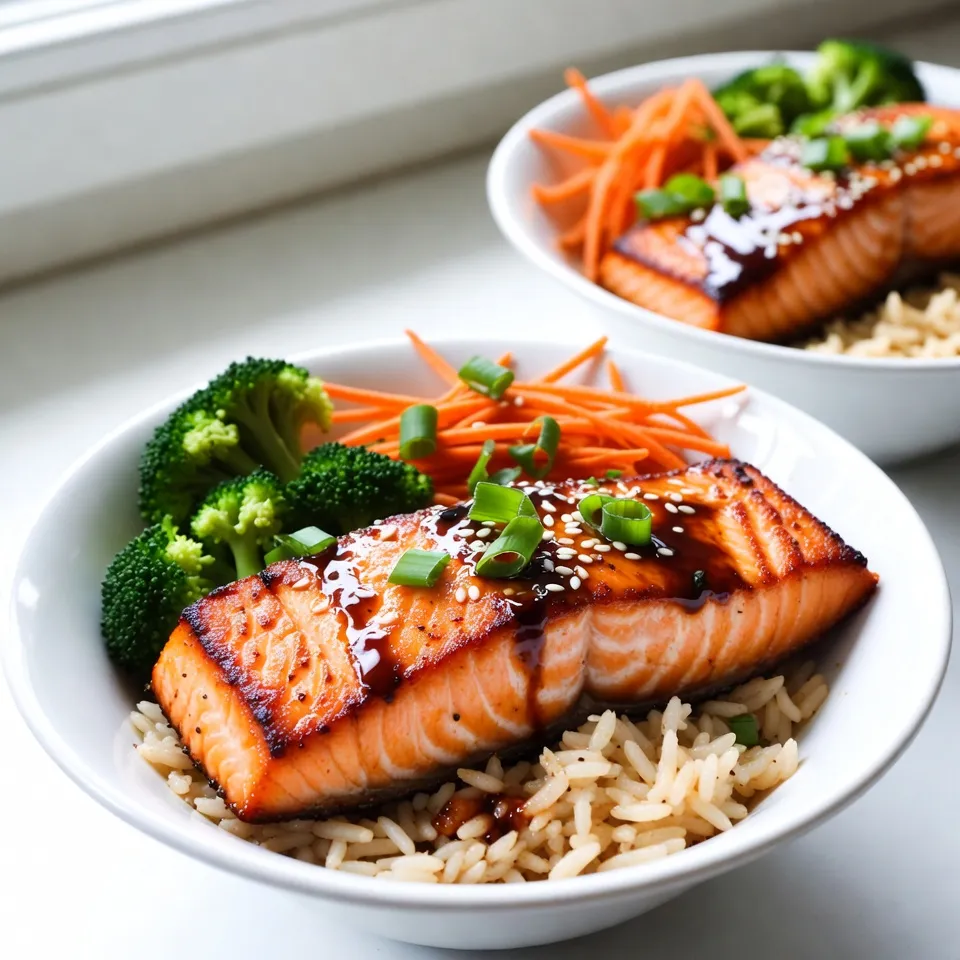
Are you ready to impress your family or friends with a delicious meal? Teriyaki Salmon Rice Bowls are not only

Older posts
Newer posts
← Previous Page1 … Page114 Page115 Page116 … Page122 Next →

dsad

© 2026 dailydishcraft • Built with GeneratePress

Our Policies

  • Copyright Policy
  • Cookie Policy
  • GDPR Policy
  • Privacy Policy
  • Disclaimer
  • Terms Of Use

More Information

  • Home
  • About
  • Contact
  • Appetizers
  • Dessert
  • Dinner
  • Drinks
©2026, dailydishcraft About Back To Top