Skip to content
DisclaimerTerms Of UseGDPR PolicyCookie Policy

dailydishcraft

  • Home
  • Drinks
  • Appetizers
  • Dinner
  • Dessert
  • About
  • Contact
  • Privacy Policy
DisclaimerTerms Of UseGDPR PolicyCookie Policy

Jessica

To make a classic tres leches cake, you need a list of simple ingredients. Each plays a key role in creating this rich and creamy delight. Here is what you will need: - 1 cup all-purpose flour - 1 ½ teaspoons baking powder - ¼ teaspoon salt - 5 large eggs, separated - 1 cup granulated sugar, divided - ½ cup whole milk - 1 teaspoon vanilla extract - 1 can (12 oz) evaporated milk - 1 can (14 oz) sweetened condensed milk - 1 cup heavy cream - Fresh berries (strawberries, blueberries) for garnish - Ground cinnamon for dusting (optional) Each ingredient adds unique flavors and textures. The all-purpose flour gives the cake structure. The eggs, both yolks and whites, provide moisture and lightness. Granulated sugar sweetens the cake and helps it brown nicely. Whole milk adds creaminess, while vanilla extract enhances the flavor. Evaporated and sweetened condensed milk create the signature soaking mixture. This is what makes tres leches cake so moist and delicious. Finally, the heavy cream is whipped to top the cake, creating a light and fluffy finish. Fresh berries add a pop of color and flavor, while a sprinkle of cinnamon can enhance the presentation. With these ingredients, you're ready to create a dessert that impresses everyone. Make sure to gather everything before starting. This will help you stay organized and make the cooking process smooth. {{ingredient_image_2}} - Start by preheating your oven to 350°F (175°C). - Prepare a 9x13-inch baking dish by greasing it and lightly dusting it with flour. This helps the cake release easily. - In a medium bowl, mix 1 cup of all-purpose flour, 1 ½ teaspoons of baking powder, and ¼ teaspoon of salt. Sift this mixture to make it light and airy. - In a large bowl, beat 5 egg yolks with ¾ cup of granulated sugar until it turns a pale yellow. This makes the batter creamy and smooth. - Add ½ cup of whole milk and 1 teaspoon of vanilla extract, mixing until smooth. - Gradually add the flour mixture to the egg yolk mixture. Fold gently with a spatula until just combined. - In a clean bowl, beat the 5 egg whites on medium speed until soft peaks form. - Slowly add the remaining ¼ cup of sugar. Keep beating on high until stiff peaks form and the mixture looks glossy. - Carefully fold one-third of the whipped egg whites into the batter. This lightens the mixture. Then, fold in the rest of the egg whites in two parts, keeping as much air in as possible. - Pour the batter into your prepared baking dish. Spread it evenly with a spatula. - Bake in the preheated oven for 25-30 minutes. Check for doneness by inserting a toothpick in the center. If it comes out clean, the cake is ready. - Remove it from the oven and let it cool completely in the pan on a wire rack. - While the cake cools, whisk together 1 can of evaporated milk, 1 can of sweetened condensed milk, and 1 cup of heavy cream in a medium bowl. Mix until it's well blended. - Once the cake is cool, poke holes all over the top with a fork. - Slowly pour the tres leches mixture over the cake. Make sure it soaks evenly. Let it absorb for at least 1 hour at room temperature or overnight in the fridge for a richer taste. - Before serving, whip 1 cup of heavy cream until soft peaks form. - Spread or pipe the whipped cream generously over the soaked cake. - Garnish with fresh berries and a sprinkle of ground cinnamon if you like. To get that soft, airy texture, I focus on the egg whites. When whipping them, I beat them until soft peaks form. Then, I slowly add sugar. This creates the glossy peaks you want. After that, I fold the egg whites into the batter gently. I do this in three parts, which helps keep air in the mix. It’s key to avoid over-mixing here. Soaking time is also very important. The cake needs to absorb the milk mixture fully. I let it soak for at least an hour at room temperature. For the best flavor, I prefer to let it soak overnight in the fridge. One big mistake I see is overmixing the batter. When you do this, the cake can turn out dense and dry. I always mix just until combined. This keeps the cake fluffy and light. Another mistake is not soaking enough. If you don’t pour the milk mixture evenly, some parts stay dry. This can lead to a bland bite. So, poke holes all over the cake. This ensures every piece soaks up the sweet milk. For a beautiful presentation, I cut the cake into generous squares. I serve them on individual plates, which looks nice. I top each square with whipped cream and fresh berries. A sprinkle of ground cinnamon adds a lovely touch too. Pair this cake with coffee or a sweet dessert wine. The rich flavors blend well together. Enjoy this classic treat with friends and family for a special gathering! Pro Tips Use Room Temperature Ingredients: Ensure that your eggs and milk are at room temperature before starting. This helps the ingredients to blend better, making for a lighter and fluffier cake. Let the Cake Soak Overnight: For the best flavor and texture, allow the cake to soak in the tres leches mixture overnight in the refrigerator. This allows the flavors to meld beautifully. Whip Cream to Soft Peaks: When whipping your cream for the topping, stop when you reach soft peaks. This will create a light and airy texture that complements the moist cake perfectly. Garnish with Fresh Fruits: Add a burst of color and freshness by garnishing with a variety of fresh berries. They not only enhance the presentation but also add a delicious contrast to the sweetness of the cake. {{image_4}} You can make your tres leches cake even better with some tasty twists. - Adding chocolate or coffee: Mix in cocoa powder or coffee for a rich flavor. Just add 1/4 cup of cocoa powder when combining the dry ingredients. For coffee, brew a strong cup and use it in place of some of the milk. - Infusing with citrus zest: Add zest from oranges or limes to the batter. This brings a bright, fresh taste to the cake. Use about 1 tablespoon of zest for a nice kick. If you want a dairy-free tres leches cake, there are great options. - Dairy-free options: Use coconut milk, almond milk, or soy milk instead of regular milk. This keeps the cake creamy and delicious. - Plant-based alternatives: Try oat milk or cashew milk. They are great substitutes and add unique flavors. Toppings can change the look and taste of your cake. - Using different fruits: Top your cake with mango, kiwi, or peaches for a colorful treat. Fresh fruit adds a nice sweetness. - Adding nuts or sprinkles: Chopped nuts like almonds or walnuts give a nice crunch. Sprinkles add fun color and texture. Just go wild with what you love! - Store any leftover tres leches cake in an airtight container. - Keep the cake in the fridge to maintain its freshness. - It will stay tasty for about 3 to 5 days. - If the cake has no toppings, it can last a bit longer. - Cover it well to avoid drying out. - You can freeze tres leches cake for up to 2 months. - Cut the cake into slices for easy freezing. - Wrap each piece in plastic wrap, then place in a freezer bag. - To defrost, move the cake to the fridge for several hours. - Avoid using the microwave, as it changes the texture. - The cake might lose some of its softness after freezing. - Soaking it again with the milk mixture can help restore moisture. Tres Leches Cake is a moist dessert soaked in three kinds of milk. This cake comes from Latin America, especially Mexico. The name means "three milks" in Spanish. It has a rich history tied to celebrations and family gatherings. People love its fluffy texture and sweet flavor. Each bite is creamy and dreamy, making it a favorite for many. Tres Leches Cake can last about 3 to 5 days in the fridge. Keep it covered to stop it from drying out. Signs that the cake is bad include a sour smell or mold. If it looks off, it’s better to toss it. Yes, you can make Tres Leches Cake a day early. This helps the flavors blend better. After soaking the cake, cover it tightly and chill. It will stay fresh and taste even better the next day. If you need a substitute for heavy cream, use whipped coconut cream. You can also try whipped topping or half-and-half. These options give a similar texture. Adjust the sweetness if needed, as some substitutes are sweeter. This blog post detailed how to make a delicious Tres Leches Cake. We covered ingredients, step-by-step instructions, tips, variations, storage methods, and FAQs. Making this cake can be fun and rewarding. You can impress guests and family with your skills. Enjoy experimenting with flavors and toppings. Keep your cake fresh for days. Happy baking!

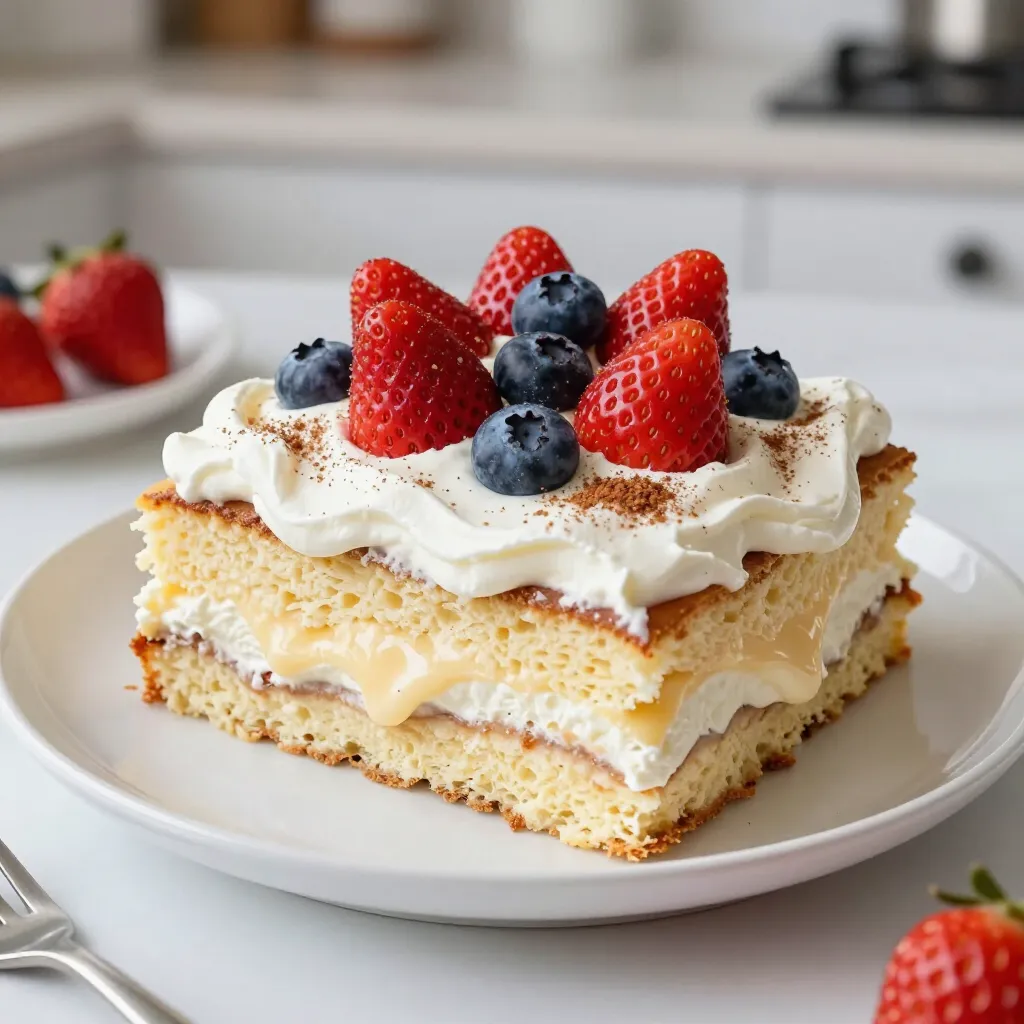
Classic Tres Leches Cake Rich and Creamy Delight

Are you ready to dive into the world of desserts? Let’s explore the magic of Classic Tres Leches Cake, a

- 8 oz rice noodles - 1 cup shredded purple cabbage - 1 cup shredded carrots - 1 red bell pepper, thinly sliced - 1/2 cup cucumber, julienned - 1/4 cup green onions, sliced - 1/4 cup fresh cilantro, chopped - 1/4 cup roasted peanuts, chopped - 1/3 cup creamy peanut butter - 2 tablespoons soy sauce - 1 tablespoon maple syrup - 1 tablespoon rice vinegar - 1 teaspoon sesame oil - 1-2 teaspoons Sriracha (adjust to your spice preference) - Water (for thinning the sauce, as needed) The rice noodles are the base of this dish. They soak up the sauce well. I love using purple cabbage for its crunch and vibrant color. Carrots add sweetness and more crunch. The red bell pepper brings a lovely flavor and more color. Cucumber adds a fresh, cool bite. Green onions give a nice sharpness, while cilantro adds freshness. Finally, roasted peanuts add crunch and nutty flavor. For the peanut sauce, creamy peanut butter is key for richness. Soy sauce adds salt and umami. Maple syrup sweetens the mix, while rice vinegar adds tang. Sesame oil gives a warm, nutty note. Adjust the Sriracha for spice. If it's too thick, you can add water to reach your desired consistency. This mix of flavors and textures makes the salad so enjoyable! {{ingredient_image_2}} 1. Bring a large pot of water to a boil. 2. Add 8 oz of rice noodles and cook until al dente. This usually takes about 4-6 minutes. 3. Drain the noodles in a colander and rinse them under cold water. This stops the cooking process and keeps them from sticking. Set them aside to cool. 1. In a large mixing bowl, combine the following shredded vegetables: - 1 cup shredded purple cabbage - 1 cup shredded carrots - 1 red bell pepper, thinly sliced - 1/2 cup cucumber, julienned - 1/4 cup green onions, sliced - 1/4 cup fresh cilantro, chopped 2. Toss all these veggies together. Make sure they are evenly mixed for the best flavor. 1. In a small bowl, whisk together: - 1/3 cup creamy peanut butter - 2 tablespoons soy sauce - 1 tablespoon maple syrup - 1 tablespoon rice vinegar - 1 teaspoon sesame oil - 1-2 teaspoons Sriracha (add more for more heat) 2. If the sauce is too thick, add water one teaspoon at a time. Mix until you reach your desired consistency. 1. Gently add the cooled noodles to the bowl of mixed vegetables. 2. Pour the peanut sauce over the noodles and veggies. 3. Use tongs or a spatula to toss everything together. Make sure all ingredients are coated in the sauce. 1. Transfer the noodle salad to serving plates or a large platter. 2. Garnish with chopped roasted peanuts and extra cilantro for a nice touch. This adds flavor and crunch! To get the right consistency for your peanut sauce, start with creamy peanut butter. Mix it well with soy sauce, maple syrup, and rice vinegar. If it feels too thick, add water little by little. Stir until smooth. If you want more heat, add Sriracha. Start with one teaspoon and taste. Adjust to your spice preference. You can change up the veggies for your salad. Try using bean sprouts, snap peas, or zucchini. These options keep things fresh and fun! You can also use seasonal vegetables, like bell peppers in summer or carrots in spring. This keeps your salad exciting throughout the year. To save time, prepare your salad components ahead of time. You can cook the noodles and chop the veggies a day before. Store them in separate containers in the fridge. When you're ready to eat, mix them with the peanut sauce. This way, your salad stays fresh and crisp. Pro Tips Cook Noodles Al Dente: To achieve the perfect texture, cook the rice noodles until they are al dente, as they will continue to soften when mixed with the sauce. Customize Your Veggies: Feel free to add or substitute vegetables based on your preference or what's in season, like snap peas or bean sprouts for extra crunch. Adjust Sauce Thickness: If the peanut sauce is too thick, thin it out gradually with water until you reach the desired consistency for easy mixing. Garnish for Flavor: Enhance the dish's appearance and taste by topping it with additional chopped roasted peanuts and fresh lime wedges before serving. {{image_4}} You can make your Thai Peanut Noodle Salad even heartier by adding protein. Chicken, shrimp, or tofu all work well. If you choose chicken, grill or sauté it first. For shrimp, a quick sear brings out the flavor. If you want a plant-based option, use firm tofu. Just cube it and pan-fry until golden. These proteins enhance the dish and keep it filling. While rice noodles are classic, don’t hesitate to try other noodles. Soba noodles are a great choice for a nutty flavor. Udon noodles offer a chewier texture. If you need a gluten-free option, look for rice or gluten-free noodles. They will still pair well with the peanut sauce and veggies. If you want to shake things up, try different nut butters. Almond butter or cashew butter can change the taste of your sauce. You can also explore other dressing ideas. A sesame dressing or a spicy chili sauce can add a new twist. Mix and match to find your favorite combination. To store leftovers, place the salad in an airtight container. Make sure the lid seals well. This keeps the salad fresh longer. You can keep it in the fridge for up to three days. The noodles may soak up the sauce, so you might want to add more sauce when serving. To maintain freshness, store the salad and peanut sauce separately if possible. This method helps keep the noodles firm and the veggies crisp. When ready to eat, just mix them back together. Can you freeze the salad? I do not recommend freezing this salad. The texture of the noodles and veggies can change once frozen. They may become mushy when thawed. If you do freeze it, use a freezer-safe container. Thaw the salad overnight in the fridge before serving. If you want to reheat it, do so gently in a pan over low heat. Add a little water or sauce to prevent sticking. Thai Peanut Noodle Salad is a fresh and tasty dish. It features rice noodles and crisp veggies. The main elements include cabbage, carrots, and bell peppers. You mix these with a creamy peanut sauce. This sauce has a rich flavor from peanut butter and soy sauce. The salad is colorful and healthy, perfect for warm days. Making this salad is quick and easy. It takes about 15 minutes to prep the ingredients. The cooking time for the noodles is just a few minutes. In total, you can have this dish ready in about 30 minutes. It’s a great option for a busy weeknight meal. Yes, you can make this salad vegan! The main ingredients are already plant-based. Just replace the soy sauce with a gluten-free version if needed. You can also substitute maple syrup with agave syrup for a vegan-friendly sweetener. This way, everyone can enjoy this delicious dish. This salad pairs well with many side dishes. You can serve it with spring rolls for a fun snack. A light soup, like miso, makes a great addition too. Grilled veggies or tofu also complement the flavors of the salad. Feel free to mix and match for a full meal. You can easily change the spice level in the sauce. If you like it mild, use less Sriracha. Start with just one teaspoon and taste the sauce. If it’s not spicy enough, add more Sriracha little by little. This way, you can create the perfect balance for your taste. This blog post covered how to make a tasty Thai Peanut Noodle Salad. You learned about the main ingredients, how to cook the noodles, and prepare the peanut sauce. We shared tips for perfecting the dish and suggested variations for extra flavor. I hope you're excited to try this fresh salad and customize it to your taste. Remember, this dish is quick to make and perfect for any meal. Enjoy exploring different combos and making this recipe your own!

Thai Peanut Noodle Salad Flavorful and Fresh Dish

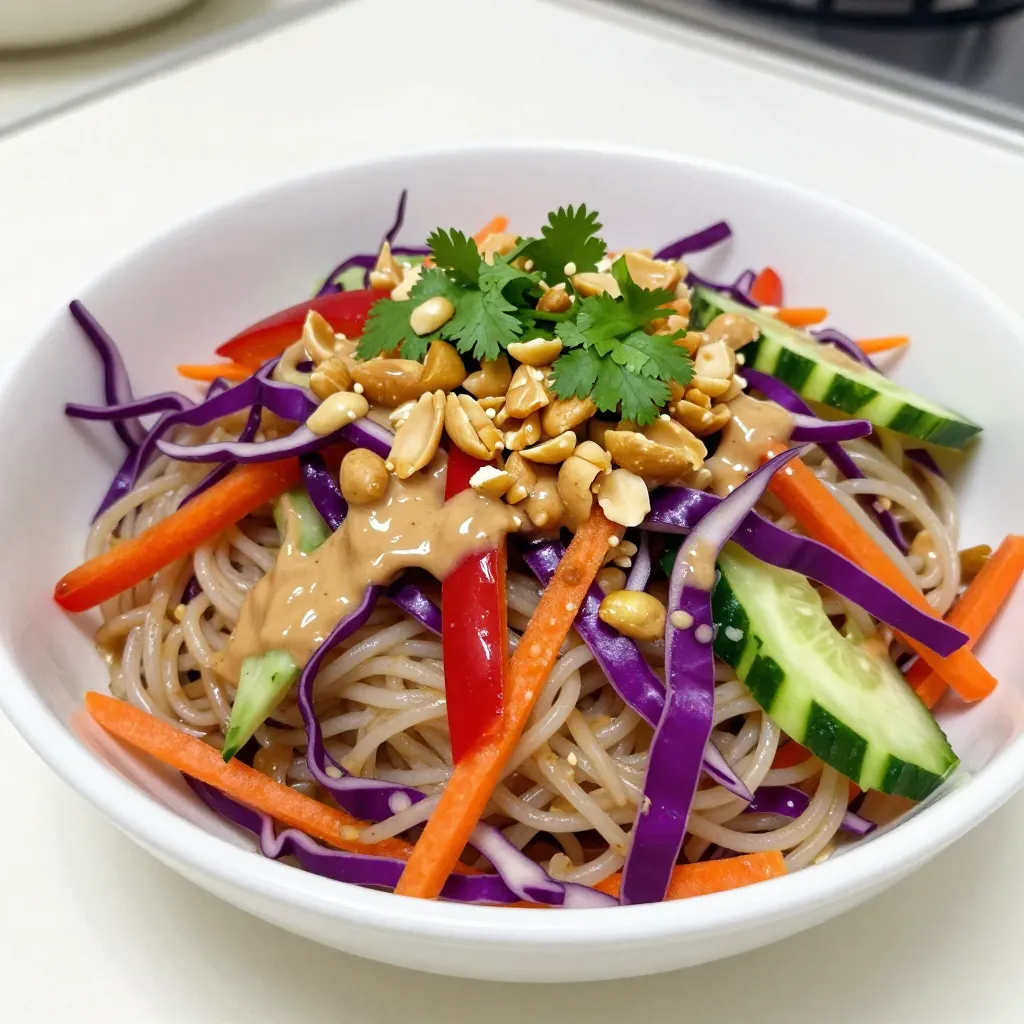
Are you ready for a fresh and tasty dish? Thai Peanut Noodle Salad is the perfect choice! This colorful salad

For spinach dumplings, you need fresh and vibrant ingredients. Here’s what you will need: - 2 cups fresh spinach, finely chopped - 1 cup creamy ricotta cheese These ingredients bring a bright taste and rich texture to the dumplings. Fresh spinach adds color and nutrients, while ricotta gives a creamy bite. Dairy plays a big role in flavor. You will use: - 1/2 cup freshly grated Parmesan cheese - 1 large egg, beaten Parmesan adds a nutty flavor. The egg acts as a binder. It helps hold the dumplings together, making them sturdy yet soft. Seasoning is key for taste. Gather these essentials: - 1/2 teaspoon garlic powder - 1/4 teaspoon freshly grated nutmeg - Salt and freshly cracked pepper, to taste - 1 tablespoon extra virgin olive oil - 1 cup all-purpose flour, plus extra for dusting - 1 cup marinara sauce, warmed (for serving) Garlic powder enhances flavor, while nutmeg adds warmth. Olive oil helps when sautéing, and flour is for the dough. Marinara sauce finishes the dish beautifully. {{ingredient_image_2}} First, gather your ingredients. You need fresh spinach, ricotta cheese, Parmesan cheese, garlic powder, nutmeg, salt, and pepper. 1. Chop the Spinach: Finely chop 2 cups of fresh spinach. Make sure it's small enough to mix well. 2. Mix Ingredients: In a large bowl, add the chopped spinach, 1 cup of ricotta, and 1/2 cup of Parmesan. 3. Season: Add 1/2 teaspoon of garlic powder, 1/4 teaspoon of nutmeg, and a pinch of salt and pepper. 4. Combine: Stir everything together until well mixed. This will be your tasty filling. Now, let’s shape our dumplings. 1. Prepare the Surface: Dust a clean surface with flour. This keeps the dough from sticking. 2. Add Egg: Pour 1 beaten egg into your spinach mixture. 3. Knead the Dough: Mix it into a dough. If it’s sticky, add more flour until it's soft and smooth. 4. Divide the Dough: Cut the dough into small pieces. Roll each piece into a thin circle, about 2-3 inches wide. 5. Fill the Dumplings: Place a teaspoon of the filling in the center of each circle. Don't overfill them. 6. Seal: Fold the dough over the filling to make a half-moon. Pinch the edges to close them tightly. Now we will cook our dumplings. 1. Boil Water: Bring a large pot of salted water to a boil. 2. Cook Dumplings: Lower the heat to a simmer. Add the dumplings in batches. Cook for 3-4 minutes until they float. 3. Remove Dumplings: Use a slotted spoon to lift them from the water. Set them aside. 4. Sauté: In a skillet, heat 1 tablespoon of olive oil over medium heat. Add the cooked dumplings and sauté for 2-3 minutes until golden brown. Serve the dumplings warm with marinara sauce on top. Enjoy your delicious creation! To make great dumplings, you need the right dough. Start with the right flour. Use all-purpose flour, as it gives the best texture. When mixing, add flour slowly. You want a soft, not sticky dough. If it feels wet, sprinkle in more flour. Knead gently until smooth. This step is key for easy rolling and shaping. Dumpling-making can be tricky. To avoid issues, don’t overfill your dumplings. Use just a teaspoon of filling. Too much can make them burst while cooking. Seal the edges well; this keeps the filling inside. Also, avoid overcrowding the pot when boiling. This helps them cook evenly. Lastly, keep an eye on cooking time. Dumplings should float when ready. Presentation matters for any dish. For your spinach dumplings, serve them hot on a nice plate. Drizzle warmed marinara sauce on top. This adds color and flavor. Garnish with fresh basil leaves and extra Parmesan. It makes your dish look gourmet! Use a clean cloth to wipe the plate edges. This simple step elevates your meal’s look. Pro Tips Use Fresh Spinach: For the best flavor and texture, always use fresh spinach instead of frozen. It retains its vibrant color and nutritional value. Adjust the Seasoning: Taste the filling before sealing the dumplings and adjust the seasoning as needed. This will ensure a flavorful bite every time. Don’t Overfill: Be cautious not to overfill the dumplings, as this can cause them to burst while cooking. A teaspoon of filling is usually just right. Serve Immediately: These dumplings are best served hot and fresh. If you need to prepare them in advance, keep them warm in a low oven until ready to serve. {{image_4}} You can change the flavor by using different cheeses. Try adding feta or goat cheese. These cheeses give a tangy taste. You can mix in mozzarella for a creamier texture. Blend cheeses for a unique dumpling. Each option adds a special twist. Spinach is great, but other greens work too. Kale is a sturdy choice that adds a strong flavor. Swiss chard brings a hint of sweetness. You can even use arugula for a peppery kick. Experimenting with greens can surprise your taste buds. While marinara sauce is tasty, try other sauces. A simple garlic butter sauce shines with these dumplings. You can also drizzle lemon olive oil for a fresh touch. Pesto sauce adds a burst of flavor, too. Don’t forget to sprinkle some extra cheese on top! After you enjoy your spinach dumplings, you may have extras. To store them, let dumplings cool to room temperature. Place them in an airtight container. Keep them in the fridge for up to three days. This way, you can savor them later. If you want to save dumplings for a long time, freezing is best. Arrange uncooked dumplings on a baking sheet. Make sure they don’t touch each other. Freeze them for about an hour. Then, transfer them to a freezer-safe bag. They can stay good for up to three months. To reheat, boil them straight from the freezer. Cook for about 5-6 minutes until they float. You can also sauté them in olive oil for a crispy finish. This gives them a fresh taste, just like when you first made them. Meal prepping with spinach dumplings saves time. You can make a big batch on the weekend. Store them in portions. This makes it easy to grab and go during the week. Pair them with marinara or pesto for quick meals. Just remember to check the cooking time, as reheating might vary. Yes, you can make spinach dumplings ahead of time. You can prepare them and keep them in the fridge for up to two days. Just store them in an airtight container. You can also freeze the dumplings. Place them on a baking sheet, freeze until firm, then store them in a freezer bag. This way, you can enjoy them later without losing flavor. I love serving spinach dumplings with warm marinara sauce. The sauce adds a nice touch. You can also try serving them with pesto or a light garlic butter sauce. For a fuller meal, pair them with a fresh salad or roasted vegetables. This adds color and nutrition to your plate. You can tell when the dumplings are cooked by watching for them to float. When they rise to the top of the water, they are ready. This usually takes about 3-4 minutes. You can also cut one open to check if the filling is hot and cooked through. If they look golden brown after sautéing, they are perfect! In this blog post, we covered how to make tasty spinach dumplings. We started with fresh ingredients, dairy, and seasonings. Then, I detailed each step, from preparing the filling to cooking the dumplings. I shared tips for perfect dough and avoiding mistakes. We explored variations like adding different cheeses and greens, plus unique serving ideas. Finally, I gave storage tips to keep leftovers fresh. Enjoy making these dumplings, and don’t hesitate to get creative with your own twists!

Spinach Dumplings Simple and Flavorful Recipe Guide

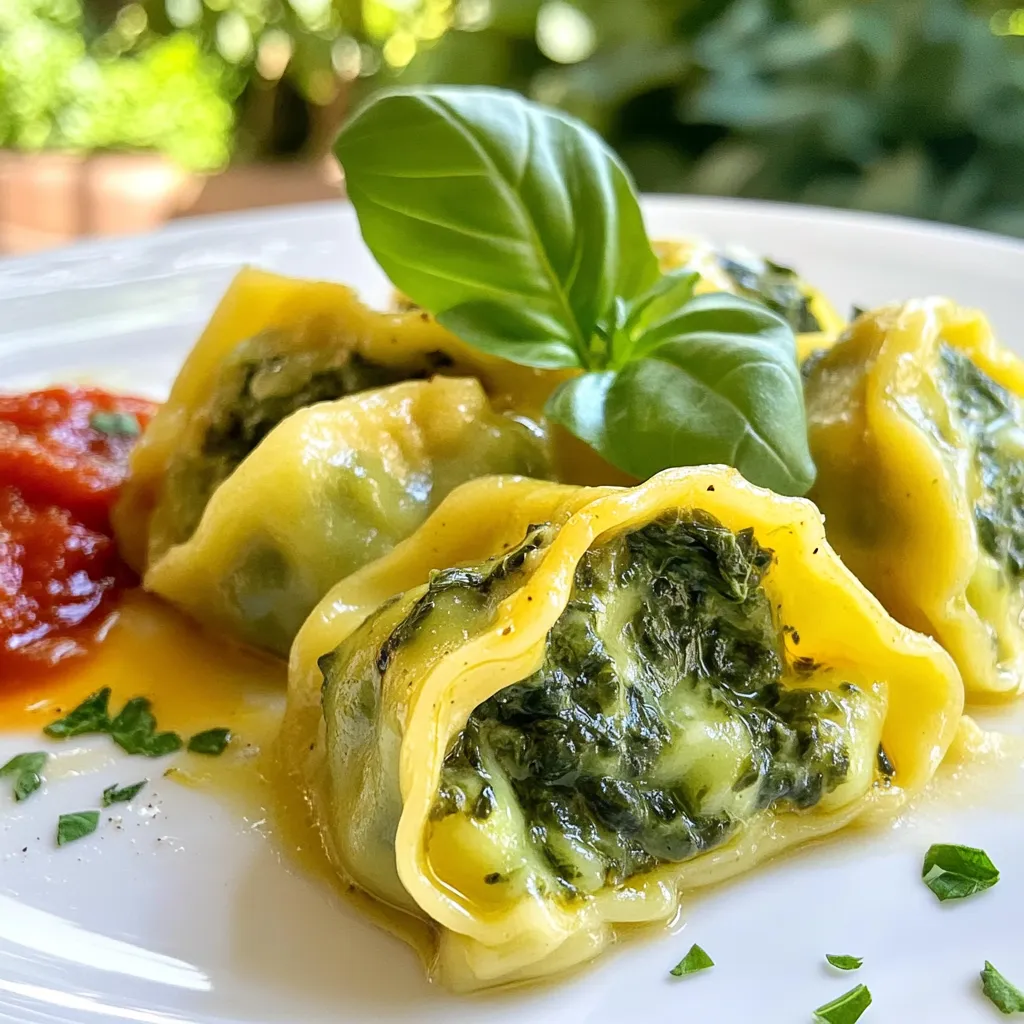
If you love delicious, homemade meals, you’ll adore this spinach dumpling recipe! I’ll guide you step-by-step through the process, so

- 4 boneless, skinless chicken breasts - 1 cup fresh mozzarella cheese, sliced into thick rounds - 1 cup cherry tomatoes, halved - 1/2 cup fresh basil leaves, finely chopped (plus extra leaves for garnish) - 2 cloves garlic, minced finely - 2 tablespoons extra virgin olive oil - 1 teaspoon balsamic vinegar - Salt and freshly ground black pepper to taste - 1 teaspoon dried oregano - 1/4 teaspoon red pepper flakes (optional) These ingredients bring the dish to life. The chicken is the star, juicy and tender. The fresh mozzarella melts beautifully over the chicken, adding a creamy layer. Cherry tomatoes burst with flavor, while basil gives a fresh touch. Garlic and olive oil provide a rich base, and balsamic vinegar adds depth. I love how simple herbs can elevate this dish. Using fresh ingredients makes a big difference. Fresh mozzarella melts better than pre-shredded cheese. Cherry tomatoes add sweetness, and fresh basil brightens every bite. You can adjust the red pepper flakes based on your heat preference. Gather all the ingredients before you start cooking. This will make your process easy and fun. Enjoy the vibrant colors and fresh scents as you prepare. {{ingredient_image_2}} - Preheat the oven to 375°F (190°C). This helps cook the chicken evenly. - In a bowl, mix minced garlic, olive oil, balsamic vinegar, oregano, salt, and pepper. This mix adds great flavor to the chicken. - Place the chicken breasts in a baking dish. Make sure they sit flat. - Pour half of the garlic-oil mixture over the chicken. Use a brush or spoon to coat it well. - Bake the chicken for 20 minutes. It should look opaque when done. - Remove the dish from the oven. Add mozzarella, halved cherry tomatoes, and fresh basil on top. Drizzle the rest of the garlic-oil mixture over everything. - Bake again until the cheese is melted and bubbly. This takes about 10 to 15 minutes. The tomatoes will soften and add sweetness. To make sure your chicken cooks evenly, space each breast apart. This helps the heat reach all sides. Keep an eye on the internal temperature. You want it to reach 165°F (75°C) for safe eating. Use a meat thermometer for accuracy. This way, your chicken will be juicy and tender. Fresh herbs bring bright flavor. Fresh basil really shines in this dish. If you use dried herbs, remember they are stronger. You can also add lemon zest for a bright, fresh taste. It adds a nice zing to the dish. For a pretty plate, serve the chicken on a rustic platter. Drizzle some balsamic glaze on top for style. Add a side of crusty bread or a fresh salad. This will make your meal look inviting and delicious. Serve it warm, and enjoy the beautiful colors on your table. Pro Tips Use Fresh Ingredients: Fresh mozzarella and basil will elevate the flavor of your dish significantly. Always opt for the freshest ingredients you can find for the best results. Let it Rest: Allowing the chicken to rest for a few minutes after baking helps to keep it juicy. This step is crucial for achieving a tender bite. Customize Your Toppings: Feel free to add other vegetables like bell peppers or zucchini for added texture and flavor. Experimenting with different toppings can make this dish your own. Watch the Cheese: Keep an eye on the mozzarella while baking to prevent it from browning too much. You want it melted and bubbly, not burnt. {{image_4}} You can switch up the chicken for other meats like turkey or pork. These options still work well with the flavors in the dish. If you want to change the cheese, try using provolone or goat cheese. These cheeses will add a unique taste that pairs nicely with the tomatoes and basil. For gluten-free or dairy-free options, use a gluten-free breading on the chicken. You can also replace mozzarella with a dairy-free cheese. If you want a vegetarian option, swap the chicken for eggplant or tofu. Both work great and absorb the flavors well. Feel free to add more vegetables for extra color and taste. Zucchini and bell peppers are both excellent choices. They add texture and nutrition. You can also try different herbs like thyme or parsley. These will give your dish a fresh twist and elevate the flavors. To store leftovers, let the chicken cool first. Place it in an airtight container. This helps keep it fresh and safe. The recommended shelf life in the fridge is about 3 to 4 days. Make sure to check for any off smells before eating. If you want to save some for later, freezing is a great option. Cut the chicken into portions and wrap each piece in plastic wrap. Then, place them in a freezer bag. This way, they stay fresh for up to 3 months. When you're ready to eat, thaw the chicken in the fridge overnight. For reheating, bake it at 350°F (175°C) until heated through, about 20 minutes. Leftovers can create new meals. Chop the chicken and add it to pasta or salad. You can even make a tasty sandwich. To keep ingredients fresh, store components separately. Keep the chicken, tomatoes, and basil apart until you are ready to use them. This keeps everything flavorful and vibrant. It takes about 45 minutes to bake Mozzarella Basil Chicken. You spend 15 minutes prepping. Then, bake for 20 minutes first. After adding toppings, bake for another 10 to 15 minutes. The chicken reaches an internal temperature of 165°F (75°C) when done. Yes, you can use frozen chicken. Just remember to thaw it first. Place the chicken in the fridge overnight. If in a hurry, use a microwave on defrost mode. Make sure the chicken is fully thawed before seasoning and baking. This way, it cooks evenly and stays juicy. You can serve many sides with this dish. Here are some popular choices: - Crusty bread for dipping in juices - A fresh garden salad with a light vinaigrette - Roasted vegetables for added nutrition - Garlic mashed potatoes for a comforting touch These sides enhance the meal and create a complete dining experience. Enjoy mixing and matching! This recipe combines chicken, fresh vegetables, and herbs for a tasty dish. You learned how to prepare and bake Mozzarella Basil Chicken easily. I shared tips for enhancing flavor and suggestions for ingredient swaps. Also, you found ideas for storage and meal prep. Experiment with the variations to make it your own. Enjoy making this dish and sharing it with others!

Mozzarella Basil Chicken Easy and Flavorful Dinner

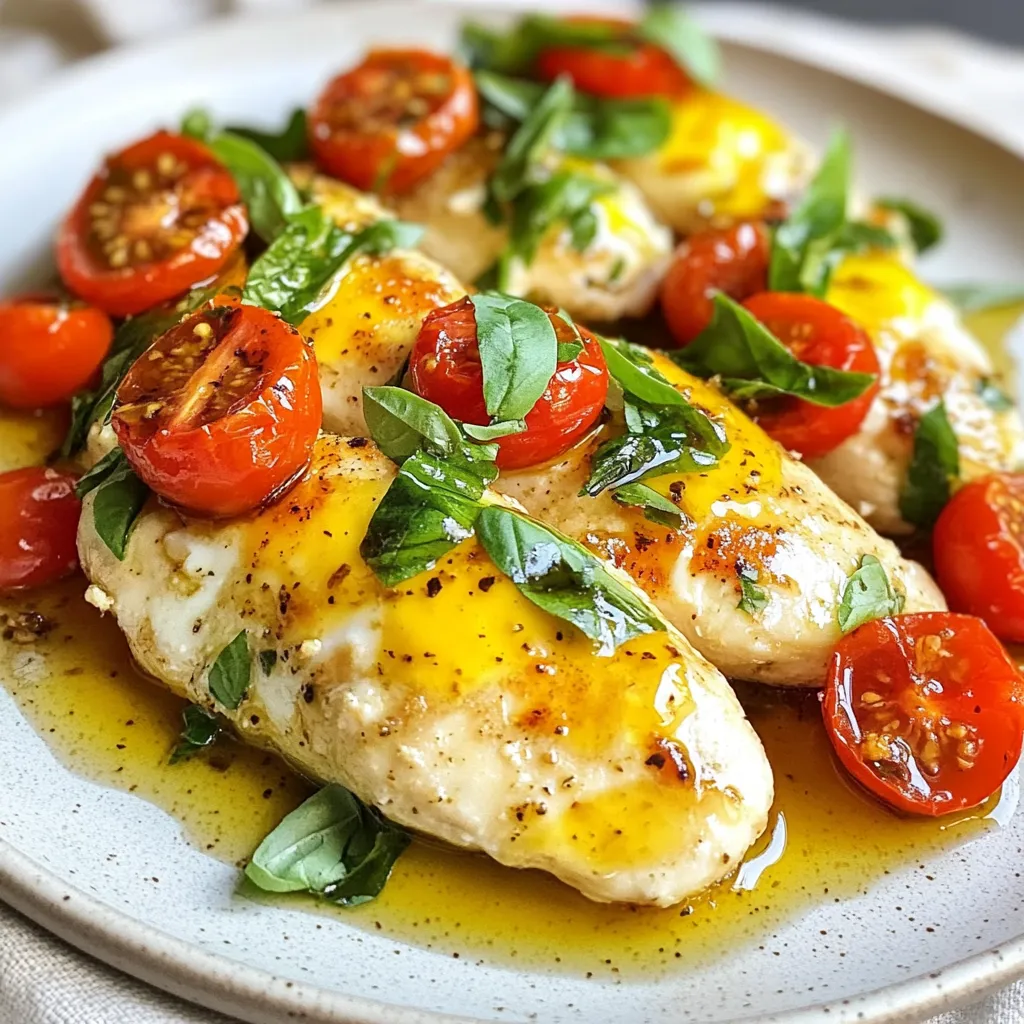
Looking for an easy and tasty dinner idea? Mozzarella Basil Chicken is a perfect choice! This dish combines juicy chicken

Here are the ingredients you will need for a delicious shrimp scampi linguine: - 8 ounces linguine pasta - 1 pound large shrimp, peeled and deveined - 4 tablespoons unsalted butter - 4 cloves garlic, minced - 1 teaspoon red pepper flakes (adjust to your spice preference) - 1 lemon, zested and juiced - ½ cup low-sodium chicken broth - ¼ cup fresh parsley, chopped - Salt, to taste - Freshly ground black pepper, to taste - Grated Parmesan cheese, for serving (optional) Each ingredient plays a key role in making this dish special. The linguine serves as a perfect base, while the large shrimp add a tasty protein boost. Butter and garlic create a rich flavor, and red pepper flakes give it a nice kick. The lemon juice brightens the dish, and the chicken broth adds depth. Fresh parsley brings a pop of color and freshness. Remember to taste and adjust the salt and pepper as needed, and feel free to sprinkle on some Parmesan cheese for extra richness. {{ingredient_image_2}} Start by boiling a large pot of salted water. Use enough water to allow the linguine to move freely. Bring it to a full boil before adding the pasta. Cook the linguine according to the package directions, usually about 8-10 minutes for al dente. Once the pasta is ready, drain it but keep about 1 cup of the pasta water. Set the pasta aside in a bowl. While the pasta cooks, grab the shrimp. Use paper towels to pat them dry. This helps them cook better. After drying, season the shrimp with salt and black pepper. Make sure they are well-coated for great flavor. In a large skillet, melt 2 tablespoons of butter over medium heat. Once the butter melts, add minced garlic and red pepper flakes. Stir for about 1 minute until the garlic smells nice but doesn’t brown. Next, add the seasoned shrimp to the skillet. Cook them for about 2-3 minutes without moving them. This helps them cook evenly. Flip the shrimp and add lemon juice and zest. Cook for another 2-3 minutes until the shrimp turn pink and are fully cooked. Remove the shrimp and keep them warm on a plate. In the same skillet, pour in the low-sodium chicken broth. Bring it to a gentle simmer. Let it reduce for about 2 minutes. Then stir in the other 2 tablespoons of butter until it melts and blends into the broth. This creates a smooth sauce. Now, add the drained linguine to the skillet with the garlic butter sauce. Toss everything well so the pasta gets coated. If it looks dry, add some of the reserved pasta water a little at a time. This will help achieve a creamy sauce. Fold in the cooked shrimp and half of the chopped parsley for extra flavor and color. To serve, place the shrimp linguine into bowls. Garnish with the remaining parsley and a sprinkle of grated Parmesan cheese if you like. For a nice touch, serve with lemon wedges on the side. This adds a fresh burst of flavor to the dish. Enjoy your lovely Garlic Butter Shrimp Linguine! To avoid overcooking shrimp, cook them just until they turn pink. This usually takes about 2-3 minutes on each side. Overcooked shrimp will become tough and chewy. When seasoning, sprinkle salt and fresh black pepper on the shrimp before cooking. This simple step enhances their natural flavor. For extra kick, add a pinch of red pepper flakes right before cooking. To boost the flavor of your shrimp scampi, consider adding fresh herbs like basil or oregano. These herbs work well with the garlic and lemon. You can also incorporate a splash of white wine into the sauce. This adds a layer of depth to the dish. Just let it simmer for a minute to cook off the alcohol. Using linguine pasta is key for this dish. Its long strands hold the sauce well, making each bite flavorful. Timing is important when cooking. Start boiling the water for the pasta first. While the pasta cooks, you can prepare the shrimp and sauce. This multitasking makes the meal quick and easy. Pro Tips Quality Shrimp Matters: Always opt for the freshest shrimp available. If possible, buy them from a reputable fishmonger or the seafood section of your grocery store to ensure the best taste and texture. Don’t Overcook the Shrimp: Shrimp cooks quickly; keep an eye on them to prevent overcooking. They should be pink and opaque when done. If they curl tightly, they might be overcooked. Reserve Pasta Water: Always save some pasta water before draining the linguine. The starchy water helps to adjust the sauce’s consistency and enhances the overall flavor. Customize the Heat: Adjust the amount of red pepper flakes to match your spice preference. For a milder dish, start with less and add more as needed. {{image_4}} You can easily add vegetables to your shrimp scampi linguine. Great choices include: - Spinach - Cherry tomatoes - Zucchini - Bell peppers If you want to add these veggies, cook them first. Sauté them with the garlic for about 2-3 minutes before adding the shrimp. This will soften the veggies and let their flavors mix. If you want to switch up the protein, chicken or scallops work well. For chicken, cut it into small pieces. Cook it in the skillet for about 5-7 minutes before adding the garlic. For scallops, cook them for about 2-3 minutes on each side. This keeps everything yummy and ensures proper cooking times. If you need gluten-free options, use gluten-free linguine. It cooks similarly, so you won’t miss a beat. For a dairy-free version, skip the butter. Use olive oil instead, and leave out the Parmesan cheese. This way, you still enjoy a tasty dish without the dairy. To keep your shrimp scampi linguine fresh, use airtight containers. This helps keep out moisture and air. Store your dish in the fridge for up to three days. After that, the shrimp might lose flavor and texture. You can freeze shrimp linguine if you want to save some for later. First, let it cool down. Then, place it in a freezer-safe container. It can last up to three months in the freezer. To enjoy it again, thaw it overnight in the fridge. For reheating, use the stove or microwave. If using the stove, add a splash of chicken broth or water. This keeps the pasta moist. Stir often until it’s hot. In the microwave, heat in short bursts. Stir in between to avoid hot spots. Enjoy your meal just like the first time! To add heat, you can increase the red pepper flakes. I suggest adding 1 to 2 teaspoons more. You can also use fresh chili peppers or a splash of hot sauce. Both will give your dish a nice kick. Just remember to taste as you go! Yes, you can use frozen shrimp! First, thaw the shrimp in cold water for about 15-20 minutes. Pat them dry before seasoning. This helps them cook evenly and keeps them juicy. You can also leave them in the fridge overnight to thaw. Great sides include a simple green salad or garlic bread. A side of steamed vegetables, like broccoli or asparagus, also works well. These dishes complement the shrimp scampi without stealing the show. To make it heartier, you can add a side of chicken or fish. You could also toss in some veggies like spinach or cherry tomatoes into the pasta. These additions boost nutrition and flavor. Plus, they make your meal colorful and appealing! This blog post covered how to make shrimp scampi linguine, from simple ingredients to delicious variations. You learned how to cook the pasta and shrimp, make a flavorful sauce, and serve it beautifully. Keep these tips in mind to enhance flavor and ensure perfect shrimp every time. Experiment with different veggies or proteins to make the dish your own. With these guidelines, you can create a satisfying meal that impresses. Enjoy your cooking journey!

Savory Shrimp Scampi Linguine Quick and Easy Recipe

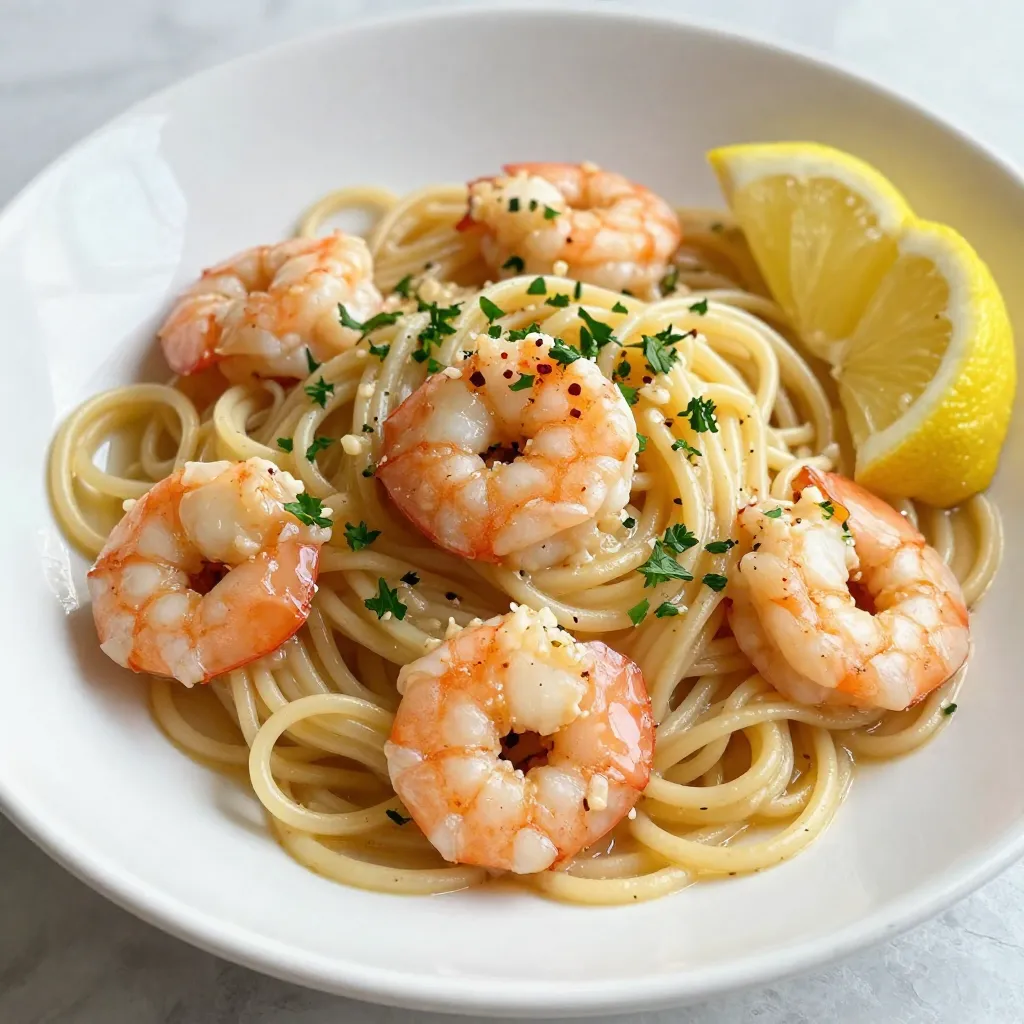
Craving a delicious, quick meal? You’ve found it! This Savory Shrimp Scampi Linguine is not only easy to make, but

- 3 ripe bananas, well-mashed - 1/2 cup unsalted butter, melted and slightly cooled - 1/2 cup granulated sugar - 1/4 cup brown sugar, tightly packed - 2 large eggs, at room temperature - 1 teaspoon pure vanilla extract - 1 teaspoon baking soda - 1/2 teaspoon fine sea salt - 1 1/2 cups all-purpose flour - 1 cup semi-sweet chocolate chips - 1/2 teaspoon ground cinnamon (optional for an extra flavor boost) The ripe bananas are the star here. They add natural sweetness and moisture. Use bananas that are very soft for the best flavor. Unsalted butter gives the muffins a rich taste. Make sure to melt it and let it cool a bit before mixing. Granulated sugar adds sweetness, while brown sugar brings a hint of caramel flavor. Together, they create a perfect balance. Eggs are essential for structure. They help the muffins rise and become fluffy. Pure vanilla extract adds a warm, inviting flavor. It enhances the other tastes in the muffins. Baking soda is the leavening agent. It helps the muffins rise and become light. Fine sea salt balances the sweetness and enhances flavors. Just a small amount makes a big difference. All-purpose flour gives the muffins their texture. It helps hold everything together. Semi-sweet chocolate chips bring the chocolatey goodness. They melt slightly during baking, creating pockets of chocolate joy. Ground cinnamon is optional but highly recommended. It adds warmth and spice that complements the bananas. Each muffin has about: - Calories: 200 - Total Fat: 8g - Saturated Fat: 5g - Cholesterol: 30mg - Sodium: 150mg - Total Carbohydrates: 30g - Dietary Fiber: 1g - Sugars: 12g - Protein: 3g This gives you a tasty treat that can fit into a balanced diet. Enjoy them as a snack or breakfast! {{ingredient_image_2}} First, heat your oven to 350°F (175°C). This temperature helps the muffins rise well. Next, take a standard muffin tin. You can line it with paper liners or use cooking spray. This step makes it easy to remove the muffins later. In a big bowl, mash the ripe bananas until they are smooth. Add the melted butter and mix well. Next, sprinkle in the granulated sugar and brown sugar. Stir until the sugars blend into the banana mixture. Now, add the eggs, one at a time. Mix well after each egg to blend them fully. Pour in the pure vanilla extract and stir until everything is combined. In another bowl, whisk together the baking soda, sea salt, all-purpose flour, and ground cinnamon if you want a hint of spice. Gently fold the dry mix into the wet banana mix. Be careful not to overmix. This keeps your muffins light and fluffy. Finally, fold in the chocolate chips. Make sure they are evenly distributed throughout the batter. Scoop the muffin batter into the prepared muffin tin. Fill each cup about 3/4 full. This gives the muffins room to rise during baking. Place the muffin tin in the oven and bake for 18-22 minutes. Check for doneness by inserting a toothpick in the center of a muffin. If it comes out clean, your muffins are ready. Once baked, take the muffin tin from the oven. Let the muffins cool in the tin for 5 minutes. Then, transfer them to a wire rack to cool completely. Enjoy the warm muffins with a sprinkle of powdered sugar or a side of butter. To get soft and fluffy muffins, use ripe bananas. They should be brown and spotty. This gives great flavor and moisture. Mix the wet and dry ingredients separately first. Then, combine them gently. Overmixing can make the muffins tough. Stir just until you see no dry flour. Make sure your oven is preheated to 350°F (175°C). Use an oven thermometer for accuracy. Fill each muffin cup about 3/4 full. This allows the muffins to rise evenly. Rotate the muffin tin halfway through baking. This helps them cook evenly on all sides. Serve the muffins warm for the best taste. A light dusting of powdered sugar adds flair. Pair them with butter or cream cheese for added richness. You can also serve them with fresh fruit or yogurt for a balanced snack. Enjoy them with a cup of coffee or tea for a perfect treat! Pro Tips Choose Ripe Bananas: The riper the bananas, the sweeter and more flavorful your muffins will be. Look for bananas with lots of brown spots for the best results. Don’t Overmix: When combining the wet and dry ingredients, mix just until incorporated. Overmixing can lead to tough muffins, so be gentle! Custom Add-ins: Feel free to get creative! Add nuts, dried fruit, or even a sprinkle of sea salt on top before baking for an extra flavor dimension. Storage Tips: Store your muffins in an airtight container at room temperature for up to three days, or freeze for longer storage. Just reheat them for a few seconds in the microwave for a warm treat! {{image_4}} To make vegan chocolate chip banana muffins, you can swap the eggs. Use flaxseed meal instead. Mix 1 tablespoon of flaxseed meal with 2.5 tablespoons of water. Let it sit for five minutes to thicken. This mixture works great in place of eggs. For butter, use coconut oil or any plant-based butter. The rest of the recipe stays the same. Your muffins will still be moist and tasty! If you need gluten-free muffins, replace all-purpose flour with a gluten-free flour blend. Make sure the blend has xanthan gum for better structure. You may also use almond flour or oat flour. These flours add a nice nutty taste. Check that your chocolate chips are gluten-free too. This way, everyone can enjoy these muffins! Want to add more flavor? Try adding nuts or dried fruit. Walnuts or pecans add crunch. Dried cranberries or raisins give a chewy texture. You can also sprinkle in spices like nutmeg or cardamom. If you love coconut, add shredded coconut for a tropical twist. These small changes make your muffins unique and fun to eat! To keep your muffins fresh, place them in an airtight container. You can store them at room temperature for up to three days. If you want to keep them longer, consider refrigerating them. Just make sure they cool completely before sealing them up. Freezing muffins is a great way to enjoy them later. Allow the muffins to cool down completely. Then, wrap each muffin in plastic wrap tightly. Place the wrapped muffins in a freezer-safe bag. They can last up to three months in the freezer. When you're ready to eat, just thaw them at room temperature or microwave for a few seconds. To reheat your muffins, you can use the microwave or the oven. For the microwave, heat each muffin for about 15-20 seconds. If you prefer the oven, preheat it to 350°F (175°C). Place the muffins in for about 5-10 minutes until warm. Enjoy them fresh, just like when they were baked! Yes, you can use frozen bananas. First, let them thaw completely. After thawing, mash them well. They will be soft and easy to mix. Frozen bananas add great flavor and moisture to your muffins. Just remember to drain any extra liquid. If you need an egg substitute, try using applesauce. Use 1/4 cup of unsweetened applesauce for each egg. Another option is mashed flaxseed. Mix one tablespoon of flaxseed meal with three tablespoons of water. Let it sit for five minutes before adding it to the mixture. Both choices will keep your muffins moist and fluffy. To boost the chocolate flavor, add more chocolate chips. You can use up to 1 1/2 cups of semi-sweet chocolate chips. For an extra treat, try mixing in some cocoa powder. About 1/4 cup will give you rich chocolate flavor. You could also drizzle melted chocolate on top after baking for a tasty finish. You learned about key ingredients and their benefits. We explored simple steps for baking muffins. You picked up tips for great texture and even baking. Plus, you saw fun variations for different diets. Finally, we discussed how to store and reheat muffins. Making muffins can be easy and rewarding. With these tips, you can bake tasty treats for family and friends. Happy baking!

Chocolate Chip Banana Bread Muffins Simple and Tasty

Are you ready to indulge in a treat that combines the best of both worlds? Chocolate Chip Banana Bread Muffins

To make One-Pot Creamy Tuscan Gnocchi, you need these key ingredients: - 1 pound potato gnocchi - 2 tablespoons extra-virgin olive oil - 3 cloves garlic, finely minced - 1 cup cherry tomatoes, halved - 1 cup fresh baby spinach - 1 cup heavy cream - 1 cup low-sodium vegetable broth - 1 teaspoon dried basil - 1 teaspoon dried oregano - Sea salt and freshly cracked black pepper, to taste - ½ cup grated Parmesan cheese, plus extra for serving - Fresh basil leaves, for garnish These ingredients create a rich and creamy dish that is full of flavor. You can add extra flavors to the dish. Consider these options: - Cooked chicken or shrimp for protein - Mushrooms for an earthy taste - Sun-dried tomatoes for added sweetness - Red pepper flakes for heat These add-ins can make your dish more unique and satisfying. Garnishes can elevate your meal's look and flavor. Try these: - Extra grated Parmesan cheese - Fresh basil leaves for color - A drizzle of olive oil for richness These garnishes make each serving visually appealing and tasty. {{ingredient_image_2}} Start by heating 2 tablespoons of extra-virgin olive oil in a large pot over medium heat. When the oil shimmers, add 3 cloves of finely minced garlic. Sauté the garlic for about 1 minute. You want it fragrant and golden, not burnt. Next, add 1 cup of halved cherry tomatoes to the pot. Stir them occasionally and cook for 3-4 minutes. You will see them soften and release their juices. Then, toss in 1 cup of fresh baby spinach. Stir for about 2 minutes until it wilts down completely. After preparing the sauce base, pour in 1 cup of heavy cream and 1 cup of low-sodium vegetable broth. Add 1 teaspoon of dried basil and 1 teaspoon of dried oregano. Season with sea salt and freshly cracked black pepper. Stir everything well to combine. Increase the heat slightly to bring the mixture to a gentle simmer. Now, carefully add 1 pound of potato gnocchi. Stir well to ensure they are submerged in the creamy sauce. Cook for about 5-7 minutes. You will know the gnocchi are done when they float to the surface and become tender. Once the gnocchi are fully cooked, remove the pot from the heat. Stir in ½ cup of grated Parmesan cheese until it melts and creates a velvety texture. Taste the sauce and adjust the seasoning if needed. Let the mixture rest for a few minutes. It will thicken slightly as it sits. To serve, ladle the creamy gnocchi into bowls. Garnish with fresh basil leaves and an extra sprinkle of Parmesan cheese. Enjoy this creamy dish! When cooking gnocchi, always boil them in salted water. This adds flavor right away. Use a large pot to give them space to move. Once they float, they are done. This takes about 5-7 minutes. Add more herbs to boost the taste. Fresh basil gives a bright note. You can also use rosemary or thyme. A squeeze of lemon juice adds a zesty kick. Lastly, mix in some red pepper flakes for heat. Don’t overcrowd the pot with gnocchi. This makes them stick together. Avoid cooking them too long; they can turn mushy. If your sauce is too thick, add a splash of broth or cream. Taste your dish before serving to adjust the seasoning. Pro Tips Perfecting Gnocchi: For the best texture, look for gnocchi that are light and fluffy. You can also make your own fresh gnocchi for a gourmet touch! Enhancing Flavor: Feel free to add red pepper flakes for a bit of heat or a splash of white wine for added depth in flavor when sautéing the garlic. Vegetable Variations: Add other vegetables like zucchini or bell peppers for extra nutrients and color. Just sauté them with the garlic before adding the tomatoes. Resting Time: Letting the dish rest for a few minutes after cooking allows the flavors to meld and the sauce to thicken, enhancing the overall taste. {{image_4}} You can add protein to your one-pot creamy Tuscan gnocchi for extra flavor. Chicken and shrimp work well. For chicken, use boneless, skinless breasts. Cook them in the pot before adding garlic. Cut them into bite-sized pieces for fast cooking. For shrimp, add them when the sauce is simmering. Cook until they turn pink and curl up. Both options make the dish hearty and satisfying. This dish can easily cater to vegetarians and vegans. For a vegetarian twist, just skip any meat. You can add more veggies like mushrooms or bell peppers. To make it vegan, replace heavy cream with coconut milk or cashew cream. Use nutritional yeast instead of Parmesan to keep that cheesy flavor. The dish stays creamy and rich without dairy. Using seasonal ingredients can enhance your gnocchi. In spring, add asparagus or peas for a fresh touch. In summer, try zucchini or bell peppers for vibrant color. In fall, swap in pumpkin or butternut squash for a cozy flavor. Winter calls for kale or Brussels sprouts. These swaps keep your meal exciting and flavorful all year round. To store leftover creamy Tuscan gnocchi, let it cool first. Then, place it in an airtight container. Make sure to cover it tightly. You can keep it in the fridge for up to three days. When you’re ready to eat, take the gnocchi out of the fridge. Place it in a pot over low heat. Stir it gently as it warms up. You can add a splash of vegetable broth or cream for moisture. Heat it until it is hot all the way through. If you want to freeze the gnocchi, use a freezer-safe container. Allow it to cool completely before sealing it. The gnocchi can last for up to three months in the freezer. To thaw, move it to the fridge overnight. Reheat as described above. Yes, you can use store-bought gnocchi. It saves time and effort. Look for fresh or frozen gnocchi at the store. Both options work well in this recipe. Just cook them according to package instructions. Then, follow the steps here. It’s a quick way to enjoy a tasty meal! To make this dish gluten-free, use gluten-free gnocchi. Many brands offer good options now. Check the label for gluten-free status. You can also use gluten-free pasta if needed. Just adjust cooking times as needed. The sauce will still be rich and creamy! If you want a lighter option, try using half-and-half. It adds creaminess but with less fat. You can also use coconut milk for a dairy-free choice. Silken tofu blended until smooth is another great option. This keeps the creamy texture while adding a unique flavor. This blog post covered how to make gnocchi from scratch. You learned about essential ingredients, optional add-ins, and garnishes. I shared step-by-step instructions, tips, and common mistakes to avoid. We explored protein options, vegetarian swaps, and seasonal changes. Lastly, I explained how to store leftovers and answered FAQs. Making gnocchi can be fun and easy. With these tips, you will impress your friends and family. Enjoy creating your own delicious dishes!

One-Pot Creamy Tuscan Gnocchi Easy and Tasty Meal

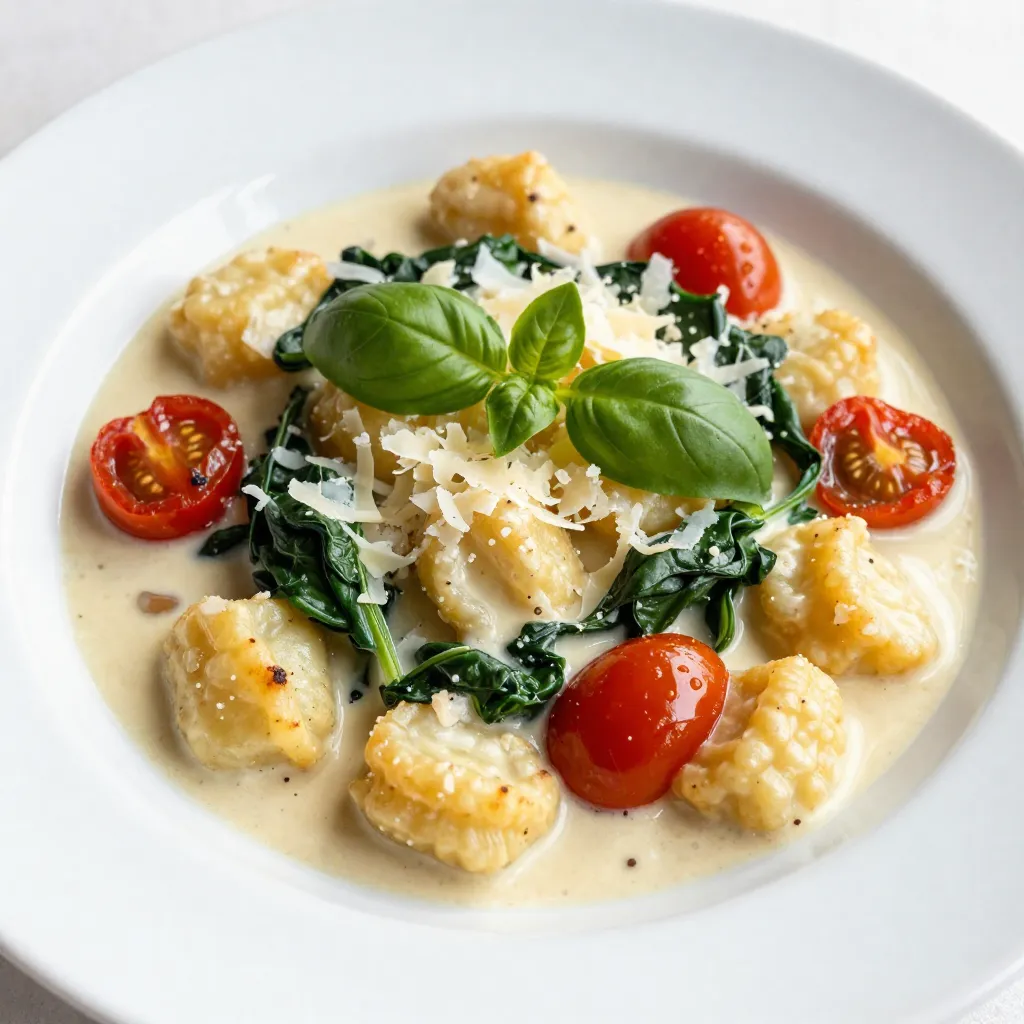
Looking for a quick and delicious meal? One-Pot Creamy Tuscan Gnocchi is the answer. You can whip this up in

- 8 oz. rice noodles - 1 cup creamy peanut butter - 3 tablespoons soy sauce or tamari - Sriracha for spice level - Honey or maple syrup for sweetness - Fresh herbs and garnishes Rice noodles are the base of this dish. They are light and soak up flavors well. Creamy peanut butter brings richness and texture to the sauce. Soy sauce or tamari adds a salty umami kick. For those who like heat, add sriracha to your sauce. A drizzle will boost the spice level. Honey or maple syrup sweetens the dish and balances the heat. Fresh herbs like cilantro add bright flavor and color. Feel free to get creative with your toppings! Crushed peanuts give a nice crunch. Green onions add a fresh bite. The more you add, the more fun your dish will be! {{ingredient_image_2}} 1. Bring a large pot of water to a boil. 2. Once boiling, add 8 oz. of rice noodles. 3. Cook the noodles for about 4-5 minutes as per the package instructions. 4. Drain the noodles and rinse them under cold water. 5. Set the noodles aside in a large mixing bowl. 1. In a separate bowl, mix together 1 cup of creamy peanut butter, 3 tablespoons of soy sauce, and 2 tablespoons of toasted sesame oil. 2. Add in 2 tablespoons of honey or maple syrup, 2 tablespoons of sriracha, 1 tablespoon of finely grated ginger, and 2 minced garlic cloves. 3. Whisk the mixture until smooth and creamy. 4. If the sauce is too thick, slowly add warm water until it’s just right. 1. In the bowl with the cooled noodles, add 1 cup of shredded carrots and 1 julienned red bell pepper. 2. Toss the vegetables with the noodles to mix them well. 3. Drizzle the spicy peanut sauce over the noodle and veggie mix. 4. Use tongs or two forks to toss everything together, ensuring all is coated in the sauce. 5. Taste the dish and adjust the seasoning with more sriracha if you want it spicier. - Best practices for cooking rice noodles: Start with a big pot of boiling water. Add the rice noodles and cook them for about 4-5 minutes. Stir them gently to prevent sticking. Once done, drain and rinse them under cold water. This stops cooking and keeps them from getting mushy. - How to adjust sauce thickness: If your sauce is thick, add warm water a spoonful at a time. Mix well after each addition. This way, you can get the sauce just how you like it. - Plating for visual appeal: When serving, create a small mound of noodles on one side of the bowl. This makes the dish look more inviting. Let the colorful toppings flow over the noodles for a beautiful look. - Recommended garnishes for texture and flavor: Top your noodles with sliced green onions, chopped cilantro, and crushed peanuts. These add crunch and fresh taste. You can also try a sprinkle of sesame seeds for extra flair. Pro Tips Adjust the Heat: If you prefer a milder dish, start with less sriracha and add more to taste. You can also use a milder chili sauce as an alternative. Perfectly Cooked Noodles: To prevent the rice noodles from becoming mushy, be sure to rinse them under cold water right after draining; this stops the cooking process. Enhance the Flavor: Add a splash of lime juice or rice vinegar to the sauce for a tangy twist that brightens the dish. Meal Prep Friendly: This dish can be made ahead and stored in the fridge for up to 3 days. Just remember to toss it again with a bit of water to freshen it up before serving. {{image_4}} You can easily switch up your noodles for a gluten-free option. Try using rice noodles, which are a great substitute. If you want to change the nut flavor, use almond butter or sunflower seed butter instead of peanut butter. Both options work well in the spicy sauce. To make your meal heartier, add protein. Tofu is a great choice for a vegan dish. You can pan-fry it until golden and toss it in with your noodles. If you prefer meat, chicken or shrimp also make tasty additions. Just cook them separately before mixing them in. Boost the flavor of your dish by adding veggies. Snap peas or broccoli add crunch and color. You can also squeeze some lime juice on top to add brightness. The citrus flavor really lifts the dish and complements the richness of the peanut sauce. To store leftovers, let the spicy peanut noodles cool to room temperature. Then, place them in an airtight container. They can stay fresh in the fridge for up to three days. To keep the noodles from sticking, add a little extra sesame oil before storing. This simple trick helps maintain their texture. When reheating, avoid the microwave if you can. Instead, use a skillet for even heat. Heat the skillet over low heat and add a splash of water. Stir gently as the noodles warm up. This method helps keep the noodles from turning mushy. To refresh the sauce while reheating, add a little more peanut butter and soy sauce. This adds richness and keeps the flavors vibrant. If the sauce looks dry, a bit of warm water can help. Keep stirring until everything is hot and well combined. If you have a peanut allergy, try almond butter or sunflower seed butter. These options give a similar creamy texture. You can also use tahini for a different flavor. Each option will change the taste a bit, but they work well in this dish. Yes, you can prep this dish in advance. Cook the noodles and mix the sauce early in the day. Store them separately in the fridge. Keep the noodles in an airtight container. This way, they won’t stick together. When ready to serve, mix everything. The spice level depends on how much sriracha you add. Start with two tablespoons for a mild kick. If you like it hotter, add more sriracha bit by bit. Remember, you can always add more spice, but you can't take it away! This blog post covered how to make spicy peanut noodles from scratch. We explored key ingredients like rice noodles and creamy peanut butter. I shared step-by-step instructions to create a mouthwatering dish. We also discussed tips for cooking and serving, plus variations to fit your taste. In conclusion, this dish is flexible and fun to make. You can change ingredients or spice levels to suit your mood. Enjoy your cooking adventure, and share your delicious results with others!

Spicy Peanut Noodles Flavorful and Easy Recipe

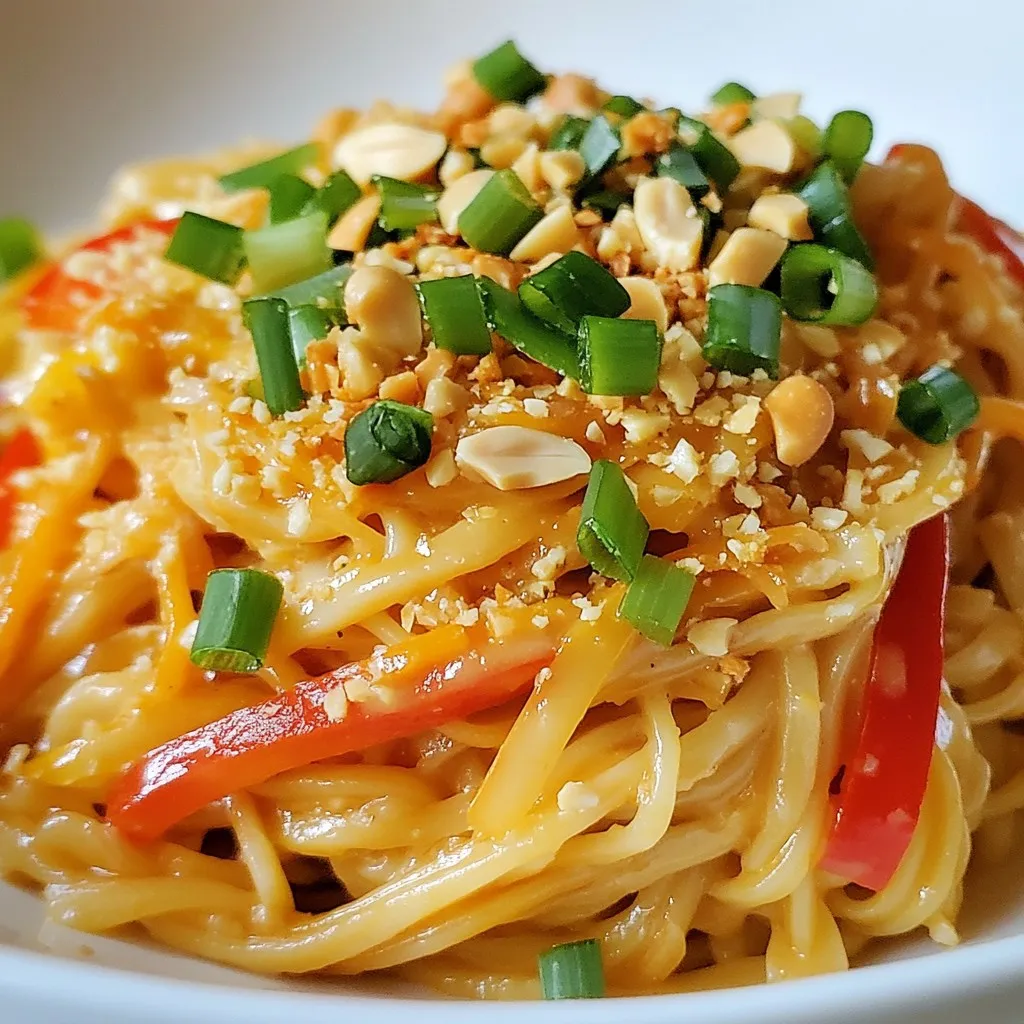
If you’re craving a meal that packs a punch, spicy peanut noodles are for you! This quick recipe features creamy

- 2 lbs baby Yukon gold potatoes - ⅓ cup extra virgin olive oil - 4 cloves garlic - 1 cup vegetable broth - 1 large lemon - 2 teaspoons dried oregano - Sea salt and freshly cracked black pepper - Fresh parsley for garnish Choosing the right type of potatoes For Greek lemon potatoes, baby Yukon gold potatoes work best. They are creamy and tender. Their smooth skin adds to the dish's look. You can also use other waxy potatoes if you can't find Yukon gold. Importance of fresh lemon juice and zest Fresh lemon juice and zest are key for flavor. The zest adds a bright, fragrant note. It gives the dish a fresh taste. Bottled lemon juice doesn’t compare. Always use fresh lemons for the best results. This step brings your dish to life! {{ingredient_image_2}} 1. Preheat your oven to 425°F (220°C). This step is key for crispy potatoes. 2. In a large bowl, combine 2 lbs of halved baby Yukon gold potatoes. 3. Add ⅓ cup of extra virgin olive oil and 4 minced garlic cloves. 4. Squeeze in the juice of 1 large lemon and add its zest. 5. Sprinkle in 2 teaspoons of dried oregano, sea salt, and black pepper. 6. Mix everything well until all the potatoes are coated. 1. Arrange the potatoes in a single layer in a baking dish, cut side facing up. 2. Pour 1 cup of vegetable broth around the potatoes. Make sure they are not fully submerged. 3. Cover the dish tightly with aluminum foil to trap the steam. 1. Roast the covered potatoes in the oven for 30 minutes. 2. Remove the foil and let the steam escape. Bake uncovered for another 25-30 minutes. 3. Check for golden brown color and crispy edges; turn them halfway for even browning. 4. Once done, take them out and let them cool for a few minutes. 5. For extra freshness, add more lemon juice and adjust the seasoning. 6. Garnish with freshly chopped parsley before serving for a lovely touch. To get the best flavor from your Greek lemon potatoes, start with the right seasoning. Use fresh ingredients whenever possible. The garlic must be finely minced. This helps release its flavor. Squeeze fresh lemon juice and mix in the zest. This adds brightness to the dish. Use good quality extra virgin olive oil for a rich taste. Roasting technique is key. Preheat your oven to 425°F. This high heat gives your potatoes that crispy edge. Arrange them cut side up. This allows the tops to brown nicely. Pour vegetable broth around, but don’t drown them. This method adds moisture and flavor as they cook. What if your potatoes aren’t browning? First, check that your oven is hot enough. If they still lack color, try increasing the heat slightly. You can also turn them halfway through for even browning. If the texture seems off, you can adjust by cooking longer. If they’re too soft, reduce the broth next time. If they lack flavor, add more lemon juice or salt. Taste as you go to get it just right. Pro Tips Choose the Right Potatoes: For the best texture and flavor, use Yukon gold or similar waxy potatoes that hold their shape well during roasting. Enhance the Lemon Flavor: To deepen the lemon flavor, consider adding lemon slices on top of the potatoes before roasting. Don’t Skip the Foil: Covering the dish with foil at the beginning helps steam the potatoes and keeps them moist. Remove it later for crispiness. Garnish for Freshness: Adding fresh herbs like parsley or dill right before serving brightens the dish and adds a pop of color. {{image_4}} You can enjoy Greek lemon potatoes in different ways. Roasting is the most common method. You get crispy edges and tender insides. The flavors blend well when you roast them in the oven. Grilling adds a smoky flavor. Grilled potatoes have a nice char. To grill, coat the potatoes and place them on a hot grill. Cook until they are tender and have grill marks. Both methods are tasty, so choose what you prefer. You can switch up herbs for new flavors. Try fresh rosemary or thyme instead of oregano. These herbs give a nice twist to the dish. If you want a different oil, use avocado oil. It has a high smoke point and rich flavor. For a vegan option, use vegetable broth. It keeps the dish plant-based. You can also use water with more lemon juice for a zesty kick. Experiment with these options to find your favorite version of Greek lemon potatoes! To keep Greek lemon potatoes fresh, store them in an airtight container. Let them cool to room temperature before sealing. You can refrigerate leftovers for up to four days. This helps maintain their tangy flavor and soft texture. When you are ready to enjoy your potatoes again, reheat them in the oven. Preheat your oven to 350°F (175°C). Spread the potatoes on a baking sheet. Heat for about 15 minutes or until warm. This keeps them crispy and flavorful. You can also microwave them, but the texture may change. To freeze Greek lemon potatoes, first let them cool completely. Place them in a freezer-safe bag or container. Make sure to remove as much air as possible. They can be frozen for up to three months. When ready to eat, thaw them overnight in the fridge. Reheat them in the oven for the best taste and texture. Greek Lemon Potatoes are a popular side dish in Greek cuisine. They are simple to make and full of flavor. This dish uses fresh lemon juice, garlic, and oregano to create a bright taste. The potatoes roast in broth, which makes them tender and flavorful. This dish dates back to ancient Greece, where they used local ingredients. Potatoes became popular in Greece after the 19th century. Now, you can find them in many Greek homes and restaurants. They symbolize warmth and hospitality. Yes, you can prepare Greek Lemon Potatoes ahead of time. Here are some best practices to follow: - Prep the potatoes: You can mix the potatoes with the oil, lemon juice, and spices a day before. - Store in the fridge: Keep the mixture in an airtight container. This helps the flavors blend well. - Bake before serving: When you're ready, bake them fresh. This keeps them crispy and delicious. Greek Lemon Potatoes pair well with many dishes. Here are some tasty ideas: - Grilled meats: They go great with chicken, lamb, or pork. - Fresh salads: A Greek salad or simple green salad adds freshness. - Seafood: Try them with grilled fish or shrimp for a lighter meal. Feel free to mix and match. Enjoy your Greek Lemon Potatoes in many ways! Greek lemon potatoes are simple yet full of flavor. You learned about the best ingredients, preparation steps, and cooking methods to make this dish shine. I shared tips for achieving authentic taste and troubleshooting issues. Plus, I included ideas for variations and trusted storage methods. Remember, these potatoes are not only tasty but easy to share. With a little practice, you’ll perfect this dish and impress your family and friends. Enjoy making Greek lemon potatoes a staple on your table!

Greek Lemon Potatoes Simple and Flavorful Delight

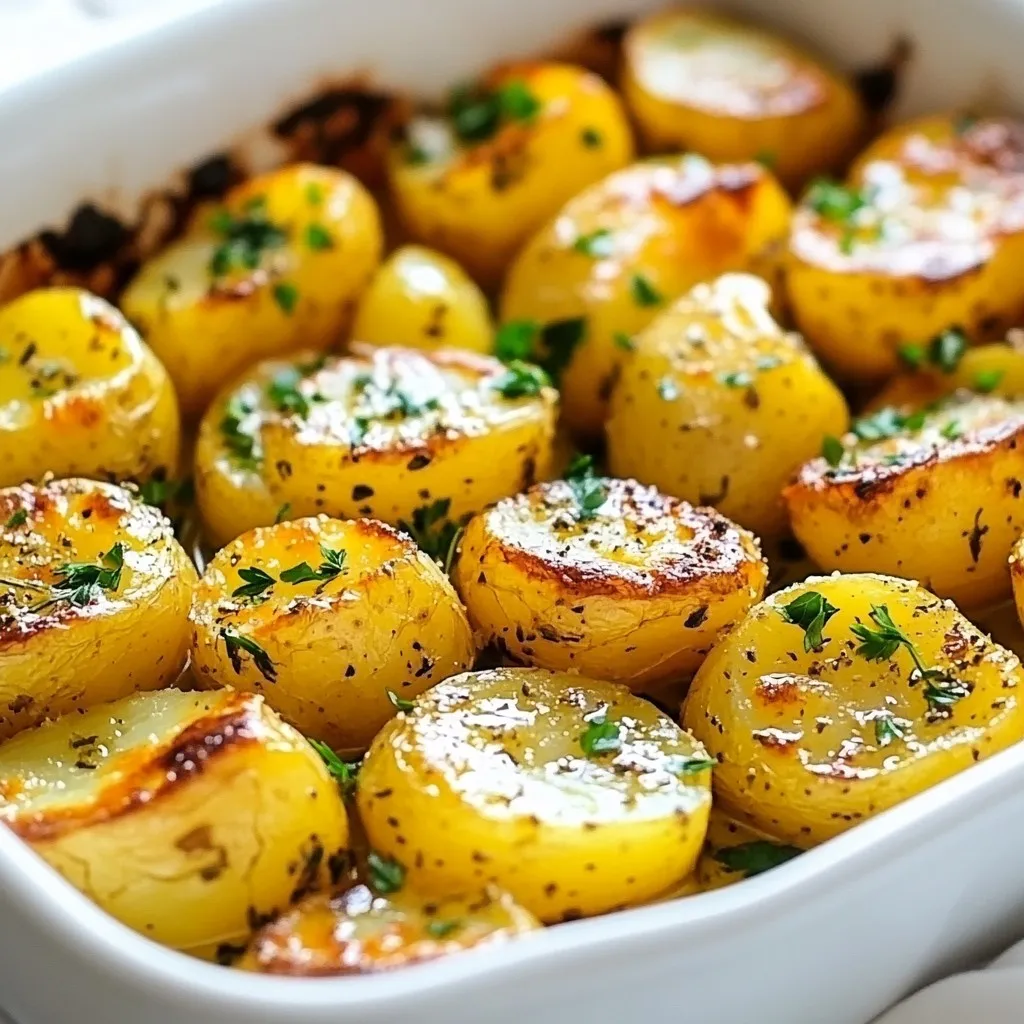
Greek Lemon Potatoes are a simple yet flavorful delight that you’ll love. This dish brings sunshine to your table with

- 4 boneless, skinless chicken thighs - 4 large Yukon Gold potatoes - 6 tablespoons unsalted butter, divided - 6 cloves garlic, finely minced - 1 teaspoon dried thyme - 1 teaspoon dried rosemary - 1 teaspoon paprika - Salt and freshly ground black pepper to taste - Fresh parsley, chopped Gather these simple ingredients to make a tasty meal. Chicken thighs are juicy and full of flavor. Yukon Gold potatoes are creamy and perfect for smashing. Unsalted butter adds richness. Fresh garlic gives the dish its name and aroma. For seasoning, dried thyme and rosemary bring warmth and depth. Paprika adds a lovely color and slight heat. Salt and black pepper will enhance all the flavors. Finally, fresh parsley adds a pop of color and freshness to the dish. With these ingredients, you can create a comforting meal that’s easy and satisfying. Trust me, your family will love it! {{ingredient_image_2}} Start by filling a large pot with water. Add a good amount of salt to the water. Bring it to a rolling boil. Carefully add the Yukon Gold potatoes. Cook them for 15-20 minutes. They should be tender enough to pierce with a fork. Once they are done, drain the water. Let the potatoes cool a bit. This will make them easier to handle when smashing. When the potatoes are cool, place them on a lined baking sheet. Use the bottom of a glass or a potato masher. Press down on each potato gently until they are smashed. Aim for a thickness of about half an inch. This helps create crispy edges. Next, melt 2 tablespoons of butter in a small saucepan. Brush this melted butter over the smashed potatoes. Make sure to coat them evenly. Sprinkle them with salt and freshly ground black pepper. Add a light dusting of paprika for flavor and color. Bake the smashed potatoes in a preheated oven at 425°F (220°C). Bake for about 20 minutes until they are golden and crispy. While the potatoes bake, season the chicken thighs. Use salt, black pepper, dried thyme, and dried rosemary. In a large skillet, melt the remaining 4 tablespoons of butter over medium heat. When the butter is frothy, add the minced garlic. Sauté the garlic for about 1 minute. It should smell fragrant but not brown. Carefully place the seasoned chicken thighs in the skillet. Cook each side for about 6-7 minutes. The chicken should be cooked through and have a golden-brown color. While it cooks, use a spoon to baste the chicken with the garlic butter. This adds great flavor. Once the chicken is fully cooked, remove it from the skillet. Let it rest for a few minutes. This helps it stay moist. Slice the chicken for serving. Arrange the crispy smashed potatoes and sliced chicken on a plate. Drizzle any leftover garlic butter from the skillet over both. This adds a delicious finishing touch. To make cooking easy, use your oven and stove at the same time. Start boiling the potatoes while you prepare the chicken. This way, you save time and keep the meal moving. Basting the chicken helps add flavor. As the chicken cooks, use a spoon to pour the garlic butter over it. This keeps the chicken moist and packed with taste. For crispy potato edges, smash them to about half an inch thick. This helps them get golden and crunchy when baked. The more surface area, the better the crunch! To keep the chicken tender and juicy, don’t overcook it. Cook each side for about 6-7 minutes. Use a meat thermometer to check if the chicken reaches 165°F. Letting it rest after cooking keeps the juices inside. If you want to switch things up, try different herbs. Fresh thyme or rosemary can add a new twist. You can also mix in some Italian seasoning or lemon zest for a fresh taste. For added flavor, sprinkle some garlic powder or onion powder on the chicken before cooking. A touch of chili powder can add a nice kick. Play around and find what you love! Pro Tips Use Fresh Herbs: Fresh herbs like thyme and rosemary can elevate the flavor of your chicken; consider using them instead of dried for a more aromatic dish. Perfectly Smashed Potatoes: For extra crispy edges, ensure your smashed potatoes are a bit irregular in shape, as this increases the surface area that gets crisped up in the oven. Butter Basting Technique: Basting the chicken with garlic butter not only adds flavor but also helps keep the meat moist and juicy. Don't skip this step! Resting Time: Allowing the chicken to rest after cooking is crucial; it helps the juices redistribute, resulting in a more succulent bite. {{image_4}} You can change the herbs in this dish to suit your taste. Fresh herbs offer a bright flavor. Use about three times more fresh herbs than dried herbs. For example, if a recipe calls for one teaspoon of dried thyme, use three teaspoons of fresh thyme. Fresh rosemary has a strong taste, so use it sparingly. Other seasonings also work well. Consider using lemon zest for a fresh twist. Smoked paprika adds a nice depth. Try a pinch of chili flakes if you like heat. Experimenting with flavors can make this dish new each time. Adding vegetables can boost nutrition and flavor. Carrots, green beans, or bell peppers pair well with this dish. Chop them into small pieces for even cooking. You can sauté them in the same skillet after the chicken. Just cook them for about 5-7 minutes until tender. You can also roast vegetables alongside the smashed potatoes. Toss them in olive oil and seasonings. This method gives a nice caramelized flavor. Just make sure to cut the veggies small for even cooking. Pair garlic butter chicken and potatoes with simple sides. A fresh salad with vinaigrette adds a nice contrast. You can also serve it with crusty bread to soak up the garlic butter. If you have leftovers, they can become a fun new dish. Chop the chicken and mix it with pasta. Toss in some fresh veggies and a light sauce for a quick meal. You can also make a savory wrap with the chicken and some greens. This keeps your meals interesting and reduces waste. After you finish your meal, let the garlic butter chicken and potatoes cool. This helps prevent moisture buildup. Use shallow containers to store your leftovers. They help the food cool quickly and evenly. Make sure the container has a tight lid. This keeps your meal fresh and tasty. To freeze garlic butter chicken and potatoes, first, let them cool completely. Divide them into portions. Use freezer-safe containers or heavy-duty bags. Remove as much air as possible before sealing. This stops freezer burn. When you want to eat them again, thaw in the fridge overnight. To reheat, you can bake them in the oven or warm them on the stove. You can keep garlic butter chicken and smashed potatoes in the fridge for up to three days. For the best taste, eat them within this time. If you freeze them, they will stay good for about three months. Just remember to label your containers with the date. This way, you know when to use them. Cook chicken thighs for about 12 to 14 minutes. Each side needs around 6 to 7 minutes. You want the chicken to reach an internal temperature of 165°F. This ensures it is safe to eat. A meat thermometer helps check the doneness. Yes, you can use other potatoes. Each type has a unique flavor and texture. For example, Russet potatoes are fluffier and absorb flavors well. Red potatoes are waxy and hold their shape better. Yukon Gold potatoes give a creamy texture and buttery taste. Choose what you like best! You can use olive oil or coconut oil as a substitute for butter. Both add rich flavor. For a dairy-free option, try vegan butter. You can also use ghee for a healthier choice. Each option changes the taste slightly but keeps the dish delicious. This blog post showed how to prepare a tasty garlic butter chicken with smashed potatoes. You learned about the key ingredients and how to cook them step-by-step. Remember, using fresh herbs can boost flavor, while freezing leftovers helps keep your meal fresh. Experiment with variations to make this dish your own. Follow these steps for a delicious meal that is easy and fun to make. Enjoy your cooking adventure!

Garlic Butter Chicken and Potatoes Easy Home Dish

Looking for an easy home dish that’s packed with flavor? Garlic Butter Chicken and Potatoes is your answer! In this

Older posts
Newer posts
← Previous Page1 … Page112 Page113 Page114 … Page122 Next →

dsad

© 2026 dailydishcraft • Built with GeneratePress

Our Policies

  • Copyright Policy
  • Cookie Policy
  • GDPR Policy
  • Privacy Policy
  • Disclaimer
  • Terms Of Use

More Information

  • Home
  • About
  • Contact
  • Appetizers
  • Dessert
  • Dinner
  • Drinks
©2026, dailydishcraft About Back To Top