Skip to content
DisclaimerTerms Of UseGDPR PolicyCookie Policy

dailydishcraft

  • Home
  • Drinks
  • Appetizers
  • Dinner
  • Dessert
  • About
  • Contact
  • Privacy Policy
DisclaimerTerms Of UseGDPR PolicyCookie Policy

Jessica

- 1 cup unsalted butter - 1 ½ cups granulated sugar - 4 large eggs - 1 teaspoon vanilla extract - 1 cup all-purpose flour - ½ cup unsweetened cocoa powder - 1 teaspoon baking powder - ½ teaspoon salt - 1 cup pumpkin puree - 1 teaspoon pumpkin pie spice - 8 oz cream cheese - ½ cup powdered sugar These ingredients create a delightful mix of rich brownie and creamy cheesecake. I love using unsalted butter for a better taste. Granulated sugar adds just the right sweetness. Eggs help bind everything together, making the texture perfect. Vanilla extract enhances flavors and adds warmth. All-purpose flour gives the brownies a great structure. Cocoa powder adds deep chocolate flavor, while baking powder helps them rise. A pinch of salt balances all the sweetness. Pumpkin puree is key for that fall flavor. I often use canned pumpkin for ease, but fresh works well too. Pumpkin pie spice gives a warm, spiced taste that makes these brownies special. Cream cheese adds richness and creaminess to the cheesecake layer. Lastly, powdered sugar sweetens the cream cheese mix perfectly. Together, these ingredients create a treat that is both fun and festive. They are perfect for sharing with friends or enjoying alone. Whether it’s a cozy night in or a gathering, these brownies will impress! {{ingredient_image_2}} - Preheat your oven to 350°F (175°C). - Prepare a 9x13-inch baking dish by greasing it lightly. Line it with parchment paper. Leave some parchment hanging over the edges. This helps to lift the brownies out later. - In a large bowl, whisk the melted butter and granulated sugar until smooth. - Beat in the eggs one at a time. Make sure each egg mixes in well before adding the next. Stir in the vanilla extract. - In another bowl, sift together the all-purpose flour, cocoa powder, baking powder, and salt. - Gradually fold the dry mix into the wet mix. Use a spatula and mix just until combined. Don’t overmix, or the brownies may not be as fudgy. - In a separate bowl, combine the pumpkin puree, softened cream cheese, powdered sugar, and pumpkin pie spice. - Mix until the mixture is smooth and creamy. - Pour half of the brownie batter into the prepared baking dish. Spread it evenly across the bottom. - Spoon dollops of the pumpkin cheesecake mix over the brownie layer. - Use a knife or a toothpick to swirl the two mixtures together. This creates a lovely marbled look. - Carefully pour the remaining brownie batter over the pumpkin layer. Smooth it out evenly. - Place the dish in the preheated oven. Bake for 30-35 minutes. - Check for doneness by inserting a toothpick into the center. It should come out with a few moist crumbs. - Allow the brownies to cool completely in the pan. Once cool, lift them out using the parchment overhang. Transfer to a cutting board and slice into squares. Enjoy! - Avoiding overmixing: Mix your ingredients just until they blend. Overmixing can make your brownies tough. When folding in the dry ingredients, use a gentle hand. This keeps the brownies soft and chewy. - Tips for a fudgy brownie: For that rich, fudgy texture, watch your baking time. Take them out when a toothpick shows a few moist crumbs. This ensures a gooey center that melts in your mouth. - Dusting with cocoa or powdered sugar: To make your brownies shine, sprinkle cocoa or powdered sugar on top. This adds a nice touch and makes them look fancy. It’s an easy way to impress guests! - Serving ideas with whipped cream and cinnamon: Serve each brownie with a dollop of whipped cream. A sprinkle of cinnamon on top gives a warm flavor. You can also add a drizzle of caramel for a sweet twist. Pro Tips Use Room Temperature Ingredients: Ensure your cream cheese is at room temperature for a smoother blending process, resulting in a creamier cheesecake layer. Don’t Overmix the Batter: Mix the brownie batter just until combined to maintain a fudgy texture; overmixing can lead to a cakey result. Swirl for a Beautiful Marbling: When combining the brownie and pumpkin layers, use a knife to swirl them gently rather than mixing completely for a stunning visual effect. Cool Before Cutting: Allow the brownies to cool completely in the pan before cutting them into squares to prevent them from falling apart. {{image_4}} You can easily change the flavor of your Pumpkin Cheesecake Brownies. Here are two simple ways: - Incorporating chocolate chips: Adding chocolate chips gives a rich touch. Use semi-sweet or dark chocolate chips. Stir in about one cup into the brownie batter. This adds bursts of chocolatey goodness in every bite. - Adding nuts for crunch: Walnuts or pecans add a nice crunch. Chop about half a cup and fold them into the brownie batter. This gives a pleasant texture and enhances the flavor. Let’s spice things up with some seasonal twists: - Using other spices like nutmeg: Nutmeg adds warmth. Try replacing some pumpkin pie spice with nutmeg. This gives a unique flavor that complements the pumpkin well. - Alternative purees like sweet potato: If you want to switch things up, use sweet potato puree. It has a similar texture. It will create a different taste while keeping the brownies moist and delicious. - Storing at room temperature: Keep your brownies in an airtight container. They taste best at room temp. Place a piece of parchment paper between layers to avoid sticking. Enjoy them within three days for the best flavor. - Refrigeration and freezing options: For longer storage, refrigerate your brownies. They can last up to a week in the fridge. To freeze, wrap them tightly in plastic wrap, then place in a freezer bag. They can last up to three months this way. Thaw them in the fridge overnight before enjoying. How long do they last? Brownies stay fresh at room temperature for up to three days. In the fridge, they can last about a week. If frozen, they maintain their taste for about three months. Enjoy your pumpkin cheesecake brownies while they are fresh for the best experience! Yes, you can use other sweeteners instead of granulated sugar. Some great options include: - Brown sugar for a deeper flavor - Coconut sugar for a lower glycemic index - Maple syrup or honey, but adjust liquid ingredients Using these substitutes may change the texture or flavor slightly. Brown sugar adds moisture, while coconut sugar has a slight caramel taste. Experiment to find what you like best! To check if the brownies are done, look for these signs: - A toothpick inserted into the center comes out with a few moist crumbs - The edges pull away slightly from the pan - The top looks set and is not shiny If you see these signs, your brownies are ready. Remember, they will continue to cook a little after you take them out, so don’t overbake! Yes, you can make these brownies ahead of time! Here are some tips: - Bake and cool the brownies completely before storing - Cut them into squares and store in an airtight container - Keep them at room temperature for up to 3 days or in the fridge for up to a week If you want to store them longer, freeze the brownies. Wrap each square tightly in plastic wrap and place them in a freezer-safe bag. They can last for up to 3 months in the freezer. Just thaw before serving! You learned how to make delicious pumpkin cheesecake brownies using simple ingredients. I covered the steps from preparing the dish to baking, ensuring you achieve that perfect texture. Don't forget to add personal touches with flavors or toppings. Store them properly to keep them fresh for longer. Enjoy making these tasty treats and impress friends and family! Baking should be fun and rewarding, so get started today!

Pumpkin Cheesecake Brownies Irresistible Fall Treat

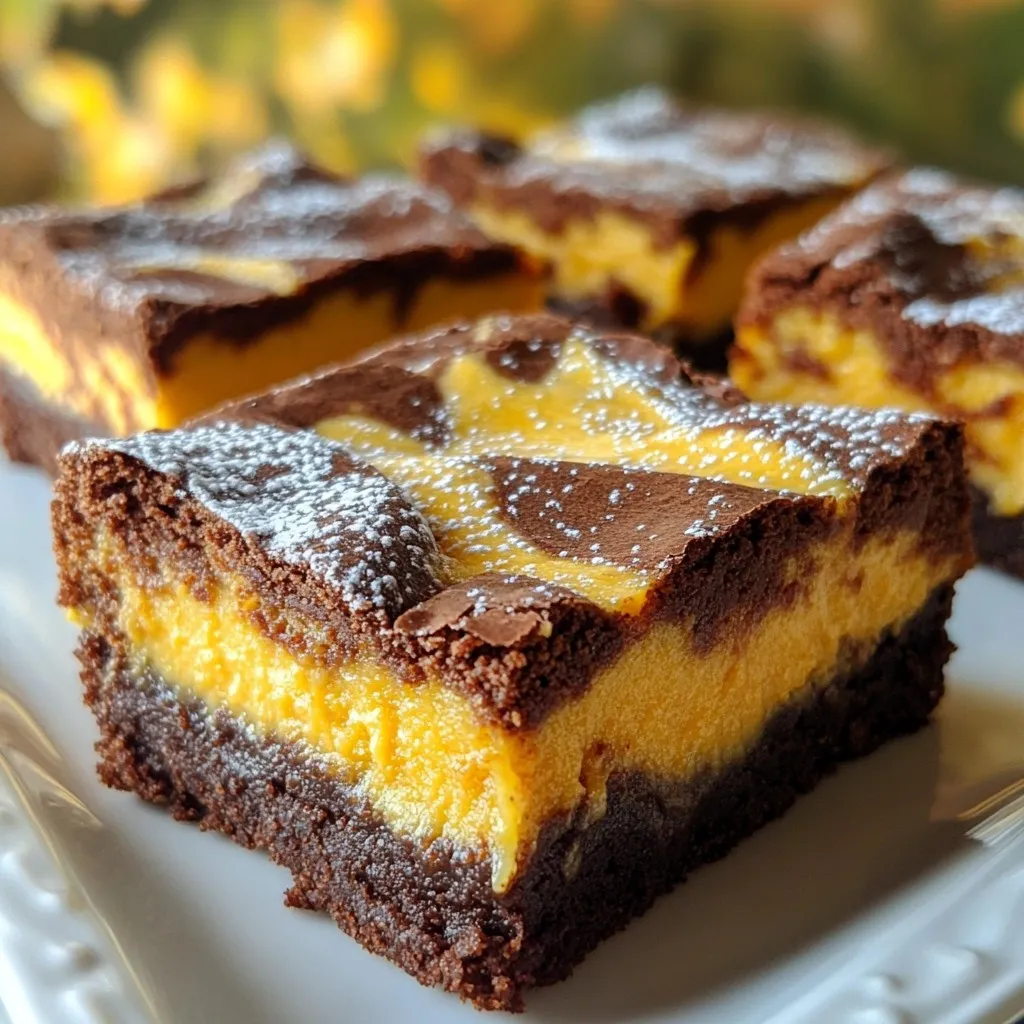
Fall is here, and that means it’s time for Pumpkin Cheesecake Brownies! This delicious treat blends rich chocolatey brownies with

To make Apple Cinnamon Overnight Oats, you need a few simple items. Here’s the list: - 1 cup rolled oats - 2 cups almond milk or any milk of your choice - 1 medium apple, peeled and diced - 1 tablespoon chia seeds - 1 tablespoon maple syrup (optional, for added sweetness) - 1 teaspoon ground cinnamon - 1/2 teaspoon pure vanilla extract - 1/4 cup walnuts, finely chopped (optional for added crunch) - A pinch of salt These ingredients blend together to create a creamy and delicious breakfast. The rolled oats give you a nice base, while the almond milk makes it creamy. The diced apple adds freshness and sweetness. Chia seeds boost the nutrition and help thicken the oats. Ground cinnamon gives that warm spice flavor, and the vanilla adds depth. You can always adjust the recipe based on your taste. Want it sweeter? Add more maple syrup. Prefer a crunch? Toss in more walnuts. Each ingredient plays a role, making this breakfast not just tasty but also healthy! {{ingredient_image_2}} 1. Mixing dry ingredients Start by taking a large mixing bowl. Add 1 cup of rolled oats, 1 tablespoon of chia seeds, and a pinch of salt. Mix these dry ingredients well. This helps to ensure even flavor. 2. Preparing wet ingredients In another bowl or measuring jug, pour in 2 cups of almond milk. If you want added sweetness, add 1 tablespoon of maple syrup. Then, mix in 1 teaspoon of ground cinnamon and 1/2 teaspoon of pure vanilla extract. Whisk until the mixture is smooth. 3. Combining mixtures Gradually pour the wet mixture over the dry ingredients. Use a spatula or wooden spoon to stir. Make sure all the oats are coated and combined well. No dry spots should remain. 4. Adding diced apples Take 1 medium apple, peel it, and dice it into small pieces. Gently fold the diced apple into the oat mixture. This adds delicious flavor and a nice texture. 5. Storing in jars Spoon the combined mixture into two jars or containers. Layer it evenly. If you want some crunch, sprinkle 1/4 cup of finely chopped walnuts on top. Seal each jar with a lid or cover them with plastic wrap. Let the jars chill in the refrigerator overnight. This helps the oats and chia seeds absorb the liquid. Enjoy a tasty breakfast in the morning! - Adjusting sweetness levels You can change the sweetness to fit your taste. If you like it sweet, add more maple syrup. For less sweetness, use less syrup or skip it. You can also use ripe bananas for natural sweetness. - Choosing the right milk alternatives Almond milk is my favorite, but feel free to try other types. Cow's milk, oat milk, or soy milk all work well. Choose what you love or what you have on hand. - Ensuring proper consistency If your oats are too thick, add a splash of milk when you stir them in the morning. If they are too thin, add a bit more oats or let them sit longer to soak up the liquid. - Flavoring variations Get creative with flavors! You can add nuts, seeds, or different spices like nutmeg. Fresh fruits like berries or bananas can also boost flavor. Mix and match until you find your favorite combo! Pro Tips Use Old-Fashioned Rolled Oats: They absorb liquid better and provide a creamier texture compared to quick oats. Customize Your Sweetness: Adjust the amount of maple syrup based on the sweetness of your apples to create the perfect balance. Experiment with Toppings: Feel free to add other toppings like nut butter, seeds, or dried fruits to elevate your overnight oats. Make It Ahead: These overnight oats can last in the fridge for up to 5 days, making them perfect for meal prep. {{image_4}} You can make apple cinnamon overnight oats your own in many ways. Here are some ideas: - Flavor additions: Try adding other fruits like bananas or berries. Nuts like almonds or pecans also work well. They add crunch and good taste. - Alternative spices: If you want to mix things up, add nutmeg or ginger. These spices give your oats a new twist and flavor. - Different sweeteners: Maple syrup is great, but you can also use honey or agave. Each sweetener brings a unique taste to your oats. Using these ideas will help you create a breakfast that fits your taste. Enjoy trying new combinations! You can keep your apple cinnamon overnight oats in the fridge for up to five days. This makes it easy to meal prep for the week. Just store them in airtight jars or containers. If you want to freeze them, it’s best to do so before adding any fresh fruit or toppings. Freeze the jars without the apple slices. They can stay in the freezer for up to three months. When you want to eat them, move a jar to the fridge overnight to thaw. Reheating is not usually needed, but if you prefer warm oats, you can microwave them. Just take off the lid and heat for about 30 to 60 seconds. Stir well before eating. If the oats are too thick, add a splash of almond milk to get your perfect texture. Yes, you can use instant oats. However, they will absorb liquid faster. This may change the texture. Rolled oats give a chewier bite, which I prefer. You can store these oats in the fridge for up to five days. Just keep them in sealed jars. This makes it easy to grab a quick breakfast. You can skip chia seeds if you want. They add fiber and help thicken the oats. If you don't have any, just leave them out. To add protein, consider these options: - Greek yogurt - Protein powder - Nut butter - Cottage cheese These ingredients blend well and boost nutrition. Yes, you can make these oats vegan. Use plant-based milk like almond, soy, or oat milk. Skip the honey and use maple syrup for sweetness. You learned how to make easy overnight oats using simple ingredients. We covered step-by-step instructions, tips for perfect oats, and fun variations. Remember, you can customize your oats to fit your taste. Make them sweeter or swap out ingredients based on what you like. Proper storage keeps them fresh, and you can enjoy them all week. This healthy breakfast is tasty and quick to prepare. Dive in and start making your own delicious overnight oats today!

Apple Cinnamon Overnight Oats Simple and Tasty Meal

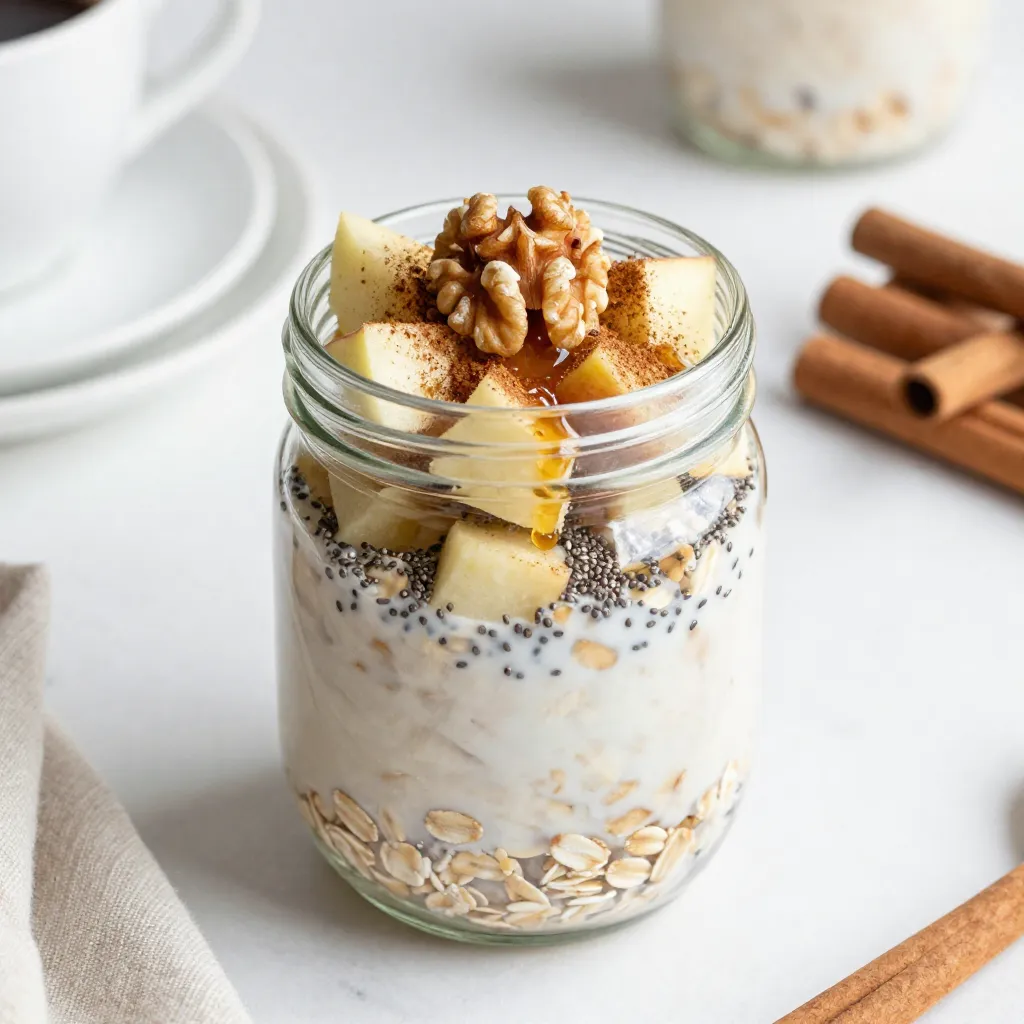
Looking for a quick and tasty breakfast? Let me introduce you to Apple Cinnamon Overnight Oats! These scrumptious oats are

To make the Lemon Herb Couscous Salad, gather these ingredients: - 1 cup couscous - 1 ½ cups vegetable broth - 1 cup cherry tomatoes, halved - 1 cucumber, diced - 1 bell pepper (red or yellow), diced - ¼ cup red onion, finely chopped - ½ cup fresh parsley, chopped - ½ cup fresh mint, chopped - Juice of 1 fresh lemon - 3 tablespoons olive oil - Salt and pepper to taste - Crumbled feta cheese (optional, for garnishing) You can customize your salad with these optional ingredients: - Avocado, diced for creaminess - Olives, sliced for a briny kick - Chickpeas for added protein - Sun-dried tomatoes for extra flavor Each ingredient in this salad brings its own benefits: - Couscous is light and fluffy. It's quick to prepare and full of carbs for energy. - Cherry tomatoes add bright color and antioxidants, supporting overall health. - Cucumber provides hydration and crunch, making the salad refreshing. - Bell pepper is sweet and packed with vitamins A and C. - Red onion gives a mild bite and contains anti-inflammatory properties. - Parsley and mint add fresh flavor and help with digestion. - Lemon juice brightens the dish and is high in vitamin C. - Olive oil adds healthy fats and enhances flavor. - Feta cheese adds creaminess and a salty touch (if you choose to use it). These ingredients work together to create a tasty and healthy salad. Enjoy the mix of flavors and colors! {{ingredient_image_2}} First, you need to boil the vegetable broth in a medium pot over medium heat. Once it bubbles, take the pot off the heat. Stir in the couscous and cover it with a lid. Let it sit for about 5 minutes so the couscous can absorb the broth. After that, use a fork to fluff the couscous. This helps break apart any clumps. Then, transfer it to a large mixing bowl to cool down. When the couscous has cooled, it’s time to add the veggies. Toss in the halved cherry tomatoes, diced cucumber, and diced bell pepper. You can pick either a red or yellow pepper for a sweet touch. Then, add in the finely chopped red onion. Mix everything well so the flavors blend. This colorful mix will make your salad pop! Next, let’s make the dressing. In a small bowl, squeeze the juice of one fresh lemon. Add in the olive oil, salt, and pepper. Whisk it all together until it's well blended. Drizzle this zesty dressing over the couscous salad. Gently toss everything together to coat all the ingredients. Finally, fold in the chopped parsley and mint. Be gentle so the herbs stay fresh and bright. If you like, sprinkle crumbled feta cheese on top for a creamy finish. To fluff couscous, you start by letting it soak. After boiling the broth, stir in the couscous. Cover the pan and wait five minutes. Then, take a fork and gently scrape through the couscous. This breaks up clumps. You want light, airy grains. Fluffing is key to a nice texture. You can serve this salad as a main dish or a side. It pairs well with grilled chicken or fish. For a colorful plate, add sliced avocado or roasted veggies. You can also use it as a filling in wraps. Garnish with lemon wedges and parsley for a fresh look. To boost flavor, always taste and adjust. Add more lemon juice for zing. A pinch of salt or pepper can bring out the best in the salad. For a kick, try adding red pepper flakes. Fresh herbs like basil or thyme also work well. Mix and match to find your favorite taste. Pro Tips Use the Right Broth: For a more intense flavor, consider using homemade vegetable broth instead of store-bought. This will enhance the overall taste of your salad. Chill Before Serving: Allow the salad to chill in the refrigerator for at least 30 minutes after mixing. This will help the flavors meld together and create a more refreshing dish. Herb Variations: Feel free to experiment with other fresh herbs like basil or cilantro to give the salad a unique twist based on your preference. Texture Matters: For added crunch, consider adding roasted nuts or seeds such as pine nuts or sunflower seeds to your salad before serving. {{image_4}} You can make this salad even heartier by adding protein. Chicken or shrimp work great. Simply grill or sauté them before mixing them in. If you want a plant-based option, consider adding chickpeas. They pack a punch of protein and add a nice texture. Feel free to mix up the veggies to suit your taste. You could add diced carrots or zucchini for a crunchy bite. Roasted vegetables like bell peppers or even sweet potatoes can add a sweet flavor. Don't hesitate to experiment with what you have on hand! To make this salad vegan, skip the feta cheese, or use a dairy-free alternative. You can still achieve a creamy texture by adding avocado. Just dice it and mix it in gently. This keeps the salad fresh and flavorful without dairy. When you have leftover Lemon Herb Couscous Salad, store it in an airtight container. This keeps the salad fresh and tasty. Place the container in the fridge. Avoid letting it sit out for too long. You want to keep the flavors in and bacteria out. If you can, eat the salad within a few days. This way, you can enjoy its bright taste. Freezing couscous salad is not the best idea. The veggies may get mushy after thawing. If you plan to freeze it, leave out the fresh herbs and veggies. Instead, freeze only the couscous and dressing. When you want to eat it, thaw it overnight in the fridge. Then, add fresh veggies and herbs before serving. Lemon Herb Couscous Salad lasts about 3 to 5 days in the fridge. Make sure to check for any off smells or changes in texture. If you see or smell something unusual, it’s best to toss it. Keeping it in an airtight container helps it last longer. Enjoy your delicious salad while it’s still fresh! Yes, you can prepare this salad ahead of time. The flavors blend well when it sits. I recommend making it up to a day in advance. Just store it in the fridge. When you're ready to serve, give it a good stir. This keeps it fresh and tasty. If you don't have couscous, try quinoa or bulgur wheat. Both are great alternatives. Quinoa adds a nutty flavor, while bulgur is quick to cook. You can also use rice for a different texture. Just adjust the cooking time based on what you choose. To add heat, sprinkle in some red pepper flakes. You can also use diced jalapeños for a fresh kick. Another option is to add a dash of hot sauce to the dressing. These additions will spice up your salad without losing its fresh taste. This blog post covers all you need for a delicious Lemon Herb Couscous Salad. We explored key ingredients and their benefits, outlined step-by-step instructions, shared helpful tips, and discussed variations to suit your taste. Remember, you can customize this salad with proteins or veggies. Store your leftovers properly for the best flavor. With these insights, making this salad can be fun and easy. Enjoy creating your tasty dish!

Lemon Herb Couscous Salad Fresh and Tasty Delight

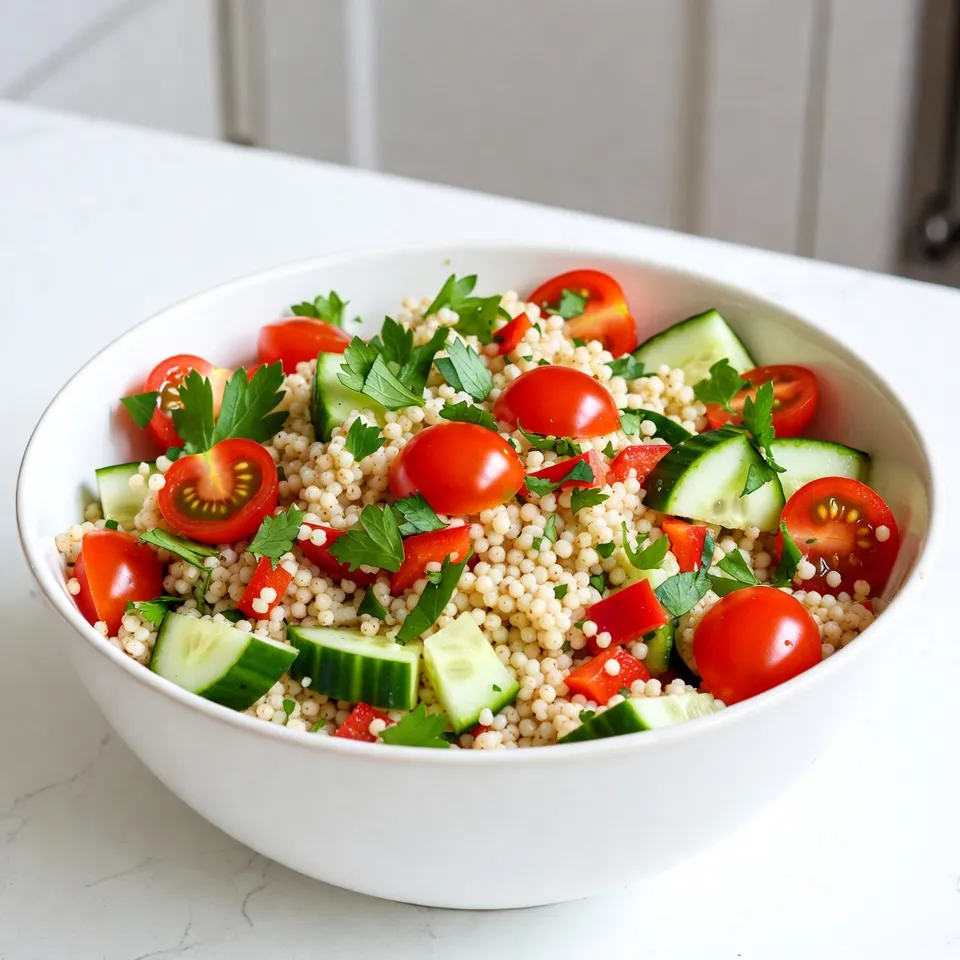
Looking for a fresh and tasty dish that’s easy to make? I present to you the Lemon Herb Couscous Salad!

- 1 cup rolled oats - 1 cup whole wheat flour - 1/2 cup packed brown sugar - 1 tablespoon baking powder - 1/2 teaspoon baking soda - 1/2 teaspoon salt - 1 cup buttermilk (or plant-based milk with 1 tablespoon vinegar) - 1/4 cup vegetable oil (or melted coconut oil) - 2 large eggs - Zest of 1 lemon - 1/4 cup fresh lemon juice - 1 cup fresh blueberries (or frozen) - 1 teaspoon vanilla extract You can swap buttermilk with plant-based milk mixed with vinegar. This works well. If you don’t have vegetable oil, melted coconut oil is a good choice. For sweetness, you can use honey or maple syrup instead of brown sugar. If you want a gluten-free option, use gluten-free flour that can replace whole wheat flour. Each muffin has about 160 calories. They contain 4 grams of protein and 3 grams of fiber. With 7 grams of sugar, they are a treat that won’t spike your blood sugar too much. The muffins also provide a good source of vitamins from blueberries and lemon. {{ingredient_image_2}} First, preheat your oven to 350°F (175°C). This step is key to getting the muffins just right. Next, grab a muffin tin. You can line it with paper liners or grease it lightly with cooking spray or oil. Both methods work well. In a large bowl, combine the rolled oats, whole wheat flour, brown sugar, baking powder, baking soda, and salt. Whisk these dry ingredients together until they blend well. This mix gives your muffins a great base. In another bowl, whisk together the buttermilk, vegetable oil, eggs, lemon zest, lemon juice, and vanilla extract. Make sure this mixture is smooth. This is where the flavor starts to build. Now, pour the wet mixture into the bowl with the dry ingredients. Gently stir with a spatula or wooden spoon. Mix just until combined. It’s okay if there are small lumps. Overmixing can make the muffins tough. Carefully fold in the fresh blueberries. Make sure they spread evenly in the batter. Avoid crushing them, as you want those juicy bursts of flavor in each muffin! Use a spoon or ice cream scoop to fill each muffin cup about three-quarters full. Bake in your preheated oven for 18-20 minutes. To check if they are done, insert a toothpick in the center; it should come out clean. Once baked, let the muffins cool in the tin for about 5 minutes, then transfer them to a wire rack. Let them cool completely before you enjoy them. To make your muffins soft and fluffy, do not overmix the batter. When you combine the wet and dry ingredients, stir gently. You want to mix just until the flour disappears. A few lumps are okay. This method keeps the muffins light. For a great rise, use fresh baking powder. Always check the expiration date on your baking soda too. When adding blueberries, be gentle. Use a spatula to fold them in. This keeps the berries whole and juicy. If you crush the berries, your muffins may turn blue. Try to evenly distribute them throughout the batter. If you use frozen blueberries, do not thaw them first. This helps prevent extra moisture in the batter. To keep your muffins fresh, store them in an airtight container. They stay good for about three days at room temperature. If you want them to last longer, freeze them. Just wrap each muffin in plastic wrap. Place them in a freezer bag, and they can last up to three months. When you’re ready to eat, thaw at room temperature or warm in the oven. Pro Tips Use Fresh Ingredients: Always opt for fresh blueberries when in season for the best flavor and texture. Don't Overmix: Mix the batter until just combined to ensure your muffins remain light and fluffy. Experiment with Add-ins: Feel free to add nuts or seeds for extra crunch and nutrition. Storage Tips: Store muffins in an airtight container at room temperature for up to 3 days or freeze for longer shelf life. {{image_4}} You can mix up the fruits in these muffins. Try adding raspberries, strawberries, or blackberries. Each fruit brings a unique taste. For a tropical twist, add chopped mango or pineapple. Just remember to keep the amount similar to the blueberries. Use one cup of any fruit you choose. Switching flours can change the muffins' texture and taste. You can use almond flour or oat flour. These flours are gluten-free and give a nice flavor. If you want a sweeter muffin, try using maple syrup or honey instead of brown sugar. Use about half the amount since these sweeteners are stronger. If you need gluten-free muffins, switch the whole wheat flour with a gluten-free blend. Many brands offer good mixes that work well in baking. You can also use rolled oats labeled gluten-free. This way, everyone can enjoy these tasty muffins without worry. To keep your Lemon Blueberry Oatmeal Muffins fresh, place them in an airtight container. This will help maintain their moisture and flavor. You can store them at room temperature for about three days. If you want to keep them longer, the fridge is a good option. Just make sure to wrap them tightly in plastic wrap. Freezing these muffins is easy and smart. Let the muffins cool completely first. Then, wrap each muffin in plastic wrap. After that, place them in a freezer bag. They can last up to three months in the freezer. When you're ready to enjoy, just take one out and let it thaw at room temperature. Reheating muffins is simple! You can use a microwave or an oven. For the microwave, heat each muffin for about 15-20 seconds. If you prefer the oven, preheat it to 350°F (175°C). Place the muffins on a baking sheet and warm them for about 5-10 minutes. This will bring back their fresh taste and soft texture. Enjoy your muffins warm! Yes, you can use frozen blueberries. They are easy to find and work well. Frozen blueberries do not need thawing. Just fold them into the batter straight from the freezer. This keeps them from staining the batter too much. If you do not have buttermilk, mix 1 cup of plant-based milk with 1 tablespoon of vinegar. Let it sit for 5 minutes. This will create a similar tangy flavor and texture. To make these muffins vegan, use the plant-based milk and vinegar mix for buttermilk. Replace the eggs with flax eggs. To make a flax egg, mix 1 tablespoon of ground flaxseed with 2.5 tablespoons of water. Let it sit for 5 minutes until it thickens. These muffins can last up to 4 days at room temperature. Store them in an airtight container to keep them fresh. You can also refrigerate them for about a week. Absolutely! You can make mini muffins by using a mini muffin tin. Fill each cup about halfway. Bake them for 10-12 minutes. Keep an eye on them to avoid overbaking. Lemon pairs well with many flavors. Try adding poppy seeds for a classic twist. You can also mix in coconut or almond extract for a unique taste. Fresh herbs like basil or thyme can add a fresh note. This blog post covered all you need to make lemon blueberry oatmeal muffins. We went through ingredients, step-by-step instructions, and helpful tips to ensure great results. You also learned about storage and fun variations. With these ideas, you can enjoy muffins that fit your taste. Baking can be fun and easy. Trust your skills and get started in the kitchen. You will love the results!

Lemon Blueberry Oatmeal Muffins Fresh and Simple Treat

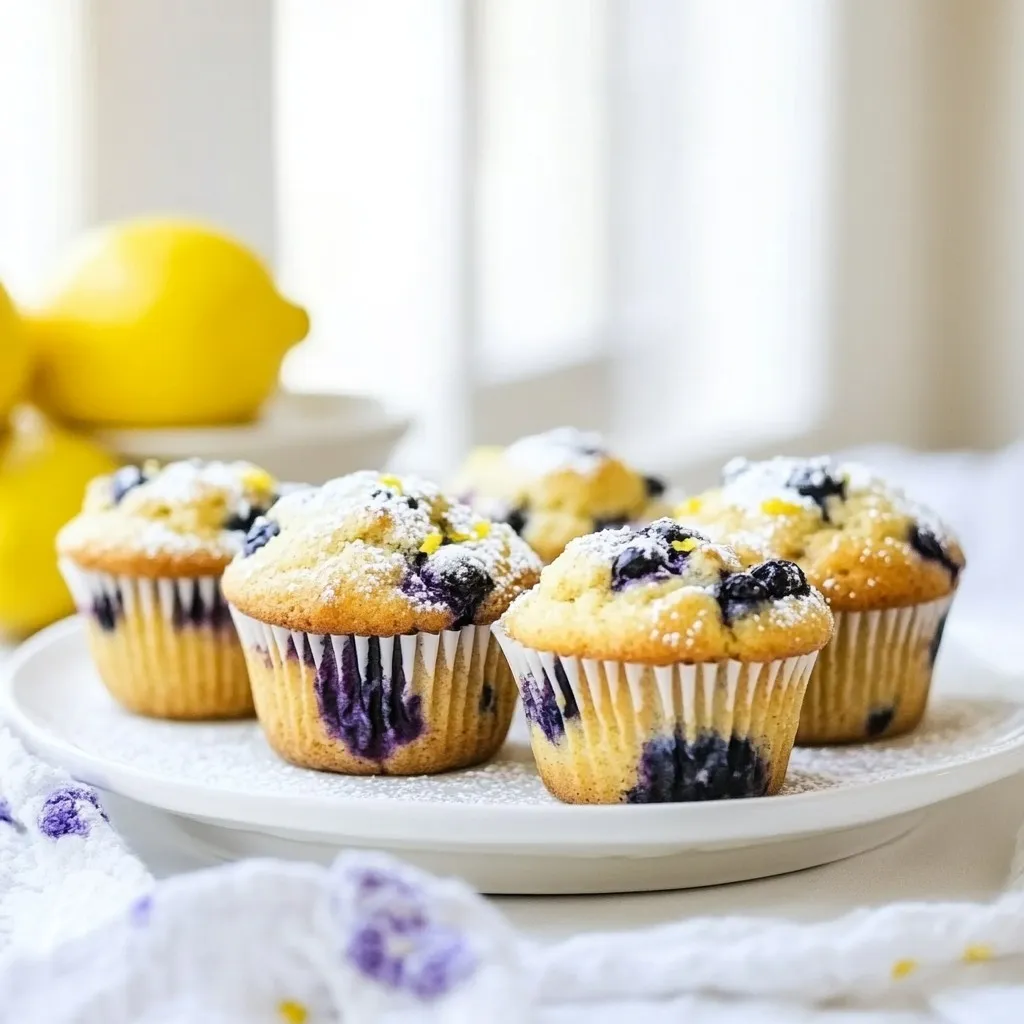
Craving a quick and tasty snack? These Lemon Blueberry Oatmeal Muffins are the answer! They’re fresh, simple, and packed with

- 1 lb thinly sliced ribeye steak - 1 tablespoon olive oil - 1 medium onion, thinly sliced - 1 medium green bell pepper, thinly sliced - 6 oz provolone cheese slices - 6 large lettuce leaves (romaine or iceberg) - 1 teaspoon garlic powder - Salt and pepper to taste - Optional: Hot sauce for serving You need fresh ingredients for these Keto Philly Cheesesteak Roll Ups. Start with one pound of ribeye steak, cut very thin. This cut gives a rich flavor. You will also need one tablespoon of olive oil. This oil helps to cook the steak and veggies well. Next, grab one medium onion and one green bell pepper. Slice them thin for easy cooking. The onion adds sweetness, and the pepper adds crunch. You will need six ounces of provolone cheese. This cheese melts beautifully and gives a rich taste. For the wrap, use six large lettuce leaves. Romaine or iceberg works best. These leaves hold the filling well and keep it fresh. Don't forget the seasonings! Use one teaspoon of garlic powder. Salt and pepper will enhance all the flavors. If you like heat, add some hot sauce when serving. It adds a nice kick! {{ingredient_image_2}} - Heat 1 tablespoon of olive oil in a large skillet over medium heat. - Add 1 medium onion and 1 medium green bell pepper, both thinly sliced. Sauté these for about 5-7 minutes. Stir occasionally until they soften and caramelize a bit. This brings out their sweet flavors. - Push the veggies to one side of the skillet. - On the other side, add 1 lb of thinly sliced ribeye steak. Season it with 1 teaspoon of garlic powder, salt, and pepper to taste. - Cook the steak for about 3-4 minutes. Stir it occasionally until it turns brown and is cooked to how you like it. - Mix the steak with the sautéed vegetables. This blends the flavors nicely. Remove the skillet from the heat. - Lay out 6 large lettuce leaves on a clean surface. - Place 2 slices of provolone cheese on each leaf. Make sure there’s enough space to hold the filling. - Spoon the steak and vegetable mix onto the cheese in each lettuce leaf. - Starting from one end, roll the leaf tightly around the filling. Make sure to enclose everything well. - Repeat until all the filling is used. - Optionally, secure each roll with a toothpick for easy serving. You can also drizzle hot sauce on top for a spicy kick. To make your steak shine, start with good seasoning. Use salt and pepper to bring out the meat's natural taste. Add garlic powder for a boost of flavor. Mix these seasonings well into the ribeye before cooking. For cooking times, aim for about 3-4 minutes for medium doneness. If you like it rare, cook for about 2-3 minutes. If you prefer it well done, extend the time to about 5 minutes. Always check that the steak is brown and cooked through. When you use lettuce leaves, choose larger ones. They hold everything better. To avoid tearing, use fresh leaves. If they are too cold, let them warm slightly at room temperature. For a neat finish, roll tightly from one end. Keep the filling inside as you roll. Use toothpicks to hold the rolls together. This keeps your roll-ups looking great on the plate. Pro Tips Choose the Right Steak: For the best flavor and tenderness, opt for ribeye steak as it has the perfect fat content that enhances the dish. Maintain Heat Control: Be sure to keep the skillet at medium heat to prevent burning the vegetables while allowing them to caramelize beautifully. Use Fresh Ingredients: Fresh lettuce and quality provolone cheese will elevate the taste and texture of your roll-ups, making them more enjoyable. Experiment with Toppings: Feel free to add toppings like sautéed mushrooms or jalapeños for extra flavor and a kick of heat in your roll-ups. {{image_4}} You can change the protein in this recipe. Try using chicken or turkey instead of ribeye. Both options keep the dish light and tasty. They also fit well with the keto diet. For cheese, you can switch provolone for mozzarella or even cheddar. Each cheese brings a different flavor. Choose what you enjoy most or what you have on hand. To boost the flavor, add sautéed mushrooms or spicy peppers. Mushrooms add a nice umami taste. Spicy peppers bring heat and zest. You can use jalapeños or banana peppers for a kick. You can also mix in different spices or condiments. Try adding paprika or onion powder for extra depth. A splash of Worcestershire sauce can add a savory note, too. Feel free to experiment and find your favorite combinations! To store Keto Philly Cheesesteak Roll Ups, place them in an airtight container. This keeps them fresh. You can keep them in the fridge for up to three days. If you want to save them longer, consider freezing them. They will stay good for about one month in the freezer. When you are ready to eat your leftovers, use the oven or an air fryer. Preheat the oven to 350°F (175°C). Place the roll-ups on a baking sheet. Heat them for about 10 minutes. This method helps keep them crunchy. If you use an air fryer, set it to 350°F (175°C) and cook for 5-7 minutes. Always check that they are warm throughout before serving. Keto Philly Cheesesteak Roll Ups are low in carbs. Each roll-up has about 3 grams of carbs. This makes them perfect for a keto diet. The main ingredients are ribeye steak and cheese, which have very few carbs. The lettuce also adds minimal carbs. If you track your carb intake, these roll-ups fit well into your plan. Yes, you can make these roll-ups ahead of time. Prepare the steak and veggies in advance. Store them in the fridge for up to three days. When you are ready to eat, just assemble the roll-ups. This saves time on busy days. For the best taste, keep the filling and lettuce separate until serving. Pair these roll-ups with a fresh salad or veggie sticks. A simple cucumber salad works great. You can also serve them with a low-carb dip. If you want something warm, try roasted cauliflower. These sides add color and nutrients to your meal. Enjoy your roll-ups with your favorite keto-friendly options! This blog post covered how to make Keto Philly Cheesesteak Roll Ups. You learned about the key ingredients, step-by-step cooking instructions, and useful tips for flavor and assembly. Knowing how to store and reheat leftovers also helps you enjoy them later. Try different proteins and cheeses for your roll ups. With easy swaps, you can customize this dish to your taste. Enjoy these delicious roll ups with your favorite sides for a full meal. Happy cooking!

Keto Philly Cheesesteak Roll Ups Tasty and Simple Meal

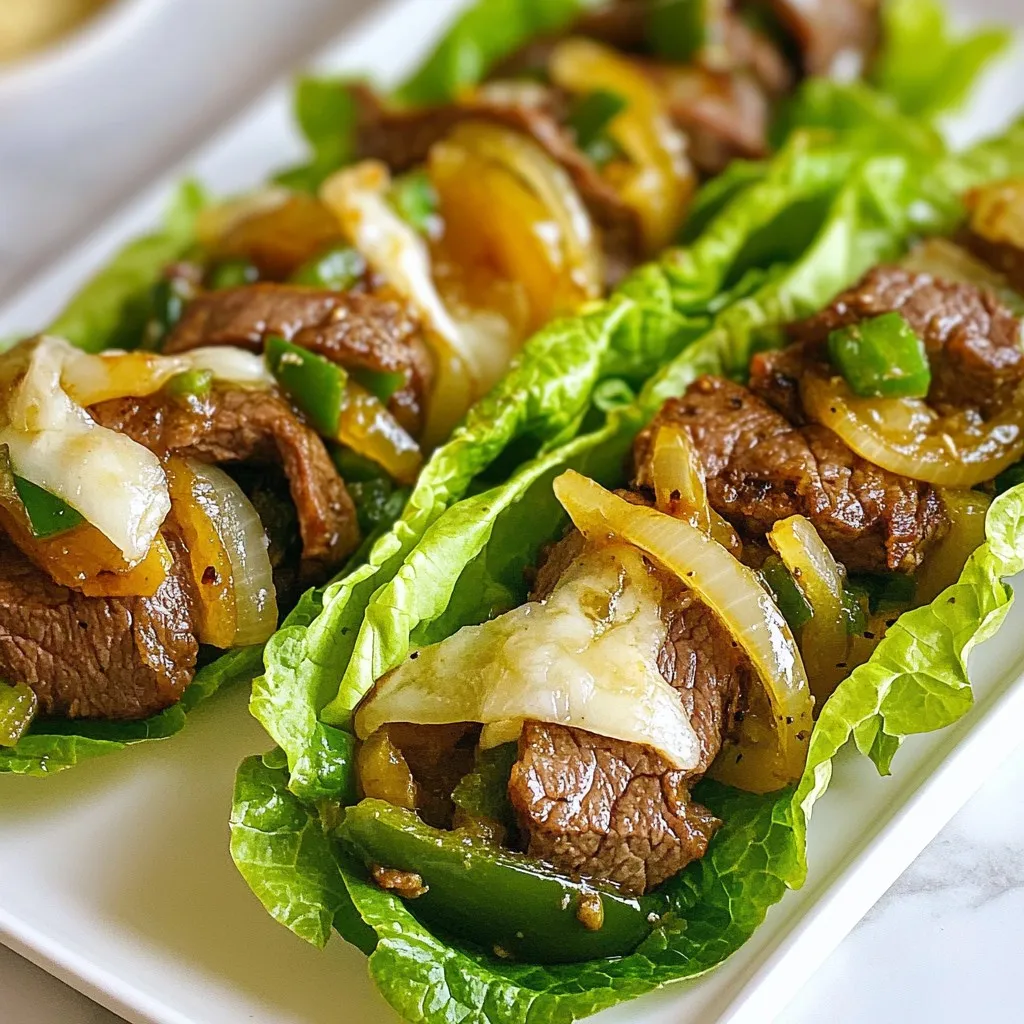
Are you ready to enjoy a tasty and simple meal that fits your keto diet? Let me introduce you to

- 12 oz of pasta (fettuccine or penne) - 2 cups of cherry tomatoes, halved - 1 cup of fresh ricotta cheese - 2 cloves of garlic, minced - 1 tablespoon of olive oil - 1 tablespoon of balsamic vinegar - 1 teaspoon of dried basil - 1 teaspoon of dried oregano - Salt and freshly ground black pepper to taste - Fresh basil leaves for garnish - Grated Parmesan cheese for serving For this dish, the main ingredients are simple and fresh. The cherry tomatoes burst with flavor and pair well with rich ricotta. The pasta acts as a tasty base, while garlic adds depth. Olive oil and balsamic vinegar bring a nice balance of richness and acidity. - Red pepper flakes for heat - Lemon zest for brightness - Spinach or arugula for greens You can add red pepper flakes for a spicy kick. Lemon zest brightens the dish and adds freshness. Adding spinach gives a nice green touch and boosts nutrition. - Use whole wheat pasta for more fiber. - Swap ricotta for cottage cheese for a lighter option. - Replace balsamic vinegar with red wine vinegar for a different flavor. If you don’t have ricotta, cottage cheese works well. Whole wheat pasta is a healthy choice. Red wine vinegar can replace balsamic if you want a sharper taste. Adjust these ingredients based on what you have! {{ingredient_image_2}} Start by boiling a large pot of salted water. Once it’s bubbling, add 12 ounces of pasta, like fettuccine or penne. Cook the pasta according to the package instructions, usually about 8-10 minutes, until it is al dente. Be sure to stir it occasionally. When done, drain the pasta in a colander. Keep about a cup of the pasta water on the side. This water will help later if you need to add creaminess. In a wide skillet, pour in 1 tablespoon of olive oil and heat over medium. Add 2 cloves of minced garlic and sauté for about 1 minute, stirring often. Watch the garlic closely; burnt garlic can ruin the taste. Next, add 2 cups of halved cherry tomatoes to the skillet. Season them with salt, black pepper, 1 teaspoon of dried basil, and 1 teaspoon of dried oregano. Stir everything together and cook for 5-7 minutes. You want the tomatoes to soften and start releasing their juices. To finish, drizzle in 1 tablespoon of balsamic vinegar and take the skillet off the heat. In a large mixing bowl, combine the drained pasta with the sautéed tomato mix. Add 1 cup of fresh ricotta cheese to the bowl. Gently toss everything together until the pasta gets a nice, creamy coat. If it seems dry, pour in a splash of the reserved pasta water. This will help you achieve the creaminess you want. Take a moment to taste and adjust the salt or pepper as needed. To make your pasta creamy, use fresh ricotta cheese. It adds a rich and smooth touch. After mixing the ricotta with the pasta, if it feels dry, add a splash of the reserved pasta water. This simple step helps to achieve that perfect creamy texture. Stir gently to blend all the flavors. Seasoning is key to making your dish pop. Use salt and freshly ground black pepper to taste. Dried basil and oregano bring warmth and depth. Don’t forget the balsamic vinegar; it adds a nice tang. Taste and adjust the seasonings as you go. This ensures a balanced flavor profile that excites your palate. Make your dish look as good as it tastes. For a stunning presentation, drizzle a little extra olive oil on top. Add more halved cherry tomatoes and fresh basil leaves for color. A sprinkle of grated Parmesan cheese enhances the look and flavor. Serve in shallow bowls for an elegant touch. Enjoy the beauty of your creamy dish! Pro Tips Use Fresh Ingredients: Fresh cherry tomatoes and quality ricotta cheese elevate the dish and enhance the flavor profile significantly. Don't Overcook the Pasta: Aim for al dente pasta for the best texture. This prevents the pasta from becoming mushy in the creamy sauce. Balance the Flavors: Adjust the seasoning with salt and pepper, and consider adding a pinch of sugar if the tomatoes are too acidic. Garnish Generously: Fresh basil leaves and grated Parmesan not only add flavor but also make the dish visually appealing. Don’t skimp on these toppings! {{image_4}} You can easily make this dish more colorful and tasty with veggies. Try adding spinach or arugula for fresh greens. Zucchini or bell peppers add crunch and flavor. Mushrooms also work well for a meaty texture. Just sauté them with garlic and then mix them in. If you want more protein, consider adding grilled chicken or shrimp. They give a nice boost to the meal. You can also try chickpeas or white beans for a plant-based option. They mix well with the creamy sauce and add heartiness. Switching up the sauce can change the whole dish. For a spicy kick, add red pepper flakes or a spicy tomato sauce. A pesto sauce can bring a fresh herb flavor. You can also try a creamy Alfredo sauce for a richer taste. Each option makes this pasta unique and fun. To keep your creamy tomato ricotta pasta fresh, store it in an airtight container. Let the pasta cool to room temperature first. This helps prevent condensation, which can make your pasta soggy. Place it in the fridge. It will stay good for about 3 to 4 days. If you have a lot left, consider dividing it into smaller portions. When you're ready to enjoy the leftovers, reheat them gently. You can use the microwave or a skillet. If using a microwave, place the pasta in a bowl and cover it with a damp paper towel. Heat for 1 to 2 minutes, stirring halfway. If using a skillet, add a splash of water or olive oil over medium heat. Stir until warmed through. This keeps the pasta creamy. If you want to save the pasta for later, freezing works well. First, let the pasta cool completely. Then, portion it into freezer-safe bags or containers. Try to remove as much air as possible to avoid freezer burn. It will keep well for about 2 to 3 months. When ready to eat, thaw it overnight in the fridge. Reheat as mentioned before for the best texture. Yes, you can use other pasta shapes. Fettuccine and penne work great, but feel free to try spaghetti, farfalle, or even gluten-free pasta. Each shape offers a unique texture. Just cook it according to the package instructions. To make this dish dairy-free, swap the ricotta cheese for a plant-based alternative. You can use cashew cream or a store-bought dairy-free ricotta. These options give a creamy texture. This pasta pairs well with a fresh salad. Try a simple arugula salad drizzled with olive oil and lemon. You can also serve garlic bread or roasted vegetables on the side for a hearty meal. Creamy Tomato Ricotta Pasta stays fresh for about 3 days in the fridge. Store it in an airtight container. When ready to eat, reheat it gently on the stove or in the microwave. Add a splash of water if it seems dry. This blog post shared how to make creamy tomato ricotta pasta. You learned about the key ingredients and their substitutes. I provided easy steps to cook your pasta perfectly and tips to enhance flavor and texture. We also explored exciting variations and best ways to store leftovers. By trying this dish, you can impress friends and family with a delicious meal. Enjoy the cooking process and experiment with flavors to make it your own. Happy cooking!

Creamy Tomato Ricotta Pasta Simple and Tasty Recipe

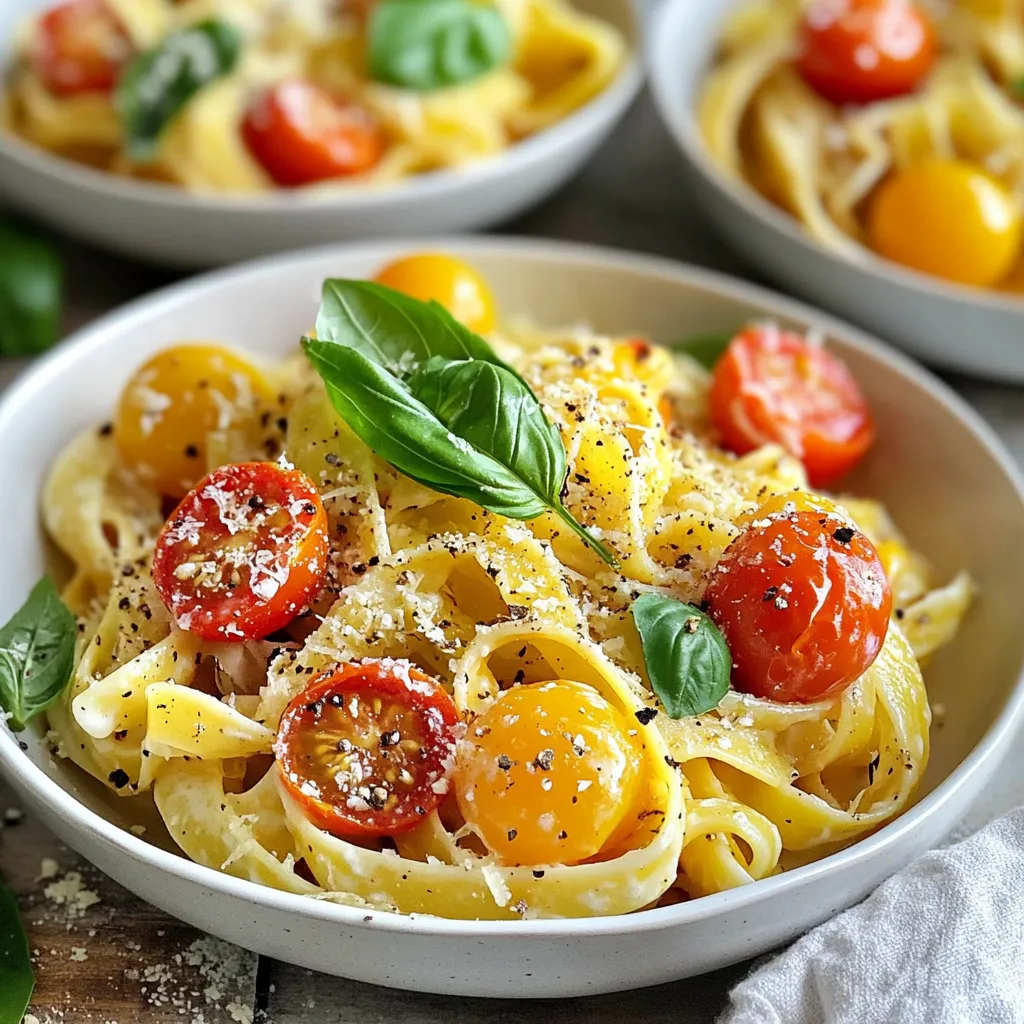
Looking for a quick and creamy pasta dish? My Creamy Tomato Ricotta Pasta is simple and tasty, perfect for any

To make Raspberry Almond Linzer Cookies, you need a few key ingredients. Each one plays a big role in making these cookies tasty and special. Here is the list: - 2 cups all-purpose flour - 1 cup unsalted butter, softened at room temperature - 2/3 cup powdered sugar, plus extra for dusting - 1/2 cup almond meal - 1 large egg yolk - 1 teaspoon pure vanilla extract - 1 teaspoon pure almond extract - 1/4 teaspoon fine salt - 1 cup raspberry jam (for filling) Each ingredient adds flavor and texture to the cookies. The all-purpose flour gives a good base. The unsalted butter makes them rich and smooth. Powdered sugar sweetens the mix and keeps it light. Almond meal adds a nutty taste. Vanilla and almond extracts enhance the flavor profile beautifully. Finally, the raspberry jam brings a fruity burst that completes these delightful treats. {{ingredient_image_2}} 1. Preheat your oven to 350°F (175°C). This makes sure the cookies bake evenly. 2. Line two baking sheets with parchment paper. This helps the cookies not stick. 3. In a large bowl, cream together the softened butter and powdered sugar. Use an electric mixer on medium speed. Beat for about 3-4 minutes until fluffy. 4. Add the egg yolk, vanilla extract, and almond extract into the butter mix. Mix on low speed until smooth and well combined. 1. Gradually sift in the all-purpose flour, almond meal, and fine salt. Mix on low speed until the dough forms. Be careful not to overmix. 2. Divide the dough in half. Shape each piece into a flat disk. Wrap each disk in plastic wrap. 3. Chill the dough in the refrigerator for at least 30 minutes. This helps the dough firm up for easier rolling. 1. After chilling, take one disk of dough from the fridge. On a lightly floured surface, roll it out to about 1/8 inch thick. 2. Use a cookie cutter to cut out shapes. For half of these shapes, use a smaller cutter to make a window in the center. 3. Carefully transfer the cookies to the lined baking sheets. Leave space between each cookie. 4. Bake in the preheated oven for 10-12 minutes. Watch for lightly golden edges. 5. Let the cookies cool completely on a wire rack before you assemble them. 1. Take the solid cookies and spread about 1 teaspoon of raspberry jam on top. 2. Place the cookies with cut-out centers on top of the jam-covered cookies. This makes a lovely sandwich. 3. Dust the tops with powdered sugar just before serving. This adds a nice touch to your cookies. To make the perfect Raspberry Almond Linzer Cookies, focus on the dough texture. You want it to be soft but not sticky. When mixing your ingredients, stop as soon as it forms a ball. Overmixing can lead to tough cookies. Chilling the dough is key for easy handling. After you shape each piece into a disk, wrap it in plastic. Refrigerate for at least 30 minutes. This helps the dough firm up, making rolling much easier. Serve these lovely cookies on a decorative platter. This makes them look even more appealing. For a special touch, add a few fresh raspberries or mint leaves around the cookies. The bright colors will draw everyone in. Dust the top of each cookie with powdered sugar. This adds elegance and makes them picture-perfect. Remember, a beautiful treat tastes even better! Pro Tips Chill the Dough: Chilling the dough not only makes it easier to roll out but also helps prevent the cookies from spreading too much in the oven. Use Quality Jam: For the best flavor, opt for high-quality raspberry jam. Homemade jam can elevate your cookies to the next level. Experiment with Shapes: Get creative with your cookie cutters! Use seasonal shapes for holidays to make these cookies festive and fun. Dust Just Before Serving: To keep the powdered sugar from absorbing moisture and looking dull, dust the cookies with sugar just before serving. {{image_4}} You can change the jam if you like. Try other flavors like strawberry or apricot. You can also use nut types that you enjoy. Hazelnuts and walnuts both work great. Each nut adds its own unique taste. This way, you can create a twist on the classic recipe. Adding spices can make these cookies even better. A pinch of cinnamon or nutmeg can add warmth. You can also change the extracts. Instead of almond, try lemon or orange. This will give your cookies a fresh, new flavor. Each variation allows for creative fun in the kitchen! To keep your Raspberry Almond Linzer Cookies fresh, choose a good container. A tin or a glass jar works great. These options help keep cookies soft and tasty. You can store cookies at room temperature for up to five days. Just make sure they are in a sealed container. If you want them to last longer, you can refrigerate them. This can keep them fresh for up to two weeks. However, the cold may change their texture a bit. These cookies taste best when fresh. Enjoy them within one week for the best flavor. After that, they can still taste good but may lose some charm. To keep their texture, place parchment paper between layers in your container. This helps them stay soft. If you see any moisture, it’s a sign to eat them soon. For the best flavor, avoid exposing them to air or heat. Can I use different types of flour? Yes, you can use other flours. Try using whole wheat flour for a nutty flavor. Gluten-free flour works too, but it may change the texture. How do I know when the cookies are done baking? Look for lightly golden edges. The centers may look soft, but they will firm up as they cool. Keep an eye on them after 10 minutes. What can I use instead of almond meal? You can swap almond meal with finely ground walnuts or hazelnuts. Sunflower seed flour is a great nut-free option. Can I freeze these cookies? If so, how? Yes, you can freeze these cookies. Place them in an airtight container with layers of parchment paper. They last up to three months in the freezer. My cookies spread too much; what went wrong? Too much butter or not enough flour can cause spreading. Ensure your butter is softened but not melted. Chilling the dough helps too. How can I avoid cookies sticking to the surface? Roll the dough on a floured surface. Use parchment paper for baking. You can also chill the dough to make it easier to handle. In this post, we explored the delightful world of Raspberry Almond Linzer Cookies. From choosing the right ingredients to tips for perfect baking, you now have the tools to create these tasty treats. Remember to chill your dough and be creative with flavors or fillings. Store your cookies properly to keep them fresh longer. With practice, you'll master this recipe. Enjoy baking and sharing these cookies with loved ones!

Raspberry Almond Linzer Cookies Delightful Treats

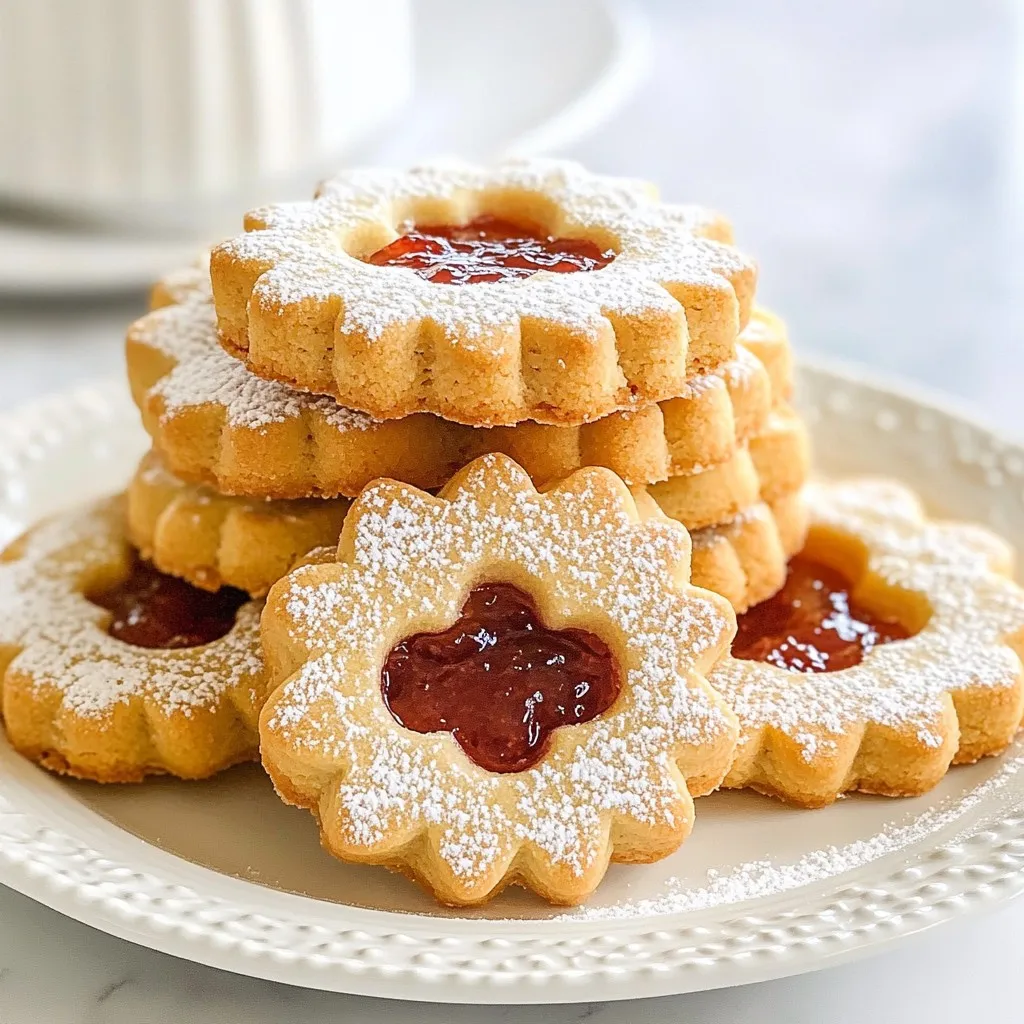
Get ready to indulge in a treat that combines sweet raspberry and nutty almond flavors! Raspberry Almond Linzer Cookies are

To make Air Fryer Buffalo Cauliflower Wings, you will need: - 1 medium head of cauliflower, cut into bite-sized florets - 1 cup all-purpose flour - 1 cup plant-based milk (or regular milk) - 1 teaspoon garlic powder - 1 teaspoon onion powder - 1 teaspoon smoked paprika - 1 teaspoon salt - ½ teaspoon black pepper - 1 cup buffalo sauce - Cooking spray You can add extra flavors to your wings. Consider these options: - 1 teaspoon cayenne pepper for heat - 1 tablespoon nutritional yeast for a cheesy flavor - 1 tablespoon fresh herbs like thyme or oregano for freshness Serve your buffalo cauliflower wings with these tasty sides: - Crunchy celery sticks for a fresh bite - Carrot sticks for extra crunch - Creamy ranch dressing or zesty blue cheese for dipping These additions and sides make your dish more fun and flavorful! {{ingredient_image_2}} First, rinse the cauliflower under cold water. This step removes any dirt or debris. Next, chop the head into small, bite-sized florets. Make sure they are uniform in size. This helps them cook evenly. In a large bowl, mix one cup of all-purpose flour with the spices. Add garlic powder, onion powder, smoked paprika, salt, and black pepper. Whisk these dry ingredients together until they blend well. Gradually pour in one cup of plant-based milk or regular milk. Whisk continuously until you create a smooth and creamy batter. Preheat your air fryer to 375°F (190°C) for about five minutes. Lightly spray the air fryer basket with cooking spray. Dip each cauliflower floret into the batter. Make sure each piece is fully coated. Let any excess batter drip off before placing them in the air fryer. Arrange the florets in a single layer. If your air fryer is small, cook in batches to avoid overcrowding. Air fry the cauliflower for 12-15 minutes. Shake the basket halfway through cooking to ensure even crispiness. Once golden brown and crispy, transfer the cooked wings to a large mixing bowl. Pour buffalo sauce over the florets and toss gently to coat. Return the coated cauliflower to the air fryer for an extra five minutes. This step helps the sauce stick. Finally, carefully remove the wings and let them cool for a bit before serving. To get that perfect crunch, make sure your cauliflower is dry. After rinsing, pat it down with a paper towel. This helps the batter stick better. When coating the florets, don't rush. Let the excess batter drip off before placing them in the air fryer. This step is key for crispiness. Air fry in a single layer; overcrowding makes them steam instead of crisp. If you want more heat, add cayenne pepper to the batter. A teaspoon will really amp it up. For a milder dish, reduce the buffalo sauce. You can use a mix of buffalo sauce and regular sauce to balance the heat. This way, you can adjust to your taste and that of your guests. One big mistake is not preheating the air fryer. This step is essential for even cooking. Another common error is overcooking the cauliflower. Keep an eye on them. If they start to burn, lower the cooking time next time. Finally, don’t skip the tossing step after air frying. This ensures each wing is fully coated in flavor. Pro Tips Choose the Right Cauliflower: Opt for a fresh medium head of cauliflower that is firm and free from blemishes; this ensures the best texture and flavor. Perfect the Batter: Make sure the batter is smooth and thick enough to coat the florets well. If it’s too thin, add a little more flour to achieve the right consistency. Preheat for Crispiness: Always preheat your air fryer before cooking; this helps the cauliflower wings to become crispy and golden brown. Customize Your Spice Level: If you prefer less heat, mix buffalo sauce with a bit of ranch dressing or use a milder hot sauce for a more balanced flavor. {{image_4}} Buffalo sauce is not just one flavor. You can choose many types to spice up your wings. Try honey buffalo for a sweet twist. Add some ranch or blue cheese dressing for creaminess. You can even mix in chipotle for a smoky flavor. Experiment with different heat levels too. Use mild, hot, or extra hot sauce based on your taste. If you prefer a gluten-free version, you have options. Swap out regular flour for almond flour or chickpea flour. These alternatives give a nice crunch and flavor. Make sure to check the buffalo sauce label. Some sauces may contain gluten, so pick a brand that is gluten-free. This way, everyone can enjoy the dish. Breading can be fun to change. Instead of flour, use crushed cornflakes for extra crunch. You can also coat the florets in panko breadcrumbs. This gives a lovely texture that contrasts well with the sauce. For a lighter option, try skipping the batter entirely. Just toss the cauliflower in buffalo sauce before air frying. Each method offers a unique taste and texture. To keep your buffalo cauliflower wings fresh, place them in an airtight container. You can store them in the fridge for up to three days. Make sure they cool down before you seal the container. This helps prevent moisture from making them soggy. For the best taste, reheat the wings in your air fryer. Set it to 350°F (175°C) and heat for about 5-7 minutes. This method keeps them crispy. You can also use an oven. Preheat it to 350°F (175°C) and bake for 10-12 minutes. If you use a microwave, they may turn soft. You can freeze the wings if you have extra. First, let them cool completely. Then, place them in a freezer-safe bag or container. They can last for up to three months in the freezer. When ready to eat, thaw them in the fridge overnight before reheating. Yes, you can make buffalo cauliflower wings without an air fryer. You can bake them in the oven instead. Preheat your oven to 425°F (220°C). After coating the florets in batter, place them on a lined baking sheet. Bake for about 25-30 minutes. Flip them halfway through to ensure even cooking. This method will still give you crispy wings, but they may not be as quick to cook. If you want to avoid flour, you can use almond flour or chickpea flour. Both options are gluten-free and still provide a nice texture. You can also use cornmeal for a crunchier coating. Just keep in mind that the flavor may change slightly. Always check for allergies if you are cooking for others. Leftovers can last in the fridge for up to 3 days. Store them in an airtight container to keep them fresh. When you are ready to eat, reheat them in the air fryer or oven. This will help restore their crispiness. Avoid using the microwave, as it can make them soggy. You learned how to make tasty buffalo cauliflower wings. We covered the full ingredient list, step-by-step cooking guides, and helpful tips. You can explore different flavors and options, ensuring everyone gets what they like. Remember, avoiding common mistakes leads to the perfect, crispy wings. Proper storage lets you enjoy these treats later. With this knowledge, you can impress guests or enjoy a snack anytime. Now, get cooking and enjoy your delicious buffalo cauliflower!

Air Fryer Buffalo Cauliflower Wings Tasty and Simple

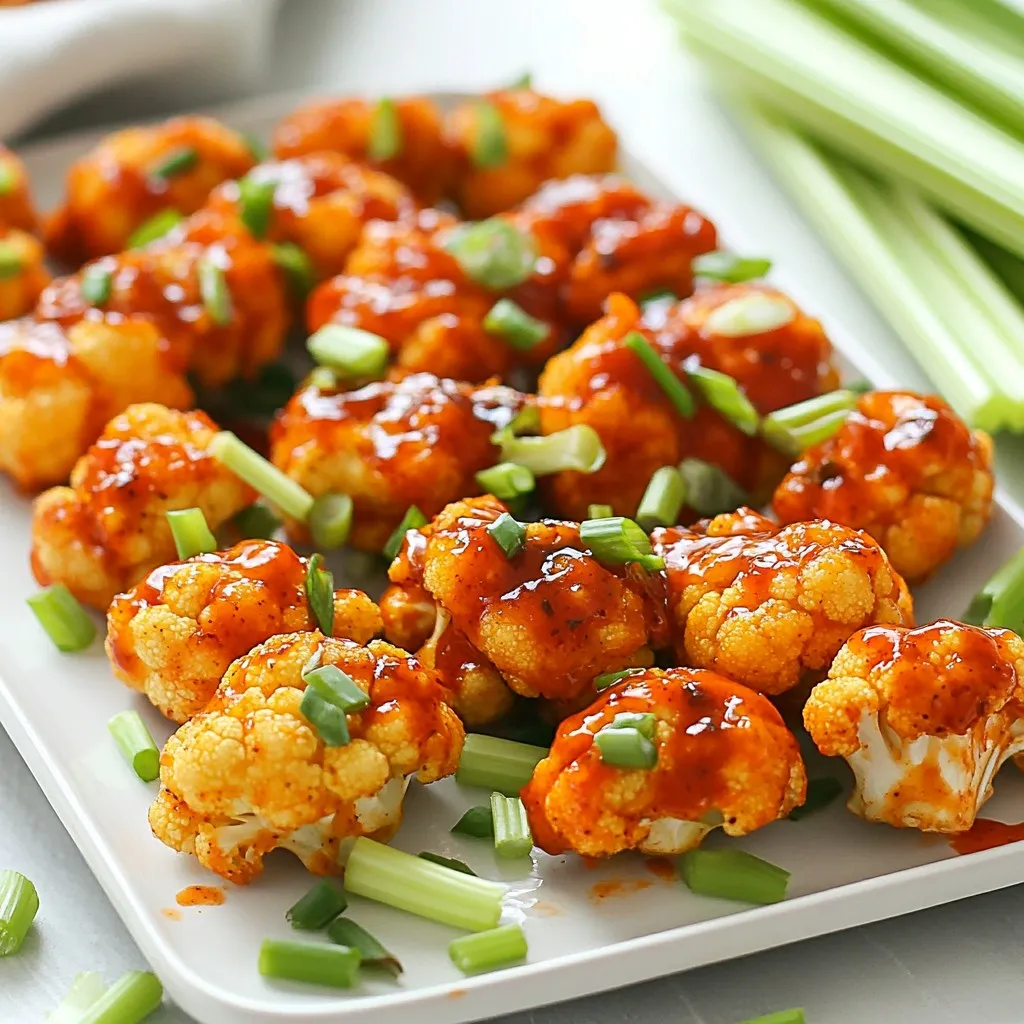
If you’re searching for a tasty, simple snack, look no further! Air Fryer Buffalo Cauliflower Wings are the perfect treat

- 1 lb ground chicken or turkey - 1/2 cup breadcrumbs - 1/4 cup fresh cilantro, finely chopped - 2 cloves of garlic, minced - 1 teaspoon fresh ginger, grated - 1 tablespoon lime zest - 1 teaspoon salt - 1/2 teaspoon black pepper The base of this dish is the meatballs. I like using ground chicken or turkey for a lighter touch. Breadcrumbs add texture and help keep the meatballs moist. Fresh cilantro, garlic, and ginger give a great flavor boost. Zesting lime brings a bright note, while salt and pepper enhance the taste. - 1 can (14 oz) coconut milk - 2 tablespoons red curry paste - 1 tablespoon fish sauce or soy sauce The sauce is the star! Coconut milk makes it creamy and rich. Red curry paste provides warmth and spice. Fish sauce adds depth, but you can swap it for soy sauce if you prefer. - 1 bell pepper, thinly sliced - 1 cup fresh spinach leaves - Juice of 1 lime - Cooked jasmine rice or quinoa for serving I love adding bell pepper for crunch and color. Fresh spinach brightens the dish and packs in nutrients. A squeeze of lime at the end lifts the flavors. You can serve these meatballs over fluffy jasmine rice or quinoa for a filling meal. {{ingredient_image_2}} 1. Mixing the meatball ingredients In a large bowl, combine 1 pound of ground chicken or turkey, 1/2 cup of breadcrumbs, 1/4 cup of chopped cilantro, 2 minced garlic cloves, 1 teaspoon of grated ginger, 1 tablespoon of lime zest, 1 teaspoon of salt, and 1/2 teaspoon of black pepper. Use your hands or a spoon to mix well. Be gentle to avoid overmixing. 2. Shaping the meatballs Take a small amount of the mixture and roll it into a ball, about 1 inch in diameter. Place the formed meatballs on a plate. This step is fun and messy, so enjoy! 1. Browning in a skillet Heat a splash of oil in a large skillet over medium heat. Once hot, add the meatballs in batches. Cook them for about 5-7 minutes. You want them to be golden brown and cooked through on all sides. 2. Removing from heat After browning, carefully take the meatballs out of the skillet. Set them on a paper towel-lined plate to absorb excess oil. This will keep them nice and light. 1. Incorporating coconut milk and curry paste Lower the heat and pour a can of coconut milk into the same skillet. Add 2 tablespoons of red curry paste, 1 tablespoon of fish sauce, and 1 tablespoon of brown sugar. Whisk until the sauce is smooth and well combined. The smell is amazing! 2. Adding bell pepper and simmering Toss in a thinly sliced bell pepper and stir it into the sauce. Let it simmer gently for about 5 minutes. The pepper will soften, adding a nice crunch to the dish. 1. Returning meatballs to sauce Gently add the browned meatballs back into the skillet. Stir them into the sauce carefully. Cover the skillet and allow them to simmer for 10-15 minutes. This helps the flavors meld together. 2. Folding in spinach leaves In the last few minutes, add in 1 cup of fresh spinach leaves. Stir them in to let them wilt. This adds color and nutrients to your dish. 3. Adding lime juice before serving Before serving, squeeze fresh lime juice over the top. This brightens the flavors and adds freshness. Enjoy your Thai Coconut Curry Meatballs! - Avoiding overmixing: Mix your meatball ingredients just until they come together. This way, your meatballs will stay tender and juicy. Overmixing makes them tough. Keep it simple and gentle. - Achieving ideal browning: Heat a splash of oil in your skillet over medium heat. Add meatballs in batches, giving them space. Brown them for 5-7 minutes. This step adds flavor and a nice crust. - Adjusting spice level: If you like more heat, add extra red curry paste. Start small and taste as you go. You can also add sliced fresh chilis for an extra kick. - Best cilantro substitutes: If you don’t have cilantro, try parsley or basil. Both add freshness. Use what you have on hand, and don't worry about being perfect. - Garnishing options: Top your meatballs with extra chopped cilantro. Lime wedges add a nice touch. You can also sprinkle some sesame seeds for crunch. - Pairing with sides: Serve these meatballs over jasmine rice or quinoa. Both soak up the sauce well. You can also add a side of stir-fried veggies for color and nutrition. Pro Tips Tip 1: Use Fresh Ingredients: Fresh herbs and spices elevate the flavor of your meatballs and sauce. Opt for fresh cilantro, ginger, and garlic whenever possible for the best taste. Tip 2: Control the Spice Level: Adjust the amount of red curry paste according to your heat preference. Start with less and add more if you enjoy a spicier dish. Tip 3: Don't Overcook the Meatballs: To keep the meatballs juicy, cook them until just browned and cooked through. They will continue cooking in the sauce, which helps them stay moist. Tip 4: Customize Your Veggies: Feel free to add other vegetables like zucchini, carrots, or snap peas to the curry for added nutrition and color. Just adjust the cooking time accordingly. {{image_4}} You can change the meat in this recipe. Ground beef or pork works well. Both give a rich flavor. If you want a vegetarian option, try plant-based meat. It absorbs the curry sauce nicely. These swaps keep the dish tasty and enjoyable. You can switch up the coconut milk. Almond milk or soy milk can be good alternatives. They add a different taste but still work. For the curry flavor, adjust the red curry paste. Add more for spice or less for mildness. You can even try a green curry paste for a twist. Feel free to add more veggies! Carrots, zucchini, or snap peas fit nicely. They add crunch and color. You can also use seasonal veggies. In summer, try fresh corn or bell peppers. In winter, add root vegetables like sweet potatoes. Each choice adds new flavors and textures. To store leftovers safely, let the meatballs cool first. Place them in an airtight container. Be sure to cover the sauce too. This keeps everything fresh. You can store them in the fridge for up to three days. Glass or plastic containers both work well. Just make sure they seal tightly. To freeze meatballs and sauce, use freezer bags or containers. Divide them into smaller portions for easy use. Make sure to label the bags with the date. You can freeze them for up to three months. When ready to eat, thaw in the fridge overnight. For reheating, you can use the microwave or a stovetop. Just heat until hot throughout. For the best taste, eat the meatballs within three days if refrigerated. If frozen, consume within three months for best quality. Signs of spoilage include off smells or changes in color. If you notice these, it’s best to discard them. Always trust your senses when it comes to food safety. To add heat, use extra red curry paste. You can also add chopped fresh chili peppers. Adjust to your taste. Start with small amounts and taste as you go. You can mix in chili flakes for a kick. Yes, you can use ground beef or pork instead of chicken. Turkey is a great choice for a leaner option. For a vegetarian dish, use plant-based meat like lentils or chickpeas. Make sure to adjust cooking times as needed. Serve these meatballs with jasmine rice or quinoa. They soak up the sauce well. You can also add a side of steamed veggies. Fresh cilantro on top adds a nice touch. Lime wedges brighten the dish and enhance flavor. You can prepare the meatballs a day in advance. Store them in the fridge until ready to cook. The sauce can also be made ahead. Just reheat it gently before adding the meatballs. This makes meal prep easy and quick. This article covered how to make Thai Coconut Curry Meatballs. We explored key ingredients like ground chicken, coconut milk, and red curry paste. I shared step-by-step instructions for preparing and cooking the meatballs and making the sauce. You learned tips for perfect meatballs, variations, and serving ideas. With these guidelines, you can easily enjoy this tasty dish. Don’t hesitate to get creative with ingredients and flavors. Happy cooking!

Thai Coconut Curry Meatballs Rich and Flavorful Dish

Are you ready to dive into a dish that bursts with flavor? Thai Coconut Curry Meatballs combine tender, juicy meatballs

- 1 lb turkey sausage, crumbled - 1 medium onion, diced - 3 cloves garlic, minced - 4 cups chicken broth - 2 large potatoes, thinly sliced - 1 cup kale, chopped - 1 cup heavy cream - 2 tablespoons olive oil - 1 teaspoon red pepper flakes (adjust for desired spice level) - Salt and pepper to taste - Fresh parsley, chopped (for garnish) You can swap the turkey sausage for chicken or pork sausage if you want. If you prefer a lighter option, try using ground turkey. For a dairy-free version, replace heavy cream with coconut milk or cashew cream. If you don’t have kale, spinach works just as well. You can also add more veggies like carrots or zucchini for extra nutrition. Always look for fresh turkey sausage with no fillers. Check the label for high meat content. The onions should feel firm and be free of soft spots. For the garlic, choose firm cloves with no sprouting. When selecting potatoes, pick ones that are smooth and firm. Kale should be vibrant and crisp. Fresh herbs should smell strong and fragrant. Good quality ingredients really make a big difference in your soup's flavor! {{ingredient_image_2}} First, heat 2 tablespoons of olive oil in a large pot over medium heat. When the oil is shimmering, add 1 pound of crumbled turkey sausage. Cook it for about 5-7 minutes. Stir it often, breaking it apart as it cooks. You want it to be browned and fully cooked. Once the sausage is done, add 1 medium diced onion and 3 minced garlic cloves to the pot. Stir everything together and sauté for 3-4 minutes. The onion will soften and turn clear. This step adds great flavor. After that, pour in 4 cups of chicken broth. Next, add 2 large thinly sliced potatoes to the pot. Bring the soup to a boil. Once boiling, lower the heat to a simmer. Cover the pot and let it cook for 15-20 minutes. Check the potatoes with a fork; they should be tender. After that, stir in 1 cup of chopped kale, 1 cup of heavy cream, and 1 teaspoon of red pepper flakes. Let it simmer for 5 more minutes to blend the flavors. To cook turkey sausage well, start with medium heat. Use a large pot and add olive oil. Once it shimmers, add the crumbled sausage. Stir it often, breaking it apart. Cook until it is brown, about 5-7 minutes. This way, you get great flavor and texture. You can control the heat in your Zuppa Toscana. Red pepper flakes add spice. Start with one teaspoon for warmth. If you want more heat, add more flakes little by little. Always taste the soup before serving. Adjust it until it suits your taste buds. Fresh herbs can make your soup burst with flavor. Try adding chopped parsley as a garnish. It brings a fresh taste and lovely color. You can also use thyme or basil for added depth. Just sprinkle them in before serving for the best effect. Pro Tips Use Fresh Ingredients: Fresh kale and high-quality chicken broth will enhance the flavor of your soup significantly. Opt for organic options when possible for the best taste. Adjust the Spice Level: If you prefer a milder soup, reduce the amount of red pepper flakes. You can always add more to individual servings for those who enjoy extra heat. Potato Texture: For a creamier consistency, consider mashing some of the potatoes once they are cooked, or use a hand blender to purée a portion of the soup before adding the kale and cream. Serving Suggestions: This soup pairs beautifully with crusty bread or a light salad. Consider adding a sprinkle of grated Parmesan cheese on top for added flavor. {{image_4}} You can enjoy Zuppa Toscana without dairy. Use coconut milk instead of heavy cream. It gives a nice creamy texture. Almond milk or cashew cream also works well. These options keep the soup rich while being dairy-free. Want to boost nutrition? Add more veggies! Carrots, celery, or bell peppers can add flavor. You can also toss in zucchini or spinach. They cook quickly and add color to the soup. Just chop them small and add when you add the kale. If you prefer different meats, go for chicken or beef. Ground chicken or beef works great in this soup. For a vegetarian twist, try lentils or beans. They add protein and fiber, making the soup hearty. Just make sure to adjust cooking times for different proteins. Once you finish your Zuppa Toscana, let it cool. Pour the soup into an airtight container. Make sure to leave some space at the top. This helps avoid spills when freezing. Store it in the fridge for up to three days. If you want to keep it longer, freezing is a great option. To reheat your leftover soup, pour it into a pot. Heat over medium-low until warm. Stir often to ensure even heating. You can also use a microwave. Place the soup in a microwave-safe bowl. Heat it in 30-second intervals, stirring in between. Make sure it’s hot all the way through before enjoying. Freezing Zuppa Toscana is easy. Use freezer-safe containers or bags. Portion out the soup for easy reheating later. Label each container with the date. You can freeze it for up to three months. When ready to eat, thaw in the fridge overnight. Reheat on the stove or in the microwave. You can use any ground meat you like. Mild Italian sausage works great. If you want a lighter option, try chicken or beef sausage. For a vegetarian twist, use plant-based sausage. Just adjust the cooking time if needed. Yes, you can! Start by browning the turkey sausage in a pan. Then, add everything to a slow cooker. Cook on low for 6-8 hours or on high for 3-4 hours. This method makes the flavors even richer. This soup lasts about 3-4 days in the fridge. Store it in an airtight container. To keep it fresh, let it cool before sealing. If you want it to last longer, consider freezing it. In this blog post, I shared how to make a delicious Zuppa Toscana. We covered the key ingredients, including options for substitutions and tips to choose quality items. You learned step-by-step how to cook turkey sausage, add aromatics, and mix in kale. I shared tips for perfect cooking, spice adjustments, and using fresh herbs to boost flavor. Remember, you can customize this soup with dairy-free choices or extra veggies. Store leftovers properly to enjoy later. This soup is easy to adapt and always satisfying. Enjoy your cooking journey!

Copycat Zuppa Toscana with Turkey Sausage Recipe

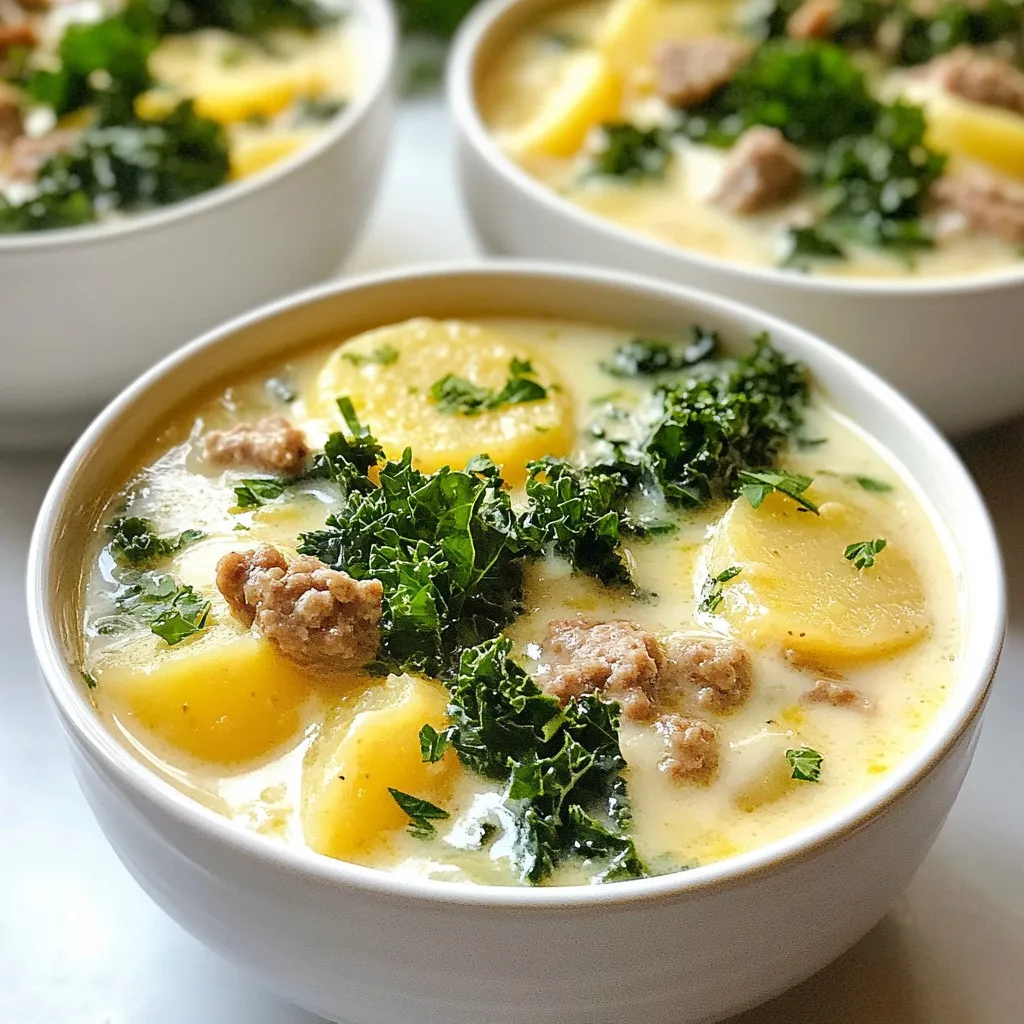
Have you been craving a warm bowl of Zuppa Toscana but want a healthier twist? My Copycat Zuppa Toscana with

Older posts
Newer posts
← Previous Page1 … Page110 Page111 Page112 … Page122 Next →

dsad

© 2026 dailydishcraft • Built with GeneratePress

Our Policies

  • Copyright Policy
  • Cookie Policy
  • GDPR Policy
  • Privacy Policy
  • Disclaimer
  • Terms Of Use

More Information

  • Home
  • About
  • Contact
  • Appetizers
  • Dessert
  • Dinner
  • Drinks
©2026, dailydishcraft About Back To Top