Skip to content
DisclaimerTerms Of UseGDPR PolicyCookie Policy

dailydishcraft

  • Home
  • Drinks
  • Appetizers
  • Dinner
  • Dessert
  • About
  • Contact
  • Privacy Policy
DisclaimerTerms Of UseGDPR PolicyCookie Policy

Jessica

To make a tasty Cranberry Pecan Chicken Salad, gather these fresh ingredients: - 2 cups cooked chicken breast, shredded - 1 cup dried cranberries - 1/2 cup pecans, roughly chopped - 1/4 cup celery, finely chopped - 1/4 cup red onion, finely chopped - 1/2 cup Greek yogurt (or mayonnaise for a creamier texture) - 2 tablespoons honey - 1 tablespoon Dijon mustard - Salt and black pepper to taste - Fresh greens (such as spinach or a mix of salad greens) for serving Each ingredient plays a key role in this salad. The chicken provides protein, while cranberries add sweetness and a pop of color. Pecans bring crunch and a nutty flavor. Celery and red onion add crispness and zest. The Greek yogurt or mayonnaise gives the salad creaminess. Honey and Dijon mustard balance the flavors perfectly. This mix creates a dish that is both fresh and flavorful. When you add fresh greens as a base, it makes the salad even more vibrant and appealing. Enjoy preparing this delightful dish! {{ingredient_image_2}} - In a big bowl, mix the shredded chicken, dried cranberries, chopped pecans, celery, and red onion. Stir gently to blend well. - In a smaller bowl, whisk together Greek yogurt, honey, Dijon mustard, and a pinch of salt and pepper. Keep whisking till smooth. - Pour the dressing over the chicken mixture. Use a spatula to fold everything together gently. Make sure all pieces are well-coated. - Taste your salad. Adjust the seasoning if needed. Add more salt, pepper, or honey based on your taste. - Cover the salad with plastic wrap or a lid. Chill it in the fridge for at least 30 minutes. This helps the flavors mix well. - When ready to serve, lay down fresh greens on each plate. Scoop the chicken salad on top of the greens. Enjoy! - Choosing the right chicken: Start with cooked chicken breast. You can use leftover chicken or rotisserie chicken. Shredding it makes it easy to mix with other ingredients. - Making ahead of time: This salad tastes better after it chills. You can make it up to a day in advance. Just store it in the fridge. The flavors will blend nicely. - Adjusting flavors to taste: Everyone likes different flavors. After mixing, taste your salad. If it needs more sweetness, add a bit more honey. If it needs salt, sprinkle some on. - Pairing with bread or wraps: This chicken salad is great in a sandwich or wrap. Use crusty bread or soft tortillas. It also tastes good on its own, served on fresh greens. - Ideal occasions for serving: Serve this salad for lunch, picnics, or casual dinners. It's also perfect for potlucks and gatherings. People love its fresh and crunchy taste. - Presentation ideas: To make your salad look lovely, add extra chopped pecans or cranberries on top. A pop of color makes it more inviting. You can serve it in clear bowls to show off the layers. Pro Tips Use Leftover Chicken: This recipe is perfect for using up leftover rotisserie chicken, saving time and reducing waste. Customizable Ingredients: Feel free to add other ingredients like apples, grapes, or different nuts to personalize your salad. Make It Ahead: Prepare this salad a day in advance; the flavors will develop even more, making it taste even better. Serving Suggestions: Serve in a hollowed-out avocado or on whole-grain bread for a delicious sandwich variation. {{image_4}} You can easily swap ingredients to fit your taste. If you want a lighter option, use low-fat yogurt instead of Greek yogurt or mayonnaise. This keeps it creamy without the extra calories. You can also try sour cream for a tangy twist. For nuts, if you prefer, use walnuts or almonds instead of pecans. Each nut adds a unique crunch and flavor. Want a fruity touch? Toss in diced apples or grapes. These add sweetness and a nice texture. If you need gluten-free options, this salad is already friendly! Just make sure the dressing has no gluten. For low-carb diets, reduce the dried cranberries, as they have sugar. You can use fresh cranberries instead, but keep in mind they are tart. For vegan modifications, replace chicken with chickpeas or tofu. Use vegan yogurt or avocado for creaminess. These changes keep the dish fresh and flavorful while meeting dietary needs. To keep your cranberry pecan chicken salad fresh, store it in an airtight container. Make sure to seal it well. This will prevent moisture loss and keep the flavors intact. Place the container in the fridge right after serving. The salad stays tasty for up to four days. Always check for freshness before eating leftovers. If it smells off or looks strange, it’s best to toss it. Can you freeze chicken salad? Yes, but it’s not the best option. Freezing can change the texture of the chicken and veggies. If you choose to freeze it, do so in a safe, airtight container. Leave some space at the top, as the salad may expand. When you want to eat it, let it thaw in the fridge overnight. Use the thawed salad within two days for the best flavor. How to make cranberry pecan chicken salad healthier? You can make this salad healthier by using Greek yogurt instead of mayonnaise. Greek yogurt adds protein and cuts down on fat. You can also add more veggies like carrots or bell peppers for extra crunch. Use less honey if you want to cut down on sugar. This way, you keep the flavor but make it lighter. Can I use leftover rotisserie chicken? Yes! Leftover rotisserie chicken works great in this salad. Just shred the chicken and mix it with the other ingredients. This saves time and adds a nice flavor. You’ll enjoy the taste without any extra cooking. What can I serve with chicken salad? You can serve this salad on a bed of greens or in a sandwich. It pairs well with whole grain bread, pita, or wraps. You might also enjoy it with a side of fresh fruit or a simple vegetable soup. These sides balance the meal and add brightness. What to do if the salad is too dry? If your salad feels too dry, add more dressing. You can mix a bit more Greek yogurt or mayonnaise with a splash of lemon juice. This will help combine the flavors without making it too runny. Stir well to ensure everything is coated nicely. How to enhance the flavor of the chicken salad? To boost the flavor, add some spices or herbs. Fresh herbs like dill or parsley work wonders. A dash of lemon juice can brighten the taste too. If you like heat, try adding a pinch of cayenne pepper. Just be careful not to overpower the salad. In this article, we explored how to make a tasty chicken salad with cranberries and pecans. We covered the ingredients, step-by-step preparation, tips for the best results, and creative variations. Remember to adjust flavors to suit your taste and consider dietary needs. Whether you serve it for lunch or a picnic, this salad is sure to please. Enjoy experimenting with your own twists, and make it a dish everyone loves!

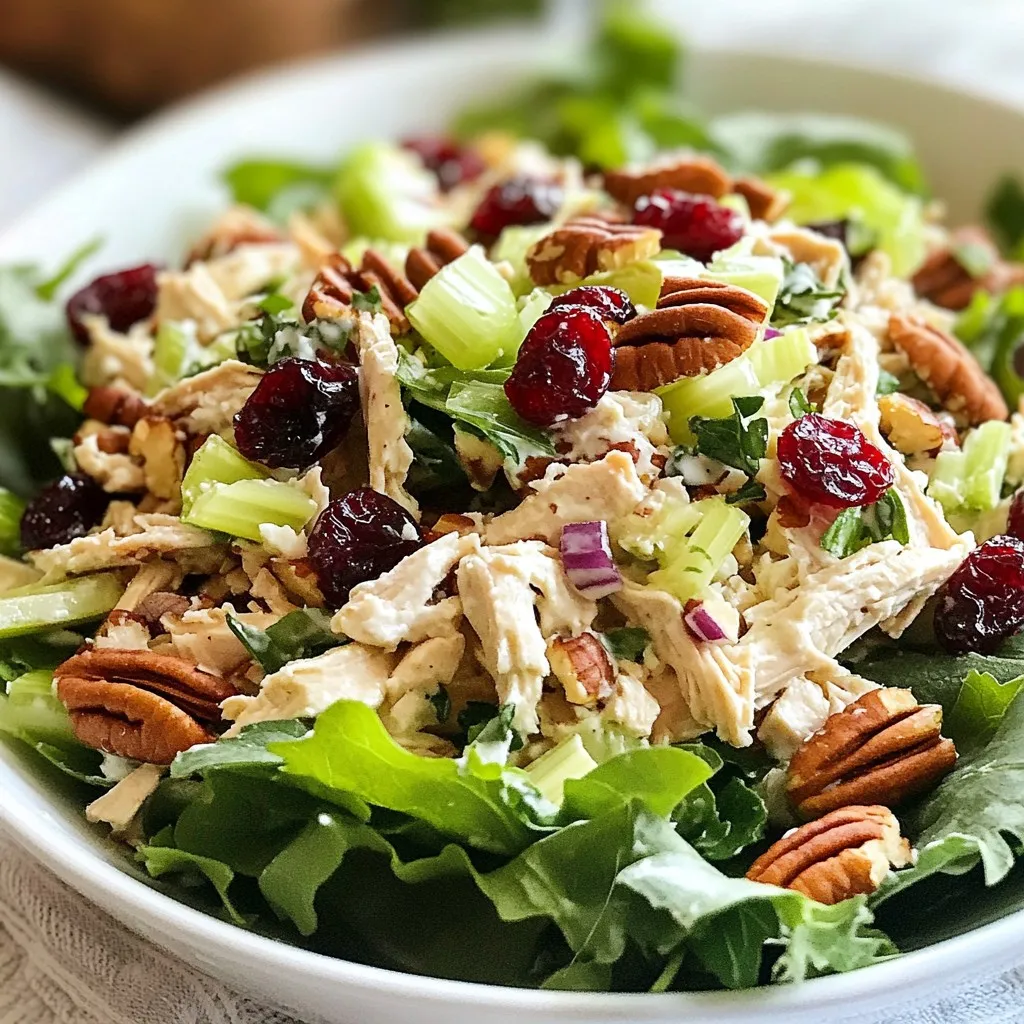
Cranberry Pecan Chicken Salad Fresh and Flavorful Dish

Looking for a fresh and flavorful dish that’s easy to make? This Cranberry Pecan Chicken Salad hits the spot! Packed

- 2 cups cooked chicken (shredded or diced) - 1 cup plain Greek yogurt - 1/2 cup celery (finely chopped) - 1/2 cup red grapes (halved) - 1/4 cup almonds (sliced) - 1/4 cup green onion (chopped) - 1 tablespoon honey - 1 tablespoon Dijon mustard - 1 tablespoon freshly squeezed lemon juice - Salt and pepper to taste - Fresh herbs (like dill or parsley) The main ingredients create a great base for Greek yogurt chicken salad. The cooked chicken gives it protein. You can use shredded or diced chicken based on your preference. The Greek yogurt adds creaminess and tang. Celery adds crunch. Red grapes bring a sweet bite. Sliced almonds add a nutty flavor and extra texture. Chopped green onion gives a mild onion flavor. The dressing ingredients are simple but effective. Honey brings a touch of sweetness. Dijon mustard adds a nice tang. Freshly squeezed lemon juice gives brightness. Salt and pepper balance all the flavors. You can also add fresh herbs like dill or parsley for a burst of freshness. Each ingredient plays a role in making the salad tasty and healthy. You can mix and match some of these ingredients based on what you have at home. This makes the recipe flexible and fun. Enjoy creating your own version! {{ingredient_image_2}} First, you need to gather all your ingredients. In a large mixing bowl, combine 2 cups of cooked chicken, 1/2 cup of finely chopped celery, 1/2 cup of halved red grapes, 1/4 cup of sliced almonds, and 1/4 cup of chopped green onion. Use a sturdy spoon to mix these ingredients gently. You want to ensure an even blend without breaking up the chicken. Next, in a separate medium bowl, whisk together 1 cup of plain Greek yogurt, 1 tablespoon of honey, 1 tablespoon of Dijon mustard, and 1 tablespoon of freshly squeezed lemon juice. Mix until smooth. This creamy dressing will coat the salad perfectly. Now, carefully pour the yogurt dressing over your chicken mixture. Use a spatula to fold the dressing into the salad. Make sure everything is well-coated. Be gentle, as you don’t want to shred the chicken too much. After mixing, season your salad with salt and freshly cracked pepper. Taste it and adjust to your liking. If you want a sweeter or tangier flavor, add more honey or lemon juice. Once your salad is seasoned, cover the mixing bowl with plastic wrap or a lid. Refrigerate the salad for at least 30 minutes. This chilling time helps the flavors meld together, making each bite even better. Just before serving, give the salad a gentle stir to mix everything again. If you like, garnish with fresh herbs like dill or parsley for a nice touch. This will not only enhance the look but also add a fresh flavor. Choosing the right chicken texture helps your salad shine. You can use shredded or diced chicken. Shredded chicken gives a soft feel, while diced chicken adds bite. Both are tasty, so pick what you like best. Adjusting yogurt thickness can change the salad's creaminess. If you want it thicker, use full-fat Greek yogurt. If you prefer a lighter mix, opt for low-fat yogurt. You can also add a splash of milk to thin it out. Adding more sweetness or tang can make your salad pop. If you want it sweeter, mix in more honey. This sweet touch balances the tang of the yogurt. For more tang, add a bit more lemon juice or Dijon mustard. Experimenting with spice levels can change the whole dish. If you like heat, try adding a pinch of cayenne pepper or some red pepper flakes. This can give your salad a fun kick. Creative serving ideas can impress your guests. Serve the salad on a bed of mixed greens. This adds color and crunch. You can also use a hollowed-out cucumber as a bowl. It’s fun and unique! Garnishing tips for visual appeal can elevate your dish. Sprinkle fresh herbs like dill or parsley on top. A few whole red grapes scattered can also add a pop of color. These simple touches make your salad look as good as it tastes. Pro Tips Use Leftover Chicken: This salad is a perfect way to use up leftover grilled or rotisserie chicken, saving you time and minimizing waste. Create Your Own Flavor: Feel free to experiment with different nuts or add-ins like cranberries or diced apples for unique flavor profiles. Make It Ahead: Prepare the salad a day in advance; the flavors will deepen and develop, making it even tastier. Adjust the Creaminess: If you prefer a lighter version, substitute half the Greek yogurt with a bit of low-fat sour cream or additional lemon juice for a tangy kick. {{image_4}} You can swap chicken for turkey or tofu. Turkey keeps the same flavor. Tofu works well for a plant-based option. You can also use canned chicken. This saves time and still gives a tasty result. Try adding dried fruits like cranberries or raisins. They add a sweet twist. Nuts like walnuts or pecans can give a nice crunch. You can also mix in different herbs and spices. Dill or basil can change the salad's taste completely. For a dairy-free version, use a plant-based yogurt. This keeps it creamy while being milk-free. If you want low-carb options, skip the grapes and almonds. Add more celery or use lettuce instead. These changes still keep the salad delicious. Keep your Greek yogurt chicken salad in an airtight container. This helps keep it fresh. It stays good in the fridge for about 3 to 5 days. Make sure to check for any changes in smell or color before eating. To freeze portions, divide the salad into smaller containers. Leave some space at the top, as it will expand. It can last in the freezer for about 2 to 3 months. When ready to eat, move it to the fridge to thaw overnight. For quicker thawing, place it in cold water. Reheat gently to keep the salad's texture. Use the microwave on low power for 30 seconds at a time. Stir between each round to heat evenly. Avoid boiling, as this can change the creamy texture of the yogurt. Enjoy your salad warm or cold! Yes, you can make this chicken salad ahead of time. It tastes even better after chilling. I suggest making it a day in advance. Just keep it covered in the fridge. This helps the flavors blend well. If you store it properly, it will stay fresh for three to four days. You can serve this chicken salad with many sides. Here are some tasty options: - Fresh mixed greens for a salad - Whole grain bread for sandwiches - Crunchy cucumber slices for dipping - Crackers for a fun snack - Sweet potato fries for a hearty bite Greek yogurt chicken salad lasts about three to four days in the fridge. Look for signs of spoilage. If it smells sour or has a strange color, it is best to throw it away. Keeping it in an airtight container helps it last longer. Always check before eating leftovers. This blog post covered a simple and tasty Greek Yogurt Chicken Salad. We talked about the key ingredients, like chicken, yogurt, and grapes. The dressing adds flavor with honey and mustard. I shared tips to perfect texture and enhance taste. You can try different proteins or herbs for variety. In summary, this chicken salad is versatile and easy to prepare. Enjoy making it your own!

Greek Yogurt Chicken Salad Flavorful and Healthy Mix

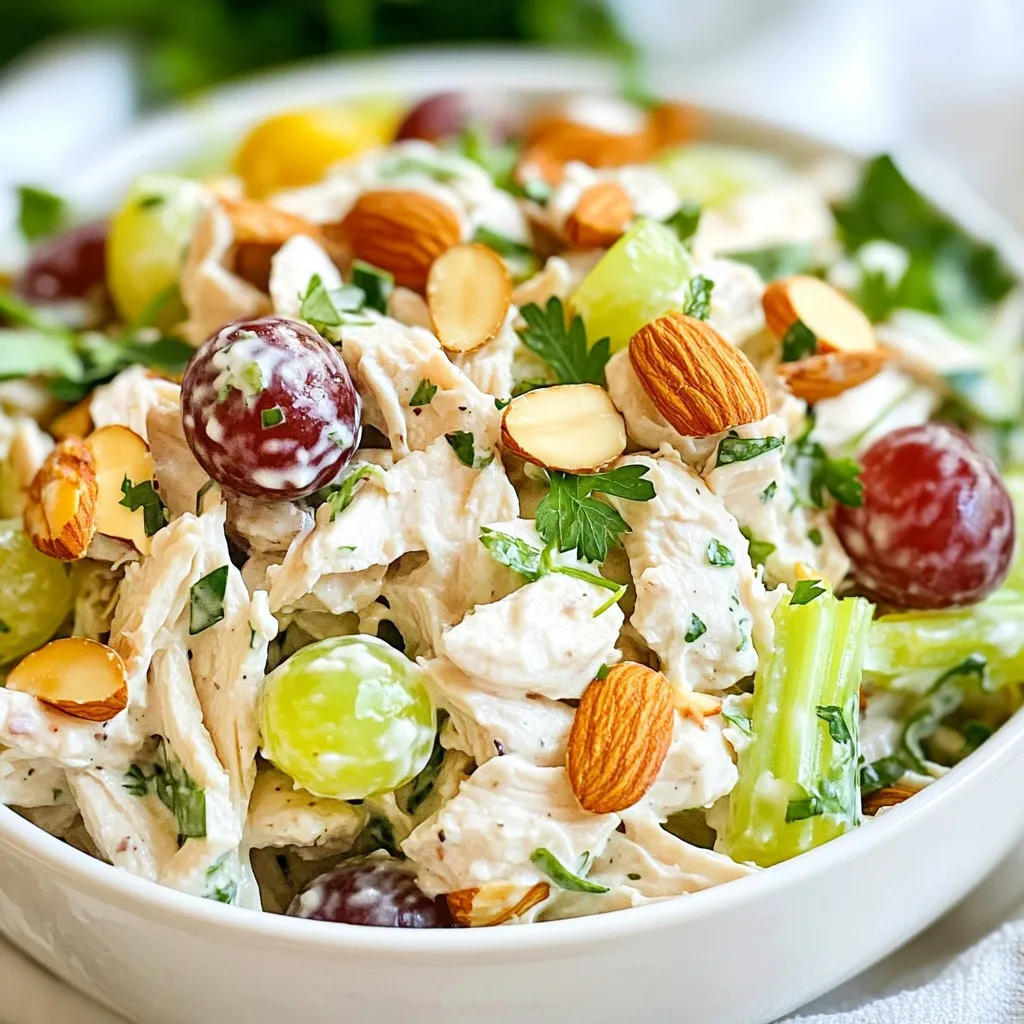
Looking for a healthy meal that’s packed with flavor? This Greek Yogurt Chicken Salad is for you! Combining tender chicken,

- 1 lb thinly sliced beef (sirloin or ribeye) - 1 medium onion, thinly sliced - 1 bell pepper (your choice of color), thinly sliced - 8 slices provolone cheese - 12 slider buns - 1 tablespoon olive oil - 2 tablespoons mayonnaise - 1 teaspoon garlic powder - Salt and pepper to taste - Optional: sliced jalapeños for an extra kick Gather these ingredients to make your Easy Philly Cheesesteak Sliders. The thinly sliced beef gives you that classic flavor. Use sirloin or ribeye for the best taste. The onion and bell pepper add sweetness and crunch. Provolone cheese melts beautifully, making every bite creamy. Slider buns hold everything together, perfect for small hands or big cravings. For added flavor, I recommend a good quality olive oil to sauté your veggies. Mayonnaise adds a rich touch to the buns. Garlic powder spices things up without being too much. Don’t forget salt and pepper to enhance the taste. If you want some heat, add sliced jalapeños to the mix. These ingredients make your sliders tasty and fun to eat! {{ingredient_image_2}} - Heat olive oil in a skillet until shimmering. This step prepares the pan for cooking. - Sauté onion and bell pepper until tender. This adds a sweet and savory flavor to your sliders. - Cook thinly sliced beef with seasonings. Use garlic powder, salt, and pepper for taste. Brown the beef for about 4-5 minutes. - Combine beef with vegetables in the skillet. Stir it well so all the flavors mix together. - Preheat oven to 350°F (175°C). This ensures your sliders cook evenly. - Assemble sliders and layer ingredients. Start with the bottom buns, mayo, cheese, beef, and veggies, then more cheese on top. - Bake covered and then uncovered until cheese is bubbly. Cover with foil for the first 15 minutes, then remove it to let the cheese melt beautifully. - Choose the right cut of beef: For great sliders, I recommend thinly sliced sirloin or ribeye. These cuts have the right balance of flavor and tenderness. They cook quickly and stay juicy. Thin slices help the beef cook evenly and soak up the flavors. - Tips for achieving the best melt on the cheese: To get that perfect cheese melt, layer your provolone slices over the beef mixture. Bake the sliders covered first to trap heat. After 15 minutes, remove the foil. This helps the cheese bubble and brown nicely. You’ll get that gooey, delicious texture in every bite. - Presentation tips for sliders: Arrange your sliders on a big platter for a fun look. You can add fresh parsley or extra jalapeños for color. This makes the dish pop and looks great at any gathering. - Recommended sides to serve with cheesesteak sliders: Pair your sliders with crunchy pickles or crispy chips. You can also add a simple salad for freshness. These sides complement the rich flavors of the sliders and create a well-rounded meal. Pro Tips Slice Against the Grain: For tender beef, always slice against the grain. This helps break down the muscle fibers, making each bite more enjoyable. Choose the Right Cheese: Provolone is traditional, but feel free to mix in some mozzarella or even pepper jack for a twist on flavor and spice. Keep it Warm: If serving at a party, keep the sliders warm in a slow cooker on low heat. This ensures they stay gooey and delicious throughout the event. Customize Toppings: Don't hesitate to add your favorite toppings! Sautéed mushrooms, spinach, or different peppers can enhance the flavor profile. {{image_4}} You can switch up the cheese for a new taste. Here are some great options: - Cheddar cheese for a sharper flavor. - Swiss cheese for a milder, nutty taste. - American cheese for extra creaminess. Feel free to play with the veggies too. Here are some tasty choices: - Mushrooms for an earthy flavor. - Zucchini for a fresh crunch. - Spinach for added nutrients. Want to amp up the flavor? Try these tips: - Add a pinch of paprika for warmth. - Mix in some Worcestershire sauce for depth. - Drizzle with hot sauce for a spicy kick. You can also try different buns. Here are some ideas: - Pretzel buns for a salty twist. - Whole wheat buns for a healthier choice. - Garlic bread for extra flavor. Experimenting with these variations makes your sliders unique and fun! To keep your sliders fresh, place them in an airtight container. This helps lock in moisture and flavor. Store them in the fridge for up to three days. When you want to enjoy them again, use a microwave for reheating. Just warm them for about 30 seconds. This keeps the bread soft and the cheese melty. You can freeze assembled sliders for later. Wrap them tightly in plastic wrap and then foil. This helps prevent freezer burn. You can freeze them for up to three months. When you're ready to eat, thaw them in the fridge overnight. To reheat frozen sliders, preheat your oven to 350°F (175°C). Unwrap the sliders and place them on a baking sheet. Bake for about 15 to 20 minutes. This will get them warm and cheesy again. Enjoy the taste of fresh Philly cheesesteak sliders! Yes, you can use chicken or turkey. Thinly slice the meat so it cooks fast. Use the same seasonings to keep the flavor. Chicken or turkey gives a lighter taste but still works great. Slider buns are best for this recipe. Look for soft, small rolls that hold the filling well. Brioche or potato buns add a nice touch of sweetness. You can also use whole wheat for a healthier option. To make these sliders vegetarian, use mushrooms instead of beef. Portobello mushrooms work well when sliced thin. Add extra veggies like zucchini or spinach for more flavor. Use the same cheeses to keep it cheesy and delicious. Yes, you can prepare the filling in advance. Cook the beef and veggies, then cool them down. Store in the fridge for up to two days. When ready, just assemble and bake the sliders. This saves time and makes serving easy! These cheesesteak sliders are easy to make and full of flavor. We covered the best ingredients, step-by-step cooking methods, and helpful tips to enhance your dish. Remember to mix up the flavors with different vegetables or cheeses. You can store leftovers easily or even freeze them for later. With these recipes, you can impress at any gathering. Now, enjoy your delicious cheesesteak sliders!

Easy Philly Cheesesteak Sliders Tasty and Fast Recipe

Get ready to savor the best of comfort food with my Easy Philly Cheesesteak Sliders recipe! These sliders pack all

Gathering the right ingredients is key to a tasty garlic herb butter board. Here’s what you need: - 1 cup unsalted butter, softened - 4 cloves garlic, finely minced - Fresh herbs: parsley, chives, thyme - 1 teaspoon fresh lemon zest - 1/2 teaspoon crushed red pepper flakes (optional) - Salt and freshly ground black pepper, to taste - An assortment of breads for serving (like baguette, ciabatta, or sourdough) - Fresh vegetables for dipping (carrots, cucumbers, radishes) Start by softening your butter. This helps it mix well with garlic and herbs. Mince the garlic finely. This step brings out its strong flavor. Chop the herbs and zest the lemon. Each ingredient adds great taste and color. The crushed red pepper flakes are optional. They give a little kick, but you can skip them if you prefer mild flavors. Season the butter with salt and pepper for balance. Finally, choose a mix of breads and fresh veggies. This will make your board fun and exciting. Enjoy the process of creating your garlic herb butter board! {{ingredient_image_2}} To start, take a medium-sized mixing bowl. Add 1 cup of softened unsalted butter. Next, include 4 finely minced cloves of garlic. Then, add 2 tablespoons of chopped fresh parsley, 1 tablespoon of finely chopped chives, and 1 tablespoon of stripped fresh thyme leaves. Finally, mix in 1 teaspoon of fresh lemon zest. Now, if you like some heat, fold in 1/2 teaspoon of crushed red pepper flakes. This step is optional. After that, sprinkle in some salt and freshly ground black pepper to taste. Use a spatula to blend everything well. You want a smooth and cohesive butter mixture. Once your garlic herb butter is ready, it’s time to serve. Carefully transfer the mixture onto a wooden serving board. Use your spatula to create a lovely swirl or a decorative pattern on the surface. This makes it look inviting and delicious. For an extra touch, you can garnish the butter with more finely chopped herbs or a light sprinkle of crushed red pepper flakes. This adds color and flair to your dish. Now, let’s talk about what to serve with your garlic herb butter. Select a variety of breads, like baguette slices, ciabatta, or sourdough. Arrange these breads around the edges of your board. Then, choose some fresh vegetables for dipping. Carrots, cucumbers, and radishes work well. Place these colorful veggies next to the bread. This not only looks nice but invites your guests to dip and enjoy the garlic herb butter. The key to great garlic herb butter is butter temperature. Always use softened butter. Cold butter does not mix well with the herbs and garlic. Let it sit at room temperature for about 30 minutes. This helps blend the flavors better. To store leftover garlic herb butter, place it in an airtight container. You can also wrap it in plastic wrap. Keep it in the fridge for up to two weeks. For longer storage, freeze it. You can form it into a log and wrap it tightly. Cut off slices as needed later. Garlic herb butter pairs well with meats like grilled chicken or steak. It adds rich flavor to fish too. Spread it on meats just before serving for extra taste. You can use garlic herb butter in many creative ways. Try it on popcorn for a tasty snack. Mix it into pasta for added flavor. Use it to sauté vegetables for a delicious side dish. The options are endless! Pro Tips Use Room Temperature Butter: Ensuring your butter is at room temperature makes it easier to blend with the herbs and garlic, resulting in a smoother and more cohesive mixture. Fresh Herbs are Key: For the best flavor, use fresh herbs instead of dried ones. They provide a vibrant taste and enhance the overall experience of the garlic herb butter. Customize Your Heat Level: Adjust the amount of crushed red pepper flakes based on your preference. Start with a small amount and increase until you reach your desired spice level. Presentation Matters: Take the time to create an appealing presentation. Use a variety of colorful vegetables and bread types to make the butter board visually enticing for your guests. {{image_4}} You can change the flavor of your garlic herb butter easily. Try adding different herbs or spices to make it your own. For example: - Basil gives a sweet, green taste. - Oregano adds a hint of warmth. - Rosemary brings a strong, earthy flavor. You can also make infused butters. To do this, melt your butter and add in flavors. For instance, mix in roasted garlic, sun-dried tomatoes, or even citrus zest. Let it cool and solidify. This gives each bite a new twist. If you want a vegan alternative, use plant-based butter. This keeps the taste rich and creamy without dairy. You might also try nut butters, like cashew or almond, for a unique flavor. For those needing gluten-free options, serve with gluten-free breads. Rice crackers or veggie sticks are great, too. They add crunch and fresh taste. Enjoying garlic herb butter can be simple and tasty, no matter your diet! To keep your garlic herb butter fresh, store it in an airtight container. This will help prevent it from absorbing any other flavors in your fridge. If you want to store it longer, you can freeze it. Just wrap it in plastic wrap and place it in a freezer bag. Make sure to squeeze out any air before sealing. Shelf life: - In the fridge, your garlic herb butter will last about one week. - In the freezer, it can last up to three months. When you take the butter out of the fridge, it will be cold and hard. To use it, let it sit at room temperature for about 15-20 minutes. This will make it easier to spread on your bread or veggies. If your butter has been in the freezer, let it thaw in the fridge overnight for best results. You can also grate it while frozen if you need small amounts for cooking. To restore consistency after refrigeration, just stir it gently with a spatula. This will help bring it back to that creamy texture you love. You can serve garlic herb butter with many tasty foods. Here are some great options: - Sliced baguette or ciabatta - Toasted sourdough bread - Fresh vegetables like carrots and cucumbers - Crackers for a crunchy bite - Grilled meats for added flavor - Roasted potatoes for a rich twist Each of these options will soak up the buttery goodness. You can mix and match to find your favorites. Yes, you can make garlic herb butter ahead of time! Mix up your butter and transfer it to a container. Seal it well and store it in the fridge. If you want to make it even earlier, you can freeze it. Just wrap it in plastic wrap and place it in a freezer bag. When you want to use it, let it thaw in the fridge overnight. Homemade garlic herb butter lasts about one week in the fridge. Make sure to keep it sealed to keep it fresh. If you freeze it, it can last up to three months. Check for any signs of spoilage before using. Always trust your nose; if it smells off, it’s best to toss it. This blog post covered how to make garlic herb butter from simple ingredients. You learned the steps to prepare, present, and store it. We also shared tips for perfecting the butter and creative serving ideas. Garlic herb butter enhances many dishes and tastes great on bread and veggies. It’s easy to customize for different diets too. Explore your creativity with flavors. Enjoy making this delicious spread!

Garlic Herb Butter Board Flavorful and Simple Delight

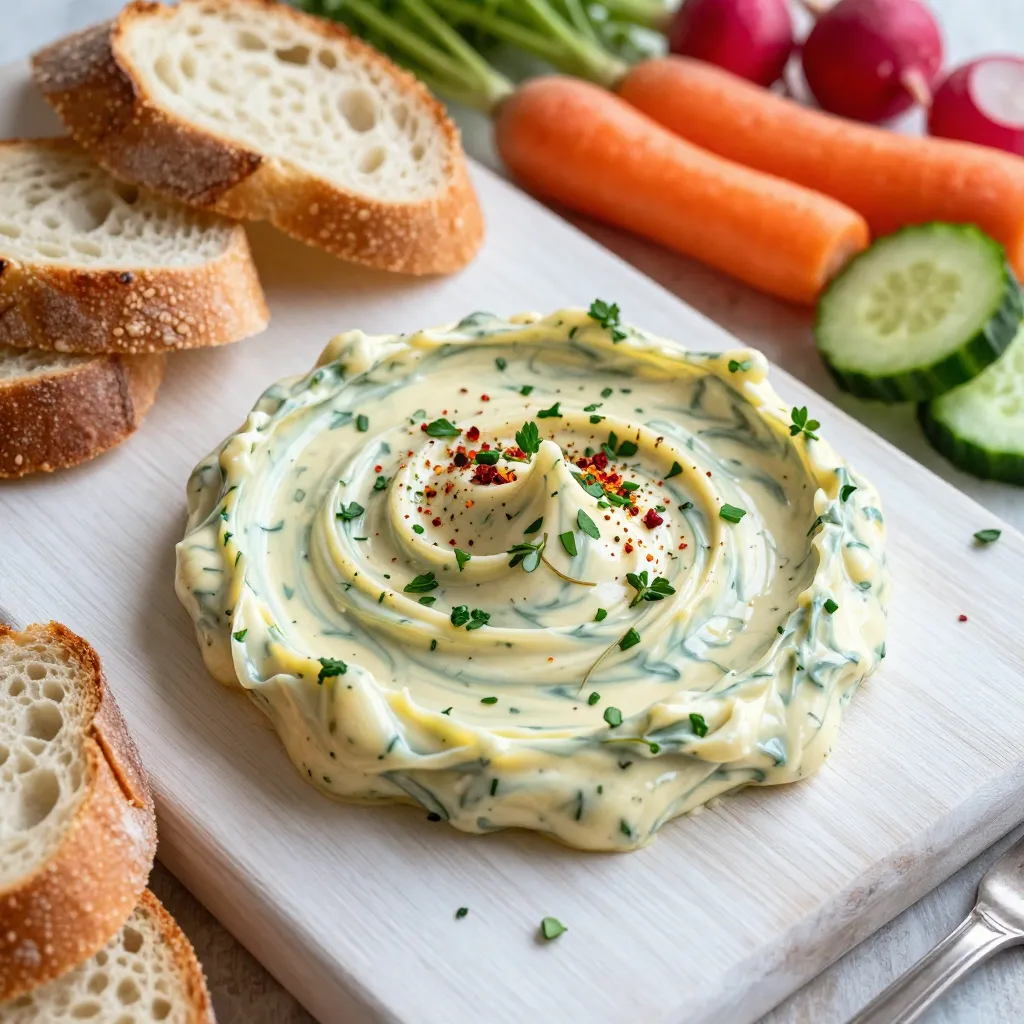
Ready to elevate your next gathering with an easy and flavorful dish? The Garlic Herb Butter Board is your secret

To make roasted red pepper hummus, gather these key items: - 1 cup canned chickpeas, thoroughly drained and rinsed - 1 large roasted red pepper (jarred or homemade) - 2 tablespoons tahini - 2 tablespoons freshly squeezed lemon juice - 2 cloves garlic, finely minced - 2 tablespoons extra virgin olive oil, plus extra for drizzling - 1/2 teaspoon ground cumin - Sea salt, to taste - Water, as needed for desired consistency - Fresh parsley, finely chopped, for garnish - Smoked paprika, for garnish You can boost the flavor with these extras: - A pinch of cayenne pepper for heat - A squeeze of lime juice for zestiness - A handful of roasted nuts for crunch This hummus packs a nutritious punch. Here’s a quick look at what you get per serving: - Protein from chickpeas helps build muscle. - Healthy fats from olive oil support heart health. - Vitamins from red peppers and parsley add nutrients. - Fiber aids digestion and keeps you full longer. Each ingredient not only adds flavor but also brings health benefits. Enjoy creating this tasty dish! {{ingredient_image_2}} To prepare roasted red peppers, you can use fresh ones or jarred ones. If using fresh, start by roasting them. Place the peppers over an open flame or under a broiler. Cook until the skin is charred and blistered. This usually takes about 10 to 15 minutes. Once charred, put the peppers in a bowl and cover it tightly with plastic wrap. Let them steam for about 10 minutes. This helps loosen the skin. After that, peel off the charred skin and remove the seeds. Now, your roasted red pepper is ready to use! Start blending by adding the rinsed chickpeas to a food processor. Next, add the roasted red pepper you just prepared. Then, add 2 tablespoons of tahini, 2 tablespoons of lemon juice, and 2 minced garlic cloves. Pour in 2 tablespoons of extra virgin olive oil. Add 1/2 teaspoon of ground cumin and a pinch of sea salt. Now, close the lid and pulse the mixture. Blend until it's smooth and creamy. Stop to scrape down the sides of the bowl to mix everything well. After blending, check the texture of the hummus. If it seems too thick, add water slowly. Use one tablespoon at a time, blending in between each addition. Keep blending until you reach your desired consistency. Once you have the right texture, taste your hummus. Adjust the sea salt if needed. Blend again for a few seconds to mix everything. Now, your roasted red pepper hummus is ready to serve! To boost your roasted red pepper hummus, think about adding spices. Ground cumin adds warmth and depth. Try adding a dash of cayenne for a little heat. You can also mix in lemon zest for a bright twist. Fresh herbs like basil or cilantro can give your hummus a fresh taste. Remember, start with small amounts and taste as you go. Many people forget to rinse the chickpeas. Rinsing helps remove excess salt. Another mistake is not blending long enough. A smooth hummus needs time in the food processor. If your hummus is too thick, don’t skip the water step. Add water slowly until you reach the right texture. Avoid over-salting; taste before adding more sea salt. Presentation makes a big difference. Serve your hummus in a nice bowl to catch the eye. Drizzle extra virgin olive oil on top for shine and flavor. Sprinkle smoked paprika and fresh parsley for color. To serve, arrange warm pita bread or fresh veggies around the bowl. This invites everyone to dive in and enjoy your tasty creation. Pro Tips Perfect Roasting: For the best flavor, ensure your red peppers are charred evenly. This enhances their sweetness and provides a smoky depth to your hummus. Texture Matters: Adjust the water slowly. Adding too much at once can make your hummus too thin. Aim for a creamy consistency that holds its shape. Season to Taste: Hummus flavor can vary based on the ingredients. Always taste and adjust seasoning before serving for the best flavor balance. Garnish for Appeal: A drizzle of olive oil and a sprinkle of smoked paprika not only enhance the flavor but also make your hummus visually appealing. {{image_4}} To add heat to your hummus, toss in some red pepper flakes. Start with a pinch. Blend it well with the chickpeas and red pepper. Taste and adjust until it reaches your desired spice level. You can also use jalapeños for a fresh kick. This version adds a bold flavor that will impress anyone. Herbs can elevate your hummus to new heights. Fresh basil or cilantro pairs well with the sweet pepper. Simply add a handful before blending. You can also try dried herbs like oregano or thyme. These additions will give your hummus a fresh taste and a lovely aroma. Want some crunch in your hummus? Try adding nuts or seeds. Toasted pine nuts or sunflower seeds work great. Just blend them in with the other ingredients. This not only adds texture but also boosts the nutrition. It makes your hummus more satisfying and hearty. To keep your hummus fresh, transfer it to an airtight container. Make sure the top is smooth. Drizzle a little olive oil on the surface. This helps keep it moist and tasty. Seal the container tightly and store it in the fridge. Roasted red pepper hummus lasts about five days in the fridge. If you want to store it longer, freeze it. In the freezer, it can stay good for up to three months. When ready to eat, defrost it in the fridge overnight. Stir it well before serving. Leftover hummus is very versatile! You can spread it on sandwiches for extra flavor. Use it as a dip for veggies or chips. Mix it into pasta for a creamy sauce. You can even use it as a topping for grilled meats or fish. The options are endless! Yes, you can use store-bought roasted red peppers. They save time and effort. Just drain and rinse them before adding to your hummus. This makes the recipe quick and easy. However, homemade roasted peppers do add a fresh taste. If you have the time, I recommend roasting your own. To make hummus creamier, add a bit of water as you blend. Start with one tablespoon. Blend, then check the texture. You can add more water if needed. Using high-quality tahini also helps. Make sure to blend well, so all the ingredients mix smoothly. If you want an extra rich taste, try adding a little more olive oil. Roasted red pepper hummus pairs well with various foods. Here are some options: - Warm pita bread - Fresh vegetable sticks like carrots or cucumbers - Crackers - Breadsticks - Toasted flatbreads You can also use it as a spread on sandwiches. It adds flavor and creaminess to any dish. This blog post covered making roasted red pepper hummus step by step. We detailed the key ingredients, and I gave tips for flavor and presentation. You learned about different variations and how to store your hummus properly. Remember, making hummus can be fun and easy. With practice, you’ll create delicious results. Use this guide to impress your friends and family with your skills. Enjoy experimenting with flavors and textures. Now, go make some hummus!

Roasted Red Pepper Hummus Flavorful and Easy Recipe

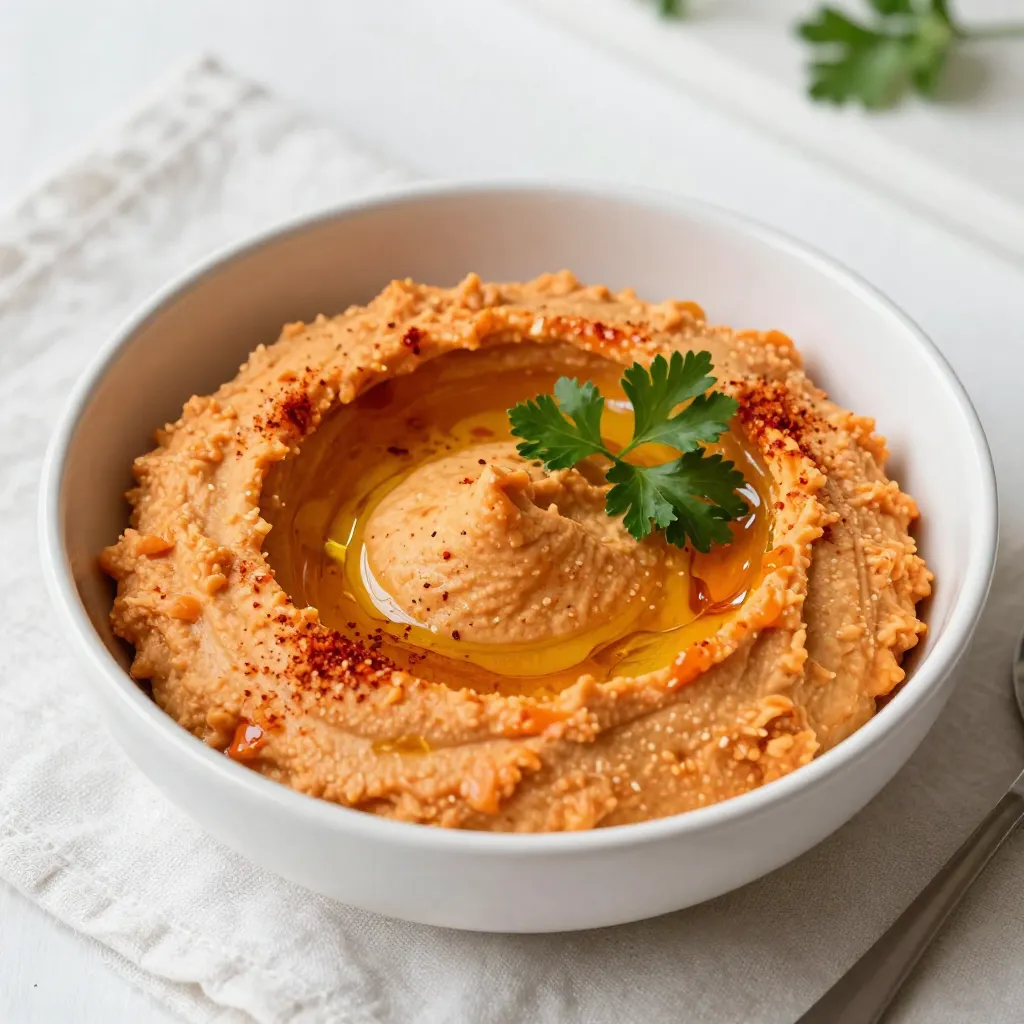
Are you ready to elevate your snack game? This Roasted Red Pepper Hummus recipe is flavorful, easy, and perfect for

- 1 pound ground turkey - 1 cup fresh spinach, finely chopped - 1/2 cup feta cheese, crumbled Ground turkey is lean and perfect for a healthy burger. It keeps the burger moist without extra fat. Fresh spinach adds color and nutrients. Plus, feta cheese brings a tangy flavor that pairs well with turkey. - Whole wheat burger buns - Toppings: lettuce, tomato, cucumber, tzatziki sauce Whole wheat burger buns add fiber and a nutty taste. Toppings like lettuce and tomato add crunch and freshness. Tzatziki sauce gives a creamy touch that complements the burgers well. - 1/4 cup whole wheat breadcrumbs - 1 small onion, finely chopped - 2 cloves garlic, minced - 1 tablespoon olive oil - 1 teaspoon dried oregano - 1/2 teaspoon freshly ground black pepper - Salt, to taste Whole wheat breadcrumbs help bind the patties together. Onion and garlic add depth and flavor. Oregano gives an herbal note, while black pepper adds a little heat. Salt brings out all the flavors. Each ingredient plays a key role in making these burgers tasty and satisfying. {{ingredient_image_2}} First, we need to sauté the onion and garlic. Heat one tablespoon of olive oil in a medium skillet on medium heat. Add the finely chopped onion and cook it for about 4-5 minutes. You want the onion to turn translucent. This step adds sweetness to the flavor. Next, stir in two minced garlic cloves and sauté for one more minute. Garlic adds a rich aroma to the dish. After cooking, remove the mixture from heat and let it cool slightly. Cooling is key. If you add hot vegetables to the meat, it can change the texture of the patties. Now it's time to mix the patty ingredients. In a large bowl, combine the ground turkey with the cooled onion and garlic mixture. Then, add one cup of finely chopped fresh spinach and half a cup of crumbled feta cheese. The spinach adds color and nutrients. The feta brings a salty, creamy taste. Next, sprinkle in one-fourth cup of whole wheat breadcrumbs, one teaspoon of dried oregano, and half a teaspoon of freshly ground black pepper. Don't forget a pinch of salt. Mix everything with your hands, but be careful. Overmixing can make the patties tough. Gently combine until you see no dry spots. Your mixture should be well blended but still tender. Now, let’s shape the patties. Divide the turkey mixture into equal portions. You should get about 4-5 patties, depending on how thick you like them. Shape each portion into a nice, round patty. Next, it’s time to cook. Preheat your grill or skillet on medium-high heat. Place the patties on the grill or in the skillet. Cook them for about 5-7 minutes on each side. You want a nice golden brown color. Always check for doneness. The internal temperature should be 165°F (74°C). This ensures the burgers are safe to eat and juicy. If you want, you can toast your burger buns while the patties cook. This adds an extra crunch. After cooking, place each patty on a bun and add your favorite toppings. Enjoy your healthy and flavorful Spinach Feta Turkey Burgers! How can you avoid dry patties? To keep your turkey burgers moist, do not overmix the meat. Gently combine the ground turkey with the veggies and cheese. If you overwork the mix, your burgers can become tough. Choosing the right turkey is key. Use ground turkey with some fat, like 85% lean. This helps keep the patties juicy. What additional herbs and spices can you consider? Fresh herbs like parsley or dill can add brightness. You can also try a pinch of red pepper flakes for heat. What about variations in cheese types? You can use goat cheese or mozzarella instead of feta. Each cheese brings its own unique flair to the burger. Is grilling better than pan-searing? Grilling adds a nice smoky flavor to your burgers. It also allows fat to drip away, keeping them lighter. What are some alternative cooking methods? You can bake the patties in the oven at 375°F for about 20 minutes. This method is easy and ensures even cooking. Pro Tips Use Fresh Ingredients: Fresh spinach and high-quality feta cheese will enhance the flavor of your turkey burgers significantly. Don’t Overmix: When combining the ingredients, mix gently to keep the patties tender and prevent them from becoming tough. Check for Doneness: Use a meat thermometer to ensure the internal temperature reaches 165°F (74°C) for safe consumption. Customize Your Toppings: Feel free to get creative with toppings; adding avocado or a spicy sauce can elevate the flavor profile of your burgers. {{image_4}} For a tasty vegetarian option, you can use plant-based ground meat. This swap gives you the same texture without the turkey. You might need to adjust your seasonings a bit. Plant-based meat can be less flavorful, so add extra garlic or herbs to enhance taste. You can get creative with cheeses. Try adding goat cheese for a tangy twist. It melts well and adds great flavor. You can also mix in other vegetables. Chopped bell peppers or zucchini give a fresh crunch and boost the nutrients. Don’t be afraid to experiment! Switch things up by serving burgers in bowls. Place the patty on a bed of greens and add your favorite toppings. Another fun option is lettuce wraps instead of buns. This keeps it light and low-carb while still being delicious. Both styles let you enjoy the flavors in new ways. To keep your spinach feta turkey burgers fresh, store them properly. Place the patties in an airtight container. Refrigerate them for up to three days. If you want to store them longer, freeze the patties. Wrap each patty in plastic wrap, then place them in a freezer-safe bag. This way, they can last up to three months. When you're ready to enjoy your leftover patties, you want to reheat them right. The best way is to use a skillet. Heat the skillet over medium heat and add a splash of water. Cover it with a lid to steam the burgers. This keeps them moist. Make sure they reach an internal temperature of 165°F (74°C) for safety. You can make meal prep easy with these turkey burgers. Prepare the patties in advance and store them in the fridge. Pair them with healthy sides like roasted veggies or a fresh salad. This makes a quick and tasty meal during busy days. You can even assemble burgers ahead of time. Just keep the toppings separate to keep them fresh. Yes, you can use frozen spinach. First, thaw the spinach and drain excess water. This step helps avoid soggy burgers. Use about 1/2 cup of thawed spinach for this recipe. Add it to the turkey mixture just like you would with fresh spinach. There are many tasty sides for these burgers. Consider these options: - Sweet potato fries - Mixed green salad - Grilled vegetables - Quinoa salad - Coleslaw These sides add color and taste to your meal. They also balance the flavors of the burgers. To make gluten-free burgers, swap the breadcrumbs. Use ground oats or gluten-free breadcrumbs instead. For buns, look for gluten-free burger buns in stores. You can also serve the patties in lettuce wraps. This choice is light and adds crunch. In this post, we explored how to make easy spinach feta turkey burgers. We covered key ingredients like ground turkey, spinach, and feta cheese. I shared step-by-step instructions, along with helpful tips for cooking and storing. Remember, you can adjust the recipe for variations, like using plant-based meat or trying different cheeses. With these ideas, you can enjoy delicious burgers your way. Now, it’s time to fire up the grill or stove and create a tasty meal for yourself or loved ones. Enjoy!

Spinach Feta Turkey Burgers Flavorful and Healthy Meal

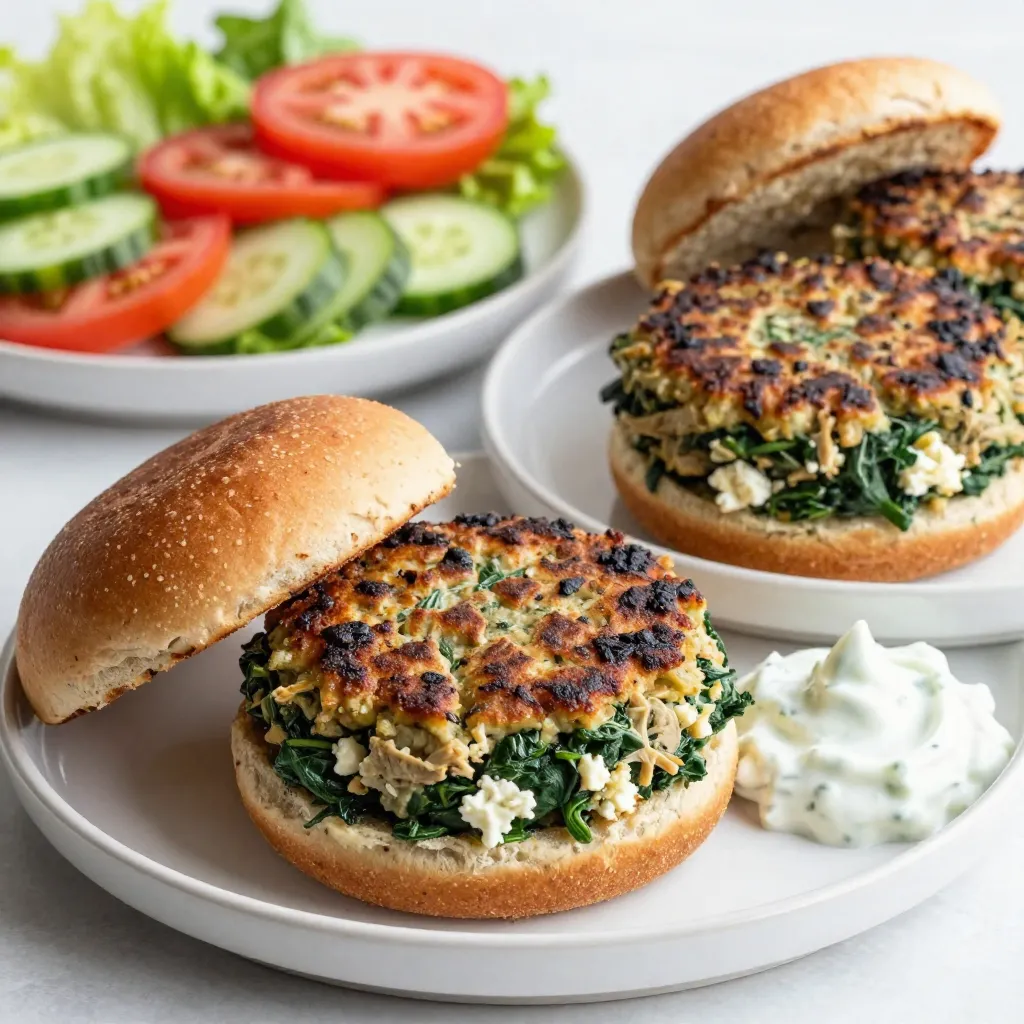
Looking for a tasty and healthy meal? You’ll love these Spinach Feta Turkey Burgers! Packed with ground turkey, fresh spinach,

- 2 lbs beef chuck roast, cut into large chunks - 1 lb lamb shoulder, cut into large pieces - 4 dried guajillo chilies, stems and seeds removed - 2 dried ancho chilies, stems and seeds removed I love using beef chuck roast and lamb shoulder for birria tacos. They both bring a rich flavor. The dried guajillo and ancho chilies add depth and spice. Toasting these chilies before blending really enhances their taste. - 4 cups beef broth - 1 medium onion, quartered - 4 cloves garlic, peeled - 2 teaspoons ground cumin - 2 teaspoons dried oregano - 1 teaspoon smoked paprika - Salt and pepper, to taste - 10-12 corn tortillas Beef broth gives the tacos a hearty base. Onion and garlic add layers of flavor. I love the combo of cumin, oregano, and smoked paprika. Each spice brings something special to the dish. Corn tortillas are perfect for holding all the delicious fillings. - Chopped fresh cilantro, for garnish - Lime wedges, for serving Fresh cilantro brightens the dish with a burst of freshness. Lime wedges add a tangy kick. Squeeze some lime on top for an extra flavor boost. These simple toppings make a big difference in taste. {{ingredient_image_2}} To start, we need to toast the dried chilies. Take four guajillo chilies and two ancho chilies. Remove their stems and seeds. Heat a dry skillet over medium heat. Place the chilies in the skillet. Toast them for about two minutes. They should smell fragrant and darken slightly. Once toasted, take them off the heat and let them cool for a few minutes. Next, we make the chili sauce. In a blender, combine the cooled toasted chilies, one quartered onion, four peeled garlic cloves, two teaspoons of ground cumin, two teaspoons of dried oregano, and one teaspoon of smoked paprika. Add a pinch of salt. Pour in one cup of beef broth and blend until smooth. Now, it’s time to cook the meat. Use two pounds of beef chuck roast and one pound of lamb shoulder. Cut them into large chunks. In a large pot or Dutch oven, heat a tablespoon of oil over medium-high heat. Season the beef and lamb with salt and pepper. Brown the meat in batches, about four to five minutes per batch. Make sure not to overcrowd the pot. Once browned, place the meat on a plate. After browning all the meat, return it to the pot. Pour the blended chili sauce over the meat. Add the remaining beef broth. Bring this mixture to a boil. Then reduce the heat to low. Cover the pot and let it simmer for two hours. The meat should become very tender and easy to shred. When the meat is cooked, carefully take it out of the pot. Use two forks to shred it into bite-sized pieces. Strain the leftover broth to remove any solids. Save this rich consomé for serving. To assemble the tacos, heat corn tortillas in a skillet over medium heat. Make them soft and pliable. Lightly dip each tortilla into the reserved consomé for added flavor. Fill each tortilla with the shredded meat and fold it in half. Now, serve the tacos with freshly chopped cilantro and lime wedges on the side. Enjoy your delicious birria tacos! - Tips for perfecting the chili sauce: Toast the guajillo and ancho chilies in a dry skillet. This step brings out their rich flavors. Toast them until fragrant, about 2 minutes. Blend the chilies with onion, garlic, and spices. Add beef broth to make a smooth sauce. This sauce will be the heart of your tacos. - Ensuring meat tenderness: Use beef chuck roast and lamb shoulder, as they have great fat. Brown the meat well to build flavor. After browning, simmer the meat in the chili sauce and broth for 2 hours. This slow cooking makes the meat tender and juicy. Make sure to check it often, so it doesn’t dry out. - Serving suggestions: For a stunning display, serve your tacos on a wooden board. Add a small bowl of warm consomé for dipping. This makes the meal feel special and inviting. - Garnishing tips: Top the tacos with chopped fresh cilantro for color and flavor. Serve lime wedges on the side. The lime adds a zesty kick when squeezed over the tacos. - Overcooking the meat: Watch the cooking time closely. If you overcook the meat, it can become dry. The meat should be tender but still juicy. - Soggy tortillas: To prevent soggy tortillas, heat them in a skillet until soft. Lightly dip them in the warm consomé for flavor, but do not soak them. This keeps them sturdy for filling. Pro Tips Choosing the Right Meat: Opt for a combination of beef chuck and lamb shoulder for a richer flavor profile. The fat content in both cuts will keep the meat tender and juicy during cooking. Perfecting the Chili Sauce: Make sure to toast the chilies until fragrant but not burnt. This enhances their flavor and adds a depth of richness to the sauce. Simmering Time: Allow the meat to simmer for at least 2 hours. This slow cooking process is crucial for breaking down the meat fibers, resulting in a tender and flavorful filling. Dipping the Tortillas: For added flavor, lightly dip the tortillas in the reserved consomé before filling them. This will enhance the overall taste of your tacos. {{image_4}} To make birria ramen, you need a few simple changes. First, keep the meat and consomé from your birria tacos. Then, cook some ramen noodles. - Ingredients: - Shredded birria meat - Reserved consomé - Ramen noodles - Fresh cilantro - Lime wedges Next, boil the ramen in a pot. After the noodles are done, place them in a bowl. Pour hot consomé over the noodles. Top with the meat, cilantro, and lime. This dish mixes flavors and textures. It provides a new way to enjoy birria. Birria quesatacos add cheese to the mix. This makes them even richer. To make these, start with your birria recipe. - Adding cheese: - Use Oaxaca cheese or mozzarella. - Place cheese directly on the tortilla before adding meat. For the cooking method, heat the tortillas in a pan. Add cheese on one side. Once the cheese melts, add the meat. Fold the tortilla and let it crisp slightly. This gives you a gooey, cheesy bite. Birria styles vary across Mexico. Each region has its own twist. In Jalisco, they use goat meat. In Tijuana, they keep it beef-based but add more spices. - Ingredient substitutions: - Try using chicken or pork instead of beef or lamb. - Add different chilies for a unique taste. These changes keep the dish fresh and exciting. You can always adapt birria to your taste. Store your leftover birria tacos in an airtight container. This keeps them fresh and flavorful. You can keep them in the fridge for up to three days. If you want to enjoy them later, freezing is a great option. To freeze birria tacos, wrap each taco tightly in plastic wrap. Then, place them in a freezer-safe bag or container. This helps prevent freezer burn. You can freeze them for up to three months. When you're ready to eat, thaw them in the fridge overnight. Reheat them in a skillet over medium heat for about 5-7 minutes. This keeps the tortillas warm and tasty. Store leftover consomé in a separate airtight container. It can last in the fridge for up to five days. To use it, simply reheat it on the stove. Use the consomé as a dip for your tacos. This adds rich flavor. You can also drizzle it over the tacos before serving. For extra taste, add fresh herbs or a squeeze of lime juice. Birria tacos are a Mexican dish from the state of Jalisco. They feature tender, slow-cooked meat, often beef or lamb. The meat is seasoned with dried chilies, herbs, and spices. This mix gives birria its deep, rich flavor. Traditionally, birria is served with a broth called consomé. People love to dip their tacos in this savory sauce. The dish has roots in celebrations and family gatherings. It has become popular worldwide, known for its unique taste and comforting qualities. To simplify birria tacos, you can use a slow cooker. This method allows the meat to cook slowly and evenly. Start by browning the meat on the stovetop. Then transfer it to the slow cooker with the chili sauce and broth. This cuts down on hands-on time. You can also make the chili sauce ahead of time. Store it in the fridge until you are ready to cook. Using store-bought broth can save time, too. Make sure to choose a high-quality broth for the best flavor. Yes, you can use other meats for birria. Pork, goat, or chicken are great alternatives. Each meat type brings its unique taste. If you use pork or chicken, reduce the cooking time. For pork, cook for about 1.5 hours. Chicken cooks even quicker, around 1 hour. Adjust the spices to match the meat's flavor. This way, you can enjoy birria tacos made with your favorite meat. In this post, we explored birria tacos, from key ingredients to preparation and personal touches. We discussed how to prepare chilies, cook the meats, and assemble the tacos. Tips included common mistakes to avoid and variations like birria ramen or quesatacos. To enjoy the best birria tacos, remember to keep meat tender and avoid soggy tortillas. With practice, you can master these flavorful tacos and impress others. Dive into your kitchen and create a dish that honors this rich tradition!

Birria Tacos Flavorful Dish You’ll Love to Make

If you’re craving a dish that’s rich, savory, and bursting with flavor, Birria Tacos are calling your name. This comforting

- 1 cup all-purpose flour - 1/2 cup powdered sugar - 1/4 cup cornstarch - 1/2 teaspoon fine sea salt - 1/2 cup unsalted butter, melted - 1 cup Greek yogurt (preferably full-fat for richness) - 1 cup granulated sugar - 3 large eggs - 1/4 cup freshly squeezed lemon juice (about 2 medium lemons) - Zest of 2 lemons (for vibrant flavor) - 1 teaspoon pure vanilla extract - Additional powdered sugar for dusting The ingredients for Greek yogurt lemon bars are simple yet essential. The dry ingredients create a firm crust. The all-purpose flour gives it structure. Powdered sugar adds sweetness. Cornstarch helps make the crust light. Fine sea salt balances the flavors. For the wet ingredients, melted unsalted butter brings richness. Greek yogurt gives creaminess and a tangy taste. Granulated sugar sweetens the filling. Eggs help bind everything together. Freshly squeezed lemon juice adds brightness. Lemon zest enhances the lemon flavor. Pure vanilla extract rounds out the taste. If you want, you can dust the bars with extra powdered sugar. This adds a sweet touch and makes them look pretty. {{ingredient_image_2}} First, preheat your oven to 350°F (175°C). This step warms the oven for baking. Next, grab a medium bowl and mix 1 cup of all-purpose flour, 1/2 cup of powdered sugar, 1/4 cup of cornstarch, and 1/2 teaspoon of fine sea salt. Whisk them together until fluffy. Now, pour in 1/2 cup of melted unsalted butter. Mix until you get coarse crumbs. Press this mixture into the bottom of your baking dish. Place the crust in your preheated oven and bake for 15-20 minutes. Look for a light golden color. Once done, take it out and let it cool slightly. Don’t let it cool too much, since you need to add the filling soon. While the crust cools, grab a large mixing bowl. Here, whisk together 1 cup of Greek yogurt, 1 cup of granulated sugar, and 3 large eggs. Add 1/4 cup of freshly squeezed lemon juice, lemon zest, and 1 teaspoon of pure vanilla extract. Mix vigorously until smooth and creamy. This filling is where the magic happens. Pour the creamy filling over the slightly cooled crust. Make sure it spreads evenly. Return the baking dish to the oven and bake for another 25-30 minutes. Look for the filling to be set and firm to the touch. When it’s done, take it out and let it cool to room temperature. After that, refrigerate for at least 2 hours. This helps the bars set perfectly. To achieve the right crust texture, mix dry ingredients well. Combine flour, powdered sugar, cornstarch, and salt. When you add melted butter, mix until it looks like coarse crumbs. Press this mixture firmly into your baking dish. This helps make a strong base. For a smooth filling, whisk your wet ingredients well. Use a large bowl to combine Greek yogurt, sugar, eggs, lemon juice, zest, and vanilla. Whisk until there are no lumps. This makes your filling creamy and delightful. Always use fresh lemons for zest and juice. Fresh lemons give a bright taste that dried lemon cannot match. Zest the lemons first before juicing them. This way, you capture all that vibrant flavor. You can play with flavor too! Try lime instead of lemon for a different twist. You could even mix citrus fruits for a fun taste. Think about adding orange for a sweet touch. Garnishing can elevate your dessert. Serve your lemon bars on a nice plate. Add thin lemon slices and fresh mint leaves. This not only looks good but adds a fresh smell. For serving, cut the bars into squares or rectangles. Dust them with powdered sugar for a sweet look. You can even pair them with a scoop of ice cream for a tasty treat! Pro Tips Use Fresh Lemons: Freshly squeezed lemon juice and zest will impart a much brighter and more vibrant flavor than bottled alternatives. Let Them Chill: Refrigerating the lemon bars for at least 2 hours after baking helps them set properly and enhances the texture. Check for Doneness: The filling should be set and slightly firm to the touch when done. Avoid overbaking to keep the bars creamy. Perfect Dusting: For an elegant finish, use a fine mesh sieve to dust powdered sugar over the bars just before serving. {{image_4}} You can mix up the flavors in your Greek yogurt lemon bars. Try using orange or lime juice instead of lemon juice. This gives a fun twist and bright taste. You can also add herbs like mint or basil into the filling. It adds a fresh note that surprises the palate. If you need gluten-free bars, switch to almond or coconut flour. Both options work well in this recipe. For dairy-free variations, use coconut yogurt or cashew yogurt. These alternatives will keep the texture creamy and delicious. These lemon bars are great on their own, but you can make them even better. Serve them with a scoop of vanilla ice cream or a dollop of whipped cream. This adds a nice creaminess. You can also use these bars as part of a dessert platter. Pair them with fresh fruits or other treats for a colorful display. To keep your Greek yogurt lemon bars fresh, refrigerate them right after cooling. Place them in an airtight container. Make sure to cover the bars well. This prevents them from drying out. You can also use plastic wrap for extra protection. If you want, you can place parchment paper between the bars for easy serving. If you want to freeze your lemon bars, let them cool completely first. Cut them into squares before freezing. Wrap each piece in plastic wrap and then foil. This keeps them safe from freezer burn. You can store them in the freezer for up to three months. When you are ready to eat them, thaw them overnight in the fridge. Enjoy them cold or bring them to room temperature before serving. In the fridge, Greek yogurt lemon bars can last about 5 to 7 days. After that, they may lose flavor and texture. Look for signs that they’ve gone bad. Check for any mold or an off smell. If they feel sticky or slimy, it’s best to toss them. Always trust your senses to keep safe! To check if your bars are done, look for firmness. The filling should feel set but slightly jiggly in the center. If it wobbles too much, give it a few more minutes in the oven. You want a nice, smooth top without cracks. The edges should look a bit golden. Yes, you can use regular yogurt instead of Greek yogurt. However, this will change the texture and flavor. Greek yogurt is thicker and creamier. Regular yogurt might make your bars a bit more runny. If you do swap, try to use plain, unsweetened yogurt for the best results. If you want a vegan option, you can replace eggs with flaxseed meal or applesauce. Use 1 tablespoon of flaxseed meal mixed with 2.5 tablespoons of water for each egg. This will help bind the bars without eggs. Applesauce works too. Use 1/4 cup for each egg. It can add a slight sweetness. Greek yogurt is packed with protein, which helps you feel full. It also has less sugar than regular yogurt. This makes your bars a healthier treat. Plus, it adds a rich, creamy texture without extra fat. Using Greek yogurt keeps your dessert light yet satisfying. This blog post covered how to make delicious Greek yogurt lemon bars, focusing on simple ingredients and easy steps. We walked through the dry and wet ingredients, highlighting tips for a perfect crust and smooth filling. You can enhance the flavor and vary the recipe to your liking. With proper storage techniques, your bars will stay fresh and tasty for days. Enjoy making this delightful treat, and don't hesitate to experiment with flavors. Your feedback can help others enjoy Greek yogurt lemon bars just like you!

Greek Yogurt Lemon Bars Refreshing and Simple Dessert

If you’re craving a sweet treat that’s both refreshing and simple, you’ve come to the right place! Greek Yogurt Lemon

- 1 ½ cups all-purpose flour - 1 cup granulated sugar - 1 ½ teaspoons baking powder - ½ teaspoon baking soda - ¼ teaspoon salt - ½ cup unsalted butter, softened - 2 large eggs - 1 teaspoon pure vanilla extract - 1 teaspoon almond extract - ½ cup buttermilk - ½ cup sliced almonds (for topping) - Powdered sugar (for dusting) Gathering these ingredients is key to making the best Vanilla Almond Cake Donuts. Each one plays a special role in creating a tasty treat. First, all-purpose flour gives the donuts the right structure. The granulated sugar adds sweetness and helps with browning. Baking powder and baking soda are vital for that perfect rise. Salt balances the sweetness, making each bite pop. Softened butter creates a rich flavor and a moist texture. The eggs bind everything together, adding richness. Using pure vanilla and almond extracts gives the donuts a lovely, warm flavor that makes them special. Buttermilk adds moisture and a slight tang, which enhances the taste. Don't forget the sliced almonds! They add a nice crunch on top. Finally, a dusting of powdered sugar makes these donuts look stunning. With this ingredient list, you are ready to create a delightful snack! {{ingredient_image_2}} 1. Preheat your oven to 350°F (175°C). This is key for even baking. 2. Prepare your donut pan by spraying it well with non-stick spray. This helps the donuts come out easily. 3. In a big bowl, mix together the all-purpose flour, granulated sugar, baking powder, baking soda, and salt. Stir until everything is even and lump-free. 4. In another bowl, cream the softened butter with a mixer until it’s light and fluffy. This takes about 2-3 minutes. 5. Add the eggs to the butter one at a time. Make sure each egg mixes in fully before you add the next. Then stir in the pure vanilla and almond extracts until smooth. 6. Now, slowly add the dry ingredients to the butter mixture. Do this while alternating with the buttermilk. Start and end with the dry mix. Mix just until combined. Don’t overmix, or your donuts may turn out tough. 1. To fill the donut pan, use a piping bag or a ziplock bag with a corner cut off. Pipe the batter into each donut cavity, filling them about ¾ full. This helps them rise without overflowing. 2. Sprinkle sliced almonds on top of each donut batter, pressing them in lightly so they stick. 3. Bake the donuts for 10-12 minutes. They are done when they spring back lightly when you press them. 4. Once baked, take the pan out of the oven and let the donuts cool in the pan for about 5 minutes. Then, move them to a wire rack to cool completely. 5. Before serving, dust the cooled donuts with powdered sugar for a nice touch. Enjoy the fresh and delightful taste! How to ensure donuts rise properly To make sure your donuts rise well, use fresh baking powder and baking soda. Always check the expiration date. Preheat your oven fully before baking. Filling the donut pan about ¾ full allows room for rising. Avoiding overmixing for tender texture Mix your wet and dry ingredients just until combined. Overmixing makes donuts tough. You want a light and fluffy texture, so be gentle when stirring. Cooling techniques for best results After baking, let the donuts cool in the pan for about 5 minutes. This helps them firm up. Then transfer them to a wire rack to cool completely. This step prevents sogginess. Plating suggestions for an elegant display For a beautiful display, use a nice platter. Arrange the donuts in a circle or in a stack. Garnish with extra sliced almonds around them for a pop of color. Creative ways to dust with powdered sugar To dust with powdered sugar, use a fine mesh strainer. Hold it above the donuts and tap gently. This gives an even coating and looks lovely. You can also dust just before serving for freshness. Pro Tips Measure Ingredients Accurately: Use a kitchen scale for precise measurements, especially for flour. This ensures consistent results every time you bake. Room Temperature Ingredients: Make sure butter, eggs, and buttermilk are at room temperature before mixing. This helps create a smoother batter and better texture. Donut Pan Preparation: Ensure your donut pan is well-greased or use non-stick spray to prevent sticking. This will help in easily releasing the donuts after baking. Donut Cooling Tips: Allow the donuts to cool completely on a wire rack before dusting with powdered sugar. This prevents the sugar from melting and losing its effect. {{image_4}} You can easily change the taste of your Vanilla Almond Cake Donuts. Here are two fun ideas: - Different Extracts: Swap vanilla or almond extract for coconut or orange extract. This small change gives your donuts a new flair. Coconut adds a tropical vibe, while orange brings a bright citrus twist. - Add-Ins: Try mixing in chocolate chips or fruits. Mini chocolate chips can give a rich, sweet surprise. Fresh berries can add a juicy burst of flavor. Just fold them gently into the batter before piping. Making these donuts fit different diets is simple. Here’s how: - Gluten-Free Options: Use almond flour instead of all-purpose flour. This swap keeps your donuts soft and tasty. Just remember to adjust the liquid slightly for the best texture. - Dairy-Free Substitutes: Replace unsalted butter with coconut oil or a dairy-free spread. For buttermilk, you can mix almond milk with a bit of lemon juice. This way, you can enjoy the same great taste without dairy. These variations let you enjoy Vanilla Almond Cake Donuts in new ways. To keep your Vanilla Almond Cake Donuts fresh, store them in an airtight container. Place the donuts at room temperature. They will stay tasty for about 2 to 3 days. Make sure not to stack them too high. This keeps them from getting squished. If you want to keep the donuts longer, freezing is a great option. First, let the donuts cool completely. Then, wrap each donut in plastic wrap. After that, place them in a freezer-safe bag or container. They can last up to 2 months in the freezer. When you're ready to enjoy them, take the desired number of donuts out. Let them thaw at room temperature for about 30 minutes. You can also reheat them in the oven. Preheat the oven to 350°F (175°C). Place the donuts on a baking sheet for about 5 minutes. This makes them warm and fresh again. Can I make the batter ahead of time? Yes, you can make the batter ahead of time. Just store it in the fridge. Use it within 24 hours for best results. How do I know when the donuts are done baking? Check the donuts after 10 minutes. They should spring back when you press them lightly. A toothpick should come out clean when inserted. Can I use a different type of pan? Yes, you can use a muffin pan instead. Just adjust your baking time. Muffins may need a few extra minutes in the oven. What to do if the donuts stick to the pan? If donuts stick, let them cool for a few minutes. Use a butter knife to gently loosen them from the sides. Solutions for dense donuts If your donuts are dense, check your baking powder. Make sure it’s fresh. Also, don't overmix the batter. Mix until just combined. Fixing uneven baking issues If donuts bake unevenly, make sure your oven is preheated. Rotate the pan halfway through baking. This helps them bake evenly. In this post, we covered how to make delicious donuts from scratch. We discussed ingredients, preparation steps, and baking tips. You now have the tools to create light, fluffy donuts. Don't forget about flavor and dietary variations to suit your taste. Proper storage helps keep your treats fresh. Remember to troubleshoot any baking issues with our tips. Enjoy your baking journey and impress friends with your tasty results!

Vanilla Almond Cake Donuts Fresh and Delightful Snack

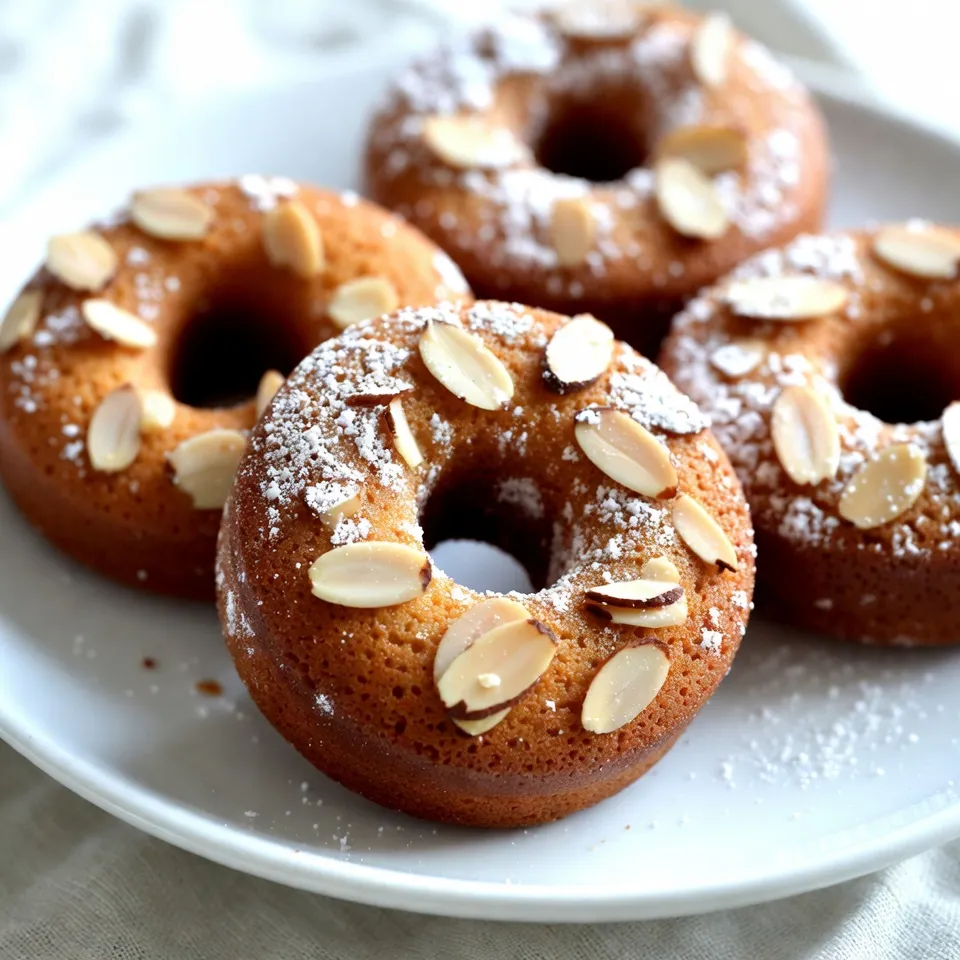
Looking for a tasty snack that brings joy in every bite? Meet my Vanilla Almond Cake Donuts! These delightful treats

- 4 cups boiling water - 4 black tea bags - 2 ripe peaches, pitted and sliced - 1/4 cup honey (adjust to taste) - 1/4 cup fresh lemon juice - 2 cups cold water - Fresh mint leaves for garnish - Ice cubes For this honey peach iced tea, the ingredients matter a lot. Each one adds its own flavor and charm. You start with the boiling water. This is key to making the tea strong and tasty. Next, you need black tea bags. They give a nice depth to the drink. You can choose any brand you like. Just make sure it's strong enough to stand up to the sweet peaches. The ripe peaches are the star of this drink. They must be sweet and soft. You will pit and slice them to get the best flavor. If they're in season, that’s even better. Honey acts as a natural sweetener. You can adjust the amount based on your taste. If you like it sweeter, add a bit more. Fresh lemon juice brings a nice tang. It balances the sweetness of the honey and peaches. Cold water is important to dilute the tea after brewing. This makes it refreshing and perfect for hot days. Finally, fresh mint leaves add a burst of freshness when you serve the drink. Ice cubes are a must for that chilling effect. Gather these ingredients, and you will be on your way to a delightful summer treat! {{ingredient_image_2}} 1. Boiling water and steeping tea Start by boiling 4 cups of water in a kettle. Once it boils, pour it into a large heatproof pitcher. Add 4 black tea bags to the hot water. Let them steep for about 5 minutes. This step gives the tea a rich flavor. After steeping, remove the tea bags and let the tea cool to room temperature. 2. Making peach puree While the tea cools, prepare your peaches. Take 2 ripe peaches, pit them, and slice them. Put the peach slices into a blender. Blend until smooth. If you prefer some texture, pulse the blender a few times. This will keep small chunks of peach in your puree. 3. Combining peach mixture with tea In a separate bowl or pitcher, mix the peach puree with 1/4 cup honey and 1/4 cup fresh lemon juice. Stir well until the honey dissolves. This creates a tasty peach mixture. Once the brewed tea has cooled, pour in the peach mixture. Stir it well to blend the flavors. 1. Cooling the mixture in the refrigerator Add 2 cups of cold water to the pitcher and stir again. Cover the pitcher and place it in the refrigerator. Chill it for at least 1 hour. This allows the flavors to come together nicely. 2. Serving suggestions with ice and garnishes When you are ready to serve, grab a glass and fill it with ice cubes. Pour the honey peach iced tea over the ice until the glass is full. For a pretty touch, garnish each drink with fresh mint leaves. You can also add thin slices of peach on the rim or floating in the tea. Enjoy your refreshing drink! To customize the honey levels in your Honey Peach Iced Tea, start with the suggested 1/4 cup. If you like it sweeter, add more honey, one tablespoon at a time. Taste as you go to find your perfect balance. You can also try using flavored honey, like wildflower or orange blossom, for a unique twist. When choosing peaches, pick ripe, fragrant ones. Look for peaches that yield slightly to gentle pressure. They should feel soft but not mushy. If they are too firm, let them ripen at room temperature for a few days. Ripe peaches pack more flavor and sweetness, making your iced tea taste amazing. For garnishing ideas, fresh mint leaves add a lovely touch. You can also add thin peach slices on the rim of the glass. This not only looks pretty but also hints at the flavors inside. Another fun idea is to use edible flowers for decoration. They add color and a special flair to your drink. Consider serving the iced tea in clear glasses to show off its beautiful color. You can layer the ice cubes with peach slices inside the glass. This creates a lovely visual effect and makes your drink stand out at any summer gathering. Pro Tips Adjust Sweetness: Feel free to modify the amount of honey based on your personal preference. Start with less and add more if you like it sweeter! Peach Variations: Experiment with different varieties of peaches or even nectarines for unique flavors. Each type will bring a different sweetness and aroma. Chill Time: Allowing the iced tea to chill for longer than an hour will help deepen the flavors. Aim for at least 2-3 hours if you have the time! Mint Garnish: Fresh mint not only looks beautiful but also adds a refreshing aroma. Slap the mint leaves between your hands before adding to release more oils! {{image_4}} You can switch peaches with other fruits. Try using ripe mangoes or juicy strawberries. Each fruit brings unique flavors. You can also mix fruits for a fun twist. Seasonal fruits can keep your iced tea fresh all year. In summer, add berries. In fall, try apples or pears. Each choice changes the drink. Experiment to find what you love. Honey is a great sweetener, but other options exist. You can use maple syrup for a richer taste. Agave nectar is another choice if you want a milder flavor. If you like a herbal twist, try stevia or monk fruit. These options offer a unique flavor and can be lower in calories. Adjust the sweetness to match your taste buds. Enjoy the fun of mixing flavors! To keep your honey peach iced tea fresh, store it in a pitcher. Use a glass or plastic container with a lid. This helps keep out odors and flavors from the fridge. Make sure to cool the tea to room temperature before sealing it. Your iced tea can last up to 3 to 5 days in the refrigerator. After this time, the flavor may start to fade. If you notice any strange smells or tastes, it’s best to toss it out. Freezing is a great way to enjoy honey peach iced tea later. Pour the iced tea into ice cube trays for easy freezing. This way, you can have iced tea on hand anytime. Making iced tea cubes is simple. Just pour the leftover iced tea into the trays and freeze. Once frozen, pop them out and store them in a freezer bag. You can add these cubes to fresh tea to chill it without watering it down. I recommend using black tea for Honey Peach Iced Tea. Brands like Lipton or Twinings work well. Black tea gives a rich flavor that pairs nicely with peach. You can also try green tea for a lighter taste. Just remember to steep it for a shorter time, about 3 minutes. Yes, you can make Honey Peach Iced Tea ahead of time. Brew the tea and mix it with the peach puree. Then chill it in the fridge. Keep the tea covered to maintain its flavor. For the best taste, drink it within two days. The longer it sits, the more the flavors change. Yes, both honey and peaches have health benefits. Honey can help soothe your throat and has natural antioxidants. Peaches are low in calories and provide vitamins A and C. They also have fiber, which is good for digestion. Adding them to tea makes a tasty and healthy drink. Now you know how to make refreshing honey peach iced tea. You start with key ingredients like black tea, fresh peaches, and honey. Follow the steps to brew, chill, and serve this tasty drink. Remember, you can adjust sweetness and try different fruits too. Don’t forget about storage tips for freshness. Enjoy your ice-cold tea anytime, especially on hot days. Try your own variations, and have fun with flavors. This simple recipe can bring joy to your summer moments. Now, it's time to make your perfect iced tea.

Honey Peach Iced Tea Refreshing Summer Drink Recipe

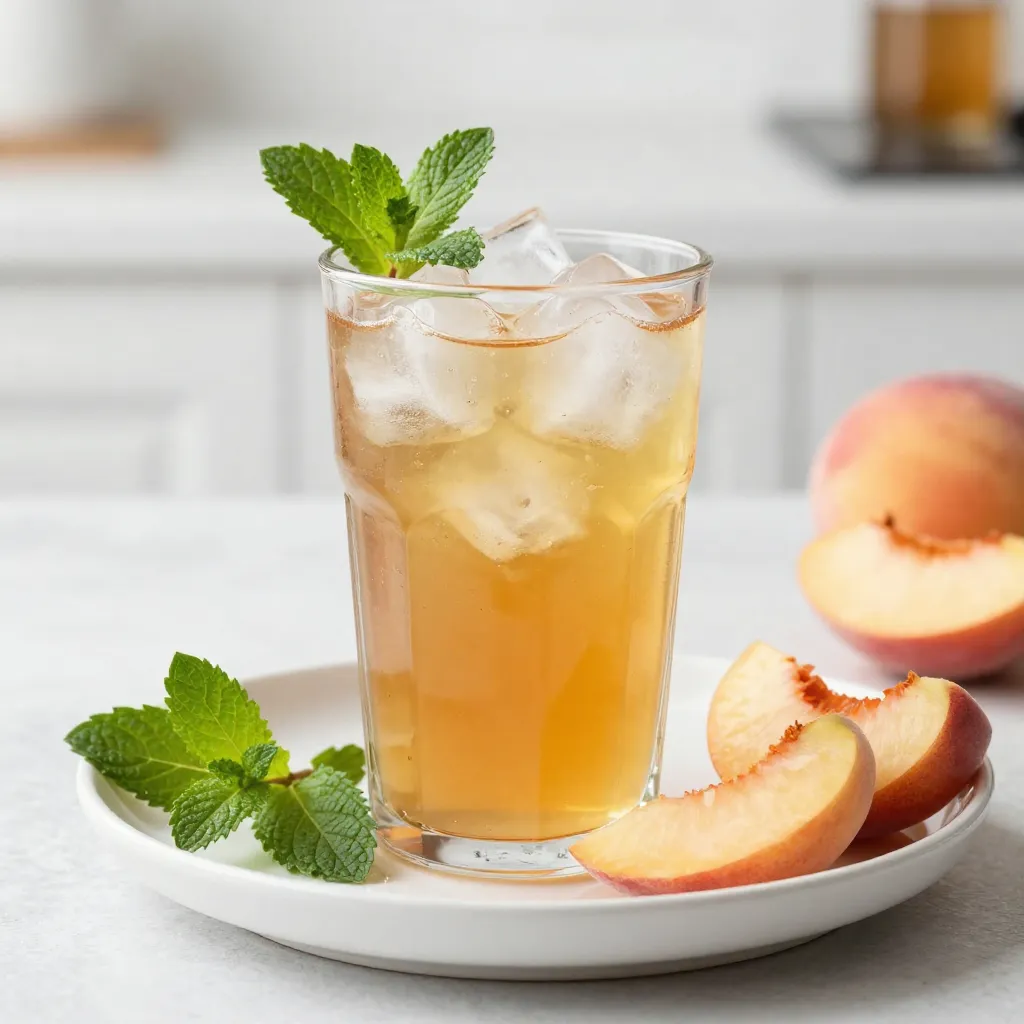
Summer is all about refreshing drinks, and Honey Peach Iced Tea is a star! This sweet blend of ripe peaches

Older posts
Newer posts
← Previous Page1 … Page109 Page110 Page111 … Page122 Next →

dsad

© 2026 dailydishcraft • Built with GeneratePress

Our Policies

  • Copyright Policy
  • Cookie Policy
  • GDPR Policy
  • Privacy Policy
  • Disclaimer
  • Terms Of Use

More Information

  • Home
  • About
  • Contact
  • Appetizers
  • Dessert
  • Dinner
  • Drinks
©2026, dailydishcraft About Back To Top