Skip to content
DisclaimerTerms Of UseGDPR PolicyCookie Policy

dailydishcraft

  • Home
  • Drinks
  • Appetizers
  • Dinner
  • Dessert
  • About
  • Contact
  • Privacy Policy
DisclaimerTerms Of UseGDPR PolicyCookie Policy

Jessica

- Fresh ahi tuna steaks - White and black sesame seeds - Olive oil - Mixed salad greens - Cherry tomatoes - Cucumber - Red onion - Avocado - Dressing ingredients: - Soy sauce - Rice vinegar - Sesame oil - Honey - Ginger To make this Sesame Crusted Ahi Tuna Salad, you need a few key ingredients. First, get two fresh ahi tuna steaks. Each should weigh about six ounces. Next, you’ll need a blend of white and black sesame seeds. A quarter cup of each will do. You also need some olive oil for cooking. For the salad, grab four cups of mixed salad greens. I love using arugula, spinach, and romaine for a nice mix. Add one cup of halved cherry tomatoes, half a cucumber sliced thin, and a quarter of a red onion finely sliced. Don’t forget one ripe avocado, sliced for creaminess. For the dressing, you will combine soy sauce, rice vinegar, sesame oil, honey, and freshly grated ginger. Each ingredient adds a special flavor to the dish. The soy sauce brings saltiness, while rice vinegar adds a tangy touch. Honey offers sweetness, and ginger gives a warm spice. All these ingredients come together to make your salad fresh and flavorful. Start by drying the tuna steaks. Use paper towels to soak up any moisture. This helps the seasoning stick. Next, season both sides with salt and freshly ground pepper. This adds great flavor to your fish. Now it’s time to coat the tuna. In a shallow dish, mix the white and black sesame seeds together. Press each seasoned steak firmly into the seeds. Make sure both sides are fully coated. This crust will give your tuna a nice crunch and a nutty taste. Heat olive oil in a non-stick skillet over medium-high heat. Wait until the oil shimmers. This tells you it’s hot enough. Now, carefully place the sesame-coated tuna steaks in the skillet. Sear them for about 1-2 minutes on each side. If you like your tuna rare, this timing works well. After searing, remove the tuna from the skillet. Place it on a cutting board and let it rest for a few minutes. This helps keep the juices inside the fish. In a large mixing bowl, combine the mixed salad greens, halved cherry tomatoes, cucumber slices, finely sliced red onion, and avocado. Gently toss the ingredients together. This ensures that all the flavors mix well. Next, prepare the dressing. In a small bowl, whisk together soy sauce, rice vinegar, sesame oil, honey, and freshly grated ginger. Mix until smooth. This dressing adds a burst of flavor to your salad. Now, it’s time to assemble. Once the tuna has rested, slice it into thin strips. Arrange the salad mixture on individual plates or a large platter. Neatly place the slices of seared tuna on top of the salad. Finally, drizzle the prepared dressing over the salad just before serving. This adds a fresh and tasty finish. Enjoy your delicious sesame crusted ahi tuna salad! To achieve the perfect crust on your ahi tuna, start with dry steaks. Pat them with paper towels to remove moisture. Season well with salt and pepper before coating with sesame seeds. Heat olive oil in a non-stick skillet until it shimmers. This indicates it’s hot enough. Place the tuna in the skillet and sear for 1-2 minutes on each side for rare. Adjust the time if you prefer it more cooked. For medium, aim for 3-4 minutes, flipping once. For a beautiful salad, arrange the greens on a large plate. Neatly layer the cherry tomatoes, cucumber, and red onion. Add the avocado slices on top for color. Place the seared tuna in a fan shape across the salad. Sprinkle extra sesame seeds for a finishing touch. Add a lime wedge for a burst of color and aroma. This simple step enhances the dish's appeal. You can play with the dressing to match your taste. Instead of soy sauce, try tamari for a gluten-free option. Swap rice vinegar for apple cider vinegar for a different flavor. For a spicy kick, add a dash of sriracha or chili flakes. Adjust the sweetness by adding more honey or using agave syrup. Each change can create a unique flavor profile for your salad. {{image_4}} You can change the protein in this dish. Salmon works great if you want a different taste. You can also use tofu for a plant-based option. Tofu soaks up flavors well and adds a nice texture. For the crust, try using panko instead of sesame seeds. Panko gives a crunchy texture and a light flavor. You can mix panko with a few sesame seeds for fun. Adding more vegetables to your salad can make it even better. Try bell peppers, shredded carrots, or radishes for color and crunch. Fresh herbs like cilantro or basil can also brighten the dish. For a bit of crunch, consider nuts or seeds. Sliced almonds or toasted sunflower seeds add a nice bite. They also give healthy fats and protein to your meal. You can switch up the dressing for global flavors. Try a spicy Asian dressing with chili paste for some heat. A Mediterranean dressing with lemon and olives can work well too. You can also change the spices for different cuisines. Add cumin for a Middle Eastern twist or chili powder for some Mexican flair. Spice can elevate the dish and make it unique every time you enjoy it. To keep your salad fresh, use airtight containers. Glass or plastic containers work great. Store the tuna and salad separately to avoid sogginess. The salad lasts about 2 days in the fridge. The tuna stays fresh for 1 to 2 days but tastes best when eaten right away. If you have leftover tuna, reheat it carefully. The best method is to use a skillet. Heat it over low heat for a few minutes. This way, you keep it tender. Avoid microwave reheating, as it can overcook the tuna and make it tough. Keep your dressing in a separate container. This helps the greens stay crisp. When you are ready to eat, drizzle the dressing on top. Store your mixed greens away from moisture. This way, they will last longer and taste fresh. Ahi tuna, also known as yellowfin tuna, is a popular fish. It has a rich flavor and firm texture. Unlike other tuna types, like skipjack, ahi is larger and has a deeper color. Ahi tuna is often served raw, making it great for sushi or salads. Nutritionally, ahi tuna is a powerhouse. It is high in protein and low in fat. Ahi tuna also provides omega-3 fatty acids, which are good for heart health. Plus, it contains vitamins B6 and B12, which help energy levels and brain function. Yes, you can make parts of the salad ahead of time. Prepare the dressing and store it in the fridge. This keeps the flavors fresh. You can also chop the veggies a day before. Just keep them in an airtight container. To maintain freshness, wait to add the avocado until serving. Avocado browns quickly, so slice it just before you serve. Also, store the salad greens separately to keep them crisp. This salad pairs well with many side dishes. Consider serving it with steamed rice or quinoa for a filling meal. You can also add a side of grilled vegetables for a colorful plate. For beverages, light white wines or sparkling water with lime work great. If you prefer, a refreshing iced tea can also complement the meal. These options enhance the flavors of the tuna and salad. This blog post showed how to make a tasty sesame crusted ahi tuna salad. We covered the key ingredients, the steps for preparing and searing the tuna, and assembling the salad. I shared tips to enhance flavor and presentation. With variations for proteins and dressings, you can tailor this dish to your taste. Remember to store leftovers correctly to keep them fresh. Enjoy this delightful meal that combines health and flavor!

Sesame Crusted Ahi Tuna Salad Fresh and Flavorful Dish

Looking for a fresh and flavorful dish that stands out? My Sesame Crusted Ahi Tuna Salad is just what you

- 1 cup ricotta cheese (I prefer Galbani for its creaminess) - 2 large eggs (organic eggs are best for flavor) - ¾ cup milk (whole milk adds richness) - Zest of 1 lemon (use a fresh lemon for best taste) - 2 tablespoons fresh lemon juice (freshly squeezed is key) - 1 cup all-purpose flour (King Arthur Flour is my go-to) - 2 tablespoons granulated sugar (C&H for sweetness) - 1 tablespoon baking powder (Clabber Girl for reliable rising) - ½ teaspoon salt (Morton Kosher salt enhances flavor) - 1 cup fresh blueberries (Driscoll’s are often the sweetest) - Butter or oil for cooking (I like using unsalted butter) - Use cottage cheese instead of ricotta for a different texture. - Almond milk or oat milk can replace regular milk for a dairy-free option. - For a gluten-free version, use almond flour or a gluten-free blend. - You can swap fresh blueberries for strawberries or raspberries if desired. - Calories: 220 - Protein: 8g - Carbohydrates: 30g - Fat: 9g - Fiber: 1g - Sugar: 5g These pancakes are not only delicious but also a great way to start your day with a burst of flavor. Each bite brings the sweet taste of blueberries and the zesty kick of lemon. Enjoy them with a drizzle of maple syrup or a sprinkle of powdered sugar for an extra treat! Start by gathering all your ingredients. In a large bowl, mix 1 cup of ricotta cheese, 2 large eggs, and ¾ cup of milk. Add the zest of 1 lemon and 2 tablespoons of fresh lemon juice. Whisk until the mix is smooth. In another bowl, sift together 1 cup of all-purpose flour, 2 tablespoons of granulated sugar, 1 tablespoon of baking powder, and ½ teaspoon of salt. Sifting helps make the pancakes fluffy. Slowly add the dry mix to the ricotta mix. Stir gently until just combined. It’s okay if there are small lumps. Over-mixing can make your pancakes tough. Finally, fold in 1 cup of fresh blueberries, taking care not to break them. Preheat a non-stick skillet or griddle over medium heat. Lightly coat it with butter or oil. To check if it’s ready, sprinkle a drop of water on the skillet. If it sizzles, you’re set! Pour about ¼ cup of batter onto the skillet for each pancake. Cook until small bubbles form on the surface and the edges look set, about 2-3 minutes. Flip the pancakes carefully and cook for another 2-3 minutes until golden brown. Remove them and keep warm on a plate covered with a kitchen towel. Repeat with the rest of the batter. For a beautiful presentation, stack the pancakes high on a plate. Dust the top with powdered sugar for a sweet touch. Add a handful of fresh blueberries and drizzle with honey or maple syrup. For an extra special treat, consider a dollop of whipped cream. This adds creaminess and makes the dish even more inviting. To make pancakes fluffy, the key is gentle mixing. Start by mixing the wet and dry ingredients in separate bowls. When you combine them, stir just until they blend. Small lumps are okay! Over-mixing can make pancakes tough. Also, use fresh baking powder. It helps create air bubbles that make pancakes rise. Using a non-stick skillet is best for cooking pancakes. You can use a griddle, too! Preheat the skillet on medium heat. Add a little butter or oil to prevent sticking. To test the heat, sprinkle water on the skillet. If it sizzles, it’s ready! Cook pancakes until bubbles form on top, then flip them carefully. One common mistake is using cold ingredients. Always use room temperature eggs and milk. This helps the batter mix better. Another mistake is cooking on too high heat. It burns the outside while leaving the inside raw. Lastly, avoid pressing down on the pancakes as they cook. This can make them dense. Keep these tips in mind, and you'll enjoy perfect pancakes every time! {{image_4}} You can switch up the fruit in these pancakes. Try adding strawberries or bananas. Both fruits pair well with the lemon flavor. Slice the strawberries and fold them into the batter. If you use bananas, mash them first for a nice mix. You can even combine different fruits to create a fun, colorful stack! If you want a dairy-free version, swap out the ricotta cheese. Use silken tofu blended until smooth. You can also use almond or oat milk instead of regular milk. For a vegan option, replace the eggs with flaxseed meal. Mix one tablespoon of flaxseed meal with two and a half tablespoons of water. Let it sit for five minutes to thicken. This will help bind your pancakes. To elevate the taste, think about adding extracts. A splash of vanilla or almond extract can add depth to the pancakes. Just a little goes a long way, so start with half a teaspoon. You can also mix in some lemon extract for an extra citrus kick. These small tweaks can make your pancakes even more delightful! After making these delicious pancakes, you might have some left. To store them, let the pancakes cool down first. Then, stack them with a piece of parchment paper in between each. This prevents them from sticking together. Place the stack in an airtight container. You can keep them in the fridge for about 3 days. If you want to enjoy them later, freezing is the best option. When you are ready to eat your leftover pancakes, reheating is simple. You can use the microwave, stove, or oven. For the microwave, place one pancake on a plate and heat for about 30 seconds. If you like them crispy, use a skillet. Heat over medium heat and cook for 1-2 minutes on each side. For the oven, preheat it to 350°F (175°C). Place the pancakes on a baking sheet and cover with foil. Heat for about 10 minutes. Freezing pancakes is a great way to save time. Once cooled, place each pancake in a single layer on a baking sheet. Freeze them for 1-2 hours until they are firm. After that, transfer them to a freezer bag or airtight container. Label the bag with the date. They can last up to 2 months in the freezer. When you are ready to eat, just reheat as mentioned above. Enjoy your tasty pancakes anytime! Yes, you can use frozen blueberries. Just thaw them first. This helps keep the pancakes fluffy. Frozen blueberries may bleed a little color, making the pancakes look lovely with a hint of purple. These pancakes are tasty on their own. You can serve them with syrup, honey, or whipped cream. Fresh fruit like strawberries or raspberries adds a nice touch too. A sprinkle of powdered sugar makes them look fancy. Add a side of crispy bacon for a savory twist. To make gluten-free pancakes, swap all-purpose flour for a gluten-free blend. Look for one that has a good mix of flours. Check if it includes xanthan gum, which helps bind the pancakes. Follow the same steps in the recipe, and you'll have gluten-free pancakes everyone can enjoy! Making Blueberry Lemon Ricotta Pancakes is easy and fun. We covered ingredients and helpful brands. You learned about mixing, cooking, and serving tips. Fluffiness is key, and now you know tricks to get it just right. Variations let you explore flavors, and storage tips keep leftovers fresh. Remember, ask questions if you need help. Try these pancakes soon; they will impress your friends and family. Enjoy your cooking adventure!

Blueberry Lemon Ricotta Pancakes Flavorful Morning Dish

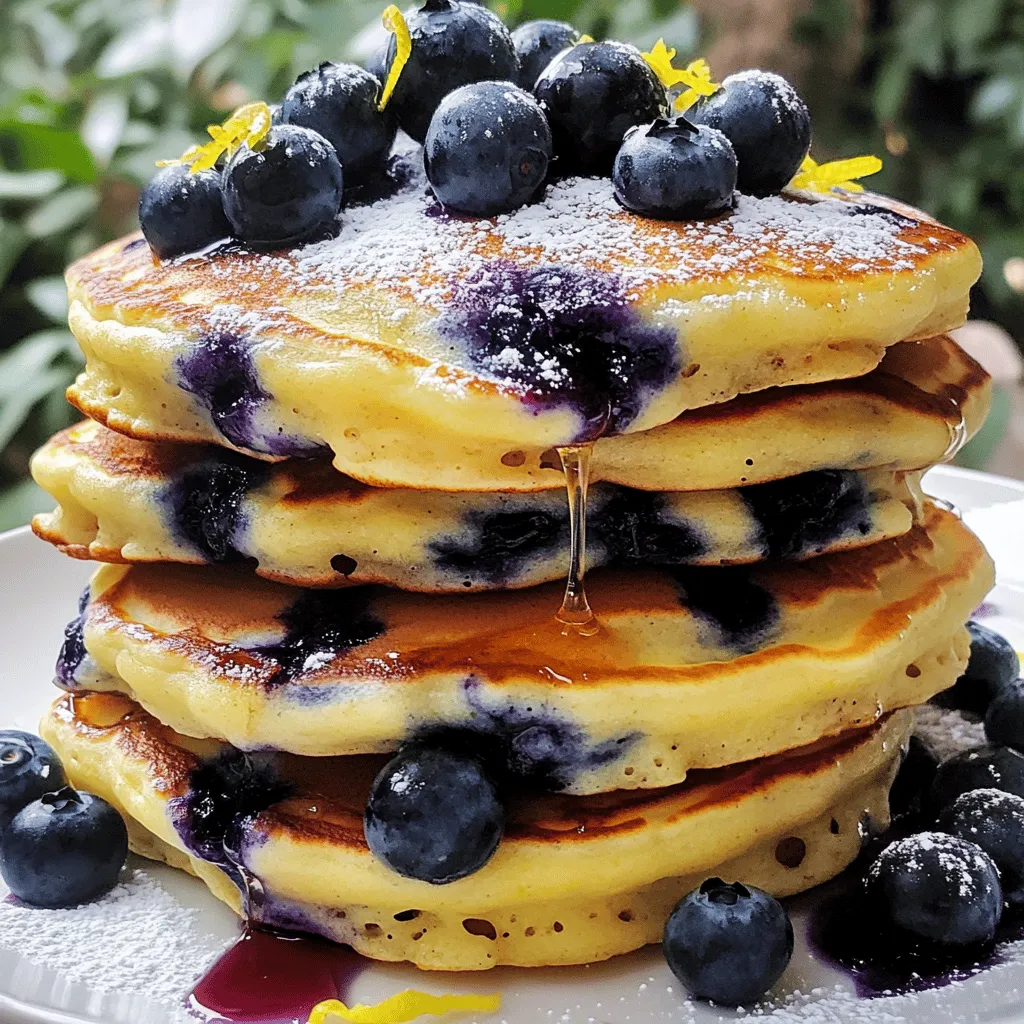
Start your day with a burst of flavor! Blueberry Lemon Ricotta Pancakes combine sweet blueberries and tangy lemon for a

- 1 can (15 oz) chickpeas, drained and thoroughly rinsed - 2 tablespoons extra virgin olive oil - 1 teaspoon garlic powder - ½ teaspoon smoked paprika - ½ teaspoon ground cumin - Zest of 1 fresh lemon - 2 tablespoons freshly squeezed lemon juice - Salt and freshly ground black pepper to taste - Fresh parsley, finely chopped (for garnish) When you make lemon garlic roasted chickpeas, the main star is the chickpeas. They provide protein and fiber. The olive oil keeps them crisp and adds flavor. Garlic powder brings a punch, while smoked paprika offers a warm, rich taste. Cumin adds earthiness, while lemon zest and juice brighten up the dish. A sprinkle of salt and pepper rounds it all out. Finally, fresh parsley adds color and freshness. - Baking sheet and parchment paper - Mixing bowl and kitchen towel For this recipe, you will need a few tools. A baking sheet lined with parchment paper helps with easy cleanup and prevents sticking. A mixing bowl is perfect for tossing the chickpeas with oil and spices. A kitchen towel helps dry the chickpeas, making them crispier. - Caloric content per serving - Health benefits of chickpeas One serving of lemon garlic roasted chickpeas has about 120 calories. Chickpeas are not just tasty; they are full of nutrients. They have protein, fiber, and many vitamins. Eating chickpeas can help keep you full and satisfied. They are also good for your heart and digestive health. Plus, they are low in fat, making them a smart snack choice. 1. First, preheat your oven to 400°F (200°C). This helps the chickpeas crisp up nicely. 2. Line a baking sheet with parchment paper. This makes for easy cleanup and prevents sticking. 3. Next, spread the rinsed chickpeas on a clean kitchen towel. 4. Gently pat them dry with another towel. This step is key! Removing moisture makes them crispy. 1. In a large mixing bowl, combine the dried chickpeas with 2 tablespoons of olive oil. 2. Add 1 teaspoon of garlic powder, ½ teaspoon of smoked paprika, and ½ teaspoon of ground cumin. 3. Zest one fresh lemon and squeeze in 2 tablespoons of lemon juice. 4. Season with salt and pepper to taste. 5. Toss everything together well. You want every chickpea to be coated in flavor. 1. Pour the seasoned chickpeas onto the lined baking sheet. Spread them out in a single layer. This spacing helps them roast evenly. 2. Place the baking sheet in the oven. Roast for 25-30 minutes until they are golden brown. 3. Remember to shake the pan halfway through. This ensures all sides get nice and crispy. 4. Once done, take them out and let them cool for about 5 minutes. Taste and adjust seasoning if needed. 5. Just before serving, sprinkle finely chopped parsley on top for color and flavor. To get that perfect crunch, start by drying the chickpeas well. After rinsing, spread them on a clean kitchen towel. Pat them dry gently until no moisture remains. This step is key. Too much water means less crispiness. Next, use the right oven temperature. Preheat your oven to 400°F (200°C). This high heat helps the chickpeas roast quickly. The result? A golden brown and crunchy snack that you won't want to stop eating. Want to boost the taste? You can add more spices or herbs to the mix. Consider adding cayenne pepper for heat or rosemary for a fresh twist. You can also try other citrus flavors, like lime or orange. Each brings a new taste and keeps things exciting. When serving, think about how to wow your guests. Use a vibrant dish or bowl to showcase the chickpeas. For gatherings, pair them with tzatziki or hummus. This adds fun and flavor to your snack table. To make it even prettier, sprinkle chopped fresh parsley on top. This adds color and a fresh aroma to your dish. Enjoy your lovely, crispy lemon garlic roasted chickpeas! {{image_4}} You can spice up your chickpeas easily. Try adding cayenne pepper for a kick. This small change gives your snack a bold, zesty flavor. If you prefer herbs, mix in rosemary or thyme. These herbs add a fresh taste that complements the lemon perfectly. If you want to save time, use an air fryer. It cooks the chickpeas faster and gives them a nice crunch. You can also roast them on the stovetop. This method offers a different texture, making them crispy on the outside and soft inside. These chickpeas are vegan and gluten-free, making them great for many diets. If you want to lower the salt, simply cut back on the added salt. You can still enjoy a tasty snack while sticking to your dietary needs. To keep your lemon garlic roasted chickpeas fresh, store them in an airtight container. This helps keep out air and moisture. If you have leftovers, let them cool completely before sealing. For best results, place a paper towel at the bottom of the container. This will help absorb any moisture that might make them soggy. Keep the container in a cool, dry place, like a pantry. When you want to enjoy your roasted chickpeas again, the oven works best. Preheat your oven to 350°F (175°C). Spread the chickpeas on a baking sheet and heat for about 10 minutes. This will help them regain crunchiness. Avoid using the microwave. It can make them soft and chewy. If you do use it, heat them in short bursts and check often. Refrigerated roasted chickpeas last about 3-4 days. If you notice any off smells or a change in texture, it’s best to toss them. Watch for signs of spoilage like a slimy feel or mold, which means they are no longer safe to eat. Roast chickpeas at 400°F (200°C) for 25-30 minutes. This time gives them a nice crunch. Remember to shake the pan halfway through to ensure even roasting. If you like them extra crispy, you can leave them in for a few more minutes. Just watch them closely to avoid burning. Yes, you can use dried chickpeas. Start by soaking them overnight. After soaking, cook them until tender. This takes about 1-2 hours. Once cooked, follow the same steps in the recipe. Make sure to dry them well before roasting to get that perfect crunch. These chickpeas make a great snack on their own. You can also add them to salads for extra crunch. They pair nicely with dips like tzatziki or hummus. Try serving them with grilled meats or roasted vegetables for a tasty meal. In this guide, we explored how to make delicious Lemon Garlic Roasted Chickpeas. We covered the ingredients, equipment, and step-by-step instructions. You learned tips to achieve extra crispiness and variations to enhance flavor. Remember the best storage practices to keep them fresh and tasty. Enjoy these chickpeas as a snack or meal addition. They're healthy and packed with flavor. With this recipe, you can impress friends and family at any gathering. Happy cooking!

Lemon Garlic Roasted Chickpeas Simple Crispy Snack

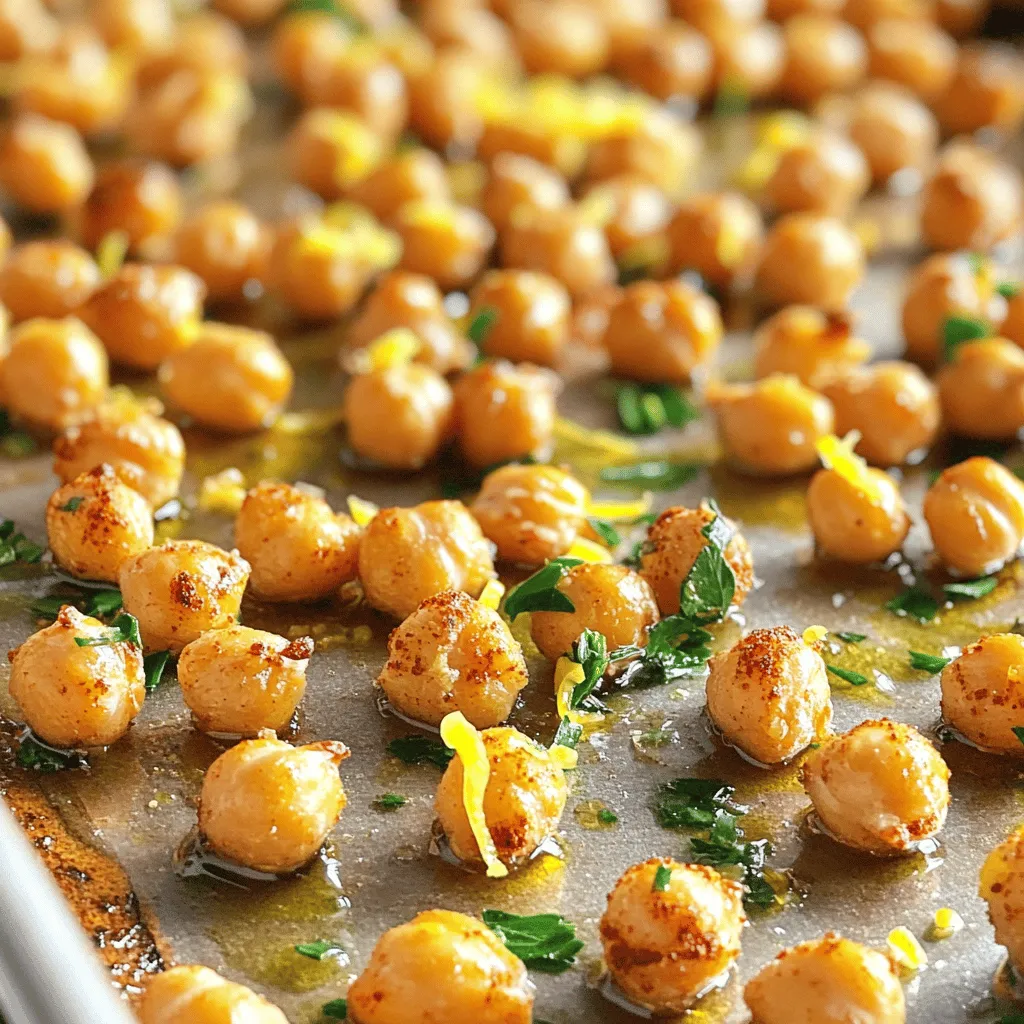
Looking for a tasty, healthy snack? You’ll love these Lemon Garlic Roasted Chickpeas! Crispy, zesty, and full of flavor, they

To make these tasty vegan loaded nacho fries, you need: - 4 large russet potatoes, cut into fries - 1 tablespoon olive oil - 1 teaspoon garlic powder - 1 teaspoon smoked paprika - Salt and pepper to taste - 1 cup canned black beans, drained and rinsed - 1 cup corn (fresh, frozen, or canned) - 1 cup cherry tomatoes, halved - 1 avocado, diced - 1/2 cup dairy-free cheese shreds (optional) - 1/4 cup fresh cilantro, chopped - 1/4 cup vegan sour cream (optional) - 2 tablespoons sliced jalapeños (optional, for a spicy kick) Each ingredient plays a key role. The russet potatoes give the fries their structure. Olive oil helps them crisp up in the oven. Garlic powder and smoked paprika add depth to the flavor. Black beans and corn provide protein and texture. Cherry tomatoes and avocado add freshness, while dairy-free cheese gives that cheesy feel. You can customize your nacho fries with various toppings. Feel free to add: - Extra diced avocado for creaminess - More fresh cilantro for a pop of color - Vegan sour cream for extra richness - Sliced jalapeños for heat - A squeeze of lime juice for brightness These toppings enhance the dish and let you express your taste. For extra flavor, consider these seasonings: - Cumin for warmth - Chili powder for heat - Onion powder for sweetness Experiment with these seasonings to find your perfect flavor balance. Each adds a unique twist to your vegan loaded nacho fries. Start by preheating your oven to 425°F (220°C). This hot oven helps to make the fries crispy and golden. Take 4 large russet potatoes and cut them into fry shapes. Place them in a large bowl. Drizzle 1 tablespoon of olive oil over the fries. Add 1 teaspoon of garlic powder, 1 teaspoon of smoked paprika, and salt and pepper to taste. Toss everything together. Make sure each fry is coated with the mix. This seasoning gives great flavor. Spread the seasoned fries on a baking sheet lined with parchment paper. Ensure they are in a single layer for even cooking. Bake in the oven for 25-30 minutes. Flip the fries halfway through for a nice golden color. While the fries bake, mix your toppings. In a bowl, combine 1 cup of drained black beans, 1 cup of corn, and 1 cup of halved cherry tomatoes. If you like spice, add 2 tablespoons of sliced jalapeños. Stir gently and set the mixture aside. This adds color and crunch. When the fries are done, take them out of the oven. If you want extra creaminess, sprinkle 1/2 cup of dairy-free cheese shreds on top of the hot fries. Return the baking sheet to the oven for 5 minutes. The cheese will melt, making it ooey-gooey. Get a large serving platter. Pile the crispy fries high. Spoon the black bean and corn mix over the fries. Make sure each fry gets some toppings. Next, add fresh diced avocado and a sprinkle of chopped cilantro. If you want, add dollops of vegan sour cream on top. This makes the dish look vibrant and delicious! To make your fries crispy, follow a few simple steps. First, cut your russet potatoes into even strips. This will help them cook evenly. Next, soak the cut fries in cold water for about 30 minutes. This removes excess starch, giving you that perfect crisp. After soaking, dry them well with a towel. Toss the fries with olive oil and seasonings to coat. Spread them in a single layer on a baking sheet. Bake at 425°F (220°C) for 25-30 minutes. Flip them halfway through for even browning. If you don’t have some ingredients, don't worry! You can swap out the black beans for pinto beans or lentils. Use frozen corn instead of fresh if you’re in a hurry. Cherry tomatoes can be replaced with diced bell peppers for a different taste. For the cheese, try cashew cheese or nutritional yeast for a cheesy flavor without dairy. You can even use sweet potatoes for a sweeter twist on your fries. When you are ready to serve, pile your loaded nacho fries high on a large platter. This makes for a great centerpiece. Add extra toppings like diced jalapeños or a squeeze of lime for a zesty kick. Offer vegan sour cream on the side for dipping. You can also add a fresh salad or guacamole for a balanced meal. This dish is perfect for movie nights or casual gatherings with friends. {{image_4}} You can easily add more heat to your nacho fries. Start by adding more jalapeños. You can also use spicy black beans or a zesty hot sauce. For an extra kick, mix in some diced green chilies or sprinkle crushed red pepper flakes on top. The heat pairs well with the creamy avocado and cool vegan sour cream. If you love cheese, go for extra dairy-free cheese shreds. You can try different types, like pepper jack or cheddar. Just sprinkle the cheese on top of the hot fries. Then, pop it back in the oven for a few minutes until it melts. This gives your nachos a gooey, cheesy goodness that everyone loves. You can change your nacho fries with the seasons. In summer, use fresh corn and ripe tomatoes. In fall, add roasted pumpkin or butternut squash for a sweet twist. Winter brings hearty toppings like sautéed kale or roasted Brussels sprouts. Each season offers new flavors that keep your nacho fries exciting and tasty. To keep your vegan loaded nacho fries fresh, store them in an airtight container. Let the fries cool completely before sealing them. This step prevents condensation that can make them soggy. You can store them in the fridge for up to three days. When you're ready to enjoy your leftovers, preheat your oven to 350°F (175°C). Spread the fries on a baking sheet. Reheat them for about 10 to 15 minutes. This method helps regain their crispiness. If you have toppings, like beans or cheese, consider adding them in the last few minutes to warm through without overcooking. If you want to store your nacho fries for a longer time, freezing is a great option. First, let the fries cool completely. Spread them in a single layer on a baking sheet and freeze for about one hour. Once frozen, transfer the fries to a freezer-safe bag or container. They can last up to one month in the freezer. When ready to eat, reheat directly from frozen, adding a few extra minutes to the cooking time. Yes, you can prepare the fries ahead of time. Cut the potatoes and toss them with oil and spices. Store them in the fridge for up to 24 hours. When you're ready, bake them straight from the fridge for a quick meal. You can use mashed avocado or a cashew cream instead of dairy-free cheese. Nutritional yeast also adds a cheesy flavor without the dairy. Try these options to keep your nacho fries tasty and creamy. Yes, these nacho fries are gluten-free. Potatoes are naturally gluten-free, and the other ingredients are also gluten-free. Always check the labels on canned goods to ensure there are no hidden gluten sources. To give your fries a spicy kick, add sliced jalapeños on top. You can also mix some cayenne pepper into the seasoning blend. For extra heat, toss in some hot sauce before serving. Enjoy the spicy flavor! Vegan loaded nacho fries are simple to make and delicious to eat. We covered the main ingredients, toppings, and seasonings you can use. I shared step-by-step instructions for preparing and baking your fries, plus tasty tips for serving and variations. Store your leftovers properly and enjoy them later. Remember, making these nacho fries allows for creative freedom in the kitchen. Experiment with flavors, and have fun! Enjoy your delicious creation.

Vegan Loaded Nacho Fries Deliciously Cheesy Treat

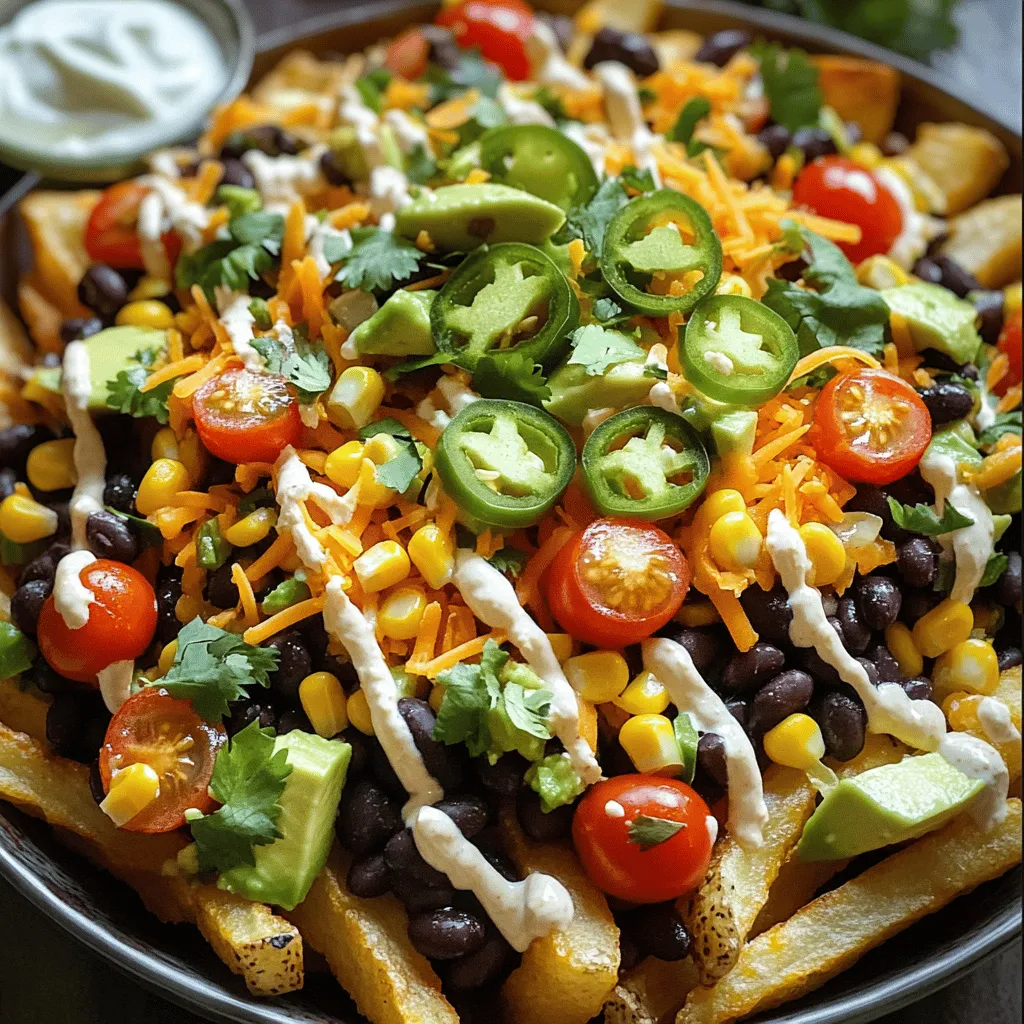
Craving a fun, tasty snack? Try my Vegan Loaded Nacho Fries! This cheesy treat packs flavor, crunch, and lots of

- 2 cups fresh blueberries, rinsed and drained - 2 cups fresh peaches, peeled and sliced into thin wedges - 1 tablespoon fresh lemon juice Fresh fruits are key to a great crisp. I love using ripe blueberries and juicy peaches. The lemon juice brightens the flavors. You can mix in other fruits too, like cherries or nectarines. - 1 cup rolled oats - 1/2 cup all-purpose flour - 1/2 cup packed brown sugar - 1/2 teaspoon ground cinnamon - 1/4 teaspoon sea salt - 1/2 cup unsalted butter, melted and slightly cooled - 1/4 cup chopped nuts (use pecans or almonds for added crunch) These dry ingredients create a wonderful topping. Rolled oats give it texture. Brown sugar adds sweetness and a nice color when baked. The nuts bring in a great crunch. Cinnamon makes everything taste warm and cozy. - 1 tablespoon honey or pure maple syrup You can add honey or maple syrup to sweeten the fruit. Adjust the amount based on your taste. This makes the crisp even more delightful! If you like it less sweet, feel free to skip this step. First, set your oven to 350°F (175°C). This will prepare the oven for baking. Preheating helps the crisp cook evenly. Make sure to do this step first. In a large bowl, mix 2 cups of fresh blueberries and 2 cups of sliced peaches. You want them to be rinsed and peeled. Add 1 tablespoon of fresh lemon juice. This will brighten the flavor. If you like it sweeter, drizzle in 1 tablespoon of honey or maple syrup. Gently toss the fruit until it is all coated. Now, transfer this mixture into a greased 9x9-inch baking dish. Spread the fruit evenly across the bottom. In another bowl, combine 1 cup of rolled oats, 1/2 cup of all-purpose flour, 1/2 cup of packed brown sugar, 1/2 teaspoon of ground cinnamon, and 1/4 teaspoon of sea salt. Mix these dry ingredients well. Then, pour in 1/2 cup of melted butter. Stir it all together until it looks crumbly. This topping will give you a great crunch. Now, sprinkle the oat mixture evenly over the fruit layer. Make sure to cover all the fruit so it forms a nice crust while baking. To get your crisp nice and crunchy, use cold butter. Cold butter helps form clumps. Mix it with dry ingredients for the best texture. Bake until the topping is golden brown. This usually takes about 30 to 35 minutes. Keep an eye on it to avoid burning. Serve your blueberry peach crisp warm. It pairs well with vanilla ice cream. The cold ice cream melts a bit, creating a creamy blend. You can also use whipped cream for a lighter option. For a fresh touch, add mint leaves on top. They add color and flavor to each bite. To boost flavor, try adding a splash of vanilla extract. This makes the topping even more aromatic. You can also mix in a pinch of nutmeg for warmth. Adding lemon zest brightens the fruit's taste. Feel free to experiment with spices until you find your perfect mix. {{image_4}} To make this recipe gluten-free, swap out the all-purpose flour. Use a gluten-free flour blend instead. You can also choose certified gluten-free oats. This way, you can enjoy a tasty crisp without worry. For a vegan twist, replace the butter with coconut oil or vegan butter. Use maple syrup in place of honey for sweetness. These swaps keep the dish plant-based and just as delicious. You can mix it up by using different fruits. Consider using raspberries, blackberries, or even apples. Each fruit brings its own flavor and twist, making this recipe versatile. Just remember to adjust sweetness based on the fruit you choose. After you enjoy your blueberry peach crisp, store any leftovers in an airtight container. This keeps the crisp fresh. Place it in the fridge for up to three days. The fruit stays tasty and the topping remains crunchy. To reheat, preheat your oven to 350°F (175°C). Place the crisp in a baking dish. Cover it with foil to prevent over-browning. Heat for about 15 minutes. This warms it through and brings back its crispy topping. You can also use a microwave for quick reheating. Heat in short intervals, checking often to avoid sogginess. You can freeze blueberry peach crisp for up to three months. First, let it cool completely. Then, wrap it tightly in plastic wrap. Place it in a freezer-safe bag or container. When you’re ready to enjoy it, thaw it in the fridge overnight. Reheat as mentioned above for the best results. Yes, you can use frozen fruits for this recipe. Frozen blueberries and peaches work well. Just make sure to thaw and drain them first. This helps prevent extra liquid in your crisp. Blueberry Peach Crisp lasts about 3 to 5 days in the fridge. Store it in an airtight container. You can enjoy it warm or cold, but it tastes best fresh from the oven. You can mix up the toppings to suit your taste. Consider adding: - Shredded coconut - Chopped nuts like walnuts or hazelnuts - Crushed graham crackers - A sprinkle of granola for extra crunch Feel free to get creative! Yes, you can prepare it ahead. Just assemble the fruit and topping, then store them separately in the fridge. Bake them when you are ready to serve. This keeps it fresh and warm. Blueberry Peach Crisp is a healthier dessert option. It uses fresh fruit and oats, which provide fiber. You can also adjust the sugar to make it less sweet if desired. Absolutely! This crisp is versatile. You can try: - Apples - Pears - Cherries Mix and match to find your favorite combination. For a tasty treat, serve your Blueberry Peach Crisp with: - Vanilla ice cream - Whipped cream - Greek yogurt These toppings add creaminess and a nice contrast to the crisp. This blog post covered all you need for a delicious Blueberry Peach Crisp. We explored fresh fruits, dry ingredients, and sweeteners. I provided clear steps for baking, tips for crispiness, and ways to serve. You learned about gluten-free and vegan options and how to store leftovers. Try this crisp, enjoy the flavors, and share with friends. Simple recipes like this bring joy and comfort. Your kitchen can create tasty treats every day!

Blueberry Peach Crisp Delightful and Easy Recipe

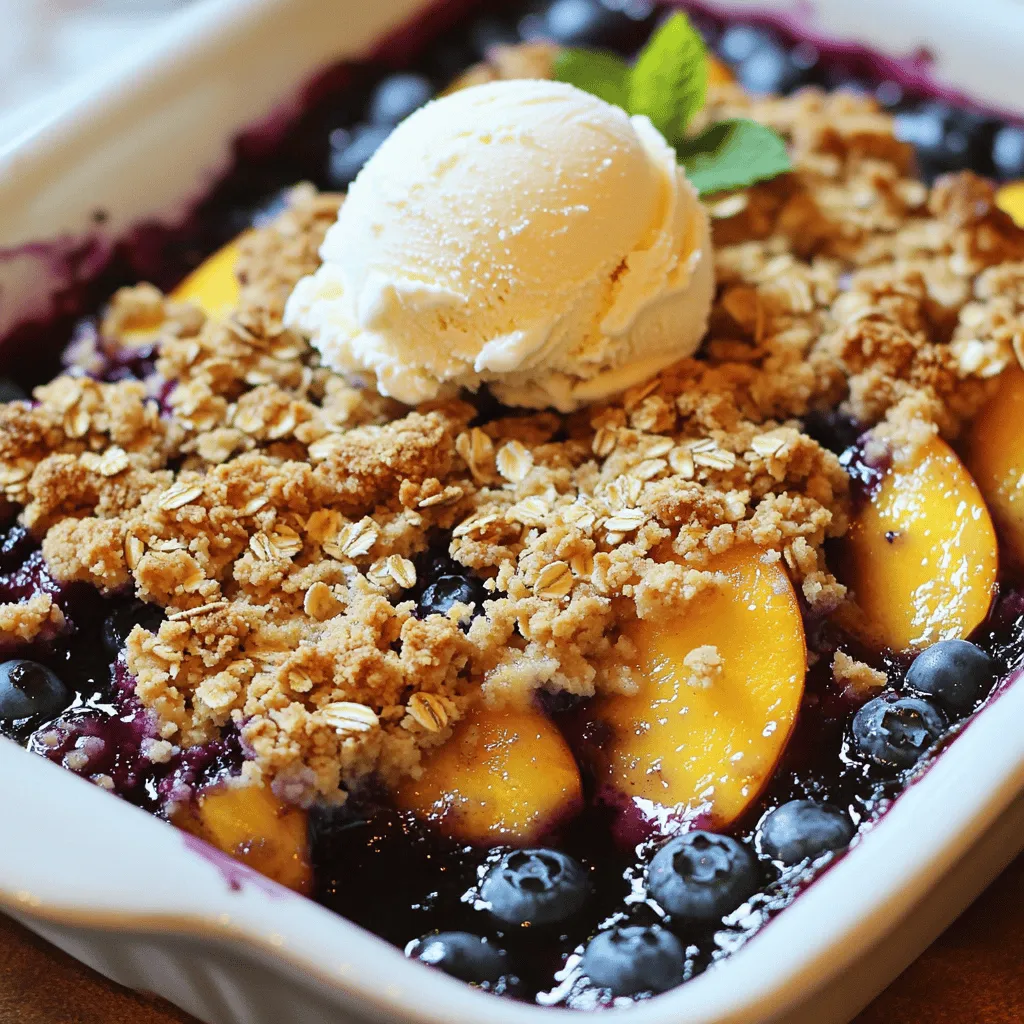
Craving a sweet, fruity treat that’s both simple and delicious? You’ve come to the right place! This Blueberry Peach Crisp

To make the best spicy tuna sushi bowls, you need these key ingredients: - 1 cup sushi rice - 1 ¼ cups water - 1 tablespoon rice vinegar - 1 teaspoon sugar - ½ teaspoon salt - 8 ounces sushi-grade tuna, diced - 2 tablespoons mayonnaise (Kewpie is best) - 1 tablespoon sriracha (plus more for drizzling) - 1 teaspoon sesame oil - 1 ripe avocado, thinly sliced - 1 cucumber, sliced into rounds - 1 small carrot, shredded - 2 green onions, finely chopped - 1 tablespoon sesame seeds (for garnish) - Seaweed sheets, cut into strips (optional) These ingredients create a delicious and fresh bowl that packs a punch of flavor. You can add extra ingredients to enhance your bowls: - Pickled ginger for a tangy kick - Radish slices for crunch - Edamame for protein - Extra vegetables like bell peppers or scallions - Wasabi for those who love heat These options let you customize the bowls to your taste. When choosing tuna, freshness is key. Look for: - Bright red color, which indicates freshness - A firm texture that feels sturdy under your touch - A clean, ocean-like smell Buying from a trusted fish market or grocery store ensures you get the best quality. Always ask if it is sushi-grade. This way, you can enjoy your spicy tuna sushi bowls with confidence. Start by rinsing 1 cup of sushi rice under cold water. Rinse until the water is clear. This step removes extra starch, helping the rice stay fluffy. Next, in a medium saucepan, combine the rinsed rice with 1 ¼ cups of water. Bring it to a boil over high heat. Once boiling, lower the heat and cover the pot. Let it simmer for 20 minutes. After that, remove the pot from heat but keep it covered. Let it rest for another 10 minutes to steam. Once the rice has rested, you need to season it. In a small bowl, mix 1 tablespoon of rice vinegar, 1 teaspoon of sugar, and ½ teaspoon of salt. Stir until the sugar dissolves. Transfer the rice to a large bowl and gently fold in the vinegar mixture using a spatula. This keeps the rice grains intact. Allow the seasoned rice to cool to room temperature. Now, let’s make the spicy tuna. In a separate bowl, place 8 ounces of diced sushi-grade tuna. Add 2 tablespoons of mayonnaise, preferably Kewpie for its creaminess. Then, include 1 tablespoon of sriracha and 1 teaspoon of sesame oil. Mix everything well until the tuna is fully coated. Taste the mixture. If you like it spicier, add more sriracha to suit your taste. It’s time to put everything together. Take two bowls and divide the cooled sushi rice as a base. Top each bowl with the spicy tuna mixture. Next, arrange the sliced avocado, cucumber rounds, and shredded carrot on top. Make it look pretty! Finish by sprinkling chopped green onions and sesame seeds over each bowl. For extra heat, drizzle more sriracha on top. You can serve with strips of seaweed on the side or place them artfully on the bowls. Enjoy your delicious Spicy Tuna Sushi Bowls! To cook perfect sushi rice, start with high-quality rice. Rinse the rice under cold water until it runs clear. This removes excess starch and helps the rice become sticky. Use a medium saucepan with a lid. Combine 1 cup of sushi rice with 1 ¼ cups water. Bring it to a boil over high heat. Once boiling, cover and reduce the heat to low. Simmer for 20 minutes. After this, let it sit covered for 10 more minutes. This steaming time is very important. It makes the rice fluffy and tender. To control the spice in your tuna bowl, start with the right amount of sriracha. Mix 1 tablespoon of sriracha with the tuna. Taste it. If you like more heat, add more sriracha, just a little at a time. You can also balance the spice with creamy mayonnaise. Kewpie mayonnaise is best for its rich flavor. This helps tone down the heat while keeping the taste bold. For a stunning sushi bowl, layer the ingredients neatly. Start with the seasoned sushi rice as the base. Next, add the spicy tuna mixture on top. Arrange sliced avocado, cucumber rounds, and shredded carrot around the tuna. Top with chopped green onions and sesame seeds for color. Drizzle extra sriracha for a pop of flavor. Serve with strips of seaweed for a fun touch. This way, each bite looks as good as it tastes. {{image_4}} If you want to switch up the protein in your spicy tuna sushi bowls, there are many options. Salmon is a great alternative. It has a rich taste and pairs well with spicy sauces. You could also use shrimp, which adds a nice crunch when cooked. For a twist, try using crab meat or even cooked chicken. Each protein brings its own flavor and texture, so feel free to experiment! You can easily make this bowl vegan or vegetarian. Instead of fish, use marinated tofu. Tofu absorbs flavors well and adds protein. You can also use chickpeas or edamame for a hearty bite. For a seafood alternative, try seaweed salad or pickled cucumbers. These options keep the bowl light and fresh while still being delicious. Toppings can make your sushi bowls fun and unique. Try adding pickled ginger for a zesty kick. You can also sprinkle on some crushed nori for extra flavor. Want a crunch? Add radishes or crispy wonton strips. For a hint of sweetness, toss in mango or pineapple chunks. Get creative and make your bowl your own! To store leftover sushi rice, start by letting it cool. Place it in an airtight container. Make sure to keep it at room temperature for no more than two hours. If you need to keep it longer, place the container in the fridge. Sushi rice stays fresh for up to three days in the fridge. When you want to use it again, just add a splash of water before reheating. For the spicy tuna mixture, keep it in an airtight container. It can last in the fridge for up to two days. Make sure the mixture is tightly sealed to prevent air from getting in. If it sits too long, the tuna can lose its texture and flavor. Always check for freshness before using it again. When reheating sushi rice, use the microwave or a pan. If using a microwave, sprinkle some water on the rice. Cover it with a damp paper towel to keep it moist. Heat for about 30 seconds, then stir and check if it's warm. If using a pan, add a little water and heat on low. Stir gently to prevent sticking. Avoid reheating the spicy tuna mixture, as it is best served fresh. Use sushi-grade tuna for the best flavor and safety. This type is fresh and safe to eat raw. Look for bright red color and a slight sheen. Check your local fish market or grocery store for quality options. Always ask for sushi-grade tuna to ensure freshness. Yes, you can prep some parts ahead of time. Make the sushi rice and spicy tuna mixture in advance. Store them separately in airtight containers. The rice stays fresh for up to 2 days in the fridge. The spicy tuna will last for about 1 day. Assemble the bowls just before serving for the best taste. Each serving contains approximately: - Calories: 550 - Protein: 34g - Carbohydrates: 63g - Fat: 18g - Fiber: 7g These bowls are a good source of protein and healthy fats. Adjust the ingredients to fit your dietary needs. Enjoy a delicious meal that also supports your health goals. In this article, we covered how to make delicious Spicy Tuna Sushi Bowls. We talked about key ingredients and optional garnishes to enhance your dish. You learned about selecting the best sushi-grade tuna and how to prepare sushi rice. I offered tips on adjusting spice levels and creative variations using different proteins or vegan options. Now you can enjoy making this dish at home. Experiment and find what you like best!

Spicy Tuna Sushi Bowls Tasty and Simple Recipe

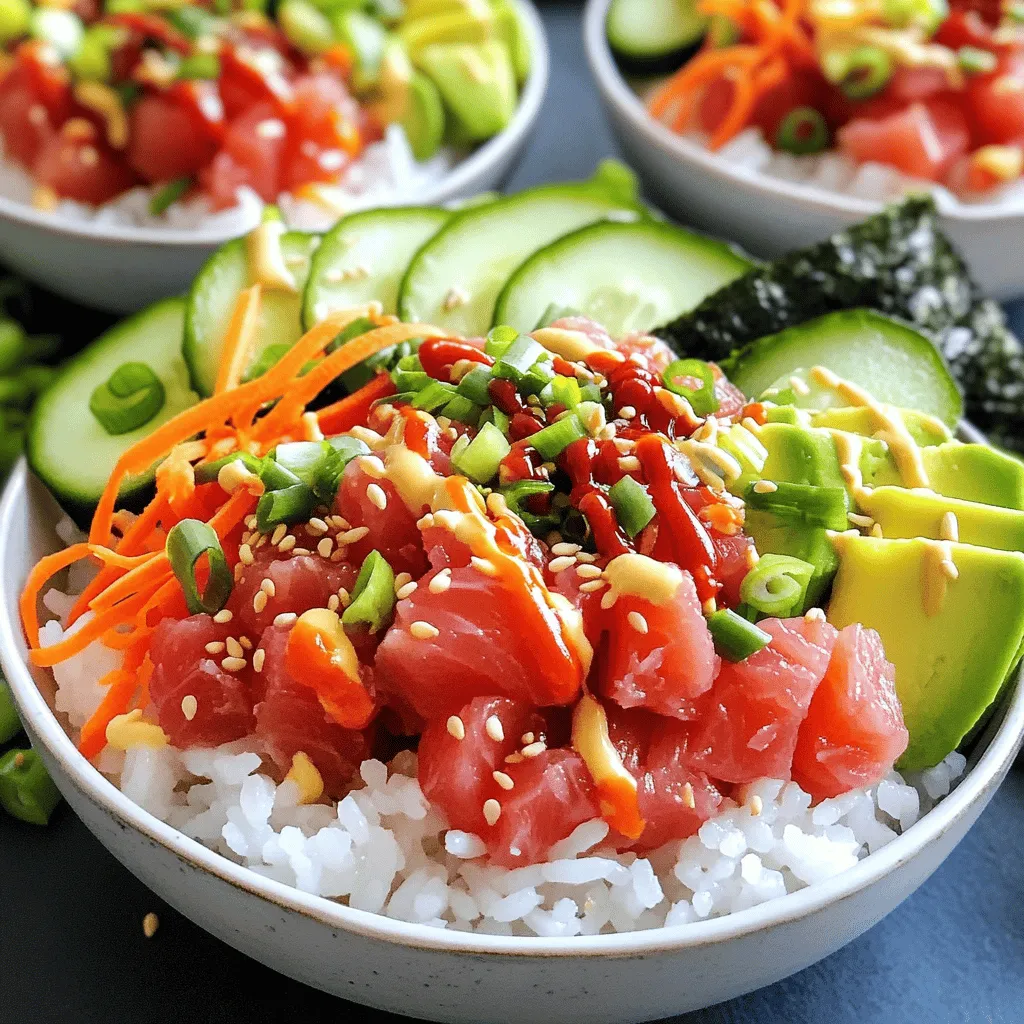
Are you ready to spice up your meal routine? I’ve got a simple and delicious recipe for Spicy Tuna Sushi

- 1 lb ground turkey - 1/2 cup breadcrumbs - 1/4 cup grated Parmesan cheese - 1/4 cup finely chopped green onions - 1/2 cup fresh orange juice - Zest of 1 orange - 1/4 cup honey (or maple syrup) - 1 tablespoon low-sodium soy sauce - 2 cloves garlic, minced - 1 tablespoon fresh ginger, grated - 1/4 teaspoon red pepper flakes (optional) - Salt and pepper to taste For these savory orange glazed turkey meatballs, start with fresh ground turkey. This keeps the meatballs juicy and flavorful. Add breadcrumbs for texture and grated Parmesan for a cheesy kick. Green onions bring a fresh crunch that complements the dish well. For the glaze, fresh orange juice is key. It adds a bright flavor that makes each bite delightful. The zest enhances that orange flavor, making it more aromatic. Sweeten it up with honey or maple syrup. Low-sodium soy sauce brings balance and depth to the glaze. Don’t forget the seasoning! Garlic and fresh ginger add warmth and spice. If you like heat, toss in some red pepper flakes. Use salt and pepper to enhance the overall taste. This balance of flavors creates a dish that is tasty and satisfying. - In a large bowl, combine 1 lb of ground turkey, 1/2 cup of breadcrumbs, and 1/4 cup of grated Parmesan cheese. - Add 1/4 cup of finely chopped green onions, 1 large egg, 2 cloves of minced garlic, and 1 tablespoon of grated fresh ginger. - If you like some heat, sprinkle in 1/4 teaspoon of red pepper flakes. - Season the mixture with salt and pepper to taste. - Mix everything well, but be careful not to overmix. This keeps the meatballs tender. - Take a small scoop of the mixture and roll it into a ball about 1 inch wide. - Place each meatball on a lined baking sheet, leaving some space between them. - Preheat your oven to 400°F (200°C). - Bake the meatballs for 20-25 minutes. They are done when they turn golden brown and reach an internal temperature of 165°F (74°C). - While the meatballs bake, prepare the orange glaze. - In a medium saucepan, whisk together 1/2 cup of fresh orange juice, the zest of 1 orange, 1/4 cup of honey, and 1 tablespoon of low-sodium soy sauce. - Heat the mixture over medium heat and bring it to a gentle simmer. Let it bubble for about 5 minutes. - To thicken the glaze, stir in 1 teaspoon of cornstarch mixed with 1 tablespoon of water. - Cook for an additional 1-2 minutes, stirring constantly until the glaze thickens to a syrupy consistency. - Once the meatballs are cooked, place them in a large bowl and pour the warm glaze over them. Toss gently to coat each meatball. - Mixing technique: Use your hands to mix the meatball ingredients. This helps blend flavors without making the meat tough. - Avoiding overmixing: Mix just until combined. If you mix too much, the meatballs become dense. - Tips for consistency: The glaze should be thick but pourable. If too thick, add a bit of water. If too thin, simmer longer to reduce. - Adjusting sweetness or heat: Taste the glaze as you go. Add more honey for sweetness or red pepper flakes for heat. - Garnishes and pairings: Top with chopped green onions or sesame seeds. These add color and crunch. - Best side dishes to complement the meatballs: Serve with rice, noodles, or a fresh salad. These balance the flavors and add texture. {{image_4}} - Substitutes for ground turkey: You can use ground chicken or lean beef. For a plant-based choice, try lentils or chickpeas. Both add protein and flavor. - Gluten-free options: Swap breadcrumbs for gluten-free bread crumbs or crushed rice cakes. These options work well and keep the texture light. - Adding herbs or spices: Try fresh herbs like cilantro or basil for a twist. You can also add cumin or smoked paprika for more depth. These spices bring warmth and complexity. - Incorporating different fruit glazes: Instead of oranges, use pineapple or mango juice for a tropical touch. These fruits create a fun, sweet glaze that pairs perfectly with turkey. - Meatball sliders: Serve meatballs on small buns with your favorite toppings. Add lettuce, tomato, or a spicy mayo for a tasty bite. - Meatballs over rice or noodles: Serve meatballs on a bed of rice or noodles. Pour extra glaze on top for flavor. This makes a hearty and filling meal. To keep your orange glazed turkey meatballs fresh, use airtight containers. Glass or plastic containers work well. Make sure to let the meatballs cool down first. Then, place them in the containers and seal tightly. For longer storage, you can freeze them. Use freezer bags or containers. Just remove as much air as possible to avoid freezer burn. The best way to reheat meatballs is in the oven. Set the oven to 350°F (175°C). Place meatballs on a baking sheet. Bake for about 10-15 minutes. You can also use a microwave, but be careful. Heat them in short bursts to avoid drying them out. Check every 30 seconds until hot. In the fridge, cooked meatballs last for about 3-4 days. Make sure the container is sealed well. If you freeze them, they can last for up to 3 months. Always label your containers with the date. This way, you’ll know when to enjoy them! You can use several alternatives for ground turkey. Here are some good substitutions: - Ground chicken - Lean ground beef - Ground pork - Plant-based ground meat Each option brings a unique flavor. Ground chicken is mild and works well. Ground beef is richer. Ground pork adds a nice sweetness. Plant-based options are great for vegans. Yes, you can make the meatballs ahead. Follow these tips for easy prep: - Mix the meatball ingredients and form the meatballs. - Place them on a baking sheet and freeze for about 30 minutes. - After that, store them in a freezer bag. You can also bake them and refrigerate. Just reheat before serving. This saves time on busy days! To check if the meatballs are done, use a meat thermometer. The safe internal temperature is 165°F (74°C). Here’s how to ensure they are cooked: - Insert the thermometer into the center of a meatball. - If it reads 165°F, it’s safe to eat. If you don’t have a thermometer, cut one open. The meat should be no longer pink. Always check a few to be sure! These turkey meatballs are easy to make and delicious. We covered the main ingredients, like ground turkey and fresh orange juice. I gave you step-by-step instructions to ensure they turn out perfectly. Tips on keeping them tender and serving suggestions will help you impress everyone. Remember, you can customize flavors and store leftovers easily. Whether you try a new glaze or serve them as sliders, you've got endless options. Enjoy cooking these tasty meatballs and make them your own!

Savory Orange Glazed Turkey Meatballs Recipe

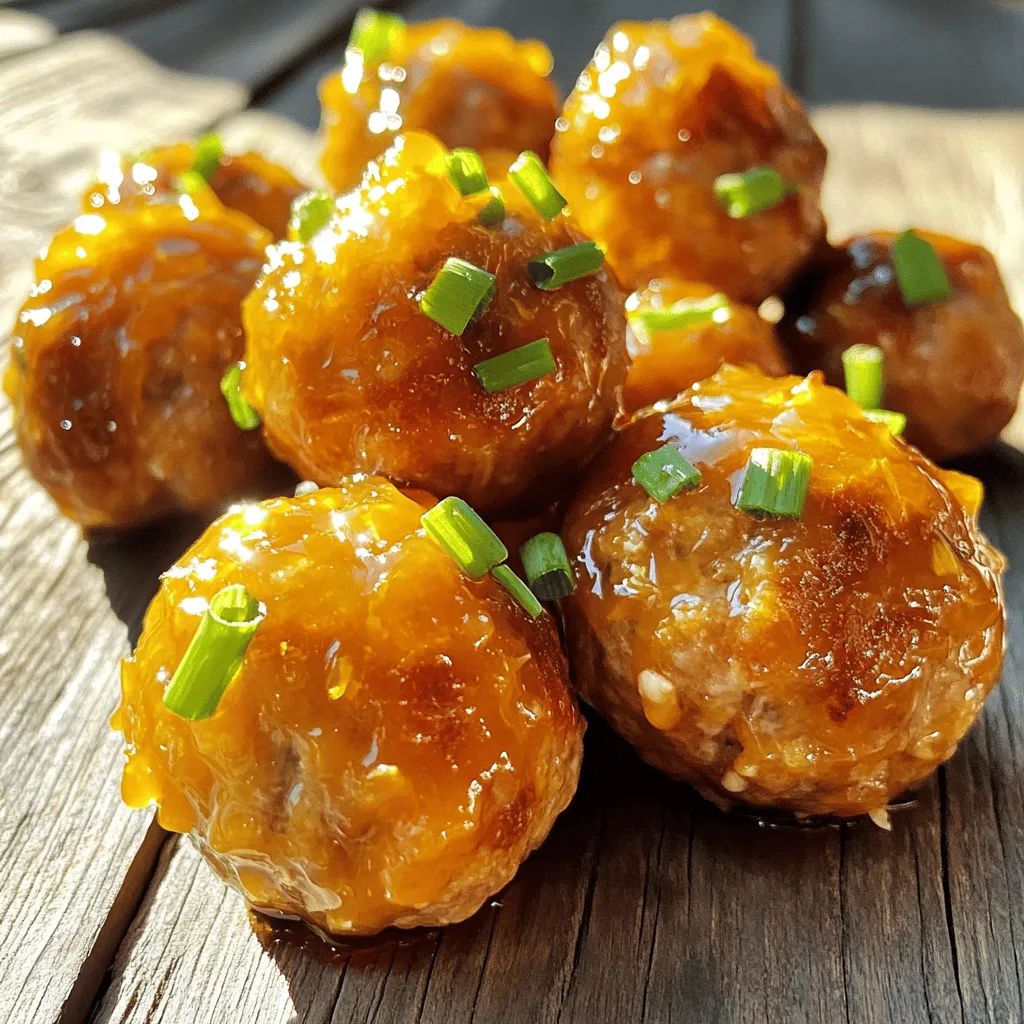
If you’re searching for a wholesome dinner idea, you’re in the right place! These savory orange glazed turkey meatballs are

- 4 large eggs - 1/4 cup milk (or dairy-free alternative) - 1 cup fresh spinach, finely chopped - 1/2 bell pepper, diced - 1/4 cup red onion, finely diced - 1/2 cup cherry tomatoes, halved - 1 tablespoon extra virgin olive oil - Salt, to taste - Freshly ground black pepper, to taste - 1/4 cup feta cheese, crumbled - Fresh herbs like parsley or chives for garnish - Use egg whites for a lower-fat option. - Almond or oat milk works well as a dairy-free choice. - Swap feta for avocado for a creamy texture without dairy. - Add mushrooms or zucchini for more veggie goodness. Start by cracking 4 large eggs into a medium bowl. Add 1/4 cup of milk or your favorite dairy-free milk. Use a whisk to blend them until smooth and fluffy. This step is key for a light texture. Don’t forget to add salt and freshly ground black pepper to taste. This boosts the flavor right from the start. In a non-stick skillet, heat 1 tablespoon of extra virgin olive oil over medium heat. Once the oil shimmers, add 1/4 cup of finely diced red onion and 1/2 diced bell pepper. Sauté for about 3 minutes, stirring often. You want the veggies to soften and smell fragrant. After that, stir in 1 cup of finely chopped fresh spinach and 1/2 cup of halved cherry tomatoes. Cook for another 2-3 minutes. The spinach should wilt, and tomatoes should soften. Now, it’s time to add the eggs. Carefully pour the egg mixture into the skillet. Use a spatula to fold the eggs gently into the veggie mix. Let the eggs cook undisturbed for about 5-7 minutes. Stir occasionally to prevent sticking. You want the eggs fully set and fluffy. If you like, sprinkle 1/4 cup of crumbled feta cheese on top before removing from heat. This adds a tasty touch. Finish by garnishing with fresh herbs. It makes the dish look vibrant and inviting. To make fluffy scrambled eggs, start with fresh eggs. Crack them into a bowl and add milk. Whisk until smooth. This step adds air and makes them light. Season with salt and pepper for taste. Use a non-stick skillet for easy cooking. Heat it over medium until it shimmers. Pour in the egg mixture gently. Cook slowly, stirring occasionally, until fully set. This method keeps your eggs fluffy and soft. For the best vegetable texture, chop them small. This helps them cook evenly and blend well with the eggs. Start with onions and bell peppers; sauté them for about three minutes. They should be soft but not mushy. Next, add spinach and cherry tomatoes. Cook just until the spinach wilts. This gives a nice contrast to the fluffy eggs. Remember, overcooking will make the veggies watery. Seasonings bring your scramble to life. Use fresh herbs like parsley or chives. These add brightness and aroma. Don’t forget the salt and freshly ground black pepper. You can also try adding spices like paprika or chili flakes. For a creamy twist, sprinkle crumbled feta on top. It melts slightly and adds a salty kick. Taste as you go to find your perfect balance. {{image_4}} To make your veggie loaded egg scramble more filling, add protein. You can mix in cooked sausage, bacon, or ham. For a healthier option, try turkey sausage. If you prefer plant-based, tofu or tempeh works well too. Just sauté these proteins with your veggies. This makes the meal richer and keeps you satisfied longer. If you want a vegetarian scramble, keep the eggs or use egg substitute like Just Egg. For a vegan twist, swap the eggs with a chickpea flour mix. Combine chickpea flour with water and spices, then cook it like eggs. This gives you a fluffy, tasty scramble without animal products. Don't forget to load it up with your favorite veggies! Seasonal veggies can change your scramble's flavor. In spring, add asparagus or peas for freshness. In summer, zucchini and corn bring sweetness. Fall is great for mushrooms and kale. Winter often calls for root veggies like sweet potatoes or carrots. Use what's fresh to create a new twist on this dish every season. To keep your veggie loaded egg scramble fresh, store it in an airtight container. Make sure it cools down first before sealing. This helps keep moisture at bay. You can safely store it in the fridge for up to three days. Label the container with the date so you can keep track. When you're ready to enjoy your leftovers, use the stove or microwave. If using the stove, heat a non-stick skillet over low heat. Add a splash of olive oil or a bit of water to help steam the eggs. Stir gently until heated through. If using a microwave, place the scramble in a microwave-safe dish. Cover it loosely and heat for about 1-2 minutes. Stir halfway through to heat evenly. If you want to make this dish ahead of time, freezing is a great option. Allow the scramble to cool completely before freezing. Portion it into freezer-safe bags or containers. Remove as much air as possible to prevent freezer burn. It can last for up to three months in the freezer. When you're ready to eat, thaw it in the fridge overnight before reheating. To make the scramble spicier, you can add diced jalapeños or red pepper flakes. Both options bring heat and flavor. Start with a small amount, then taste and add more if needed. You can also use hot sauce or spicy salsa for extra kick. Pair these with the veggies for a tasty meal. Yes, you can use egg whites instead of whole eggs. Egg whites are lower in calories and fat. They provide protein without the richness of yolks. Use about 8 egg whites for this recipe. The scramble will still be delicious, but it may lack some creaminess. Consider adding a splash of milk or a touch of cheese for added flavor. Many vegetables work well in this scramble. You can try zucchini, mushrooms, or kale. These veggies add different textures and tastes. Broccoli and asparagus are also great choices. Feel free to mix and match based on your preferences. Using seasonal veggies can make your scramble even tastier! This blog post shared key ingredients, step-by-step cooking, and helpful tips for your dish. You learned how to make fluffy scrambled eggs, customize flavors, and adjust for dietary needs. Remember to store leftovers properly and explore different variations. Cooking allows for fun and creativity. Use what you learned today to make delicious meals. Enjoy your cooking adventures!

Veggie Loaded Egg Scramble Flavorful Breakfast Idea

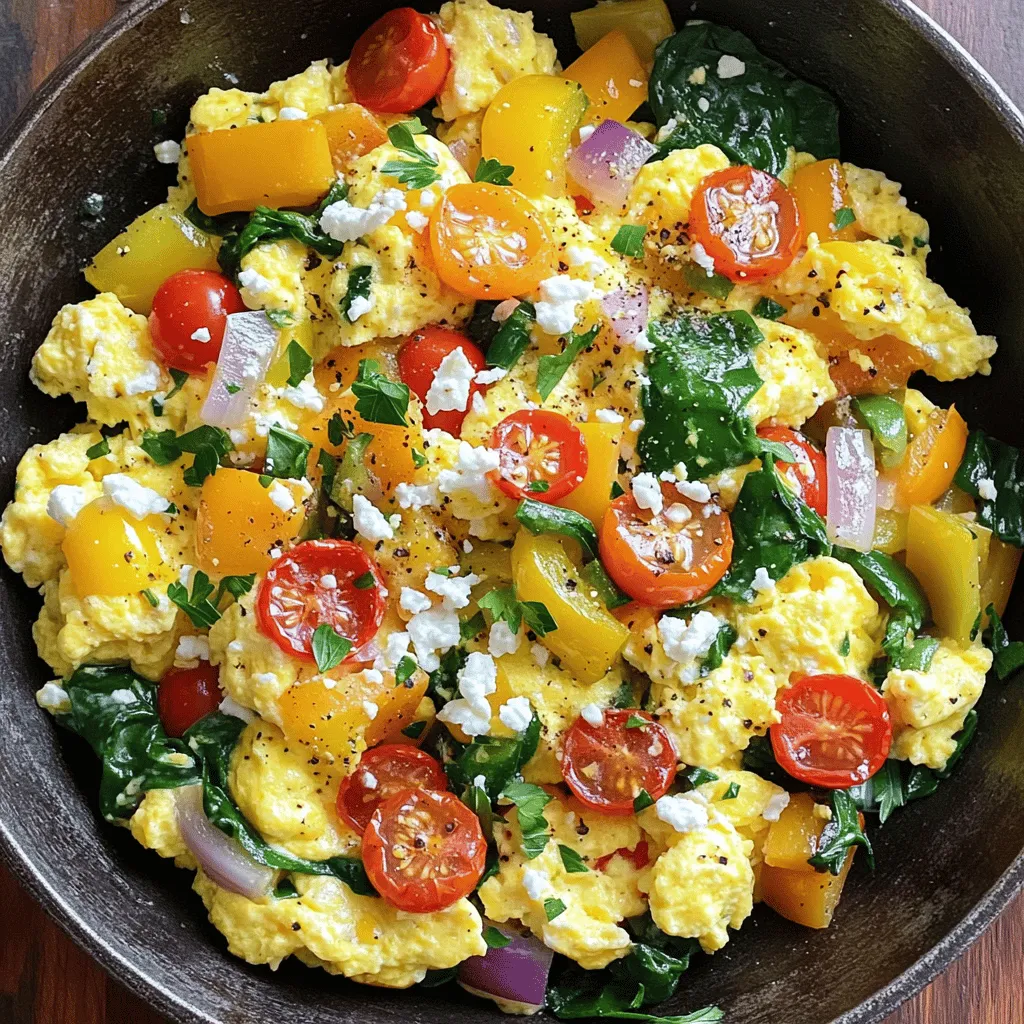
Looking for a quick, healthy breakfast? Try my Veggie Loaded Egg Scramble! Packed with colorful veggies, it’s simple to make

To make Chocolate Chip Pumpkin Pancakes, you need these simple ingredients: - 1 cup all-purpose flour - 1 tablespoon baking powder - 1 teaspoon ground cinnamon - ½ teaspoon ground nutmeg - ¼ teaspoon salt - 1 cup canned pumpkin puree - 2 tablespoons granulated sugar - 1 cup milk (dairy or non-dairy) - 1 large egg - 2 tablespoons melted butter (or coconut oil for dairy-free) - ½ cup semi-sweet chocolate chips - Maple syrup for serving These ingredients create a warm, cozy flavor that screams fall! When choosing pumpkin puree, look for a brand with 100% pumpkin. Check the can label. Avoid those with added sugars or spices. Fresh puree can also work. If you use fresh pumpkin, make sure to roast it until soft. Then, blend it until it’s smooth. This helps your pancakes stay moist and flavorful. If you need gluten-free pancakes, swap the all-purpose flour for a gluten-free blend. Many blends work well in pancakes. For a dairy-free version, use almond milk or oat milk instead of regular milk. You can also replace butter with coconut oil. These swaps keep the taste great while fitting your dietary needs. Start by gathering a large mixing bowl. Add 1 cup of all-purpose flour. Then, include 1 tablespoon of baking powder. Next, add 1 teaspoon of ground cinnamon, ½ teaspoon of ground nutmeg, and ¼ teaspoon of salt. Whisk the dry mix well. Make sure there are no lumps. This mix gives your pancakes a warm, spiced flavor. In another bowl, combine 1 cup of canned pumpkin puree, 2 tablespoons of granulated sugar, and 1 cup of milk. You can use dairy milk or a non-dairy option. Add 1 large egg and 2 tablespoons of melted butter. Stir these ingredients together until smooth. A well-blended mixture makes your batter rich and tasty. Preheat a non-stick skillet over medium heat. Lightly grease it with butter or oil to avoid sticking. Pour about ¼ cup of batter onto the skillet for each pancake. Watch for bubbles on the surface and set edges, which takes about 2-3 minutes. Flip the pancakes gently and cook for another 1-2 minutes. They should be golden brown. Serve warm with maple syrup and extra chocolate chips, if desired. Enjoy your delicious fall treat! To make your pancakes fluffy, focus on mixing. When combining the dry and wet ingredients, stir gently. Leave some lumps in the batter. This helps keep air in the mix. Let the batter rest for a few minutes. This allows the baking powder to get to work. Your pancakes will rise nicely when cooked. One common mistake is overmixing the batter. This can lead to dense pancakes. Another mistake is cooking on high heat. Medium heat is best for even cooking. Also, make sure your skillet is hot enough before pouring the batter. If it's too cool, your pancakes won’t cook right. Lastly, don’t skip the butter or oil in the pan. This helps achieve that perfect golden crisp. For a fun presentation, stack your pancakes high on a nice plate. Drizzle warm maple syrup over them. You can add a sprinkle of extra chocolate chips on top. A dash of cinnamon gives a cozy touch. Garnish with a slice of fresh fruit or nuts for more flair. These small touches make your pancakes look as great as they taste! {{image_4}} You can change your pancakes to fit the season. Adding spices can give them a warm, cozy feel. Try mixing in a pinch of ground ginger or cloves for a spicy kick. You can also toss in some chopped apples or pears for a fruit twist. These additions make your pancakes even more fun and tasty! While frying is common, you can bake these pancakes too! Baking gives you a fluffy texture that some people love. Preheat your oven to 350°F (175°C). Pour the batter into a greased baking dish and cook for about 20-25 minutes. Keep checking until they are golden brown. This method is great for making a big batch for friends or family. Toppings can take your pancakes to a new level. Maple syrup is classic, but don’t stop there! You can use honey, agave syrup, or even chocolate sauce. Fresh fruits like bananas or berries add color and flavor. For a creamy touch, add whipped cream or yogurt. Mix and match until you find your favorite combo! After enjoying your pancakes, store leftovers in an airtight container. This keeps them fresh. Let the pancakes cool to room temperature first. If you stack them, place parchment paper between each one. This prevents sticking and makes it easy to grab a pancake later. Keep the container in the fridge for up to three days. Reheating pancakes can be tricky. To keep them fluffy, use a microwave or skillet. In the microwave, place a pancake on a plate. Add a damp paper towel on top. Heat for 20-30 seconds. Check if it's warm. If not, heat in 10-second bursts. For a skillet, add a little butter over medium heat. Heat each pancake for about a minute on each side. This gives it a nice golden finish. Freezing pancakes is a great option. Once cooled, place them in a single layer on a baking sheet. Freeze them for about an hour. This prevents them from sticking together. After that, stack them in a freezer bag. Remove as much air as possible before sealing. Store them in the freezer for up to two months. When ready to enjoy, thaw them in the fridge overnight or reheat straight from the freezer. Yes, you can use fresh pumpkin. First, you need to cook it. Cut the pumpkin in half, remove the seeds, and roast it in the oven until soft. After it cools, scoop the flesh into a bowl and mash it. You want about one cup of pumpkin. This gives a fresh taste, but it may be a bit more watery than canned puree. If it is too moist, add a little more flour to your batter. You can use several things if you need to skip eggs. One option is to use mashed banana. Use about one-fourth cup of mashed banana per egg. Another choice is unsweetened applesauce, also one-fourth cup per egg. A flaxseed meal is another good option. Mix one tablespoon of flaxseed meal with two and a half tablespoons of water. Let it sit for five minutes before adding it to your mix. Each option works well and keeps your pancakes tasty. Your pancakes are done when you see bubbles on the surface. The edges should look set and firm. After flipping, cook until the bottom is golden brown. This usually takes one to two minutes. If you poke a pancake with a fork and it springs back, it is ready. If it leaves a dent, it needs more time. Enjoy your fluffy pancakes! We explored the key steps to craft delicious Chocolate Chip Pumpkin Pancakes. You learned about fresh pumpkin puree, ingredient options, and cooking methods. I shared tips for soft, fluffy pancakes and common mistakes to avoid. Lastly, we discussed fun variations and smart ways to store leftovers. Now you're ready to make these pancakes your own. Enjoy experimenting with flavors and sharing with loved ones. Happy cooking!

Chocolate Chip Pumpkin Pancakes Delightful Fall Treat

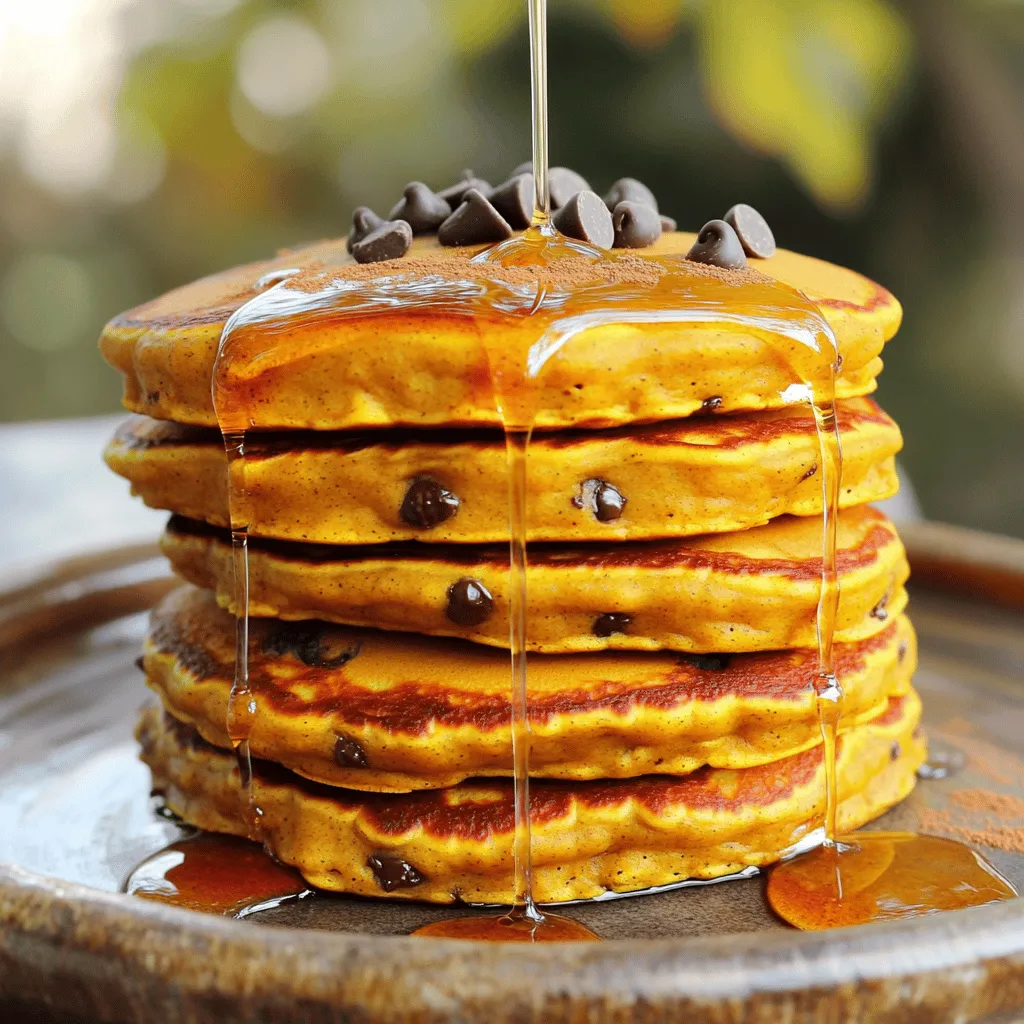
Fall is here, and that means it’s time for delicious Chocolate Chip Pumpkin Pancakes! These fluffy treats combine the warmth

- 1 lb (450g) ground beef - 2 tablespoons gochujang (Korean chili paste) - 2 tablespoons soy sauce - 1 tablespoon sesame oil - 2 teaspoons brown sugar - 1 teaspoon garlic, finely minced - 1 teaspoon ginger, freshly grated - 1 cup cooked jasmine rice - 1 cup broccoli florets, cut into bite-sized pieces - 1 large carrot, peeled and julienned - 2 green onions, thinly sliced The main ingredients make this dish bold and tasty. Ground beef gives a rich flavor. Gochujang and soy sauce add spice and depth. The ginger and garlic boost the taste, making it aromatic. Fresh veggies like broccoli and carrots bring color and crunch. - Sesame seeds - Lime wedges - Green onions Garnishes make your bowl look great and add fun flavors. Sesame seeds provide a nutty crunch. Lime wedges let you add a zesty kick. Fresh green onions give a burst of freshness on top. Using these garnishes will elevate your Spicy Korean Beef Bowls even more! Start by heating a large skillet over medium-high heat. Add 1 lb of ground beef to the skillet. Cook the beef until it turns brown, about 5-7 minutes. Use a spatula to break the meat into smaller pieces as it cooks. This helps it to cook evenly. If you see extra fat, drain it off. You want your dish to be hearty, not greasy. Once the beef is nicely browned, it’s time to add flavor. Stir in 2 tablespoons of gochujang, 2 tablespoons of soy sauce, and 1 tablespoon of sesame oil. Add 2 teaspoons of brown sugar, 1 teaspoon of minced garlic, and 1 teaspoon of grated ginger. Mix everything well and let it cook for another 3-4 minutes. This helps all the flavors blend together. While the beef cooks, prepare your vegetables. In a pot or steamer, add 1 cup of broccoli florets and 1 large carrot, which you will julienne. Steam them for about 3-5 minutes. You want them tender but still a bit crisp. This adds great texture to the dish. Keep an eye on the vegetables. You want them cooked but not mushy. They should still have a bright color and a slight crunch. This makes your dish more colorful and enjoyable. Now, it’s time to put everything together. Start by placing a scoop of cooked jasmine rice at the bottom of each bowl. Top the rice with a generous portion of the spicy beef mixture. The rice will soak up the flavors from the beef, making each bite delightful. For a beautiful finish, arrange the steamed broccoli and carrots next to the beef. This adds color and makes the dish look fresh. Garnish with sliced green onions and a sprinkle of sesame seeds. Don’t forget to add a lime wedge on the side. Squeezing fresh lime juice over the dish adds a tasty zing just before eating. Avoiding Greasiness To keep your Spicy Korean Beef Bowls light, drain the fat after browning the beef. This step stops the dish from becoming heavy. Use lean ground beef for less grease. Balancing Flavors Use gochujang wisely. This spicy paste adds heat but can overpower the dish. Start with two tablespoons and taste as you mix. Adjust with soy sauce and brown sugar for sweetness. Using Eye-Catching Dishware Choose deep bowls to show off your colorful ingredients. Bright colors from the veggies make the dish pop. The right dishware can make your meal look gourmet. Enhancing Aroma with Sesame Oil Drizzle a bit of sesame oil over the finished bowls. This adds a rich aroma that draws people in. The oil also gives a nice shine to your meal. Complementary Side Dishes Serve with a light cucumber salad or kimchi. These sides add a refreshing crunch and balance the bold flavors of the beef. Beverage Pairings Enjoy your meal with a cold Korean beer or a sweet tea. These drinks pair well and enhance the meal experience. {{image_4}} You can switch the ground beef with chicken or tofu. - Chicken: Use ground chicken for a lighter option. Cook it the same way as beef. - Tofu: For a plant-based choice, use firm tofu. Crumble it like beef and sauté until golden. If you want vegan substitutes, try seitan or tempeh. They both provide a hearty texture. Want to play with heat? You can adjust the spice level easily. - How to Modulate Heat: Start with less gochujang. Add more gradually if you want more kick. - Adding Extra Ingredients for Flavor: Consider adding a splash of rice vinegar. It adds tang without extra heat. For a healthy twist, swap jasmine rice with other grains. - Using Brown Rice or Quinoa: Both provide more fiber and nutrients. Cook them according to package directions. - Cauliflower Rice for Low-Carb: If you want something even lighter, use cauliflower rice. It’s simple to make and absorbs flavors well. These variations keep the dish fun and fresh. Enjoy experimenting with your Spicy Korean Beef Bowls! - Refrigerating Prepared Bowls: Store any leftover Spicy Korean Beef Bowls in an airtight container. This method keeps the flavors fresh. Your dish will last in the fridge for up to three days. When you store it, make sure to separate the rice from the beef and veggies. This keeps the rice from becoming soggy. - Freezing Options: You can freeze the beef mixture for later use. Place the beef in a freezer-safe bag. Remove as much air as possible before sealing. It will maintain its quality for about three months. Broccoli and carrots do not freeze well, so add fresh ones when you reheat. - Microwave vs. Stovetop: The microwave is quick for reheating. Place your bowl in the microwave for about two minutes. Stir halfway through to heat evenly. The stovetop works too. Heat in a skillet over medium heat, stirring often for about five minutes. - Preserving Texture and Flavor: To keep the texture nice, add a splash of water when reheating in the microwave. This helps steam the dish. If using the stovetop, a little sesame oil can add flavor back to the beef. Gochujang is a thick, red chili paste from Korea. It combines heat, sweetness, and umami. You will find it made from fermented soybeans, rice, and chili powder. This unique blend makes it a staple in Korean cooking. You can use it in marinades, stews, and sauces. You can find gochujang in most Asian grocery stores. Look for it in the international aisle of larger supermarkets. It usually comes in a red tub or jar. Yes, you can prepare this dish ahead of time. It makes meal prep easy and convenient. For meal prep, cook the beef mixture and store it in the fridge. You can also steam the veggies in advance. Keep the rice separate for the best texture. For storage, place the components in airtight containers. You can keep them in the fridge for up to three days. For longer storage, freeze the beef mixture and rice. To make this recipe gluten-free, swap the soy sauce. Use tamari or coconut aminos instead. Both work well and provide a similar flavor. Make sure to check the labels on all ingredients. Some gochujang brands offer gluten-free options. Always choose the ones made without wheat. This article covered how to make spicy Korean beef bowls. We explored key ingredients, like ground beef and gochujang, and optional garnishes to enhance the dish. The step-by-step guide helped with cooking, preparing veggies, and assembling your bowl attractively. Remember to balance flavors and use eye-catching dishware for a great presentation. With variations and storage tips, you can enjoy this meal multiple ways. I hope you feel confident to try making this dish and enjoy the flavors it brings to your table.

Spicy Korean Beef Bowls Bold and Flavorful Delight

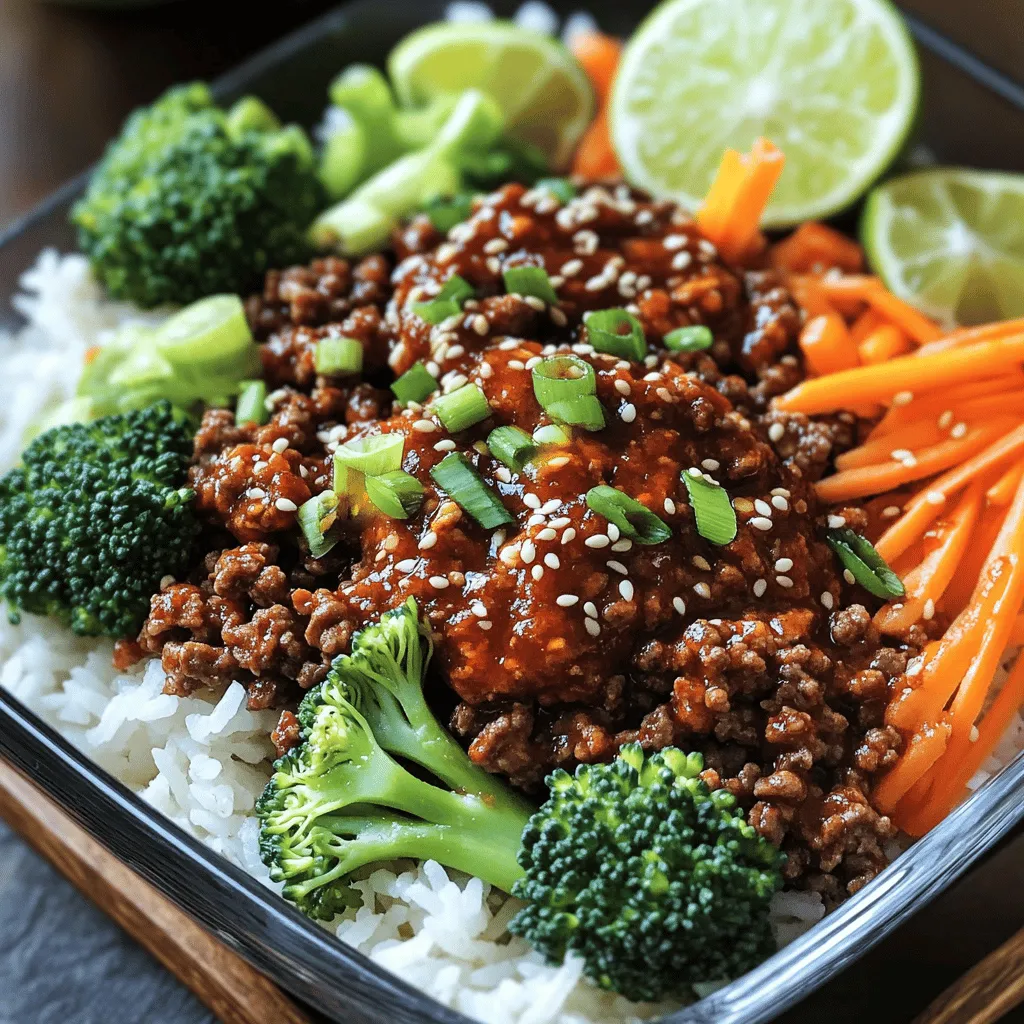
Get ready to take your taste buds on a bold journey with Spicy Korean Beef Bowls! This dish is packed

Older posts
Newer posts
← Previous Page1 … Page10 Page11 Page12 … Page91 Next →

dsad

© 2025 dailydishcraft • Built with GeneratePress

Our Policies

  • Copyright Policy
  • Cookie Policy
  • GDPR Policy
  • Privacy Policy
  • Disclaimer
  • Terms Of Use

More Information

  • Home
  • About
  • Contact
  • Appetizers
  • Dessert
  • Dinner
  • Drinks
©2025, dailydishcraft About Back To Top