Skip to content
DisclaimerTerms Of UseGDPR PolicyCookie Policy

dailydishcraft

  • Home
  • Drinks
  • Appetizers
  • Dinner
  • Dessert
  • About
  • Contact
  • Privacy Policy
DisclaimerTerms Of UseGDPR PolicyCookie Policy

Jessica

- 2 ripe avocados - 1 cup cherry tomatoes, halved - 1 cup fresh mozzarella balls, halved - 1/4 cup fresh basil leaves, finely chopped - 2 tablespoons balsamic glaze - 1 tablespoon extra virgin olive oil - Sea salt and freshly ground black pepper, to taste Choose ripe avocados for the best taste. They should feel soft but not mushy. Cherry tomatoes should be bright and firm. Fresh mozzarella balls add creaminess. Look for good quality to elevate the dish. Fresh basil gives a delightful aroma. Always chop it finely for better flavor. Balsamic glaze adds sweetness and tang. Use a high-quality one for the best results. If you can’t find cherry tomatoes, use diced regular tomatoes. For mozzarella, you can use feta cheese for a different taste. If you don’t have balsamic glaze, a splash of balsamic vinegar works too. If you want a different herb, try parsley or cilantro. You can also skip the olive oil if you prefer less fat. {{ingredient_image_2}} To start, take two ripe avocados. Cut each avocado in half lengthwise. Be gentle as you remove the pit. Use a spoon to scoop out a little flesh from each half. This creates a small cavity for the filling. Make sure not to break the avocado shell. Next, in a medium bowl, gather your ingredients. Add one cup of halved cherry tomatoes. Then, add one cup of halved fresh mozzarella balls. Finally, toss in a quarter cup of finely chopped basil leaves. Now it’s time to fill the avocados. Drizzle one tablespoon of extra virgin olive oil over the tomato mixture. Season with sea salt and freshly ground black pepper. Use a spatula to mix everything together gently. You want all the ingredients coated, but be careful not to mash them. With a spoon, take portions of the mixture. Fill each avocado half with the tomato and mozzarella mix. Press down gently to pack the filling. This helps keep it stable. To make your dish pop, drizzle two tablespoons of balsamic glaze over the stuffed avocados. Let it flow down the sides for a nice look. If you like, add whole basil leaves on top for extra color. Serve immediately to enjoy the fresh taste. To make great Caprese stuffed avocados, choose ripe avocados. Look for ones that feel slightly soft when you press them. Avoid any that feel mushy or have dark spots. The perfect avocado will have smooth skin and a vibrant color. If they are too firm, leave them at room temperature for a couple of days. For a beautiful display, use a white platter. The bright colors of the tomatoes and basil will pop against the white. You can also serve each avocado half on small plates. Add a sprinkle of extra chopped basil on top for a fresh look. Drizzle some balsamic glaze over the top for a glossy finish. To boost flavor, try adding a pinch of red pepper flakes for heat. You can also mix in some diced red onion for crunch. If you love garlic, add a little minced garlic to the filling. For a twist, use different cheeses like feta or goat cheese. Each change will give your avocados a unique taste and keep things exciting! Pro Tips Choose Perfect Avocados: Look for avocados that are slightly soft to the touch but not mushy. This ensures they are ripe and perfect for stuffing. Fresh Ingredients Matter: Use the freshest mozzarella and basil you can find to enhance the flavors of the dish. Adjust to Taste: Feel free to add more or less balsamic glaze and seasoning based on your personal preference for a customized flavor profile. Chill for Best Flavor: If you have time, let the stuffed avocados chill in the refrigerator for about 15 minutes before serving. This allows the flavors to meld beautifully. {{image_4}} Caprese stuffed avocados are already vegetarian, but you can add fun twists. Try adding roasted red peppers for a sweet touch. You can also mix in some arugula for a peppery flavor. If you want more crunch, add diced bell peppers. These options keep the dish fresh and vibrant. For those who want extra protein, consider adding grilled chicken or shrimp. Simply chop them into small pieces and mix them with the tomatoes and mozzarella. If you prefer plant-based proteins, try chickpeas or black beans. These will add a hearty feel to the dish while staying healthy and delicious. You can play with flavors in many ways. Swap out mozzarella for feta or goat cheese for a tangy kick. Adding a bit of pesto can take it to another level, bringing richness and depth. You can also try different herbs like dill or mint for a fresh taste. Just think about what you love and mix it in! To store any leftover Caprese stuffed avocados, first place them in an airtight container. Keep them in the fridge for up to two days. If you want to keep the avocados from browning, sprinkle some lemon juice on the cut surfaces. This simple step helps maintain their fresh look and taste. Freezing stuffed avocados is not ideal. The texture changes when thawed. The creamy avocado may become mushy, and the filling may lose its crunch. If you must freeze, separate the filling and the avocado halves. Freeze the filling in a sealed bag for up to a month. When ready to eat, thaw the filling and prepare fresh avocados. For the best flavor, enjoy your stuffed avocados right after making them. If you have leftovers, store them as mentioned. To keep basil fresh, wrap it in a damp paper towel and place it in a bag in the fridge. This method keeps the basil vibrant and ready for your next dish. Always check your ingredients for freshness before using them. Yes, you can prepare these stuffed avocados ahead of time, but with a few notes. Cut and scoop the avocados, but don't fill them until you're ready to serve. This keeps them fresh and green. You can mix the filling of tomatoes, mozzarella, and basil in advance. Just store it in the fridge. When you are ready, fill the avocado halves and drizzle with balsamic glaze. Stuffed avocados are great on their own, but you can pair them with many sides. A light salad with mixed greens works well. You might also serve them with crusty bread or crackers. For a heartier meal, add grilled chicken or shrimp on the side. Adding a refreshing drink, like lemonade or iced tea, makes your meal complete. Caprese stuffed avocados are generally safe for many diets, but consider a few things. The dish contains dairy from mozzarella, so it’s not vegan. For lactose-free options, use plant-based cheese. If you have a nut allergy, check the balsamic glaze for ingredients. This dish is gluten-free, making it a good choice for gluten-sensitive diets. Always ask guests about allergies or preferences before serving. This blog post shared how to make Caprese Stuffed Avocados. We covered key ingredients, preparation steps, and helpful tips. You learned about flavor combinations and storage methods. Whether you prefer vegetarian options or want to add proteins, there are many ways to enjoy this dish. Remember, use fresh avocados for the best taste. Enjoy creating your version of this treat!

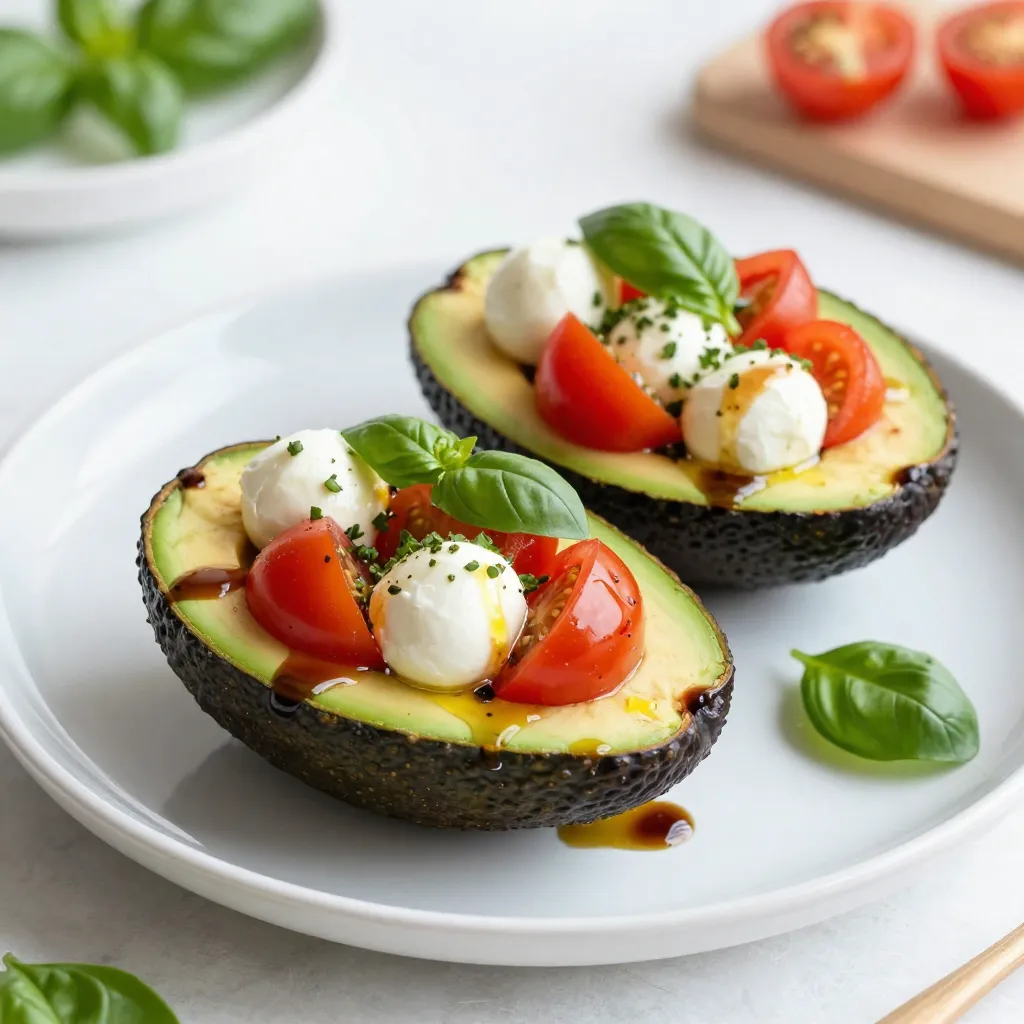
Caprese Stuffed Avocados Flavorful and Simple Recipe

Looking for a fresh, easy dish packed with flavor? Caprese Stuffed Avocados are the answer! This simple recipe combines creamy

- 1 cup ricotta cheese - 1 cup all-purpose flour - 1/4 cup granulated sugar - 1 teaspoon baking powder - 1/2 teaspoon baking soda - 1/4 teaspoon salt - 2 large eggs - 1/2 cup milk - Zest of 1 lemon - 2 tablespoons fresh lemon juice - 1 teaspoon pure vanilla extract - Butter or neutral oil for cooking Lemon ricotta pancakes shine with simple yet flavorful ingredients. The main star is ricotta cheese, which adds creaminess and protein. All-purpose flour and granulated sugar balance the texture and sweetness. Next, we have the additional ingredients. Baking powder and baking soda help the pancakes rise and stay fluffy. Eggs bind the mix, while milk makes it smooth. Lemon zest and juice bring a bright, fresh taste. For cooking, I recommend pure vanilla extract for extra flavor. Use butter or a neutral oil to prevent sticking and add richness. With these ingredients, you can create a delightful breakfast treat that is both tasty and satisfying. {{ingredient_image_2}} In a large bowl, start by adding 1 cup of ricotta cheese. Next, crack in 2 large eggs. Pour in 1/2 cup of milk. Then, add the zest of 1 lemon, 2 tablespoons of fresh lemon juice, and 1 teaspoon of pure vanilla extract. Use a whisk to mix these ingredients until smooth and well combined. This mixture will give your pancakes a rich and creamy texture. Now it’s time to focus on the dry ingredients. In a separate bowl, sift together 1 cup of all-purpose flour, 1/4 cup of granulated sugar, 1 teaspoon of baking powder, 1/2 teaspoon of baking soda, and 1/4 teaspoon of salt. Sifting helps remove lumps and makes the pancakes light and fluffy. Carefully fold the dry ingredients into the wet mixture using a spatula. Be gentle; it’s okay if a few lumps remain. Overmixing can make your pancakes tough. Next, preheat a non-stick skillet over medium heat. Lightly grease it with butter or neutral oil. For each pancake, pour about 1/4 cup of batter onto the skillet. Cook until bubbles form on the surface, which takes about 2-3 minutes. Flip the pancakes and cook for another 2-3 minutes until they turn golden brown. Transfer the cooked pancakes to a warm plate, and cover them to keep them hot while you finish cooking the rest. Serve the pancakes warm with maple syrup, fresh berries, or whipped cream for a delightful breakfast treat. To get the best texture, avoid overmixing your batter. Stir gently until just combined. It's okay if small lumps remain. This keeps the pancakes light and fluffy. Next, heat your skillet to medium. Too hot can burn the pancakes, while too low makes them soggy. A non-stick skillet is best for cooking. Lightly grease it with butter or oil for a golden finish. For a stunning presentation, stack pancakes neatly on a serving plate. Dust them lightly with powdered sugar. Add fresh lemon slices and a sprig of mint on top. This adds color and freshness to your dish. Consider topping with maple syrup, fresh berries, or whipped cream. These toppings add flavor and make the dish more inviting. To elevate the flavor, try adding spices like cinnamon or nutmeg. A touch of almond extract can also enhance the pancake's taste. These small additions can make a big difference. Experiment to find your favorite flavor combination! Pro Tips Use Fresh Ingredients: Always opt for fresh lemon juice and zest for a vibrant flavor that can't be matched by bottled alternatives. Don't Overmix: When combining wet and dry ingredients, mix gently. A few lumps are okay; this helps keep the pancakes fluffy. Control the Heat: Cook pancakes on medium heat to prevent burning. If they brown too quickly, lower the heat slightly. Keep Them Warm: As you cook the pancakes, keep the finished ones warm in a low oven (around 200°F or 93°C) to serve them hot. {{image_4}} You can easily switch up the flavors in lemon ricotta pancakes. One fun option is blueberry lemon ricotta pancakes. Just fold in fresh blueberries after mixing the batter. They add a sweet burst with every bite. Another variation is herb-infused savory pancakes. You can add fresh herbs like basil or chives to the batter. This twist makes for a tasty brunch option. It pairs well with eggs or avocado. If you need a gluten-free version, you can use gluten-free flour instead of regular flour. The pancakes will still be light and fluffy. For those who want a dairy-free option, swap the ricotta cheese with a plant-based alternative. You can use almond or cashew ricotta. This keeps the pancakes creamy without the dairy. To complement your lemon ricotta pancakes, consider serving them with crispy bacon or sausage. These savory sides balance the sweetness of the pancakes nicely. When it comes to drinks, fresh orange juice or a hot cup of tea works well. For a special touch, try a sparkling mimosa. It adds a festive feel to your breakfast or brunch. To keep your leftover lemon ricotta pancakes fresh, store them properly. First, let the pancakes cool completely. This step prevents moisture buildup. Then, place them in an airtight container. A good choice is a plastic or glass container. You can stack them with parchment paper between layers. This way, they won’t stick together. Store them in the fridge for up to three days. When you're ready to enjoy your pancakes again, reheating is easy. The best method is using a skillet. Heat it on low and add a little butter. Place the pancakes in the skillet. Cook for about one minute on each side. This keeps them soft and warm. If you're in a hurry, you can use the microwave. Heat them for about 20-30 seconds. However, this method may make them less fluffy. Freezing pancakes is a great option for longer storage. First, let the pancakes cool completely. Then, stack them with parchment paper in between. This prevents sticking. Place the stack in a freezer-safe bag or container. Be sure to remove as much air as possible. They can last up to two months in the freezer. When you want to eat them, take the pancakes out of the freezer. Thaw them in the fridge overnight for best results. Reheat them in the skillet or microwave as mentioned before. This way, they taste just as good as fresh! Lemon ricotta pancakes are fluffy and light pancakes that use ricotta cheese. They have a bright lemon flavor, making them a perfect breakfast treat. The ingredients include: - 1 cup ricotta cheese - 1 cup all-purpose flour - 1/4 cup granulated sugar - 1 teaspoon baking powder - 1/2 teaspoon baking soda - 1/4 teaspoon salt - 2 large eggs - 1/2 cup milk - Zest of 1 lemon - 2 tablespoons fresh lemon juice - 1 teaspoon pure vanilla extract - Butter or neutral oil for cooking These pancakes are delicious when served warm with syrup or fresh berries. Yes, you can use low-fat ricotta cheese. It will still work well in the recipe. However, low-fat ricotta may change the texture slightly. Your pancakes may be less rich but will still taste great. If you want a creamier texture, stick with whole milk ricotta. To make pancakes fluffier, you should: - Separate the eggs. Beat the egg whites until they are stiff. - Fold the egg whites into the batter last. This adds air and lightens the batter. - Avoid overmixing the batter. A few lumps are okay. This helps keep the pancakes light. These steps can help you achieve that perfect fluffy texture in your pancakes. Yes, you can prepare the batter in advance. Store it in the fridge for up to 2 hours. This allows the flavors to blend. When you're ready to cook, just give it a gentle stir. If the batter seems thick, add a splash of milk to loosen it. This way, you can enjoy fresh pancakes with less morning fuss. In this article, we explored how to create delicious lemon ricotta pancakes, focusing on key ingredients like ricotta, flour, and sugar. We broke down the process into simple steps, ensuring fluffy results with expert tips. I shared variations to suit different tastes and dietary needs. Lastly, we covered storage and reheating methods for leftovers. Cooking should be fun and enjoyable. With these tips, you can impress anyone with your pancake skills. Dive in, experiment, and savor your tasty creations!

Lemon Ricotta Pancakes Delightful Breakfast Treat

Looking for a breakfast that feels like a treat? Lemon ricotta pancakes are the answer! These fluffy delights combine the

- 1 lb sirloin steak, cut into bite-sized cubes - 4 tablespoons unsalted butter, divided - 5 cloves garlic, minced - 1 teaspoon fresh rosemary, chopped (or ½ teaspoon dried) - 1 teaspoon fresh thyme, chopped (or ½ teaspoon dried) The star of this dish is the sirloin steak. It gives the bites great flavor. I prefer to cut it into cubes. This way, they cook quickly and evenly. The unsalted butter adds a rich taste and helps the garlic shine. Fresh garlic brings a strong aroma. I always use five cloves for a bold kick. Fresh herbs, like rosemary and thyme, add depth and brightness. You can use dried herbs, but fresh ones make a big difference. - Salt and freshly cracked black pepper, to taste Salt and black pepper are essential. They bring out the natural taste of the steak. I recommend seasoning the steak well before cooking. This helps the flavors blend nicely. - Fresh parsley, finely chopped Fresh parsley is my go-to for garnishing. It adds a pop of color and freshness. Just a sprinkle on top makes a beautiful finish. Plus, it complements the rich garlic butter well. {{ingredient_image_2}} - Seasoning the steak: Start by cutting 1 pound of sirloin steak into bite-sized cubes. Season these cubes well with salt and freshly cracked black pepper. This step is key to adding flavor. - Letting it sit at room temperature: Allow the seasoned steak to sit for 15 to 20 minutes. This process helps the meat become tender and enhances its flavor. - Heating the skillet: Grab a large skillet and add 2 tablespoons of unsalted butter over medium-high heat. Wait until the butter melts and sizzles. Do not let it brown. - Searing the steak bites: Once the skillet is hot, add the steak cubes in a single layer. If your pan is small, cook in batches. Sear the steak for 2 to 3 minutes until a nice brown crust forms. Flip the bites and cook for another 1 to 2 minutes for medium-rare doneness. Adjust the time for your taste. - Adding garlic and herbs: Lower the heat to medium. Move the steak bites to one side of the skillet. In the empty space, add the remaining 2 tablespoons of butter, minced garlic, chopped rosemary, and thyme. Stir this mixture for 1 to 2 minutes until the garlic is golden and fragrant. - Combining with garlic butter mixture: Gently toss the seared steak bites in the garlic herb butter until they are fully coated. Let them cook for another minute to meld the flavors. - Garnishing for presentation: Take the skillet off the heat. Transfer the steak bites to a serving platter. Sprinkle with finely chopped fresh parsley for a bright touch. This method ensures you get flavorful, juicy steak bites every time. Enjoy the aroma and taste as you serve them hot! To make the best garlic butter steak bites, you need the right cut. Sirloin steak works great because it is tender and flavorful. Other good options include ribeye or tenderloin. These cuts give you juicy bites every time. Always let the steak sit at room temperature for 15-20 minutes before cooking. This helps the meat cook evenly and stay tender. If you skip this step, the inside may stay cold while the outside cooks. A perfect sear is key to great steak bites. Use a hot skillet or frying pan. Add butter and let it melt until it sizzles. Then, add the steak in one layer. Avoid overcrowding the pan. This ensures a nice brown crust forms on each piece. For medium-rare steak bites, cook for about 2-3 minutes on one side. Then flip and cook for 1-2 more minutes. Adjust the time if you like your steak more or less done. To add more flavor, use fresh herbs like rosemary and thyme. You can also sprinkle extra salt and black pepper. These simple touches make a big difference. Keep an eye on the garlic while it cooks. You want it golden and fragrant but not burnt. Cooking times may vary based on your stove, so stay close to the pan. This will help you create a rich garlic butter sauce that coats the steak bites perfectly. Pro Tips Rest the Steak: Allow your seasoned steak cubes to rest at room temperature for 15-20 minutes before cooking. This helps the meat cook more evenly and enhances its flavor. Don’t Crowd the Pan: Sear the steak bites in batches if necessary. Overcrowding the pan can cause the meat to steam instead of sear, preventing that delicious crust from forming. Use Fresh Herbs: For the best flavor, opt for fresh herbs over dried ones. They bring a vibrant taste and aroma that complements the garlic and steak perfectly. Perfect Doneness: Use a meat thermometer to check for doneness. Aim for 130°F for medium-rare, ensuring your steak bites are juicy and tender. {{image_4}} You can use other meats besides sirloin steak. - Ribeye: This cut has more fat, making it juicy. - Filet Mignon: It is tender and melts in your mouth. - Chicken: Cut chicken breasts into bite-sized pieces for a lighter dish. - Shrimp: Use large shrimp for a seafood twist. Each option gives a new taste and texture. Adding extras can boost the flavor of your steak bites. - Cheese: Sprinkle blue cheese or cheddar on top when serving. - Spices: Try adding a pinch of cayenne or paprika for heat. - Herbs: Fresh herbs like basil or oregano can change the taste. These simple changes make the dish unique each time. Pairing your steak bites with sides can enhance your meal. - Vegetables: Serve with roasted asparagus or sautéed green beans. - Starch: Mashed potatoes or rice complement the rich flavors. - Creative Ideas: Serve on skewers or in mini taco shells for fun. These suggestions make your dish look and taste great. To keep your garlic butter steak bites fresh, you need to store them right. First, let them cool. Place the steak bites in an airtight container. They can stay in the fridge for up to three days. Make sure to layer them with parchment paper. This helps keep the bites from sticking together. If you want to keep them longer, you can freeze them. Place the cooled steak bites in a freezer-safe bag. Remove as much air as you can before sealing. They will last in the freezer for about three months. When you’re ready to enjoy them, just thaw in the fridge overnight. To reheat your steak bites for the best flavor, use a skillet. Heat the skillet over medium heat. Add a small amount of butter or oil to the pan. This helps keep the bites juicy. Then, add the steak bites and stir them gently. Heat for about 3-5 minutes. Be careful not to overcook them. Keep an eye on the color and texture. You want them warm but not tough. Enjoy your flavorful garlic butter steak bites just like they were freshly made! The best steak for garlic butter steak bites is sirloin. Sirloin is tender and flavorful. It cooks well and has a nice beefy taste. Other good options include ribeye or tenderloin. These cuts also provide a juicy bite. To achieve medium doneness, cook the steak bites for about 3-5 minutes total. Start with 2-3 minutes on one side, then flip. After flipping, cook for an additional 1-2 minutes. Use a meat thermometer for accuracy. Aim for an internal temperature of 140°F. Yes, you can prep garlic butter steak bites ahead of time. Season the steak and store it in the fridge. Cook the steak bites just before serving for the best taste. Store any leftovers in an airtight container in the fridge for up to 3 days. Garlic butter steak bites pair well with many sides. Consider serving them with: - Crusty bread for soaking up the butter - Mashed potatoes for a creamy side - Steamed vegetables for a healthy touch - A fresh salad to balance the flavors These sides will enhance your meal and complement the rich flavors of the steak bites. This post covered garlic butter steak bites, from choosing the right steak to cooking tips. You learned about key ingredients like sirloin, garlic, and fresh herbs. There are also variations for different meats and extra flavors. Plus, I shared storage and reheating tips to keep your bites tasty. Now, you have all the tools to create this delicious dish. With a few simple steps, you can impress anyone at your table. Enjoy every bite and share your experience!

Garlic Butter Steak Bites Flavorful and Juicy Treat

Are you ready to indulge in a dish that’s both flavorful and juicy? Garlic Butter Steak Bites are here to

- 250g pasta (penne or fusilli recommended) - 200g block of creamy feta cheese - 2 cups cherry tomatoes, halved - 1/4 cup extra virgin olive oil - 3 cloves of fresh garlic, minced - 1 teaspoon dried oregano - 1 teaspoon dried basil - Freshly cracked black pepper, to taste - Salt, to taste - Optional: Red pepper flakes, for an extra kick - Fresh basil leaves, for garnish When I make Baked Feta Pasta, I start with the main ingredients. I love using penne or fusilli pasta because they hold sauce well. The creamy feta is key; it melts beautifully. Cherry tomatoes add sweetness and color. Next, I focus on flavor enhancers. Extra virgin olive oil is my go-to for richness. Fresh garlic gives a nice kick, while dried oregano and basil add classic Italian notes. Finally, seasoning is crucial. I use freshly cracked black pepper and salt to taste. If you like spice, red pepper flakes boost the heat. Fresh basil leaves on top make it look and taste amazing. {{ingredient_image_2}} - Preheat the oven to 200°C (400°F). - Combine halved cherry tomatoes and olive oil in a baking dish. First, you want to set your oven to 200°C (400°F). This helps ensure everything bakes evenly. Next, grab a large baking dish. In it, mix your halved cherry tomatoes with the olive oil. Make sure each tomato gets a nice coat of oil. This creates a great base for the feta cheese and adds flavor. - Nestle the feta in the center with seasonings. - Bake for approximately 30 minutes until golden and soft. Now, take your block of feta cheese. Place it right in the center of the baking dish. This allows the tomatoes to surround the cheese. Then, sprinkle it with minced garlic, dried oregano, and dried basil. Add salt and black pepper to taste. This seasoning will elevate the feta’s flavor. Bake this mixture for about 30 minutes. You’ll know it’s done when the feta is golden and soft, and the tomatoes look blistered. - Cook pasta according to package instructions. - Drain and set aside for mixing later. While the feta and tomatoes are baking, cook your pasta. Follow the package instructions for the best results. Once cooked, drain the pasta and set it aside. This step is crucial because it allows the pasta to absorb the creamy sauce later. - Mash the feta and tomatoes together. - Toss the cooked pasta into the creamy sauce. - Adjust seasoning and serve hot with garnish. Once the baking time is up, carefully remove the dish from the oven. Use a fork to mash the soft feta and tomatoes together. This creates a creamy sauce. Next, add the drained pasta to the dish and toss everything together. Make sure the pasta gets coated in that delicious sauce. Taste your dish and adjust the seasoning if needed. If you like heat, sprinkle in some red pepper flakes. Serve the pasta hot, garnished with fresh basil leaves. This adds a lovely touch and bright flavor. Enjoy your meal! - Ensure pasta is al dente for best texture. - Use high-quality feta for creaminess. Cooking the pasta just right is key. Al dente pasta holds its shape and adds a nice bite. Follow the package instructions closely. As for feta, choose a creamy block. It melts beautifully, creating a rich sauce. - Serve in shallow bowls with extra olive oil drizzle. - Add a sprinkle of red pepper flakes for visual appeal. When you plate this dish, use shallow bowls. This allows the sauce to shine. Drizzle some olive oil on top for extra flavor. A sprinkle of red pepper flakes adds a pop of color and heat. - Add spinach or kale for greens. - Incorporate olives for a briny twist. You can mix in greens like spinach or kale. They not only add nutrition but also a vibrant color. If you love a briny taste, toss in some olives. They bring a wonderful depth to the dish. Pro Tips Use Quality Feta: Opt for a high-quality Greek feta for the best flavor and creaminess. The fresher the cheese, the better the dish will taste! Customize with Veggies: Feel free to add other vegetables such as bell peppers or zucchini to the baking dish for added nutrition and flavor. Perfect Pasta Cooking: To ensure perfectly cooked pasta, always salt your water generously and reserve a cup of pasta water to adjust the sauce consistency if needed. Make it Ahead: You can prepare the feta and tomato mixture ahead of time and store it in the fridge. Just bake it before serving and toss with pasta for a quick meal! {{image_4}} You can change up the ingredients to fit your taste. - Substitute cherry tomatoes with sun-dried tomatoes: This gives a richer flavor. Sun-dried tomatoes add a sweet and tangy twist. - Use vegan feta or cream cheese for a dairy-free version: If you're avoiding dairy, try vegan feta or cream cheese. Both options melt well and add creaminess. Adding a little heat can enhance your dish. - Add chili peppers or jalapeños for heat: If you like spice, these peppers bring a nice kick. You can slice them and mix them in before baking. - Include herbs like thyme or rosemary for added flavor: Fresh or dried herbs can really boost the taste. Thyme or rosemary adds depth to your baked feta pasta. You can make this dish fit special diets. - Gluten-free pasta options for gluten sensitivity: Use gluten-free penne or fusilli if you need to avoid gluten. There are many great brands available. - Nutritional yeast for a cheesy flavor without dairy: This gives a cheesy taste without dairy. Sprinkle some on top before serving for extra flavor. After you enjoy your baked feta pasta, store any leftovers in an airtight container. It helps keep the flavors fresh. I recommend eating it within 2-3 days for the best taste. The pasta and feta will stay tasty, but they lose texture over time. When it's time to eat again, reheat your dish in the oven. This keeps the pasta and feta smooth. I suggest adding a splash of olive oil. It prevents the dish from drying out and keeps it creamy. If you want to save some for later, you can freeze it before baking. Just wrap it well to keep out air and freezer burn. When you're ready to eat it, thaw the dish overnight in the fridge. You will need to bake it for an extra 10-15 minutes from frozen to heat it through. This way, you get a warm and delicious meal anytime! Baked Feta Pasta is a simple yet delightful dish. It combines creamy feta cheese and juicy cherry tomatoes with pasta. This dish became popular on social media. The flavors blend beautifully as the feta bakes. You get a rich, creamy sauce that coats the pasta perfectly. Yes, you can prep this dish in advance. Cook the pasta and store it separately. You can also mix the feta and tomatoes and store them in the fridge. When ready to eat, bake the feta and tomatoes, then add the pasta. This saves time and keeps it fresh. I recommend using penne or fusilli pasta. Both types hold the sauce well. Their shapes help capture the creamy feta and tomato mix. If you prefer, you can use other pasta types like rotini or even gluten-free options. To add heat, sprinkle red pepper flakes before baking. You can also add fresh chili peppers to the dish. For more flavor, try using jalapeños or spicy herbs. Adjust the amount based on your spice tolerance. This baked feta pasta is easy and delicious. We covered the main ingredients, like creamy feta and cherry tomatoes. You learned how to bake the feta and mix it with pasta. Use tips for great texture and flavors, like fresh herbs. You can also change the dish with different ingredients. Enjoy making this recipe and impressing your friends. Your cooking skills will shine with every bite.

Baked Feta Pasta Simple and Flavorful Dish

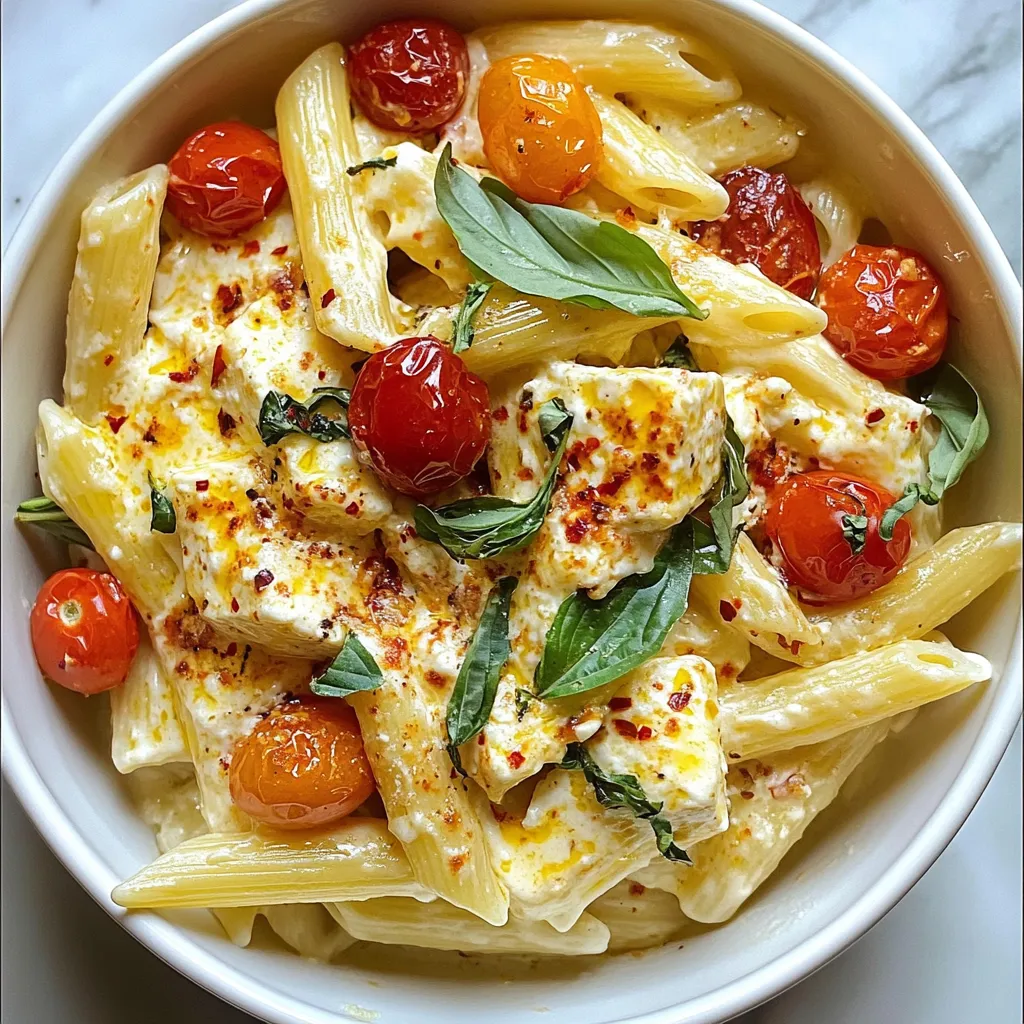
If you crave a dish that’s both simple and packed with flavor, Baked Feta Pasta is the answer. Imagine creamy

- 1 lb ground beef - 3 tablespoons soy sauce - 1 tablespoon brown sugar - 1 tablespoon sesame oil - 2 teaspoons minced garlic - 1 teaspoon minced ginger - 1 teaspoon red pepper flakes - 2 green onions, finely chopped - 1 cup cooked rice - 1 cup shredded carrots - 1 cup steamed broccoli florets - Sesame seeds for garnish In your Korean Ground Beef Bowls, you'll want to start with the basics: ground beef and cooking essentials. The beef gives a rich flavor and hearty texture. You also need soy sauce, brown sugar, and sesame oil. These add depth and sweetness to the dish. Next, we have our aromatic ingredients. Garlic and ginger add zing and warmth. Red pepper flakes give it a nice kick, but you can adjust them if you like it milder. Don’t forget the fresh elements. Green onions bring crunch and color. Shredded carrots add sweetness, and steamed broccoli offers a nice green touch. Lastly, garnish with sesame seeds. They add a delightful crunch and a bit of flair to your bowls. Enjoy bringing these flavors together! {{ingredient_image_2}} 1. First, heat the sesame oil in a large skillet over medium-high heat until it shimmers. 2. Next, add minced garlic and ginger to the hot oil. Sauté for about 30 seconds until fragrant. 3. Then, add the ground beef to the skillet. Use a spatula to break it into small crumbles. 4. Cook the beef until it is browned and no longer pink, about 5-7 minutes. 5. After the beef cooks, carefully drain any excess fat. This keeps the dish from being greasy. 6. Pour in the soy sauce, sprinkle in brown sugar, and add red pepper flakes. Stir well to combine. 7. Let the mixture simmer for 2-3 minutes. This allows the flavors to blend nicely. 1. Begin by layering cooked rice in each serving bowl. This will be the base of your meal. 2. Next, spoon the Korean ground beef mixture over the rice. Make sure each bowl has a hearty portion. 3. Top each bowl with shredded carrots, steamed broccoli, and chopped green onions. This adds crunch and color. 4. Finally, sprinkle sesame seeds on top as a garnish before serving. These steps make it easy to create delicious Korean Ground Beef Bowls. Enjoy the cooking process and the tasty results! To avoid greasy beef, drain any extra fat after cooking. This step helps keep the dish light and tasty. Use a slotted spoon or tilt the skillet to let the fat run off. For even cooking and flavor distribution, break the beef into small pieces as it cooks. Stir it often to ensure all parts get the same heat. This way, every bite is full of flavor. To make your bowls visually appealing, use a variety of colors. Layer the rice, beef, and veggies in a way that shows off the bright colors. A mix of greens, orange carrots, and dark beef looks great together. For extra garnishes, try adding slices of green onions or a drizzle of sesame oil. These small touches make the meal pop and look gourmet. You can also sprinkle extra sesame seeds for added crunch and flair. Pro Tips Adjust the Spice Level: Feel free to modify the amount of red pepper flakes based on your heat preference. Start with less if you're unsure and add more as needed. Use Fresh Ingredients: Fresh garlic and ginger make a significant difference in flavor. If possible, avoid using pre-minced versions for the best taste. Customize Your Veggies: While this recipe includes carrots and broccoli, feel free to use any vegetables you enjoy or have on hand, like bell peppers or snap peas. Meal Prep Friendly: This dish is perfect for meal prep! Cook a larger batch and store individual portions in the fridge or freezer for quick meals throughout the week. {{image_4}} To make Korean Ground Beef Bowls gluten-free, swap regular soy sauce for gluten-free soy sauce. This small change keeps the flavor intact while making it safe for those with gluten sensitivities. For low-carb or keto diets, replace the rice with cauliflower rice. Cauliflower rice has a similar texture but far fewer carbs. You can steam or sauté it for a warm base that absorbs the beef flavors well. You can adjust spice levels to fit your taste. If you like heat, add more red pepper flakes. For a milder dish, reduce or skip them. Feel free to add or substitute vegetables. Bell peppers, snap peas, or zucchini can bring new flavors and colors to your bowl. Just remember to cook them until they are tender but still crisp. Enjoy experimenting! To keep your Korean ground beef bowls fresh, let them cool down first. This helps prevent moisture build-up in the container. Once cool, store the bowls in airtight containers. Glass or plastic containers work well. Make sure to separate the beef, rice, and veggies if possible. This keeps flavors and textures intact. Refrigerate the bowls within two hours of cooking. They will stay fresh for up to four days. If you want to keep them longer, consider freezing. Place the beef and rice in freezer-safe bags. Squeeze out as much air as you can before sealing. They can last about three months in the freezer. To reheat your bowls, use the microwave for quick and easy warming. Place the bowl in the microwave and cover it with a damp paper towel. This keeps moisture in, making the meal tender. Heat for one to two minutes, stirring halfway through. If you prefer a stovetop method, heat a skillet over medium heat. Add a splash of water or broth to keep it moist. Stir occasionally until heated through. For crispy rice, let it sit a bit longer. Always check to ensure it’s hot all the way through before serving. Can I use a different type of meat? Yes, you can. Ground turkey or chicken works well. You may need to adjust cooking times. For a richer taste, use pork. Just make sure the meat is finely ground for best texture. How can I make Korean Ground Beef Bowls vegetarian? To make this dish vegetarian, swap the beef for a plant-based meat substitute. You can also use firm tofu, crumbled, or tempeh. Season it just like the beef for great flavor. What can I serve with Korean Ground Beef Bowls? These bowls are great on their own. You can add side dishes like kimchi or pickled vegetables for extra crunch. A light salad with sesame dressing also pairs well. How do I meal prep Korean Ground Beef Bowls? Meal prep is easy. Cook the beef mixture and store it in the fridge. Prepare rice and veggies separately. Just combine them when you're ready to eat. This keeps everything fresh and tasty. In this blog post, we covered the key ingredients and steps for Korean Ground Beef Bowls. I shared tips to avoid greasy beef and enhance flavors. You learned about variations for dietary needs and storage methods. This dish is simple to prepare and highly customizable. Experiment with flavors and toppings to make it your own. Trust the process and enjoy your cooking journey.

Korean Ground Beef Bowls Flavorful Meal Made Easy

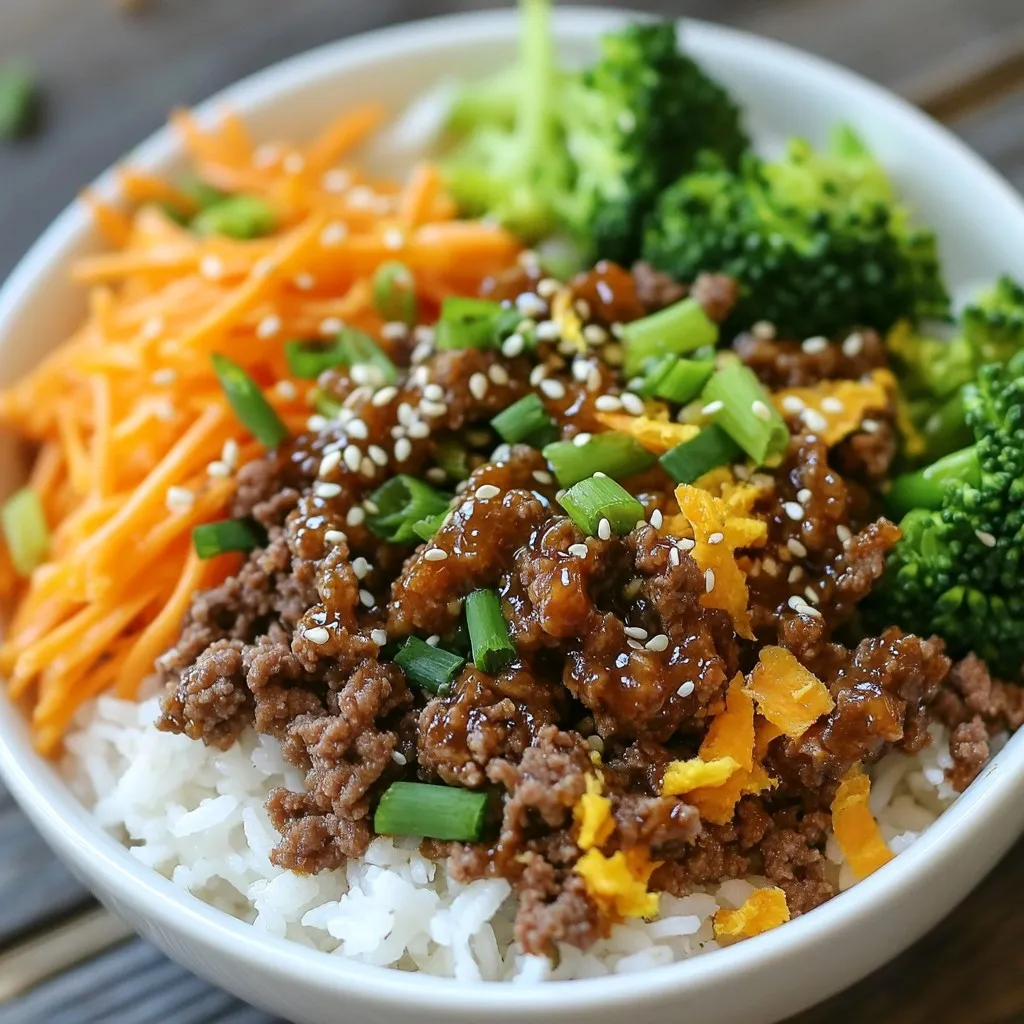
Are you ready to enjoy a flavorful meal that’s quick and easy to make? Korean Ground Beef Bowls are your

- 12 mozzarella cheese sticks - 1 cup all-purpose flour - 2 large eggs, beaten - 1 cup breadcrumbs (preferably panko for extra crunch) - 1 teaspoon garlic powder - 1 teaspoon onion powder - 1 teaspoon Italian seasoning - ½ teaspoon salt - ½ teaspoon black pepper - Cooking spray Gathering the right ingredients is key to making great air fryer mozzarella sticks. Start with fresh mozzarella cheese sticks. These give you the gooey, melty center we all love. The all-purpose flour acts as a base, helping the egg and breadcrumbs stick. Be sure to have two large eggs ready to beat. This mixture binds the cheese with the crunchy layer. For the crispy coating, choose panko breadcrumbs if you can. They add a wonderful crunch. Spice it up with garlic powder, onion powder, and Italian seasoning. These add flavor without overpowering the cheese. Don’t forget to add salt and black pepper to season. Lastly, have cooking spray on hand. This helps achieve that golden brown finish. Now, you are all set to create a cheesy delight that everyone will enjoy! {{ingredient_image_2}} 1. Start by slicing the mozzarella sticks if you want shorter ones. Cut them in half to make them easier to eat. 2. Next, set up a breading station. This will help you coat the sticks quickly. - Place 1 cup of all-purpose flour in a shallow dish. - Pour 2 beaten eggs into another shallow dish. - In a third dish, mix 1 cup of breadcrumbs, 1 teaspoon of garlic powder, 1 teaspoon of onion powder, 1 teaspoon of Italian seasoning, ½ teaspoon of salt, and ½ teaspoon of black pepper. Stir well to mix the spices evenly. 1. Take each mozzarella stick and dredge it in the flour. Make sure each stick is well-coated. 2. Dip the floured stick into the beaten eggs. Let any extra egg drip back into the dish. 3. Roll the stick in the breadcrumb mixture. Press gently so the breadcrumbs stick well. Each stick should look fully coated. 1. After breading, place the sticks on a baking sheet. Freeze them for at least 30 minutes. This helps keep their shape while cooking. 2. Preheat your air fryer to 390°F (200°C) for about 4-5 minutes. This step is key for a crispy finish. 3. Arrange the frozen mozzarella sticks in a single layer in the air fryer basket. Leave space between each stick for even cooking. 4. Lightly spray the sticks with cooking spray for extra crispiness. 5. Cook the mozzarella sticks for 6-8 minutes. Flip them halfway through to ensure they get crispy on both sides. 6. Once done, carefully remove the sticks. Let them rest for a minute before serving with marinara sauce for a tasty dip. To get that perfect crunch, breadcrumbs are key. I recommend using panko breadcrumbs. They add extra texture. Regular breadcrumbs can work, but they won’t give the same crispiness. In addition, the right coating makes a big difference. Using cooking spray is also important. Lightly spray the mozzarella sticks before cooking. This helps them brown and crisp up nicely in the air fryer. Don’t skip this step for the best results. For dipping, marinara sauce is the classic choice. Its tangy flavor pairs well with the cheese. You might also enjoy ranch dressing for a creamy twist. For those who like heat, try spicy sriracha mayo. Pair these mozzarella sticks with a side of fresh veggies or a salad. It adds a nice crunch and balances the cheese. You can also serve them with garlic bread for a true comfort food feast. Pro Tips Chill Before Cooking: Freezing the breaded mozzarella sticks for at least 30 minutes is essential to prevent them from melting too quickly in the air fryer. Use Panko Breadcrumbs: Opt for panko breadcrumbs instead of regular ones for an extra crunchy texture that enhances the overall enjoyment of the mozzarella sticks. Don’t Overcrowd the Basket: Arrange the mozzarella sticks in a single layer without overcrowding to ensure they cook evenly and become crispy on all sides. Experiment with Dips: While marinara sauce is a classic pairing, try serving these mozzarella sticks with ranch, spicy aioli, or even a sweet chili sauce for a fun twist! {{image_4}} You can make your mozzarella sticks even better! Try adding spices to the breadcrumbs. This gives a nice twist. You can use: - 1 teaspoon paprika for a smoky flavor. - ½ teaspoon crushed red pepper for heat. - 1 teaspoon dried basil for a fresh taste. Another fun idea is to stuff the mozzarella sticks with herbs. You can cut a small slit in each stick and fill it with fresh basil or oregano. This will add a burst of flavor in every bite. Dipping sauces make mozzarella sticks even more fun. You can try ranch dressing for a creamy taste. It pairs well with the cheesy goodness. Another option is spicy sriracha mayo. Mix mayonnaise with sriracha for some kick. This sauce adds a nice heat that balances the cheese. Enjoy exploring these tasty options! To keep your cooked mozzarella sticks fresh, you should refrigerate them. Place them in an airtight container. They can stay good for about 3 days. For longer storage, freezing is best. You can freeze un-cooked breaded sticks. Lay them on a baking sheet first. Freeze them for about 30 minutes. Once firm, transfer them to a freezer bag. This way, they will last up to 3 months without losing taste. When you want to enjoy leftovers, reheating is key. The best way to reheat mozzarella sticks is in the air fryer. Set it to 350°F (175°C) for about 3-5 minutes. This method keeps them crispy. You can also use an oven. Preheat it to 375°F (190°C) and bake for 5-10 minutes. Avoid using the microwave, as it can make them soggy. Enjoy that crispy texture again! You should freeze the mozzarella sticks for at least 30 minutes. This helps them hold their shape while cooking. If you skip this step, they might melt too fast. Freezing makes sure you get a crispy outside and gooey inside. Yes, you can use different cheeses! Cheddar or pepper jack works well. These cheeses add fun flavors. Make sure to cut them into sticks like mozzarella. The breading and cooking time stay the same. The best temperature is 390°F (200°C). This heat gives you a crisp finish. Preheating the air fryer for about 4-5 minutes helps a lot. It ensures even cooking, making the sticks golden brown and delicious. Yes, air fryer mozzarella sticks are healthier! They use less oil than deep frying. This means fewer calories and less fat. You still get the crispy texture without the extra grease. Enjoy your cheesy treat with less guilt! In this post, we covered how to make delicious air fryer mozzarella sticks. You learned about the ingredients, preparation steps, and cooking techniques to achieve a crispy texture. Remember to experiment with different seasonings and sauces for added flavor. If you store leftovers properly, you can enjoy these treats later. Mozzarella sticks are fun and easy to make, perfect for snacks or parties. Try it out and enjoy this cheesy delight!

Air Fryer Mozzarella Sticks Crispy and Cheesy Delight

Are you ready to make Air Fryer Mozzarella Sticks that are crispy on the outside and ooey-gooey on the inside?

Creating beautiful and tasty Rainbow Spring Roll Bowls starts with the right base. Here are the main ingredients you’ll need: - 1 cup cooked quinoa - 1 cup shredded purple cabbage - 1 cup carrot, julienned - 1 red bell pepper, thinly sliced - 1 cup cucumber, julienned - 1 avocado, sliced - 1 cup fresh mint leaves - 1 cup fresh cilantro leaves - 1/4 cup peanuts, chopped (or your favorite nuts) - 1/4 cup sesame seeds These ingredients give your bowls color and texture. The quinoa acts as a healthy base. The veggies add crunch and vibrant colors. Fresh herbs lift the flavors and aroma. Peanuts and sesame seeds add a delightful crunch. Now let’s talk about the dressing. It ties all the flavors together and adds creaminess. Here’s what you will need: - 1/4 cup almond butter - 2 tablespoons soy sauce (use tamari for a gluten-free option) - 1 tablespoon fresh lime juice - 1 tablespoon pure maple syrup - 1 teaspoon freshly grated ginger - 1-2 teaspoons sriracha (adjust to your spice preference) This dressing is packed with flavor. The almond butter gives it a creamy texture. The soy sauce adds umami taste, while lime juice balances the sweetness. Ginger adds a fresh kick, and sriracha brings in the heat. Adjust these ingredients to fit your taste. {{ingredient_image_2}} To cook quinoa, measure out 1 cup of quinoa and rinse it under cold water. This step removes any bitterness. Add the rinsed quinoa to a pot with 2 cups of water. Bring the pot to a boil over medium heat. Once it starts boiling, reduce the heat to low and cover the pot. Let it simmer for about 15 minutes. After that, remove it from heat and let it sit for another 5 minutes. This helps it fluff up nicely. Fluff the quinoa with a fork and transfer it to a bowl. Let it cool while you prepare the other ingredients. Now, let’s get colorful! For the carrots and cucumber, use a sharp knife to julienne them. This means cutting them into thin matchstick shapes. Thinly slice the red bell pepper. For the purple cabbage, shred it finely. It adds great texture and color. Once you have all your veggies ready, set each one aside in separate bowls. This way, you can easily grab them when it’s time to assemble the bowls. In a small mixing bowl, combine 1/4 cup almond butter, 2 tablespoons soy sauce, 1 tablespoon lime juice, 1 tablespoon maple syrup, 1 teaspoon grated ginger, and 1-2 teaspoons sriracha. Whisk the mixture until it’s smooth. Taste it to see if you want to add more sweetness or spice. Adjust the flavors to fit your taste. This dressing will tie all the flavors together in your bowl. Now comes the fun part! Start by adding a scoop of cooled quinoa to each bowl. Next, arrange the colorful veggies on top in sections. Place the shredded cabbage, julienned carrots, sliced bell pepper, and cucumber all around. Add avocado slices for creaminess. For extra crunch, sprinkle chopped peanuts and sesame seeds on top. Finish by adding fresh mint and cilantro leaves for a burst of flavor. Just before serving, drizzle the almond butter dressing over the bowls. If you plan to prepare them ahead, keep the dressing on the side. This keeps everything fresh! To bring your Rainbow Spring Roll Bowls to life, think about adding texture and taste. Here are some ideas: - Suggestions for additional crunch: Add crispy rice noodles or fried shallots on top. These will give your bowls a fun crunch. You can also use toasted sesame seeds for extra flavor. - Mix-ins for extra protein: Consider adding grilled shrimp, chicken, or tofu. These protein options not only boost nutrition but also make your meal more filling. You can marinate your protein in the same dressing for added flavor. The way you serve your bowls can make a big difference. Here are some tips to impress: - Serving suggestions for visual impact: Use a wide, shallow bowl to show off the colors. Arrange your ingredients in sections to create a beautiful rainbow effect. This makes the dish more appealing and fun to eat. - Complementary sides to serve with the bowls: Pair your bowls with fresh lime wedges or a light salad. A side of pickled vegetables can also add a nice tang and contrast to the flavors in the bowl. Pro Tips Freshness Matters: Use fresh herbs and vegetables to enhance the flavor and nutritional content of your spring roll bowls. The freshness will brighten the dish and elevate the overall taste. Customize Your Bowl: Feel free to swap out vegetables based on your preference or seasonal availability. Other great options include snap peas, radishes, or even grilled chicken for added protein. Make Ahead: Prepare the quinoa and chop the vegetables in advance to save time. Store each component separately in airtight containers in the refrigerator for quick assembly when you're ready to eat. Dressing Variations: Experiment with different nut butters or add a splash of rice vinegar for tanginess in the dressing. Adjust the spice level by varying the amount of sriracha to fit your taste. {{image_4}} You can easily customize your Rainbow Spring Roll Bowls with different proteins. Adding shrimp, chicken, or tofu gives you more choices. Shrimp adds a sweet taste, while chicken brings a savory flavor. Tofu is a great choice for a plant-based option. If you want a vegetarian or vegan option, simply skip the meat. You can also use tempeh or chickpeas for extra protein. These swaps keep your meal healthy and delicious. While quinoa is a great base, feel free to switch it up. You can use brown rice or farro instead. These grains add a nutty flavor and texture. Another fun idea is to use leafy greens as your base. Spinach or kale works well and adds more nutrients. This change gives your bowl a fresh and light feel. The dressing is key to making your Rainbow Spring Roll Bowls shine. You can try different dressings for unique flavors. A peanut sauce or a sesame dressing can change the taste. Want some heat? Adjust the spice level in your dressing. Add more sriracha for a kick, or leave it out for a milder taste. This way, you can make the dish suit your spice preference perfectly. To keep your Rainbow Spring Roll Bowls fresh, store the ingredients separately. This prevents sogginess and keeps everything crisp. Here are some tips: - Quinoa: Store in an airtight container in the fridge. It stays good for about four days. - Vegetables: Place cut veggies in sealed bags or containers. Use paper towels to absorb moisture. - Herbs: Wrap fresh mint and cilantro in a damp paper towel and store in a bag. - Dressing: Keep the dressing in a jar in the fridge. Shake well before use. When reheating, it's key to keep things tasty. Follow these steps: - Quinoa: Warm it in the microwave for about 30 seconds. Add a splash of water to keep it moist. - Proteins: If using cooked shrimp, chicken, or tofu, heat gently in a pan. This keeps them from drying out. - Vegetables: Avoid reheating them in the microwave. Instead, sauté them on low heat. This prevents sogginess. By following these storage and reheating tips, your Rainbow Spring Roll Bowls will stay colorful and delicious! Rainbow Spring Roll Bowls are packed with nutrition. Each ingredient adds color and benefits. - Cooked quinoa gives you protein and fiber. It keeps you full. - Purple cabbage is rich in vitamins and antioxidants. It supports your immune system. - Carrots are great for your eyes. They have beta-carotene. - Red bell pepper adds vitamin C. This helps with skin health. - Cucumber keeps you hydrated. It has a high water content. - Avocado provides healthy fats. It is good for your heart. - Mint and cilantro boost flavor and add vitamins. They also help digestion. Eating a variety of colorful foods is key. It gives you a range of nutrients. A rainbow on your plate means a rainbow of health benefits. Yes, you can prepare these bowls in advance. Here are some tips to make meal prep easy: - Cook your quinoa ahead of time. Store it in the fridge. - Prepare the veggies and herbs. Keep them separate so they stay fresh. - Assemble the bowls just before eating. This keeps the veggies crunchy. For storage: - Use airtight containers. This helps keep everything fresh. - Keep the dressing separate. Pour it on right before serving. These steps will help you enjoy your bowls throughout the week. You can change up the dressing for new flavors. Here are some ideas: - Peanut sauce adds a rich taste. Mix peanut butter with soy sauce and lime. - Sesame dressing gives a nutty flavor. Combine sesame oil with rice vinegar. - Cilantro lime dressing is fresh and zesty. Blend cilantro, lime juice, and olive oil. If you have dietary needs, consider these tips: - Nut-free? Use tahini instead of almond butter. - Gluten-free? Choose tamari for soy sauce. - Spicy? Add more sriracha or chili paste to your dressing. These alternatives can make your bowls exciting and tasty! Rainbow Spring Roll Bowls are colorful, fun, and tasty. We explored the main ingredients, like quinoa and fresh veggies. I showed you how to make a yummy dressing and assemble the bowls for that perfect look. You can even play with flavors and protein options. Store leftovers properly to keep them fresh. Enjoy making these bowls as a healthy meal. You now have the tips to make your own version shine. Dive into your kitchen and get creative!

Rainbow Spring Roll Bowls Colorful and Healthy Meal

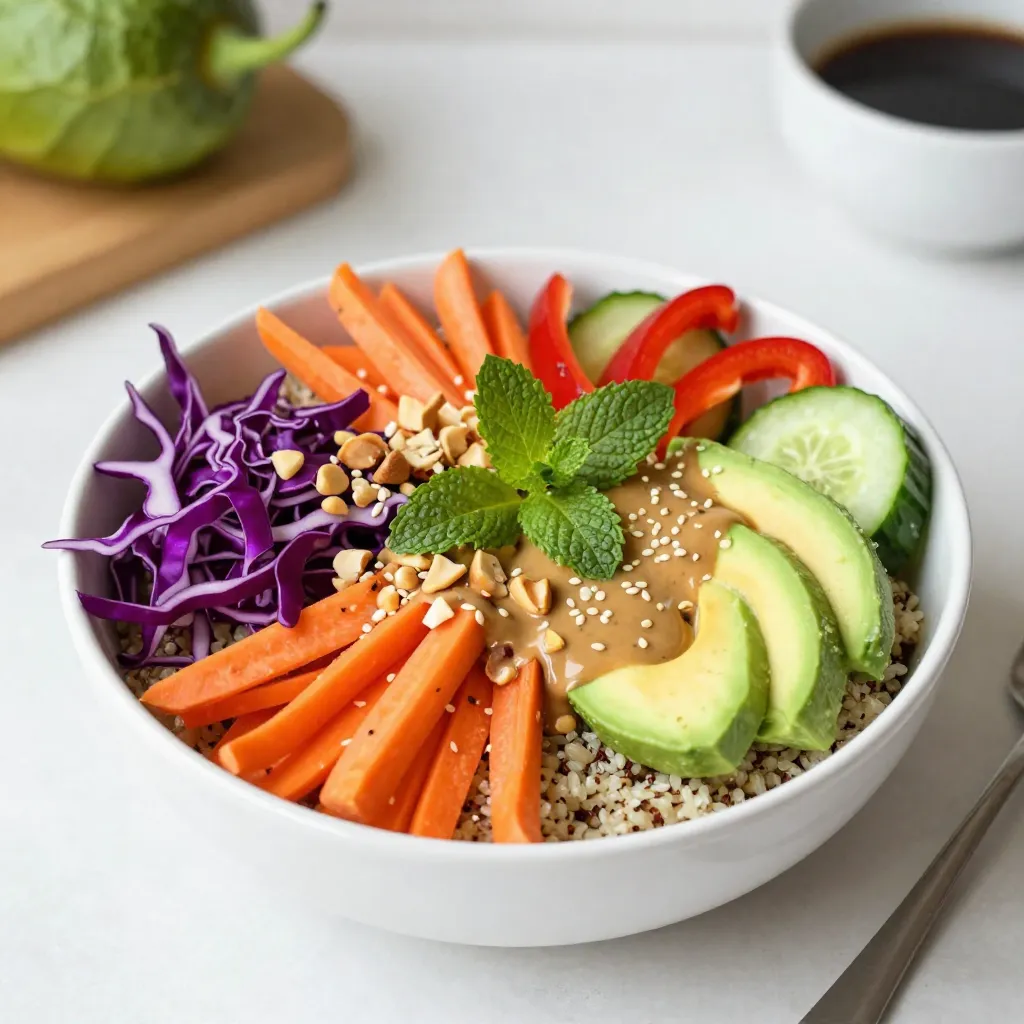
Looking for a fun and healthy meal option? Rainbow Spring Roll Bowls are the perfect choice! These colorful bowls are

When making sheet pan chicken fajitas, having the right ingredients makes all the difference. Here’s what you need: - 1.5 lbs boneless, skinless chicken thighs, cut into thin strips - 2 bell peppers (one red, one yellow), sliced into strips - 1 medium onion, sliced into thin rings These main ingredients form the heart of your fajitas. Chicken thighs are juicy and tender. Bell peppers add color and crunch. The onion gives a sweet flavor when cooked. - 2 tablespoons olive oil - 1 tablespoon chili powder - 1 teaspoon ground cumin - 1 teaspoon smoked paprika - 1/2 teaspoon garlic powder - 1/2 teaspoon onion powder - Salt and freshly ground black pepper, to taste These seasonings are key to bringing out the rich flavors. Olive oil helps the spices stick to the chicken and veggies. Chili powder and cumin give a warm, smoky taste. Don’t skip the salt and pepper; they enhance all the flavors. - Fresh cilantro - Lime wedges - Creamy guacamole - Sour cream Toppings add a fresh touch to your fajitas. Cilantro brings bright flavor, while lime adds zesty acidity. Guacamole and sour cream provide creaminess and richness. You can mix and match the toppings to suit your taste. Enjoy experimenting! {{ingredient_image_2}} Set your oven to 400°F (200°C). Preheating helps cook the food evenly. This step is key for great fajitas. Grab a large mixing bowl. Add the sliced chicken, bell peppers, and onion. Mix them well. Cut the chicken into thin strips for quick cooking. Slice the bell peppers and onion into strips too. This ensures even cooking and great texture. In a small bowl, whisk the olive oil, chili powder, cumin, smoked paprika, garlic powder, onion powder, and a pinch of salt and pepper. This mix adds depth. Pour the mixture over the chicken and vegetables. Toss everything so each piece is coated. This step is crucial for flavor. Spread the chicken and veggies on a large sheet pan. Make sure to space them out. An even layer helps with roasting. If they crowd each other, they might steam instead of roast. Place the sheet pan in the preheated oven. Bake for 20-25 minutes. Check that the chicken reaches 165°F. The veggies should be tender and slightly charred. This gives that lovely roasted flavor. After baking, take the pan out and let it cool for a few minutes. This helps the flavors blend. While it cools, warm up the tortillas. You can do this in a dry skillet for about 30 seconds on each side. Or, pop them in the oven for a few minutes. Serve the fajitas right from the sheet pan. This adds a rustic feel. You can also plate them with warm tortillas on the side. Let everyone build their own fajitas. Layer the chicken and veggies onto the tortillas. Top with cilantro, lime juice, guacamole, and sour cream for extra flavor. To get the best flavor from your fajitas, start with salt. Use it to season both the chicken and veggies. I suggest a good pinch of salt when mixing everything. This helps the flavors pop. For added depth, try marinating the chicken. Combine olive oil, chili powder, cumin, and a pinch of salt. Let it sit for at least 30 minutes. You will taste the difference! Sheet pan cooking is simple and quick. You can cook everything in one place. This saves time on cleanup too. Spread the chicken and veggies evenly on the pan. This helps them cook well and get a nice char. Keep an eye on the cooking time. Bake for 20-25 minutes. Check the chicken's temperature. It should be 165°F. When serving fajitas, think about what to add. Warm tortillas are a must. You can use flour or corn, whatever you like. Fresh cilantro, lime wedges, and creamy guacamole make great toppings. Pair your meal with a refreshing drink. I love a cold margarita or iced tea. These drinks balance the flavors of the fajitas nicely. Pro Tips Marinate for More Flavor: For enhanced flavor, consider marinating the chicken in the spice mix and olive oil for at least 30 minutes or overnight in the refrigerator before cooking. Use Fresh Ingredients: Fresh, high-quality ingredients make a significant difference in flavor. Opt for vibrant bell peppers and fresh herbs for the best results. Customize Your Spice Level: Adjust the amount of chili powder according to your spice preference. You can also add jalapeños for an extra kick! Keep It Warm: To keep the tortillas warm while serving, wrap them in a clean kitchen towel or foil. This will help maintain their softness and pliability. {{image_4}} You can swap chicken thighs for other proteins. Chicken breast works well too. It's leaner but still tasty. If you want seafood, try shrimp. Shrimp cooks fast and adds a nice twist. For a plant-based option, use tofu. Firm tofu absorbs flavors well and gives a great texture. Feel free to mix in more veggies. Zucchini, corn, or mushrooms can add variety. You can also use seasonal veggies. In summer, try fresh tomatoes or avocados. In fall, consider sweet potatoes. These options keep your fajitas fresh and fun. When it comes to tortillas, you have choices. Flour tortillas are soft and flexible. They hold fillings well. Corn tortillas are gluten-free and add a nice crunch. If you need gluten-free options, look for dedicated brands. They make tasty alternatives without losing flavor. To store your leftover fajitas, place them in an airtight container. Make sure to refrigerate them right away. This keeps the flavors fresh and safe. You can enjoy your fajitas within three days for the best taste. After that, they may start to lose flavor and texture. When reheating, the oven is the best choice. Preheat it to 350°F (175°C). Spread the fajitas on a baking sheet. Cover them with foil to keep them moist. Heat for about 10-15 minutes. This method prevents sogginess, so you keep that tasty crunch. You can also use a skillet over medium heat. Just stir gently to warm them up without drying them out. To freeze fajitas, let them cool completely first. Then, pack them in freezer-safe bags or containers. Squeeze out as much air as possible. This helps prevent freezer burn. You can freeze them for up to three months. When ready to eat, thaw them in the fridge overnight. Reheat in the oven or skillet as mentioned earlier. This way, you can enjoy a quick meal anytime! I recommend baking the sheet pan chicken fajitas for 20-25 minutes. This time ensures the chicken cooks through and the veggies get tender. Make sure the chicken reaches an internal temperature of 165°F for safety. Yes, you can customize the spice blend to fit your taste. Try using taco seasoning for a classic flavor. You could also add cayenne pepper for heat or oregano for a fresh touch. Mix and match spices based on what you enjoy. Some popular sides include rice, beans, or a fresh salad. You can also serve chips and salsa for a crunchy contrast. Guacamole adds creaminess and pairs well with the spicy fajitas. Consider a cold drink, like a margarita, to complete your meal. Yes, you can prep this recipe ahead of time. Chop the chicken and veggies, and store them in the fridge. You can also mix the spices and oil in advance. Just assemble everything when you are ready to cook. Absolutely! You can store leftovers in an airtight container in the fridge for up to four days. To reheat, place the fajitas in the oven or microwave. Make sure to warm them gently to keep them from getting soggy. This article covers chicken fajitas from start to finish. We explored key ingredients, steps, and tips to achieve the best flavor. Remember to preheat your oven and let the chicken and veggies mix well for even taste. Feel free to experiment with proteins and toppings. With proper storage, enjoy the leftovers later. Fajitas are fun to make and share, bringing joy to your table. Dive in and enjoy your tasty creations!

Sheet Pan Chicken Fajitas Quick and Flavorful Meal

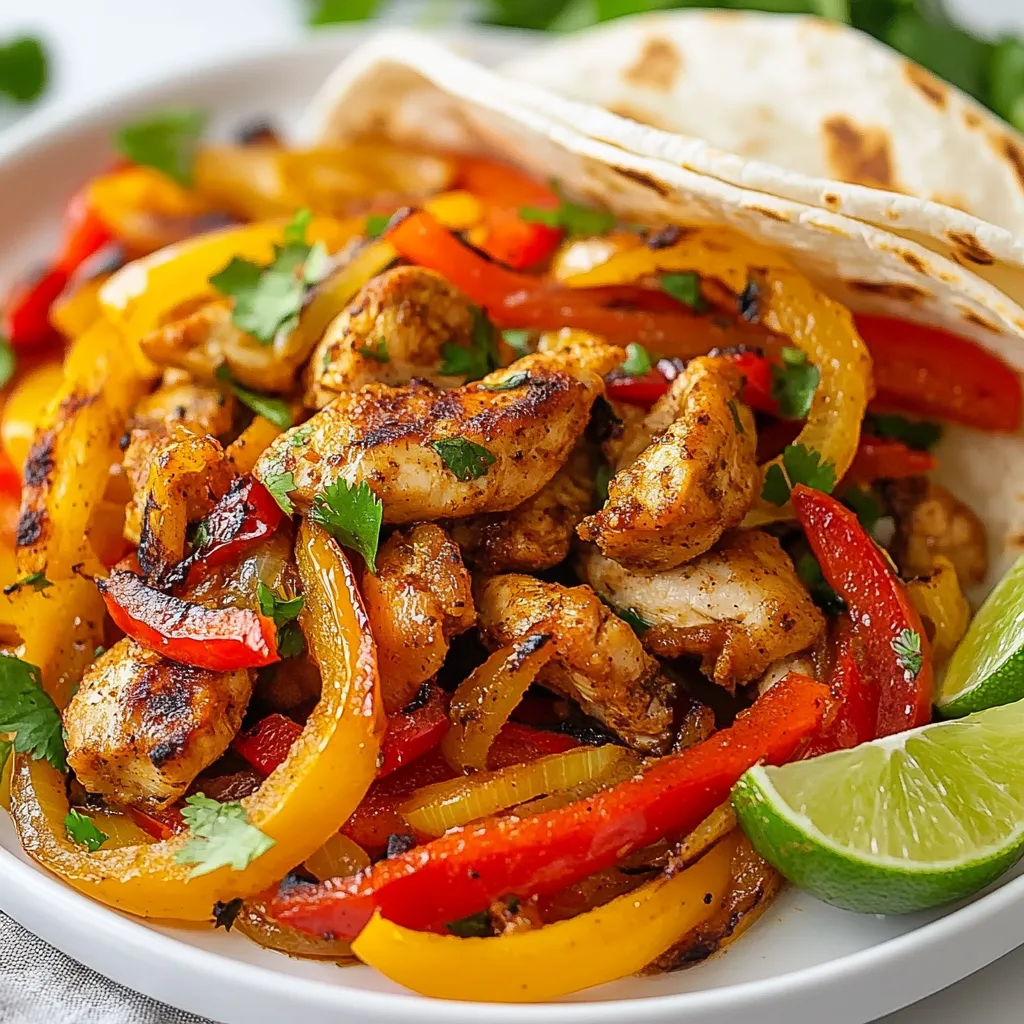
Looking for a quick, tasty meal? Look no further than my Sheet Pan Chicken Fajitas! This one-pan dish is packed

- 1 pound ground turkey - 1/4 cup breadcrumbs - 1/4 cup green onions, finely chopped - 1/4 cup fresh cilantro, finely chopped - 1 egg, lightly beaten - 2 cloves garlic, minced - 1 tablespoon fresh ginger, grated - 3 tablespoons soy sauce, divided - 2 tablespoons honey - 1 tablespoon sesame oil - 1 tablespoon rice vinegar - Salt and pepper, to taste - Sesame seeds, for garnish - Steamed broccoli or cooked rice, for serving - Add 1/2 cup grated carrots for extra crunch. - Use ground chicken instead of turkey for a different taste. - Try using scallions instead of green onions for a milder flavor. - A large mixing bowl for combining ingredients. - Baking sheet lined with parchment paper for easy cleanup. - Meat thermometer to check doneness. - Small saucepan for cooking the teriyaki glaze. - Mixing spoon or spatula for combining and tossing. - Measuring cups and spoons for accurate ingredient measurement. These ingredients set the stage for a delicious meal. Each one plays a key role in creating the flavors you’ll love. Feel free to mix it up with optional ingredients that fit your taste. The right tools will make cooking easier and more fun. Enjoy every step! {{ingredient_image_2}} To start, grab a large mixing bowl. Add 1 pound of ground turkey. This is the main part of the meatballs. Next, mix in 1/4 cup of breadcrumbs. This helps bind the meatballs. Then, chop 1/4 cup of green onions and 1/4 cup of fresh cilantro. Toss these into the bowl for flavor. Now, add 1 lightly beaten egg. This will make the meatballs fluffy. Include 2 cloves of minced garlic and 1 tablespoon of grated fresh ginger. These give a nice kick! Pour in 1 tablespoon of soy sauce. Finally, sprinkle in salt and pepper to taste. Using your hands or a spoon, mix everything well. Ensure all the ingredients blend nicely. Now it’s time to shape the meatballs. Preheat your oven to 400°F (200°C). Line a baking sheet with parchment paper. This keeps the meatballs from sticking. Take some of the turkey mixture and roll it into balls. Aim for about 1 inch in diameter. Place the meatballs on the baking sheet. Make sure to leave space between each one. Bake the meatballs for about 20 minutes. They should turn golden brown and be cooked through. Use a meat thermometer to check for 165°F (75°C) inside. While the meatballs are baking, let’s make the teriyaki glaze. In a small saucepan, mix together 2 tablespoons of soy sauce, 2 tablespoons of honey, 1 tablespoon of sesame oil, and 1 tablespoon of rice vinegar. Place the saucepan over medium heat. Whisk the mixture until it simmers gently. This should take about 5 minutes. You want it to thicken a little. Once the meatballs are ready, transfer them to the saucepan. Toss them gently in the glaze to coat each meatball well. To make juicy meatballs, keep these tips in mind: - Use Lean Ground Turkey: Choose turkey with some fat. This helps keep meatballs moist. - Add Breadcrumbs: Breadcrumbs absorb moisture. They also help hold the meatballs together. - Don't Overmix: Mix just enough to combine. Overmixing can make meatballs tough. - Chill the Mixture: If you have time, chill the meatball mix for 30 minutes. This helps them hold their shape. Baking meatballs is easy and effective. Here are my best tips: - Preheat the Oven: Always preheat your oven to 400°F. This helps cook them evenly. - Use Parchment Paper: Line your baking sheet with parchment paper. It prevents sticking and makes clean-up a breeze. - Space Them Out: Place meatballs an inch apart. This allows air to circulate around them. - Check for Doneness: Use a meat thermometer. Aim for 165°F to ensure they are fully cooked. A great glaze makes a big difference. Here are my tips for the best teriyaki glaze: - Whisk Well: Mix soy sauce, honey, sesame oil, and rice vinegar in a saucepan. - Simmer Gently: Heat over medium heat. Stir until it thickens, about 5 minutes. - Taste and Adjust: If you want more sweetness, add more honey. For a salty kick, add more soy sauce. - Coat Evenly: Once the meatballs bake, toss them in the glaze. Make sure every bite is flavorful! Pro Tips Use High-Quality Soy Sauce: Opt for a good quality soy sauce for the teriyaki glaze to enhance the flavor of the meatballs. Chill the Mixture: If your meatball mixture feels too sticky, refrigerate it for 15 minutes before shaping to make it easier to handle. Experiment with Add-Ins: Feel free to add other ingredients like grated carrots or chopped bell peppers to the turkey mixture for added flavor and nutrition. Make Extra Glaze: Double the teriyaki glaze recipe to have extra sauce on hand for drizzling over rice or veggies when serving. {{image_4}} You can switch ground turkey for other meats. Try ground chicken for a lighter option. Beef adds a rich flavor, while pork gives a juicy bite. When using beef or pork, adjust cooking time. Ensure they reach 165°F for safe eating. For a vegetarian or vegan option, use plant-based meat. Products made from soy or peas work well. You can also use lentils, chickpeas, or mushrooms. Mash or finely chop these ingredients. Add breadcrumbs and your favorite seasonings to hold them together. This way, you still get tasty meatballs. Try different herbs and spices to change the flavor. Add basil or mint for a fresh touch. If you like heat, sprinkle in some red pepper flakes or chili powder. For a smoky flavor, try smoked paprika. Experimenting with cumin or coriander can also add depth. Remember, small changes can create big flavors! To store leftover teriyaki turkey meatballs, first let them cool. After they cool, place them in an airtight container. Make sure to separate layers with parchment paper to avoid sticking. You can keep them in the fridge for up to three days. When you're ready to eat your meatballs again, you have a few options. You can reheat them in the oven at 350°F (175°C) for about 10 minutes. This keeps them crispy. If you're in a hurry, you can use the microwave. Heat them on a microwave-safe plate for 1-2 minutes. Just check to see if they are hot all the way through. Freezing is a great way to save your meatballs for later. Place the cooled meatballs on a baking sheet in a single layer. Freeze them for about two hours until solid. Then transfer them into a freezer-safe bag. This way, they won't stick together. You can keep them in the freezer for up to three months. To thaw, move them to the fridge overnight. You can then reheat them using the methods mentioned above. Enjoy your meal! You can serve teriyaki turkey meatballs with several tasty sides. Steamed rice is a classic choice. It soaks up the sauce well. You can also pair them with steamed broccoli for a healthy option. Other great sides include stir-fried vegetables or a fresh salad. Feel free to mix it up! Yes, you can make these meatballs ahead of time. Prepare them and store them in the fridge for up to a day before cooking. This helps the flavors meld. You can also freeze the raw meatballs for later use. Just thaw them in the fridge before cooking. To reduce the sweetness of the glaze, cut back on honey. You can use just one teaspoon instead of two tablespoons. You can also add more soy sauce to balance the flavors. A splash of rice vinegar can add some tang without extra sweetness. Adjust to your taste! You now have a complete guide to making Teriyaki Turkey Meatballs. We covered all the ingredients, tools, and step-by-step instructions. You learned tips for moist meatballs and variations for different diets. Storing and reheating meatballs is easy with the right info. Remember, you can customize the recipe to your taste. Enjoy cooking and sharing these tasty meatballs with family and friends!

Teriyaki Turkey Meatballs Tasty and Simple Recipe

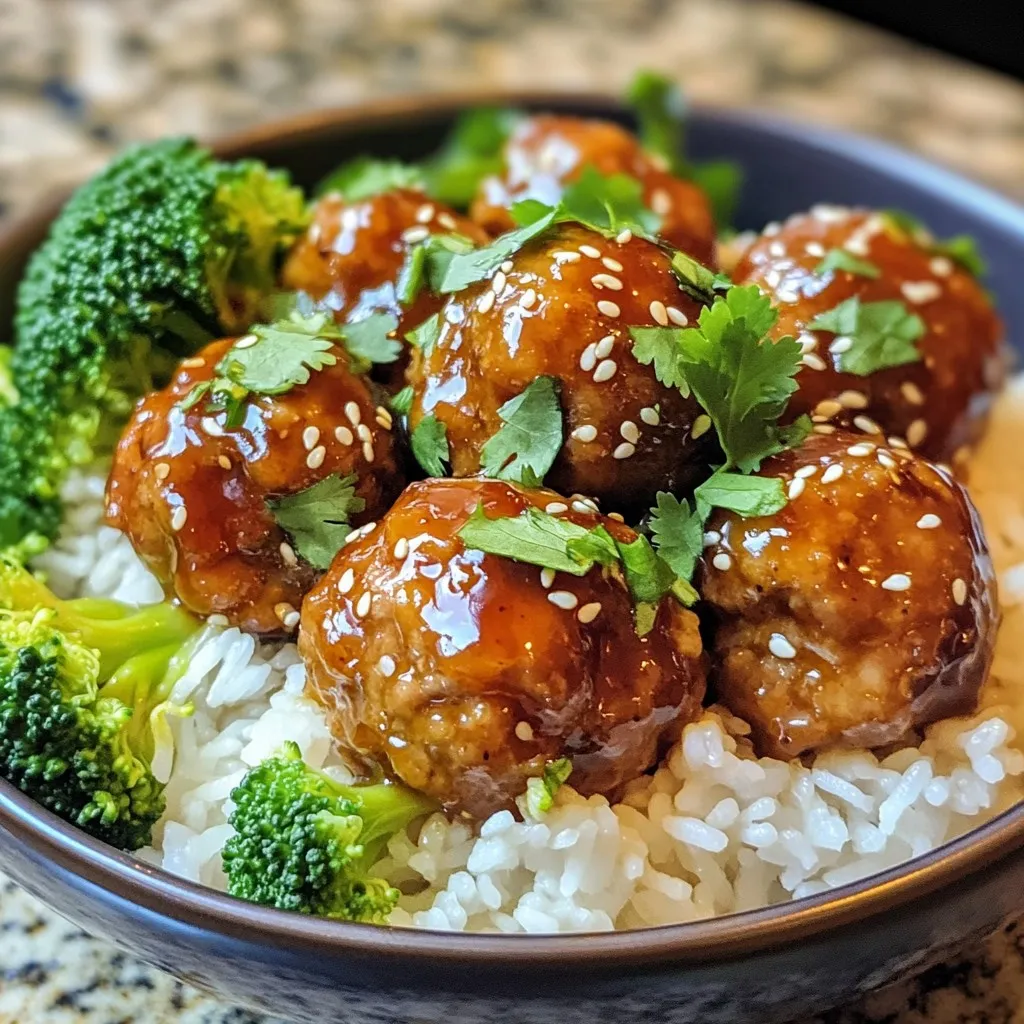
Kick off your weeknight dinner with my Teriyaki Turkey Meatballs! This easy recipe combines flavorful turkey with a sweet and

- 1 pound shelf-stable gnocchi - 1 cup cherry tomatoes, cut in half - 1 medium zucchini, sliced into half-moons - 1 bell pepper (your choice of color), diced into bite-sized pieces - 1 medium red onion, chopped - 2 cups fresh spinach, roughly chopped - 1/4 cup basil pesto - 3 tablespoons olive oil - Salt and pepper, to taste - Fresh basil leaves for garnish - Grated Parmesan cheese for serving (optional) This dish starts with gnocchi. Choose shelf-stable gnocchi for easy cooking. Gnocchi adds a soft, pillowy texture to the meal. Next, grab fresh veggies for color and taste. Cherry tomatoes bring sweetness. Zucchini adds a nice crunch. Bell pepper gives a pop of color. Red onion offers a sharp bite. You can also add fresh spinach. It wilts down nicely and adds a healthy touch. The basil pesto ties everything together. It adds a rich, herby flavor that makes this dish shine. Olive oil helps in roasting the veggies and gnocchi evenly. Don’t forget to season with salt and pepper. This step is key to enhancing the dish. For garnish, fresh basil leaves add a lovely aroma. If you want extra flavor, sprinkle grated Parmesan cheese before serving. It’s optional but highly recommended. {{ingredient_image_2}} Set your oven temperature to 425°F (220°C). This helps the dish cook evenly. Spread 1 pound of gnocchi, 1 cup of halved cherry tomatoes, 1 medium sliced zucchini, 1 diced bell pepper, and 1 chopped red onion on a large sheet pan. Make sure they are evenly spaced for even cooking. Drizzle 3 tablespoons of olive oil over the veggies and gnocchi. Add 1/4 cup of basil pesto on top. Season with salt and pepper to taste. Using your hands or a spatula, gently toss everything together. Arrange the mixture in a single layer on the sheet pan. Place it in the preheated oven and roast for 20-25 minutes. Stir halfway through for even browning. During the last 5 minutes, stir in 2 cups of roughly chopped spinach. This will wilt the spinach without overcooking it. Enjoy your vibrant, tasty meal! Even layering on the sheet pan is key for great roasting. When you spread the gnocchi and veggies evenly, they cook better. Each piece gets heat from the oven. If they’re piled too high, some won’t cook right. This can lead to soggy spots. Aim for a single layer. It helps everything brown nicely. You can boost the flavor in many ways. Try adding garlic powder or Italian herbs. A squeeze of lemon juice can add brightness too. For extra crunch, toss in nuts or seeds. If you love spice, add red pepper flakes. Don’t shy away from trying new toppings, like olives or artichokes. Fresh basil leaves on top bring freshness. Grated Parmesan cheese adds creaminess and richness. Experiment until you find your favorite mix! This dish is hearty but pairs well with sides. A simple green salad can balance the meal. Consider serving garlic bread for some crunch. You could also add a protein, like grilled chicken or shrimp, if you want. This way, you make it filling and satisfying. The options are endless, so choose what you love! Pro Tips Choose Your Veggies Wisely: Feel free to swap in your favorite seasonal vegetables for variety. Roasted carrots, asparagus, or broccoli would all work beautifully in this dish. Perfectly Crispy Gnocchi: Make sure to space the gnocchi and vegetables evenly on the sheet pan for optimal browning. Overcrowding can lead to steaming instead of roasting. Pesto Alternatives: If you don’t have basil pesto, try sun-dried tomato pesto or even a homemade herb blend for a unique twist on flavor. Serving Suggestions: This dish pairs wonderfully with a light salad or crusty bread. Consider adding a splash of lemon juice over the top before serving for a refreshing finish. {{image_4}} You can switch the veggies for this dish. Try using broccoli, asparagus, or carrots. These choices add different flavors and colors. You can even mix in some mushrooms or eggplant for a unique taste. Remember to cut them into similar sizes. This helps them cook evenly with the gnocchi. Want to boost the protein? You can easily add chicken, shrimp, or tofu. For chicken, cut it into bite-sized pieces. Toss them on the sheet pan with the veggies. For shrimp, use raw, peeled shrimp and add them in the last 10 minutes of cooking. If you prefer tofu, use firm tofu and cube it. Toss it in with the other ingredients to soak up the flavors. To make this dish vegan, skip the Parmesan cheese. Instead, use a vegan cheese or no cheese at all. Check for a vegan pesto if you want to keep the same flavor. Many brands offer plant-based pesto options. You can also add more veggies or beans for protein. This keeps the meal satisfying and delicious while staying plant-based. To store leftovers, let the dish cool first. Place it in an airtight container. You can keep it in the fridge for up to three days. If you want to save it longer, freeze it. Use a freezer-safe container and it can last up to three months. Make sure to label it with the date. This way, you can enjoy it later without worry. When you reheat, aim to keep the gnocchi soft. Use the oven if you can. Preheat it to 350°F (175°C). Spread the gnocchi and veggies on a baking sheet. Cover with foil to keep moisture in. Heat for about 15-20 minutes. You can also use a microwave. Place a portion in a bowl, add a splash of water, and cover. Heat for 1-2 minutes, stirring halfway through. For busy days, make this dish ahead of time. You can prep the veggies a day early. Cut and store them in the fridge in a sealed bag. You can also cook the gnocchi in advance. Just remember not to mix until you're ready to bake. Combine everything on the sheet pan just before roasting. This saves time and keeps flavors fresh. You can store leftovers in the fridge for up to three days. Use an airtight container to keep them fresh. If you want to store them longer, freeze them for up to two months. Just remember to let them cool completely before freezing. When you're ready to eat, thaw them overnight in the fridge. Reheat in the oven or on the stove for the best taste. Yes, you can use frozen gnocchi! Just toss them straight onto the sheet pan without thawing. This will help them cook evenly with the veggies. Keep in mind that cooking time might be a bit longer, so check them to avoid overcooking. Frozen gnocchi can give you a nice texture, too. If you don't have basil pesto, don’t worry! You can try other sauces like sun-dried tomato pesto or spinach pesto. For a homemade option, blend fresh herbs, nuts, and olive oil with garlic. You can make a simple sauce with just olive oil, garlic, and cheese if you prefer a lighter flavor. This recipe combines simple ingredients for a tasty dish. You start with gnocchi and fresh veggies, then roast them to perfection. Add spinach at the end for color and flavor. Feel free to toss in your favorite protein or change the veggies to suit your taste. With easy steps and tips, this dish is great for any meal. Enjoy experimenting with the variations and make it your own. Happy cooking!

Sheet Pan Gnocchi with Pesto Veggies Tasty Meal

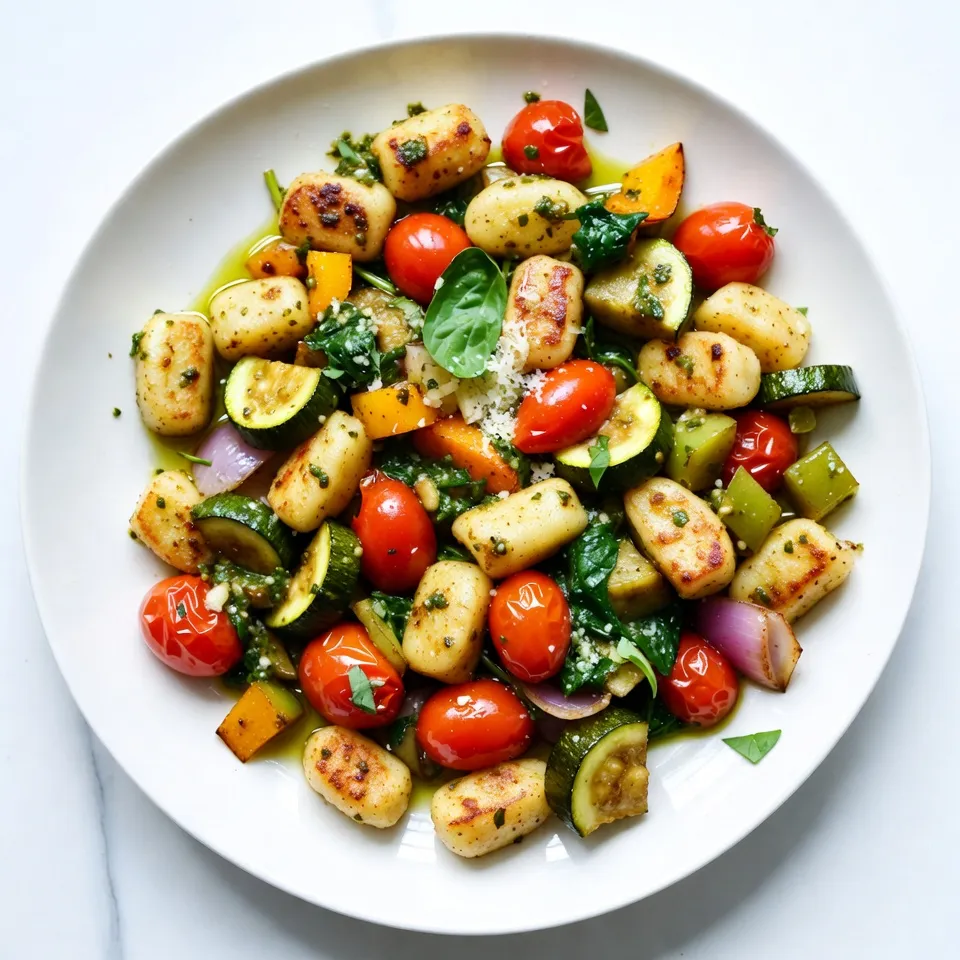
Are you ready to elevate your weeknight dinners? This Sheet Pan Gnocchi with Pesto Veggies is not just easy, but

Older posts
Newer posts
← Previous Page1 … Page108 Page109 Page110 … Page122 Next →

dsad

© 2026 dailydishcraft • Built with GeneratePress

Our Policies

  • Copyright Policy
  • Cookie Policy
  • GDPR Policy
  • Privacy Policy
  • Disclaimer
  • Terms Of Use

More Information

  • Home
  • About
  • Contact
  • Appetizers
  • Dessert
  • Dinner
  • Drinks
©2026, dailydishcraft About Back To Top