Craving a delightful treat that's both crispy and easy to make? Look no further than these Air Fryer Apple Hand Pies! With tender apples, warm spices, and a golden crust, they’re a perfect dessert for any season. In this guide, I’ll walk you through the simple steps to whip up these delicious pies, share tips for achieving that perfect crust, and even explore fun variations. Let’s dive into this tasty adventure together!
Why I Love This Recipe
- Quick and Easy: This recipe takes only 30 minutes from start to finish, making it perfect for a last-minute dessert.
- Delicious Flavor: The combination of sweet apples, cinnamon, and brown sugar creates a comforting and delightful filling.
- Air Fryer Magic: Using an air fryer makes these hand pies crispy without the need for deep frying, offering a healthier option.
- Versatile Treat: These hand pies can be enjoyed warm, at room temperature, or even with a scoop of ice cream for an indulgent dessert.
Ingredients
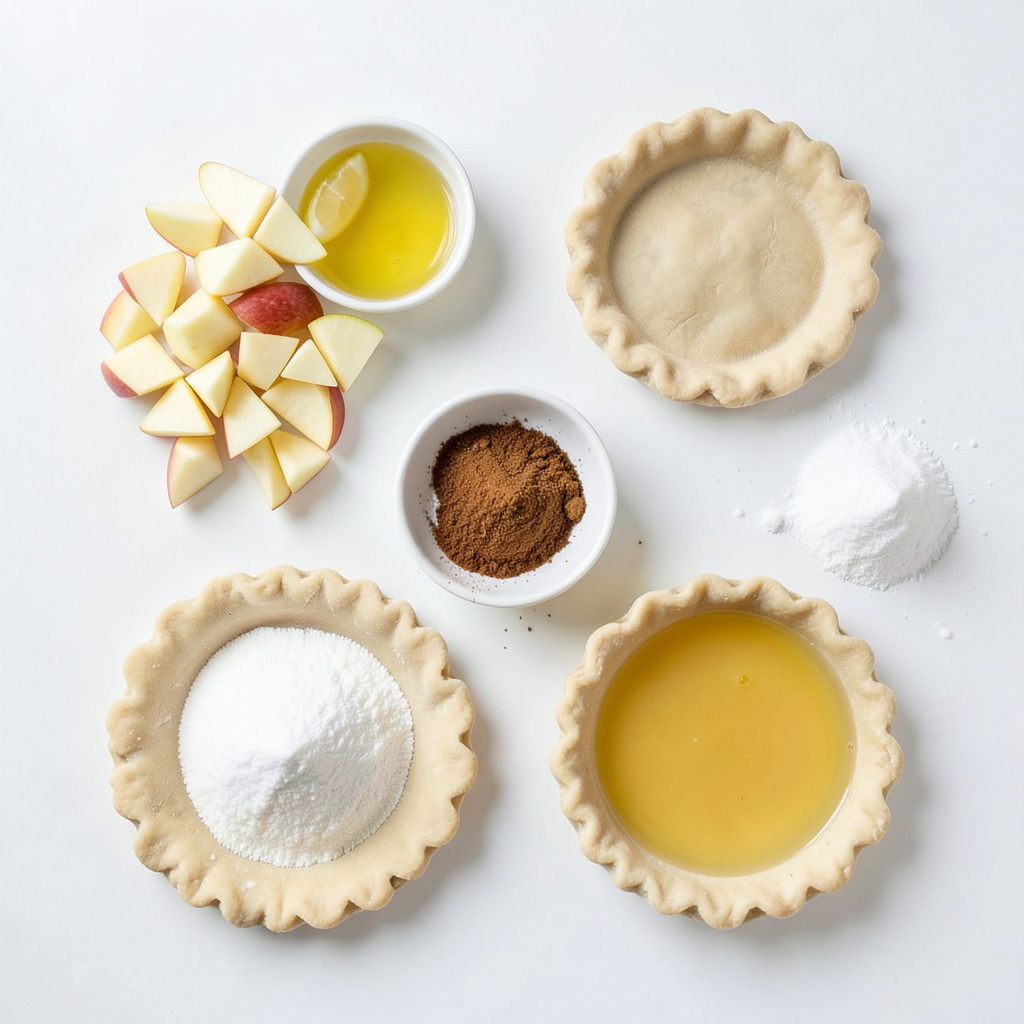
Detailed list of ingredients
- 2 medium apples, peeled, cored, and diced
- 1 tablespoon lemon juice
- 1/4 cup brown sugar
- 1 teaspoon ground cinnamon
- 1 tablespoon cornstarch
- 1 package of refrigerated pie crusts (contains 2 crusts)
- 1 large egg, beaten (for egg wash)
- 1 tablespoon granulated sugar (for sprinkling on top)
I love using fresh apples for these hand pies. They give a great flavor. The lemon juice helps keep the apples from browning. Brown sugar adds that deep, rich sweetness we all love. Cinnamon is a must for that warm, cozy taste. Cornstarch thickens the filling, making it just right.
Optional ingredients for customization
- Additional spices (nutmeg, allspice)
- Variations in sweeteners (honey, maple syrup)
You can mix it up with extra spices like nutmeg or allspice. These add a nice twist. If you want a different sweet flavor, try honey or maple syrup. They both taste great in the filling.
Step-by-Step Instructions
Preparing the apple filling
To make the apple filling, start by mixing the diced apples, lemon juice, brown sugar, ground cinnamon, and cornstarch in a medium bowl. Stir everything well. Make sure the apples get coated nicely. This step is key for flavor. Let the mixture sit for about 10 minutes. This time helps the apples soften and the flavors blend.
Assembling the hand pies
Next, roll out one pie crust on a floured surface. You want it to be a bit flat. Cut this crust into 4 equal squares. Do the same with the second pie crust. Now you have 8 squares to work with.
Take one square and spoon about one tablespoon of the apple filling into the center. Leave some space around the edges for sealing. Carefully fold the crust over the filling to make a triangle. Use a fork to press down on the edges. This keeps the filling inside. Repeat this with the rest of the squares and filling.
Air frying the hand pies
Before you cook, preheat your air fryer to 350°F (175°C). This step ensures even cooking. Place the hand pies in a single layer in the air fryer basket. Avoid overcrowding. This helps them cook well. Brush the tops of each pie with the beaten egg. This gives a nice golden color. Sprinkle some granulated sugar on top too.
Now, air fry the hand pies for about 10 to 12 minutes. Watch closely towards the end. You want them golden brown and crispy. Once done, carefully take them out and let them cool a bit. This way, you avoid burning your mouth on the hot filling.
Tips & Tricks
Achieving a crispy crust
To get that perfect crispy crust, start with an egg wash. Brush the top of each pie with a beaten egg. This gives a nice golden color. It also helps the sugar stick. Speaking of sugar, sprinkle granulated sugar on top. This adds sweetness and a light crunch.
Common mistakes to avoid
Watch out for overfilling the pies. If you add too much filling, they may burst open. It’s best to use about one tablespoon of filling per pie. Also, be sure to seal the edges properly. Use a fork to press down and lock in the filling. This prevents leaks during cooking.
Serving suggestions
These hand pies shine when paired with ice cream. A scoop of vanilla ice cream balances the warm, spiced apples nicely. If you have leftovers, store them in an airtight container in the fridge. You can also freeze them for later. Just make sure they cool completely first. When ready to eat, reheat them in the air fryer for a few minutes. This keeps the crust crispy and delicious.
Pro Tips
- Select the Right Apples: Choose firm apples like Granny Smith or Honeycrisp for the best texture and flavor in your hand pies.
- Prevent Soggy Bottoms: To keep the crust from getting soggy, consider pre-baking the pie crust squares for a few minutes before adding the filling.
- Experiment with Spices: Feel free to experiment by adding nutmeg or ginger to the apple filling for a unique flavor twist.
- Storage Tips: Store any leftover hand pies in an airtight container at room temperature for up to two days or freeze them for longer storage.
Variations
Different fillings to try
You can change the filling for your hand pies. Mixed fruit fillings like peach and cherry work great. These fruits offer a sweet and tangy taste. You can also make savory hand pies. Adding cheese or meats gives a tasty twist. Think of ham and cheese or spinach and feta. These options can surprise your guests.
Alternative cooking methods
You can bake these hand pies, too. Preheat your oven to 375°F (190°C). Place the hand pies on a baking sheet. Bake for about 20-25 minutes or until golden brown. Each method has its charm. The air fryer makes them crispy, while the oven offers a softer finish.
You can also use different pie crust types. Homemade crust gives a fresh taste. Whole wheat crust adds a nutty flavor. Choose what fits your mood and diet!
Flavor enhancements
Adding extracts can really boost flavor. A few drops of vanilla or almond can change the game. You can also adjust the spice levels. If you like a kick, add more cinnamon. For a warm touch, sprinkle in nutmeg. These tweaks help you create a unique treat that suits your taste buds.
Storage Info
Short-term storage
To keep your hand pies fresh, place them in an airtight container. Store them in the refrigerator. They will stay good for about 3 to 4 days. If you want to keep them crisp, avoid stacking them. Lay a paper towel between layers to absorb moisture.
Long-term storage options
For long-term storage, freezing is a great option. Allow the hand pies to cool completely before freezing. Place them in a single layer on a baking sheet. Freeze them for about 1 hour, then transfer to a freezer bag. They can last up to 3 months in the freezer. Write the date on the bag for easy tracking.
Reheating methods
To reheat, use your air fryer for the best results. Preheat the air fryer to 350°F (175°C). Place the hand pies inside and heat for about 5 to 7 minutes. This method helps restore their crispiness. If using a microwave, heat them for 30 seconds at a time. This will warm them but may make them soggy. Enjoy your delicious hand pies warm!
FAQs
Can I use other fruits for hand pies?
Yes, you can! Many fruits work well in hand pies. Try using:
- Peaches
- Cherries
- Blueberries
- Raspberries
- Pears
These fruits can create fun flavors. Mix and match for your favorite taste!
How do I know when my hand pies are done?
Look for a golden brown color. The crust should feel crisp. If they are puffed up, that’s a good sign too. Cooking time is around 10-12 minutes. Keep an eye on them near the end. You want them perfect, not burnt.
Can these be made gluten-free?
Yes, you can make these hand pies gluten-free! Use gluten-free pie crusts. Many brands offer ready-made options. You can also make your own from gluten-free flour. Just follow the package directions for the best results.
This blog post shows how to make tasty hand pies. We started with key ingredients, like apples and spices, and then moved on to prepare the filling. I guided you through assembling and cooking the pies in an air fryer. Remember the tips for a crispy finish and the variations to customize your pies.
Enjoy these sweet treats fresh or frozen. With practice, you’ll create great hand pies every time. Get creative with flavors and fillings, and share this recipe with friends! Happy baking!