. Enjoy creating this delightful snack! In a big bowl, combine the cream cheese, cheddar, and feta. Blend them until creamy. A hand mixer works best for super smooth cheese. This mix is the heart of your cheese ball. Next, slowly mix in the honey. This adds a lovely sweetness to the mix. Then, sprinkle in the red pepper flakes. Stir well to spread the spice throughout. Taste it and add more flakes if you like more heat. Once mixed well, shape the cheesy blend into a ball. Wrap it tightly in plastic wrap. Chill it in the fridge for at least one hour. This helps the cheese ball hold its shape when you serve it. You can find the full recipe in the ingredients section. Enjoy making this tasty snack! To get the right texture for your cheese ball, use softened cream cheese. This makes mixing easier and helps achieve a smooth blend. Chilling the cheese ball is also key. Refrigerate it for at least one hour. This helps the cheese ball hold its shape. You can enhance the flavor by trying different types of cheese. For example, swap cheddar for gouda or pepper jack. Adjust the honey and heat levels too. If you like it sweeter, add more honey. If you enjoy heat, increase the red pepper flakes. Garnish your cheese ball with extra honey and chopped chives. This adds a nice touch of color and flavor. When serving, pair it with a variety of crackers and slices of crusty bread. This pairing creates a great balance of flavors and textures. For the Full Recipe, click here to discover how to make this delightful snack. {{image_4}} Spicing up your hot honey cheese ball can be fun. If you want more heat, try these spicy alternatives. - Increase red pepper flakes: Add more flakes for a hotter kick. - Add jalapeños: Chopped jalapeños bring a fresh, spicy flavor. You can also change the cheese for exciting new tastes. Here are some great cheese variations. - Substitute goat cheese: This gives a tangy twist that many enjoy. - Use smoked cheddar: Smoked cheddar adds a unique, rich flavor. Finally, consider different coatings to enhance your cheese ball. Here are some alternative coatings. - Try using seeds: Use sesame or sunflower seeds for a crunchy texture. - Roll in herbs: Fresh herbs like parsley or dill add a bright taste. These variations keep your cheese ball fresh and exciting. Check out the Full Recipe for more delicious details! Store any leftover hot honey cheese ball in an airtight container. This keeps it fresh and tasty. Enjoy it within 3-5 days for the best flavor and texture. You can freeze the cheese ball before chilling it. However, this may change the texture. Wrap it tightly in plastic wrap and foil. For best quality, eat it within a month. If you freeze the cheese ball, let it thaw in the refrigerator before serving. This helps restore some texture. The cheese ball is best served cold or at room temperature. Enjoy your snack! For the full recipe, check out the details above. Yes, you can prepare it the day before serving. Just store it in the fridge. This gives the flavors time to mix and deepen. Plus, it saves you time when guests arrive. It pairs well with crackers, bread, and fresh veggies. You can use an array of colors and textures. This makes your platter look great and adds variety. Try serving with crunchy veggies like carrots and bell peppers. Make sure to chill it long enough to set properly before serving. I recommend at least one hour in the fridge. This helps the cheese ball hold its shape. If it's too soft, it won't look as nice on the plate. The spice level can be adjusted by modifying the amount of red pepper flakes used. Start with one teaspoon for mild heat. If you like it hotter, add more. Taste as you go, and find the heat that suits you best. This blog post covered how to make a delicious hot honey cheese ball. You learned the key ingredients, easy steps, and tips to perfect your dish. Remember, you can adjust flavors to suit your taste. Experimenting with different cheeses and toppings can lead to unique variations. Storing leftovers is simple, too. Enjoy this fun appetizer at your next gathering or snack time. With these steps, you'll impress your friends and family in no time. Happy cooking!](https://dailydishcraft.com/wp-content/uploads/2025/07/dfc884b7-f3cf-4fd0-9c1c-25ebd577b2d1-768x768.webp)
Looking for a crowd-pleasing snack that packs a punch? Try my Hot Honey Cheese Ball! This easy recipe combines smooth cream cheese, sharp cheddar, and tangy feta, all laced with sweet honey and a kick of spice. Perfect for parties, this creamy delight pairs well with crackers and bread. Whether you’re hosting a gathering or just snacking, you’ll want to keep this recipe handy. Let’s dive in!
Ingredients
Main Ingredients
– 8 oz cream cheese, softened to room temperature
– 1 cup sharp cheddar cheese, freshly shredded
– 1/2 cup crumbled feta cheese
Additional Flavor Ingredients
– 1/4 cup honey, plus extra for drizzling
– 1-2 teaspoons red pepper flakes
– 1/4 cup fresh chives, finely chopped
Coating and Serving
– 1/2 cup nuts, chopped (walnuts or pecans)
– Assorted crackers or slices of crusty bread for serving
Creating the Hot Honey Cheese Ball starts with these tasty ingredients. The cream cheese gives a rich base. The sharp cheddar adds depth, while feta brings a tangy kick. Honey adds sweetness, and red pepper flakes give just the right amount of heat.
I love using fresh chives for a pop of color and flavor. For the coating, nuts add crunch and make the cheese ball look inviting. You can choose walnuts or pecans based on your taste. When it comes to serving, crackers or slices of crusty bread are perfect for spreading.
This recipe is flexible, so feel free to mix in your favorite flavors.Enjoy creating this delightful snack!
Step-by-Step Instructions
Mixing the Cheese Base
In a big bowl, combine the cream cheese, cheddar, and feta. Blend them until creamy. A hand mixer works best for super smooth cheese. This mix is the heart of your cheese ball.
Adding Sweetness and Spice
Next, slowly mix in the honey. This adds a lovely sweetness to the mix. Then, sprinkle in the red pepper flakes. Stir well to spread the spice throughout. Taste it and add more flakes if you like more heat.
Shaping and Chilling the Cheese Ball
Once mixed well, shape the cheesy blend into a ball. Wrap it tightly in plastic wrap. Chill it in the fridge for at least one hour. This helps the cheese ball hold its shape when you serve it.Enjoy making this tasty snack!
Tips & Tricks
Achieving the Perfect Texture
To get the right texture for your cheese ball, use softened cream cheese. This makes mixing easier and helps achieve a smooth blend. Chilling the cheese ball is also key. Refrigerate it for at least one hour. This helps the cheese ball hold its shape.
Flavor Enhancements
You can enhance the flavor by trying different types of cheese. For example, swap cheddar for gouda or pepper jack. Adjust the honey and heat levels too. If you like it sweeter, add more honey. If you enjoy heat, increase the red pepper flakes.
Serving Suggestions
Garnish your cheese ball with extra honey and chopped chives. This adds a nice touch of color and flavor. When serving, pair it with a variety of crackers and slices of crusty bread. This pairing creates a great balance of flavors and textures.
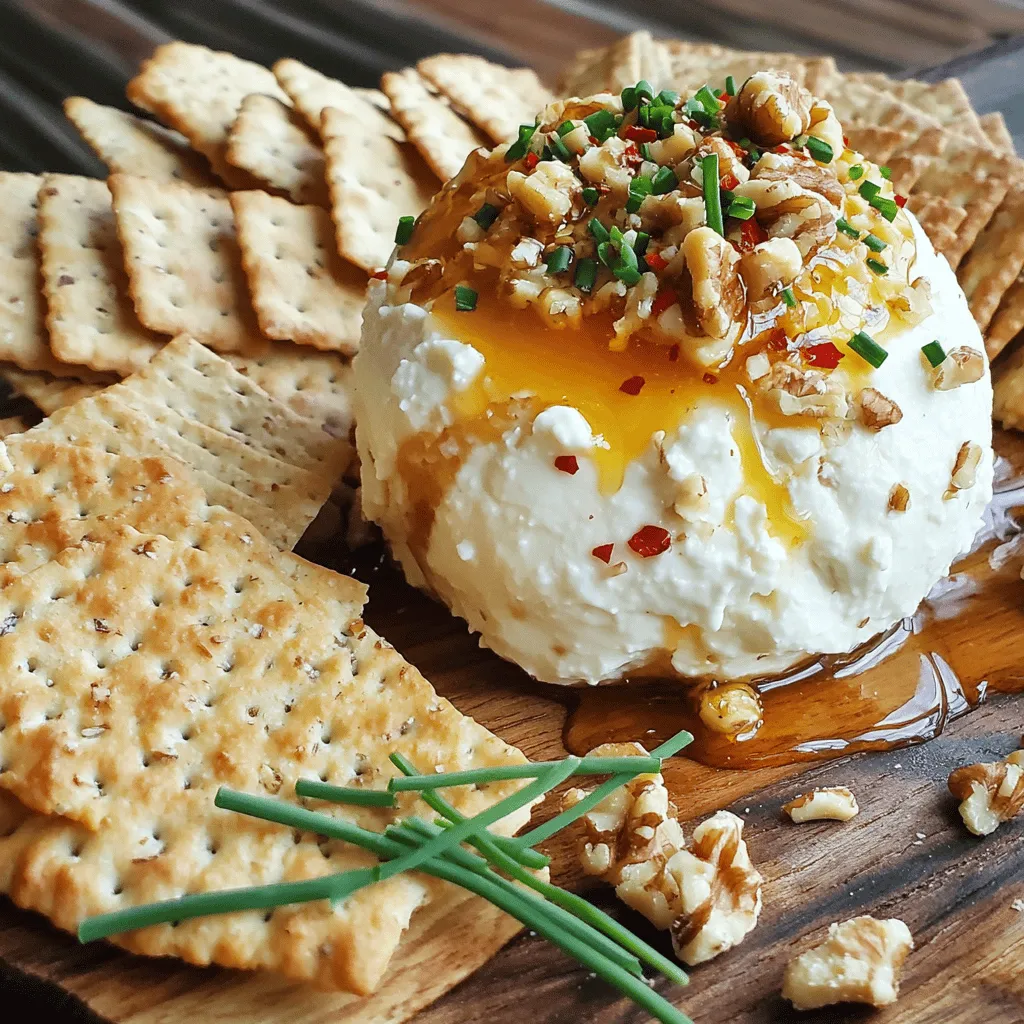
Variations
Spicing up your hot honey cheese ball can be fun. If you want more heat, try these spicy alternatives.
– Increase red pepper flakes: Add more flakes for a hotter kick.
– Add jalapeños: Chopped jalapeños bring a fresh, spicy flavor.
You can also change the cheese for exciting new tastes. Here are some great cheese variations.
– Substitute goat cheese: This gives a tangy twist that many enjoy.
– Use smoked cheddar: Smoked cheddar adds a unique, rich flavor.
Finally, consider different coatings to enhance your cheese ball. Here are some alternative coatings.
– Try using seeds: Use sesame or sunflower seeds for a crunchy texture.
– Roll in herbs: Fresh herbs like parsley or dill add a bright taste.
These variations keep your cheese ball fresh and exciting.
Storage Info
Refrigeration Guidelines
Store any leftover hot honey cheese ball in an airtight container. This keeps it fresh and tasty. Enjoy it within 3-5 days for the best flavor and texture.
Freezing Recommendations
You can freeze the cheese ball before chilling it. However, this may change the texture. Wrap it tightly in plastic wrap and foil. For best quality, eat it within a month.
Reheating Tips
If you freeze the cheese ball, let it thaw in the refrigerator before serving. This helps restore some texture. The cheese ball is best served cold or at room temperature. Enjoy your snack!
FAQs
Can I make this ahead of time?
Yes, you can prepare it the day before serving. Just store it in the fridge. This gives the flavors time to mix and deepen. Plus, it saves you time when guests arrive.
What can I serve with a hot honey cheese ball?
It pairs well with crackers, bread, and fresh veggies. You can use an array of colors and textures. This makes your platter look great and adds variety. Try serving with crunchy veggies like carrots and bell peppers.
How do I get the cheese ball to stay firm?
Make sure to chill it long enough to set properly before serving. I recommend at least one hour in the fridge. This helps the cheese ball hold its shape. If it’s too soft, it won’t look as nice on the plate.
How spicy is this recipe?
The spice level can be adjusted by modifying the amount of red pepper flakes used. Start with one teaspoon for mild heat. If you like it hotter, add more. Taste as you go, and find the heat that suits you best.
This blog post covered how to make a delicious hot honey cheese ball. You learned the key ingredients, easy steps, and tips to perfect your dish. Remember, you can adjust flavors to suit your taste. Experimenting with different cheeses and toppings can lead to unique variations. Storing leftovers is simple, too. Enjoy this fun appetizer at your next gathering or snack time. With these steps, you’ll impress your friends and family in no time. Happy cooking!
. Enjoy creating this delightful snack! In a big bowl, combine the cream cheese, cheddar, and feta. Blend them until creamy. A hand mixer works best for super smooth cheese. This mix is the heart of your cheese ball. Next, slowly mix in the honey. This adds a lovely sweetness to the mix. Then, sprinkle in the red pepper flakes. Stir well to spread the spice throughout. Taste it and add more flakes if you like more heat. Once mixed well, shape the cheesy blend into a ball. Wrap it tightly in plastic wrap. Chill it in the fridge for at least one hour. This helps the cheese ball hold its shape when you serve it. You can find the full recipe in the ingredients section. Enjoy making this tasty snack! To get the right texture for your cheese ball, use softened cream cheese. This makes mixing easier and helps achieve a smooth blend. Chilling the cheese ball is also key. Refrigerate it for at least one hour. This helps the cheese ball hold its shape. You can enhance the flavor by trying different types of cheese. For example, swap cheddar for gouda or pepper jack. Adjust the honey and heat levels too. If you like it sweeter, add more honey. If you enjoy heat, increase the red pepper flakes. Garnish your cheese ball with extra honey and chopped chives. This adds a nice touch of color and flavor. When serving, pair it with a variety of crackers and slices of crusty bread. This pairing creates a great balance of flavors and textures. For the Full Recipe, click here to discover how to make this delightful snack. {{image_4}} Spicing up your hot honey cheese ball can be fun. If you want more heat, try these spicy alternatives. - Increase red pepper flakes: Add more flakes for a hotter kick. - Add jalapeños: Chopped jalapeños bring a fresh, spicy flavor. You can also change the cheese for exciting new tastes. Here are some great cheese variations. - Substitute goat cheese: This gives a tangy twist that many enjoy. - Use smoked cheddar: Smoked cheddar adds a unique, rich flavor. Finally, consider different coatings to enhance your cheese ball. Here are some alternative coatings. - Try using seeds: Use sesame or sunflower seeds for a crunchy texture. - Roll in herbs: Fresh herbs like parsley or dill add a bright taste. These variations keep your cheese ball fresh and exciting. Check out the Full Recipe for more delicious details! Store any leftover hot honey cheese ball in an airtight container. This keeps it fresh and tasty. Enjoy it within 3-5 days for the best flavor and texture. You can freeze the cheese ball before chilling it. However, this may change the texture. Wrap it tightly in plastic wrap and foil. For best quality, eat it within a month. If you freeze the cheese ball, let it thaw in the refrigerator before serving. This helps restore some texture. The cheese ball is best served cold or at room temperature. Enjoy your snack! For the full recipe, check out the details above. Yes, you can prepare it the day before serving. Just store it in the fridge. This gives the flavors time to mix and deepen. Plus, it saves you time when guests arrive. It pairs well with crackers, bread, and fresh veggies. You can use an array of colors and textures. This makes your platter look great and adds variety. Try serving with crunchy veggies like carrots and bell peppers. Make sure to chill it long enough to set properly before serving. I recommend at least one hour in the fridge. This helps the cheese ball hold its shape. If it's too soft, it won't look as nice on the plate. The spice level can be adjusted by modifying the amount of red pepper flakes used. Start with one teaspoon for mild heat. If you like it hotter, add more. Taste as you go, and find the heat that suits you best. This blog post covered how to make a delicious hot honey cheese ball. You learned the key ingredients, easy steps, and tips to perfect your dish. Remember, you can adjust flavors to suit your taste. Experimenting with different cheeses and toppings can lead to unique variations. Storing leftovers is simple, too. Enjoy this fun appetizer at your next gathering or snack time. With these steps, you'll impress your friends and family in no time. Happy cooking!](https://dailydishcraft.com/wp-content/uploads/2025/07/dfc884b7-f3cf-4fd0-9c1c-25ebd577b2d1-250x250.webp)
